NISSAN PICK-UP 1998 Repair Manual
Manufacturer: NISSAN, Model Year: 1998, Model line: PICK-UP, Model: NISSAN PICK-UP 1998Pages: 1659, PDF Size: 53.39 MB
Page 641 of 1659
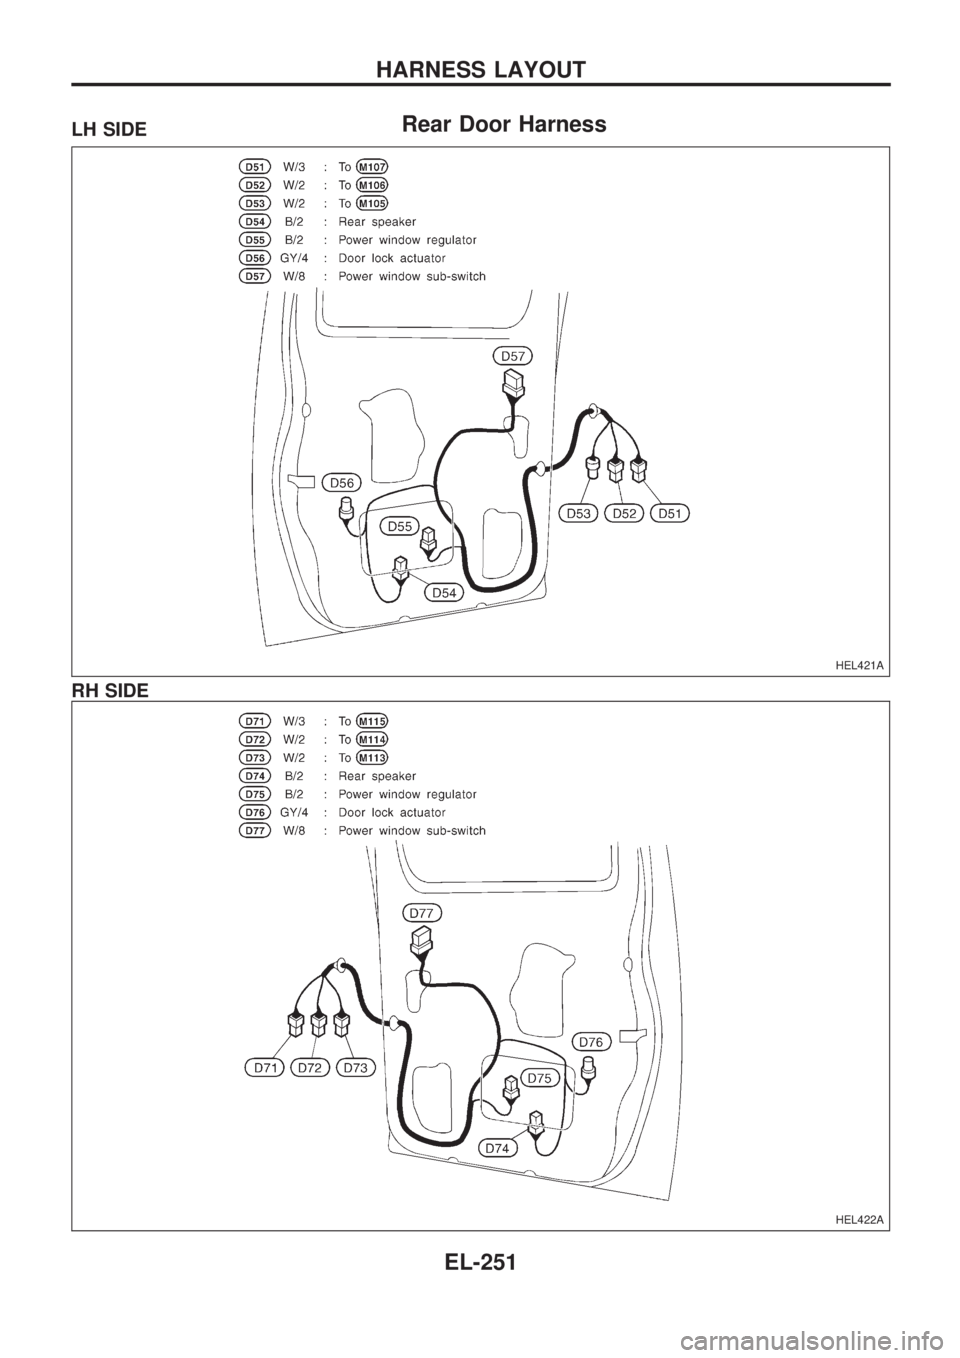
Rear Door HarnessLH SIDE
RH SIDE
HEL421A
HEL422A
HARNESS LAYOUT
EL-251
Page 642 of 1659
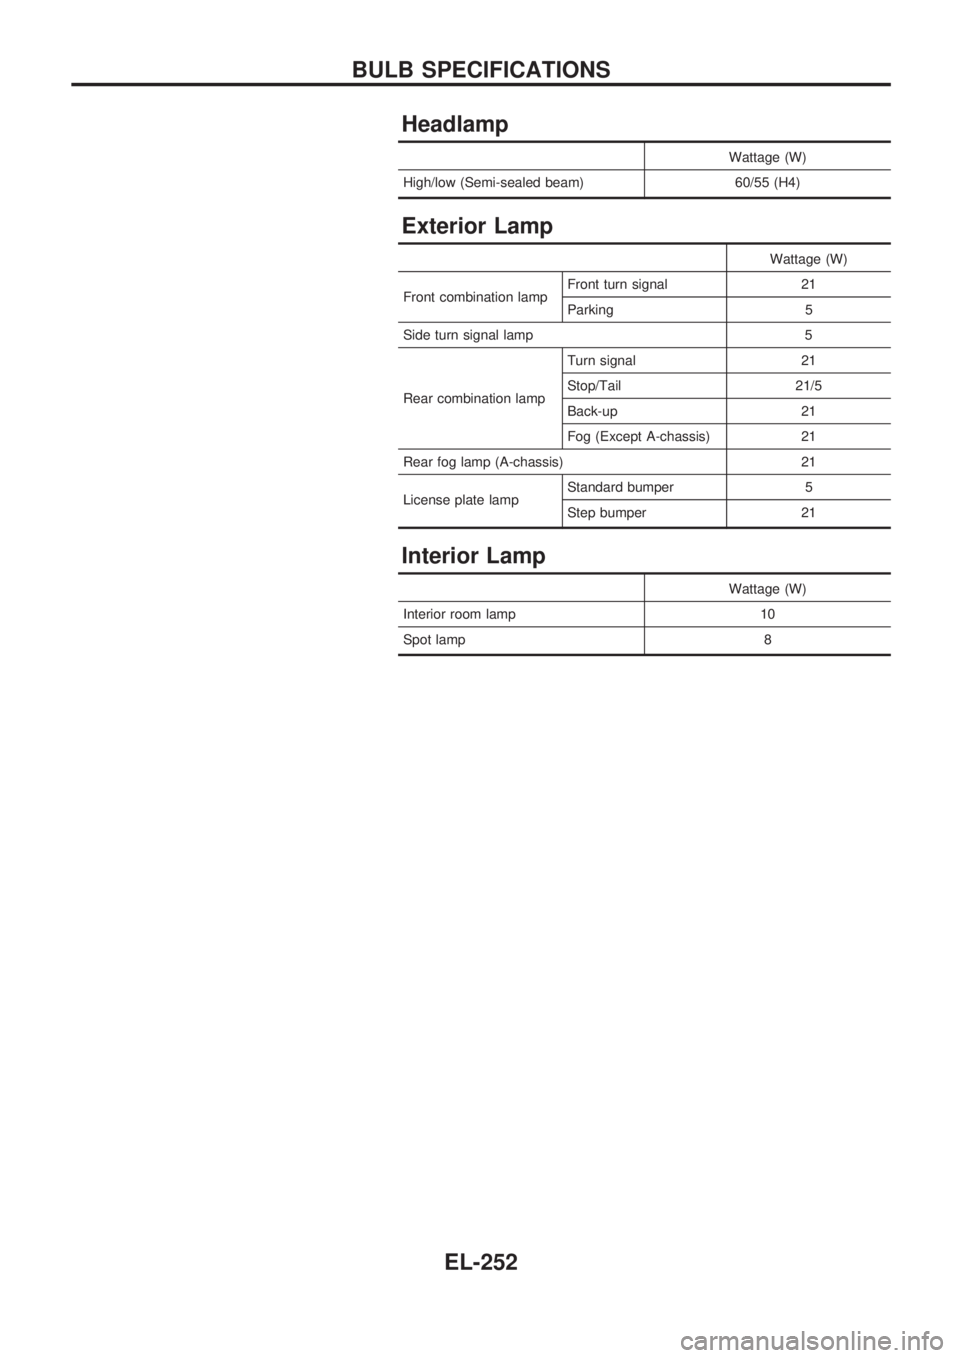
Headlamp
Wattage (W)
High/low (Semi-sealed beam) 60/55 (H4)
Exterior Lamp
Wattage (W)
Front combination lampFront turn signal 21
Parking 5
Side turn signal lamp 5
Rear combination lampTurn signal 21
Stop/Tail 21/5
Back-up 21
Fog (Except A-chassis) 21
Rear fog lamp (A-chassis) 21
License plate lampStandard bumper 5
Step bumper 21
Interior Lamp
Wattage (W)
Interior room lamp 10
Spot lamp 8
BULB SPECIFICATIONS
EL-252
Page 643 of 1659
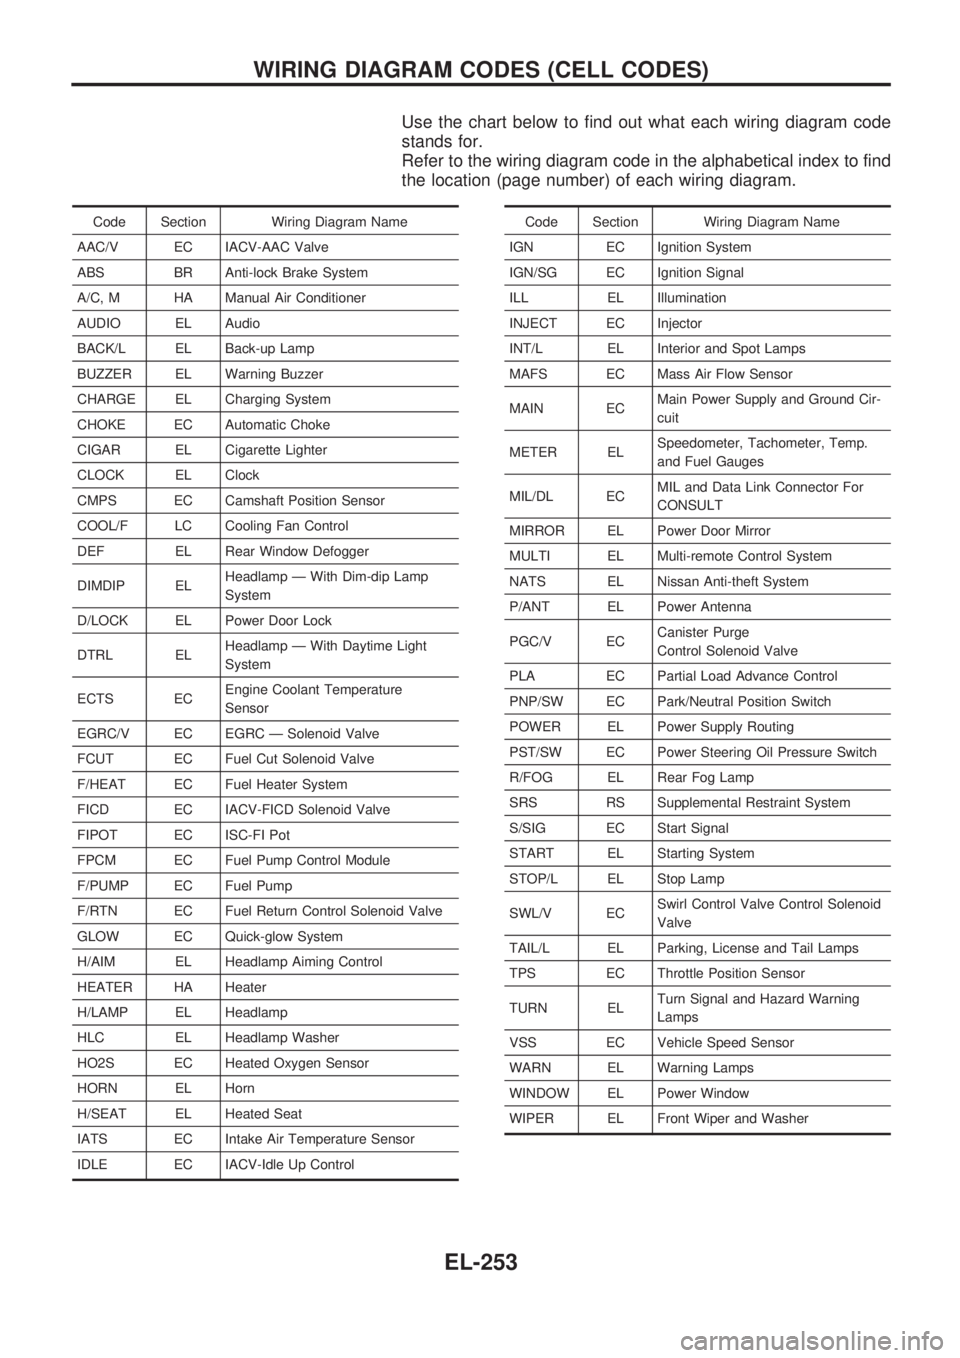
Use the chart below to find out what each wiring diagram code
stands for.
Refer to the wiring diagram code in the alphabetical index to find
the location (page number) of each wiring diagram.
Code Section Wiring Diagram Name
AAC/V EC IACV-AAC Valve
ABS BR Anti-lock Brake System
A/C, M HA Manual Air Conditioner
AUDIO EL Audio
BACK/L EL Back-up Lamp
BUZZER EL Warning Buzzer
CHARGE EL Charging System
CHOKE EC Automatic Choke
CIGAR EL Cigarette Lighter
CLOCK EL Clock
CMPS EC Camshaft Position Sensor
COOL/F LC Cooling Fan Control
DEF EL Rear Window Defogger
DIMDIP ELHeadlamp Ð With Dim-dip Lamp
System
D/LOCK EL Power Door Lock
DTRL ELHeadlamp Ð With Daytime Light
System
ECTS ECEngine Coolant Temperature
Sensor
EGRC/V EC EGRC Ð Solenoid Valve
FCUT EC Fuel Cut Solenoid Valve
F/HEAT EC Fuel Heater System
FICD EC IACV-FICD Solenoid Valve
FIPOT EC ISC-FI Pot
FPCM EC Fuel Pump Control Module
F/PUMP EC Fuel Pump
F/RTN EC Fuel Return Control Solenoid Valve
GLOW EC Quick-glow System
H/AIM EL Headlamp Aiming Control
HEATER HA Heater
H/LAMP EL Headlamp
HLC EL Headlamp Washer
HO2S EC Heated Oxygen Sensor
HORN EL Horn
H/SEAT EL Heated Seat
IATS EC Intake Air Temperature Sensor
IDLE EC IACV-Idle Up ControlCode Section Wiring Diagram Name
IGN EC Ignition System
IGN/SG EC Ignition Signal
ILL EL Illumination
INJECT EC Injector
INT/L EL Interior and Spot Lamps
MAFS EC Mass Air Flow Sensor
MAIN ECMain Power Supply and Ground Cir-
cuit
METER ELSpeedometer, Tachometer, Temp.
and Fuel Gauges
MIL/DL ECMIL and Data Link Connector For
CONSULT
MIRROR EL Power Door Mirror
MULTI EL Multi-remote Control System
NATS EL Nissan Anti-theft System
P/ANT EL Power Antenna
PGC/V ECCanister Purge
Control Solenoid Valve
PLA EC Partial Load Advance Control
PNP/SW EC Park/Neutral Position Switch
POWER EL Power Supply Routing
PST/SW EC Power Steering Oil Pressure Switch
R/FOG EL Rear Fog Lamp
SRS RS Supplemental Restraint System
S/SIG EC Start Signal
START EL Starting System
STOP/L EL Stop Lamp
SWL/V ECSwirl Control Valve Control Solenoid
Valve
TAIL/L EL Parking, License and Tail Lamps
TPS EC Throttle Position Sensor
TURN ELTurn Signal and Hazard Warning
Lamps
VSS EC Vehicle Speed Sensor
WARN EL Warning Lamps
WINDOW EL Power Window
WIPER EL Front Wiper and Washer
WIRING DIAGRAM CODES (CELL CODES)
EL-253
Page 644 of 1659
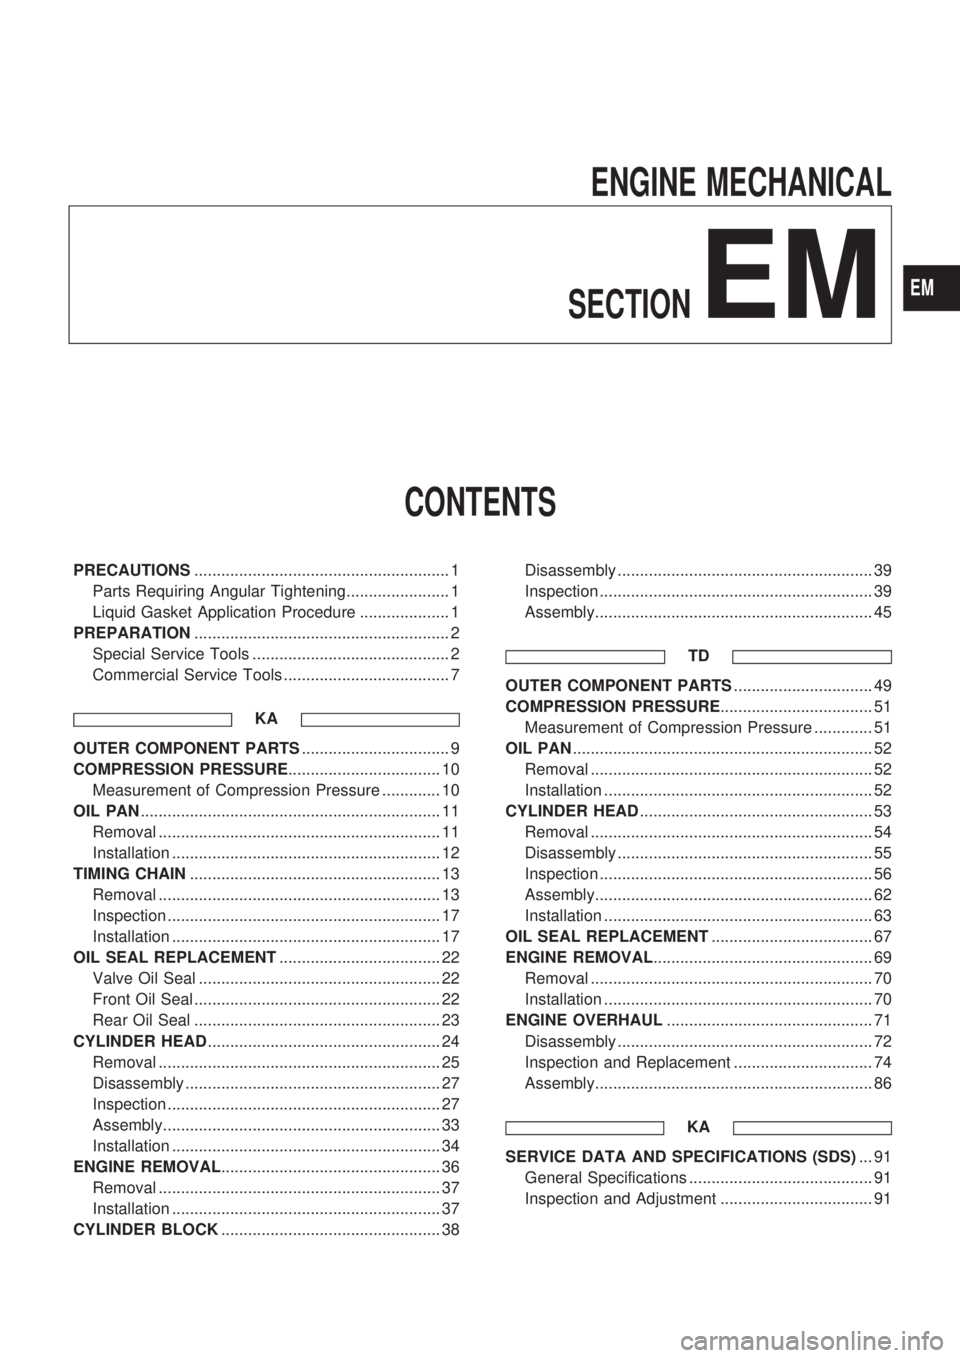
ENGINE MECHANICAL
SECTION
EM
CONTENTS
PRECAUTIONS......................................................... 1
Parts Requiring Angular Tightening....................... 1
Liquid Gasket Application Procedure .................... 1
PREPARATION......................................................... 2
Special Service Tools ............................................ 2
Commercial Service Tools ..................................... 7
KA
OUTER COMPONENT PARTS................................. 9
COMPRESSION PRESSURE.................................. 10
Measurement of Compression Pressure ............. 10
OIL PAN................................................................... 11
Removal ............................................................... 11
Installation ............................................................ 12
TIMING CHAIN........................................................ 13
Removal ............................................................... 13
Inspection ............................................................. 17
Installation ............................................................ 17
OIL SEAL REPLACEMENT.................................... 22
Valve Oil Seal ...................................................... 22
Front Oil Seal ....................................................... 22
Rear Oil Seal ....................................................... 23
CYLINDER HEAD.................................................... 24
Removal ............................................................... 25
Disassembly ......................................................... 27
Inspection ............................................................. 27
Assembly.............................................................. 33
Installation ............................................................ 34
ENGINE REMOVAL................................................. 36
Removal ............................................................... 37
Installation ............................................................ 37
CYLINDER BLOCK................................................. 38Disassembly ......................................................... 39
Inspection ............................................................. 39
Assembly.............................................................. 45
TD
OUTER COMPONENT PARTS............................... 49
COMPRESSION PRESSURE.................................. 51
Measurement of Compression Pressure ............. 51
OIL PAN................................................................... 52
Removal ............................................................... 52
Installation ............................................................ 52
CYLINDER HEAD.................................................... 53
Removal ............................................................... 54
Disassembly ......................................................... 55
Inspection ............................................................. 56
Assembly.............................................................. 62
Installation ............................................................ 63
OIL SEAL REPLACEMENT.................................... 67
ENGINE REMOVAL................................................. 69
Removal ............................................................... 70
Installation ............................................................ 70
ENGINE OVERHAUL.............................................. 71
Disassembly ......................................................... 72
Inspection and Replacement ............................... 74
Assembly.............................................................. 86
KA
SERVICE DATA AND SPECIFICATIONS (SDS)... 91
General Specifications ......................................... 91
Inspection and Adjustment .................................. 91
EM
Page 645 of 1659
TD
SERVICE DATA AND SPECIFICATIONS (SDS)... 98
General Specifications ......................................... 98
Inspection and Adjustment .................................. 98
Page 646 of 1659
Parts Requiring Angular Tightening
lUse an angle wrench for the final tightening of the following
engine parts:
(1) Cylinder head bolts
(2) Connecting rod cap nuts for gasoline engines
lDo not use a torque value for final tightening.
lThe torque value for these parts are for a preliminary step.
lEnsure thread and seat surfaces are clean and coated with
engine oil.
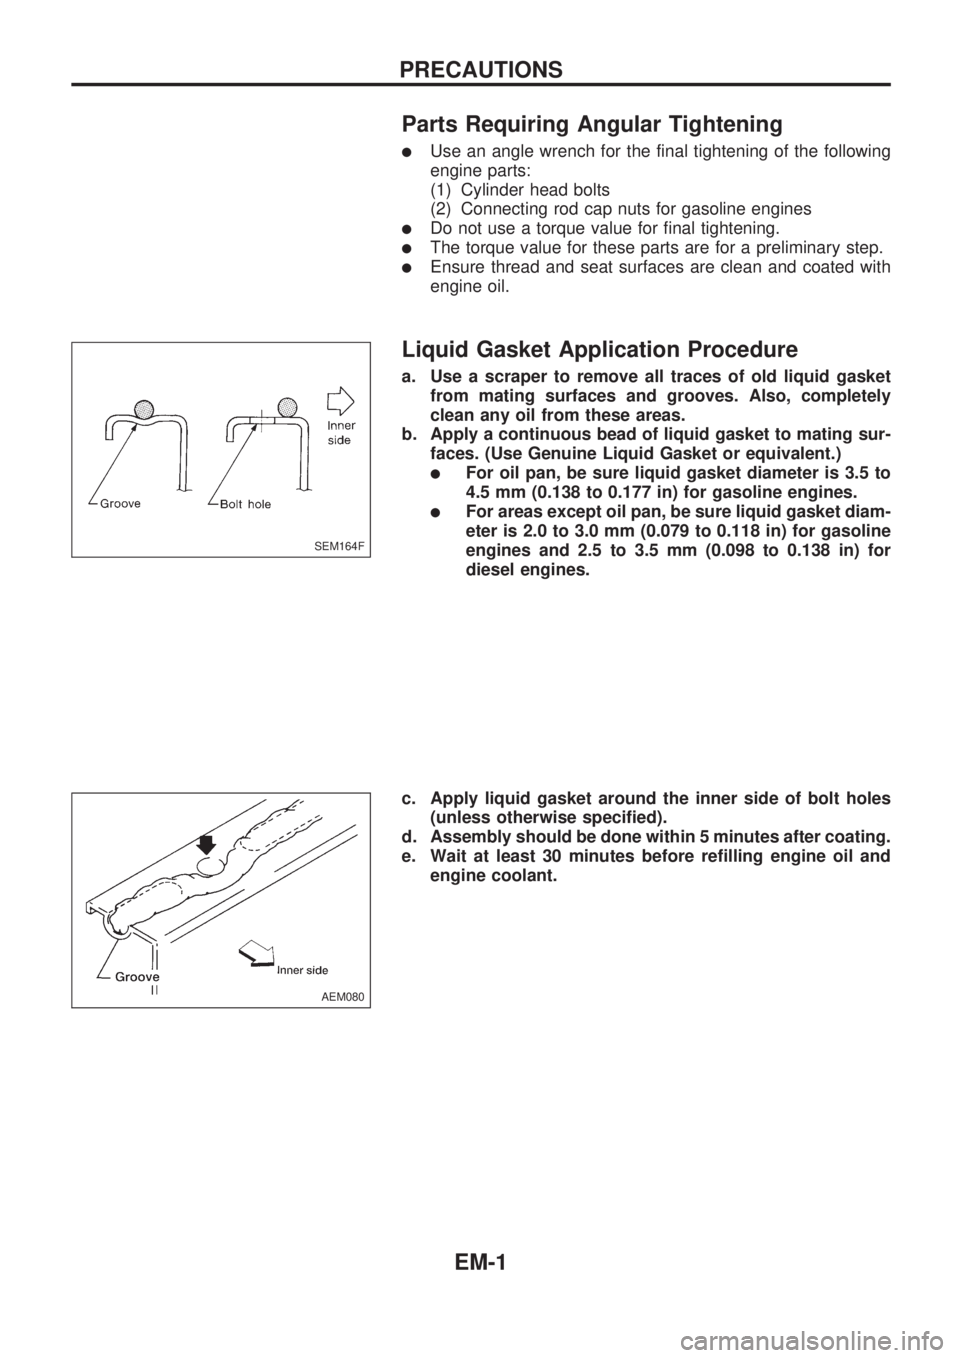
Liquid Gasket Application Procedure
a. Use a scraper to remove all traces of old liquid gasket
from mating surfaces and grooves. Also, completely
clean any oil from these areas.
b. Apply a continuous bead of liquid gasket to mating sur-
faces. (Use Genuine Liquid Gasket or equivalent.)
lFor oil pan, be sure liquid gasket diameter is 3.5 to
4.5 mm (0.138 to 0.177 in) for gasoline engines.
lFor areas except oil pan, be sure liquid gasket diam-
eter is 2.0 to 3.0 mm (0.079 to 0.118 in) for gasoline
engines and 2.5 to 3.5 mm (0.098 to 0.138 in) for
diesel engines.
c. Apply liquid gasket around the inner side of bolt holes
(unless otherwise specified).
d. Assembly should be done within 5 minutes after coating.
e. Wait at least 30 minutes before refilling engine oil and
engine coolant.
SEM164F
AEM080
PRECAUTIONS
EM-1
Page 647 of 1659
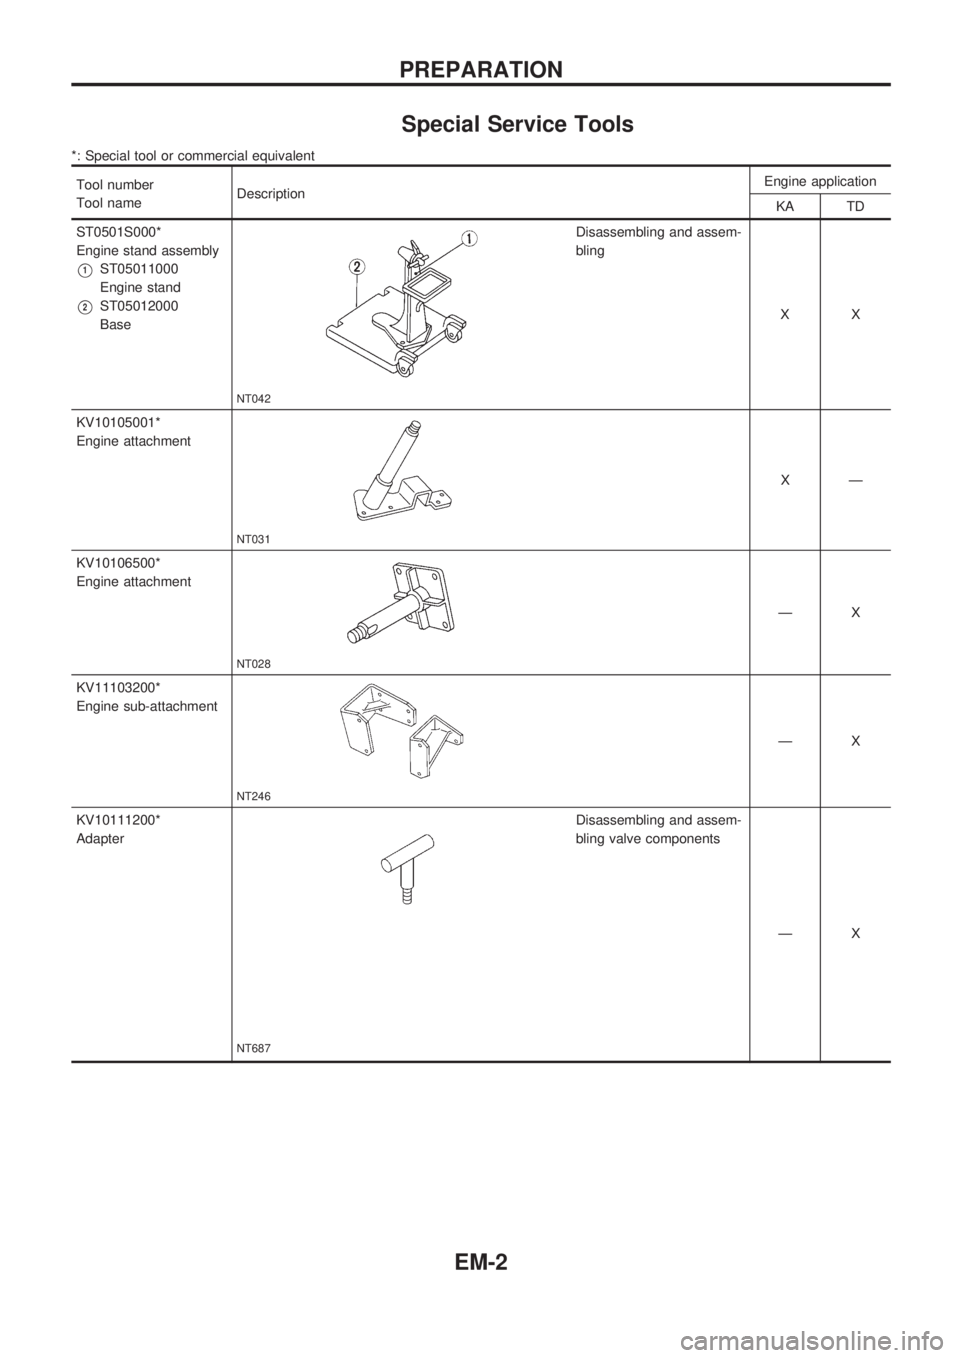
Special Service Tools
*: Special tool or commercial equivalent
Tool number
Tool nameDescriptionEngine application
KA TD
ST0501S000*
Engine stand assembly
V1ST05011000
Engine stand
V2ST05012000
Base
NT042
Disassembling and assem-
bling
XX
KV10105001*
Engine attachment
NT031
XÐ
KV10106500*
Engine attachment
NT028
ÐX
KV11103200*
Engine sub-attachment
NT246
ÐX
KV10111200*
Adapter
NT687
Disassembling and assem-
bling valve components
ÐX
PREPARATION
EM-2
Page 648 of 1659
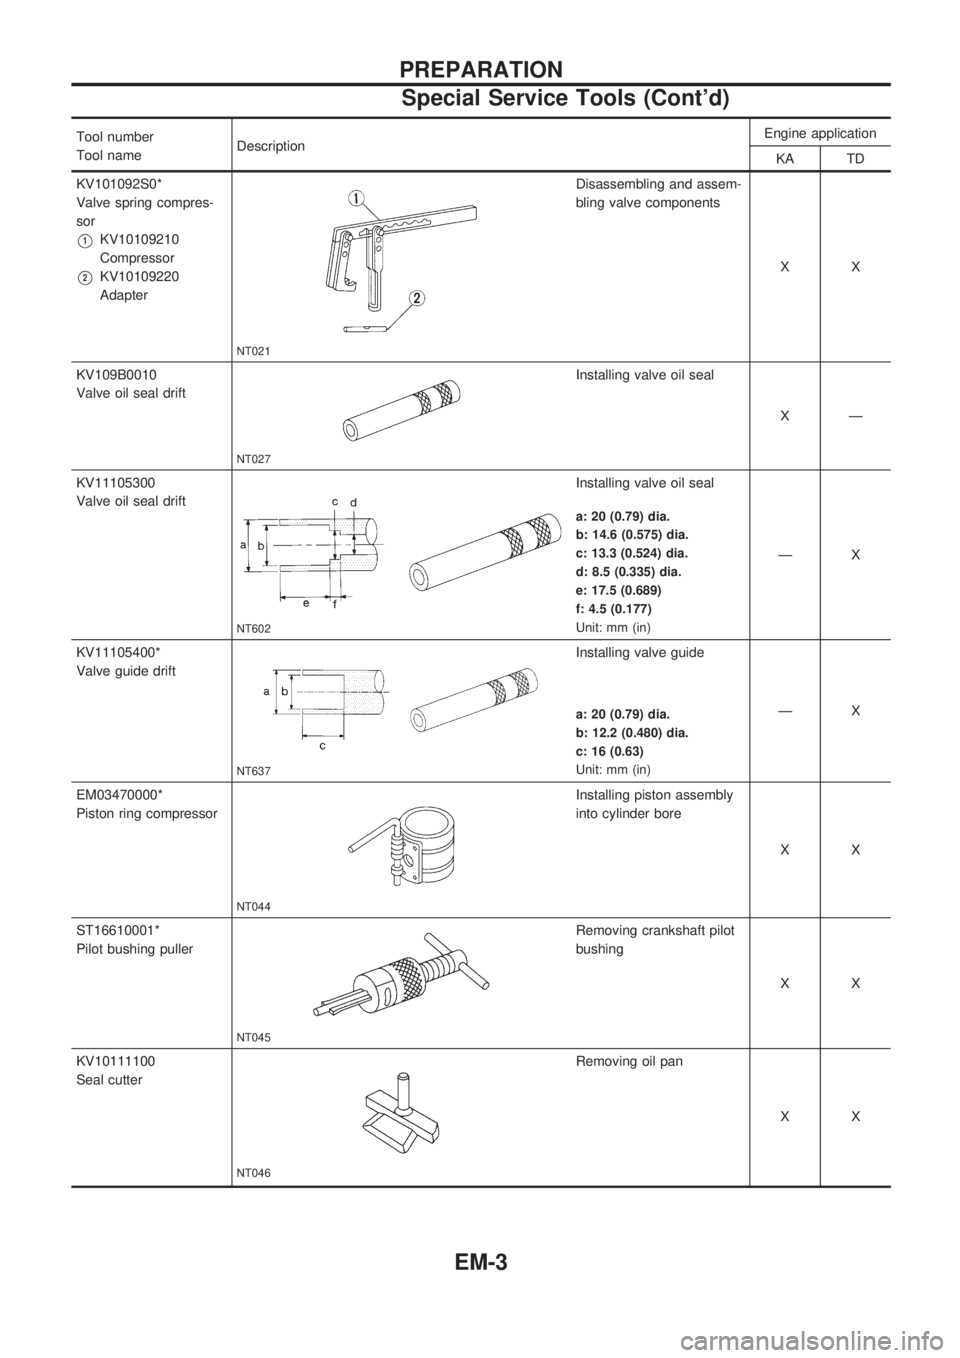
Tool number
Tool nameDescriptionEngine application
KA TD
KV101092S0*
Valve spring compres-
sor
V1KV10109210
Compressor
V2KV10109220
Adapter
NT021
Disassembling and assem-
bling valve components
XX
KV109B0010
Valve oil seal drift
NT027
Installing valve oil seal
XÐ
KV11105300
Valve oil seal drift
NT602
Installing valve oil seal
ÐX
a: 20 (0.79) dia.
b: 14.6 (0.575) dia.
c: 13.3 (0.524) dia.
d: 8.5 (0.335) dia.
e: 17.5 (0.689)
f: 4.5 (0.177)
Unit: mm (in)
KV11105400*
Valve guide drift
NT637
Installing valve guide
ÐX
a: 20 (0.79) dia.
b: 12.2 (0.480) dia.
c: 16 (0.63)
Unit: mm (in)
EM03470000*
Piston ring compressor
NT044
Installing piston assembly
into cylinder bore
XX
ST16610001*
Pilot bushing puller
NT045
Removing crankshaft pilot
bushing
XX
KV10111100
Seal cutter
NT046
Removing oil pan
XX
PREPARATION
Special Service Tools (Cont'd)
EM-3
Page 649 of 1659
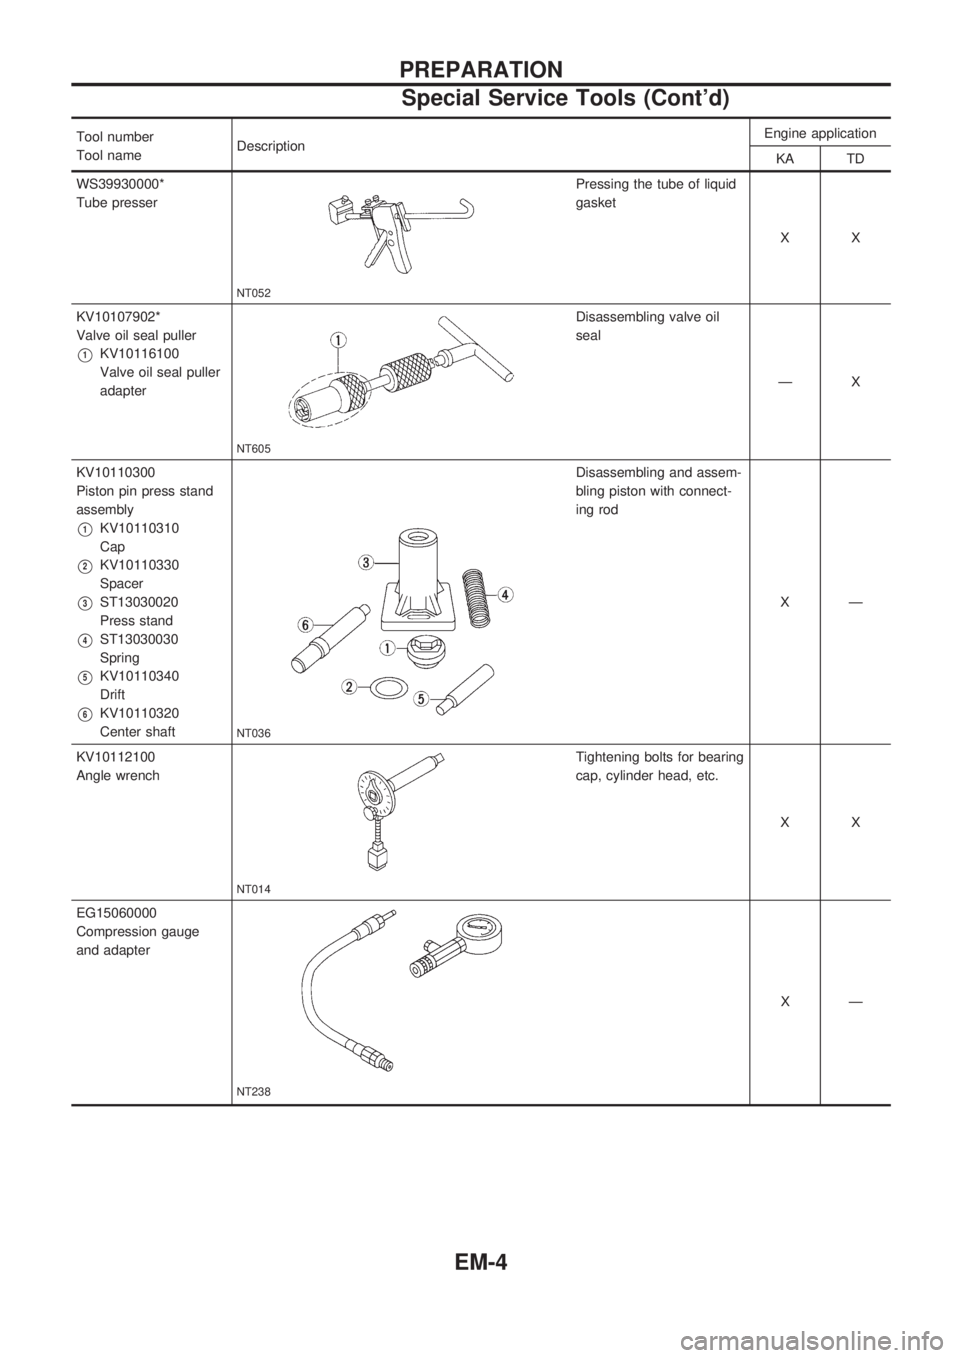
Tool number
Tool nameDescriptionEngine application
KA TD
WS39930000*
Tube presser
NT052
Pressing the tube of liquid
gasket
XX
KV10107902*
Valve oil seal puller
V1KV10116100
Valve oil seal puller
adapter
NT605
Disassembling valve oil
seal
ÐX
KV10110300
Piston pin press stand
assembly
V1KV10110310
Cap
V2KV10110330
Spacer
V3ST13030020
Press stand
V4ST13030030
Spring
V5KV10110340
Drift
V6KV10110320
Center shaft
NT036
Disassembling and assem-
bling piston with connect-
ing rod
XÐ
KV10112100
Angle wrench
NT014
Tightening bolts for bearing
cap, cylinder head, etc.
XX
EG15060000
Compression gauge
and adapter
NT238
XÐ
PREPARATION
Special Service Tools (Cont'd)
EM-4
Page 650 of 1659
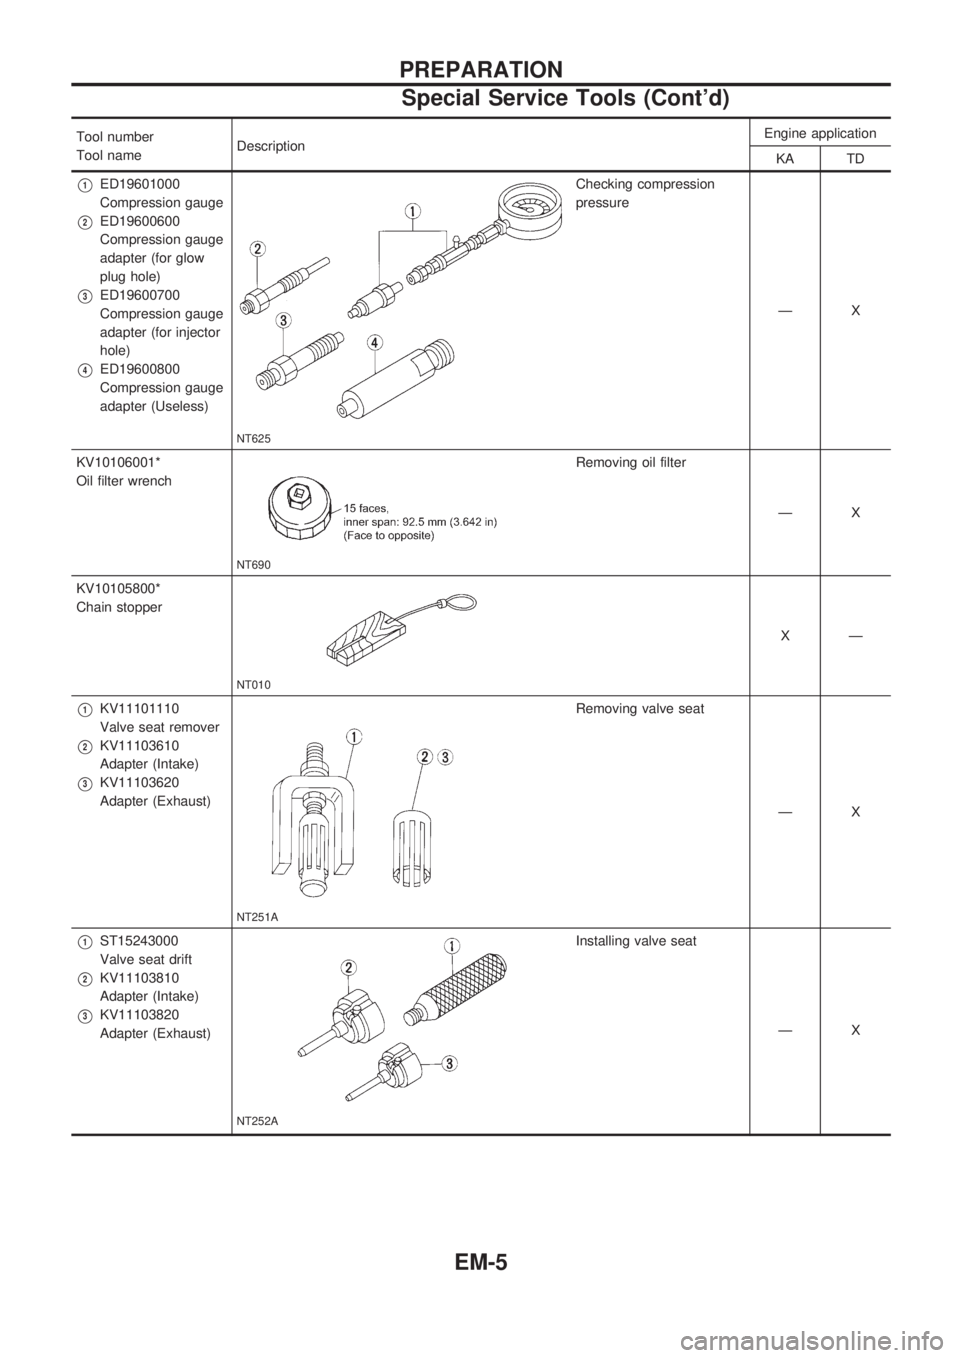
Tool number
Tool nameDescriptionEngine application
KA TD
V1ED19601000
Compression gauge
V2ED19600600
Compression gauge
adapter (for glow
plug hole)
V3ED19600700
Compression gauge
adapter (for injector
hole)
V4ED19600800
Compression gauge
adapter (Useless)
NT625
Checking compression
pressure
ÐX
KV10106001*
Oil filter wrench
NT690
Removing oil filter
ÐX
KV10105800*
Chain stopper
NT010
XÐ
V1KV11101110
Valve seat remover
V2KV11103610
Adapter (Intake)
V3KV11103620
Adapter (Exhaust)
NT251A
Removing valve seat
ÐX
V1ST15243000
Valve seat drift
V2KV11103810
Adapter (Intake)
V3KV11103820
Adapter (Exhaust)
NT252A
Installing valve seat
ÐX
PREPARATION
Special Service Tools (Cont'd)
EM-5