NISSAN PICK-UP 1998 Repair Manual
Manufacturer: NISSAN, Model Year: 1998, Model line: PICK-UP, Model: NISSAN PICK-UP 1998Pages: 1659, PDF Size: 53.39 MB
Page 681 of 1659
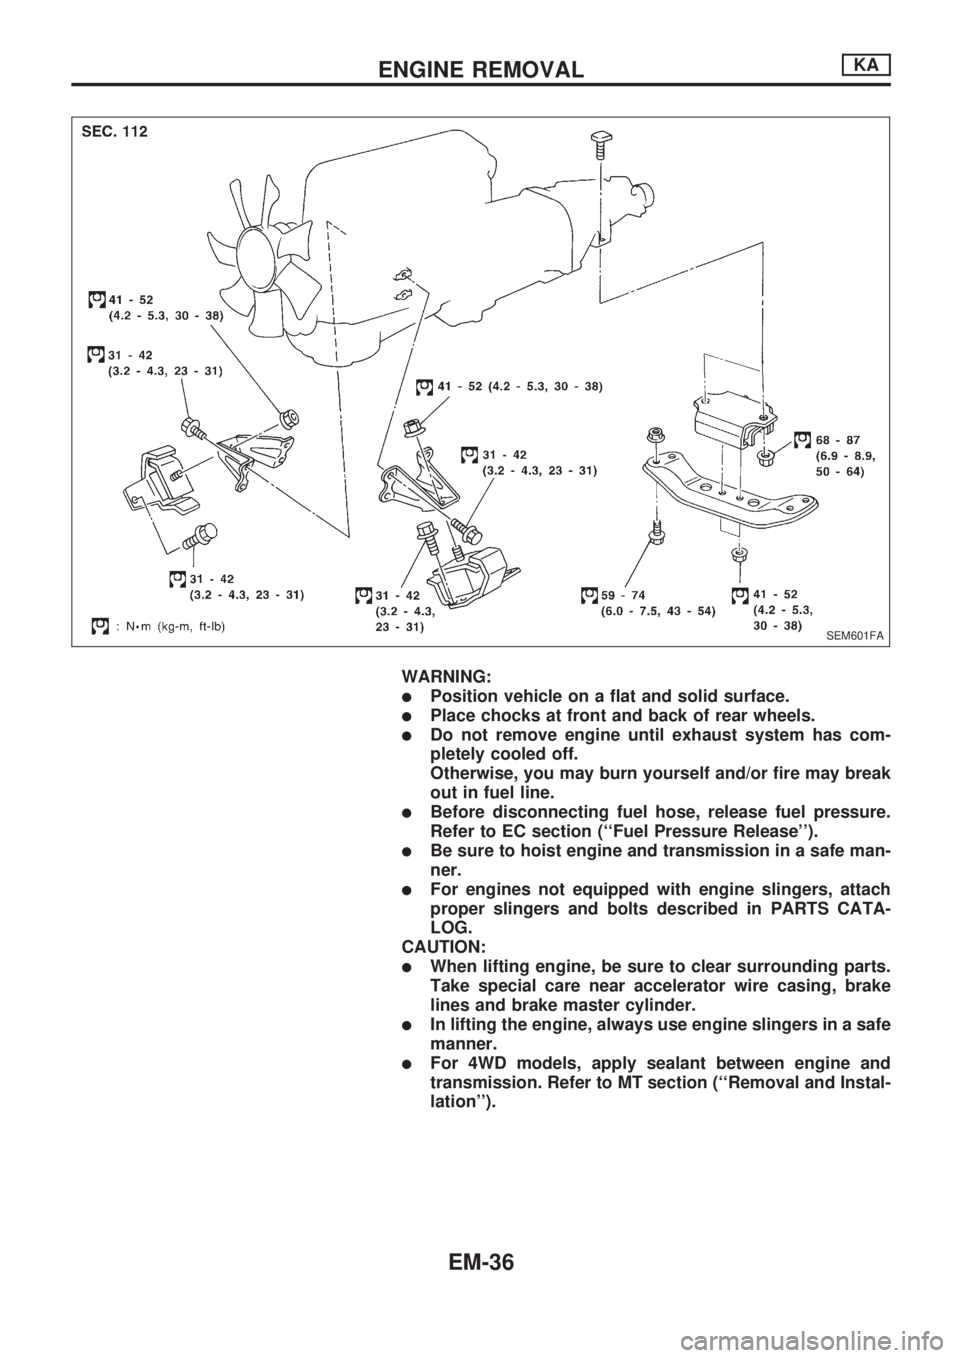
WARNING:
lPosition vehicle on a flat and solid surface.
lPlace chocks at front and back of rear wheels.
lDo not remove engine until exhaust system has com-
pletely cooled off.
Otherwise, you may burn yourself and/or fire may break
out in fuel line.
lBefore disconnecting fuel hose, release fuel pressure.
Refer to EC section (``Fuel Pressure Release'').
lBe sure to hoist engine and transmission in a safe man-
ner.
lFor engines not equipped with engine slingers, attach
proper slingers and bolts described in PARTS CATA-
LOG.
CAUTION:
lWhen lifting engine, be sure to clear surrounding parts.
Take special care near accelerator wire casing, brake
lines and brake master cylinder.
lIn lifting the engine, always use engine slingers in a safe
manner.
lFor 4WD models, apply sealant between engine and
transmission. Refer to MT section (``Removal and Instal-
lation'').
SEM601FA
ENGINE REMOVALKA
EM-36
Page 682 of 1659
Removal
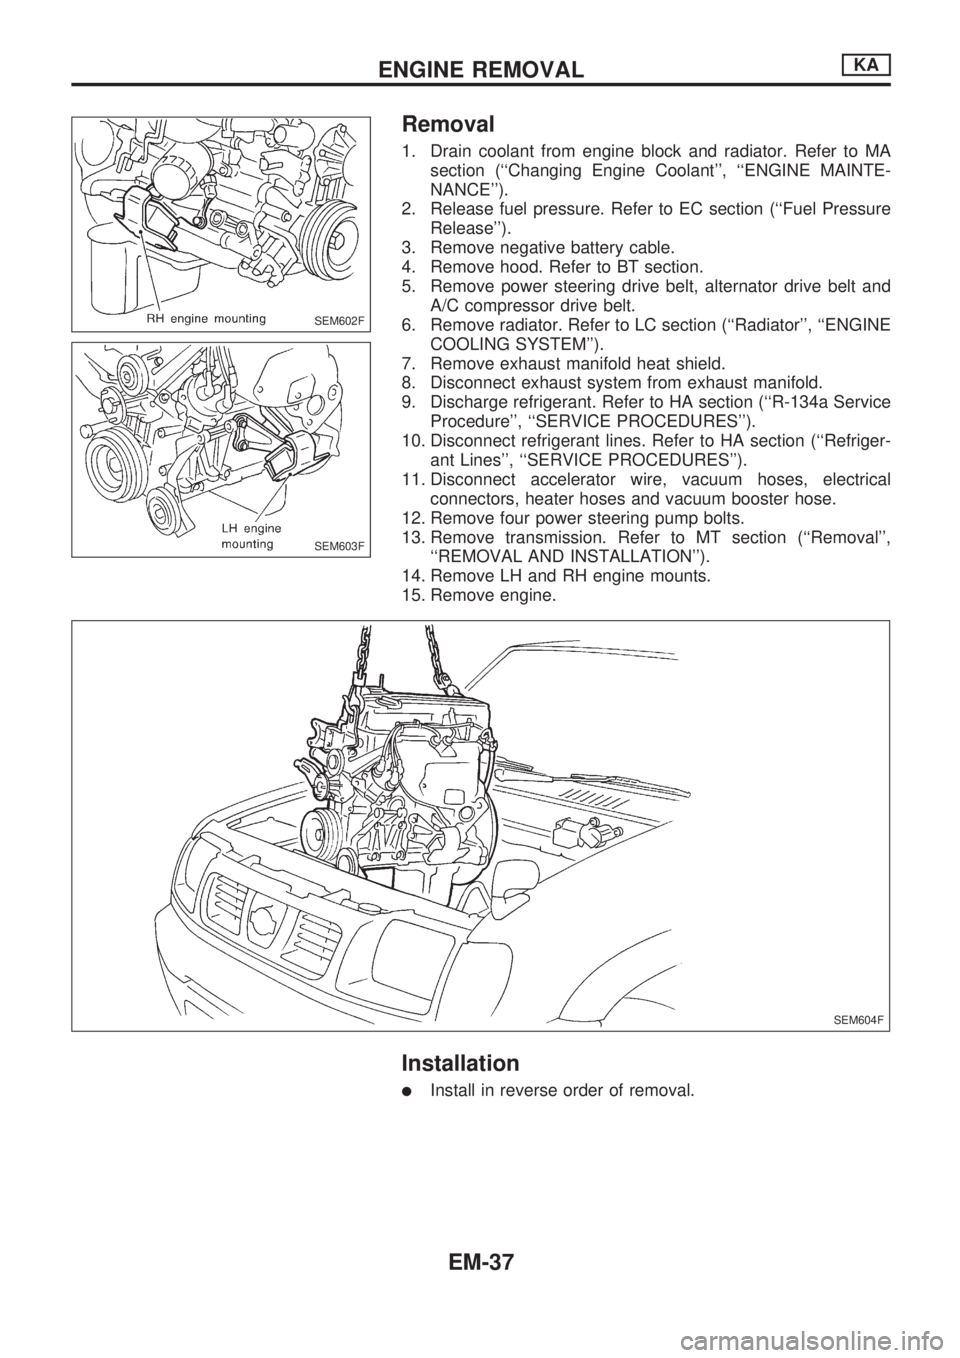
1. Drain coolant from engine block and radiator. Refer to MA
section (``Changing Engine Coolant'', ``ENGINE MAINTE-
NANCE'').
2. Release fuel pressure. Refer to EC section (``Fuel Pressure
Release'').
3. Remove negative battery cable.
4. Remove hood. Refer to BT section.
5. Remove power steering drive belt, alternator drive belt and
A/C compressor drive belt.
6. Remove radiator. Refer to LC section (``Radiator'', ``ENGINE
COOLING SYSTEM'').
7. Remove exhaust manifold heat shield.
8. Disconnect exhaust system from exhaust manifold.
9. Discharge refrigerant. Refer to HA section (``R-134a Service
Procedure'', ``SERVICE PROCEDURES'').
10. Disconnect refrigerant lines. Refer to HA section (``Refriger-
ant Lines'', ``SERVICE PROCEDURES'').
11. Disconnect accelerator wire, vacuum hoses, electrical
connectors, heater hoses and vacuum booster hose.
12. Remove four power steering pump bolts.
13. Remove transmission. Refer to MT section (``Removal'',
``REMOVAL AND INSTALLATION'').
14. Remove LH and RH engine mounts.
15. Remove engine.
Installation
lInstall in reverse order of removal.
SEM602F
SEM603F
SEM604F
ENGINE REMOVALKA
EM-37
Page 683 of 1659
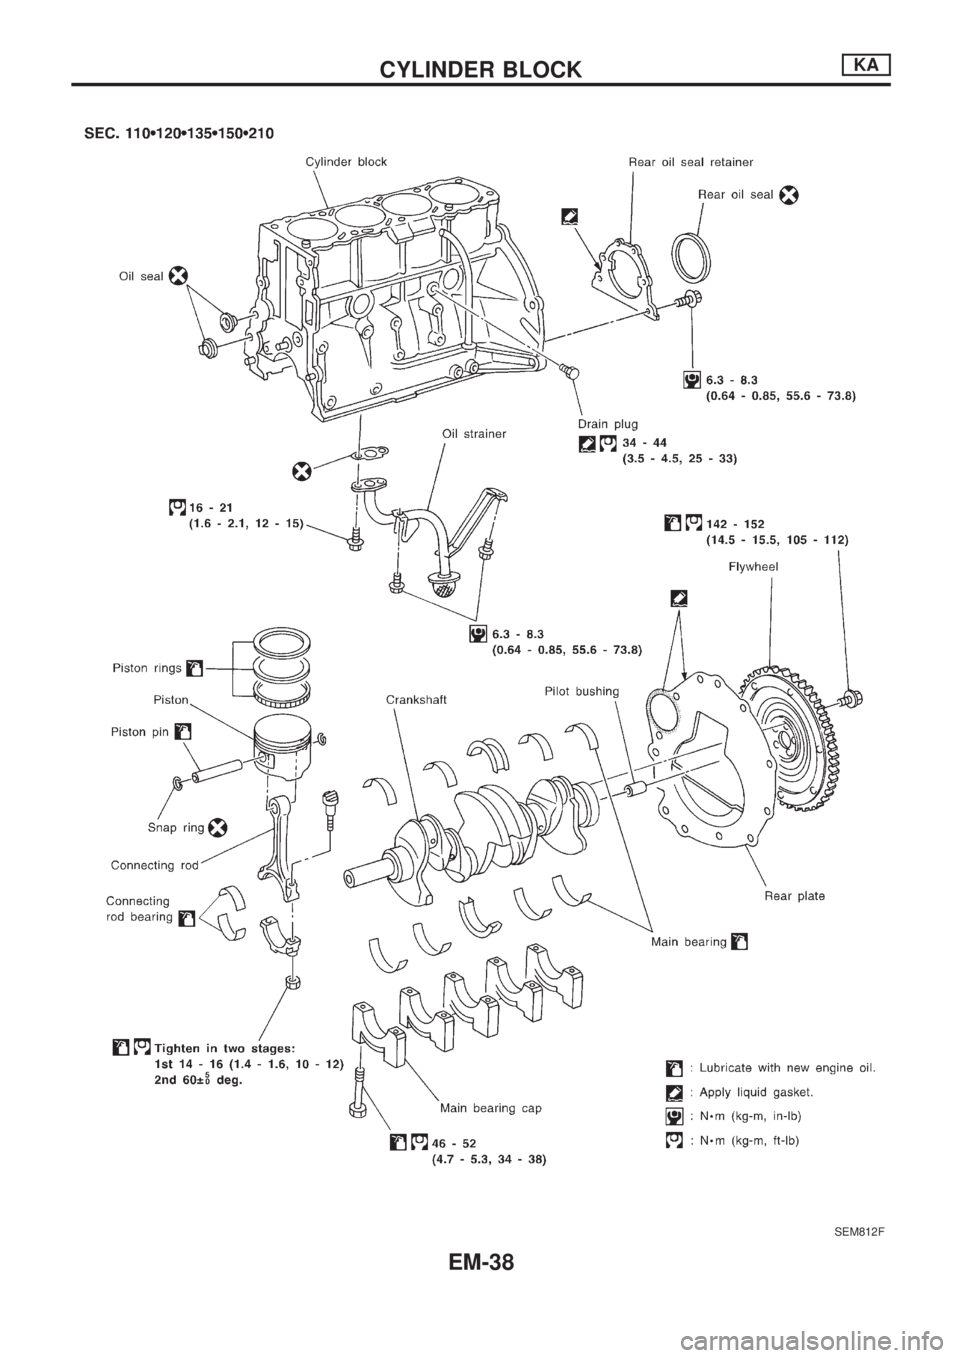
SEM812F
CYLINDER BLOCKKA
EM-38
Page 684 of 1659
CAUTION:
lWhen installing sliding parts (bearings, pistons, etc.),
lubricate contacting surfaces with new engine oil.
lPlace removed parts such as bearings and bearing caps
in their proper order and direction.
lWhen installing connecting rod nuts and main bearing
cap bolts, apply new engine oil to threads and seating
surfaces.
lDo not allow any magnetic materials to contact the ring
gear teeth of flywheel or drive plate.
Disassembly
PISTON AND CRANKSHAFT
1. Remove intake manifold.
2. Place engine on a work stand.
3. Drain coolant and oil.
4. Remove oil pan.
5. Remove water pump.
6. Remove timing chain.
7. Remove cylinder head.
8. Remove pistons with connecting rod.
9. Remove bearing caps and crankshaft.
lBefore removing bearing caps, measure crankshaft end
play. Refer to EM-47.
lBolts should be loosened in two or three steps.
Inspection
PISTON AND PISTON PIN CLEARANCE
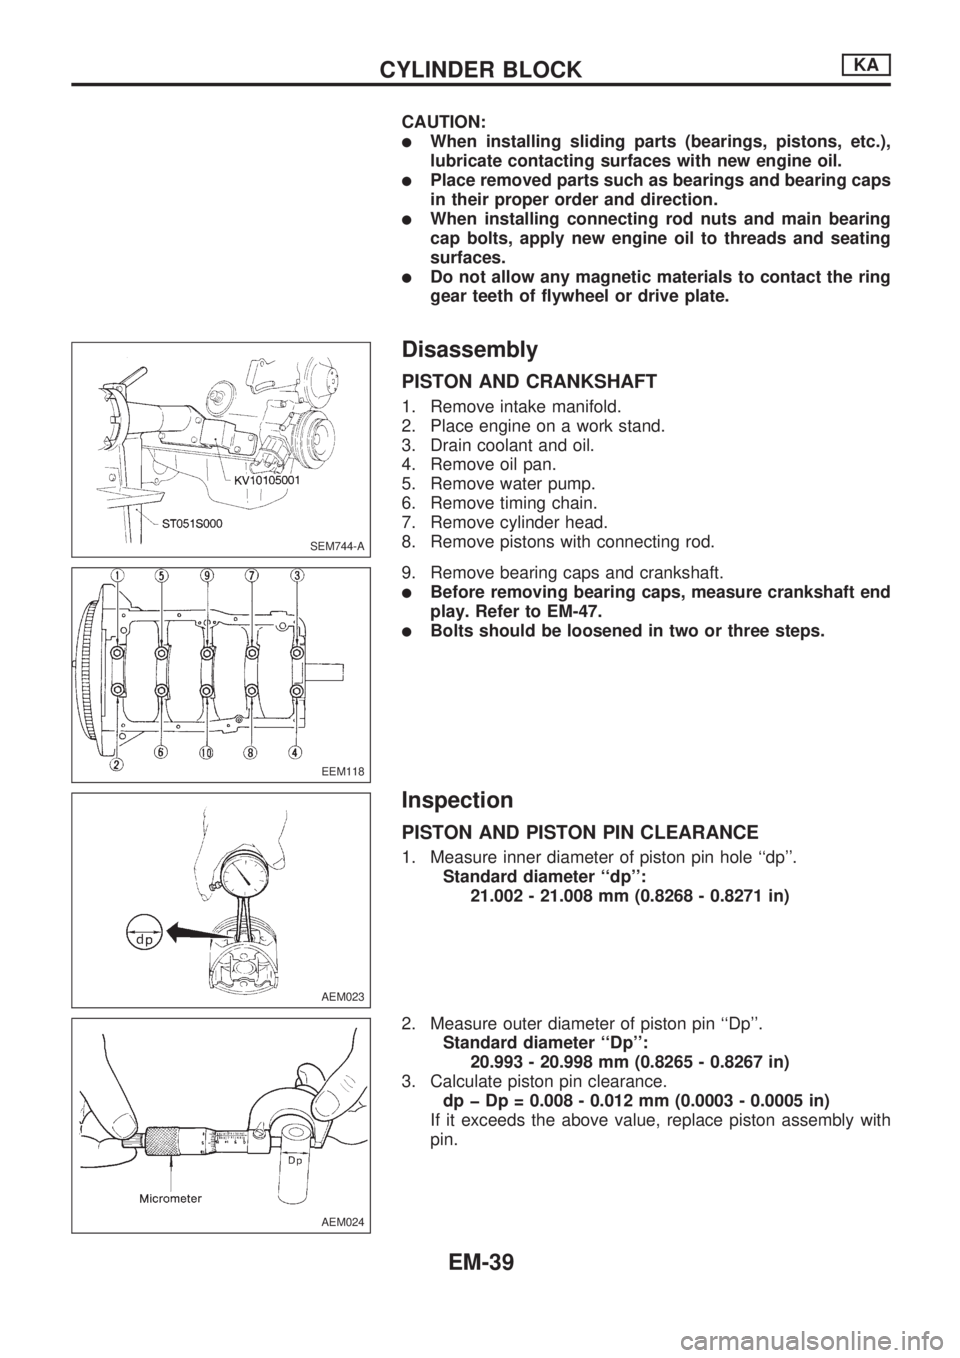
1. Measure inner diameter of piston pin hole ``dp''.
Standard diameter ``dp'':
21.002 - 21.008 mm (0.8268 - 0.8271 in)
2. Measure outer diameter of piston pin ``Dp''.
Standard diameter ``Dp'':
20.993 - 20.998 mm (0.8265 - 0.8267 in)
3. Calculate piston pin clearance.
dp þ Dp = 0.008 - 0.012 mm (0.0003 - 0.0005 in)
If it exceeds the above value, replace piston assembly with
pin.
SEM744-A
EEM118
AEM023
AEM024
CYLINDER BLOCKKA
EM-39
Page 685 of 1659
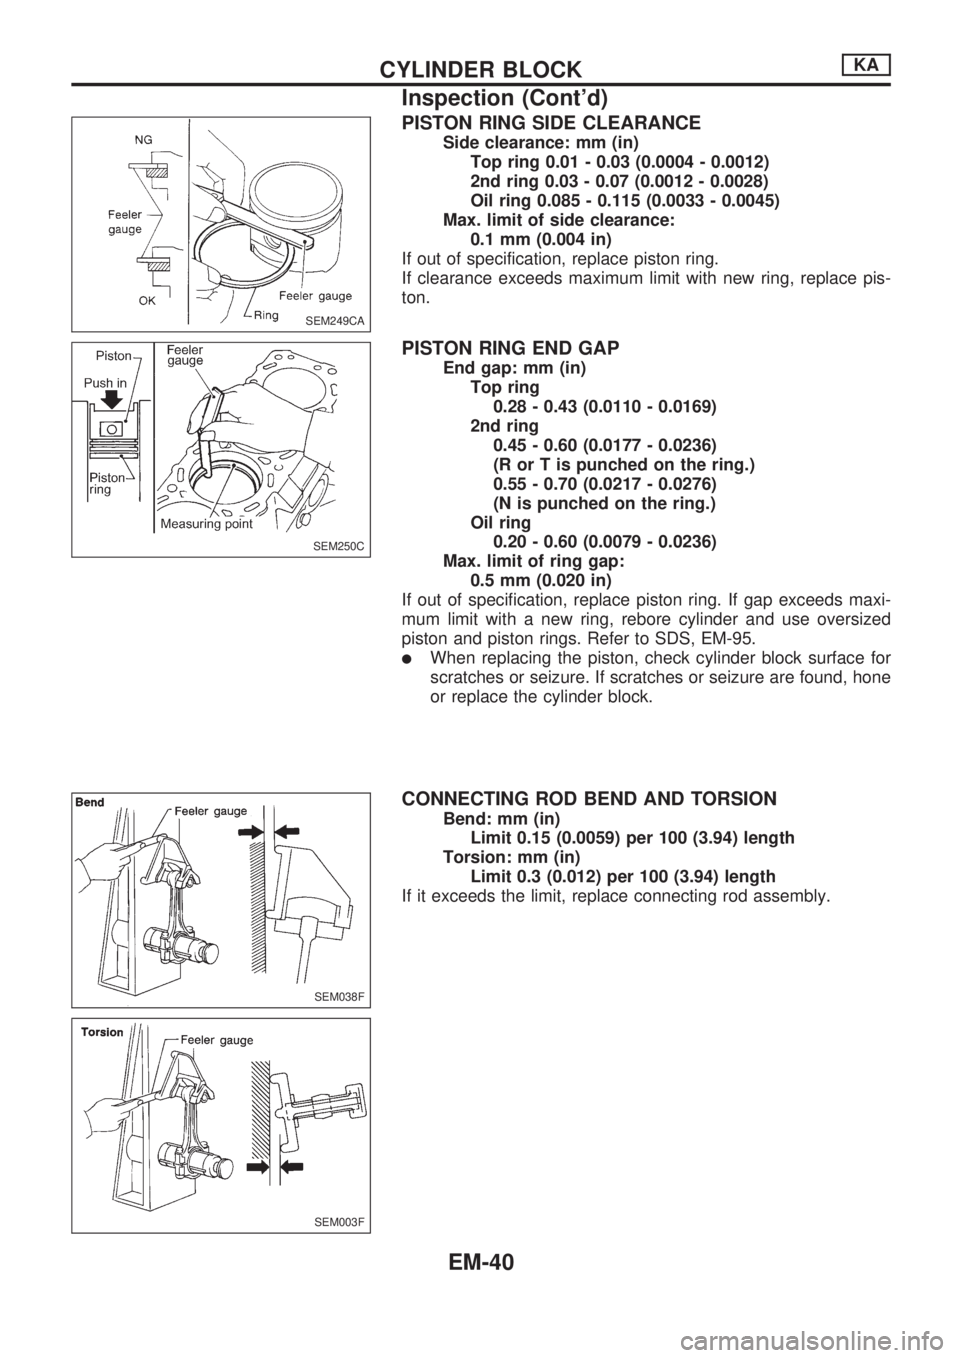
PISTON RING SIDE CLEARANCE
Side clearance: mm (in)
Top ring 0.01 - 0.03 (0.0004 - 0.0012)
2nd ring 0.03 - 0.07 (0.0012 - 0.0028)
Oil ring 0.085 - 0.115 (0.0033 - 0.0045)
Max. limit of side clearance:
0.1 mm (0.004 in)
If out of specification, replace piston ring.
If clearance exceeds maximum limit with new ring, replace pis-
ton.
PISTON RING END GAP
End gap: mm (in)
Top ring
0.28 - 0.43 (0.0110 - 0.0169)
2nd ring
0.45 - 0.60 (0.0177 - 0.0236)
(R or T is punched on the ring.)
0.55 - 0.70 (0.0217 - 0.0276)
(N is punched on the ring.)
Oil ring
0.20 - 0.60 (0.0079 - 0.0236)
Max. limit of ring gap:
0.5 mm (0.020 in)
If out of specification, replace piston ring. If gap exceeds maxi-
mum limit with a new ring, rebore cylinder and use oversized
piston and piston rings. Refer to SDS, EM-95.
lWhen replacing the piston, check cylinder block surface for
scratches or seizure. If scratches or seizure are found, hone
or replace the cylinder block.
CONNECTING ROD BEND AND TORSION
Bend: mm (in)
Limit 0.15 (0.0059) per 100 (3.94) length
Torsion: mm (in)
Limit 0.3 (0.012) per 100 (3.94) length
If it exceeds the limit, replace connecting rod assembly.
SEM249CA
SEM250C
SEM038F
SEM003F
CYLINDER BLOCKKA
Inspection (Cont'd)
EM-40
Page 686 of 1659
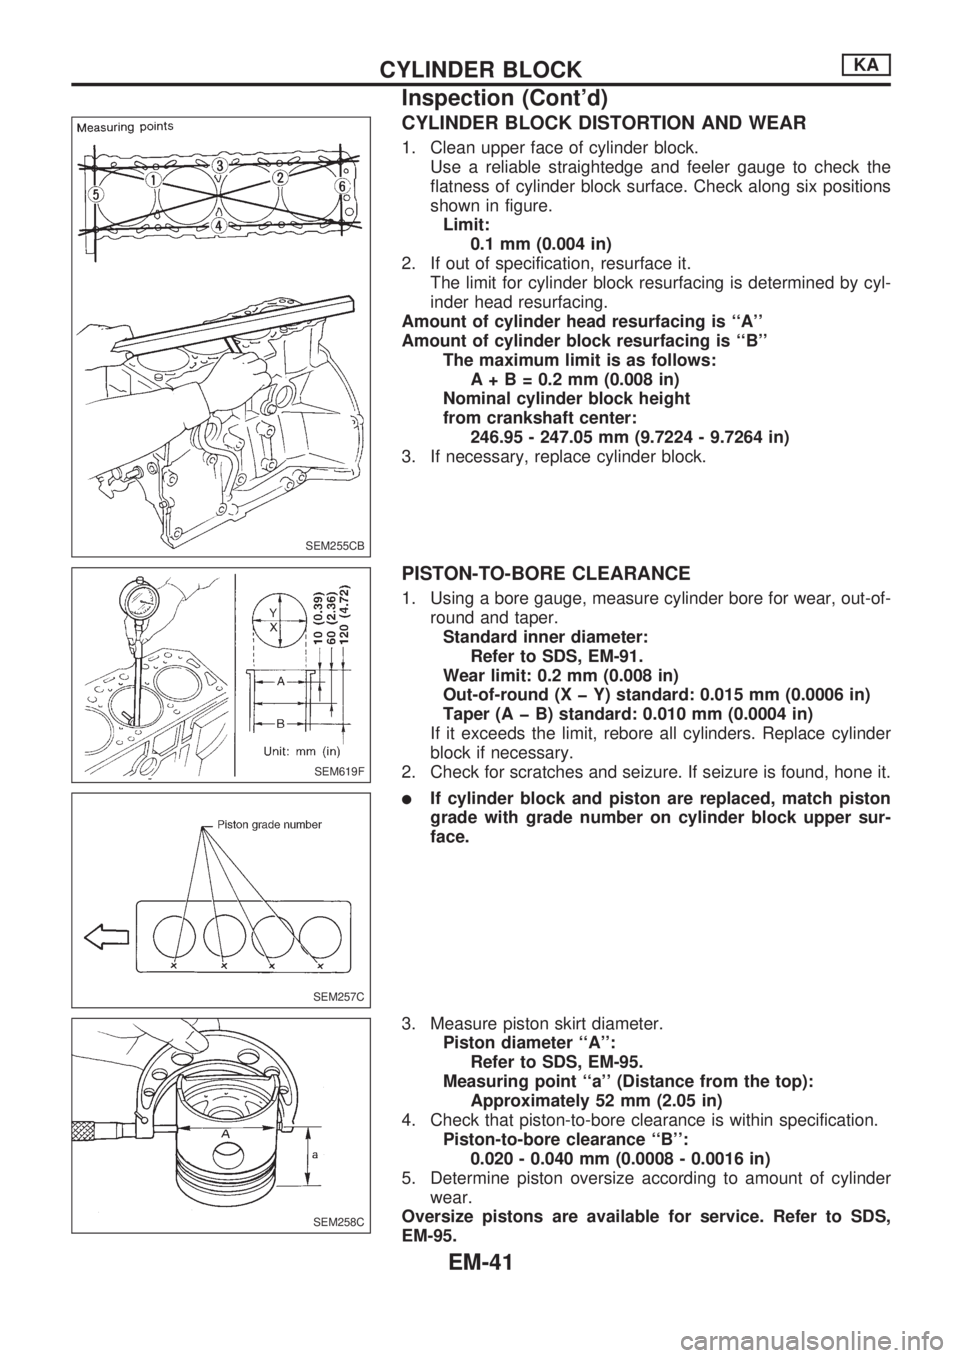
CYLINDER BLOCK DISTORTION AND WEAR
1. Clean upper face of cylinder block.
Use a reliable straightedge and feeler gauge to check the
flatness of cylinder block surface. Check along six positions
shown in figure.
Limit:
0.1 mm (0.004 in)
2. If out of specification, resurface it.
The limit for cylinder block resurfacing is determined by cyl-
inder head resurfacing.
Amount of cylinder head resurfacing is ``A''
Amount of cylinder block resurfacing is ``B''
The maximum limit is as follows:
A+B=0.2mm(0.008 in)
Nominal cylinder block height
from crankshaft center:
246.95 - 247.05 mm (9.7224 - 9.7264 in)
3. If necessary, replace cylinder block.
PISTON-TO-BORE CLEARANCE
1. Using a bore gauge, measure cylinder bore for wear, out-of-
round and taper.
Standard inner diameter:
Refer to SDS, EM-91.
Wear limit: 0.2 mm (0.008 in)
Out-of-round (X þ Y) standard: 0.015 mm (0.0006 in)
Taper (A þ B) standard: 0.010 mm (0.0004 in)
If it exceeds the limit, rebore all cylinders. Replace cylinder
block if necessary.
2. Check for scratches and seizure. If seizure is found, hone it.
lIf cylinder block and piston are replaced, match piston
grade with grade number on cylinder block upper sur-
face.
3. Measure piston skirt diameter.
Piston diameter ``A'':
Refer to SDS, EM-95.
Measuring point ``a'' (Distance from the top):
Approximately 52 mm (2.05 in)
4. Check that piston-to-bore clearance is within specification.
Piston-to-bore clearance ``B'':
0.020 - 0.040 mm (0.0008 - 0.0016 in)
5. Determine piston oversize according to amount of cylinder
wear.
Oversize pistons are available for service. Refer to SDS,
EM-95.
SEM255CB
SEM619F
SEM257C
SEM258C
CYLINDER BLOCKKA
Inspection (Cont'd)
EM-41
Page 687 of 1659
6. Cylinder bore size is determined by adding piston-to-bore
clearance to piston diameter ``A''.
Rebored size calculation:
D=A+BþC
where,
D: Bored diameter
A: Piston diameter as measured
B: Piston-to-bore clearance
C: Honing allowance 0.02 mm (0.0008 in)
7. Install main bearing caps and tighten bolts to the specified
torque. This will prevent distortion of cylinder bores.
8. Cut cylinder bores.
lWhen any cylinder needs boring, all other cylinders
must also be bored.
lDo not cut too much out of cylinder bore at a time. Cut
only 0.05 mm (0.0020 in) or so at a time.
9. Hone cylinders to obtain specified piston-to-bore clearance.
10. Measure finished cylinder bore for out-of-round and taper.
lMeasurement should be done after cylinder bore cools
down.
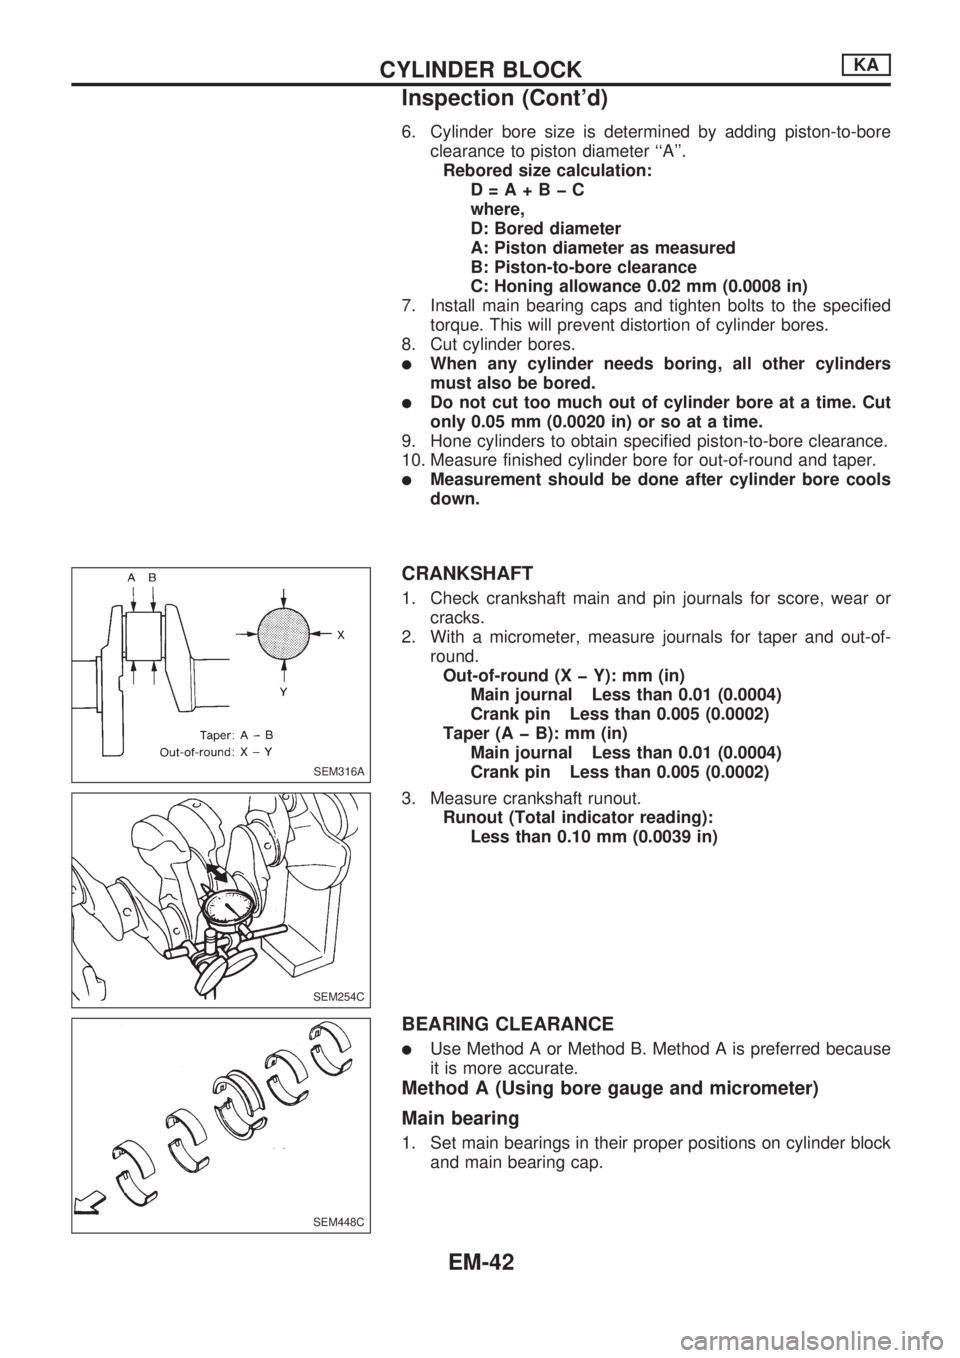
CRANKSHAFT
1. Check crankshaft main and pin journals for score, wear or
cracks.
2. With a micrometer, measure journals for taper and out-of-
round.
Out-of-round (X þ Y): mm (in)
Main journal Less than 0.01 (0.0004)
Crank pin Less than 0.005 (0.0002)
Taper (A þ B): mm (in)
Main journal Less than 0.01 (0.0004)
Crank pin Less than 0.005 (0.0002)
3. Measure crankshaft runout.
Runout (Total indicator reading):
Less than 0.10 mm (0.0039 in)
BEARING CLEARANCE
lUse Method A or Method B. Method A is preferred because
it is more accurate.
Method A (Using bore gauge and micrometer)
Main bearing
1. Set main bearings in their proper positions on cylinder block
and main bearing cap.
SEM316A
SEM254C
SEM448C
CYLINDER BLOCKKA
Inspection (Cont'd)
EM-42
Page 688 of 1659
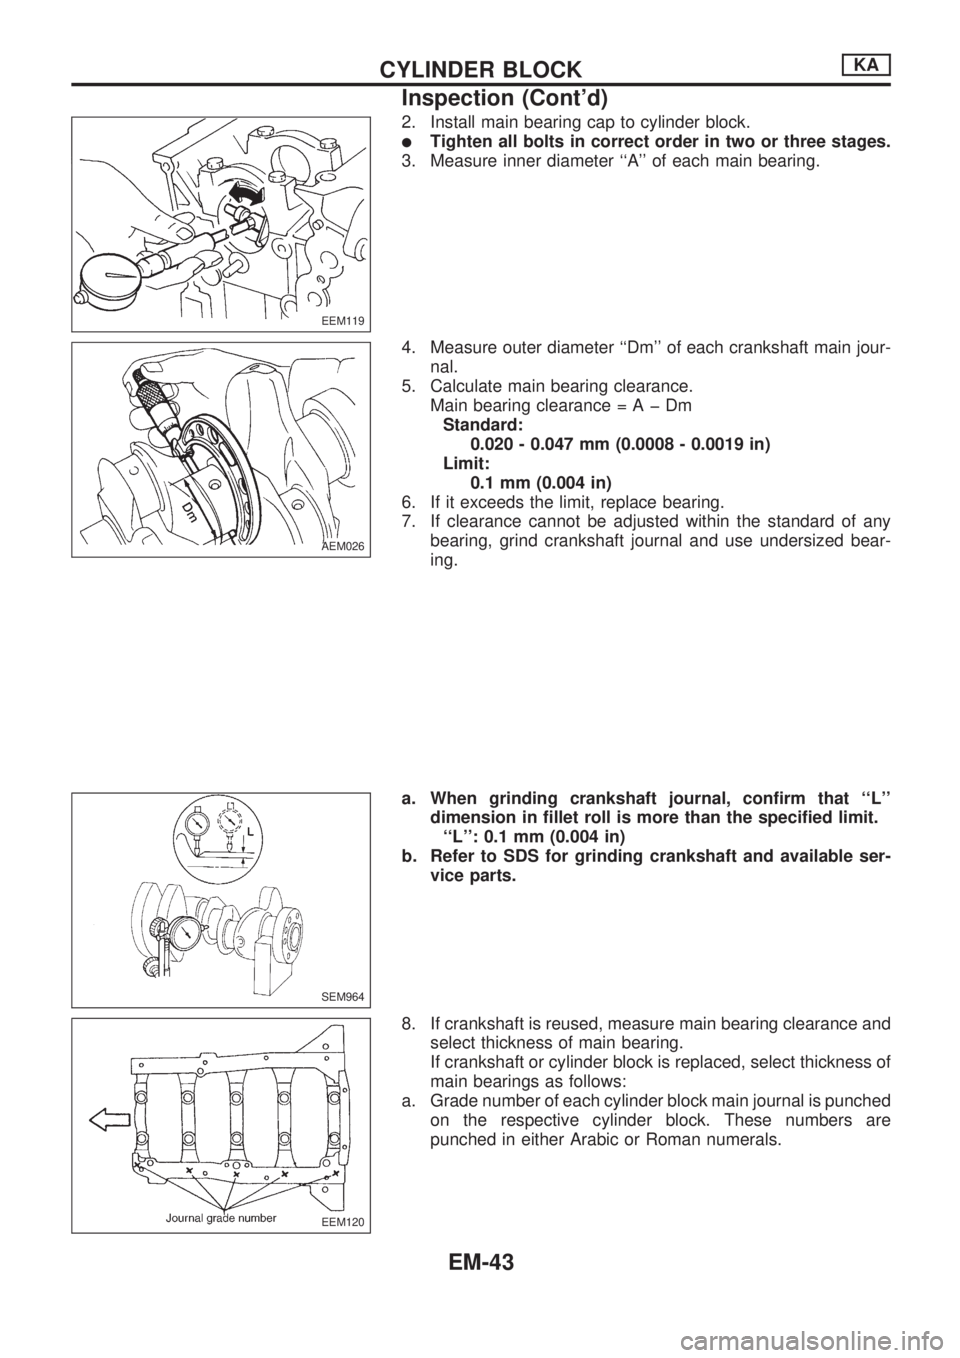
2. Install main bearing cap to cylinder block.
lTighten all bolts in correct order in two or three stages.
3. Measure inner diameter ``A'' of each main bearing.
4. Measure outer diameter ``Dm'' of each crankshaft main jour-
nal.
5. Calculate main bearing clearance.
Main bearing clearance=AþDm
Standard:
0.020 - 0.047 mm (0.0008 - 0.0019 in)
Limit:
0.1 mm (0.004 in)
6. If it exceeds the limit, replace bearing.
7. If clearance cannot be adjusted within the standard of any
bearing, grind crankshaft journal and use undersized bear-
ing.
a. When grinding crankshaft journal, confirm that ``L''
dimension in fillet roll is more than the specified limit.
``L'': 0.1 mm (0.004 in)
b. Refer to SDS for grinding crankshaft and available ser-
vice parts.
8. If crankshaft is reused, measure main bearing clearance and
select thickness of main bearing.
If crankshaft or cylinder block is replaced, select thickness of
main bearings as follows:
a. Grade number of each cylinder block main journal is punched
on the respective cylinder block. These numbers are
punched in either Arabic or Roman numerals.
EEM119
AEM026
SEM964
EEM120
CYLINDER BLOCKKA
Inspection (Cont'd)
EM-43
Page 689 of 1659
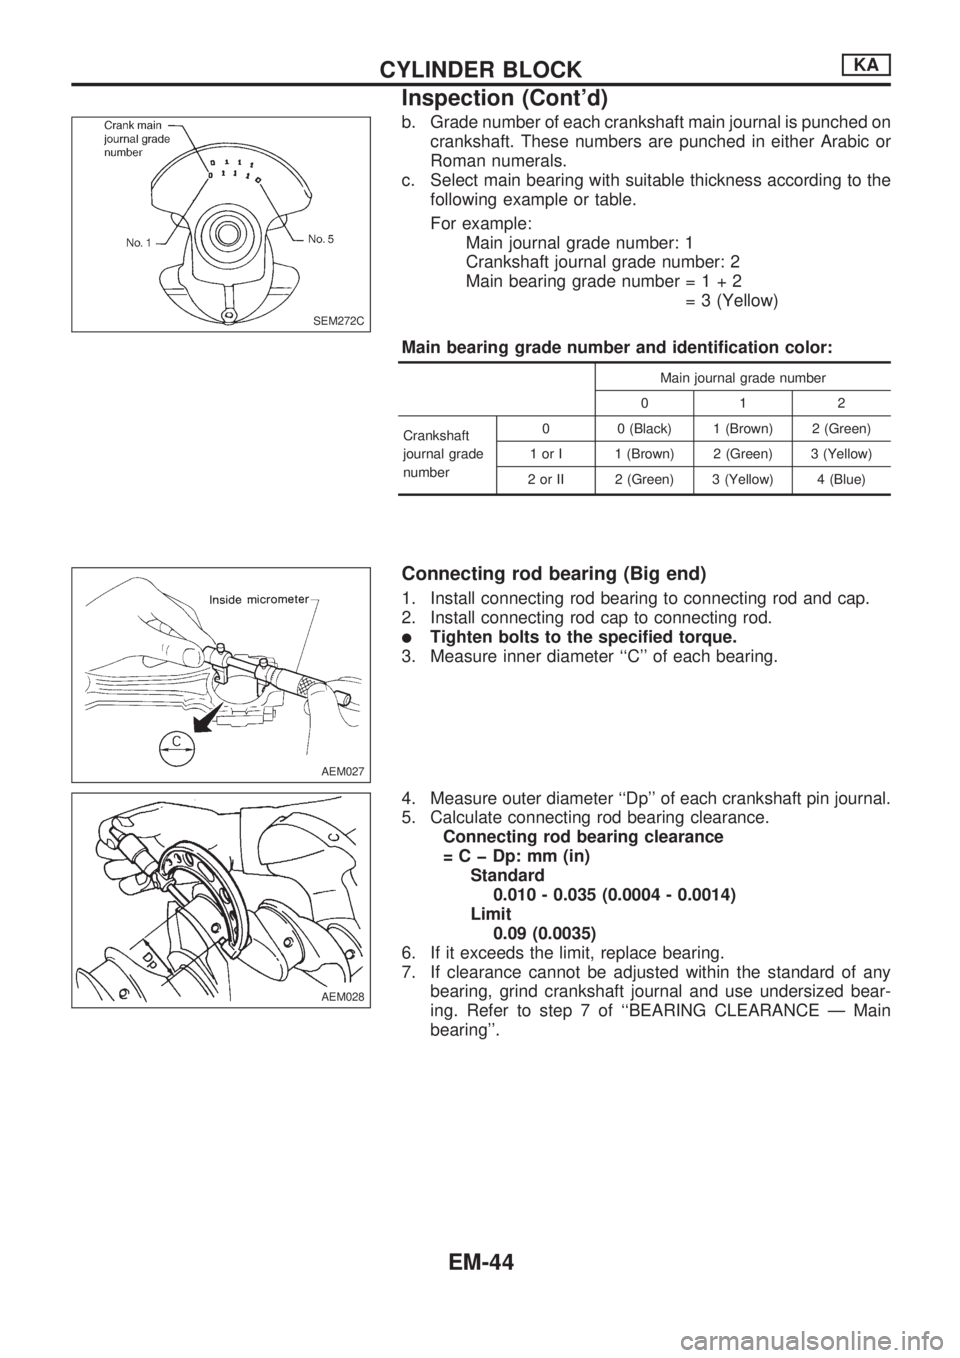
b. Grade number of each crankshaft main journal is punched on
crankshaft. These numbers are punched in either Arabic or
Roman numerals.
c. Select main bearing with suitable thickness according to the
following example or table.
For example:
Main journal grade number: 1
Crankshaft journal grade number: 2
Main bearing grade number=1+2
= 3 (Yellow)
Main bearing grade number and identification color:
Main journal grade number
012
Crankshaft
journal grade
number0 0 (Black) 1 (Brown) 2 (Green)
1 or I 1 (Brown) 2 (Green) 3 (Yellow)
2 or II 2 (Green) 3 (Yellow) 4 (Blue)
Connecting rod bearing (Big end)
1. Install connecting rod bearing to connecting rod and cap.
2. Install connecting rod cap to connecting rod.
lTighten bolts to the specified torque.
3. Measure inner diameter ``C'' of each bearing.
4. Measure outer diameter ``Dp'' of each crankshaft pin journal.
5. Calculate connecting rod bearing clearance.
Connecting rod bearing clearance
= C þ Dp: mm (in)
Standard
0.010 - 0.035 (0.0004 - 0.0014)
Limit
0.09 (0.0035)
6. If it exceeds the limit, replace bearing.
7. If clearance cannot be adjusted within the standard of any
bearing, grind crankshaft journal and use undersized bear-
ing. Refer to step 7 of ``BEARING CLEARANCE Ð Main
bearing''.
SEM272C
AEM027
AEM028
CYLINDER BLOCKKA
Inspection (Cont'd)
EM-44
Page 690 of 1659
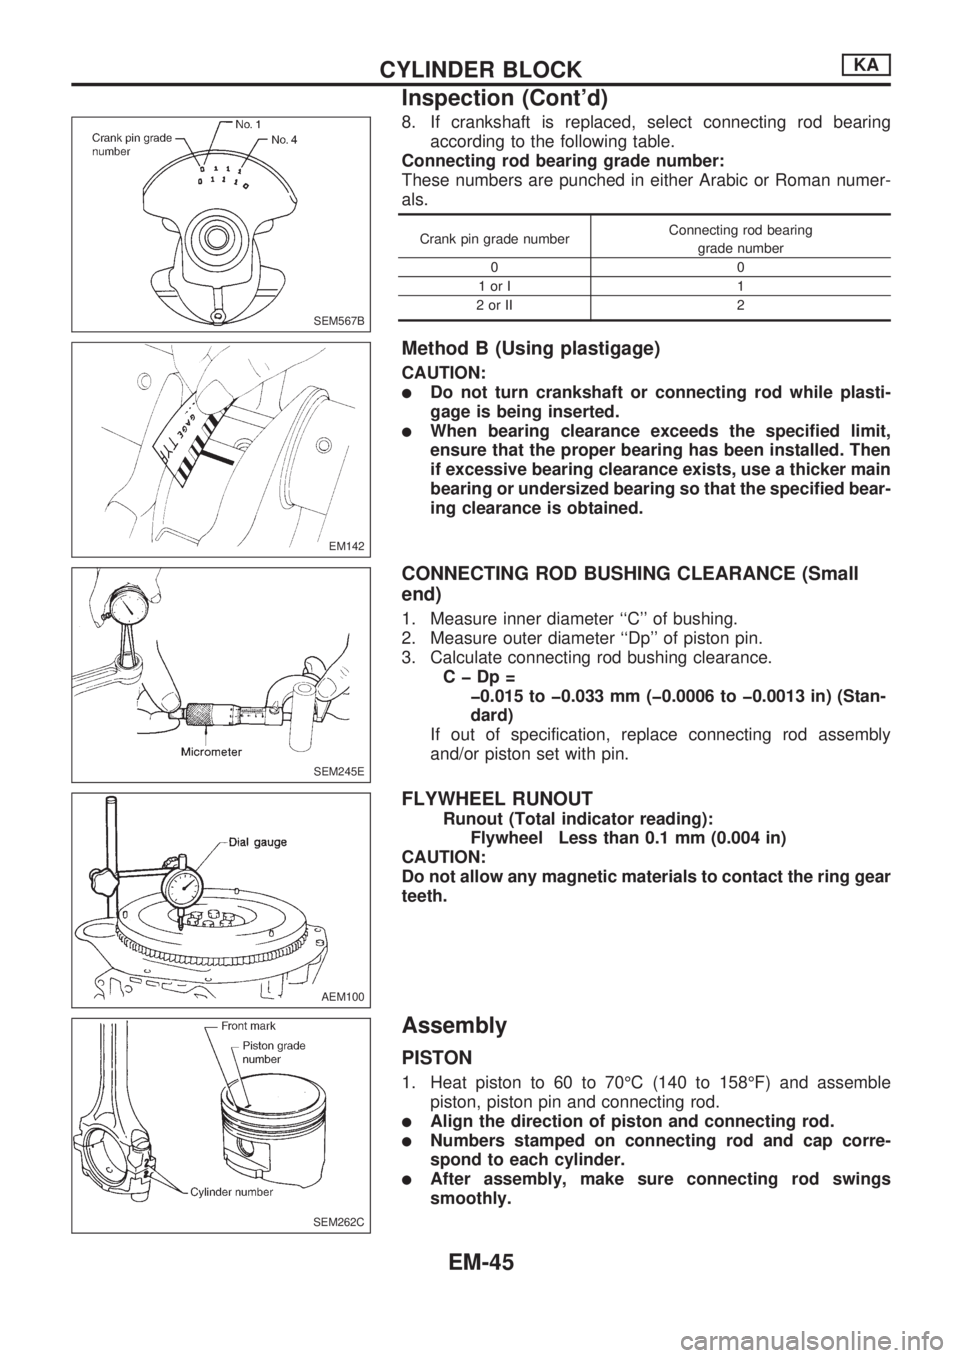
8. If crankshaft is replaced, select connecting rod bearing
according to the following table.
Connecting rod bearing grade number:
These numbers are punched in either Arabic or Roman numer-
als.
Crank pin grade numberConnecting rod bearing
grade number
00
1orI 1
2orII 2
Method B (Using plastigage)
CAUTION:
lDo not turn crankshaft or connecting rod while plasti-
gage is being inserted.
lWhen bearing clearance exceeds the specified limit,
ensure that the proper bearing has been installed. Then
if excessive bearing clearance exists, use a thicker main
bearing or undersized bearing so that the specified bear-
ing clearance is obtained.
CONNECTING ROD BUSHING CLEARANCE (Small
end)
1. Measure inner diameter ``C'' of bushing.
2. Measure outer diameter ``Dp'' of piston pin.
3. Calculate connecting rod bushing clearance.
CþDp=
þ0.015 to þ0.033 mm (þ0.0006 to þ0.0013 in) (Stan-
dard)
If out of specification, replace connecting rod assembly
and/or piston set with pin.
FLYWHEEL RUNOUT
Runout (Total indicator reading):
Flywheel Less than 0.1 mm (0.004 in)
CAUTION:
Do not allow any magnetic materials to contact the ring gear
teeth.
Assembly
PISTON
1. Heat piston to 60 to 70ÉC (140 to 158ÉF) and assemble
piston, piston pin and connecting rod.
lAlign the direction of piston and connecting rod.
lNumbers stamped on connecting rod and cap corre-
spond to each cylinder.
lAfter assembly, make sure connecting rod swings
smoothly.
SEM567B
EM142
SEM245E
AEM100
SEM262C
CYLINDER BLOCKKA
Inspection (Cont'd)
EM-45