NISSAN PRIMERA 1999 Electronic Repair Manual
Manufacturer: NISSAN, Model Year: 1999, Model line: PRIMERA, Model: NISSAN PRIMERA 1999Pages: 2267, PDF Size: 35.74 MB
Page 1771 of 2267
INSPECTION
Shock absorber assembly
lCheck for smooth operation through a full stroke, both com-
pression and extension.
lCheck for oil leakage occurring on welded or gland packing
portions.
lCheck piston rod for cracks, deformation or other damage.
Replace if necessary.
Mounting insulator and rubber parts
lCheck cemented rubber-to-metal portion for separation or
cracks.
lCheck rubber parts for deterioration. Replace if necessary.
Coil spring
lCheck for cracks, deformation or other damage. Replace if
necessary.
ASSEMBLY
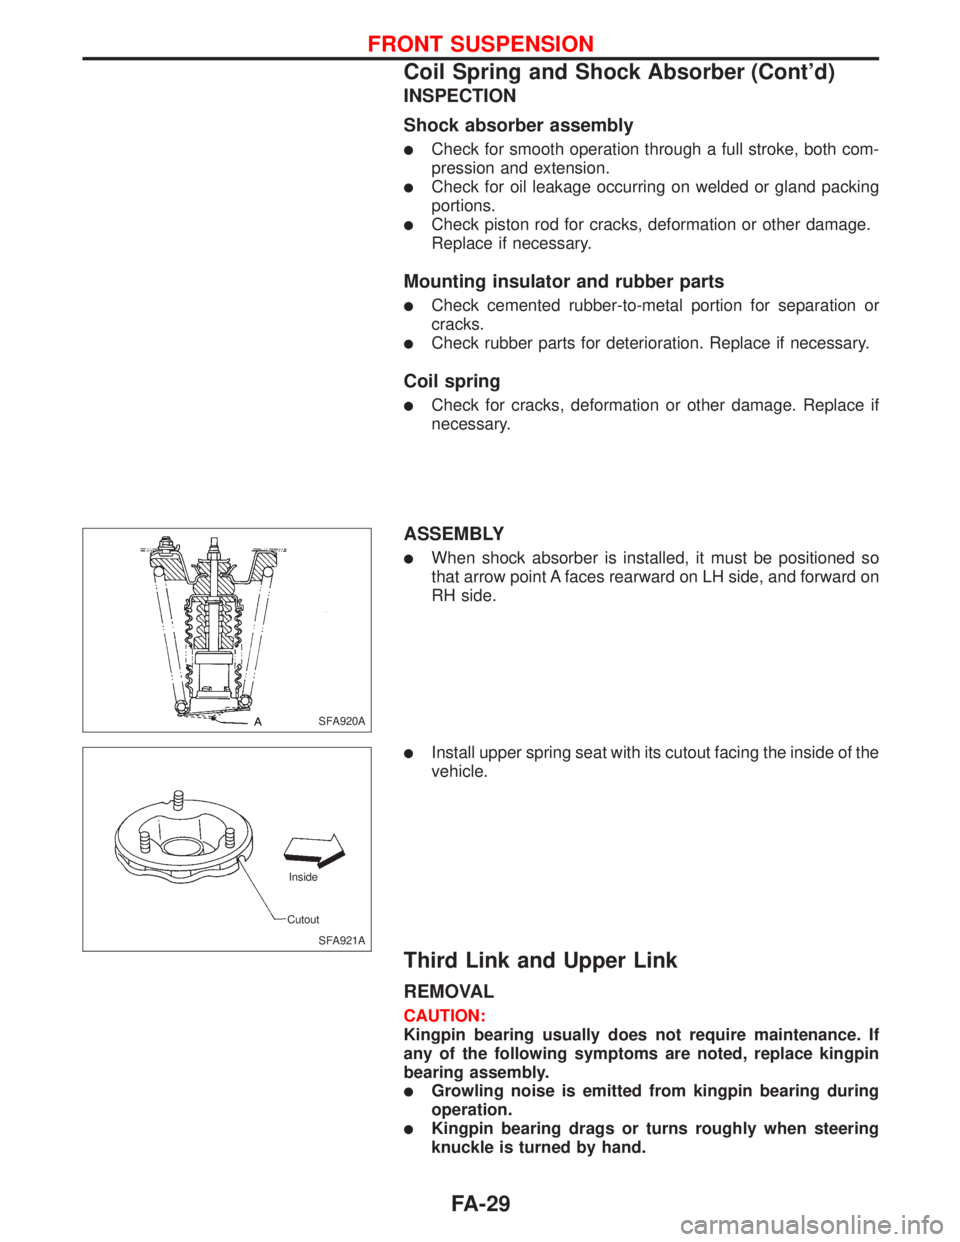
lWhen shock absorber is installed, it must be positioned so
that arrow point A faces rearward on LH side, and forward on
RH side.
lInstall upper spring seat with its cutout facing the inside of the
vehicle.
Third Link and Upper Link
REMOVAL
CAUTION:
Kingpin bearing usually does not require maintenance. If
any of the following symptoms are noted, replace kingpin
bearing assembly.
lGrowling noise is emitted from kingpin bearing during
operation.
lKingpin bearing drags or turns roughly when steering
knuckle is turned by hand.
SFA920A
SFA921A Inside
Cutout
FRONT SUSPENSION
Coil Spring and Shock Absorber (Cont'd)
FA-29
Page 1772 of 2267
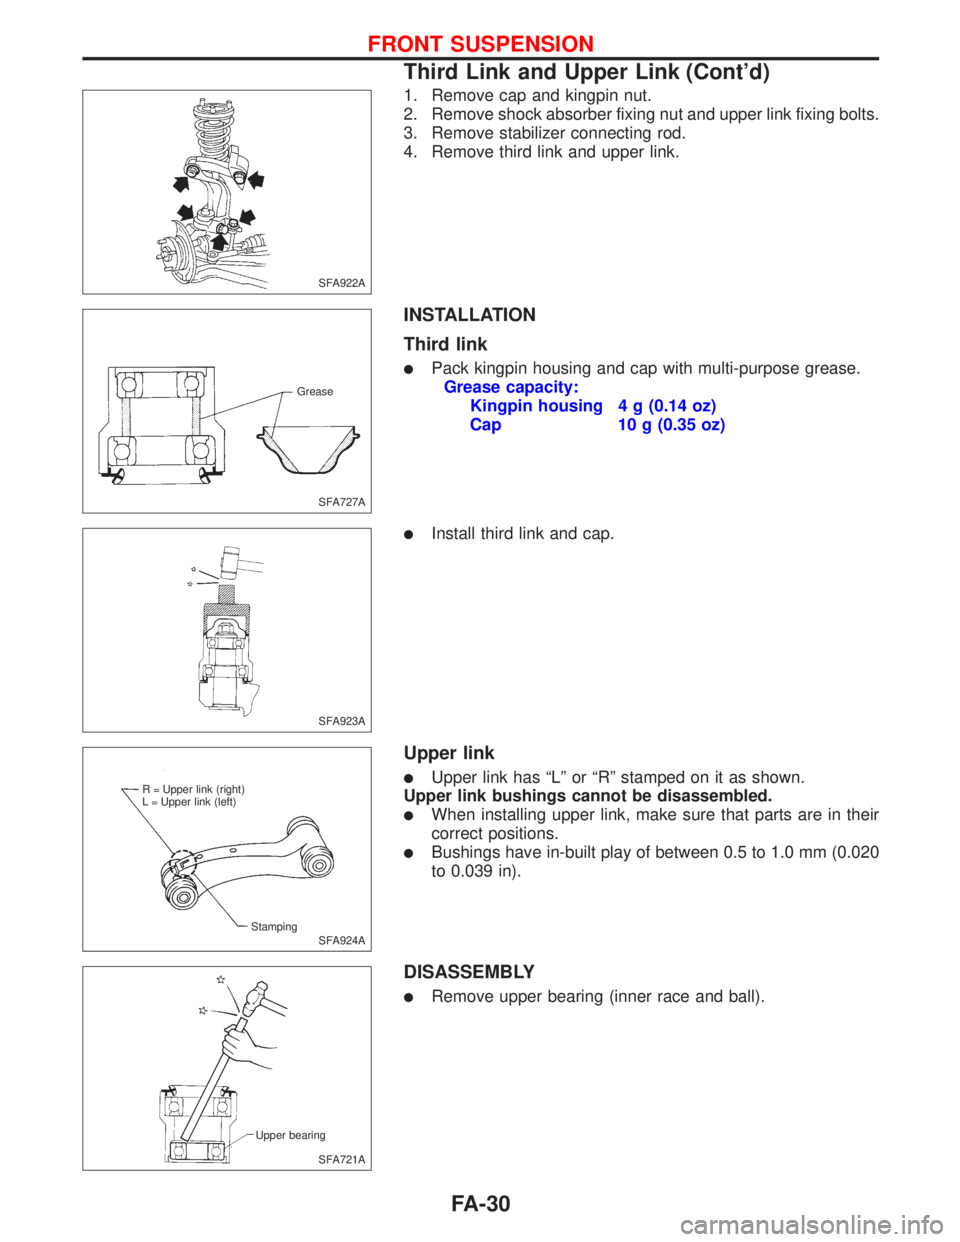
1. Remove cap and kingpin nut.
2. Remove shock absorber fixing nut and upper link fixing bolts.
3. Remove stabilizer connecting rod.
4. Remove third link and upper link.
INSTALLATION
Third link
lPack kingpin housing and cap with multi-purpose grease.
Grease capacity:
Kingpin housing 4 g (0.14 oz)
Cap 10 g (0.35 oz)
lInstall third link and cap.
Upper link
lUpper link has ªLº or ªRº stamped on it as shown.
Upper link bushings cannot be disassembled.
lWhen installing upper link, make sure that parts are in their
correct positions.
lBushings have in-built play of between 0.5 to 1.0 mm (0.020
to 0.039 in).
DISASSEMBLY
lRemove upper bearing (inner race and ball).
SFA922A
SFA727A Grease
SFA923A
SFA924A R = Upper link (right)
L = Upper link (left)
Stamping
SFA721A Upper bearing
FRONT SUSPENSION
Third Link and Upper Link (Cont'd)
FA-30
Page 1773 of 2267
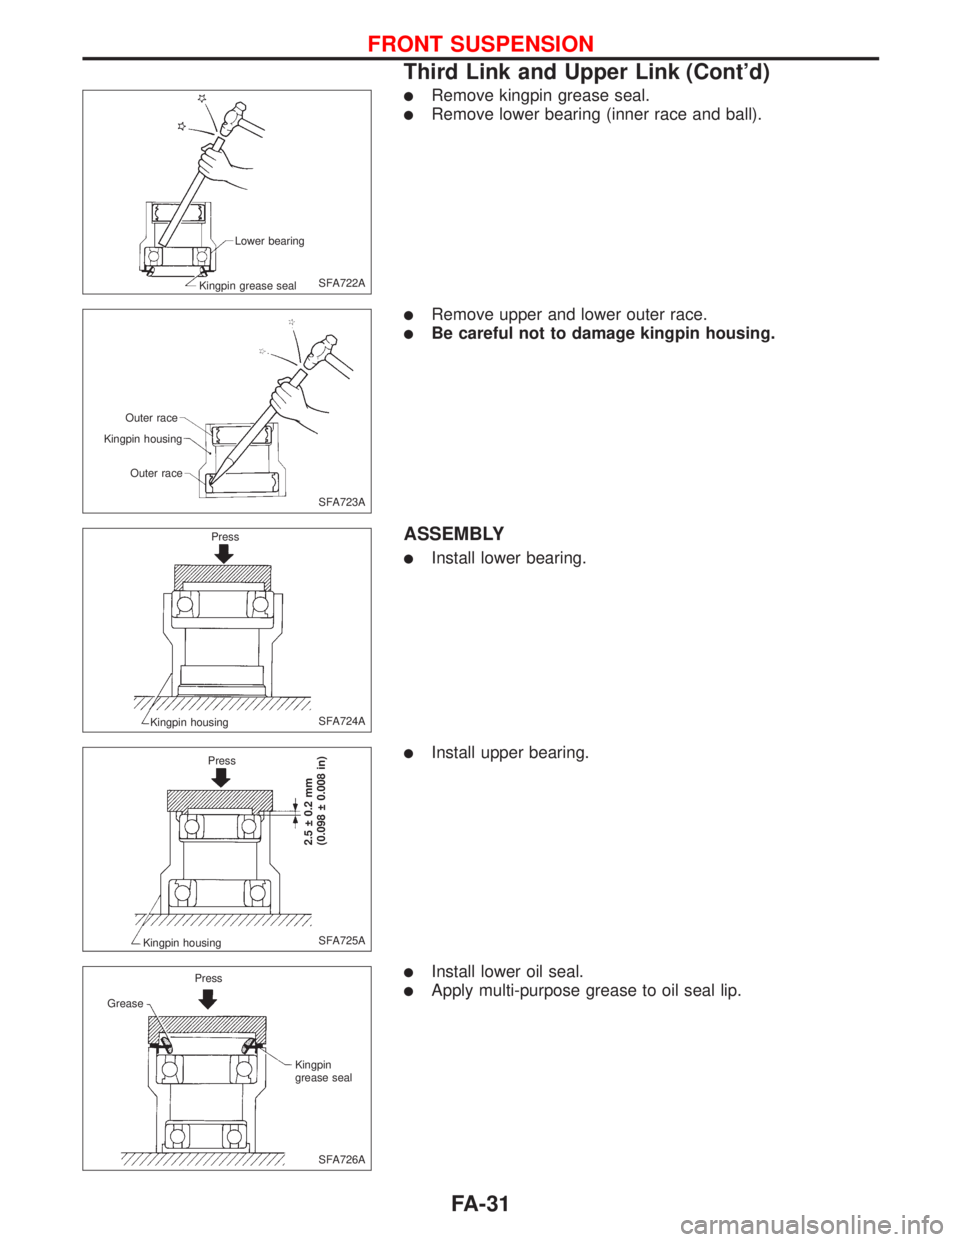
lRemove kingpin grease seal.
lRemove lower bearing (inner race and ball).
lRemove upper and lower outer race.
lBe careful not to damage kingpin housing.
ASSEMBLY
lInstall lower bearing.
lInstall upper bearing.
lInstall lower oil seal.
lApply multi-purpose grease to oil seal lip.
SFA722A Lower bearing
Kingpin grease seal
SFA723A Outer race
Kingpin housing
Outer race
SFA724A Press
Kingpin housing
SFA725A Press
Kingpin housing
2.5 0.2 mm
(0.098 0.008 in)
SFA726A Press
Grease
Kingpin
grease seal
FRONT SUSPENSION
Third Link and Upper Link (Cont'd)
FA-31
Page 1774 of 2267
Transverse Link and Lower Ball Joint
REMOVAL AND INSTALLATION
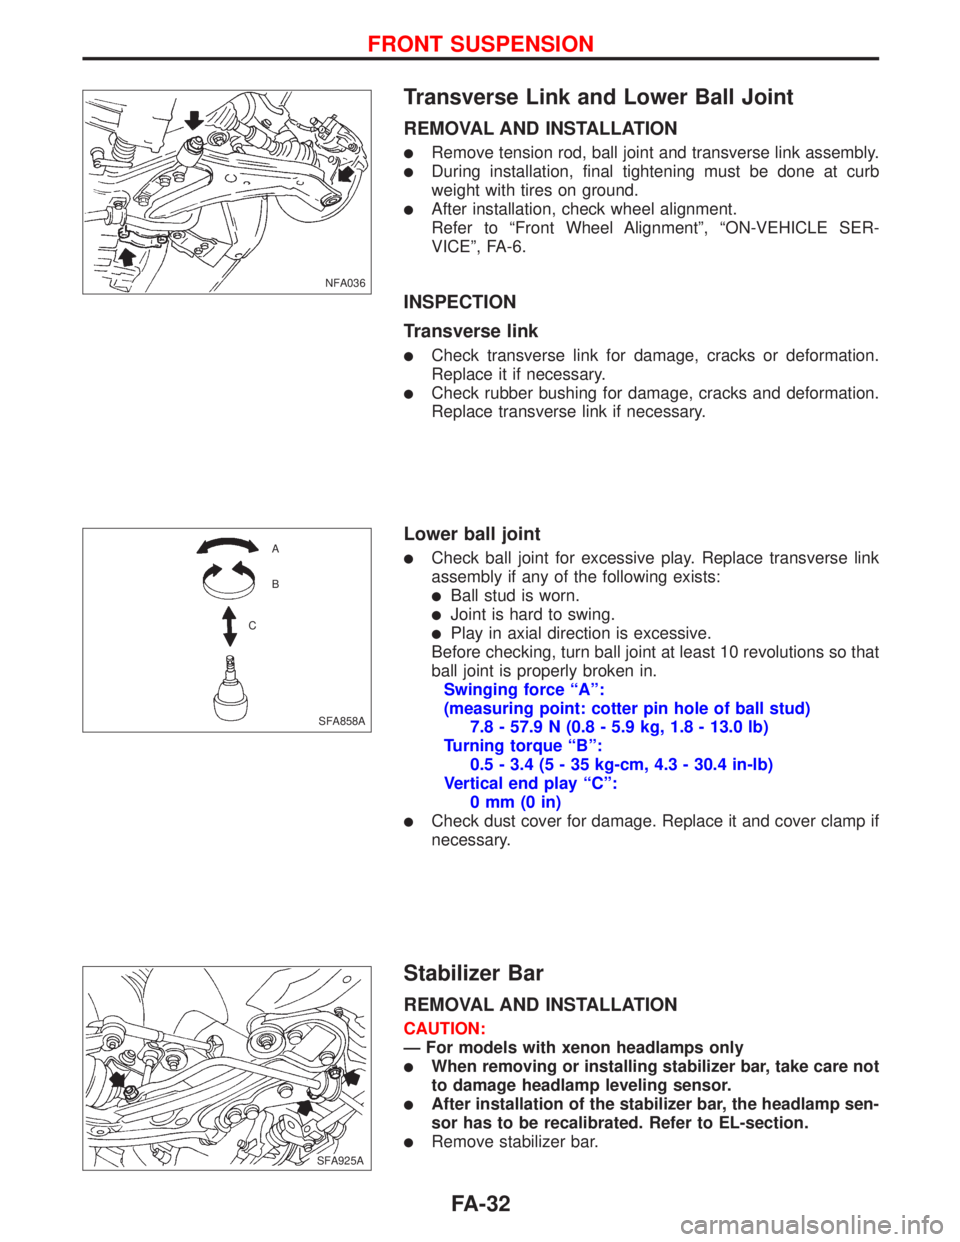
lRemove tension rod, ball joint and transverse link assembly.
lDuring installation, final tightening must be done at curb
weight with tires on ground.
lAfter installation, check wheel alignment.
Refer to ªFront Wheel Alignmentº, ªON-VEHICLE SER-
VICEº, FA-6.
INSPECTION
Transverse link
lCheck transverse link for damage, cracks or deformation.
Replace it if necessary.
lCheck rubber bushing for damage, cracks and deformation.
Replace transverse link if necessary.
Lower ball joint
lCheck ball joint for excessive play. Replace transverse link
assembly if any of the following exists:
lBall stud is worn.
lJoint is hard to swing.
lPlay in axial direction is excessive.
Before checking, turn ball joint at least 10 revolutions so that
ball joint is properly broken in.
Swinging force ªAº:
(measuring point: cotter pin hole of ball stud)
7.8 - 57.9 N (0.8 - 5.9 kg, 1.8 - 13.0 lb)
Turning torque ªBº:
0.5 - 3.4 (5 - 35 kg-cm, 4.3 - 30.4 in-lb)
Vertical end play ªCº:
0mm(0in)
lCheck dust cover for damage. Replace it and cover clamp if
necessary.
Stabilizer Bar
REMOVAL AND INSTALLATION
CAUTION:
Ð For models with xenon headlamps only
lWhen removing or installing stabilizer bar, take care not
to damage headlamp leveling sensor.
lAfter installation of the stabilizer bar, the headlamp sen-
sor has to be recalibrated. Refer to EL-section.
lRemove stabilizer bar.
NFA036
SFA858A A
B
C
.SFA925A
FRONT SUSPENSION
FA-32
Page 1775 of 2267
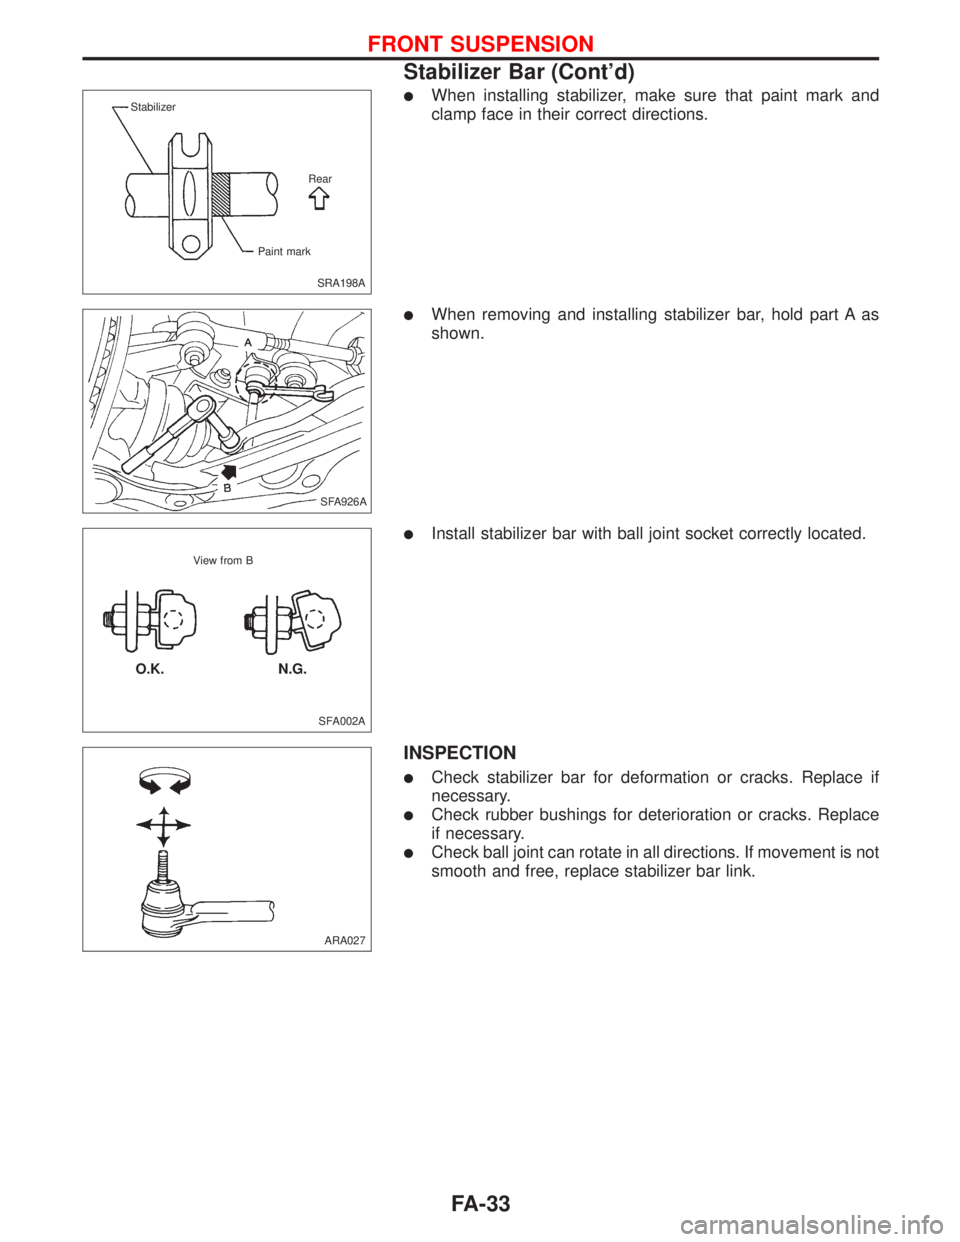
lWhen installing stabilizer, make sure that paint mark and
clamp face in their correct directions.
lWhen removing and installing stabilizer bar, hold part A as
shown.
lInstall stabilizer bar with ball joint socket correctly located.
INSPECTION
lCheck stabilizer bar for deformation or cracks. Replace if
necessary.
lCheck rubber bushings for deterioration or cracks. Replace
if necessary.
lCheck ball joint can rotate in all directions. If movement is not
smooth and free, replace stabilizer bar link.
SRA198A Stabilizer
Rear
Paint mark
.SFA926A
SFA002A View from B
O.K. N.G.
ARA027
FRONT SUSPENSION
Stabilizer Bar (Cont'd)
FA-33
Page 1776 of 2267
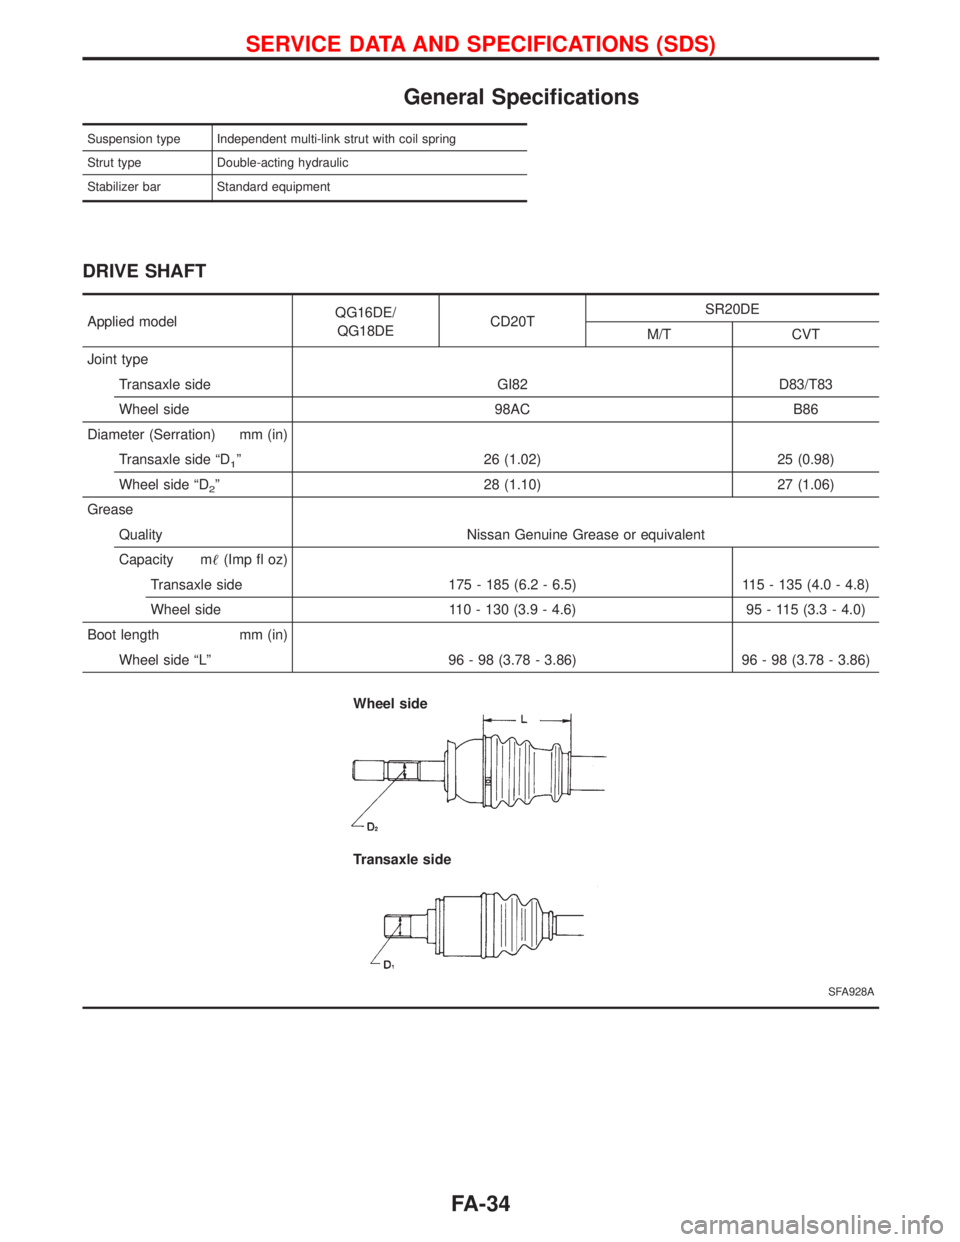
General Specifications
Suspension type Independent multi-link strut with coil spring
Strut type Double-acting hydraulic
Stabilizer bar Standard equipment
DRIVE SHAFT
Applied modelQG16DE/
QG18DECD20TSR20DE
M/T CVT
Joint type
Transaxle side GI82 D83/T83
Wheel side 98AC B86
Diameter (Serration) mm (in)
Transaxle side ªD
1º 26 (1.02) 25 (0.98)
Wheel side ªD
2º 28 (1.10) 27 (1.06)
Grease
Quality Nissan Genuine Grease or equivalent
Capacity m(Imp fl oz)
Transaxle side 175 - 185 (6.2 - 6.5) 115 - 135 (4.0 - 4.8)
Wheel side 110 - 130 (3.9 - 4.6) 95 - 115 (3.3 - 4.0)
Boot length mm (in)
Wheel side ªLº 96 - 98 (3.78 - 3.86) 96 - 98 (3.78 - 3.86)
SFA928A
Wheel side
Transaxle side
SERVICE DATA AND SPECIFICATIONS (SDS)
FA-34
Page 1777 of 2267
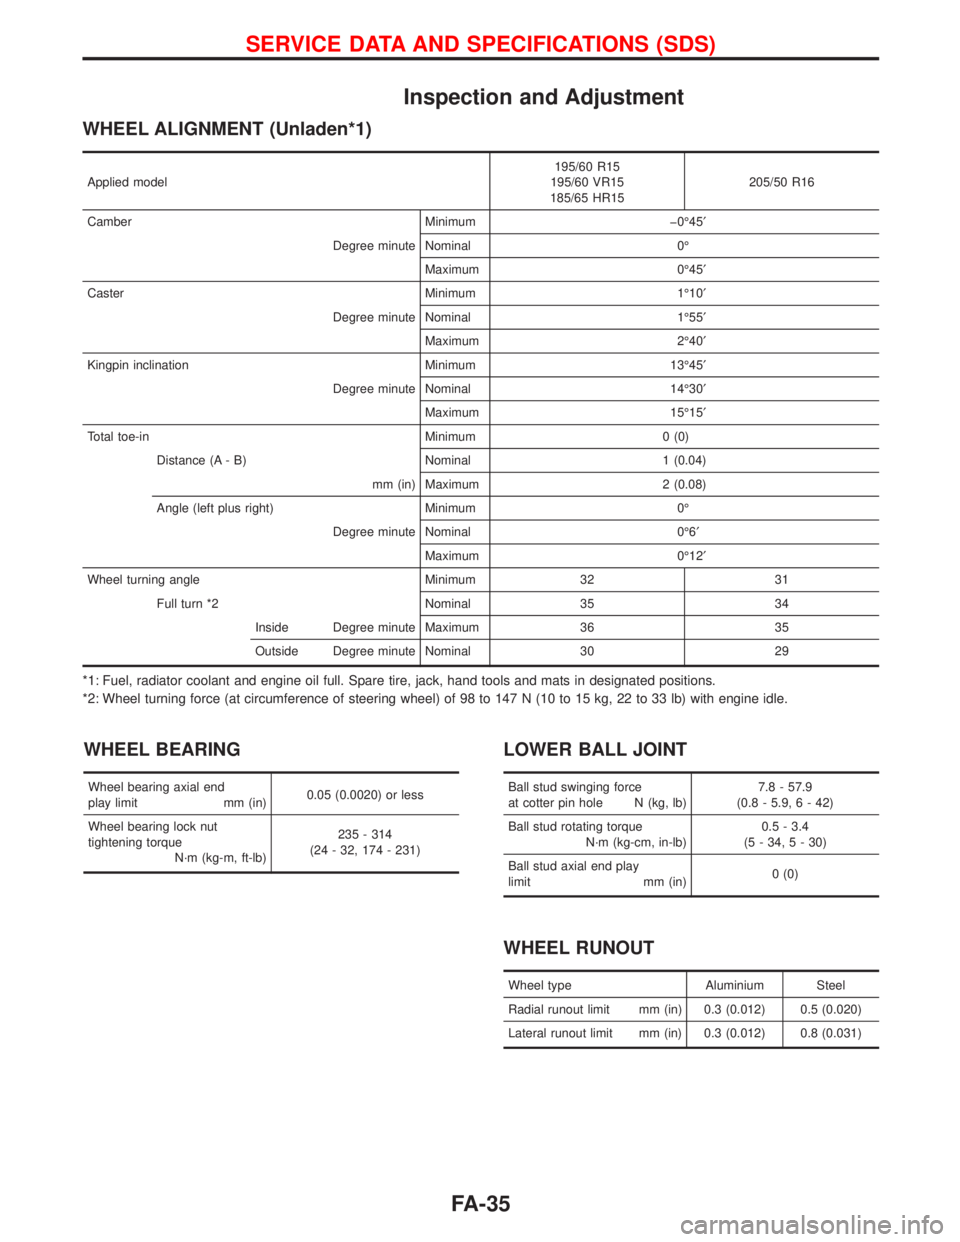
Inspection and Adjustment
WHEEL ALIGNMENT (Unladen*1)
Applied model195/60 R15
195/60 VR15
185/65 HR15205/50 R16
Camber Minimum þ0É45¢
Degree minute Nominal 0É
Maximum 0É45¢
Caster Minimum 1É10¢
Degree minute Nominal 1É55¢
Maximum 2É40¢
Kingpin inclination Minimum 13É45¢
Degree minute Nominal 14É30¢
Maximum 15É15¢
Total toe-in Minimum 0 (0)
Distance (A - B) Nominal 1 (0.04)
mm (in) Maximum 2 (0.08)
Angle (left plus right) Minimum 0É
Degree minute Nominal 0É6¢
Maximum 0É12¢
Wheel turning angle Minimum 32 31
Full turn *2 Nominal 35 34
Inside Degree minute Maximum 36 35
Outside Degree minute Nominal 30 29
*1: Fuel, radiator coolant and engine oil full. Spare tire, jack, hand tools and mats in designated positions.
*2: Wheel turning force (at circumference of steering wheel) of 98 to 147 N (10 to 15 kg, 22 to 33 lb) with engine idle.
WHEEL BEARING
Wheel bearing axial end
play limit mm (in)0.05 (0.0020) or less
Wheel bearing lock nut
tightening torque
N´m (kg-m, ft-lb)235 - 314
(24 - 32, 174 - 231)
LOWER BALL JOINT
Ball stud swinging force
at cotter pin hole N (kg, lb)7.8 - 57.9
(0.8 - 5.9, 6 - 42)
Ball stud rotating torque
N´m (kg-cm, in-lb)0.5 - 3.4
(5 - 34, 5 - 30)
Ball stud axial end play
limit mm (in)0 (0)
WHEEL RUNOUT
Wheel type Aluminium Steel
Radial runout limit mm (in) 0.3 (0.012) 0.5 (0.020)
Lateral runout limit mm (in) 0.3 (0.012) 0.8 (0.031)
SERVICE DATA AND SPECIFICATIONS (SDS)
FA-35
Page 1778 of 2267
NOTE
SERVICE DATA AND SPECIFICATIONS (SDS)
FA-36
Page 1779 of 2267
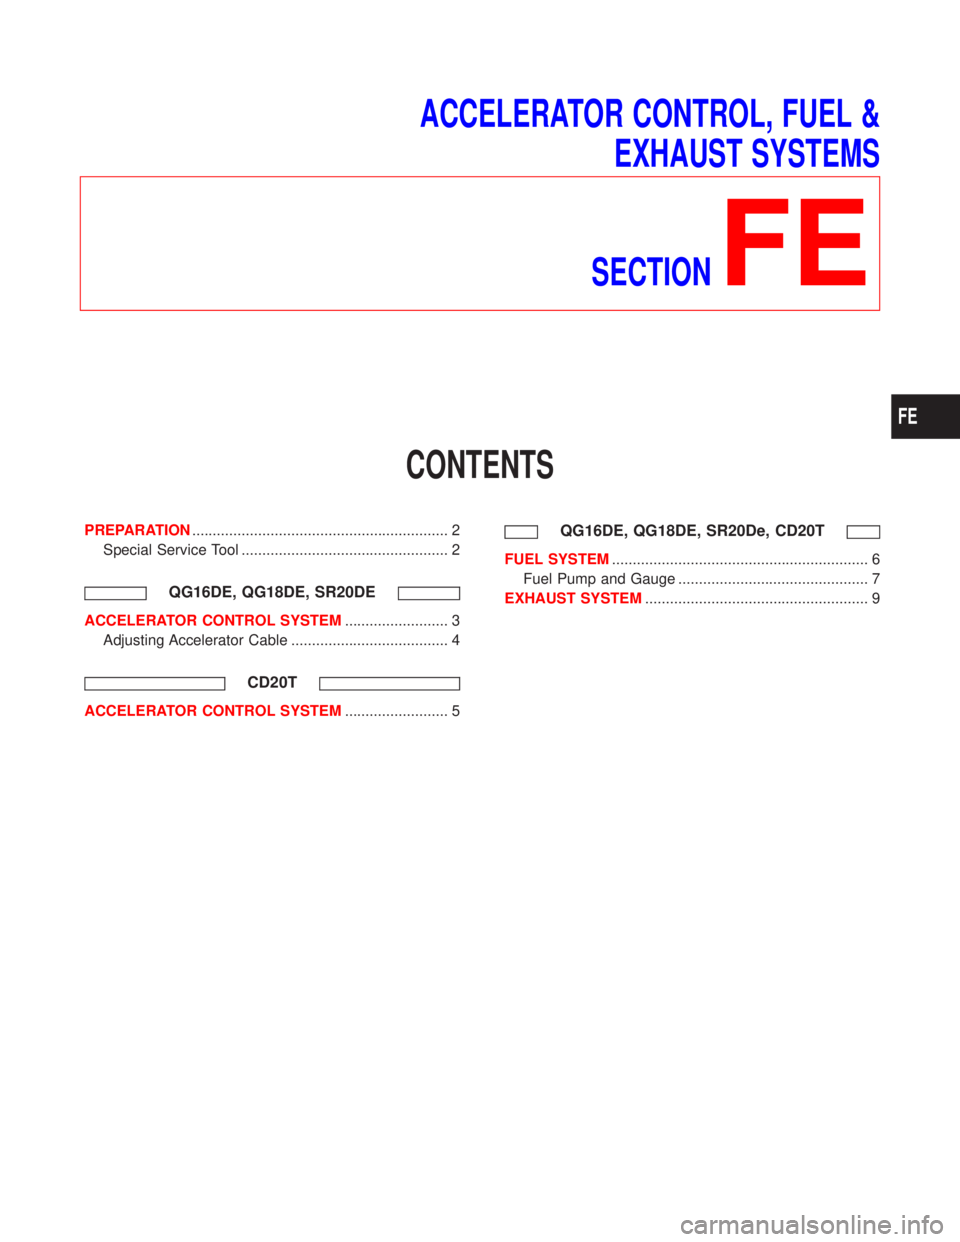
ACCELERATOR CONTROL, FUEL &
EXHAUST SYSTEMS
SECTION
FE
CONTENTS
PREPARATION.............................................................. 2
Special Service Tool .................................................. 2
QG16DE, QG18DE, SR20DE
ACCELERATOR CONTROL SYSTEM......................... 3
Adjusting Accelerator Cable ...................................... 4
CD20T
ACCELERATOR CONTROL SYSTEM......................... 5
QG16DE, QG18DE, SR20De, CD20T
FUEL SYSTEM.............................................................. 6
Fuel Pump and Gauge .............................................. 7
EXHAUST SYSTEM...................................................... 9
FE
Page 1780 of 2267
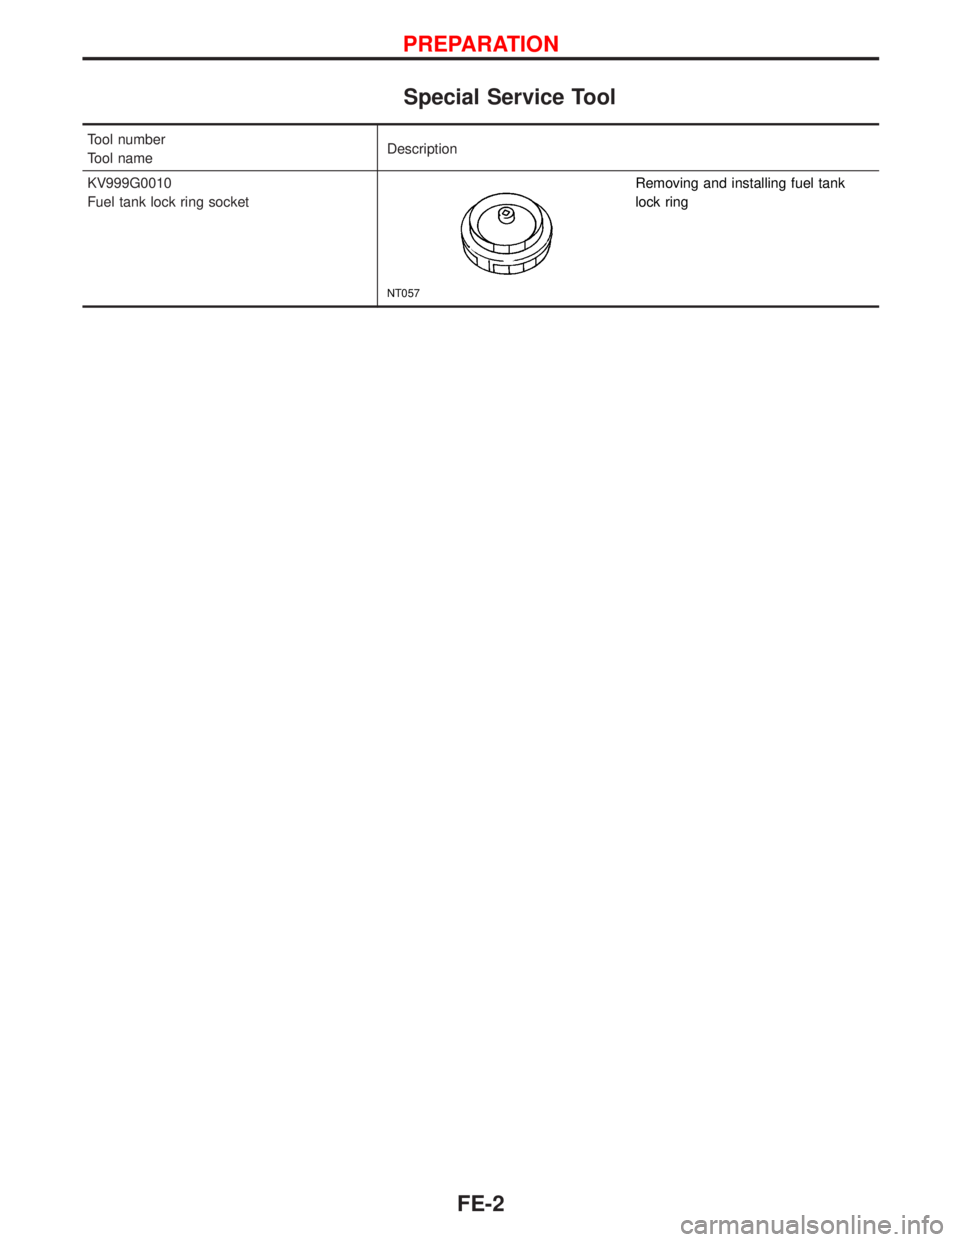
Special Service Tool
Tool number
Tool nameDescription
KV999G0010
Fuel tank lock ring socket
NT057
Removing and installing fuel tank
lock ring
PREPARATION
FE-2