NISSAN TEANA 2008 Service Manual
Manufacturer: NISSAN, Model Year: 2008, Model line: TEANA, Model: NISSAN TEANA 2008Pages: 5121, PDF Size: 69.03 MB
Page 2421 of 5121
EXT-32
< ON-VEHICLE REPAIR >
DRIP MOLDING
DRIP MOLDING
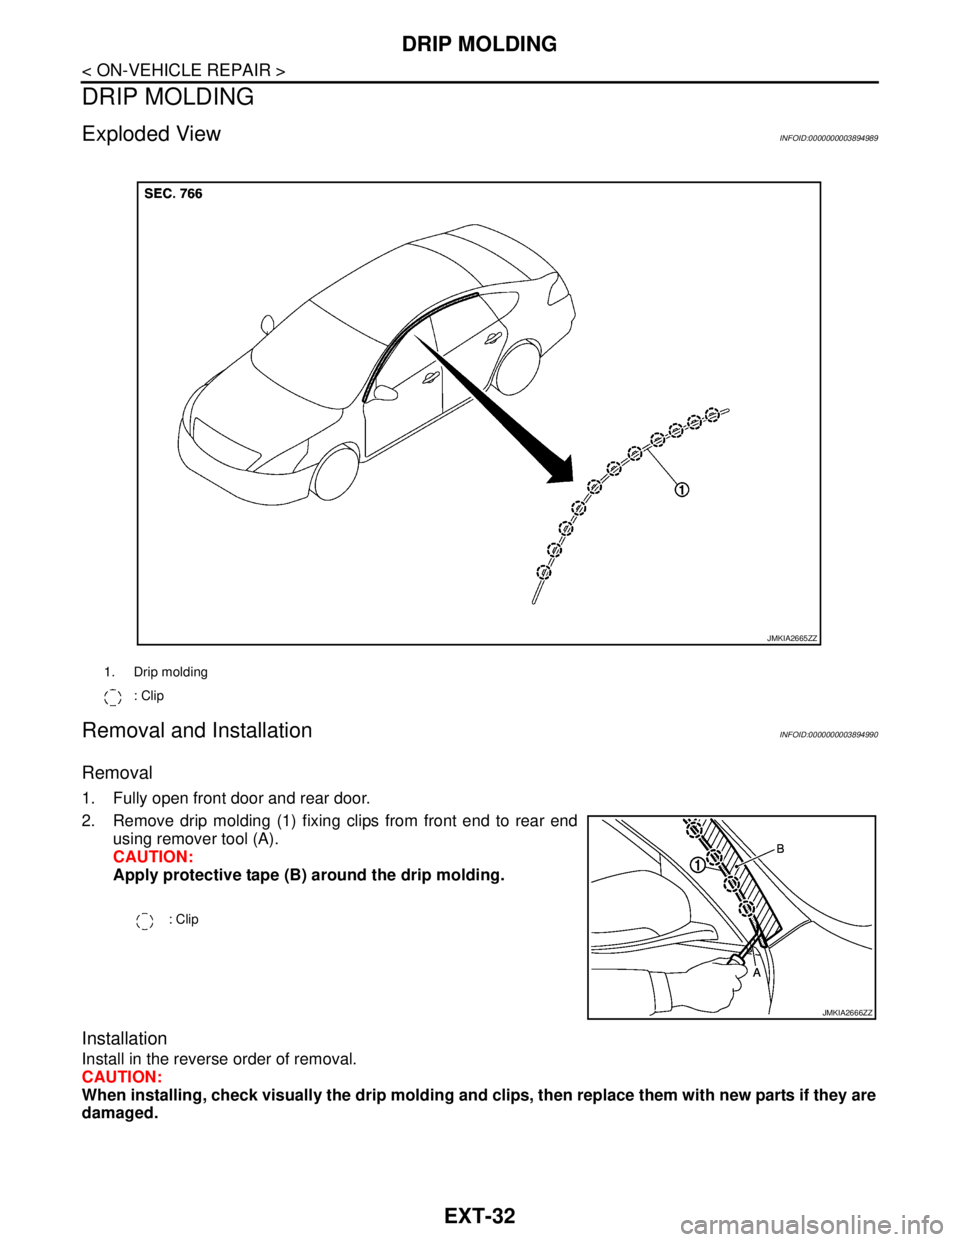
Exploded ViewINFOID:0000000003894989
Removal and InstallationINFOID:0000000003894990
Removal
1. Fully open front door and rear door.
2. Remove drip molding (1) fixing clips from front end to rear end
using remover tool (A).
CAUTION:
Apply protective tape (B) around the drip molding.
Installation
Install in the reverse order of removal.
CAUTION:
When installing, check visually the drip molding and clips, then replace them with new parts if they are
damaged.
1. Drip molding
: Clip
JMKIA2665ZZ
: Clip
JMKIA2666ZZ
Page 2422 of 5121
DOOR OUTSIDE MOLDING
EXT-33
< ON-VEHICLE REPAIR >
C
D
E
F
G
H
I
J
L
MA
B
EXT
N
O
P
DOOR OUTSIDE MOLDING
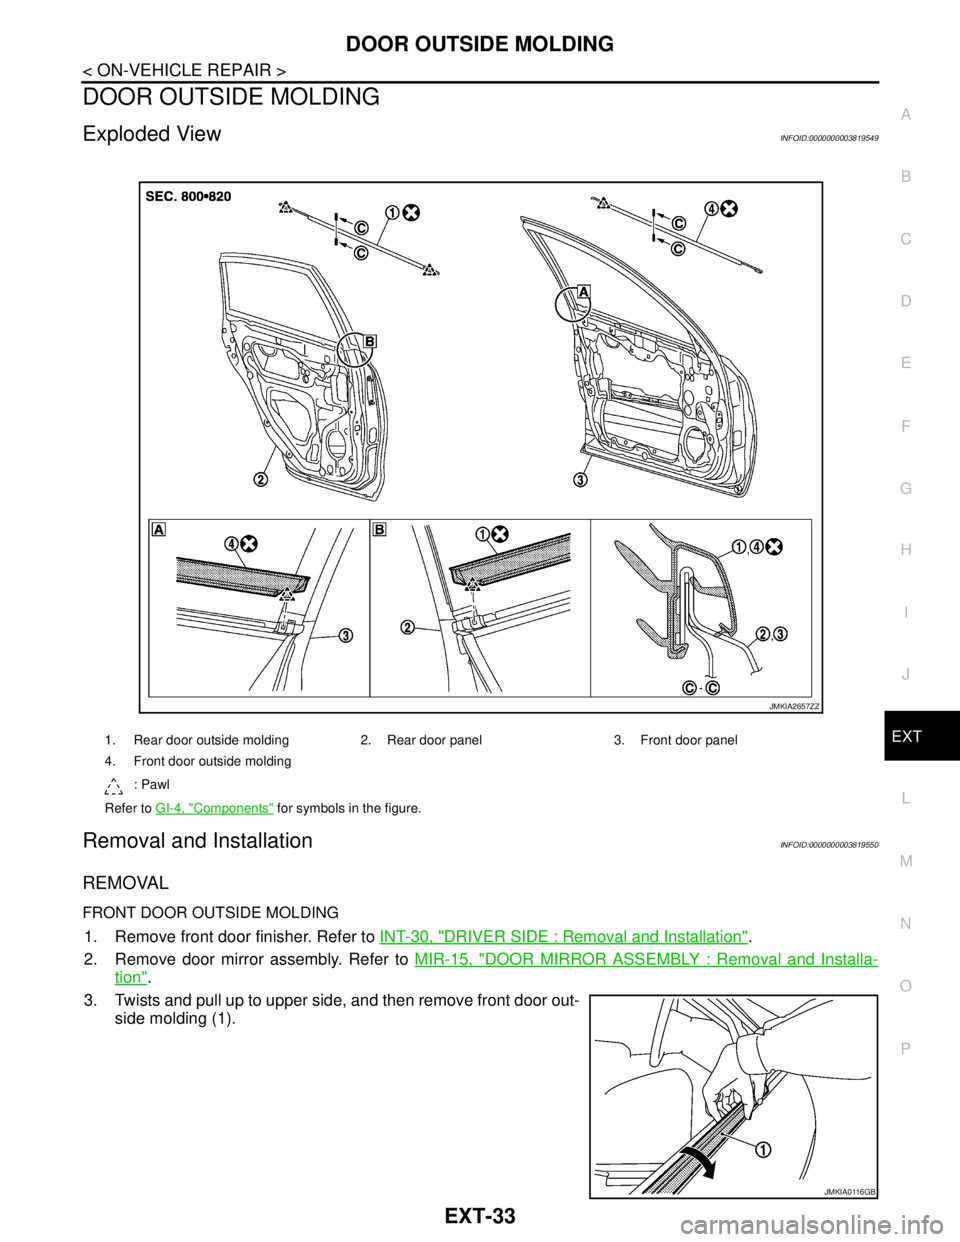
Exploded ViewINFOID:0000000003819549
Removal and InstallationINFOID:0000000003819550
REMOVAL
FRONT DOOR OUTSIDE MOLDING
1. Remove front door finisher. Refer to INT-30, "DRIVER SIDE : Removal and Installation".
2. Remove door mirror assembly. Refer to MIR-15, "
DOOR MIRROR ASSEMBLY : Removal and Installa-
tion".
3. Twists and pull up to upper side, and then remove front door out-
side molding (1).
1. Rear door outside molding 2. Rear door panel 3. Front door panel
4. Front door outside molding
: Pawl
Refer to GI-4, "
Components" for symbols in the figure.
JMKIA2657ZZ
JMKIA0116GB
Page 2423 of 5121
EXT-34
< ON-VEHICLE REPAIR >
DOOR OUTSIDE MOLDING
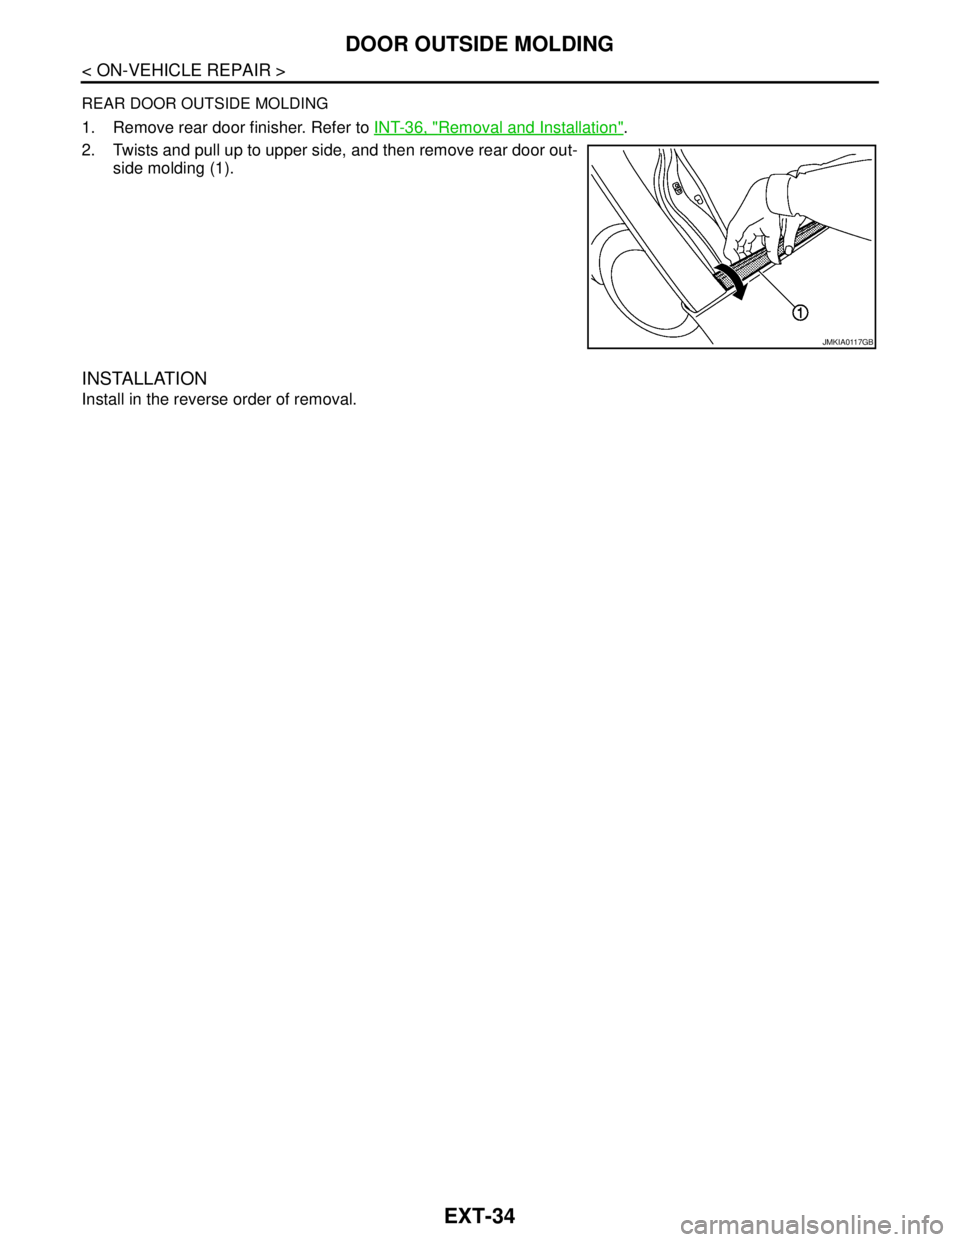
REAR DOOR OUTSIDE MOLDING
1. Remove rear door finisher. Refer to INT-36, "Removal and Installation".
2. Twists and pull up to upper side, and then remove rear door out-
side molding (1).
INSTALLATION
Install in the reverse order of removal.
JMKIA0117GB
Page 2424 of 5121
DOOR PARTING SEAL
EXT-35
< ON-VEHICLE REPAIR >
C
D
E
F
G
H
I
J
L
MA
B
EXT
N
O
P
DOOR PARTING SEAL
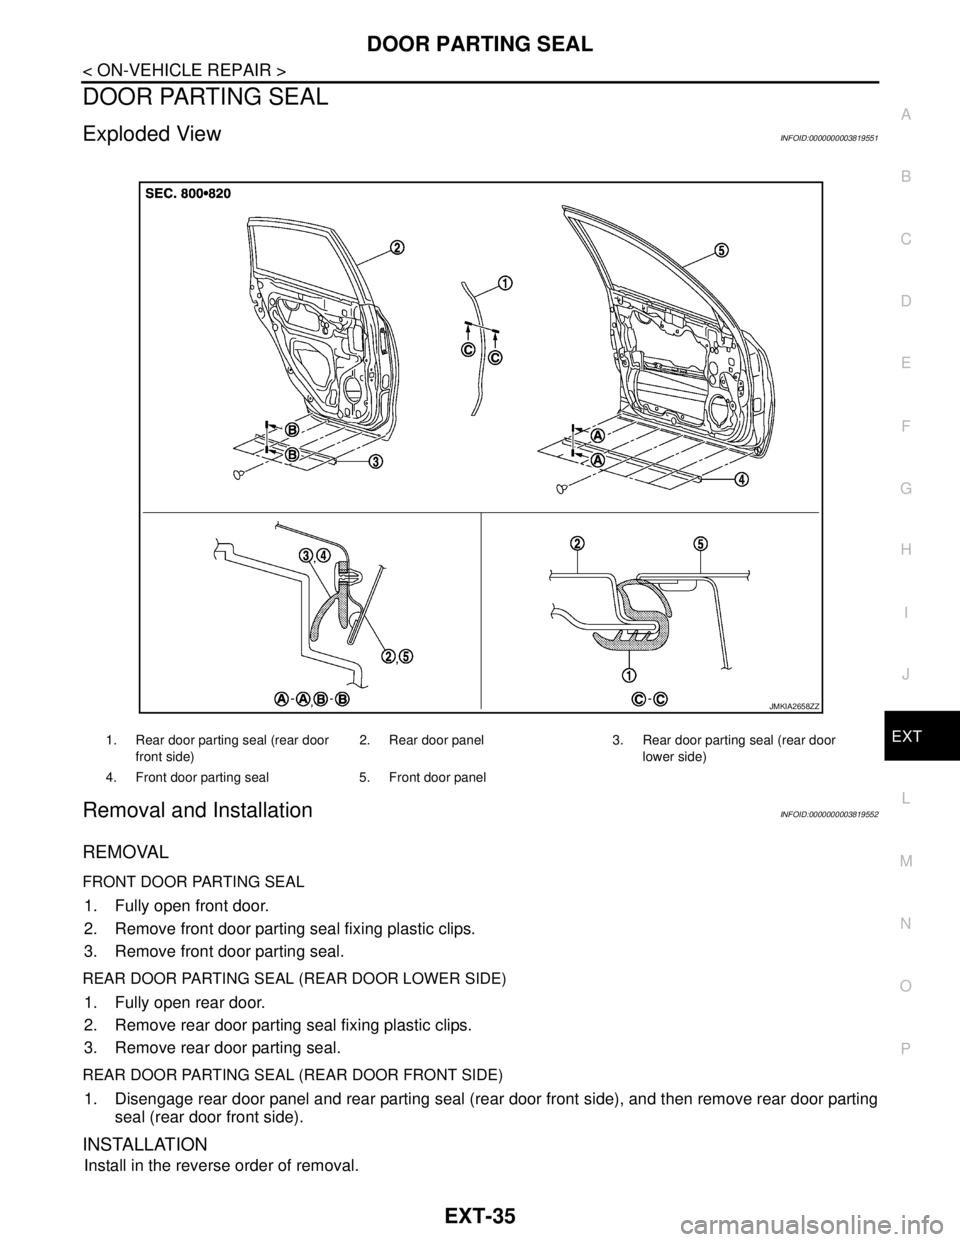
Exploded ViewINFOID:0000000003819551
Removal and InstallationINFOID:0000000003819552
REMOVAL
FRONT DOOR PARTING SEAL
1. Fully open front door.
2. Remove front door parting seal fixing plastic clips.
3. Remove front door parting seal.
REAR DOOR PARTING SEAL (REAR DOOR LOWER SIDE)
1. Fully open rear door.
2. Remove rear door parting seal fixing plastic clips.
3. Remove rear door parting seal.
REAR DOOR PARTING SEAL (REAR DOOR FRONT SIDE)
1. Disengage rear door panel and rear parting seal (rear door front side), and then remove rear door parting
seal (rear door front side).
INSTALLATION
Install in the reverse order of removal.
1. Rear door parting seal (rear door
front side)2. Rear door panel 3. Rear door parting seal (rear door
lower side)
4. Front door parting seal 5. Front door panel
JMKIA2658ZZ
Page 2425 of 5121
EXT-36
< ON-VEHICLE REPAIR >
SIDE GUARD MOLDING
SIDE GUARD MOLDING
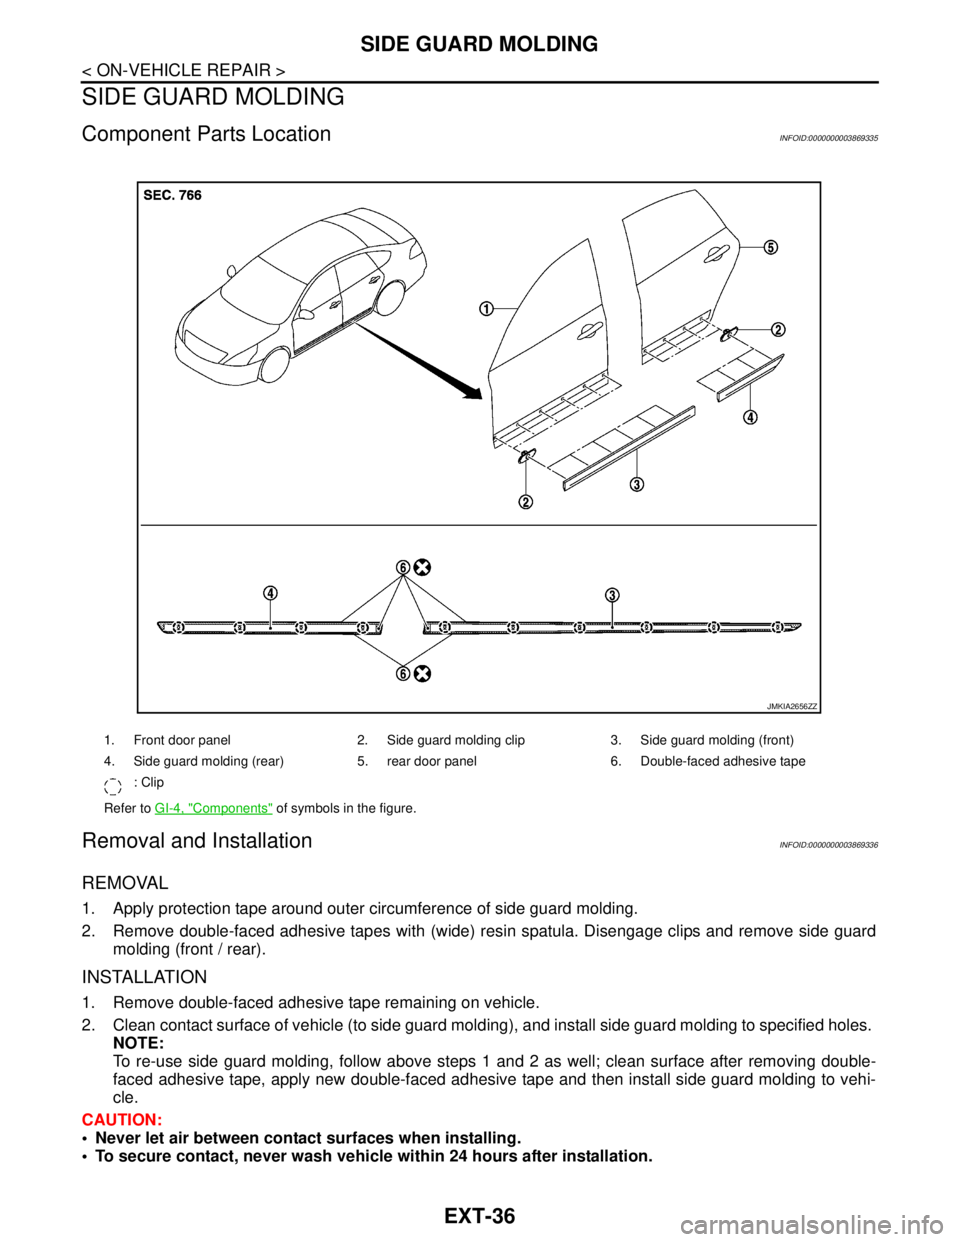
Component Parts LocationINFOID:0000000003869335
Removal and InstallationINFOID:0000000003869336
REMOVAL
1. Apply protection tape around outer circumference of side guard molding.
2. Remove double-faced adhesive tapes with (wide) resin spatula. Disengage clips and remove side guard
molding (front / rear).
INSTALLATION
1. Remove double-faced adhesive tape remaining on vehicle.
2. Clean contact surface of vehicle (to side guard molding), and install side guard molding to specified holes.
NOTE:
To re-use side guard molding, follow above steps 1 and 2 as well; clean surface after removing double-
faced adhesive tape, apply new double-faced adhesive tape and then install side guard molding to vehi-
cle.
CAUTION:
Never let air between contact surfaces when installing.
To secure contact, never wash vehicle within 24 hours after installation.
1. Front door panel 2. Side guard molding clip 3. Side guard molding (front)
4. Side guard molding (rear) 5. rear door panel 6. Double-faced adhesive tape
: Clip
Refer to GI-4, "
Components" of symbols in the figure.
JMKIA2656ZZ
Page 2426 of 5121
SIDE GUARD MOLDING
EXT-37
< ON-VEHICLE REPAIR >
C
D
E
F
G
H
I
J
L
MA
B
EXT
N
O
P
When installing, visually check the side guard molding and the clips, then replace them with new
parts if they are damaged.
Page 2427 of 5121
EXT-38
< ON-VEHICLE REPAIR >
TRUNK LID FINISHER
TRUNK LID FINISHER
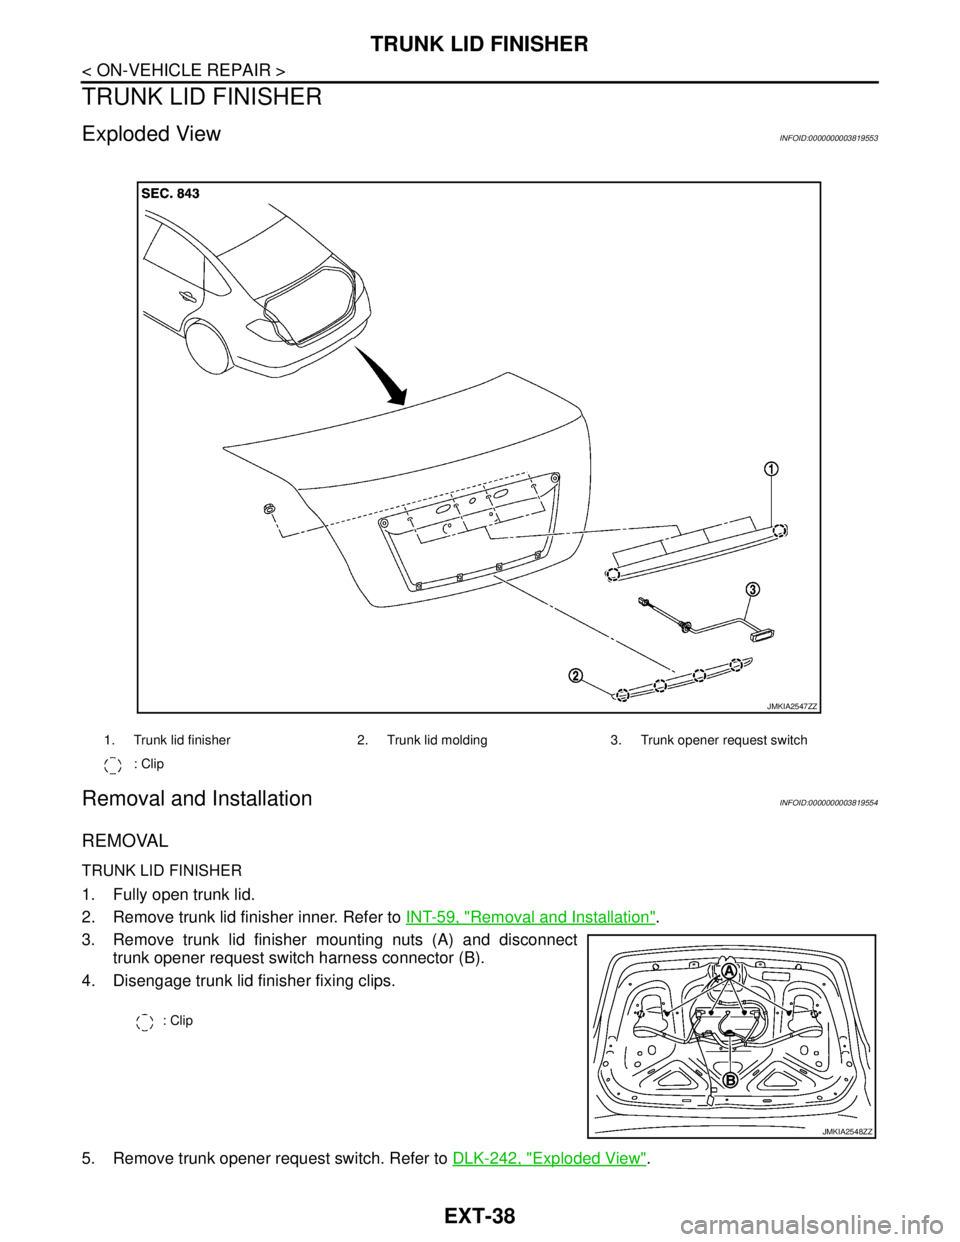
Exploded ViewINFOID:0000000003819553
Removal and InstallationINFOID:0000000003819554
REMOVAL
TRUNK LID FINISHER
1. Fully open trunk lid.
2. Remove trunk lid finisher inner. Refer to INT-59, "
Removal and Installation".
3. Remove trunk lid finisher mounting nuts (A) and disconnect
trunk opener request switch harness connector (B).
4. Disengage trunk lid finisher fixing clips.
5. Remove trunk opener request switch. Refer to DLK-242, "
Exploded View".
1. Trunk lid finisher 2. Trunk lid molding 3. Trunk opener request switch
: Clip
JMKIA2547ZZ
: Clip
JMKIA2548ZZ
Page 2428 of 5121
TRUNK LID FINISHER
EXT-39
< ON-VEHICLE REPAIR >
C
D
E
F
G
H
I
J
L
MA
B
EXT
N
O
P TRUNK LID MOLDING
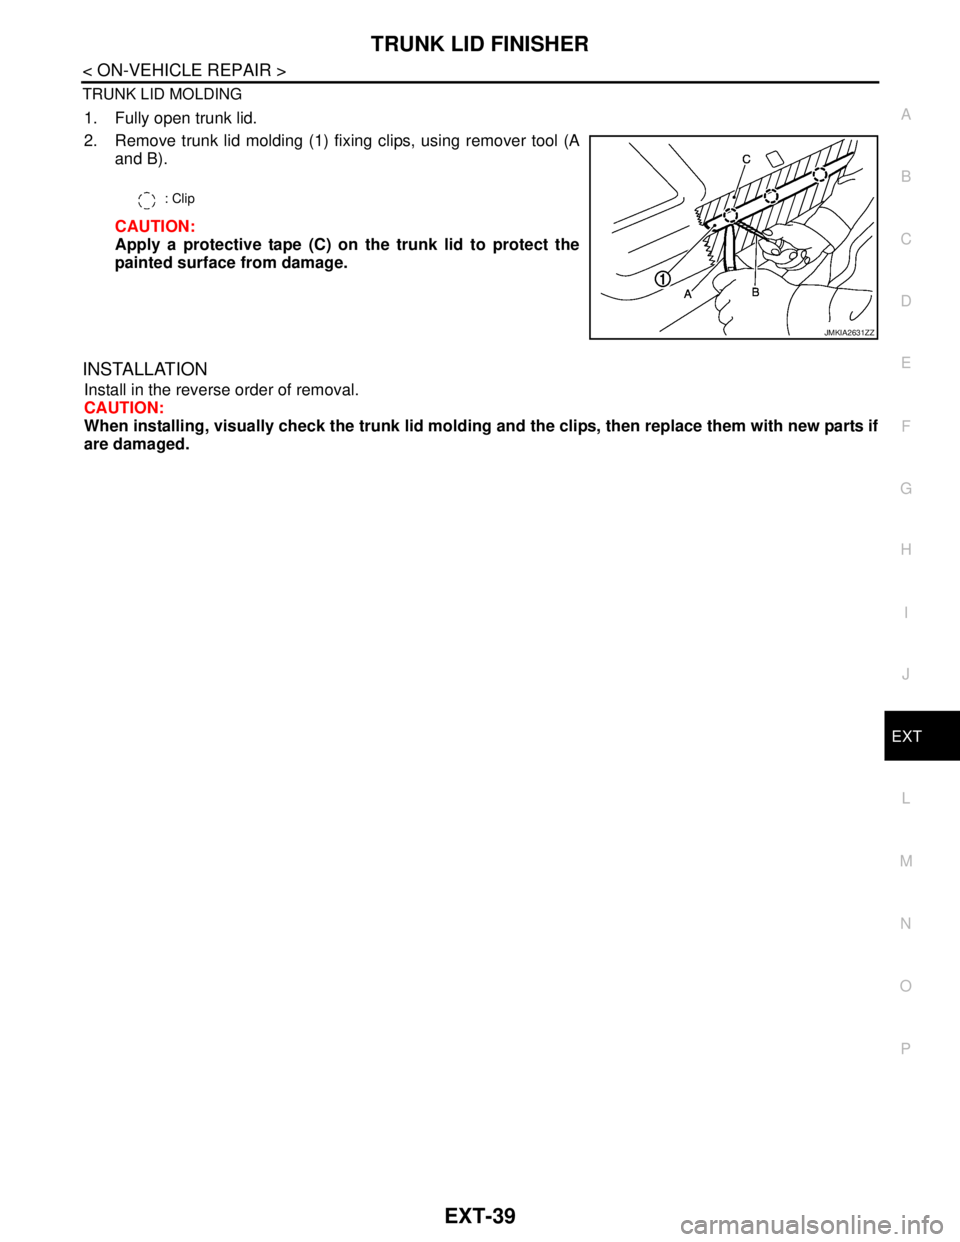
1. Fully open trunk lid.
2. Remove trunk lid molding (1) fixing clips, using remover tool (A
and B).
CAUTION:
Apply a protective tape (C) on the trunk lid to protect the
painted surface from damage.
INSTALLATION
Install in the reverse order of removal.
CAUTION:
When installing, visually check the trunk lid molding and the clips, then replace them with new parts if
are damaged.
: Clip
JMKIA2631ZZ
Page 2429 of 5121
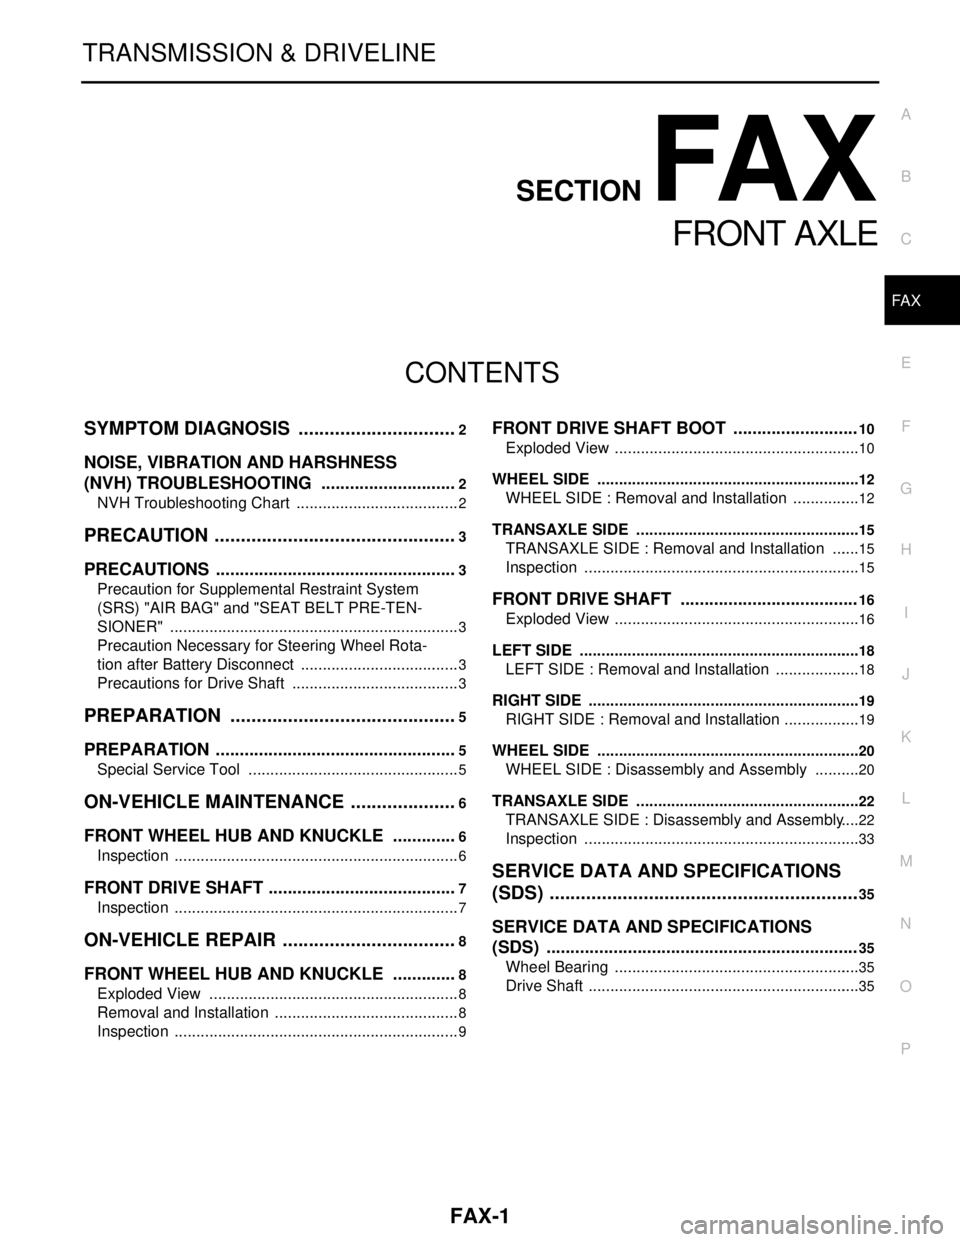
FAX-1
TRANSMISSION & DRIVELINE
CEF
G H
I
J
K L
M
SECTION FA X
A
B
FA X
N
O P
CONTENTS
FRONT AXLE
SYMPTOM DIAGNOSIS ..... ..........................2
NOISE, VIBRATION AND HARSHNESS
(NVH) TROUBLESHOOTING ........................ .....
2
NVH Troubleshooting Chart ................................ ......2
PRECAUTION ...............................................3
PRECAUTIONS .............................................. .....3
Precaution for Supplemental Restraint System
(SRS) "AIR BAG" and "SEAT BELT PRE-TEN-
SIONER" ............................................................. ......
3
Precaution Necessary for Steering Wheel Rota-
tion after Battery Disconnect .....................................
3
Precautions for Drive Shaft .......................................3
PREPARATION ............................................5
PREPARATION .............................................. .....5
Special Service Tool ........................................... ......5
ON-VEHICLE MAINTENANCE .....................6
FRONT WHEEL HUB AND KNUCKLE ......... .....6
Inspection ............................................................ ......6
FRONT DRIVE SHAFT ........................................7
Inspection ............................................................ ......7
ON-VEHICLE REPAIR ..................................8
FRONT WHEEL HUB AND KNUCKLE ......... .....8
Exploded View .................................................... ......8
Removal and Installation ...........................................8
Inspection ..................................................................9
FRONT DRIVE SHAFT BOOT ..........................10
Exploded View ..................................................... ....10
WHEEL SIDE ......................................................... ....12
WHEEL SIDE : Removal and Installation ................12
TRANSAXLE SIDE ................................................ ....15
TRANSAXLE SIDE : Removal and Installation .......15
Inspection ............................................................ ....15
FRONT DRIVE SHAFT .....................................16
Exploded View .........................................................16
LEFT SIDE ............................................................. ....18
LEFT SIDE : Removal and Installation ....................18
RIGHT SIDE ........................................................... ....19
RIGHT SIDE : Removal and Installation ..................19
WHEEL SIDE ......................................................... ....20
WHEEL SIDE : Disassembly and Assembly ...........20
TRANSAXLE SIDE ................................................ ....22
TRANSAXLE SIDE : Disassembly and Assembly ....22
Inspection ............................................................ ....33
SERVICE DATA AND SPECIFICATIONS
(SDS) ............... .............................................
35
SERVICE DATA AND SPECIFICATIONS
(SDS) .................................................................
35
Wheel Bearing ..................................................... ....35
Drive Shaft ...............................................................35
Page 2430 of 5121
FAX-2
< SYMPTOM DIAGNOSIS >
NOISE, VIBRATION AND HARSHNESS (NVH) TROUBLESHOOTING
SYMPTOM DIAGNOSIS
NOISE, VIBRATION AND HARSHNESS (NVH) TROUBLESHOOTING
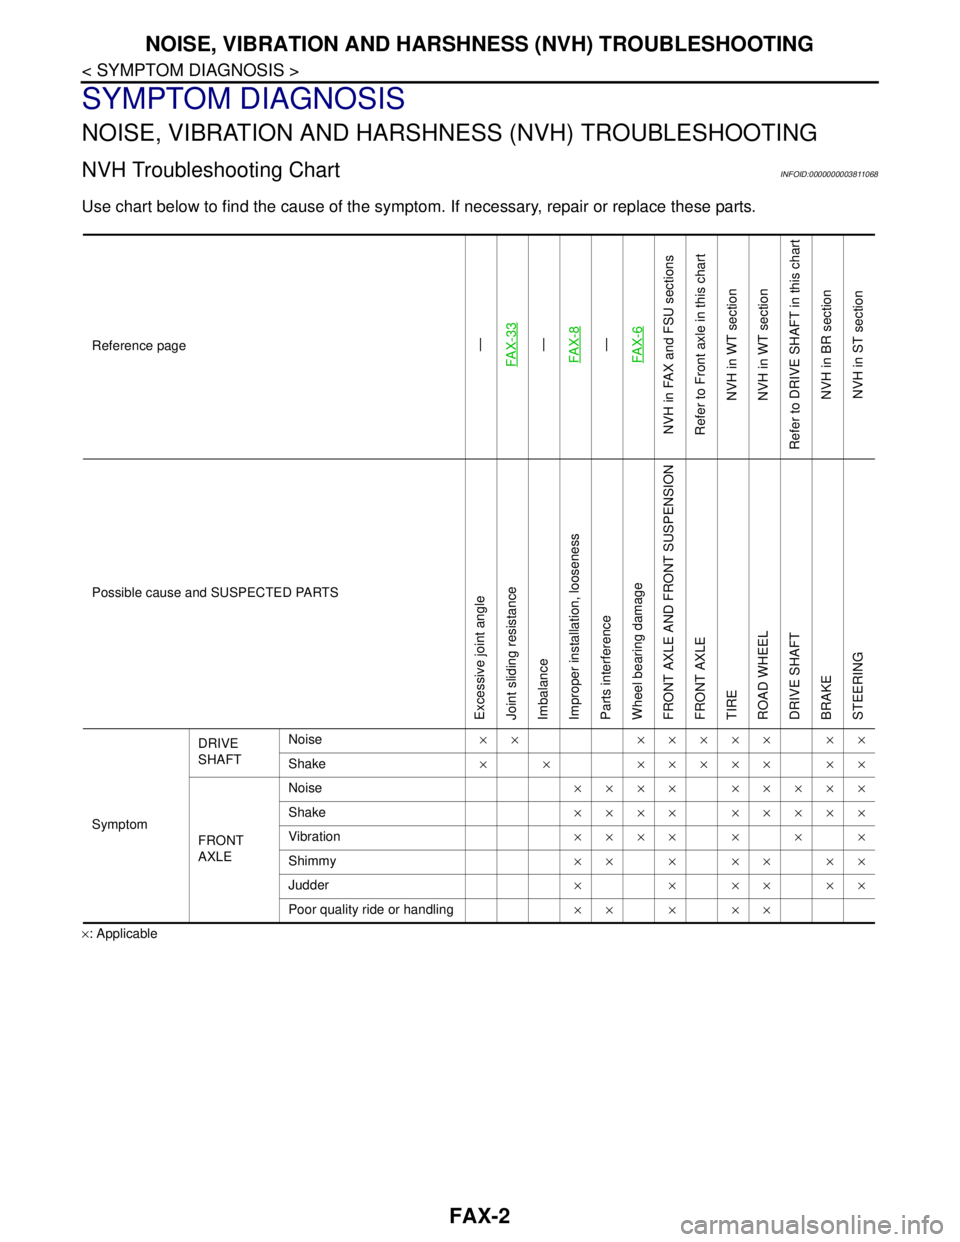
NVH Troubleshooting ChartINFOID:0000000003811068
Use chart below to find the cause of the symptom. If necessary, repair or replace these parts.
×: ApplicableReference page
—
FAX-33—
FAX-8—
FAX-6
NVH in FAX and FSU sections
Refer to Front axle in this chart
NVH in WT section
NVH in WT section
Refer to DRIVE SHAFT in this chart
NVH in BR section
NVH in ST section
Possible cause and SUSPECTED PARTS
Excessive joint angle
Joint sliding resistance
Imbalance
Improper installation, looseness
Parts interference
Wheel bearing damage
FRONT AXLE AND FRONT SUSPENSION
FRONT AXLE
TIRE
ROAD WHEEL
DRIVE SHAFT
BRAKE
STEERING
SymptomDRIVE
SHAFTNoise×× ××××× ××
Shake× × ××××× ××
FRONT
AXLENoise×××× ×××××
Shake×××× ×××××
Vibration×××× × × ×
Shimmy×× × ×× ××
Judder× × ×× ××
Poor quality ride or handling×× × ××