NISSAN TERRANO 2002 Service Repair Manual
Manufacturer: NISSAN, Model Year: 2002, Model line: TERRANO, Model: NISSAN TERRANO 2002Pages: 1767, PDF Size: 41.51 MB
Page 771 of 1767
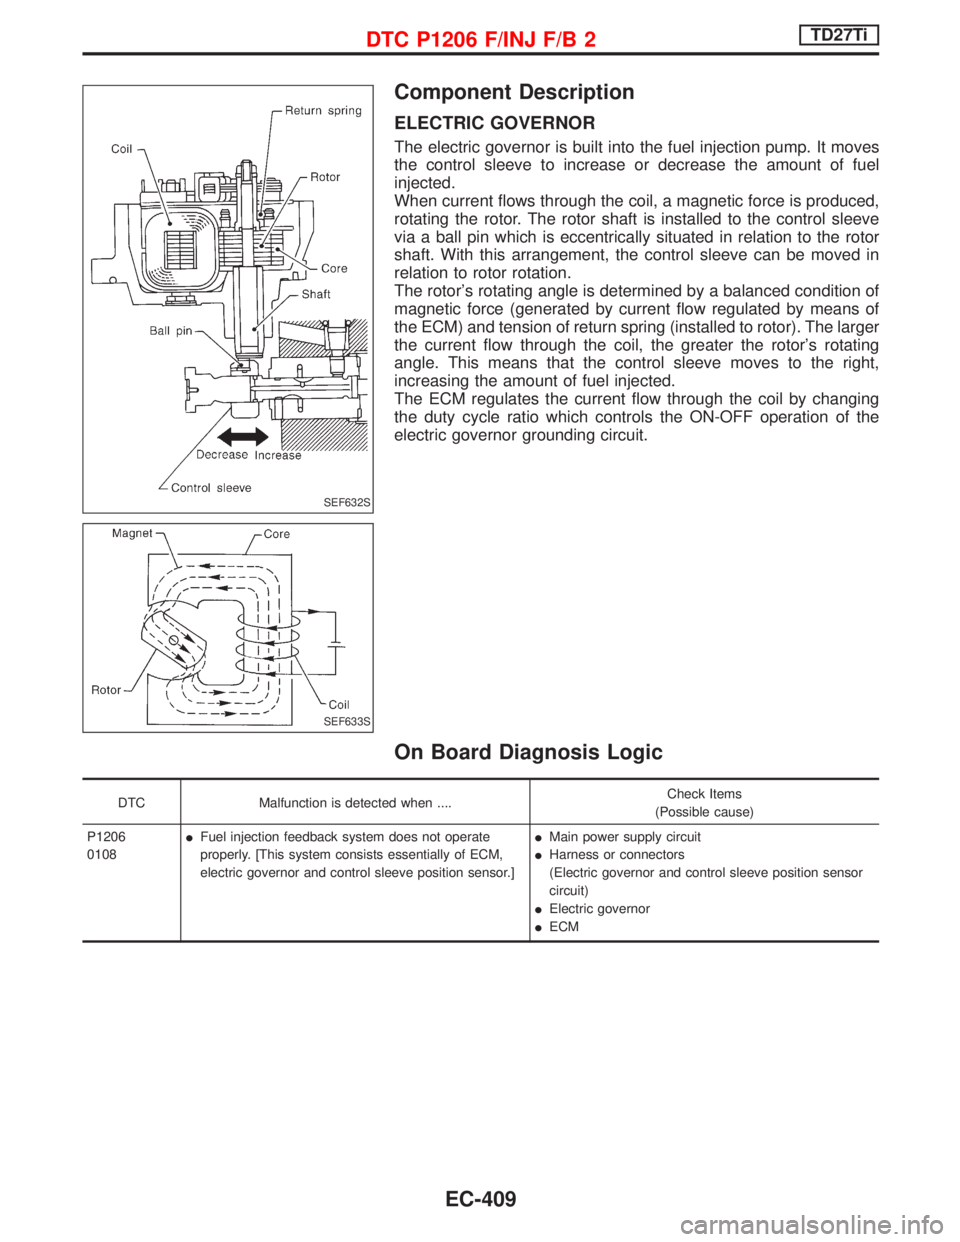
Component Description
ELECTRIC GOVERNOR
The electric governor is built into the fuel injection pump. It moves
the control sleeve to increase or decrease the amount of fuel
injected.
When current flows through the coil, a magnetic force is produced,
rotating the rotor. The rotor shaft is installed to the control sleeve
via a ball pin which is eccentrically situated in relation to the rotor
shaft. With this arrangement, the control sleeve can be moved in
relation to rotor rotation.
The rotor's rotating angle is determined by a balanced condition of
magnetic force (generated by current flow regulated by means of
the ECM) and tension of return spring (installed to rotor). The larger
the current flow through the coil, the greater the rotor's rotating
angle. This means that the control sleeve moves to the right,
increasing the amount of fuel injected.
The ECM regulates the current flow through the coil by changing
the duty cycle ratio which controls the ON-OFF operation of the
electric governor grounding circuit.
On Board Diagnosis Logic
DTC Malfunction is detected when ....Check Items
(Possible cause)
P1206
0108IFuel injection feedback system does not operate
properly. [This system consists essentially of ECM,
electric governor and control sleeve position sensor.]IMain power supply circuit
IHarness or connectors
(Electric governor and control sleeve position sensor
circuit)
IElectric governor
IECM
SEF632S
SEF633S
DTC P1206 F/INJ F/B 2TD27Ti
EC-409
Page 772 of 1767
DTC Confirmation Procedure
WITH CONSULT-II
1) Turn ignition switch to ªONº position and select ªDATA MONI-
TORº mode with CONSULT-II.
2) Start engine above 1,200 rpm.
3) Run it for 2 seconds above 1,200 rpm. Return engine speed to
idle.
WITHOUT CONSULT-II
1) Start engine above 1,200 rpm.
2) Run engine for 2 seconds above 1,200 rpm. Return engine
speed to idle.
3) Turn ignition switch to ªLOCKº position, wait at least 5 seconds
and then turn to ªONº position.
4) Perform ªDiagnostic Test Mode IIº (Self-diagnostic results).
NOTE:
If malfunction occurs intermittently, conduct suitable driving
pattern for 10 minutes. This makes it possible to determine
DTC.
DTC P1206 F/INJ F/B 2TD27Ti
EC-410
Page 773 of 1767

Wiring Diagram
YEC149A
DTC P1206 F/INJ F/B 2TD27Ti
EC-411
Page 774 of 1767
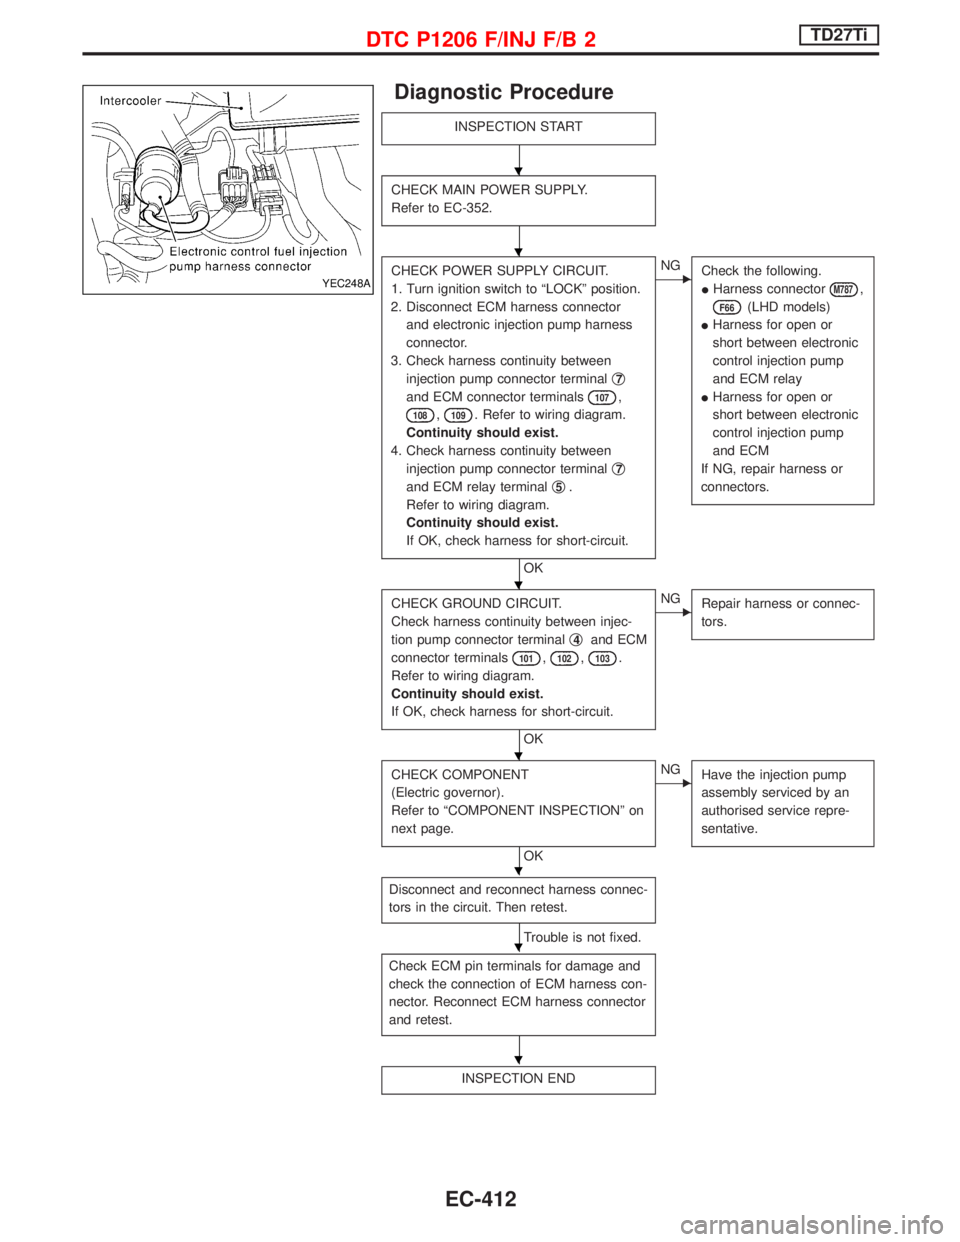
Diagnostic Procedure
INSPECTION START
CHECK MAIN POWER SUPPLY.
Refer to EC-352.
CHECK POWER SUPPLY CIRCUIT.
1. Turn ignition switch to ªLOCKº position.
2. Disconnect ECM harness connector
and electronic injection pump harness
connector.
3. Check harness continuity between
injection pump connector terminalq
7
and ECM connector terminals107,
108,109. Refer to wiring diagram.
Continuity should exist.
4. Check harness continuity between
injection pump connector terminalq
7
and ECM relay terminalq5.
Refer to wiring diagram.
Continuity should exist.
If OK, check harness for short-circuit.
OK
ENG
Check the following.
IHarness connector
M787,
F66(LHD models)
IHarness for open or
short between electronic
control injection pump
and ECM relay
IHarness for open or
short between electronic
control injection pump
and ECM
If NG, repair harness or
connectors.
CHECK GROUND CIRCUIT.
Check harness continuity between injec-
tion pump connector terminalq
4and ECM
connector terminals
101,102,103.
Refer to wiring diagram.
Continuity should exist.
If OK, check harness for short-circuit.
OK
ENG
Repair harness or connec-
tors.
CHECK COMPONENT
(Electric governor).
Refer to ªCOMPONENT INSPECTIONº on
next page.
OK
ENG
Have the injection pump
assembly serviced by an
authorised service repre-
sentative.
Disconnect and reconnect harness connec-
tors in the circuit. Then retest.
Trouble is not fixed.
Check ECM pin terminals for damage and
check the connection of ECM harness con-
nector. Reconnect ECM harness connector
and retest.
INSPECTION END
YEC248A
H
H
H
H
H
H
H
DTC P1206 F/INJ F/B 2TD27Ti
EC-412
Page 775 of 1767
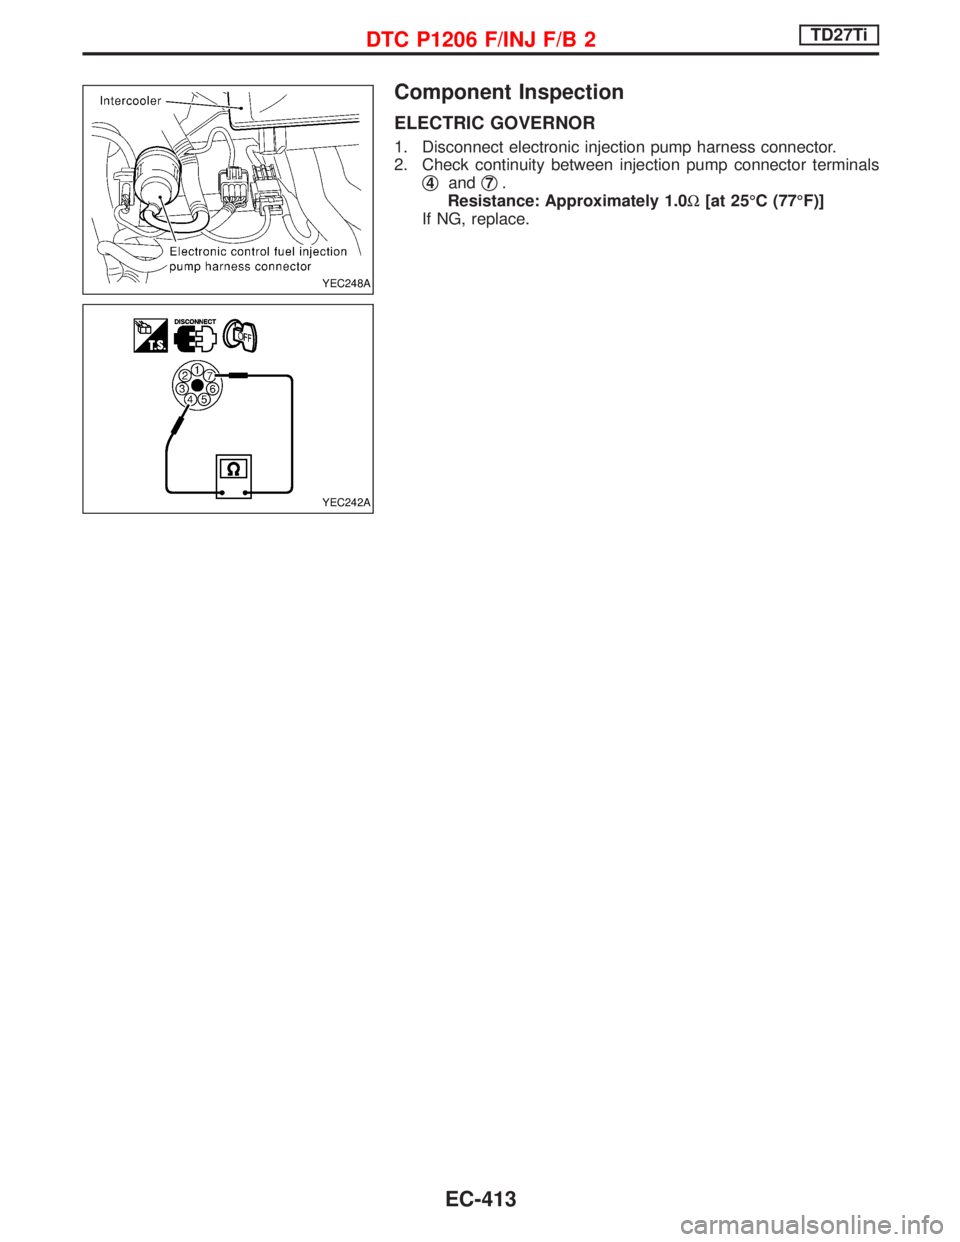
Component Inspection
ELECTRIC GOVERNOR
1. Disconnect electronic injection pump harness connector.
2. Check continuity between injection pump connector terminals
q
4andq7.
Resistance: Approximately 1.0W[at 25ÉC (77ÉF)]
If NG, replace.
YEC248A
YEC242A
DTC P1206 F/INJ F/B 2TD27Ti
EC-413
Page 776 of 1767
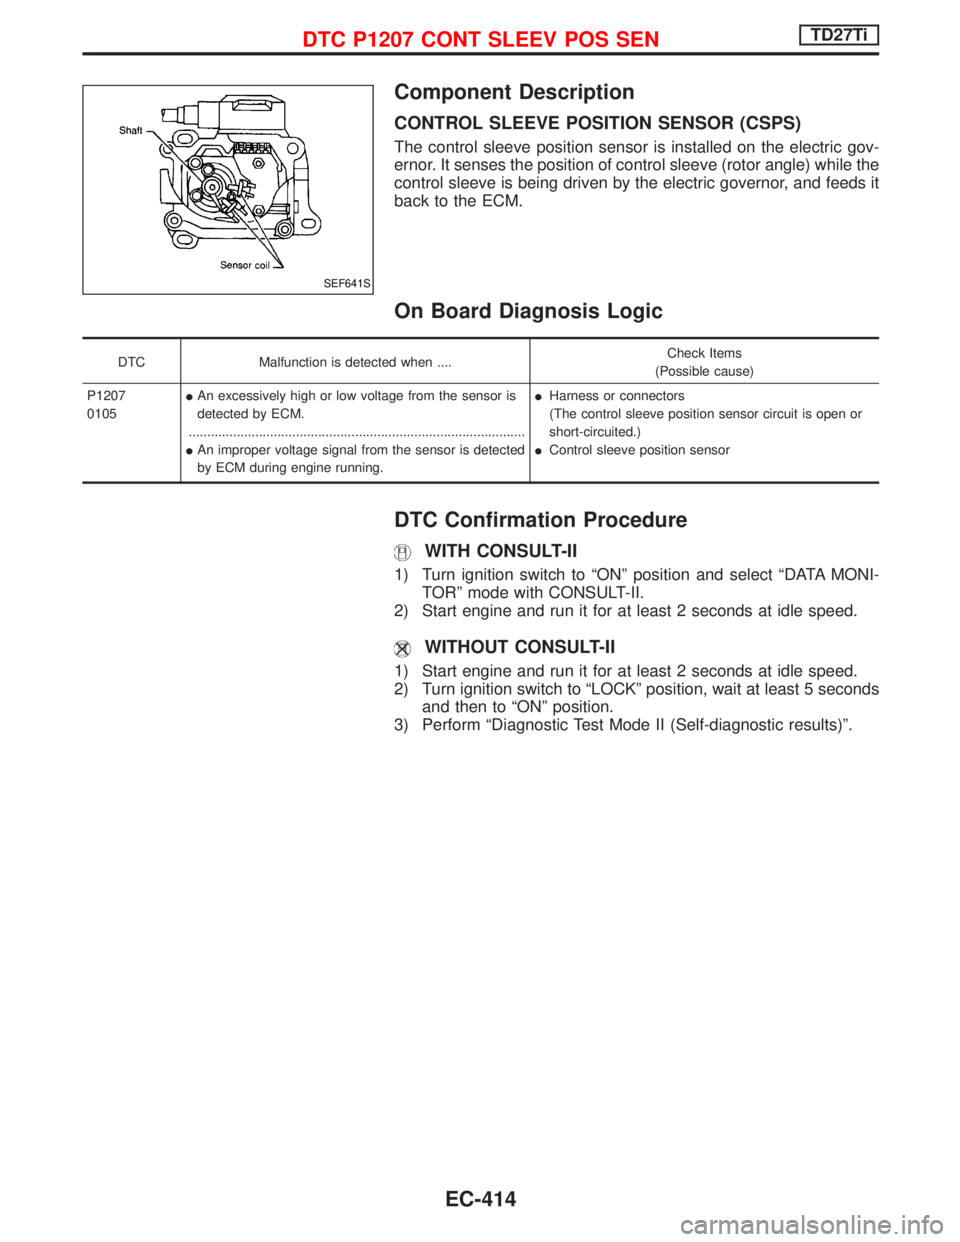
Component Description
CONTROL SLEEVE POSITION SENSOR (CSPS)
The control sleeve position sensor is installed on the electric gov-
ernor. It senses the position of control sleeve (rotor angle) while the
control sleeve is being driven by the electric governor, and feeds it
back to the ECM.
On Board Diagnosis Logic
DTC Malfunction is detected when ....Check Items
(Possible cause)
P1207
0105IAn excessively high or low voltage from the sensor is
detected by ECM.
...........................................................................................
IAn improper voltage signal from the sensor is detected
by ECM during engine running.IHarness or connectors
(The control sleeve position sensor circuit is open or
short-circuited.)
IControl sleeve position sensor
DTC Confirmation Procedure
WITH CONSULT-II
1) Turn ignition switch to ªONº position and select ªDATA MONI-
TORº mode with CONSULT-II.
2) Start engine and run it for at least 2 seconds at idle speed.
WITHOUT CONSULT-II
1) Start engine and run it for at least 2 seconds at idle speed.
2) Turn ignition switch to ªLOCKº position, wait at least 5 seconds
and then to ªONº position.
3) Perform ªDiagnostic Test Mode II (Self-diagnostic results)º.
SEF641S
DTC P1207 CONT SLEEV POS SENTD27Ti
EC-414
Page 777 of 1767

Wiring Diagram
YEC149A
DTC P1207 CONT SLEEV POS SENTD27Ti
EC-415
Page 778 of 1767
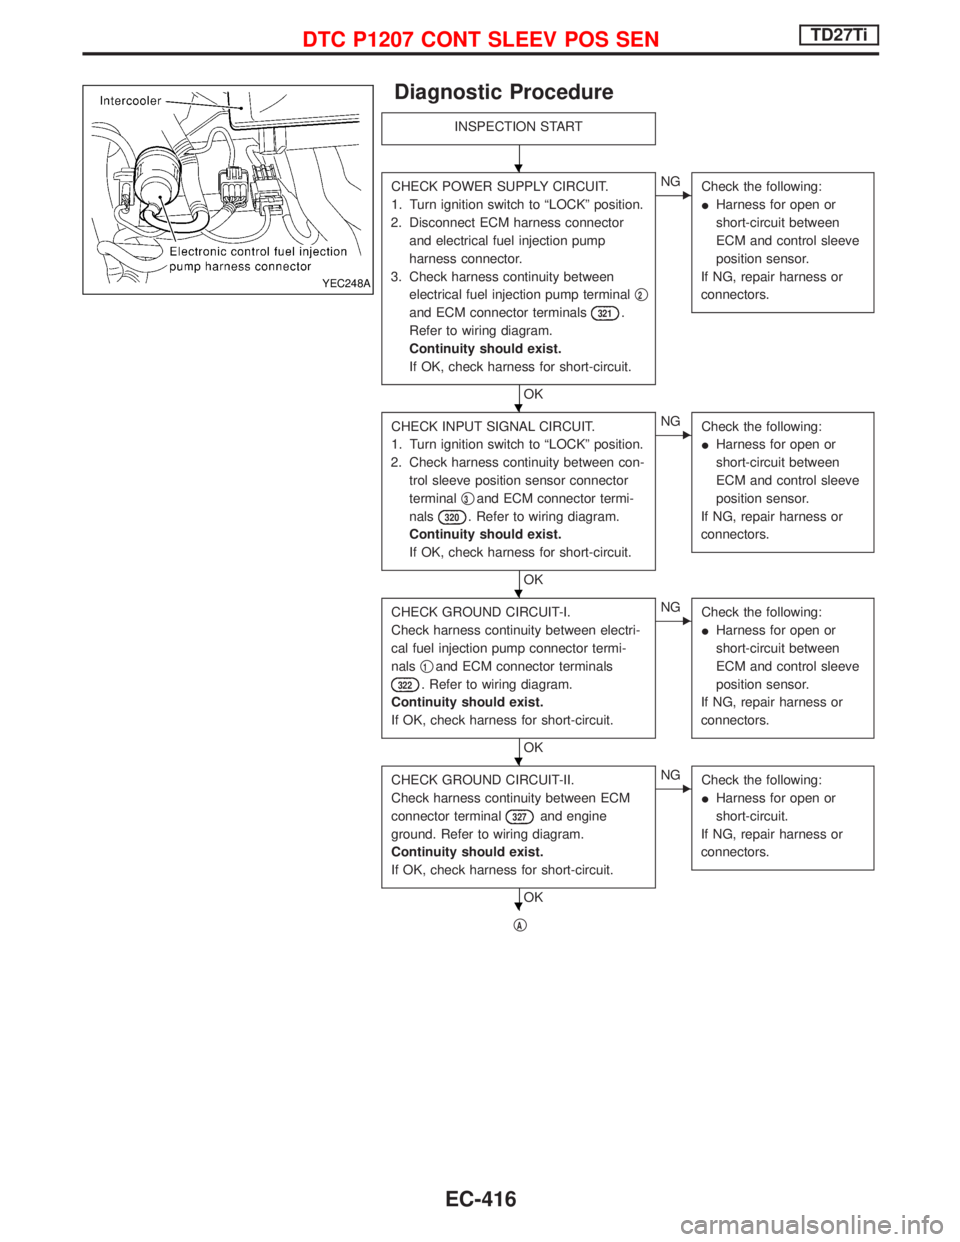
Diagnostic Procedure
INSPECTION START
CHECK POWER SUPPLY CIRCUIT.
1. Turn ignition switch to ªLOCKº position.
2. Disconnect ECM harness connector
and electrical fuel injection pump
harness connector.
3. Check harness continuity between
electrical fuel injection pump terminalq
2
and ECM connector terminals321.
Refer to wiring diagram.
Continuity should exist.
If OK, check harness for short-circuit.
OK
ENG
Check the following:
IHarness for open or
short-circuit between
ECM and control sleeve
position sensor.
If NG, repair harness or
connectors.
CHECK INPUT SIGNAL CIRCUIT.
1. Turn ignition switch to ªLOCKº position.
2. Check harness continuity between con-
trol sleeve position sensor connector
terminalq
3and ECM connector termi-
nals
320. Refer to wiring diagram.
Continuity should exist.
If OK, check harness for short-circuit.
OK
ENG
Check the following:
IHarness for open or
short-circuit between
ECM and control sleeve
position sensor.
If NG, repair harness or
connectors.
CHECK GROUND CIRCUIT-I.
Check harness continuity between electri-
cal fuel injection pump connector termi-
nalsq
1and ECM connector terminals
322. Refer to wiring diagram.
Continuity should exist.
If OK, check harness for short-circuit.
OK
ENG
Check the following:
IHarness for open or
short-circuit between
ECM and control sleeve
position sensor.
If NG, repair harness or
connectors.
CHECK GROUND CIRCUIT-II.
Check harness continuity between ECM
connector terminal
327and engine
ground. Refer to wiring diagram.
Continuity should exist.
If OK, check harness for short-circuit.
OK
ENG
Check the following:
IHarness for open or
short-circuit.
If NG, repair harness or
connectors.
qA
YEC248A
H
H
H
H
H
DTC P1207 CONT SLEEV POS SENTD27Ti
EC-416
Page 779 of 1767
qA
CHECK COMPONENT
(Control sleeve position sensor).
Refer to ªCOMPONENT INSPECTIONº on
page EC-417.
OK
ENG
Have the injection pump
assembly serviced by an
authorised service repre-
sentative.
Disconnect and reconnect harness con-
nectors in the circuit. Then retest.
Trouble is not fixed.
Check ECM pin terminals for damage and
check the connection of ECM harness
connector. Reconnect ECM harness con-
nector and retest.
INSPECTION END
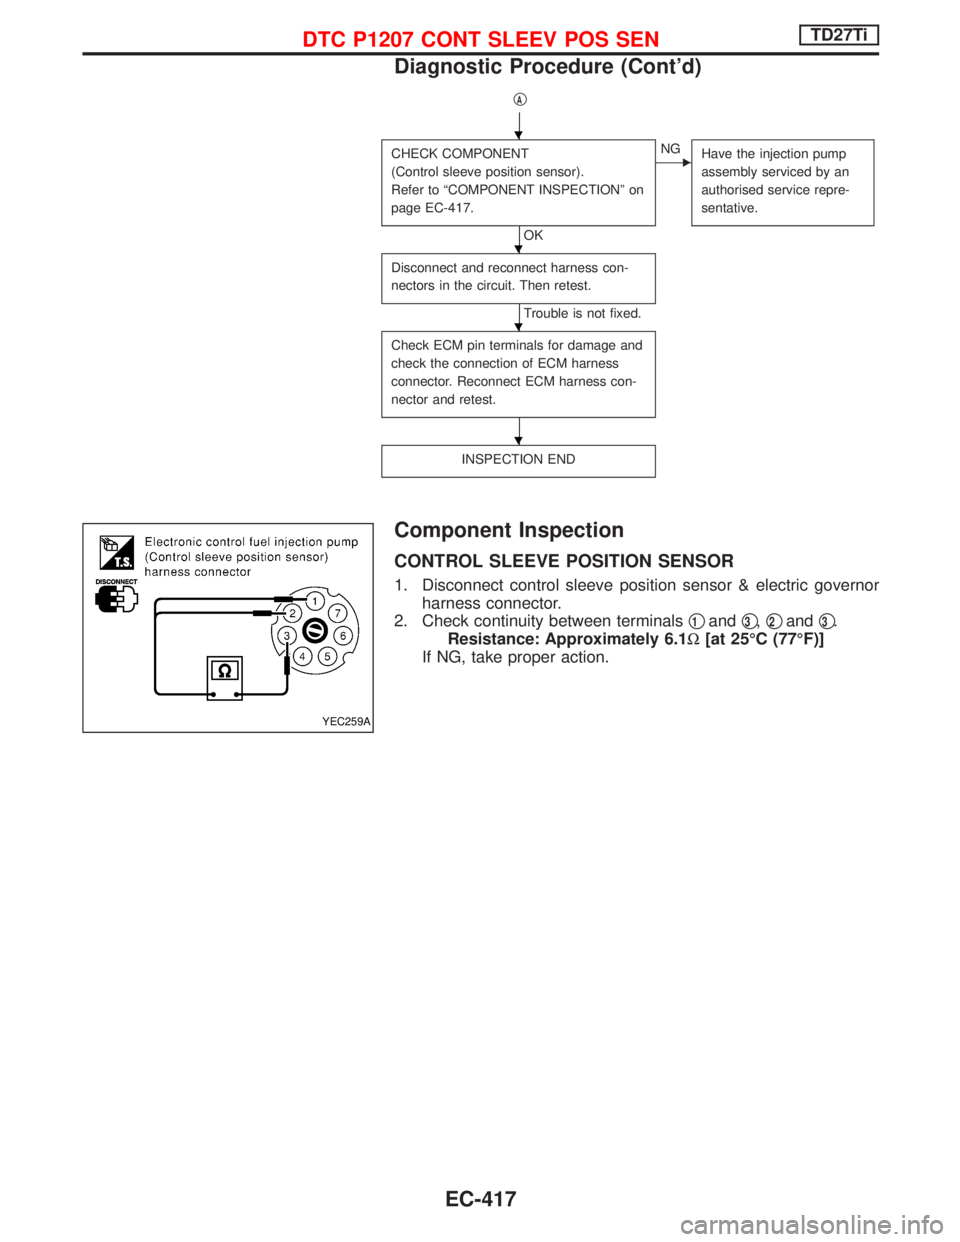
Component Inspection
CONTROL SLEEVE POSITION SENSOR
1. Disconnect control sleeve position sensor & electric governor
harness connector.
2. Check continuity between terminalsq
1andq3,q2andq3.
Resistance: Approximately 6.1W[at 25ÉC (77ÉF)]
If NG, take proper action.
YEC259A
H
H
H
H
DTC P1207 CONT SLEEV POS SENTD27Ti
Diagnostic Procedure (Cont'd)
EC-417
Page 780 of 1767
Description
SYSTEM DESCRIPTION
Sensor Input signal to ECM ECM function Actuator
Engine coolant temperature
sensorEngine coolant temperature
Cooling fan control Cooling fan relay
Air conditioner switch Air conditioner ªONº signal
The ECM controls the cooling fan corresponding to the vehicle speed, engine coolant temperature, air condi-
tioner ON signal.
On Board Diagnosis Logic
This diagnosis continuously monitors the engine coolant temperature.
If the cooling fan or another component in the cooling system malfunctions, engine coolant temperature will
rise.
When the engine coolant temperature reaches an abnormally high temperature condition, a malfunction is
indicated.
DTC Malfunction is detected when ... Check Items (Possible Cause)
P1217
0208ICooling fan does not operate properly (Overheat).
ICooling fan system does not operate properly (Over-
heat).
IEngine coolant was not added to the system using
the proper filling method.IHarness or connectors
(The cooling fan circuit is open or shorted.)
ICooling fan
IRadiator hose
IRadiator
IRadiator cap
IWater pump
IThermostat
IEngine coolant temperature sensor
For more information, refer to ªMAIN 12 CAUSES OF
OVERHEATINGº, EC-425.
CAUTION:
When a malfunction is indicated, be sure to replace the coolant following the procedure in the LC
section, ªChanging Engine Coolantº. Also, replace the engine oil.
1) Fill radiator with coolant up to specified level with a filling speed of 2 liters per minute. Be sure to
use coolant with the proper mixture ratio. Refer to MA section, ªEngine Coolant Mixture Ratioº.
2) After refilling coolant, run engine to ensure that no water-flow noise is emitted.
DTC P1217 OVER HEATTD27Ti
EC-418