NISSAN X-TRAIL 2001 Service Repair Manual
Manufacturer: NISSAN, Model Year: 2001, Model line: X-TRAIL, Model: NISSAN X-TRAIL 2001Pages: 3833, PDF Size: 39.49 MB
Page 2041 of 3833
INPUT SHAFT AND GEARS
MT-65
D
E
F
G
H
I
J
K
L
MA
B
MT
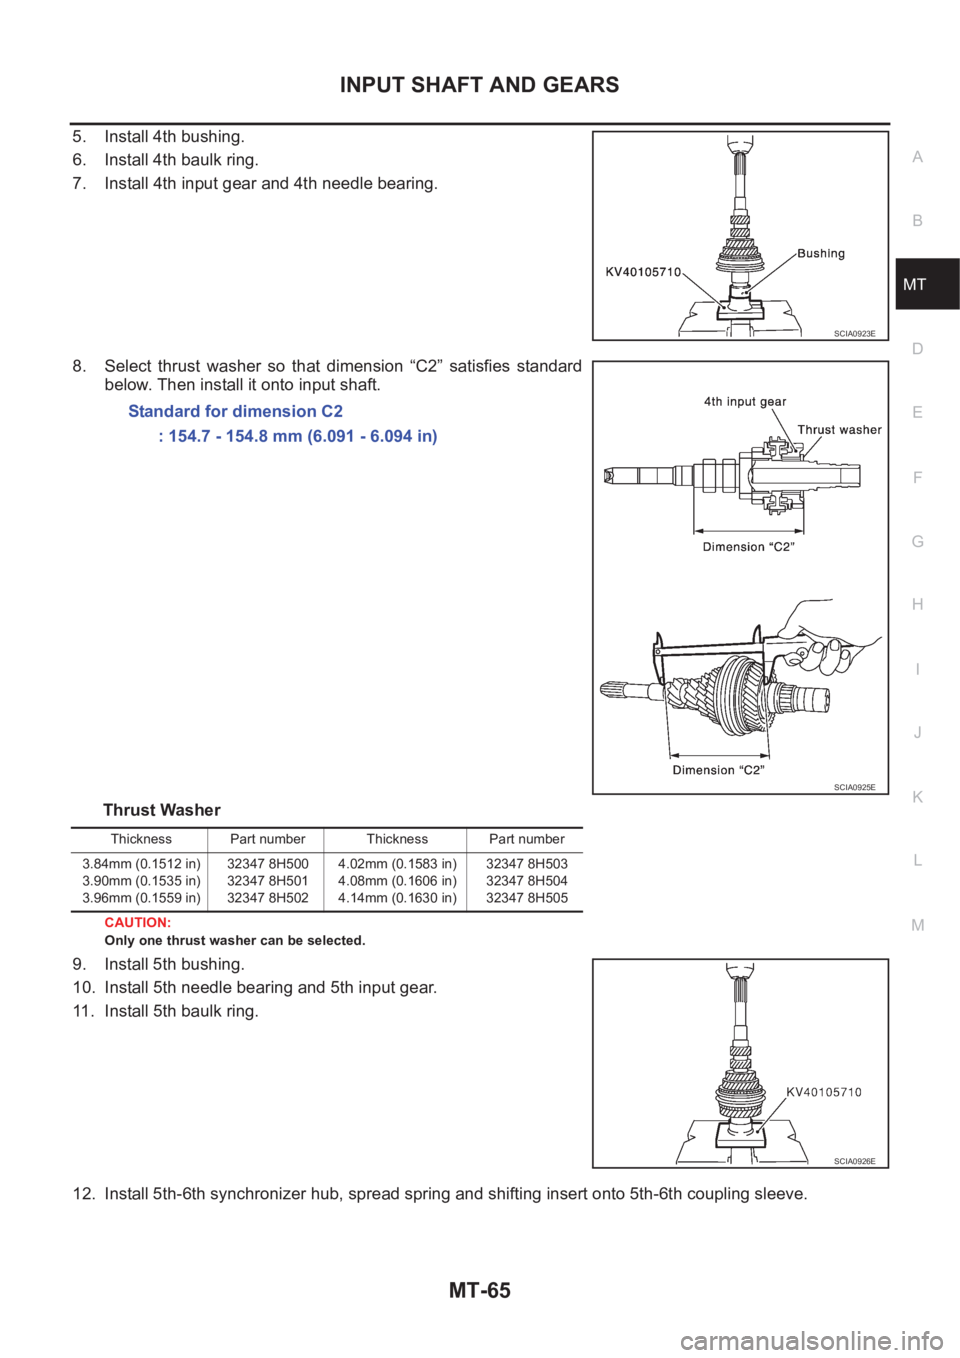
5. Install 4th bushing.
6. Install 4th baulk ring.
7. Install 4th input gear and 4th needle bearing.
8. Select thrust washer so that dimension “C2” satisfies standard
below. Then install it onto input shaft.
Thrust Washer
CAUTION:
Only one thrust washer can be selected.
9. Install 5th bushing.
10. Install 5th needle bearing and 5th input gear.
11. Install 5th baulk ring.
12. Install 5th-6th synchronizer hub, spread spring and shifting insert onto 5th-6th coupling sleeve.
SCIA0923E
Standard for dimension C2
: 154.7 - 154.8 mm (6.091 - 6.094 in)
SCIA0925E
Thickness Part number Thickness Part number
3.84mm (0.1512 in)
3.90mm (0.1535 in)
3.96mm (0.1559 in)32347 8H500
32347 8H501
32347 8H5024.02mm (0.1583 in)
4.08mm (0.1606 in)
4.14mm (0.1630 in)32347 8H503
32347 8H504
32347 8H505
SCIA0926E
Page 2042 of 3833
MT-66
INPUT SHAFT AND GEARS
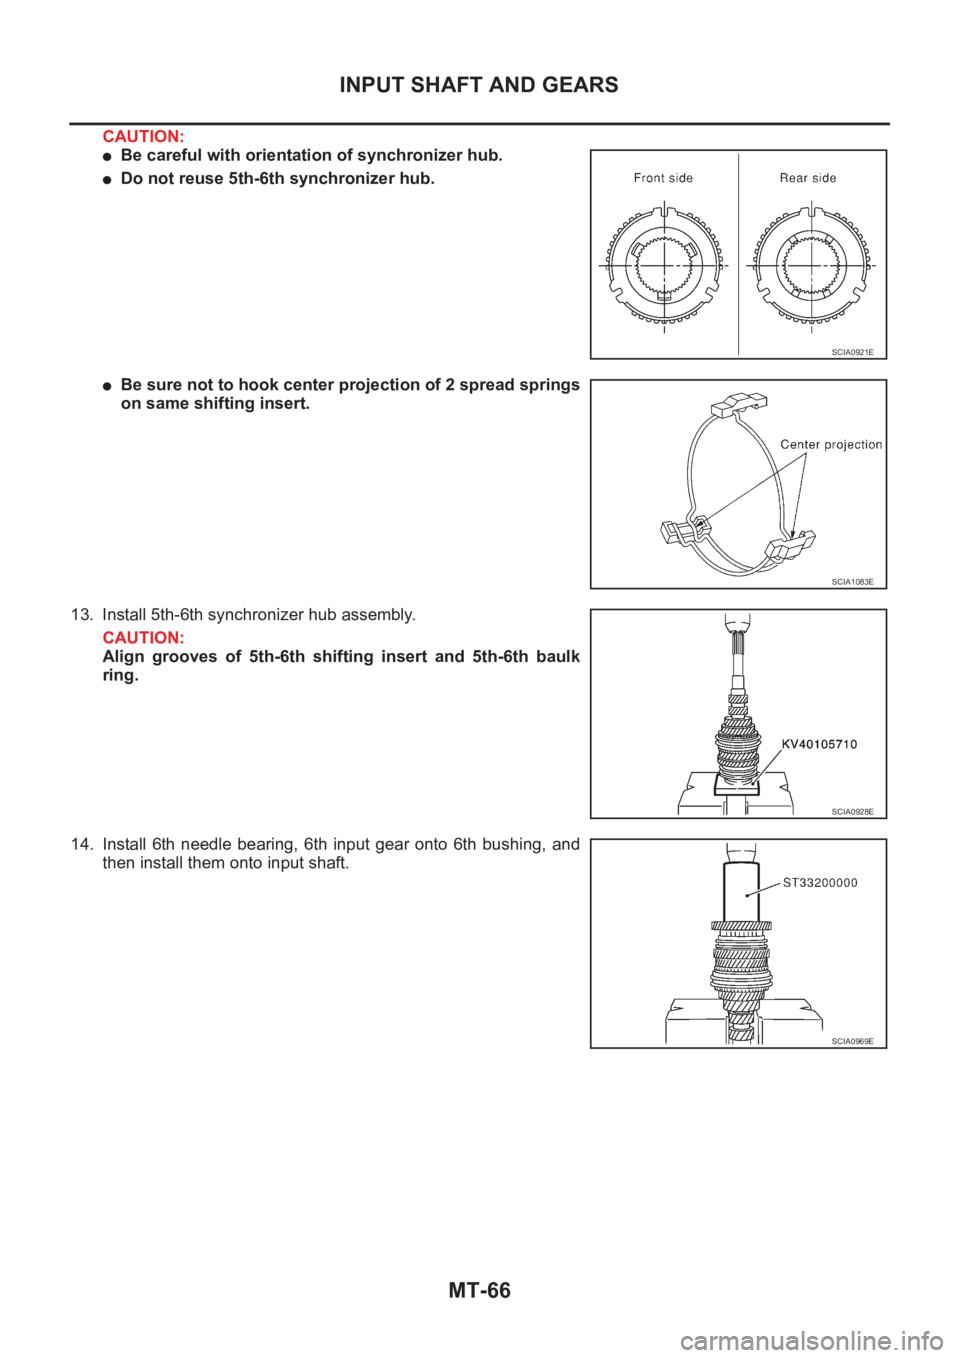
CAUTION:
●Be careful with orientation of synchronizer hub.
●Do not reuse 5th-6th synchronizer hub.
●Be sure not to hook center projection of 2 spread springs
on same shifting insert.
13. Install 5th-6th synchronizer hub assembly.
CAUTION:
Align grooves of 5th-6th shifting insert and 5th-6th baulk
ring.
14. Install 6th needle bearing, 6th input gear onto 6th bushing, and
then install them onto input shaft.
SCIA0921E
SCIA1083E
SCIA0928E
SCIA0969E
Page 2043 of 3833
INPUT SHAFT AND GEARS
MT-67
D
E
F
G
H
I
J
K
L
MA
B
MT
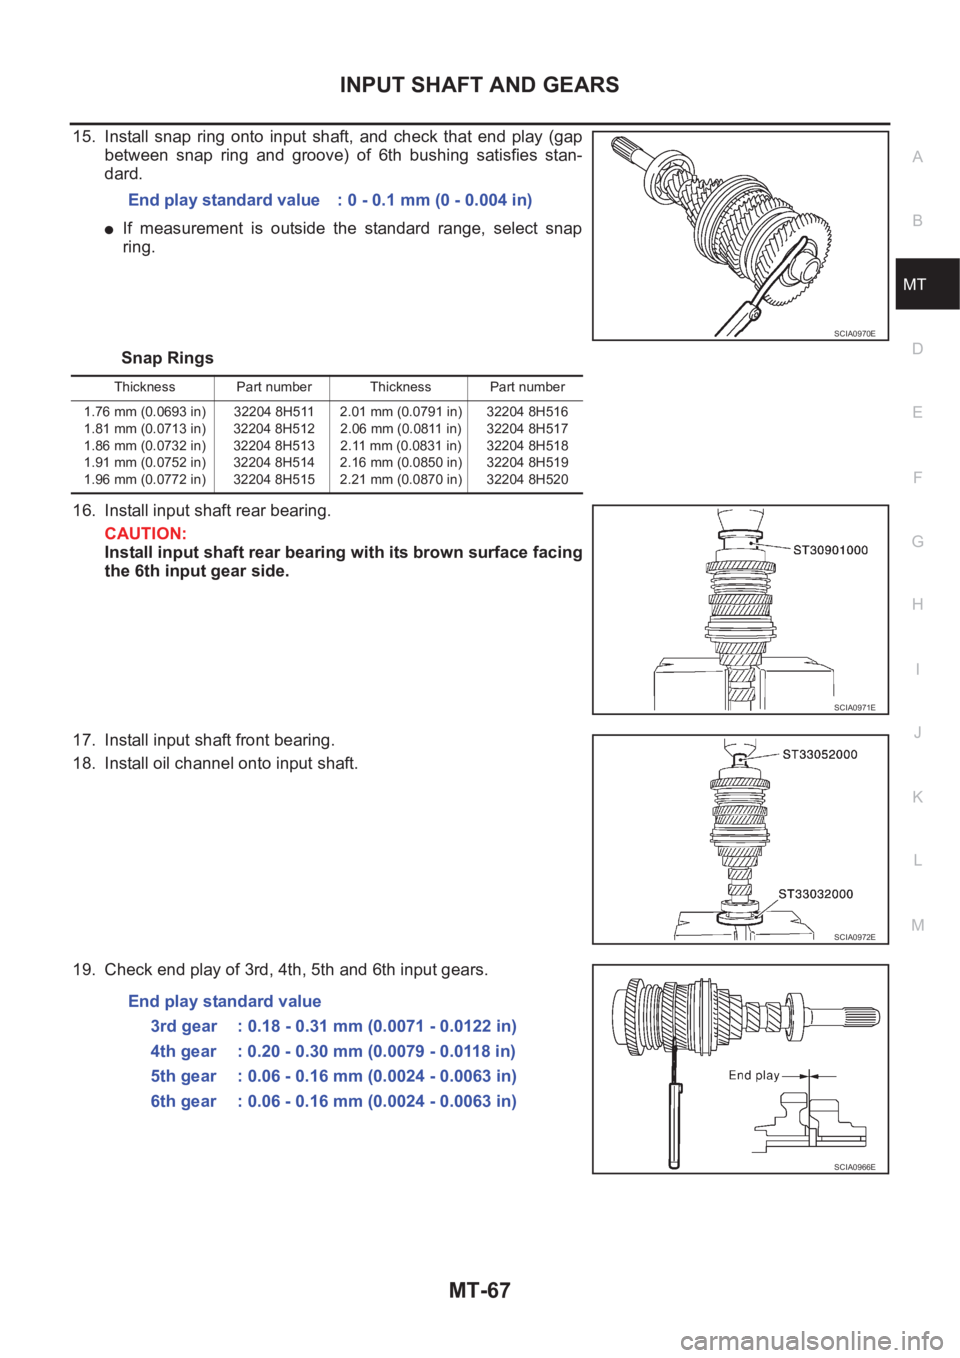
15. Install snap ring onto input shaft, and check that end play (gap
between snap ring and groove) of 6th bushing satisfies stan-
dard.
●If measurement is outside the standard range, select snap
ring.
Snap Rings
16. Install input shaft rear bearing.
CAUTION:
Install input shaft rear bearing with its brown surface facing
the 6th input gear side.
17. Install input shaft front bearing.
18. Install oil channel onto input shaft.
19. Check end play of 3rd, 4th, 5th and 6th input gears.End play standard value : 0 - 0.1 mm (0 - 0.004 in)
SCIA0970E
Thickness Part number Thickness Part number
1.76 mm (0.0693 in)
1.81 mm (0.0713 in)
1.86 mm (0.0732 in)
1.91 mm (0.0752 in)
1.96 mm (0.0772 in)32204 8H511
32204 8H512
32204 8H513
32204 8H514
32204 8H5152.01 mm (0.0791 in)
2.06 mm (0.0811 in)
2.11 mm (0.0831 in)
2.16 mm (0.0850 in)
2.21 mm (0.0870 in)32204 8H516
32204 8H517
32204 8H518
32204 8H519
32204 8H520
SCIA0971E
SCIA0972E
End play standard value
3rd gear : 0.18 - 0.31 mm (0.0071 - 0.0122 in)
4th gear : 0.20 - 0.30 mm (0.0079 - 0.0118 in)
5th gear : 0.06 - 0.16 mm (0.0024 - 0.0063 in)
6th gear : 0.06 - 0.16 mm (0.0024 - 0.0063 in)
SCIA0966E
Page 2044 of 3833
MT-68
MAINSHAFT AND GEARS
MAINSHAFT AND GEARS
PFP:32241
Assembly and Disassembly (RS5F51A)ECS008C6
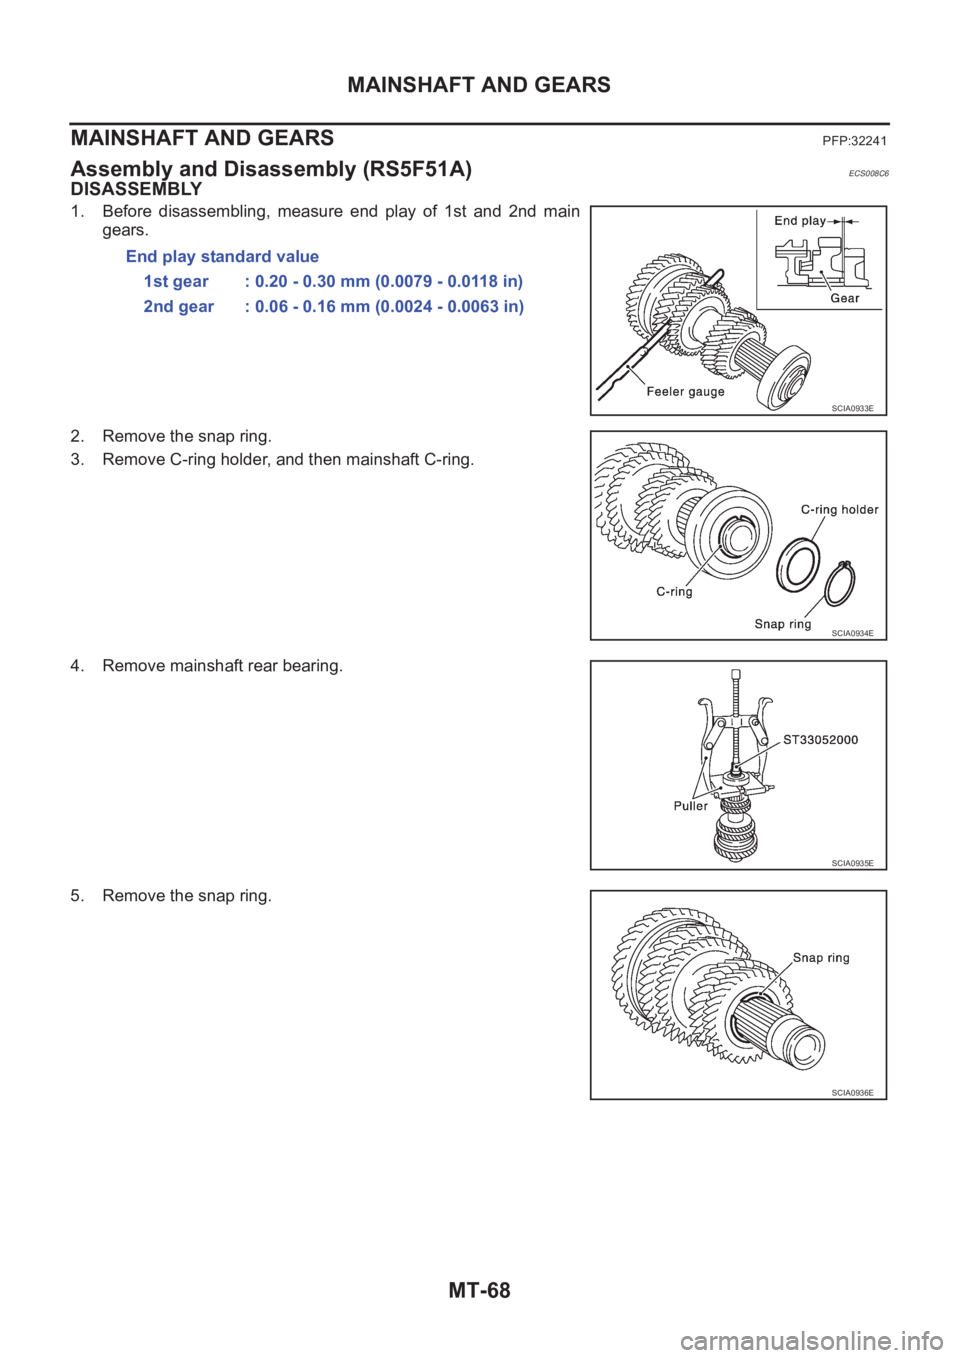
DISASSEMBLY
1. Before disassembling, measure end play of 1st and 2nd main
gears.
2. Remove the snap ring.
3. Remove C-ring holder, and then mainshaft C-ring.
4. Remove mainshaft rear bearing.
5. Remove the snap ring.End play standard value
1st gear : 0.20 - 0.30 mm (0.0079 - 0.0118 in)
2nd gear : 0.06 - 0.16 mm (0.0024 - 0.0063 in)
SCIA0933E
SCIA0934E
SCIA0935E
SCIA0936E
Page 2045 of 3833
MAINSHAFT AND GEARS
MT-69
D
E
F
G
H
I
J
K
L
MA
B
MT
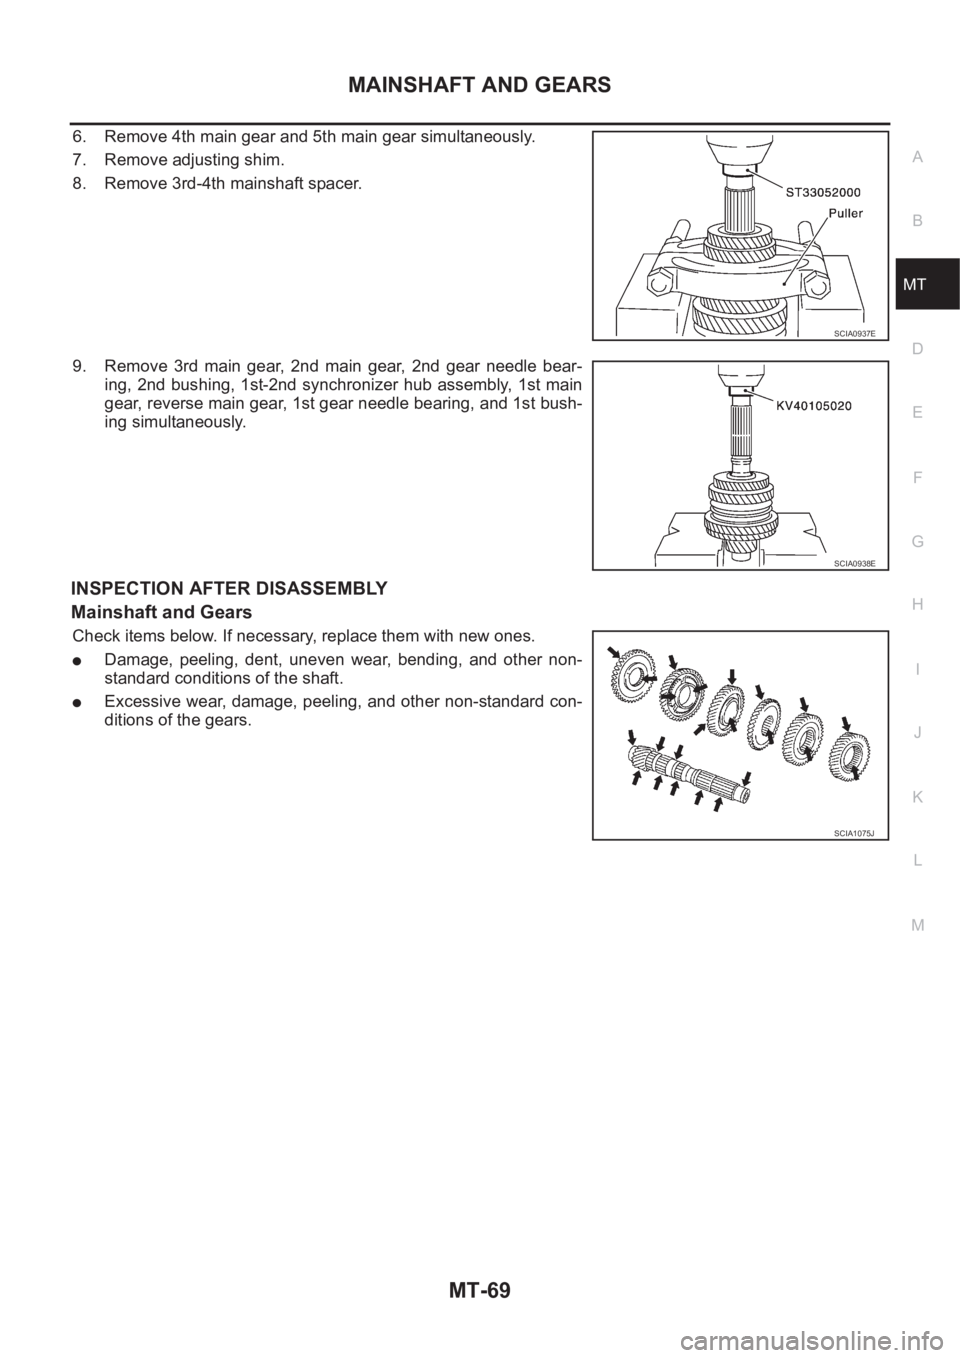
6. Remove 4th main gear and 5th main gear simultaneously.
7. Remove adjusting shim.
8. Remove 3rd-4th mainshaft spacer.
9. Remove 3rd main gear, 2nd main gear, 2nd gear needle bear-
ing, 2nd bushing, 1st-2nd synchronizer hub assembly, 1st main
gear, reverse main gear, 1st gear needle bearing, and 1st bush-
ing simultaneously.
INSPECTION AFTER DISASSEMBLY
Mainshaft and Gears
Check items below. If necessary, replace them with new ones.
●Damage, peeling, dent, uneven wear, bending, and other non-
standard conditions of the shaft.
●Excessive wear, damage, peeling, and other non-standard con-
ditions of the gears.
SCIA0937E
SCIA0938E
SCIA1075J
Page 2046 of 3833
MT-70
MAINSHAFT AND GEARS
Synchronizer
Check items below. If necessary, replace them with new ones.
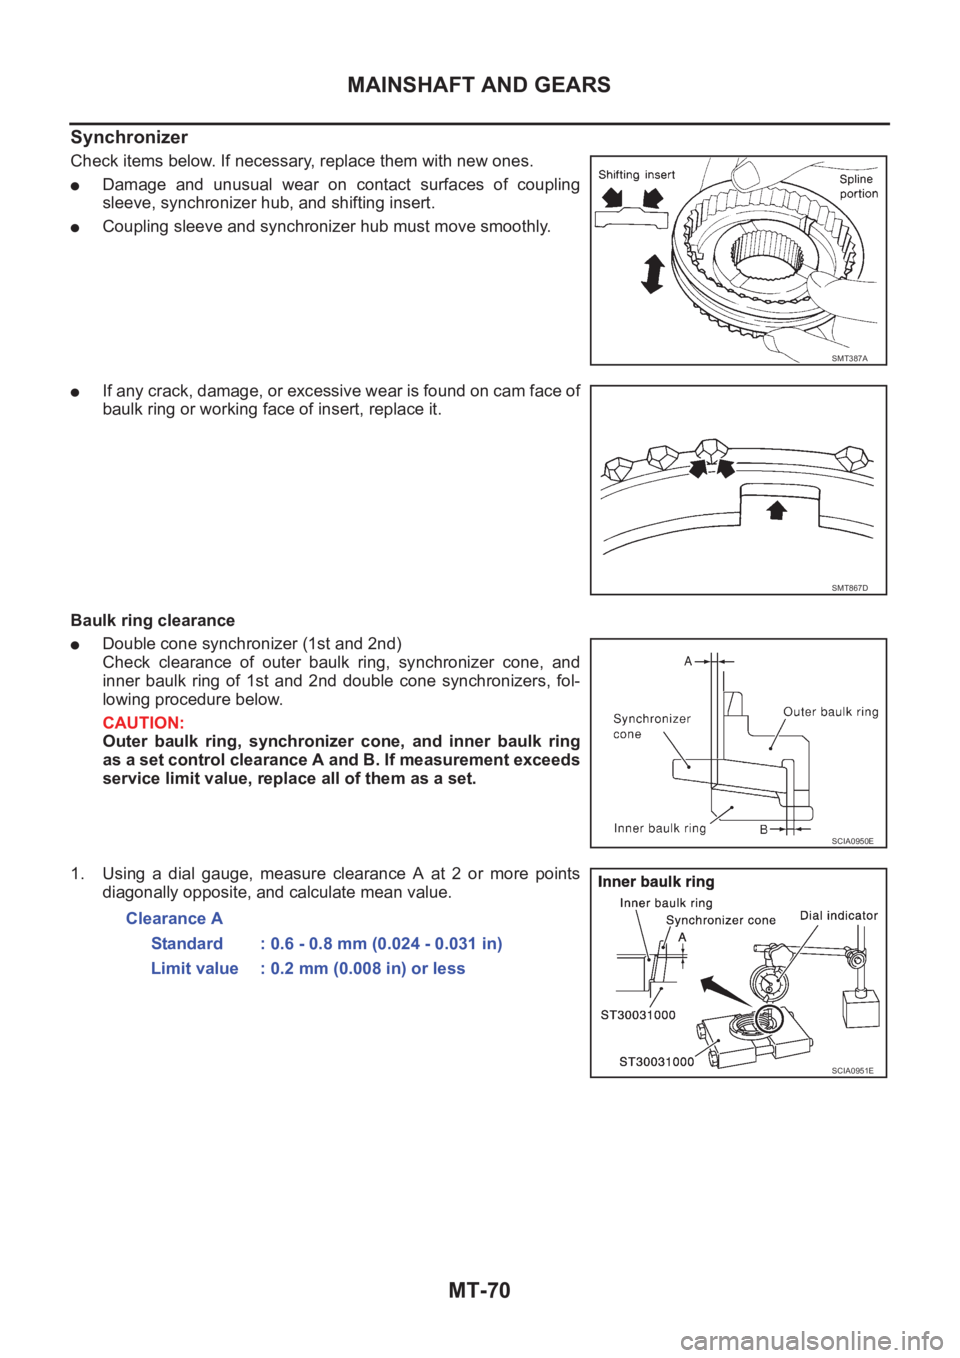
●Damage and unusual wear on contact surfaces of coupling
sleeve, synchronizer hub, and shifting insert.
●Coupling sleeve and synchronizer hub must move smoothly.
●If any crack, damage, or excessive wear is found on cam face of
baulk ring or working face of insert, replace it.
Baulk ring clearance
●Double cone synchronizer (1st and 2nd)
Check clearance of outer baulk ring, synchronizer cone, and
inner baulk ring of 1st and 2nd double cone synchronizers, fol-
lowing procedure below.
CAUTION:
Outer baulk ring, synchronizer cone, and inner baulk ring
as a set control clearance A and B. If measurement exceeds
service limit value, replace all of them as a set.
1. Using a dial gauge, measure clearance A at 2 or more points
diagonally opposite, and calculate mean value.
SMT387A
SMT867D
SCIA0950E
Clearance A
Standard : 0.6 - 0.8 mm (0.024 - 0.031 in)
Limit value : 0.2 mm (0.008 in) or less
SCIA0951E
Page 2047 of 3833
MAINSHAFT AND GEARS
MT-71
D
E
F
G
H
I
J
K
L
MA
B
MT
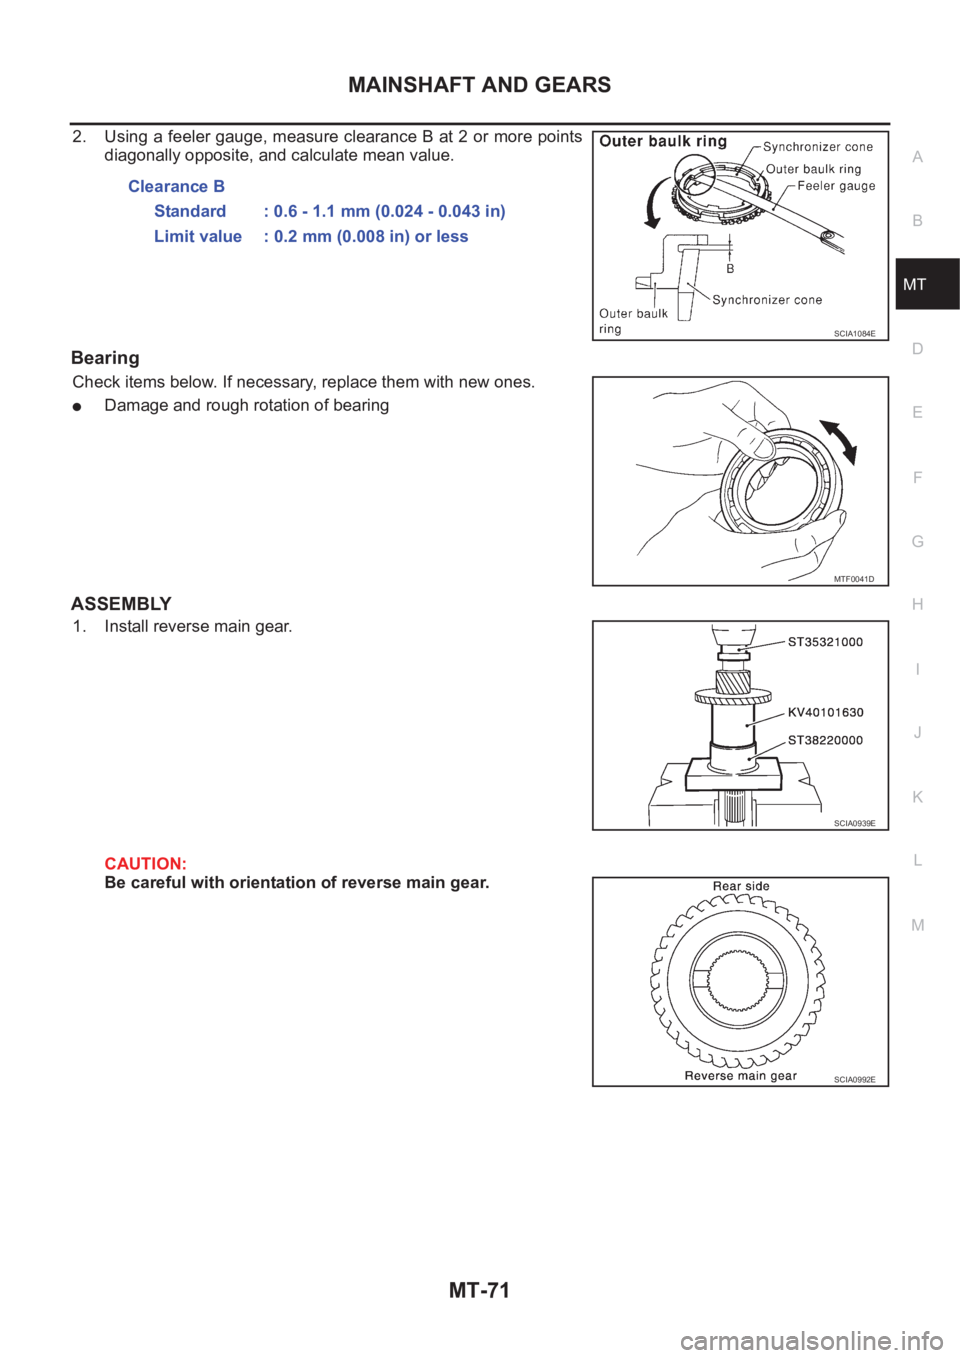
2. Using a feeler gauge, measure clearance B at 2 or more points
diagonally opposite, and calculate mean value.
Bearing
Check items below. If necessary, replace them with new ones.
●Damage and rough rotation of bearing
ASSEMBLY
1. Install reverse main gear.
CAUTION:
Be careful with orientation of reverse main gear.Clearance B
Standard : 0.6 - 1.1 mm (0.024 - 0.043 in)
Limit value : 0.2 mm (0.008 in) or less
SCIA1084E
MTF0041D
SCIA0939E
SCIA0992E
Page 2048 of 3833
MT-72
MAINSHAFT AND GEARS
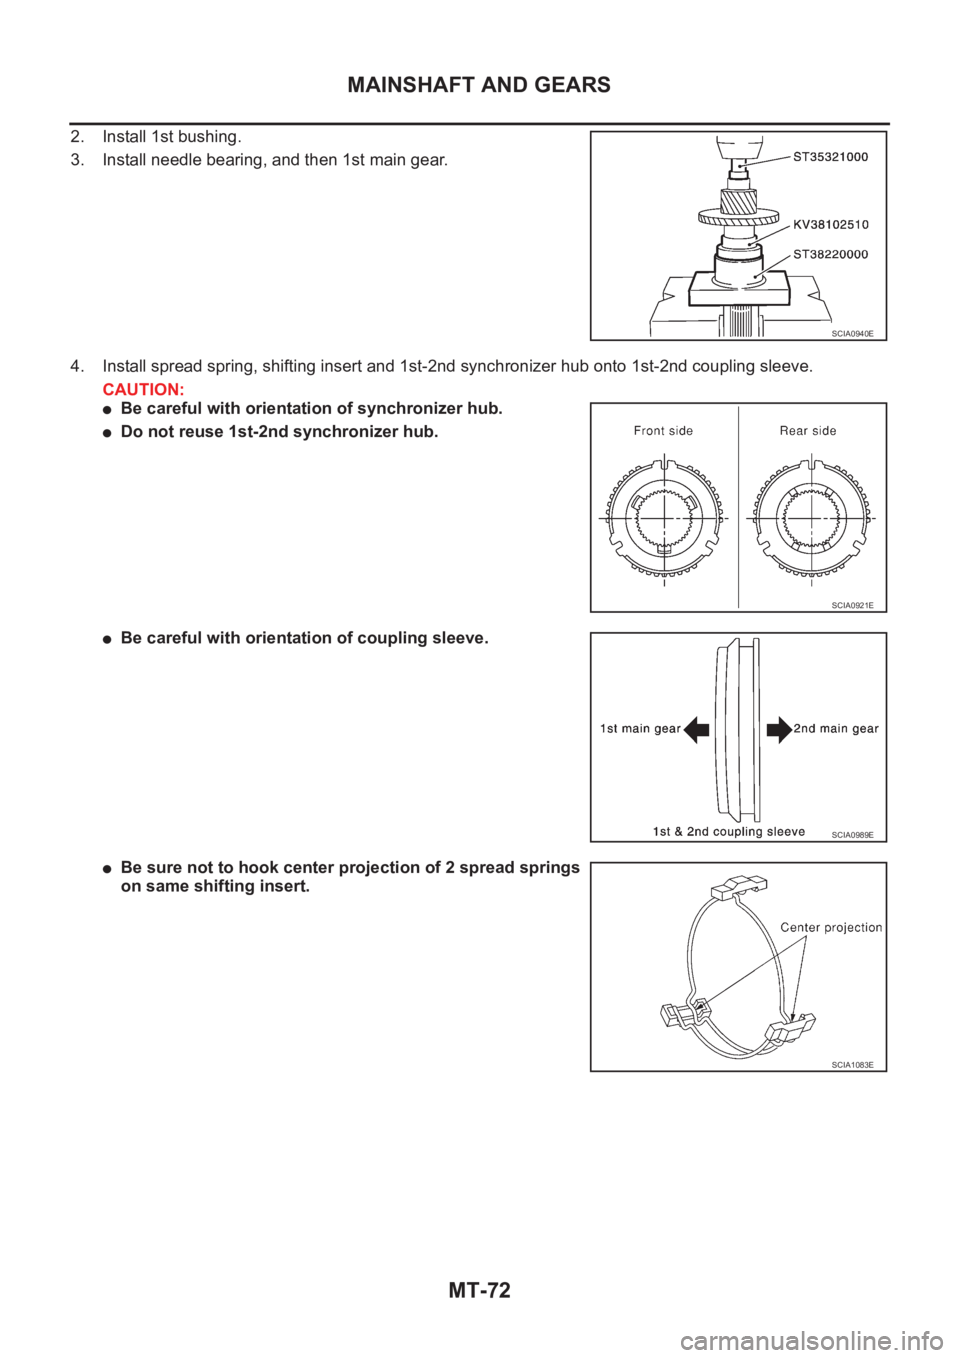
2. Install 1st bushing.
3. Install needle bearing, and then 1st main gear.
4. Install spread spring, shifting insert and 1st-2nd synchronizer hub onto 1st-2nd coupling sleeve.
CAUTION:
●Be careful with orientation of synchronizer hub.
●Do not reuse 1st-2nd synchronizer hub.
●Be careful with orientation of coupling sleeve.
●Be sure not to hook center projection of 2 spread springs
on same shifting insert.
SCIA0940E
SCIA0921E
SCIA0989E
SCIA1083E
Page 2049 of 3833
MAINSHAFT AND GEARS
MT-73
D
E
F
G
H
I
J
K
L
MA
B
MT
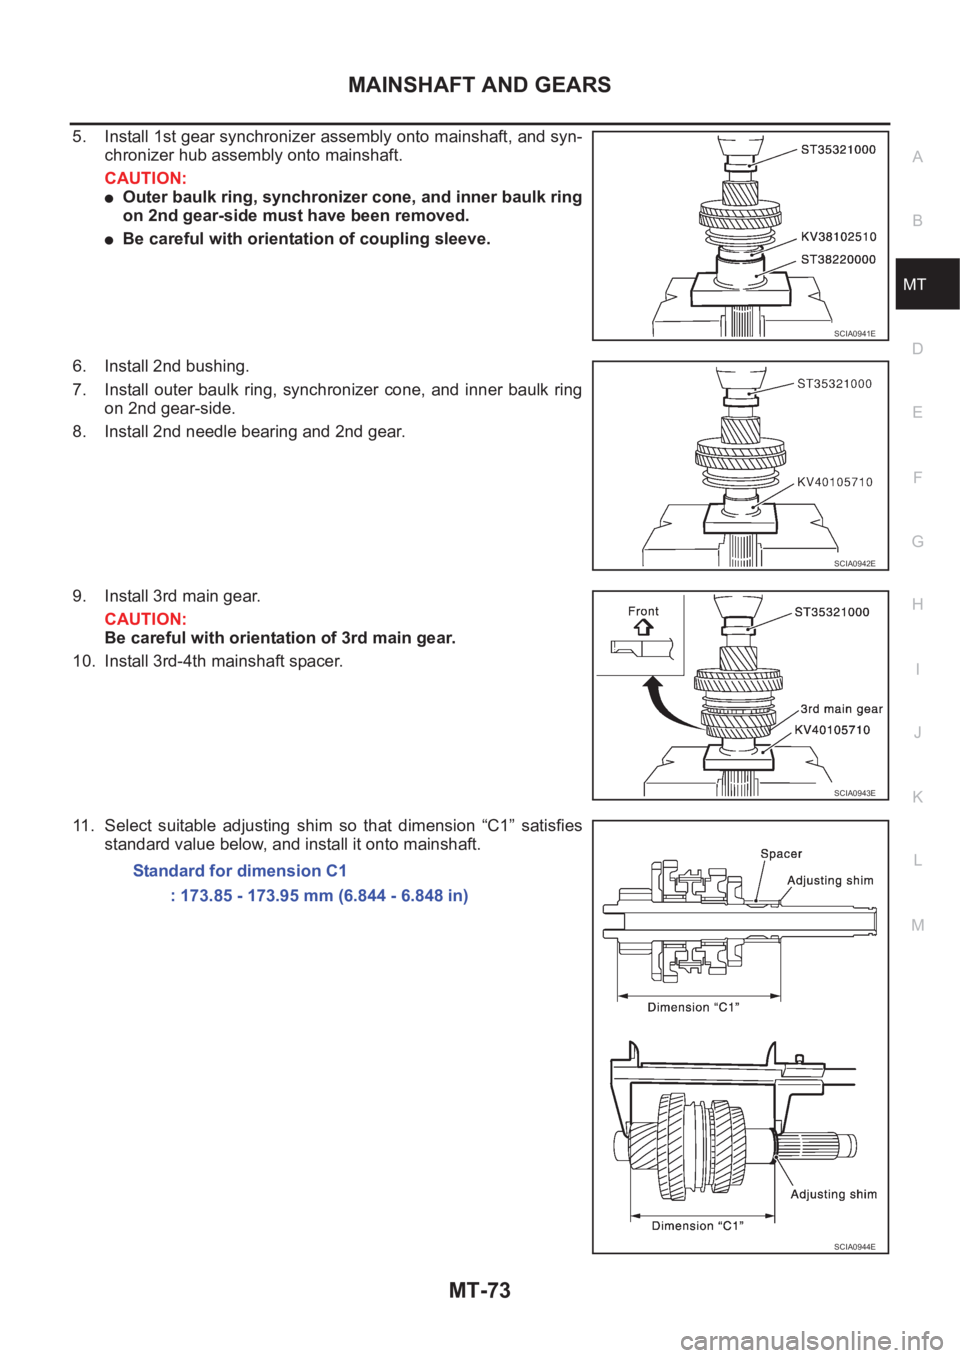
5. Install 1st gear synchronizer assembly onto mainshaft, and syn-
chronizer hub assembly onto mainshaft.
CAUTION:
●Outer baulk ring, synchronizer cone, and inner baulk ring
on 2nd gear-side must have been removed.
●Be careful with orientation of coupling sleeve.
6. Install 2nd bushing.
7. Install outer baulk ring, synchronizer cone, and inner baulk ring
on 2nd gear-side.
8. Install 2nd needle bearing and 2nd gear.
9. Install 3rd main gear.
CAUTION:
Be careful with orientation of 3rd main gear.
10. Install 3rd-4th mainshaft spacer.
11. Select suitable adjusting shim so that dimension “C1” satisfies
standard value below, and install it onto mainshaft.
SCIA0941E
SCIA0942E
SCIA0943E
Standard for dimension C1
: 173.85 - 173.95 mm (6.844 - 6.848 in)
SCIA0944E
Page 2050 of 3833
MT-74
MAINSHAFT AND GEARS
Adjusting Shim
CAUTION:
Only one adjusting shim can be selected.
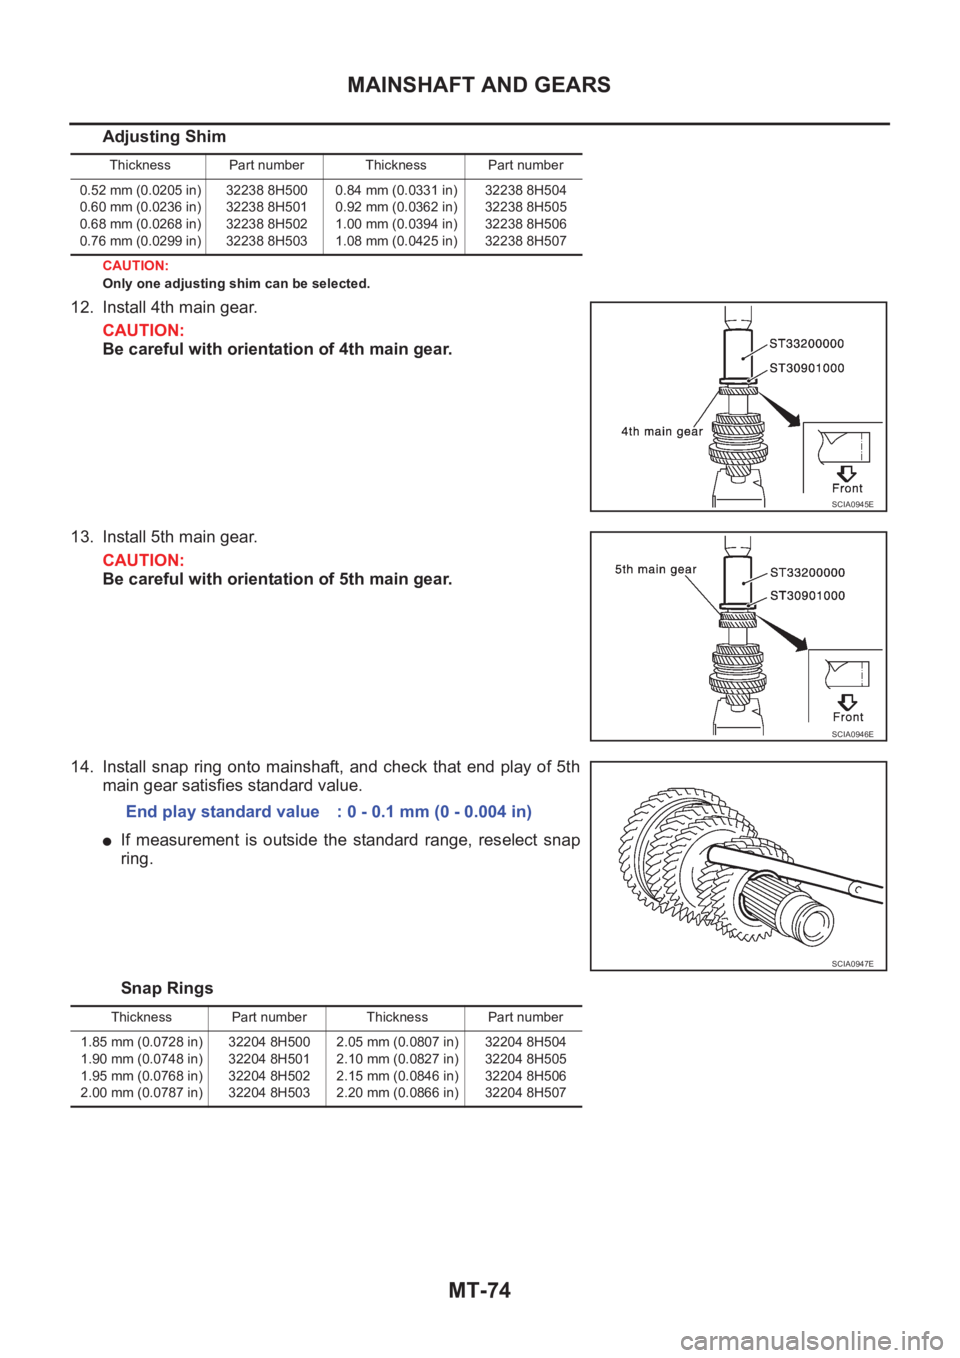
12. Install 4th main gear.
CAUTION:
Be careful with orientation of 4th main gear.
13. Install 5th main gear.
CAUTION:
Be careful with orientation of 5th main gear.
14. Install snap ring onto mainshaft, and check that end play of 5th
main gear satisfies standard value.
●If measurement is outside the standard range, reselect snap
ring.
Snap Rings
Thickness Part number Thickness Part number
0.52 mm (0.0205 in)
0.60 mm (0.0236 in)
0.68 mm (0.0268 in)
0.76 mm (0.0299 in)32238 8H500
32238 8H501
32238 8H502
32238 8H5030.84 mm (0.0331 in)
0.92 mm (0.0362 in)
1.00 mm (0.0394 in)
1.08 mm (0.0425 in)32238 8H504
32238 8H505
32238 8H506
32238 8H507
SCIA0945E
SCIA0946E
End play standard value : 0 - 0.1 mm (0 - 0.004 in)
SCIA0947E
Thickness Part number Thickness Part number
1.85 mm (0.0728 in)
1.90 mm (0.0748 in)
1.95 mm (0.0768 in)
2.00 mm (0.0787 in)32204 8H500
32204 8H501
32204 8H502
32204 8H5032.05 mm (0.0807 in)
2.10 mm (0.0827 in)
2.15 mm (0.0846 in)
2.20 mm (0.0866 in)32204 8H504
32204 8H505
32204 8H506
32204 8H507