NISSAN X-TRAIL 2003 Electronic Repair Manual
Manufacturer: NISSAN, Model Year: 2003, Model line: X-TRAIL, Model: NISSAN X-TRAIL 2003Pages: 3066, PDF Size: 51.47 MB
Page 2941 of 3066
![NISSAN X-TRAIL 2003 Electronic Repair Manual TROUBLE DIAGNOSIS
SRS-19
C
D
E
F
G
I
J
K
L
MA
B
SRS
a. Touch “SELF-DIAG [CURRENT]”.
lDiagnostic code is displayed on “SELF-DIAG [CURRENT]”.
i. If the malfunction is displayed in the “SRS Ope NISSAN X-TRAIL 2003 Electronic Repair Manual TROUBLE DIAGNOSIS
SRS-19
C
D
E
F
G
I
J
K
L
MA
B
SRS
a. Touch “SELF-DIAG [CURRENT]”.
lDiagnostic code is displayed on “SELF-DIAG [CURRENT]”.
i. If the malfunction is displayed in the “SRS Ope](/img/5/57402/w960_57402-2940.png)
TROUBLE DIAGNOSIS
SRS-19
C
D
E
F
G
I
J
K
L
MA
B
SRS
a. Touch “SELF-DIAG [CURRENT]”.
lDiagnostic code is displayed on “SELF-DIAG [CURRENT]”.
i. If the malfunction is displayed in the “SRS Operation Check (Air bag warning lamp blinking) but no mal-
function is displayed in the “SELF-DIAG [CURRENT]”, the following possibilities shall be checked.
lAfter the malfunction part is repaired, the diagnosis results in “SELF-DIAG [PAST]” has not been
erased.
lAn intermittent malfunction has been stored in the past.
NOTE:
Intermittent malfunction is a malfunction that has occurred once in the past, but soon recovered. Refer to
“SRS-20, "
DIAGNOSTIC PROCEDURE 3"andSRS-20, "DIAGNOSTIC PROCEDURE 4".
b. Touch “SELF-DIAG [PAST].
lThe diagnostic code is displayed until erasing the memory in
the “SELF-DIAG [CURRENT]”.
c. Touch “TROUBLE DIAG RECORD”.
lThe diagnosis results (malfunction parts stored in the diagno-
sis sensor unit) stored in the self-diagnosis results are dis-
played.
lThe memory of “TROUBLE DIAG RECORD” cannot be
erased.
7. Each diagnostic code is displayed.
8. Touch “PRINT,” if required.
9. Based on each diagnosis result, repair or replace the malfunc-
tion parts.
CAUTION:
Be sure to start the work after the following steps. Turn the
ignition switch OFF, and disconnect the battery ground
cable. Then wait for at least 3 minutes.
SHIA0203E
SHIA0181E
SHIA0182E
SHIA0180E
Page 2942 of 3066
![NISSAN X-TRAIL 2003 Electronic Repair Manual SRS-20
TROUBLE DIAGNOSIS
10. After repairing the malfunction, touch “SELF-DIAG [CURRENT]”
to check that “No DTC IS DETECTED” is displayed.
lAfter checking the display, touch “ERASE”.
lIf a NISSAN X-TRAIL 2003 Electronic Repair Manual SRS-20
TROUBLE DIAGNOSIS
10. After repairing the malfunction, touch “SELF-DIAG [CURRENT]”
to check that “No DTC IS DETECTED” is displayed.
lAfter checking the display, touch “ERASE”.
lIf a](/img/5/57402/w960_57402-2941.png)
SRS-20
TROUBLE DIAGNOSIS
10. After repairing the malfunction, touch “SELF-DIAG [CURRENT]”
to check that “No DTC IS DETECTED” is displayed.
lAfter checking the display, touch “ERASE”.
lIf any malfunction is displayed on “SELF-DIAG [CURRENT],
repair or replace the malfunctioning again.
11. Touch “BACK” key of CONSULT-II to “SELECT SYSTEM”
screen. Touch “SELF-DIAG [PAST].
12. Check that no malfunction is detected on “SELF-DIAG [PAST].
lIf any malfunction is deployed, Touch “ERASE” in the “SELF-
DIAG [CURRENT]” screen, and check the display.
13. Turn ignition switch OFF, then turn off and disconnect CONSULT-II.
14. Turn ignition switch ON, and check the system with the SRS air bag warning lamp (User mode).
15. Check that no malfunction is detected. Now the diagnosis is complete.
DIAGNOSTIC PROCEDURE 3
Inspecting SRS malfunctioning record
If the warning lampreys mode) indicates any malfunction, but no malfunction is detected in “SELF-DIAG
[CURRENT]” on CONSULT-II, carry out the following steps.
lErase the memory that stored in diagnosis sensor unit.
lCheck that no malfunction is detected on “SELF-DIAG [PAST] and “TROUBLE DIAG RECORD” then go
toSRS-20, "
DIAGNOSTIC PROCEDURE 3".
lCheck that the battery voltage is 9V or more. If it is below 9V, charge the battery.
DIAGNOSTIC PROCEDURE 4
Inspecting SRS malfunctioning parts by using CONSULT-II — DIAGNOSIS MODE
lTouch “SELF-DIAG[PAST]” on CONSULT–II, repair or replace
the malfunction part displayed on the screen.
lIf no malfunction is displayed on “SELF-DIAG [PAST]”, touch
“BACK” key of CONSULT-II, then touch “TROUBLE DIAG
RECORD”. Malfunction part is displayed on CONSULT–II
screen, and repair or replace the malfunction part displayed on
the screen.
SRS701
SRS702
SHIA0181E
Page 2943 of 3066

TROUBLE DIAGNOSIS
SRS-21
C
D
E
F
G
I
J
K
L
MA
B
SRS
Diagnostic code chart
Diagnostic item ExplanationRepair order
“Recheck SRS at each replacement”
NO DTC IS
DETECTED.When malfunction is
indicated by the “AIR
BAG” warning lamp in
User mode.
lLow battery voltage (Less than 9V)lGo toSRS-20, "DIAGNOSTIC PRO-
CEDURE 3".
lSelf-diagnostic result “SELF-DIAG
[PAST]” (previously stored in the
memory) might not be erased after
repair.
lIntermittent malfunction has been
detected in the past.
lGo toSRS-17, "DIAGNOSTIC PRO-
CEDURE 2".
lNo malfunction is detected. —
DRIVER AIRBAG
MODULE
[OPEN]
lDriver air bag module circuit is open (including the spiral cable). 1. Visually check the wiring harness
connection.
2. Replace the harness if it has visible
damage.
3. Replace driver air bag module.
(Before disposal, it must be
deployed.)
4. Replace the spiral cable.
5. Replace the diagnosis sensor unit.
6. Replace the related harness. DRIVER AIRBAG
MODULE
[VB-SHORT]
lDriver air bag module circuit is shorted to some power supply
circuit (including the spiral cable).
DRIVER AIRBAG
MODULE
[GND-SHORT]
lDriver air bag module circuit is shorted to ground (including the
spiral cable).
DRIVER AIRBAG
MODULE
[SHORT]
lDriver air bag module circuits are shorted to each other.
ASSIST A/B MODULE
[VB-SHORT]
lFront passenger air bag module circuit is shorted to some
power supply circuit.1. Visually check the wiring harness
connection.
2. Replace the harness if it has visible
damage.
3. Replace front passenger air bag
module. (Before disposal of it, it
must be deployed.)
4. Replace the diagnosis sensor unit.
5. Replace the related harness. ASSIST A/B MODULE
[OPEN]
lFront passenger air bag module circuit is open.
ASSIST A/B MODULE
[GND-SHORT]
lFront passenger air bag module circuit is shorted to ground.
ASSIST A/B MODULE
[SHORT]
lFront passenger air bag module circuits are shorted to each
other.
SIDE MODULE LH
[OPEN]
lFront LH side air bag module circuit is open. 1. Visually check the wiring harness
connection.
2. Replace the harness if it has visible
damage.
3. Replace front LH side air bag mod-
ule.
(Before disposal, it must be
deployed.)
4. Replace the diagnosis sensor unit.
5. Replace the related harness. SIDE MODULE LH
[VB-SHORT]
lFront LH side air bag module circuit is shorted to some power
supply circuit.
SIDE MODULE LH
[GND-SHORT]
lFront LH side air bag module circuit is shorted to ground.
SIDE MODULE LH
[SHORT]
lFront LH side air bag module circuits are shorted to each other.
SIDE MODULE RH
[OPEN]
lFront RH side air bag module circuit is open. 1. Visually check the wiring harness
connection.
2. Replace the harness if it has visible
damage.
3. Replace front RH side air bag mod-
ule.
(Before disposal, it must be
deployed.)
4. Replace the diagnosis sensor unit.
5. Replace the related harness. SIDE MODULE RH
[VB-SHORT]
lFront RH side air bag module circuit is shorted to some power
supply circuit.
SIDE MODULE RH
[GND-SHORT]
lFront RH side air bag module circuit is shorted to ground.
SIDE MODULE RH
[SHORT]
lFront RH side air bag module circuits are shorted to each other.
Page 2944 of 3066

SRS-22
TROUBLE DIAGNOSIS
NOTE:
lFollow the procedures in numerical order when repairing malfunctioning parts. Confirm whether malfunction is eliminated using air
bag warning lamp or CONSULT-II each time repair is finished. If malfunction is still observed, proceed to the next step. When mal-
function is eliminated, further repair work is not required.
lFollow the procedures in numerical order when repairing malfunctioning parts, then make the system check.
lThe screen contents are the same as the self-diagnosis results, self-diagnosis results “SELF-DIAG [CURRENT]” and “SELF-DIAG
[PAST]”.
Trouble Diagnoses Without CONSULT-IIEHS000CT
DIAGNOSTIC PROCEDURE 5
CAUTION:
SRS will not enter diagnosis mode if no malfunction is detected in user mode.
1. Turn ignition switch “ON”.
SATELLITE SENS LH
[UNIT FAIL]
SATELLITE SENS LH
[COMM FAIL]
SATELLITE SENS LH
[UNMATCH]lLH side air bag (Satellite) sensor 1. Visually check the wiring harness
connection.
2. Replace the harness if it has visible
damage.
3. Replace the LH side air bag (satel-
lite) sensor.
4. Replace the diagnosis sensor unit.
5. Replace the related harness.
SATELLITE SENS RH
[UNIT FAIL]
SATELLITE SENS RH
[COMM FAIL]
SATELLITE SENS RH
[UNMATCH]
lRH side air bag (Satellite) sensor 1. Visually check the wiring harness
connection.
2. Replace the harness if it has visible
damage.
3. Replace the RH side air bag (satel-
lite) sensor.
4. Replace the diagnosis sensor unit.
5. Replace the related harness.
PRE-TEN FRONT LH
[OPEN]
lThe circuit for front LH pre-tensioner is open.
1. Visually check the wiring harness
connections.
2. Replace the harness if it has visible
damage.
3. Replace front LH seat belt.
(Before disposing, it must be deacti-
vated.)
4. Replace the diagnosis sensor unit.
5. Replace the related harness. PRE-TEN FRONT LH
[VB-SHORT]
lThe circuit for front LH pre-tensioner is shorted to some power
supply circuit.
PRE-TEN FRONT LH
[GND-SHORT]
lThe circuit for front LH pre-tensioner is shorted to ground.
PRE-TEN FRONT RH
[OPEN]
lThe circuit for front RH pre-tensioner is shorted to some power
supply circuit.
1. Visually check the wiring harness
connections.
2. Replace the harness if it has visible
damage.
3. Replace front RH seat belt.
(Before disposing, it must be deacti-
vated.)
4. Replace the diagnosis sensor unit.
5. Replace the related harness. PRE-TEN FRONT RH
[VB-SHORT]
lThe circuit for front RH pre-tensioner is shorted to some power
supply circuit.
PRE-TEN FRONT RH
[GND-SHORT]
lThe circuit for front RH pre-tensioner is shorted to ground.
CONTROL UNIT
lDiagnosis sensor unit is malfunctioning. 1. Visually check the wiring harness
connection.
2. Replace the diagnosis sensor unit. Diagnostic item ExplanationRepair order
“Recheck SRS at each replacement”
Page 2945 of 3066
TROUBLE DIAGNOSIS
SRS-23
C
D
E
F
G
I
J
K
L
MA
B
SRS
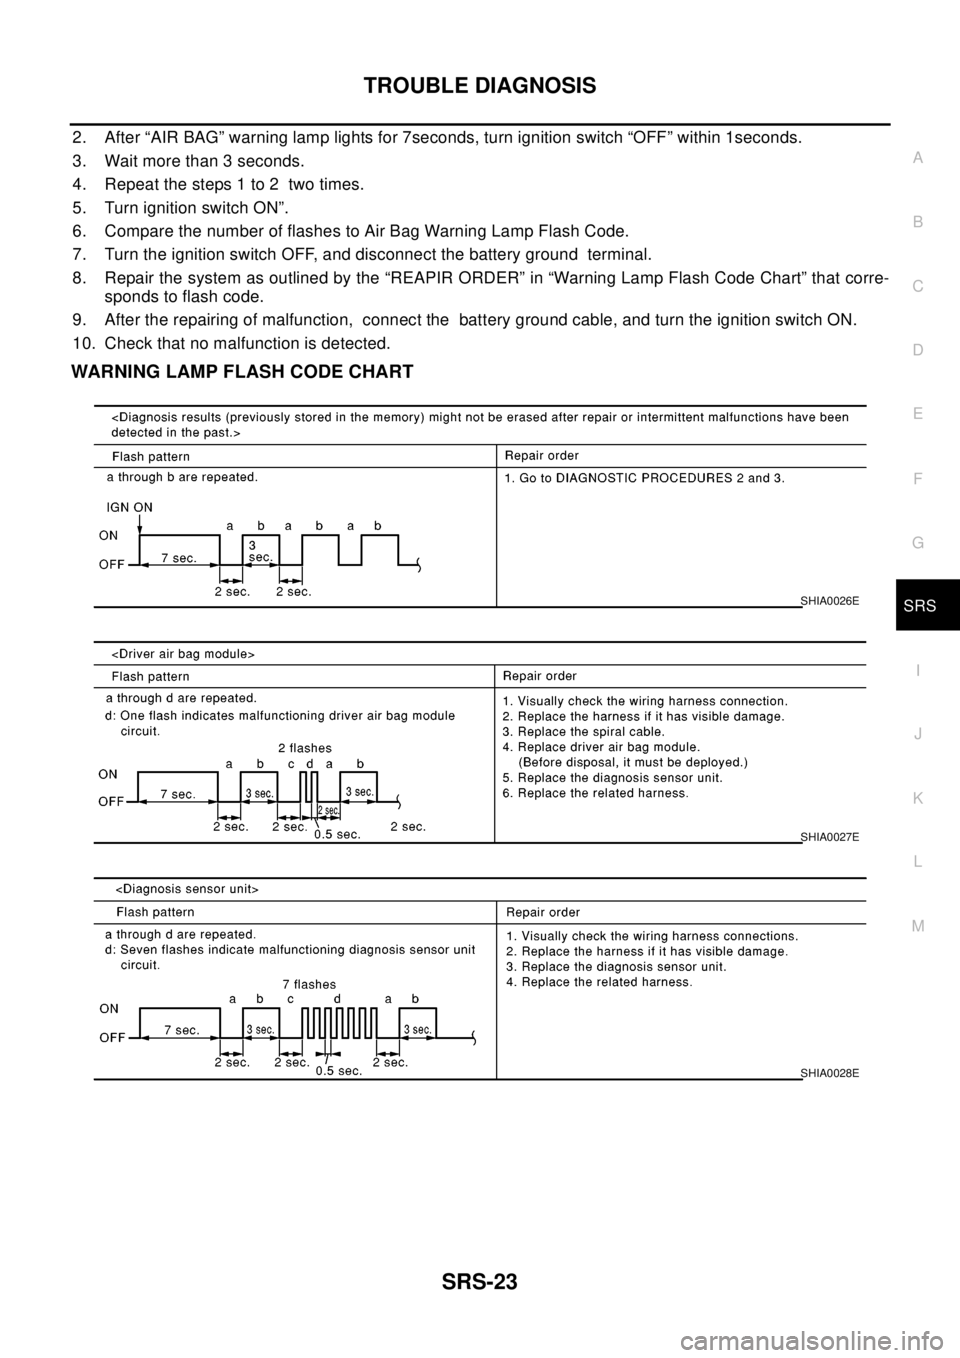
2. After “AIR BAG” warning lamp lights for 7seconds, turn ignition switch “OFF” within 1seconds.
3. Wait more than 3 seconds.
4. Repeat the steps 1 to 2 two times.
5. Turn ignition switch ON”.
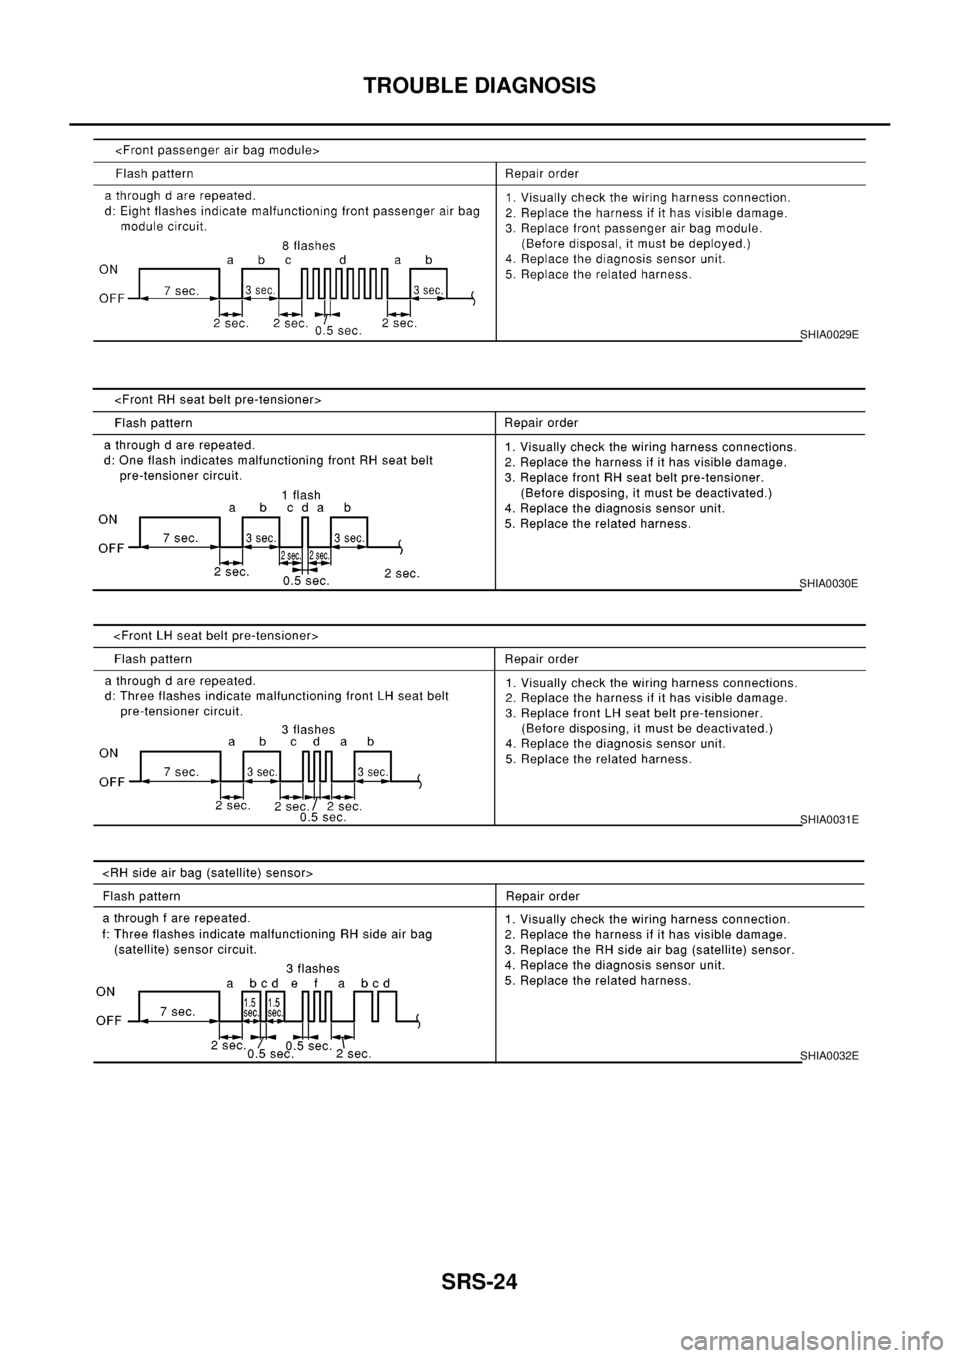
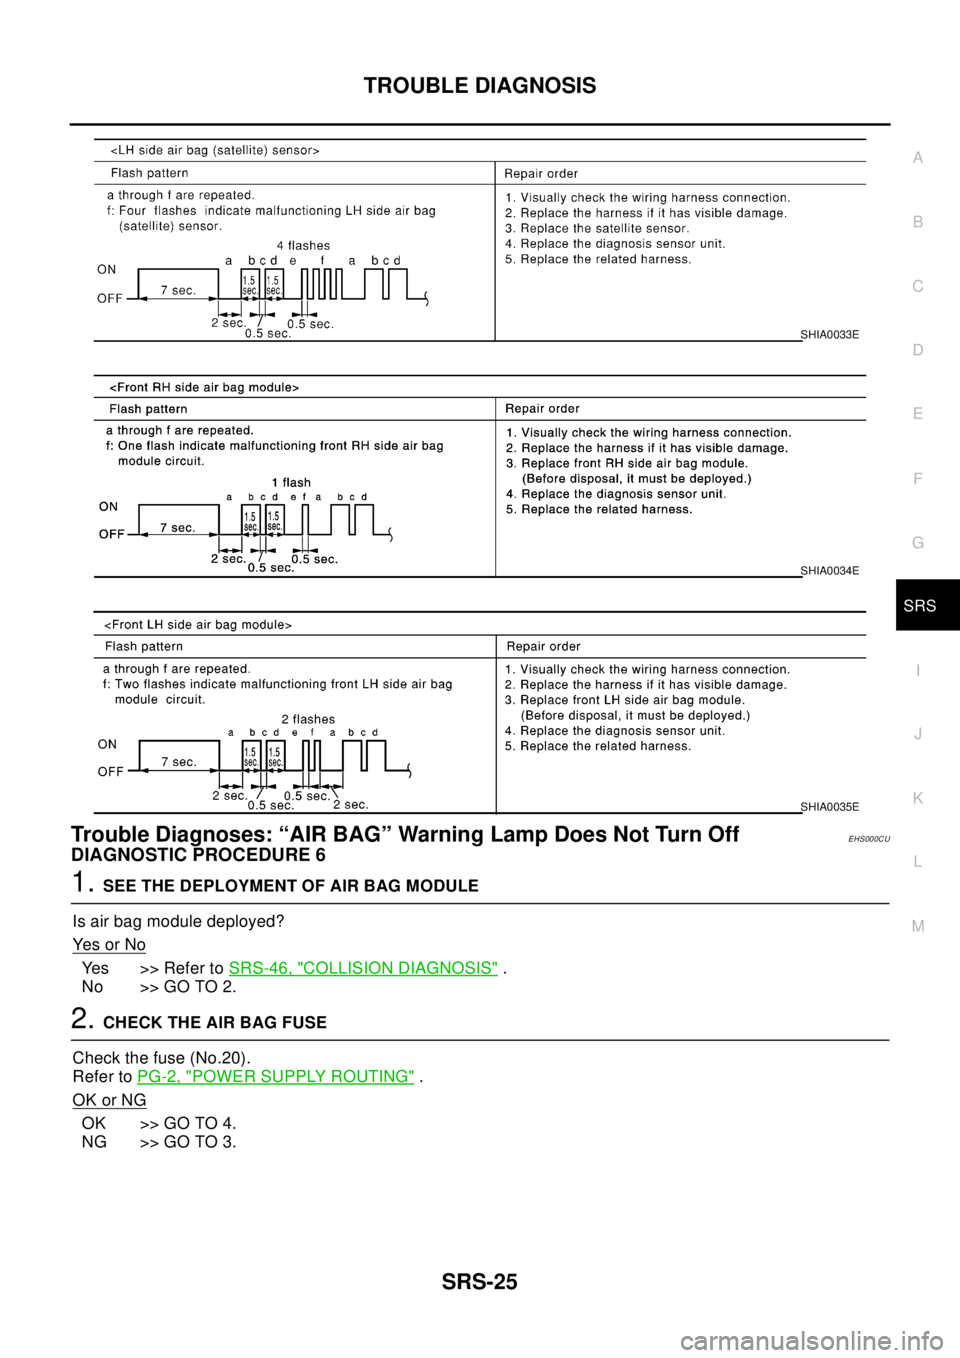
6. Compare the number of flashes to Air Bag Warning Lamp Flash Code.
7. Turn the ignition switch OFF, and disconnect the battery ground terminal.
8. Repair the system as outlined by the “REAPIR ORDER” in “Warning Lamp Flash Code Chart” that corre-
sponds to flash code.
9. After the repairing of malfunction, connect the battery ground cable, and turn the ignition switch ON.
10. Check that no malfunction is detected.
WARNING LAMP FLASH CODE CHART
SHIA0026E
SHIA0027E
SHIA0028E
Page 2946 of 3066
SRS-24
TROUBLE DIAGNOSIS
SHIA0029E
SHIA0030E
SHIA0031E
SHIA0032E
Page 2947 of 3066
TROUBLE DIAGNOSIS
SRS-25
C
D
E
F
G
I
J
K
L
MA
B
SRS
Trouble Diagnoses: “AIR BAG” Warning Lamp Does Not Turn OffEHS000CU
DIAGNOSTIC PROCEDURE 6
1.SEE THE DEPLOYMENT OF AIR BAG MODULE
Is air bag module deployed?
Ye s o r N o
Yes >> Refer toSRS-46, "COLLISION DIAGNOSIS".
No >> GO TO 2.
2.CHECK THE AIR BAG FUSE
Check the fuse (No.20).
Refer toPG-2, "
POWER SUPPLY ROUTING".
OK or NG
OK >> GO TO 4.
NG >> GO TO 3.
SHIA0033E
SHIA0034E
SHIA0035E
Page 2948 of 3066
SRS-26
TROUBLE DIAGNOSIS
3.CHECK AIR BAG FUSE AGAIN
Replace “AIR BAG” fuse and turn ignition switch ON.
Is
“AIR BAG”fuse blown again?
Yes >> Repair main harness.
No >>INSPECTION END
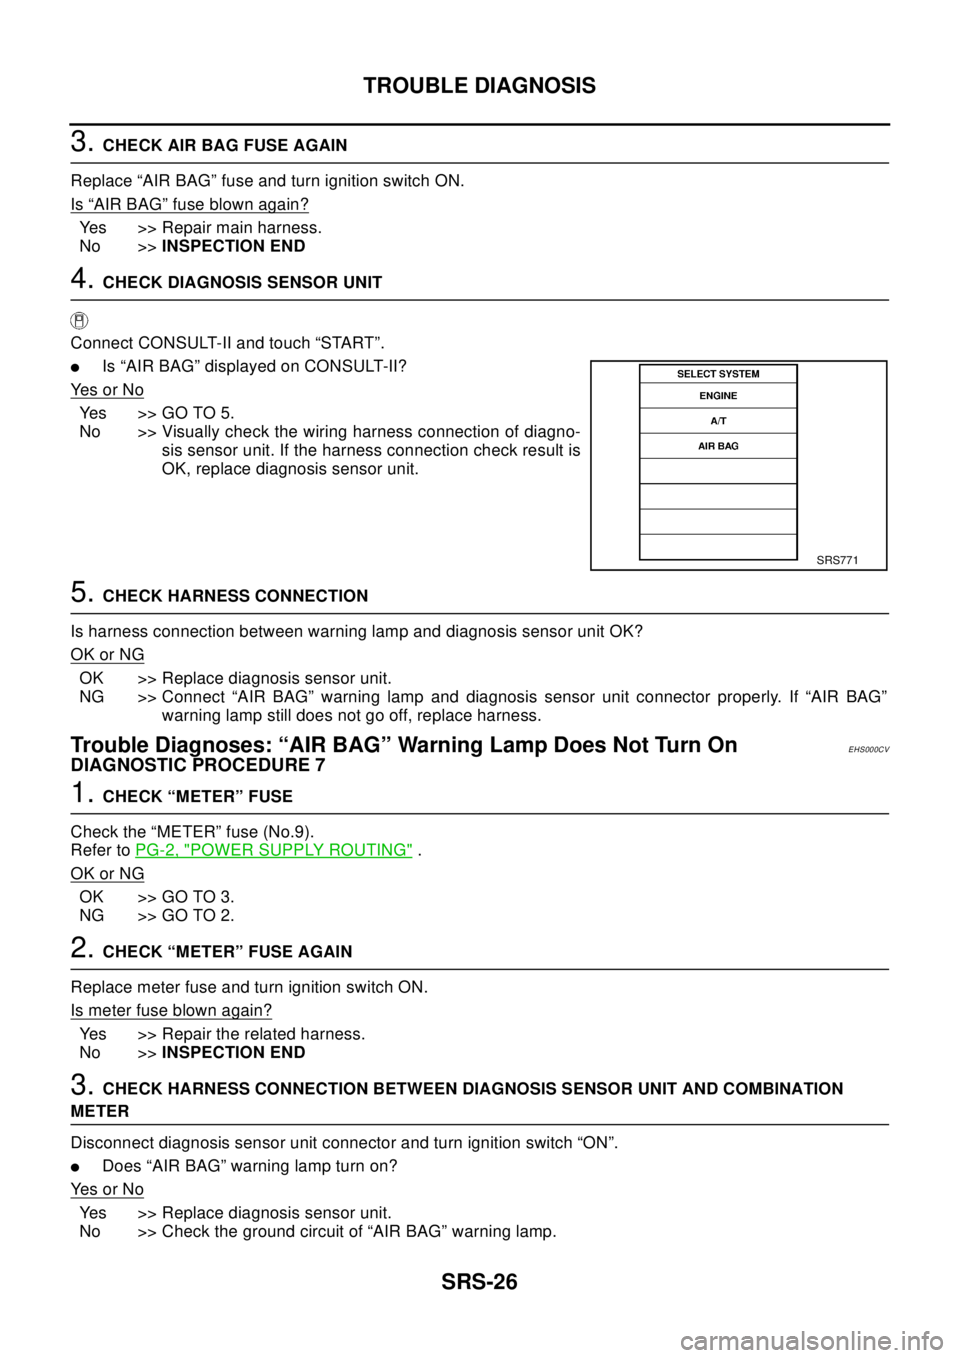
4.CHECK DIAGNOSIS SENSOR UNIT
Connect CONSULT-II and touch “START”.
lIs “AIR BAG” displayed on CONSULT-II?
Ye s o r N o
Yes >>GOTO5.
No >> Visually check the wiring harness connection of diagno-
sis sensor unit. If the harness connection check result is
OK, replace diagnosis sensor unit.
5.CHECK HARNESS CONNECTION
Is harness connection between warning lamp and diagnosis sensor unit OK?
OK or NG
OK >> Replace diagnosis sensor unit.
NG >> Connect “AIR BAG” warning lamp and diagnosis sensor unit connector properly. If “AIR BAG”
warning lamp still does not go off, replace harness.
Trouble Diagnoses: “AIR BAG” Warning Lamp Does Not Turn OnEHS000CV
DIAGNOSTIC PROCEDURE 7
1.CHECK “METER” FUSE
Check the “METER” fuse (No.9).
Refer toPG-2, "
POWER SUPPLY ROUTING".
OK or NG
OK >> GO TO 3.
NG >> GO TO 2.
2.CHECK “METER” FUSE AGAIN
Replace meter fuse and turn ignition switch ON.
Is meter fuse blown again?
Yes >> Repair the related harness.
No >>INSPECTION END
3.CHECK HARNESS CONNECTION BETWEEN DIAGNOSIS SENSOR UNIT AND COMBINATION
METER
Disconnect diagnosis sensor unit connector and turn ignition switch “ON”.
lDoes “AIR BAG” warning lamp turn on?
Ye s o r N o
Yes >> Replace diagnosis sensor unit.
No >> Check the ground circuit of “AIR BAG” warning lamp.
SRS771
Page 2949 of 3066
DRIVER AIR BAG MODULE
SRS-27
C
D
E
F
G
I
J
K
L
MA
B
SRS
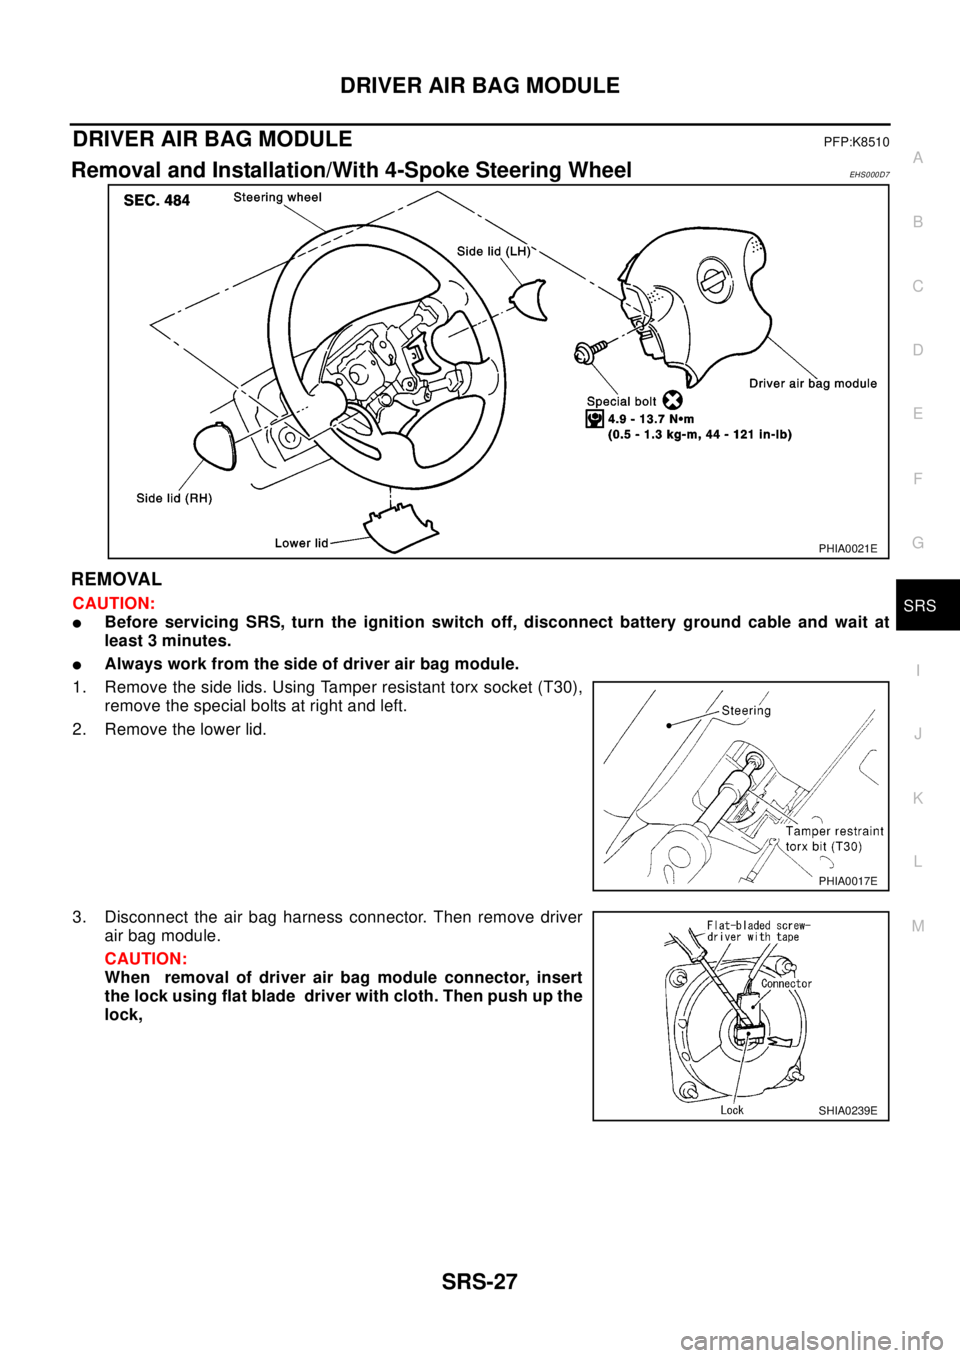
DRIVER AIR BAG MODULEPFP:K8510
Removal and Installation/With 4-Spoke Steering WheelEHS0 00 D7
REMOVAL
CAUTION:
lBefore servicing SRS, turn the ignition switch off, disconnect battery ground cable and wait at
least 3 minutes.
lAlways work from the side of driver air bag module.
1. Remove the side lids. Using Tamper resistant torx socket (T30),
remove the special bolts at right and left.
2. Remove the lower lid.
3. Disconnect the air bag harness connector. Then remove driver
air bag module.
CAUTION:
When removal of driver air bag module connector, insert
the lock using flat blade driver with cloth. Then push up the
lock,
PHIA0021E
PHIA0017E
SHIA0239E
Page 2950 of 3066
SRS-28
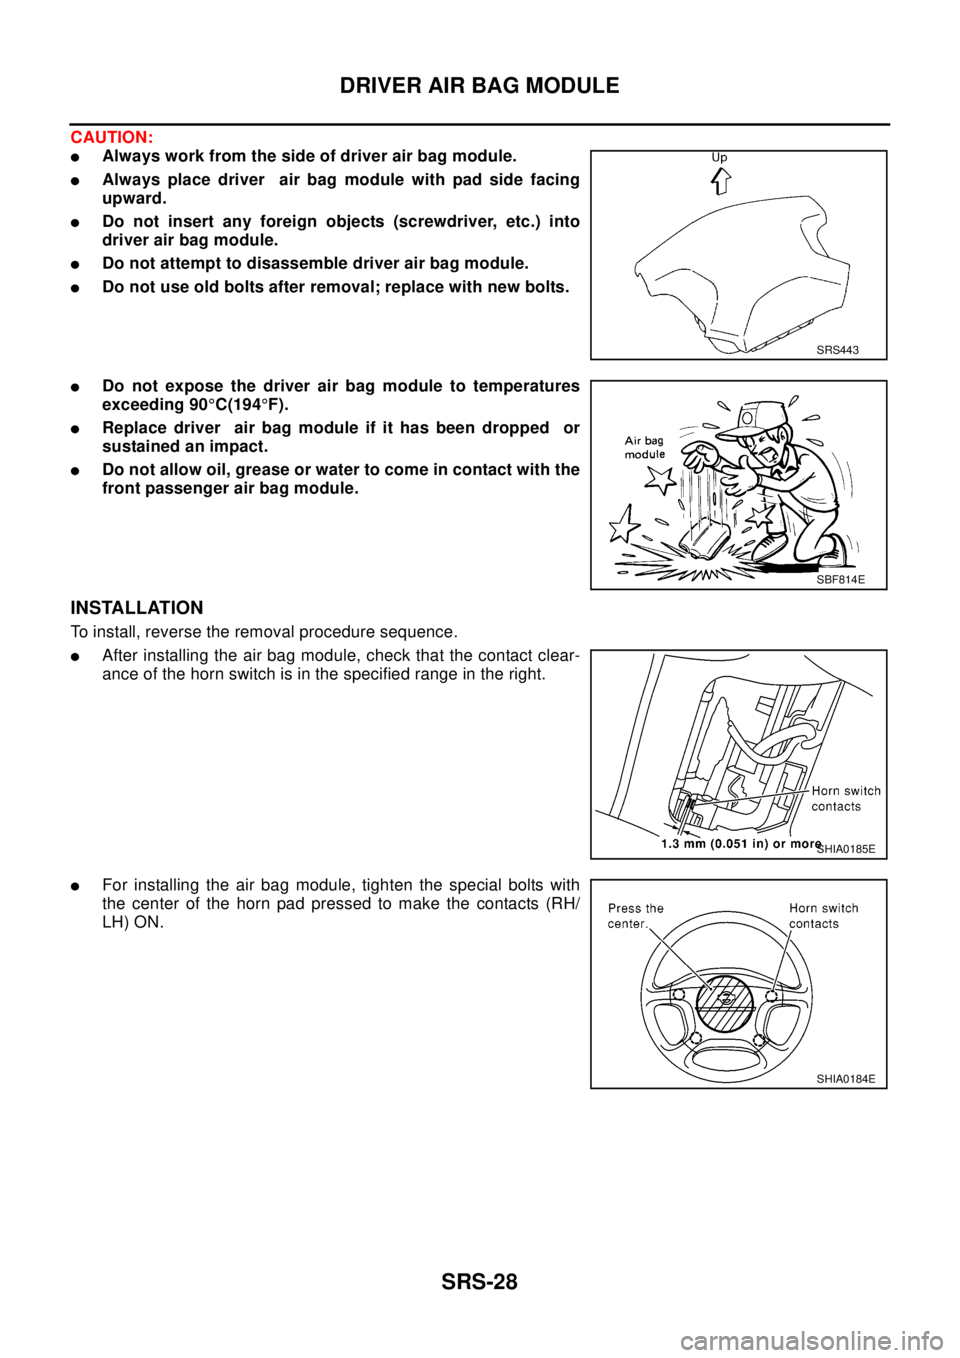
DRIVER AIR BAG MODULE
CAUTION:
lAlways work from the side of driver air bag module.
lAlways place driver air bag module with pad side facing
upward.
lDo not insert any foreign objects (screwdriver, etc.) into
driver air bag module.
lDo not attempt to disassemble driver air bag module.
lDo not use old bolts after removal; replace with new bolts.
lDo not expose the driver air bag module to temperatures
exceeding 90°C(194°F).
lReplace driver air bag module if it has been dropped or
sustained an impact.
lDo not allow oil, grease or water to come in contact with the
front passenger air bag module.
INSTALLATION
To install, reverse the removal procedure sequence.
lAfter installing the air bag module, check that the contact clear-
ance of the horn switch is in the specified range in the right.
lFor installing the air bag module, tighten the special bolts with
the center of the horn pad pressed to make the contacts (RH/
LH) ON.
SRS443
SBF814E
SHIA0185E
SHIA0184E