cooling NISSAN X-TRAIL 2003 Electronic Repair Manual
[x] Cancel search | Manufacturer: NISSAN, Model Year: 2003, Model line: X-TRAIL, Model: NISSAN X-TRAIL 2003Pages: 3066, PDF Size: 51.47 MB
Page 1 of 3066
MODEL T30 SERIES
2001 NISSAN EUROPE N.V.
All rights reserved. No part of this Electronic Service Manual may be reproduced or stored in a retrieval system, or transmitted in any
form, or by any means, electronic, mechanical, photocopying, recording or otherwise, without the prior written permission of Nissan
Europe N.V., Paris, France.
A GENERAL INFORMATION
B ENGINE
C TRANSMISSION/
TRANSAXLE
D DRIVELINE/AXLE
E SUSPENSION
F BRAKES
G STEERING
H RESTRAINTS
I BODY
J AIR CONDITIONER
K ELECTRICAL
L MAINTENANCE
M INDEXGI General Information
EM Engine Mechanical
LU Engine Lubrication System
CO Engine Cooling System
EC Engine Control System
FL Fuel System
EX Exhaust System
ACC Accelerator Control System
CL Clutch
MT Manual Transaxle
AT Automatic Transaxle
TF Transfer
PR Propeller Shaft
RFD Rear Final Drive
FAX Front Axle
RAX Rear Axle
FSU Front Suspension
RSU Rear Suspension
WT Road Wheels & Tires
BR Brake System
PB Parking Brake System
BRC Brake Control System
PS Power Steering System
SB Seat Belts
SRS Supplemental Restraint System (SRS)
BL Body, Lock & Security System
GW Glasses, Window System & Mirrors
RF Roof
EI Exterior & Interior
IP Instrument Panel
SE Seat
ATC Automatic Air Conditioner
MTC Manual AIr Conditioner
SC Starting & Charging System
LT Lighting System
DI Driver Information System
WW Wiper, Washer & Horn
BCS Body Control System
LAN LAN System
AV Audio, Visual & Telephone System
PG Power Supply, Ground & Circuit Elements
MA Maintenance
IDX Alphabetical Index
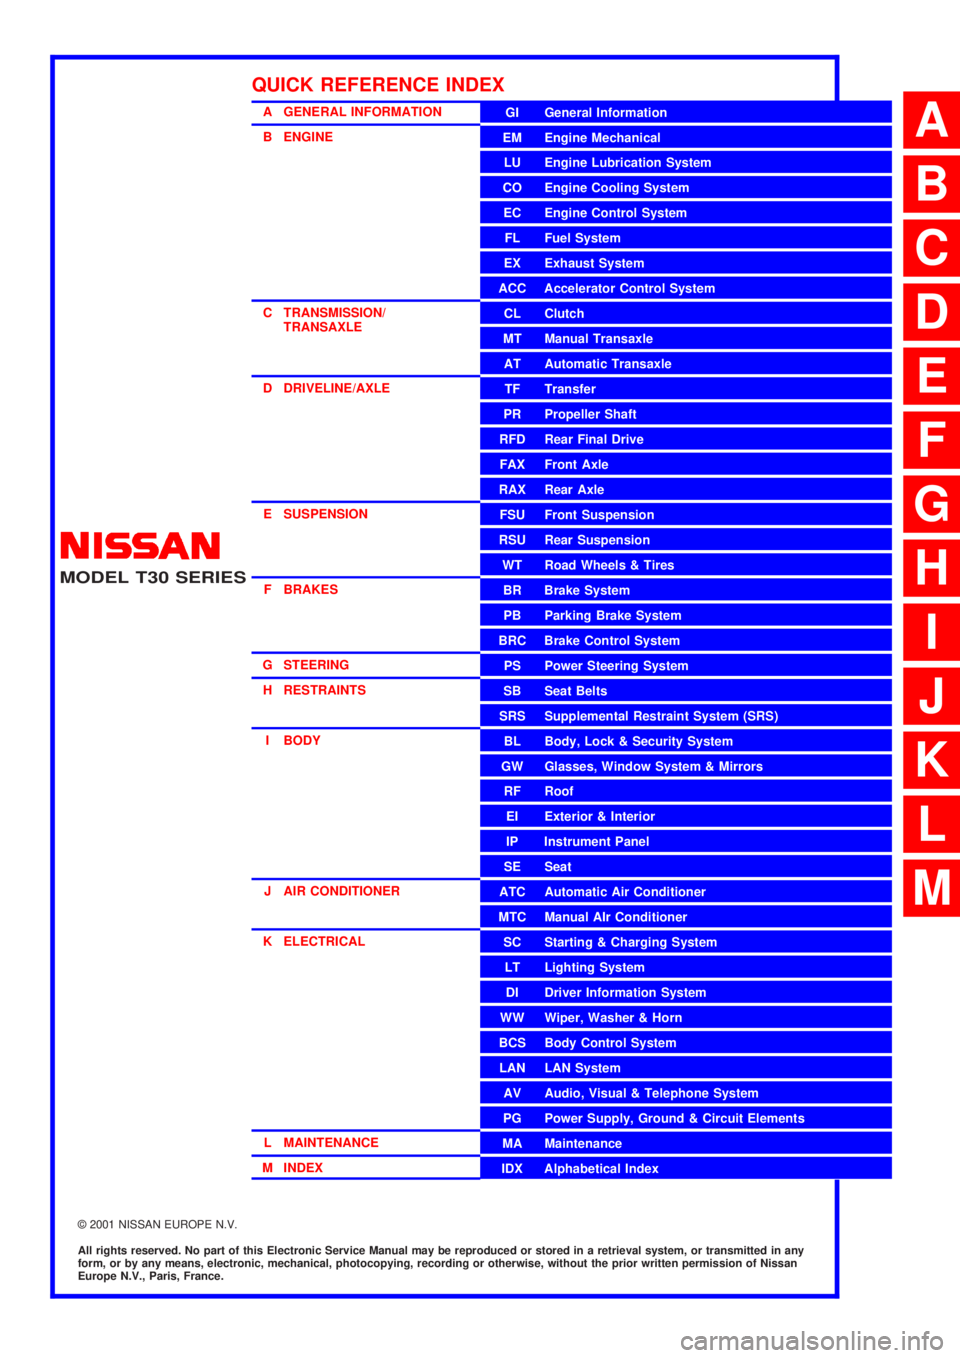
QUICK REFERENCE INDEX
A
B
C
D
E
F
G
H
I
J
K
L
M
Page 13 of 3066
PRECAUTIONS
AT-7
D
E
F
G
H
I
J
K
L
MA
B
AT
lAfter performing each TROUBLE DIAGNOSIS, perform
“DTC (Diagnostic Trouble Code) CONFIRMATION PROCE-
DURE”.
The DTC should not be displayed in the “DTC CONFIRMA-
TION PROCEDURE” if the repair is completed.
lBefore proceeding with disassembly, thoroughly clean the out-
side of the transaxle. It is important to prevent the internal parts
from becoming contaminated by dirt or other foreign matter.
lDisassembly should be done in a clean work area.
lUse lint-free cloth or towels for wiping parts clean. Common
shop rags can leave fibers that could interfere with the operation
of the transaxle.
lPlace disassembled parts in order for easier and proper assembly.
lAll parts should be carefully cleaned with a general purpose, non-flammable solvent before inspection or
reassembly.
lGaskets, seals and O-rings should be replaced any time the transaxle is disassembled.
lIt is very important to perform functional tests whenever they are indicated.
lThe valve body contains precision parts and requires extreme care when parts are removed and serviced.
Place disassembled valve body parts in order for easier and proper assembly. Care will also prevent
springs and small parts from becoming scattered or lost.
lProperly installed valves, sleeves, plugs, etc. will slide along bores in valve body under their own weight.
lBefore assembly, apply a coat of recommended ATF to all parts. Apply petroleum jelly to protect O-rings
and seals, or hold bearings and washers in place during assembly. Do not use grease.
lExtreme care should be taken to avoid damage to O-rings, seals and gaskets when assembling.
lAfter overhaul, refill the transaxle with new ATF.
lWhen the A/T drain plug is removed, only some of the fluid is drained. Old A/T fluid will remain in torque
converter and ATF cooling system.
Always follow the procedures under “Changing A/T Fluid” in the AT section when changing A/T fluid. Refer
to “Changing A/T Fluid”,AT-13, "
A/T FLUID".
Service Notice or PrecautionsECS004Q3
FAI L-S AFE
The TCM has an electronic Fail-Safe (limp home mode). This allows the vehicle to be driven even if a major
electrical input/output device circuit is damaged.
Under Fail-Safe, the vehicle always runs in third gear, even with a shift lever position of “1”, “2” or “D”. The cus-
tomer may complain of sluggish or poor acceleration.
When the ignition key is turned “ON” following Fail-Safe operation, O/D OFF indicator lamp blinks for about 8
seconds. Refer to SELF-DIAGNOSTIC PROCEDURE(WITHOUT CONSULT-II)",AT- 2 7 3 , "
Diagnostic Proce-
dure Without CONSULT-II"(EXCEPT FOR EURO-OBD) or "TCM Self-diagnostic Procedure(NO TOOLS)",
AT- 5 1 , "
TCM SELF-DIAGNOSTIC PROCEDURE (NO TOOLS)"(EURO-OBD).
The blinking of the O/D OFF indicator lamp for about 8 seconds will appear only once and be cleared. The
customer may resume normal driving conditions.
Always follow the “WORK FLOW”, refer toAT-284, "
Work Flow"(EXCEPT FOR Euro-OBD) orAT-61, "Work
Flow"(Euro-OBD).
The SELF-DIAGNOSIS results will be as follows:
lThe first SELF-DIAGNOSIS will indicate damage to the vehicle speed sensor or the revolution sensor.
lDuring the next SELF-DIAGNOSIS, performed after checking the sensor, no damages will be indicated.
TORQUE CONVERTER SERVICE
The torque converter should be replaced under any of the following conditions:
lExternal leaks in the hub weld area.
lConverter hub is scored or damaged.
lConverter pilot is broken, damaged or fits poorly into crankshaft.
lSteel particles are found after flushing the cooler and cooler lines.
lPump is damaged or steel particles are found in the converter.
SAT652J
Page 19 of 3066

A/T FLUID
AT-13
D
E
F
G
H
I
J
K
L
MA
B
AT
A/T FLUIDPFP:KLE40
Checking A/T FluidECS004Q7
1. Warm up engine.
2. Check for fluid leakage.
3. Before driving, fluid level can be checked at fluid temperatures
of 30 to 50°C (86 to 122°F) using “COLD” range on dipstick.
a. Park vehicle on level surface and set parking brake.
b. Start engine and move selector lever through each gear posi-
tion. Leave selector lever in “P” position.
c. Check fluid level with engine idling.
d. Remove dipstick and note reading. If level is at low side of either
range, and fluid to the charging pipe.
e. Re-insert dipstick into charging pipe as far as it will go.
f. Remove dipstick and note reading. If reading is at low side of range, add fluid to the charging pipe.
Do not overfill.
4. Drive vehicle for approximately 5 minutes in urban areas.
5. Re-check fluid level at fluid temperatures of 50 to 80°C (122 to 176°F) using “HOT” range on dipstick.
6. Check fluid condition.
lIf fluid is very dark or smells burned, refer to AT section for
checking operation of A/T. Flush cooling system after repair of
A/T.
lIf A/T fluid contains frictional material (clutches, bands, etc.),
replace radiator and flush cooler line using cleaning solvent
and compressed air after repair of A/T. Refer toCO-12,
"RADIATOR",CO-15, "RADIATOR (ALUMINUM TYPE)",,.
Changing A/T FluidECS004Q8
1. Warm up A/T fluid.
2. Stop engine.
3. Drain A/T fluid from drain plug and refill with new A/T fluid.
Always refill same volume with drained fluid.
4. Run engine at idle speed for five minutes.
5. Check fluid level and condition. Refer to “Checking A/T Fluid”. If fluid is still dirty, repeat steps 2 through 5.
SMA827CA
SMA853B
Fluid grade:
Genuine Nissan ATF or equivalent. Refer toMA-
17, "RECOMMENDED FLUIDS AND LUBRI-
CANTS".
Fluid capacity (With torque converter):
Approx. 8.0 (7.01 lmp qt)
Drain plug:
:29-39N·m(3.0-4.0kg-m,22-29ft-lb)
SMA027D
Page 580 of 3066

ATC-2
DEFROSTER (DEF) SWITCH ............................. 27
MODE SWITCH ................................................... 27
FAN SWITCH ...................................................... 27
OFF SWITCH ...................................................... 27
FRESH (FRE) SWITCH ....................................... 27
RECIRCULATION (REC) SWITCH ..................... 27
Discharge Air Flow ................................................. 28
System Description ................................................. 29
SWITCHES AND THEIR CONTROL FUNCTION... 29
TROUBLE DIAGNOSIS ............................................ 30
How to Perform Trouble Diagnoses for Quick and
Accurate Repair ...................................................... 30
WORK FLOW ...................................................... 30
SYMPTOM TABLE .............................................. 30
Component Parts and Harness Connector Location... 31
ENGINE COMPARTMENT .................................. 31
PASSENGER COMPARTMENT .......................... 32
Circuit Diagram ....................................................... 33
WITH GASOLINE ENGINE ................................. 33
WITH DIESEL ENGINE ....................................... 34
Wiring Diagram ....................................................... 35
WITH DASOLINE ENGINE ................................. 35
WITH DIESEL ENGINE ....................................... 38
Auto Amp. Terminals and Reference Value ............ 41
PIN CONNECTOR TERMINAL LAYOUT ............ 41
AUTO AMP. INSPECTION TABLE ...................... 41
Self-diagnosis Function .......................................... 42
DESCRIPTION .................................................... 42
PROCEDURE ...................................................... 43
AUXILIARY MECHANISM: TEMPERATURE
SETTING TRIMMER ........................................... 49
AUXILIARY MECHANISM: FOOT POSITION
SETTING TRIMMER ........................................... 50
AUXILIARY MECHANISM: INLET PORT MEM-
ORY FUNCTION (FOR LHD MODELS) .............. 51
Operational Check .................................................. 51
CHECKING MEMORY FUNCTION ..................... 51
CHECKING BLOEWER ....................................... 52
CHECKING DISCHARGE AIR ............................ 52
CHECKING RECIRCULATION ............................ 52
CHECKING TEMPERATURE DECREASE ......... 53
CHECKING TEMPERATURE INCREASE .......... 53
CHECKING AUTO MODE ................................... 53
Power Supply and Ground Circuit for Auto Amp. ... 53
INSPECTION FLOW ........................................... 54
COMPONENT DESCRIPTION ............................ 54
DIAGNOSTIC PROCEDURE .............................. 55
LAN System Circuit ................................................ 56
DIAGNOSTIC PROCEDURE .............................. 56
Mode Door Motor Circuit ........................................ 58
INSPECTION FLOW ........................................... 59
SYSTEM DESCRIPTION .................................... 60
COMPONENT DESCRIPTION ............................ 61
DIAGNOSTIC PROCEDURE .............................. 61
Air Mix Door Motor Circuit ...................................... 61
INSPECTION FLOW ........................................... 62
SYSTEM DESCRIPTION .................................... 62
COMPONENT DESCRIPTION ............................ 64DIAGNOSTIC PROCEDURE ...............................64
Intake Door Motor Circuit ........................................64
INSPECTION FLOW ............................................65
SYSTEM DESCRIPTION .....................................65
COMPONENT DESCRIPTION ............................66
DIAGNOSTIC PROCEDURE ...............................67
Blower Motor Circuit ................................................67
INSPECTION FLOW ............................................68
SYSTEM DESCRIPTION .....................................69
COMPONENT DESCRIPTION ............................70
DIAGNOSTIC PROCEDURE ...............................70
COMPONENT INSPECTION ...............................73
Magnet Clutch Circuit ..............................................73
INSPECTION FLOW ............................................74
SYSTEM DESCRIPTION .....................................74
DIAGNOSTIC PROCEDURE ...............................75
COMPONENT INSPECTION ...............................80
Insufficient Cooling ..................................................81
INSPECTION FLOW ............................................82
PERFORMANCE TEST DIAGNOSES ................83
PERFORMANCE CHART ....................................84
TROUBLE DIAGNOSES FOR ABNORMAL
PRESSURE .........................................................86
Insufficient Heating .................................................89
INSPECTION FLOW ............................................90
Noise .......................................................................91
INSPECTION FLOW ............................................91
Self-diagnosis .........................................................92
INSPECTION FLOW ............................................92
Memory Function ....................................................92
INSPECTION FLOW ............................................93
Ambient Sensor Circuit ...........................................93
COMPONENT DESCRIPTION ............................93
AMBIENT TEMPERATURE INPUT PROCESS...93
DIAGNOSTIC PROCEDURE ...............................94
COMPONENT INSPECTION ...............................95
In-vehicle Sensor Circuit .........................................95
COMPONENT DESCRIPTION ............................95
DIAGNOSTIC PROCEDURE ...............................96
COMPONENT INSPECTION ...............................97
Sunload Sensor Circuit ...........................................98
COMPONENT DESCRIPTION ............................98
SUNLOAD INPUT PROCESS .............................98
DIAGNOSTIC PROCEDURE ...............................98
COMPONENT INSPECTION ............................. 100
Intake Sensor Circuit ............................................. 101
COMPONENT DESCRIPTION .......................... 101
DIAGNOSTIC PROCEDURE ............................. 101
CONTROLLER ........................................................ 104
Removal and Installation ....................................... 104
Disassembly and Assembly .................................. 104
AMBIENT SENSOR ................................................ 105
Removal and Installation ....................................... 105
IN-VEHICLE SENSOR ............................................ 106
Removal and Installation ....................................... 106
SUNLOAD SENSOR ............................................... 107
Removal and Installation ....................................... 107
Page 581 of 3066

ATC-3
C
D
E
F
G
H
I
K
L
MA
B
AT C INTAKE SENSOR CIRCUIT ................................... 108
Removal and Installation ...................................... 108
BLOWER UNIT ....................................................... 109
Removal and Installation ...................................... 109
REMOVAL ......................................................... 109
INSTALLATION ................................................. 109
Disassembly and Assembly ................................. 109
BLOWER MOTOR ................................................... 111
Removal and Installation ...................................... . 111
INTAKE DOOR MOTOR .......................................... 112
Removal and Installation ....................................... 112
FAN CONTROL AMPLIFIER ................................... 113
Removal and Installation ....................................... 113
VENTILATION AIR FILTER ..................................... 114
Removal and Installation ....................................... 114
Function ................................................................ 114
Replacement Timing ............................................. 114
Replacement Procedures ...................................... 114
HEATER & COOLING UNIT ASSEMBLY ............... 115
Removal and Installation ....................................... 115
REMOVAL .......................................................... 115
INSTALLATION .................................................. 116
Disassembly and Assembly .................................. 116
MODE DOOR MOTOR ............................................ 118
Removal and Installation ....................................... 118
AIR MIX DOOR MOTOR .......................................... 119
Removal and Installation ....................................... 119
HEATER CORE ...................................................... 120
Removal and Installation ...................................... 120
DUCTS AND GRILLES .......................................... 121
Removal and Installation ...................................... 121
Ventilator Duct, Defroster Nozzle and Defroster
Ducts .................................................................... 121
Center Ventilator Grille ......................................... 121
Side Ventilator Grille ............................................. 121
Foot Duct .............................................................. 122
Floor duct ............................................................. 122
REFRIGERANT LINES ........................................... 123
HFC-134a (R-134a) Service Procedure ............... 123
SETTING OF SERVICE TOOLS AND EQUIP-
MENT ................................................................ 123
Components ......................................................... 125
Removal and Installation for Compressor ............ 126REMOVAL .........................................................126
INSTALLATION .................................................128
Removal and Installation for Compressor Clutch . 129
REMOVAL .........................................................129
INSTALLATION .................................................132
Removal and Installation for Low-pressure flexible
hose ......................................................................135
REMOVAL .........................................................135
INSTALLATION .................................................136
Removal and Installation for High-pressure flexible
hose ......................................................................136
REMOVAL .........................................................136
INSTALLATION .................................................136
Removal and Installation for High-pressure pipe ..137
REMOVAL .........................................................137
INSTALLATION .................................................137
Removal and Installation for Refrigerant Pressure
Sensor ..................................................................137
Removal and Installation for Dual-pressure Switch.138
Removal and Installation for Condenser ..............138
REMOVAL .........................................................138
INSTALLATION .................................................138
Removal and Installation for Evaporator ..............139
REMOVAL .........................................................139
INSTALLATION .................................................139
Removal and Installation for Expansion Valve ......140
Removal and Installation for Desiccant Assembly. 140
REMOVAL .........................................................140
INSTALLATION .................................................140
Checking for Refrigerant Leaks ............................140
Checking System for Leaks Using the Fluorescent
Leak Detector .......................................................141
Dye Injection .........................................................141
Electronic Refrigerant Leak Detector ....................141
PRECAUTIONS FOR HANDLING LEAK
DETECTOR .......................................................141
CHECKING PROCEDURE ...............................142
Service Data and Specifications (SDS) ................143
COMPRESSOR ................................................143
LUBRICANT ......................................................144
REFRIGERANT .................................................144
ENGINE IDLING SPEED ..................................144
BELT TENSION .................................................144
Page 583 of 3066
PRECAUTIONS
ATC-5
C
D
E
F
G
H
I
K
L
MA
B
AT C
property damage. Additional health and safety information may be obtained from refrigerant man-
ufacturers.
Lubricant PrecautionsEJS000T3
lUse only specified lubricant for the HFC-134a (R-134a) A/C system and HFC-134a (R-134a) components.
If lubricant other than that specified is used, compressor failure is likely to occur.
lThe specified HFC-134a (R-134a) lubricant rapidly absorbs moisture from the atmosphere. The following
handling precautions must be observed:
–When removing refrigerant components from a vehicle, immediately cap (seal) the component to minimize
the entry of moisture from the atmosphere.
–When installing refrigerant components to a vehicle, do not remove the caps (unseal) until just before con-
necting the components. Connect all refrigerant loop components as quickly as possible to minimize the
entry of moisture into system.
–Only use the specified lubricant from a sealed container. Immediately reseal containers of lubricant. With-
out proper sealing, lubricant will become moisture saturated and should not be used.
lAvoid breathing A/C refrigerant and lubricant vapor or mist. Exposure may irritate eyes, nose and throat.
Remove R-134a from the A/C system, using certified service equipment meeting requirements of SAE
J2210 (R-134a recycling equipment), or J2209 (R-134a recovery equipment). If accidental system dis-
charge occurs, ventilate work area before resuming service. Additional health and safety information may
be obtained from refrigerant and lubricant manufacturers.
lDo not allow lubricant (Nissan A/C System Oil Type S) to come in contact with styrofoam parts. Damage
may result.
Precautions for Refrigerant ConnectionEJS000T4
A new type refrigerant connection has been introduced to all refrigerant lines except the following location.
lExpansion valve to cooling unit
lRefrigerant pressure sensor to liquid tank
FEATURES OF NEW TYPE REFRIGERANT CONNECTION
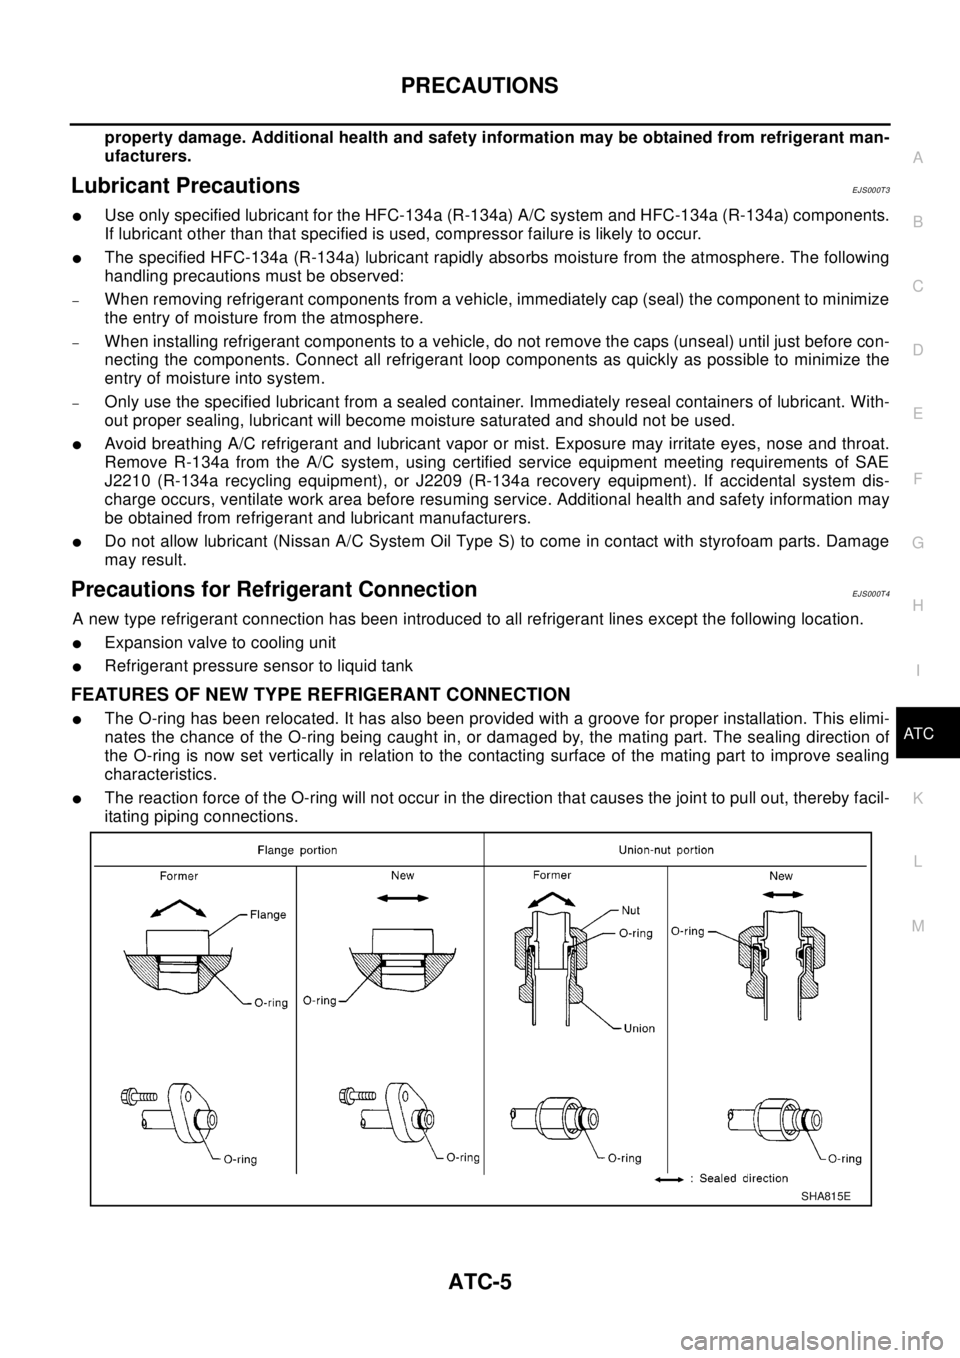
lThe O-ring has been relocated. It has also been provided with a groove for proper installation. This elimi-
nates the chance of the O-ring being caught in, or damaged by, the mating part. The sealing direction of
the O-ring is now set vertically in relation to the contacting surface of the mating part to improve sealing
characteristics.
lThe reaction force of the O-ring will not occur in the direction that causes the joint to pull out, thereby facil-
itating piping connections.
SHA815E
Page 595 of 3066
![NISSAN X-TRAIL 2003 Electronic Repair Manual REFRIGERATION SYSTEM
ATC-17
C
D
E
F
G
H
I
K
L
MA
B
AT C
cm2, 540 psi)], the release port on the pressure relief valve automatically opens and releases refrigerant into
the atmosphere.
V-6 Variable Dis NISSAN X-TRAIL 2003 Electronic Repair Manual REFRIGERATION SYSTEM
ATC-17
C
D
E
F
G
H
I
K
L
MA
B
AT C
cm2, 540 psi)], the release port on the pressure relief valve automatically opens and releases refrigerant into
the atmosphere.
V-6 Variable Dis](/img/5/57402/w960_57402-594.png)
REFRIGERATION SYSTEM
ATC-17
C
D
E
F
G
H
I
K
L
MA
B
AT C
cm2, 540 psi)], the release port on the pressure relief valve automatically opens and releases refrigerant into
the atmosphere.
V-6 Variable Displacement Compressor (With Gasoline Engine: CWV-165M
Compressor)
EJS000TF
GENERAL INFORMATION
1. The V-6 variable compressor differs from previous units. The vent temperatures of the V-6 variable com-
pressor do not drop too far below 5°C(41°F) when:
Evaporator intake air temperature is less than 20°C(68°F).
Engine is running at speeds less than 1,500 rpm.
This is because the V-6 compressor provides a means of "capacity" control.
2. The V-6 variable compressor provides refrigerant control under varying conditions. During cold winters, it
may not produce high refrigerant pressure discharge (compared to previous units) when used with air
conditioning systems.
3. A "clanking" sound may occasionally be heard during refrigerant charge. The sound indicates that the tilt
angle of the swash plate has changed and is not a problem.
4. For air conditioning systems with the V-6 compressor, the clutch remains engaged unless: the system
main switch, fan switch or ignition switch is turned OFF. When ambient (outside) temperatures are low or
when the amount of refrigerant is insufficient, the clutch is disengaged to protect the compressor.
5. A constant range of suction pressure is maintained when engine speed is greater than a certain value. It
normally ranges from 147 to 177 kPa (1.5 to 1.8 kg/cm
2, 21 to 26 psi) under varying conditions.
In previous compressors, however, suction pressure was reduced with increases in engine speed.
DESCRIPTION
General
The variable compressor is basically a swash plate type that changes piston stroke in response to the required
cooling capacity.
RJIA0198E
Page 596 of 3066
ATC-18
REFRIGERATION SYSTEM
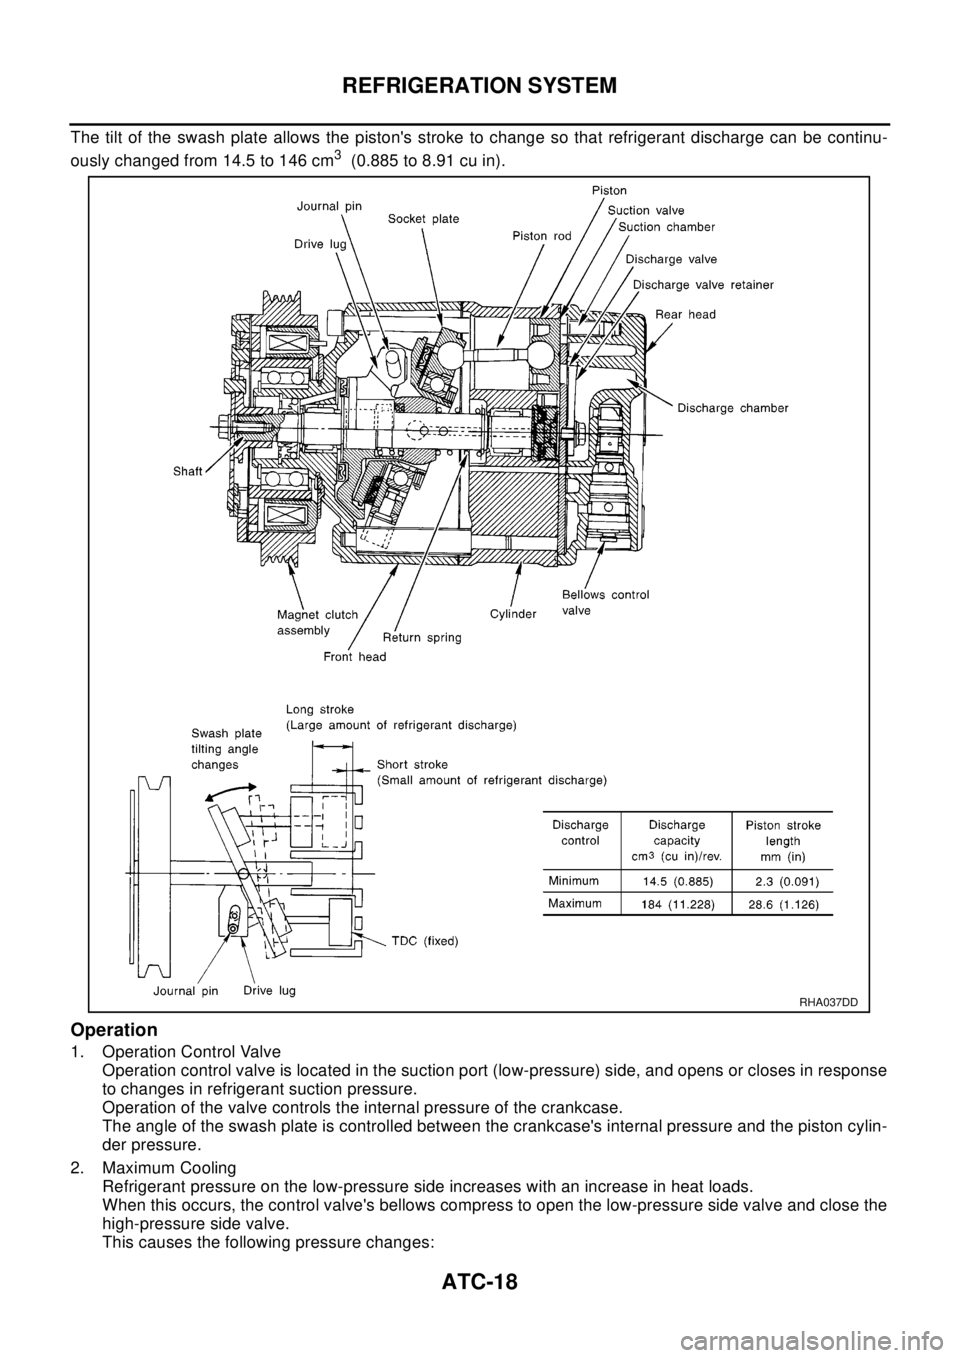
The tilt of the swash plate allows the piston's stroke to change so that refrigerant discharge can be continu-
ously changed from 14.5 to 146 cm
3(0.885 to 8.91 cu in).
Operation
1. Operation Control Valve
Operation control valve is located in the suction port (low-pressure) side, and opens or closes in response
to changes in refrigerant suction pressure.
Operation of the valve controls the internal pressure of the crankcase.
The angle of the swash plate is controlled between the crankcase's internal pressure and the piston cylin-
der pressure.
2. Maximum Cooling
Refrigerant pressure on the low-pressure side increases with an increase in heat loads.
When this occurs, the control valve's bellows compress to open the low-pressure side valve and close the
high-pressure side valve.
This causes the following pressure changes:
RHA037DD
Page 599 of 3066
LUBRICANT
ATC-21
C
D
E
F
G
H
I
K
L
MA
B
AT C
LUBRICANTPFP:KLG00
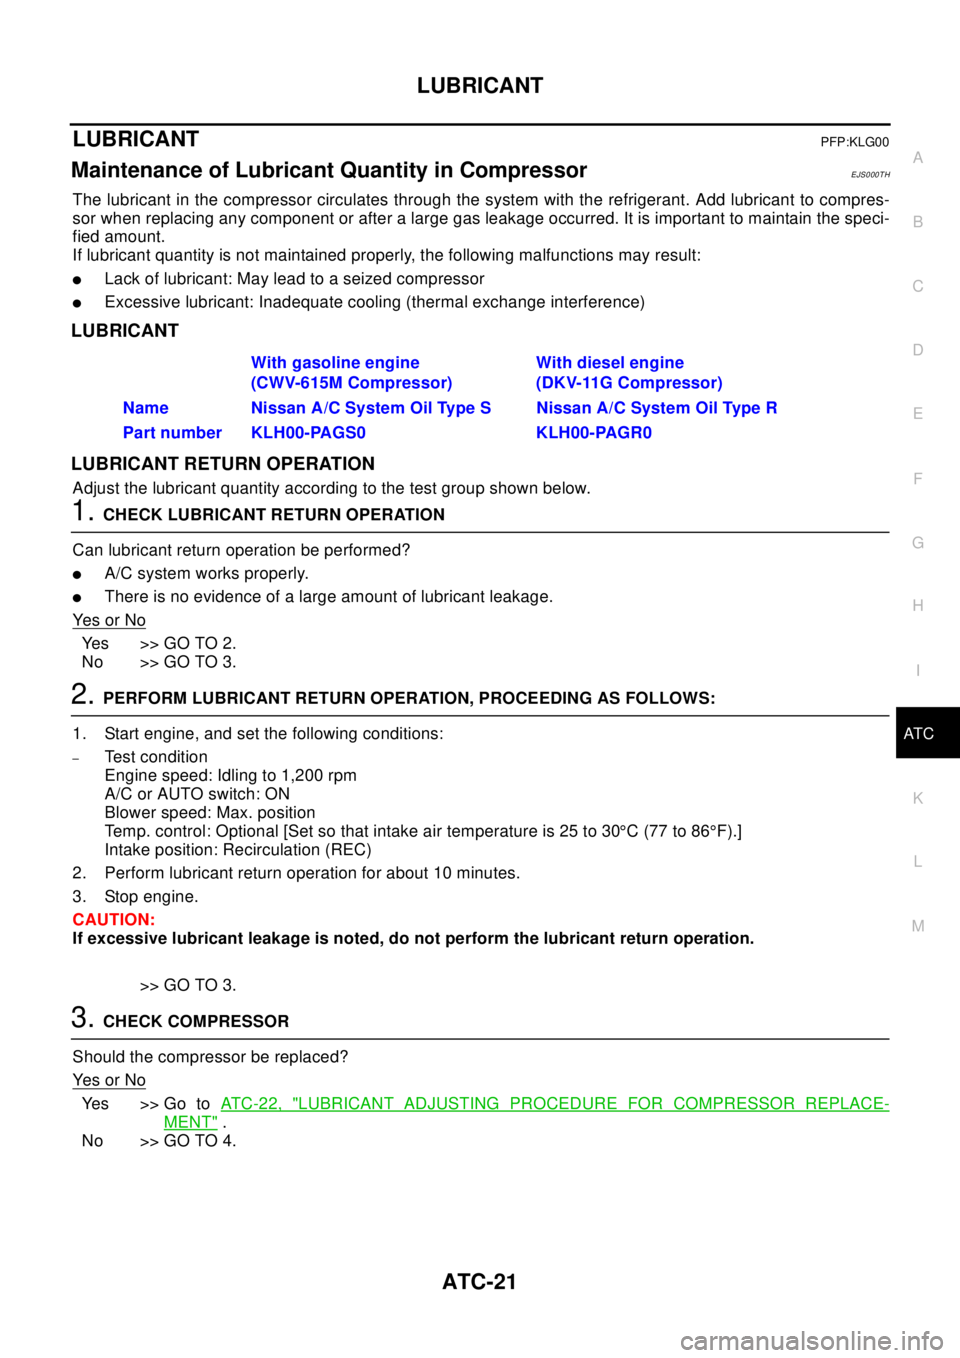
Maintenance of Lubricant Quantity in CompressorEJS000TH
The lubricant in the compressor circulates through the system with the refrigerant. Add lubricant to compres-
sor when replacing any component or after a large gas leakage occurred. It is important to maintain the speci-
fied amount.
If lubricant quantity is not maintained properly, the following malfunctions may result:
lLack of lubricant: May lead to a seized compressor
lExcessive lubricant: Inadequate cooling (thermal exchange interference)
LUBRICANT
LUBRICANT RETURN OPERATION
Adjust the lubricant quantity according to the test group shown below.
1.CHECK LUBRICANT RETURN OPERATION
Can lubricant return operation be performed?
lA/C system works properly.
lThere is no evidence of a large amount of lubricant leakage.
Ye s o r N o
Yes >>GOTO2.
No >> GO TO 3.
2.PERFORM LUBRICANT RETURN OPERATION, PROCEEDING AS FOLLOWS:
1. Start engine, and set the following conditions:
–Test condition
Engine speed: Idling to 1,200 rpm
A/C or AUTO switch: ON
Blower speed: Max. position
Temp. control: Optional [Set so that intake air temperature is 25 to 30°C (77 to 86°F).]
Intake position: Recirculation (REC)
2. Perform lubricant return operation for about 10 minutes.
3. Stop engine.
CAUTION:
If excessive lubricant leakage is noted, do not perform the lubricant return operation.
>> GO TO 3.
3.CHECK COMPRESSOR
Should the compressor be replaced?
Ye s o r N o
Ye s > > G o t oAT C - 2 2 , "LUBRICANT ADJUSTING PROCEDURE FOR COMPRESSOR REPLACE-
MENT".
No >> GO TO 4.With gasoline engine
(CWV-615M Compressor)With diesel engine
(DKV-11G Compressor)
Name Nissan A/C System Oil Type S Nissan A/C System Oil Type R
Part number KLH00-PAGS0 KLH00-PAGR0
Page 608 of 3066
ATC-30
TROUBLE DIAGNOSIS
TROUBLE DIAGNOSIS
PFP:00004
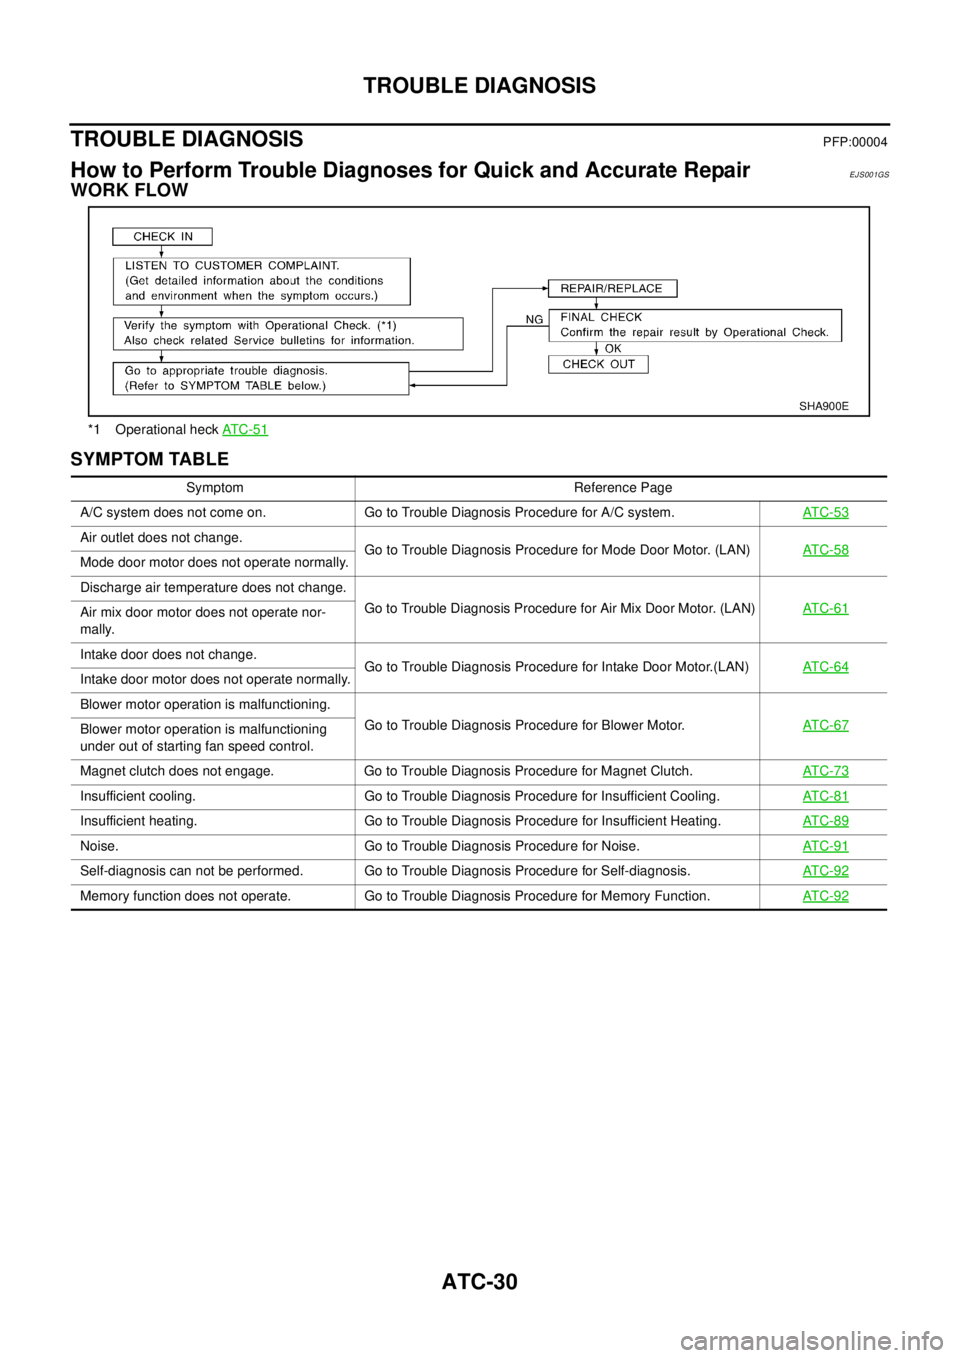
How to Perform Trouble Diagnoses for Quick and Accurate RepairEJS001GS
WORK FLOW
SYMPTOM TABLE
*1 Operational heckAT C -5 1
SHA900E
Symptom Reference Page
A/C system does not come on. Go to Trouble Diagnosis Procedure for A/C system.AT C - 5 3
Air outlet does not change.
Go to Trouble Diagnosis Procedure for Mode Door Motor. (LAN)AT C - 5 8
Mode door motor does not operate normally.
Discharge air temperature does not change.
Go to Trouble Diagnosis Procedure for Air Mix Door Motor. (LAN)AT C - 6 1
Air mix door motor does not operate nor-
mally.
Intake door does not change.
Go to Trouble Diagnosis Procedure for Intake Door Motor.(LAN)AT C - 6 4
Intake door motor does not operate normally.
Blower motor operation is malfunctioning.
Go to Trouble Diagnosis Procedure for Blower Motor.AT C - 6 7
Blower motor operation is malfunctioning
under out of starting fan speed control.
Magnet clutch does not engage. Go to Trouble Diagnosis Procedure for Magnet Clutch.AT C - 7 3
Insufficient cooling. Go to Trouble Diagnosis Procedure for Insufficient Cooling.AT C - 8 1
Insufficient heating. Go to Trouble Diagnosis Procedure for Insufficient Heating.AT C - 8 9
Noise. Go to Trouble Diagnosis Procedure for Noise.AT C - 9 1
Self-diagnosis can not be performed. Go to Trouble Diagnosis Procedure for Self-diagnosis.AT C - 9 2
Memory function does not operate. Go to Trouble Diagnosis Procedure for Memory Function.AT C - 9 2