OPEL GT-R 1973 Service Manual
Manufacturer: OPEL, Model Year: 1973, Model line: GT-R, Model: OPEL GT-R 1973Pages: 625, PDF Size: 17.22 MB
Page 261 of 625
CONTENTS
SubjectPage No.
DESCRIPTION AND OPERATION:
Power
BrakeBooster. . . . . . . . . . . . . . . . . . . . . . . . . . . . . . . . . . . . . . . . . . . . . . . . . . . . . . . .Master
Cylinder
. . . . . . . . . . . . . . . . . . . . . . . . . . . . . . . . . . . . . . . . . . . . . . . . . . . . . . . . . . . . . . . . . .DIAGNOSIS:
Power
Brake
,UnitTroubleDiagnosis. . . . . . . . . . . . . . . . . . . . . . . . . .MAINTENANCE AND ADJUSTMENTS:
Checking Brake Booster Operation
. . . . . . . . . . . . . . . . . . . . . . . . . . . .Brake Booster Filter Service
. . . . . . . . . . . . . . . . . . . . . . . . . . . . . . . . . . . . . . . . . ..Vacuum Control Valve Service
. . . . . . . . . . . . . . . . . . . . . . . . . . . . . . . . . . . . . .MAJOR REPAIR:
5A-2
5A-2SA-4SA-5
5A-65A-6
Brake Booster Removal and Installation
. . . . . . . . . . . . . . . . . .Master Cylinder Overhaul
. . . . . . . . . . . . . . . . . . . . . . . . . . . . . . . . . . * . . . . . . . . . . .SPECIFICATIONS:
General
Specifications
. . . . . . . . . . . . . . . . . . . . . . . . . . . . . . . . . . . . . . . . . . . . . . . . . . . . . .SA-6
5A-7
5A-95A. 21973 OPEL SERVICE MANUAL
POWER BRAKE BOOSTER AND MASTER CYLINDER
DESCRIPTION AND OPERATION
POWER BRAKE BOOSTERThe vacuum power cylinder contains the power pis-
ton assembly which houses the control valve and
reaction mechanism and the power piston return
spring. The control valve is composed of the air valveand the floating control valve assembly. The reaction
mechanism consists of a hydraulic piston, reaction
plate, and a series of springs. An air filter element is
assembled around the push rod and fills the cavity
inside the hub of the power piston. This keeps dirt
and dust from entering the vacuum booster. The
push rod, which operates the air valve, projects out
of the end of the power cylinder ‘housing through a
boot.MASTER CYLINDER
The master cylinder is composed pf a primary pistonand secondary piston; it is supplied with fluid from
two separate reservoirs. A check valve is mounted onthe primary circuit which supplies fluid to the rear
brakes. This keeps a slight static pressure in the rear
brake system. When the pedal is depressed, the pushrod moves the two pistons forward simultaneously
until the seals of the two pistons cover the compen-
sating ports in the cylinder. The pressure is increasedin the two chambers simultaneously, thus supplying
fluid to both front and rear brake systems.Figure
5A-1 Brake Booster Attachment (Opel 1900
and Manta)
In the GT, the brake fluid container is arranged at
right angles to the tandem brake master cylinder. SeeFigure
5A-3. It is pushed over the feed port of the
rear brake circuit onto the brake master cylinder and
Page 262 of 625
POWER BRAKE BOOSTER AND MASTER CYLINDER5A- 3
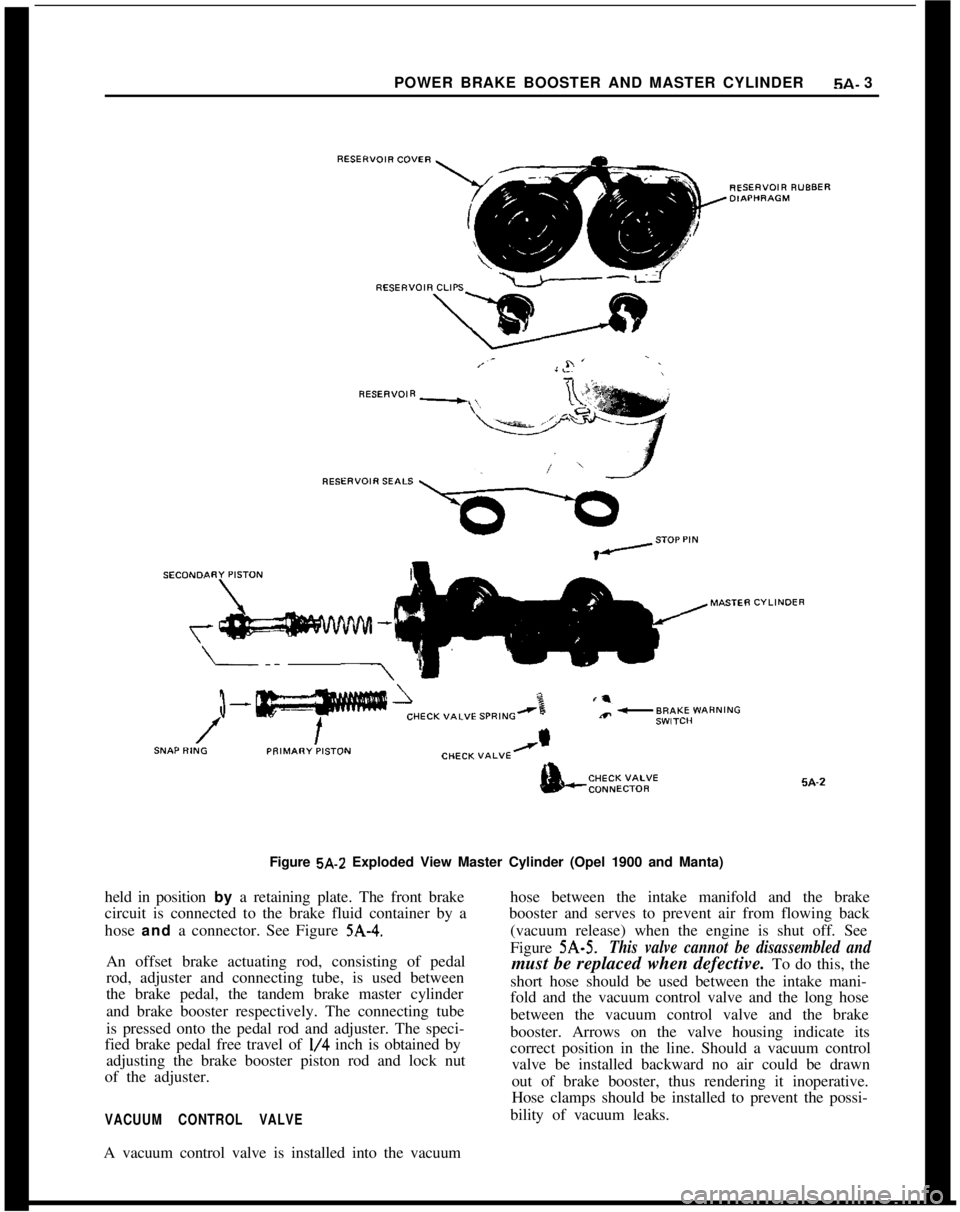
Figure 5A-2 Exploded View Master Cylinder (Opel 1900 and Manta)
held in position by a retaining plate. The front brake
circuit is connected to the brake fluid container by a
hose and a connector. See Figure
5A-4.An offset brake actuating rod, consisting of pedal
rod, adjuster and connecting tube, is used between
the brake pedal, the tandem brake master cylinder
and brake booster respectively. The connecting tube
is pressed onto the pedal rod and adjuster. The speci-
fied brake pedal free travel of
l/4 inch is obtained by
adjusting the brake booster piston rod and lock nut
of the adjuster.
VACUUM CONTROL VALVEhose between the intake manifold and the brake
booster and serves to prevent air from flowing back
(vacuum release) when the engine is shut off. See
Figure 5A-5.
This valve cannot be disassembled andmust be replaced when defective. To do this, the
short hose should be used between the intake mani-
fold and the vacuum control valve and the long hose
between the vacuum control valve and the brake
booster. Arrows on the valve housing indicate its
correct position in the line. Should a vacuum control
valve be installed backward no air could be drawn
out of brake booster, thus rendering it inoperative.
Hose clamps should be installed to prevent the possi-
bility of vacuum leaks.
A vacuum control valve is installed into the vacuum
Page 263 of 625

5A- 41973 OPEL SERVICE MANUAL
Figure
5A-4 Brake Pedal and Master Cylinder
Attachment
(GT)
v1I cy
1 THRUST SPRING
2 VALVE SEAT
3 HOUSING
Figure
5A-5 Vacuum Control Valve
DIAGNOSIS
POWER BRAKE UNIT TROUBLE DIAGNOSIS
ConditionPossible Cause
CorrectionHard Pedal
1. Broken or damagedhydraulic
brake lines.
1, Inspect and replace as necessary.
2. Vacuum failure.
2. Check for:a) Faulty vacuum check valve or
grommet
- replace.
b) Collapsed or damaged vacuum
hose
- replace.
c) Plugged or loose vacuum
fitting
- repair.
d) Faulty air valve seal
drsupport plate seal
- replace.
e) Damaged floating control valve.
3. Defective diaphragm.
4. Restricted air filter
element.3. Replace
4. Replace5. Defective apply piston5. Repair and replace master
seals.cylinder.
6. Cracked or broken powerpistons or retainer.6. Replace power unit.
Page 264 of 625

POWER BRAKE BOOSTER AND MASTER CYLINDER5A- 5ConditionGrabby Brakes (Apparent
Off-and On Condition)
Possible Cause1. Broken or damaged
hydraulic brake lines.Correction1. Inspect and replace, as
“CXXSSary.2. Insufficient fluid in
master cylinder.
3. Defective master cylinder
seals.4. Cracked master cylinder
casting.2. Fill reservoirs with approved
brake fluid check for leaks.
3. Repair or replace, asnecessary.4. Replace
5. Leaks at front disc brake
calipers or rear wheel
cylinders
in pipes or connections.5. Inspect and repair, as
necessary.Brakes Fail to Release6. Air in hydraulic system.
1. Blocked passage in power
piston.
2. Air valve sticking shut.6. Bleed system.
1. Inspect and repair or replace,
as necessary.
2. Check for proper lubrication of
air valve “0” ring.
3. Broken piston return spring
3. Replace
master cylinder.
4. Tight pedal linkage.5. Repair or replace, as
necessary.
MAINTENANCE AND ADJUSTMENTS
CHECKING BRAKE BOOSTER OPERATIONThe operation of the brake booster can be checked by
simple means and without any special devices.
1. With engine off, first clear the booster of any
vacuum by depressing brake pedal several times.
2. Then depress brake pedal and start engine. If the
vacuum system is working correctly, the brake pedal,
kept under even foot pressure, moves farther down-
wards due to the additional pressure developed by
the booster. Should the brake pedal not move farther
downwards, the vacuum system is deficient. In this
case check the vacuum hose to booster, to vacuum
control valve and to engine intake manifold connec-
tions.3. If the vacuum system operates properly, the defect
is in the brake booster itself. A dirty filter impairs oreven prevents air from entering into the booster and
thereby the formation of a difference in pressure in
the vacuum cylinder.
Repairs cannot be carried out on the brake booster.
If no deficiency can be found in the vacuum system
or filter, the brake booster has to be replaced.
Under normal operating conditions the brake
booster requires no service. However, under adverse
conditions such as frequent driving on sandy or
dusty roads, the filter and sound deadener should be
replaced occasionally. To do so, the brake booster
must be removed but it isn’t necessary to detach the
master cylinder.
BRAKE BOOSTER FILTER SERVICEUnder normal operating conditions the filter need
not be exchanged for a new one.
Under adverse operating conditions
- frequent driv-
Page 265 of 625
5A- 61973 OPEL SERVICE MANUAL
ing on dusty and sandy roads - the filter and sound
deadener should occasionally be replaced. To do so,
brake booster has to be removed without detaching
brake master cylinder.
Proceed as follows:
1. Remove protective cap (boot).
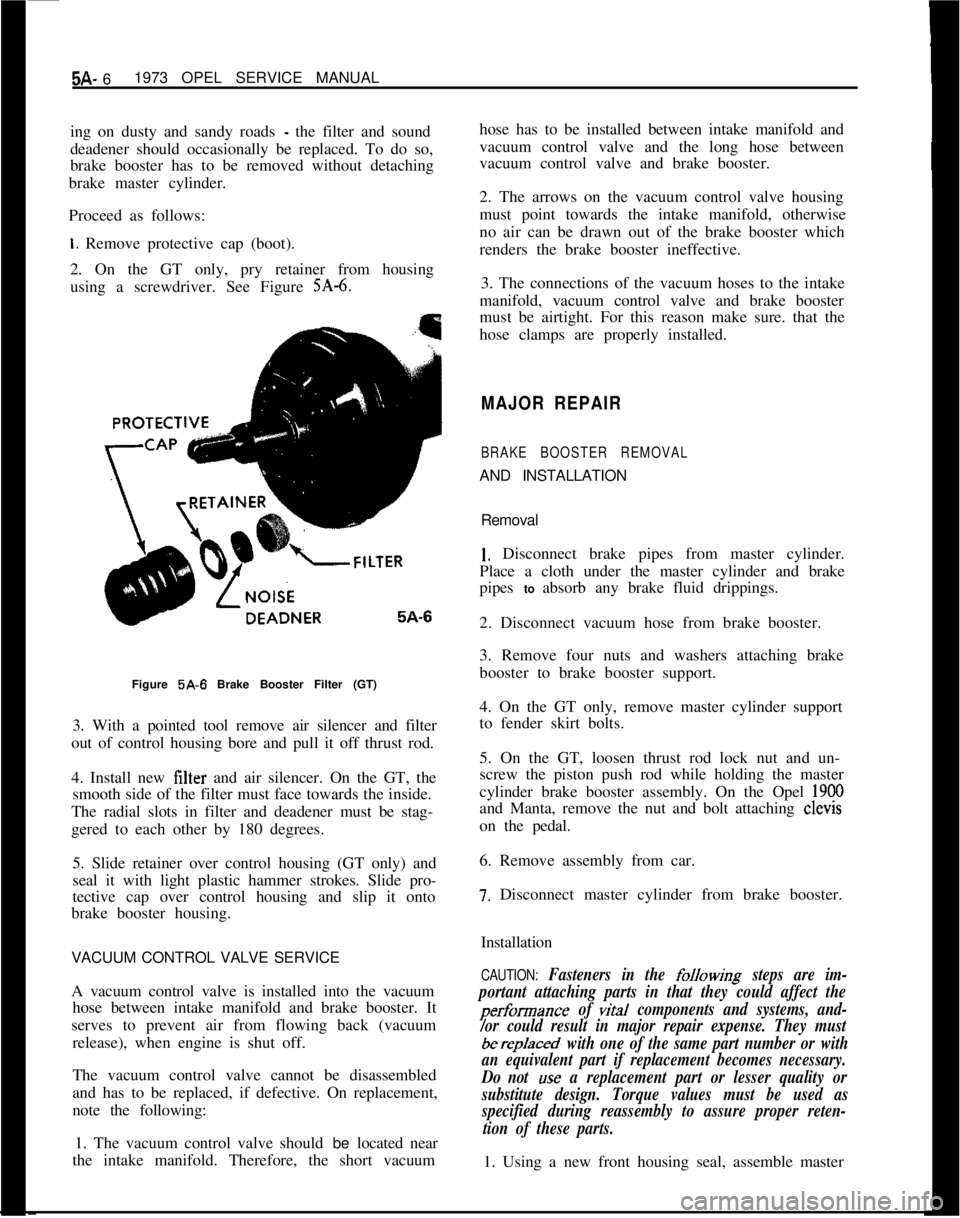
2. On the GT only, pry retainer from housing
using a screwdriver. See Figure
SA-6.Figure 5A-6 Brake Booster Filter (GT)
3. With a pointed tool remove air silencer and filter
out of control housing bore and pull it off thrust rod.
4. Install new filter and air silencer. On the GT, the
smooth side of the filter must face towards the inside.
The radial slots in filter and deadener must be stag-
gered to each other by 180 degrees.
5. Slide retainer over control housing (GT only) and
seal it with light plastic hammer strokes. Slide pro-
tective cap over control housing and slip it onto
brake booster housing.
VACUUM CONTROL VALVE SERVICE
A vacuum control valve is installed into the vacuum
hose between intake manifold and brake booster. It
serves to prevent air from flowing back (vacuum
release), when engine is shut off.
The vacuum control valve cannot be disassembled
and has to be replaced, if defective. On replacement,
note the following:
1. The vacuum control valve should be located near
the intake manifold. Therefore, the short vacuumhose has to be installed between intake manifold and
vacuum control valve and the long hose between
vacuum control valve and brake booster.
2. The arrows on the vacuum control valve housing
must point towards the intake manifold, otherwise
no air can be drawn out of the brake booster which
renders the brake booster ineffective.
3. The connections of the vacuum hoses to the intake
manifold, vacuum control valve and brake booster
must be airtight. For this reason make sure. that the
hose clamps are properly installed.
MAJOR REPAIR
BRAKE BOOSTER REMOVALAND INSTALLATION
Removal
1. Disconnect brake pipes from master cylinder.
Place a cloth under the master cylinder and brake
pipes to absorb any brake fluid drippings.
2. Disconnect vacuum hose from brake booster.
3. Remove four nuts and washers attaching brake
booster to brake booster support.
4. On the GT only, remove master cylinder support
to fender skirt bolts.
5. On the GT, loosen thrust rod lock nut and un-
screw the piston push rod while holding the master
cylinder brake booster assembly. On the Opel
1900and Manta, remove the nut and bolt attaching clevis
on the pedal.
6. Remove assembly from car.
7. Disconnect master cylinder from brake booster.
Installation
CAUTION: Fasteners in the folkwing steps are im-
portant attaching parts in that they could affect the
performance of vital components and systems, and-
/or could result in major repair expense. They must
berep/aced, with one of the same part number or with
an equivalent part if replacement becomes necessary.
Do not
use a replacement part or lesser quality or
substitute design. Torque values must be used as
specified during reassembly to assure proper reten-
tion of these parts.1. Using a new front housing seal, assemble master
Page 266 of 625
POWER BRAKE BOOSTER AND MASTER CYLINDER5A- 7cylinder to brake booster and torque nuts to 14
Ib.ft.on the GT and 12
lb.ft. on the Opel 1900 and Manta.
2. Position assembly into brake booster bracket and,
on the GT only, thread piston push rod onto the
thrust rod.
3. Install brake booster to support attaching washers
and nuts and tighten to 11
lb.ft. of torque.
4. On the GT install master cylinder support to inner
fender skirt bolts.
5. Connect vacuum hose to brake booster.
6. By turning the piston push rod on the thrust rod,
(GT only) adjust until the brake pedal free travel is
l/4 inch and tighten the lock nut.
7. Connect brake pipes to master cylinder and bleed
brakes.
MASTER CYLINDER OVERHAUL. GT
Removal of Master Cylinder1. Disconnect the two brake pipes from the master
cylinder.
2. Remove the front support to skirt attaching bolts,
the cylinder to booster retaining nuts and lift out
master cylinder.
Disassembly1. Prior to brake master cylinder disassembly, pour
brake fluid out of brake fluid reservoir, remove reser-
voir from master cylinder and take sealing plugs out
of housing.
2. Screw static pressure valve(s) out of housing.
3. To facilitate disassembly, push piston somewhat
into cylinder and insert a rounded off piece of weld-
ing rod approx.
.12 in. thick into feed port to retain
piston in this position.
4. Remove stop screw and snap ring out of housing
and take out both pistons together with springs.
5. Remove stop screw from piston for rear brake
circuit and remove all component parts. Remove
also all component parts from intermediate piston of
front brake circuit.
Cleaning and Checking1. Clean parts with genuine brake fluid, Delco Su-
preme No. 11, or equivalent. Do not use any other
cleaning solvents. Dry with compressed air. Free up
compensating and feed ports.2. Polish cylinder bore of housing with crocus cloth.
If lapping scores and rust spots are still noticeable,
replace brake master cylinder assembly.
3. Check inner components for damage and replace,
if required. The rubber seals and static pressure valve
always have to be replaced.
Assembly1. Assemble front and rear brake circuit pistons.
Prior to assembly coat rubber seals with brake fluid.
2. Coat cylinder bore, piston sliding surfaces and
seals with brake fluid.
3. Insert preassembled intermediate piston for front
brake circuit together with thrust spring and spring
seat into clyinder bore. The smaller diameter of the
tapered thrust spring must face piston.
4. With a drift, push piston (against spring pres-
sure) into housing and insert a piece of welding rod
into feed port of front brake circuit to retain piston.
5. Install stop screw with new seal ring into housing
and tighten.
6. Insert preassembled piston for rear brake circuit
into cylinder bore and install snap ring into groove
in housing.
7. Check piston fof free movement by moving it to
and fro. If required, place washers under the head of
the stop screw.
8. Lightly push piston into housing and remove
piece of welding rod out of feed port of front brake
circuit.
9. With a rounded off piece of welding rod
(.020 -
,024 in.) check whether compensating ports are free.
10. Screw in new static pressure valve(s).
11. Coat new sealing plugs with brake fluid and in-
sert them into housing. Push twin brake fluid con-
tainer into sealing plugs and install screen and cover
with seal ring.
Installation1. Install master cylinder onto brake booster with
washers and nuts. Torque to 14
lb.ft.2. Attach the front mounting bracket.
3. Install brake lines on master cylinder, and bleed
brakes.
Page 267 of 625

5A- 81973 OPEL SERVICE MANUAL
4. If required, adjust mechanically actuated stop
light switch. Pedal travel of 5/S” to 1” should actu-
ate switch. Add or subtract washers between bracket
and switch to obtain proper adjustment.
5. Road test car for proper brake performance.
MASTER CYLINDER OVERHAUL. OPEL 1900
AND MANTA
Ramoval of Master Cylinder1. Remove master cylinder from brake booster by
disconnecting brake pipes and removing two
self-tightening nuts that secure master cylinder to brake;ia;;ter. Be careful not to loosen the front housing
Disassembly1. Prior-to brake master cylinder disassembly, pour
brake fluid out of brake fluid reservoir.
2. Remove reservoir from master cylinder body by
removing reservoir clips with snap ring pliers. See
Figure 5A-7.
Figure
5A-7 Removing Reservoir Clips
3. Remove the piston stop screw which is fitted in
master cylinder body.
4. Place master cylinder in a vise and push piston
forward and insert a rod with a spherical end into the
hole nearest the mounting flange. This will retain the
piston in a forward position and allow for removal of
snap ring. See Figures
SA-8 and 5A-9,Figure 5A.8 Retaining Piston in Forward Position
Figure 6A-9 Removing Snap Ring
Page 268 of 625
POWER BRAKE BOOSTER AND MASTER CYLINDER5A- 9NOTE: Snap ring should not be reused.5. Remove primary and secondary pistons from cyl-
inder.
6. Remove check valve by unscrewing check valve
connection.
Cleaning and Checking
1. Clean parts with genuine brake fluid, Delco Su-
preme No. 11, or equivalent. Do not use any other
cleaning solvents. Dry with compressed air. Free up
compensating and feed parts.
2. Inspect cylinder bore for pits, scoring, cracks,
nicks or other defects.
NOTE: Whenever the master cylinder is overhauled,
a new repair kit must be used.
Assembly
NOTE:
Before reassembly double check that there
is no foreign particles in the master
cyIinder bore
or on any parts that are to be assembled into it.1. Coat master cylinder bore with clean brake fluid
and install secondary and primary pistons.
2. Install new snap ring while holding primary piston
in a forward position.
3. Install check valve spring, check valve and check
valve connector and torque to 26
Ib.ft.4. Install stop screw.
5. Lubricate reservoir seals and remount on master
cylinder body.
6. Install reservoir clips into reservoir and mount
reservoir onto master cylinder without distorting
seals. Do not force reservoir onto master cylinder.
7. Position reservoir cover onto reservoir.
Installation
1. Mount master cylinder to brake booster, using a
new front housing seal if old one is damaged or dis-
torted. Torque nuts to 12
lb.ft.2. Install brake pipes to master cylinder and bleed
brakes.
SPECIFICATIONS
GENERAL SPECIFICATIONSBrake Booster Size
..............................................................................................................7 in.
BrakeBoostRatio
-(GT)..........................................................................................2.06to1Brake Boost Ratio
- (Opel 1900 and Manta)............................................................2.64 to 1
NameTorque
Nut
Nut
Lb.Ft.Master Cylinder to Brake Booster
(GT) .__......._.._...._.........
Master Cylinder to Brake Booster (Opel 1900 and
Manta)14
12Brake ‘Booster to Support
.._...._..........................................11
Page 269 of 625

5B- 10 1973 OPEL SERVICE MANUAL
DISC BRAKES
CONTENTS
Subject
DESCRIPTION AND OPERATION:
Description. . . . . . . . . . . . . . . . . . . . . . . . . . . . . . . . . . . . . . . . . . . . . . . . . . . . . . . . . . . . . . . . . . . . . . . . . . . .Operation
. . . . . . . . . . . . . . . . . . . . . . . . . . . . . . . . . . . . . . . . . . . . . . . . . . . . . . . . . . . * . . . . . . . . . . . . . . . . . .DIAGNOSIS:
DiscBrakeTroubleDiagnosis. . . . . . . . . . . . . . . . . . . . . . . . . . . . . . . . . . . . . . . .MAINTENANCE AND ADJUSTMENTS:
Disc Brake Maintenance
. . . . . . . . . . . . . . . . . . . . . . . . . . . . . . . . . . . . . . . . . . . . . . . .Checking Disc Brake Friction Pads for Wear
. . . . . . . . . .Replacing Friction Pads
Checking Brake Disc for Lateral
Runout. . . . . . . . . . . . . . . . . .MAJOR REPAIR:
RemovingandInstallingBrakeCaliper. . . . . . . . . . . . . . . . . . . . . .Removing and Installing Brake Disc
. . . . . . . , . . . . . . . . . . . . . . . . . .
RemovingandInstallingBrakeDiscShield. . . . . . . . . . . . . .Disassembly and Assembly of Brake Caliper
. . . . . . . . . .SPECIFICATIONS:
Disc Brake Specifications
. . . . . . . . . . . . . . . . . . . . . . . . . . . . . . . . . . . . . . . . . . . . . .Page No.
58-1058-l
1
58-12
58-15
SB-15
5&17
56-17
58-17
58-195519
58-21
DESCRIPTION AND OPERATION
DESCRIPTIONThe front wheel disc brake consists of two major
parts: The brake disc and the brake caliper with the
two friction pads. See Figure
5B-20.The brake disc is attached to the inside of the wheel
hub flange by four bolts and centered on a shoulder
of the hub. The brake caliper consists of two halves:
the mounting half, arranged on the inside of the
brake disc, and the rim half. The two halves are
firmly attached to each other by four bolts. Two
flanges on the mounting half serve as attachment of
the brake caliper to the steering knuckle. The brake
caliper is positioned behind the front suspension
cross member at steering knuckle spindle level. It is
attached to the steering knuckle by two bolts. Both
caliper halves act as brake cylinders and each houses
a piston and a fluid seal. The fluid seal, of square
cross section, is positioned in an annular groove of
the caliper bore, preventing fluid leakage past the
piston and entry of water and dirt. The pistons and
caliper half bores are protected against entry of waterFigure 58.20 Left Front Disc Brake Assembly
and dirt in brake disc direction by a rubber seal, held
on the caliper half collar by a clamp ring and against
Page 270 of 625

DISC BRAKES5B- 11
rLF 5.2. RUBBER FLUID SEALS6.3. HOLLOW PISTONS7.
AL5
3Figure 58.21 Left Front Disc Brake
- Emloded View
the piston circumference by its inherent tension. See
Figure
5B-21. Both pistons are hollow. The open end
of each piston faces the brake disc.
A sheet metal spacer plate with two impressions for
preventing the piston from rotating is installed be-
tween each piston and friction pad and secured by
the friction pad dowel pins. The two friction pads are
positioned on the right and left of the brake disc
recesses in the caliper halves. Each friction pad con-
sists of a backing plate with friction material, which
is abrasive-coated, bonded to it. The friction pad
assemblies are held in position in the brake caliper by
two dowel pins, secured by slit dowel pin retainers,
and by a cross-shaped retaining spring which is pre-
loaded and positioned under the dowel pins, thus
pressing the friction pads and spacer plates firmly
against the pistons. The front brake line leading from
the brake master cylinder attaches to a distribution
tee from which a brake line leads to each front wheel
caliper. The caliper bores are interconnected by fluid
ducts within the caliper halves.
The front wheel disc brakes have self-adjusting pis-
tons. See Figure
5B-22.The adjustment of the pads is effected by the pistons
which push the friction pads ahead towards the
brake disc for a distance equivalent to the amount of
friction pad wear. This means that the greater the
wear the closer the pistons move towards the brake
disc. A running clearance exists between friction
pads and brake disc when the brakes are in “off”
position. This running clearance is provided by the
rubber fluid seals which are positioned in the caliper
half bores and which tightly grip and exert their
pre-load pressure on the pistons. The rubber fluid
seals also prevent the pistons from being pushed into
the caliper half bores more than the distance equiva-
lent to the running clearance. As the friction pads are
adjusted by the pistons, there must be no static pres-
sure in the front brake circuit when the brakes are in“OR position. Non-existence of a static pressure in
the front brake circuit is achieved by eliminating the
check valve in the brake master cylinder on the front
brake circuit. During brake application the pressure
from the brake master cylinder is transferred to the
pistons in the brake caliper. The pistons move ahead
and press the friction pads against both friction
SW-faces of the rotating brake disc. The force exerted on
the brake pedal determines the pressure of the fric-
tion pads against the brake disc. On releasing the
brake pedal, the brake lines of the front brake circuit,
including the caliper half bores, are relieved of
hy-OPERATION