OPEL GT-R 1973 Service Manual
Manufacturer: OPEL, Model Year: 1973, Model line: GT-R, Model: OPEL GT-R 1973Pages: 625, PDF Size: 17.22 MB
Page 271 of 625

5B- 121973 OPEL SERVICE MANUAL
A = BRAKE ON
THE RUBBER FLUID SEAL TIGHTLY GRIPPING PISTON
IS DEFLECTED IN DIRECTION OF PISTON TRAVELAFRICTION PAD
BRAKE DISCRUBBER FLUID SEALBRAKE
IICALIPER
IPISTON
I
CE BETWEEN RUNNING CLEARAN
FRICTION PAD AND BRAKE DISC
B = BRAKE OFFBTHE PISTON IS RETRACTED BY THE AMOUNT OF
RUBBER FLUID SEAL DEFLECTION. THIS AMOUNT
IS EQUAL TO RUNNING CLEARANCE.SBZZ
Figure 58-22 Rubber Fluid Seal -Automatic Piston Retractiondraulic pressure, and the friction pads and pistonsmove away from the brake disc, leaving a small run-
ning clearance. The brake disc can now rotate freely.
The amount of brake travel is dependent upon the
amount of running clearance. For this reason therunout of the brake disc should be checked, besides
bleeding of the brake system and adjusting the rear
brake shoes, when the pedal free travel is too great.during braking, the rubber seals in the annular
grooves of the brake caliper bores deflect laterally in
the direction of piston movement. See Figure
5B-22,View (A). The seal remains deflected for the duration
of the braking operation. After braking, the caliper
bores are relieved of hydraulic pressure and the rub-
ber seals resume their normal position, thus pulling
or retracting the pistons. The distance traveled by
the pistons is equal to that of the running clearance
between brake disc and friction pads.
The running clearance between brake disc and
fric-tion pads is attained as follows: When the pistons in
the caliper halves are moved towards the brake discThe shifting of the pistons in the direction of the
brake disc due to friction pad wear has no effect on
the running clearance. The running clearance re-mains the same in all piston positions.
DIAGNOSIS
DISC BRAKE TROUBLE DIAGNOSIS
ConditionPulls
Possible Cause
I. Incorrect tire
pressures.Correction1. Inflate evenly on both sides to
the recommended pressures (see
Owner’s Manual).
Page 272 of 625
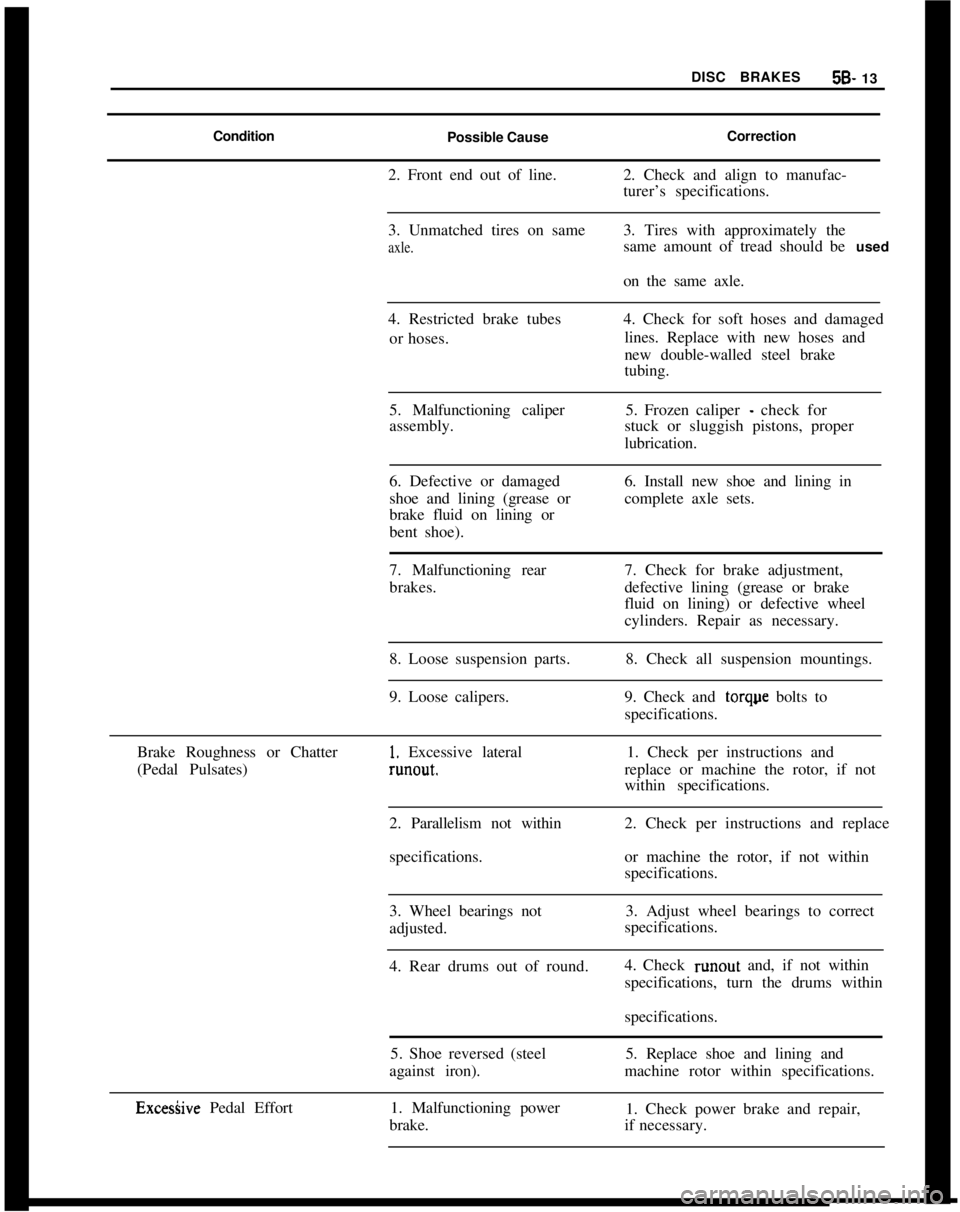
DISC BRAKES5B- 13
Condition
Possible CauseCorrection
2. Front end out of line.2. Check and align to manufac-
turer’s specifications.
3. Unmatched tires on sameaxle.3. Tires with approximately the
same amount of tread should be used
on the same axle.
4. Restricted brake tubes
or hoses.4. Check for soft hoses and damaged
lines. Replace with new hoses and
new double-walled steel brake
tubing.
5. Malfunctioning caliper
assembly.5. Frozen caliper
- check for
stuck or sluggish pistons, proper
lubrication.
6. Defective or damaged
shoe and lining (grease or
brake fluid on lining or
bent shoe).6. Install new shoe and lining in
complete axle sets.
7. Malfunctioning rear
brakes.7. Check for brake adjustment,
defective lining (grease or brake
fluid on lining) or defective wheel
cylinders. Repair as necessary.
8. Loose suspension parts.
9. Loose calipers.8. Check all suspension mountings.
9. Check and torque bolts to
specifications.
Brake Roughness or Chatter
(Pedal Pulsates)
1. Excessive lateralrunout.1. Check per instructions and
replace or machine the rotor, if not
within specifications.
2. Parallelism not within
specifications.2. Check per instructions and replace
or machine the rotor, if not within
specifications.
3. Wheel bearings not
adjusted.3. Adjust wheel bearings to correct
specifications.
4. Rear drums out of round.4. Check runout and, if not within
specifications, turn the drums within
specifications.
5. Shoe reversed (steel
against iron).5. Replace shoe and lining and
machine rotor within specifications.
ExcesGve Pedal Effort1. Malfunctioning power
brake.1. Check power brake and repair,
if necessary.
Page 273 of 625

5B- 141973 OPEL SERVICE MANUALConditionPossible CauseCorrection2. Partial system failure.2. Check front and rear brake system
and repair, if necessary. Also, check
brake warning light, if a failed
system is found and light did not
function.
3. Excessively worn shoe
and lining.3. Check and replace in axle sets.
4. Piston in caliper stuck
or sluggish.4. Remove caliper and rebuild.
5. Fading brakes due to
incorrect lining.
6. Vacuum leak.5. Remove and replace with original
equipment lining.
6. Check for ruptured hose or loose
attachment.
Excessive Pedal Travel1. Partial brake system
failure.1. Check both front and rear system
for a failure and repair. Also, check
warning light
- it should have indi-
cated a failure.
2. Insufficient fluid in
master cylinder.
3. Poor rear brake
adjustment.2. Fill reservoirs with approved
brake fluid. Check for leaks.
3. Adjust rear brake per
specifications.
4. Air trapped in system.4. Bleed system.
5. Bent shoe and lining.5. Replace axle set of shoe and
lining.
Dragging Brakes (A very
light drag is present in
all disc brakes
immediately after pedal
is released.)1. Master cylinder pistons
not returning correctly.1. With reservoir cover off, check
for fluid spurt at bypass holes as
pedal is depressed. Adjust push rod,
if necessary, or rebuild master
cylinder.
2. Restricted brake tubes2. Check for soft hoses or damaged
or hoses.tubes and replace with new hoses and
new double-walled steel brake tubing.
3. Incorrect parking brake
adjustment on rear brakes.3. Check and readjust to correct
specifications.
Grabbing or Uneven Braking
Action (All conditions
listed under “Pulls”
.)4. Check valve installed in
outlet to front disc brakes.
1. Malfunction of power
brake unit.4. Check master cylinder outlet and
remove check valve if present.
1. Check operation and repair, if
necessary.
Page 274 of 625

DISC BRAKES5B- 15
ConditionPossible Cause
2. Binding brake pedal
mechanism.Correction
2. Check and lubricate, ifnecessary.3. Corroded caliper
assembly.3. Clean and lubricate.
MAINTENANCE AND ADJUSTMENTSDISC BRAKE MAINTENANCE
Checking Brake Fluid Level
The brake fluid level in the brake fluid container
must be checked during predelivery inspection, then
every 3,000 miles during inspection and preventive
maintenance servicing.
The brake fluid level must not be higher than the
inscription “MAX” and must be at least up to
“MIN”. Replenish brake fluid, if necessary.
Because of the relatively large brake caliper bore
cross section and the self-adjustment of the disc
brakes, resulting in a greater piston travel to compen-
sate for friction pad wear, the brake fluid level drops
faster than in fluid containers for drum brakes with
their smaller wheel brake cylinders. For this reason
pay special attention to the fluid level in the brake
fluid container.
Drop of brake fluid level can be due to friction pad
wear and may not be due to leakage in the braking
system.On loss of brake fluid due to leakage, the brake sys-
tem must be checked thoroughly.
Friction Pad Adjustment
Friction pad adjustment is not necessary on the front
wheel disc brakes as this is done automatically by the
pistons in the brake calipers.
Lubricating Front Wheel Bearings
When removing one or both brake discs, check lu-
brication of front wheel bearings and the cavity of
the wheel hub and replenish if necessary (see operat-
ion
“Removing and Reinstalling Brake Disc”).
When carrying out other work on disc brakes which
does not necessitate the removal and installation of
the brake disc, lubricating wheel bearings is not
necessary.Checking Disc Brake Friction Pads for Wear
Whenever a disc brake equipped car is in for periodic
service, while the car is raised, the friction pads in
both brake calipers should be checked for wear by
making a simple measurement. Worn or oily friction
pads must be replaced.
Measure friction pad wear as follows:
1. Remove friction pads.
2. Using a one-inch micrometer, measure the thick-
ness of the pad and friction plate. See Figure
5B-23.Figure 58-23 Checking Brake Friction Pad Thickness
3. If any one of the four measurements is less than
-.280, replace all four friction pads. (Partial replace-
ment of friction pads would cause unequal braking.)
Removal and Installation of Friction Pads
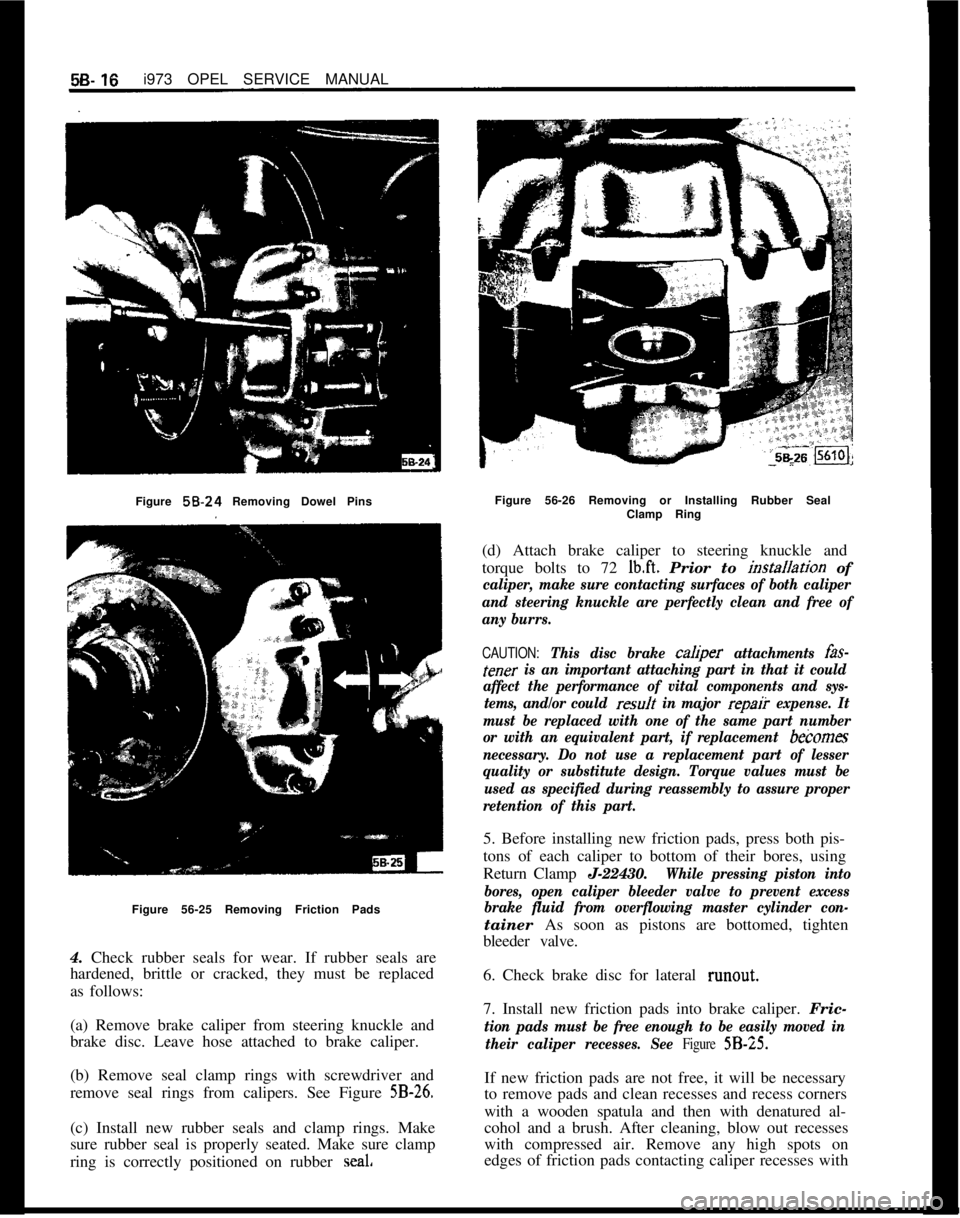
1. Raise car and remove front wheels.
2. Drive dowel pins out of brake calipers toward
center of car. See Figure
5B-24. Dowel pins must be
driven inward because they are secured by enlarge
fluted inner ends.
3. Remove friction pads from brake calipers. See
Figure
5B-25.
Page 275 of 625
5B- 19i973 OPEL SERVICE MANUAL
Figure
56-24 Removing Dowel Pins
Figure 56-25 Removing Friction Pads
4. Check rubber seals for wear. If rubber seals are
hardened, brittle or cracked, they must be replaced
as follows:
(a) Remove brake caliper from steering knuckle and
brake disc. Leave hose attached to brake caliper.
(b) Remove seal clamp rings with screwdriver and
remove seal rings from calipers. See Figure
5B-26.(c) Install new rubber seals and clamp rings. Make
sure rubber seal is properly seated. Make sure clamp
ring is correctly positioned on rubber seal,Figure 56-26 Removing or Installing Rubber Seal
Clamp Ring
(d) Attach brake caliper to steering knuckle and
torque bolts to 72
Ib.ft. Prior to installation of
caliper, make sure contacting surfaces of both caliper
and steering knuckle are perfectly clean and free of
any burrs.
CAUTION: This disc brake caliper attachments fas-
tener is an important attaching part in that it could
affect the performance of vital components and sys-
tems, and/or could
result in major repair expense. It
must be replaced with one of the same part number
or with an equivalent part, if replacement
becomes
necessary. Do not use a replacement part of lesser
quality or substitute design. Torque values must be
used as specified during reassembly to assure proper
retention of this part.5. Before installing new friction pads, press both pis-
tons of each caliper to bottom of their bores, using
Return Clamp J-22430.
While pressing piston into
bores, open caliper bleeder valve to prevent excess
brake fluid from overflowing master cylinder con-tainer As soon as pistons are bottomed, tighten
bleeder valve.
6. Check brake disc for lateral runout.
7. Install new friction pads into brake caliper. Fric-
tion pads must be free enough to be easily moved in
their caliper recesses. See
Figure X3-25.If new friction pads are not free, it will be necessary
to remove pads and clean recesses and recess corners
with a wooden spatula and then with denatured al-
cohol and a brush. After cleaning, blow out recesses
with compressed air. Remove any high spots on
edges of friction pads contacting caliper recesses with
Page 276 of 625
DISC BRAKES58.17a tine cut file.Do not use any solvent except dena-
tured alcohol. Do not use a
metaIJic scraper too/.8. With a punch, drive one dowel pin from inboard
side through caliper and friction pads to stop. Install
new cross-shaped retaining spring under installed
dowel pin, then install second dowel pin. Loose tit-
ting dowel pins must be replaced.
9. Before operating vehicle, depress brake pedal sev-
eral times to adjust friction pads to brake discs.
Check brake fluid level and add fluid as necessary to
bring level up to “MAX” on reservoir.
Car owners must be informed that a break-in period
exists for new friction pads, and that they must avoid
unnecessary, forceful braking during the first 125
miles after installation of new friction pads.
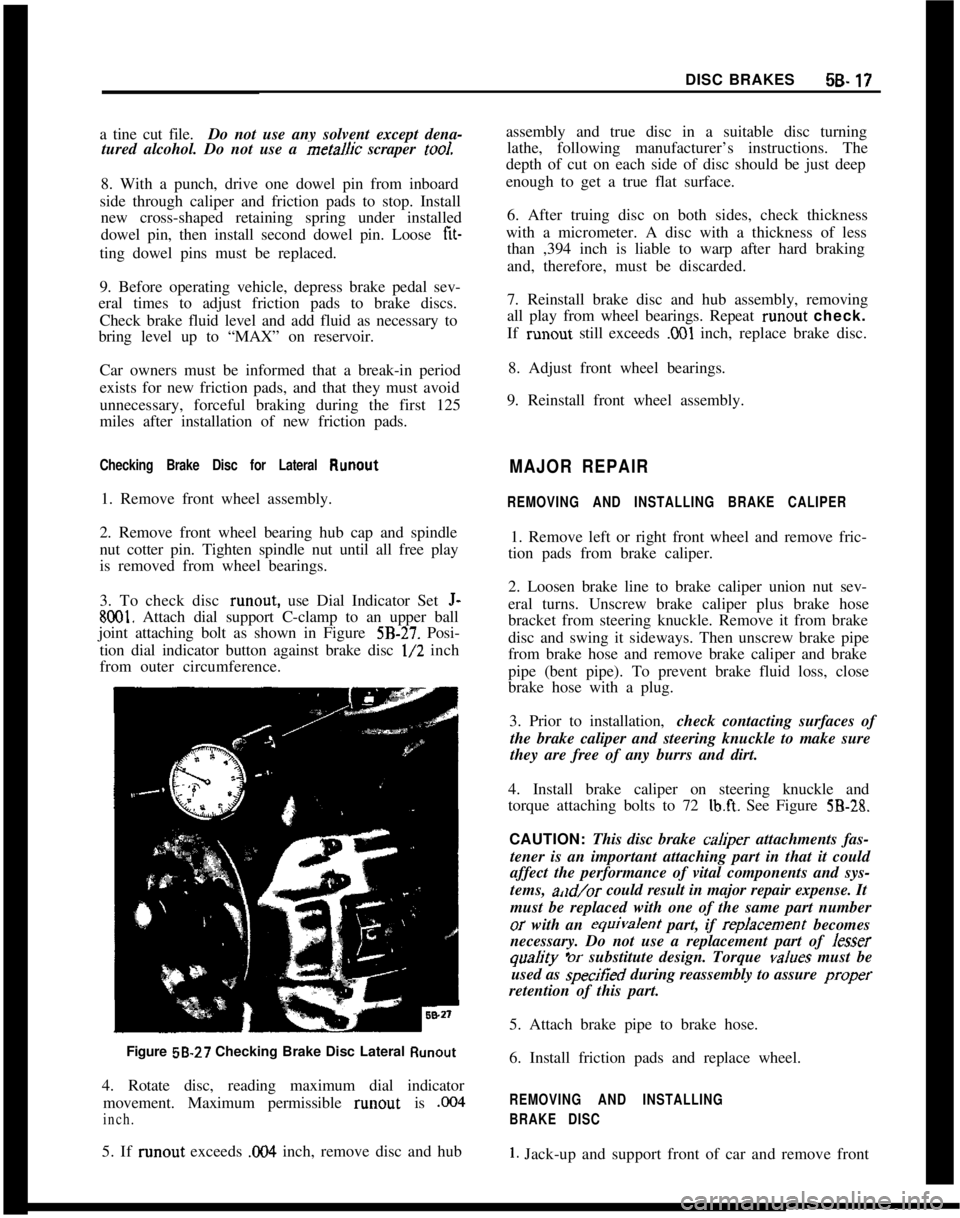
Checking Brake Disc for Lateral Runout1. Remove front wheel assembly.
2. Remove front wheel bearing hub cap and spindle
nut cotter pin. Tighten spindle nut until all free play
is removed from wheel bearings.
3. To check disc runout, use Dial Indicator Set
J-
8001. Attach dial support C-clamp to an upper ball
joint attaching bolt as shown in Figure
5B-27. Posi-
tion dial indicator button against brake disc
l/2 inch
from outer circumference.
Figure 58-27 Checking Brake Disc Lateral
Runout4. Rotate disc, reading maximum dial indicator
movement. Maximum permissible runout is
,004
inch.5. If runout exceeds
0% inch, remove disc and hubassembly and true disc in a suitable disc turning
lathe, following manufacturer’s instructions. The
depth of cut on each side of disc should be just deep
enough to get a true flat surface.
6. After truing disc on both sides, check thickness
with a micrometer. A disc with a thickness of less
than ,394 inch is liable to warp after hard braking
and, therefore, must be discarded.
7. Reinstall brake disc and hub assembly, removing
all play from wheel bearings. Repeat runout check.
If runout still exceeds
,001 inch, replace brake disc.
8. Adjust front wheel bearings.
9. Reinstall front wheel assembly.
MAJOR REPAIR
REMOVING AND INSTALLING BRAKE CALIPER1. Remove left or right front wheel and remove fric-
tion pads from brake caliper.
2. Loosen brake line to brake caliper union nut sev-
eral turns. Unscrew brake caliper plus brake hose
bracket from steering knuckle. Remove it from brake
disc and swing it sideways. Then unscrew brake pipe
from brake hose and remove brake caliper and brake
pipe (bent pipe). To prevent brake fluid loss, close
brake hose with a plug.
3. Prior to installation,check contacting surfaces of
the brake caliper and steering knuckle to make sure
they are free of any burrs and dirt.
4. Install brake caliper on steering knuckle and
torque attaching bolts to 72
lb.ft. See Figure 5B-28.CAUTION: This disc brake
cah@er attachments fas-
tener is an important attaching part in that it could
affect the performance of vital components and sys-
tems, a,ld/or could result in major repair expense. It
must be replaced with one of the same part numberor with an equivafent part, if repfacement becomes
necessary. Do not use a replacement part of Jesser
quaJity ‘or substitute design. Torque vafues must be
used as specitied during reassembly to assure proper
retention of this part.
5. Attach brake pipe to brake hose.
6. Install friction pads and replace wheel.
REMOVING AND INSTALLING
BRAKE DISC
1. Jack-up and support front of car and remove front
Page 277 of 625

58-181973 OPEL SERVICE MANUAL
Figure 58.28 Brake Caliper
to Steering Knuckle
Attaching Bolts
wheel. Disconnect brake caliper with friction pads
from steering knuckle and support the assembly as
shown in Figure
5B-29.Figure 58.29 Supporting Brake Caliper
2. Remove front wheel hub and disc assembly along
with wheel bearings.
3. Mount brake disc and wheel hub between soft
metal jaws in vise.
Do not hold too tightly, to avoidbending whet-1 bolts. Remove four star head bolts
with lockwashers using Star Wrench Adapter
J-
21737.
Piior to removal, markposition ofbrake disc
in relation to wheel hub. See
Figure 5B-30.Figure 58.30 Removing Brake Disc
to Hub Bolts
4. Pull brake disc from wheel hub. Do not drive if off.
Install in reverse sequence, paying attention to the
following:
5. Prior to installation of the brake disc, ensure that
the contacting surface of brake disc to wheel hub is
free of burrs, dirt and high spots. If necessary,
remove high spots and check disc for flatness on a
surface plate. Carefully remove burrs with a scraper
or file.
6. Also check contacting surface of wheel hub to
brake disc to make sure it is in good condition. The
same applies to brake disc aligning shoulder on
wheel hub. See Figure
5B-315831
Figure
5B-31 Brake Disc to Hub Contact Surface
Page 278 of 625
DISC BRAKES5B- 19
CAUTION:
Fasteners in Steps 7 and 9 are important
attachingparts in that they cooId affect theperfom-
ante of vital components and systems, and/or couJd
resuJt in major repair expense. They must be re-
placed with one of the same part number or with an
equivaJent part if repJacement becomes necessary.
Do not use a replacement part
or Jesser quaJity or
substitute design. Torque
vaJues must be used as
specified during
reassembJy to assure proper reten-
tion of these parts.7. Install brake disc on wheel hub and torque attach-
ing bolts to 36
Ib.ft. If old brake disc is reused, pay
attention to locator marks on brake disc and wheel
hub.8. Prior to installing brake disc and hub assembly to
steering knuckle, check lubrication of both roller
bearings and quantity of grease in cavity of wheel
hub. If necessary, repack front wheel bearings.
9. Adjust front wheel bearing clearance and tighten
brake caliper to steering knuckle, attaching bolts to
a torque of 72
lb.ft. Prior to installing brake caliper
to steering knuckle, ensure that all contacting sur-
faces are free of dirt and burrs. Also make sure that
the friction pads are not damaged when sliding the
brake caliper onto brake disc.
10. Install wheel assembly, remove supports and
lower front of car.
REMOVING AND INSTALLING
BRAKE DISC SHIELD
Removal
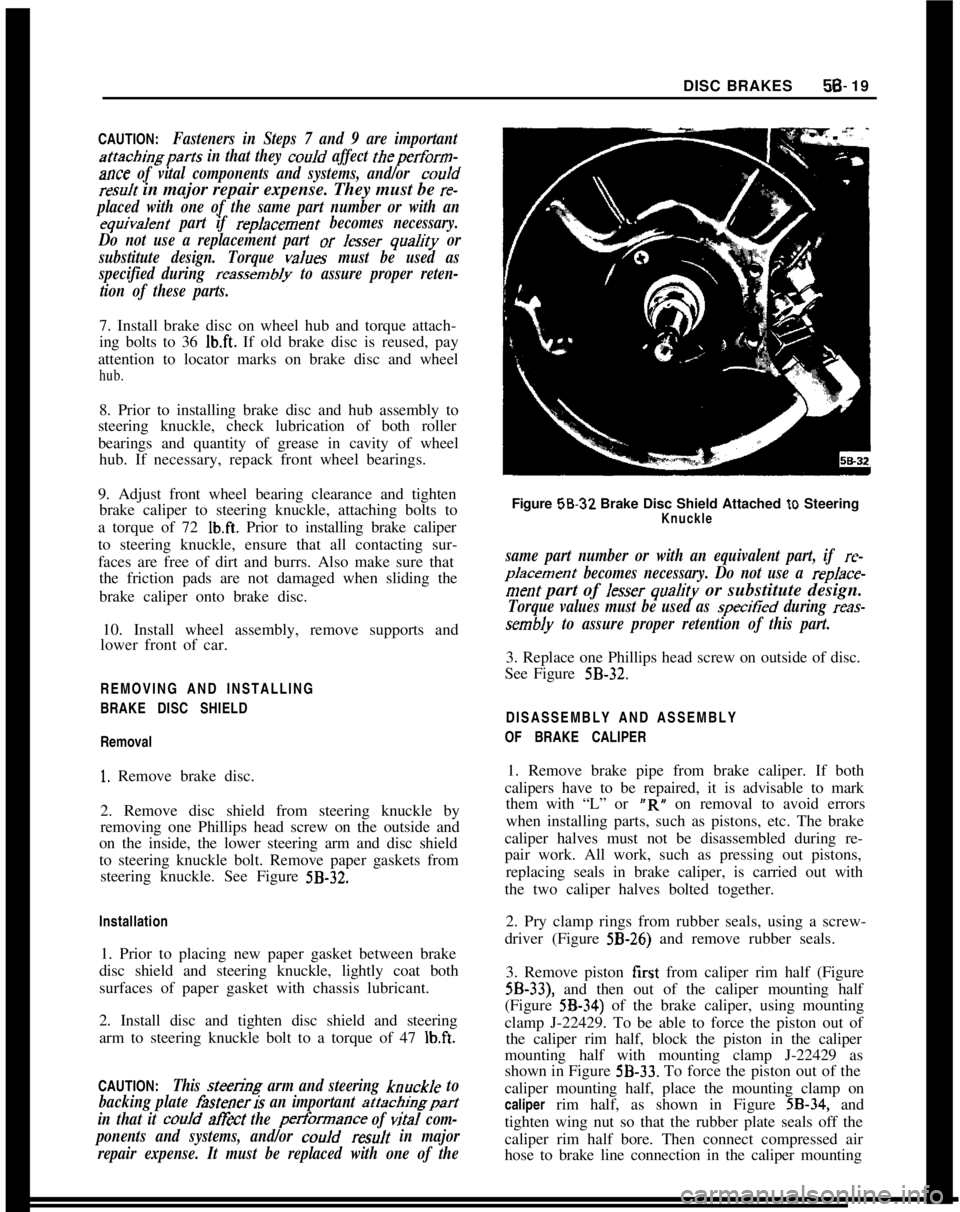
1. Remove brake disc.
2. Remove disc shield from steering knuckle by
removing one Phillips head screw on the outside and
on the inside, the lower steering arm and disc shield
to steering knuckle bolt. Remove paper gaskets from
steering knuckle. See Figure
5B-32.Installation
1. Prior to placing new paper gasket between brake
disc shield and steering knuckle, lightly coat both
surfaces of paper gasket with chassis lubricant.
2. Install disc and tighten disc shield and steering
arm to steering knuckle bolt to a torque of 47
lb.ft.CAUTION:
This steen;Og arm and steering knuckJe to
backing plate
fisteneris an important attachingpart
in that it
couJd at&t the performance of viral com-
ponents and systems, and/or
couJd resuJt in major
repair expense. It must be replaced with one of theFigure 58-32 Brake Disc Shield Attached
to SteeringKnuckle
same part number or with an equivalent part, if re-
pJacement becomes necessary. Do not use a rep/ace-
merit part of Jesser quaJity or substitute design.
Torque values must be used as specitied during reas-
sembly to assure proper retention of this part.3. Replace one Phillips head screw on outside of disc.
See Figure
5B-32.DISASSEMBLY AND ASSEMBLY
OF BRAKE CALIPER
1. Remove brake pipe from brake caliper. If both
calipers have to be repaired, it is advisable to mark
them with “L” or “R” on removal to avoid errors
when installing parts, such as pistons, etc. The brake
caliper halves must not be disassembled during re-
pair work. All work, such as pressing out pistons,
replacing seals in brake caliper, is carried out with
the two caliper halves bolted together.
2. Pry clamp rings from rubber seals, using a screw-
driver (Figure
5B-26) and remove rubber seals.
3. Remove piston first from caliper rim half (Figure
5B-33), and then out of the caliper mounting half
(Figure
5B-34) of the brake caliper, using mounting
clamp J-22429. To be able to force the piston out of
the caliper rim half, block the piston in the caliper
mounting half with mounting clamp J-22429 as
shown in Figure
5B-33. To force the piston out of the
caliper mounting half, place the mounting clamp on
caliper rim half, as shown in Figure
5B-34, and
tighten wing nut so that the rubber plate seals off the
caliper rim half bore. Then connect compressed air
hose to brake line connection in the caliper mounting
Page 279 of 625

58.201973 OPEL SERVICE MANUAL
half, and blow out pistons, carefully regulating air
flow. When removing pistons, proceed with extreme
caution and always keep the fingers ofthe hand hold-
ing the brake caliper away from the piston.
Figure 55.33 Removing Caliper Rim Half Piston
Figure 58-34 Removing Caliper Mounting Half Piston
4. Pry rubber fluid seals out of the annular grooves
in the caliper half bores. See Figure
5B-35.5. Check all parts of the brake caliper for wear. If the
caliper half bores are scored or rusted, use a new
complete brake caliper and friction pads. Small, light
rust spots in the caliper half bores or on the pistons
can be removed with fine emery cloth. If pistons are
damaged, even though the caliper half bores are inFigure 58-35 Removing Rubber Fluid Seal From
Caliper Boresgood condition, the piston must be replaced. The
rubber fluid seals and rubber seals with
clapp rings
for the pistons are to be replaced every time repair
work is carried out on the brake caliper.
6. Thoroughly clean all reusable parts
- complete
brake caliper and pistons
- with denatured alcohol
and dry with compressed air. Prior to cleaning, screw
bleeder valve out of caliper.
7. Lightly coat new rubber fluid seals with brake
fluid and insert fluid seals into grooves of brake
caliper bores.
8. Place brake caliper into vise to install pistons.
After installing one piston, change position of brake
caliper in vise to install second piston. The piston to
friction pad spacer plates should be used as a gauge
to locate relieved edge of piston at 20 degrees to
horizontal during piston installation. See Steps
9-IO-
11-12.9. Place caliper mounting half in vise and coat its
bore and piston lightly with brake fluid. Then push
piston, with hollow end towards brake disc, into the
caliper bore. Turn piston so that the relieved edge
faces downwards at an angle of 20 degrees and facing
in brake disc direction. The guide surface in the
caliper half recess at the brake pipe connection side,
will properly align the piston. Push piston into
caliper bore up to the stop.
10. Change position of brake caliper and install sec-
ond piston in the same manner.
11. Install new rubber seals with clamp rings. Make
sure that the rubber seals are properly seated on the
Page 280 of 625
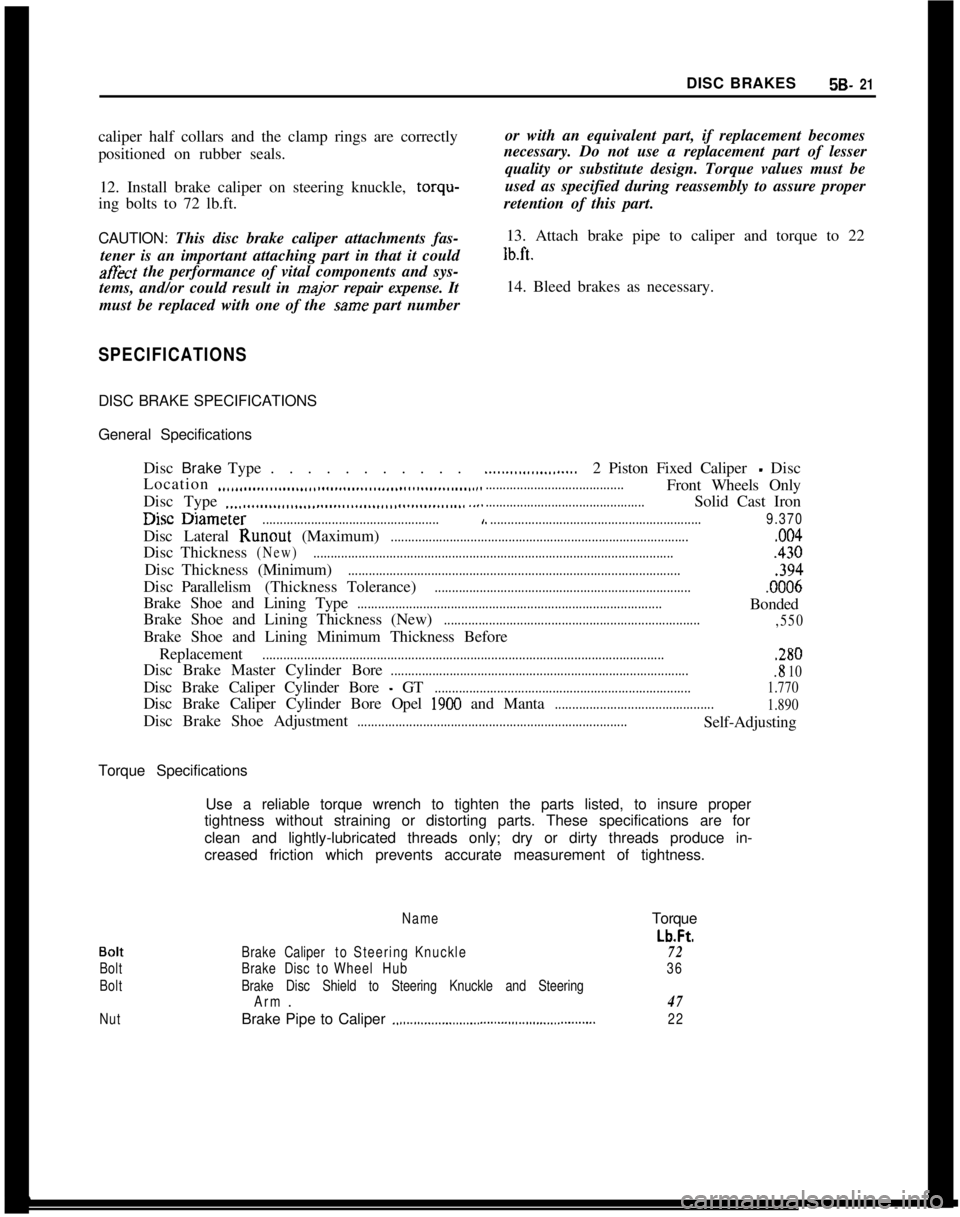
DISC BRAKES5B- 21caliper half collars and the clamp rings are correctly
positioned on rubber seals.
12. Install brake caliper on steering knuckle, torqu-
ing bolts to 72 lb.ft.or with an equivalent part, if replacement becomes
necessary. Do not use a replacement part of lesser
quality or substitute design. Torque values must be
used as specified during reassembly to assure proper
retention of this part.
CAUTION: This disc brake caliper attachments fas-
tener is an important attaching part in that it couldatExt the performance of vital components and sys-
tems, and/or could result in
ma@r repair expense. It
must be replaced with one of the
same part number13. Attach brake pipe to caliper and torque to 22
lb.ft.14. Bleed brakes as necessary.
SPECIFICATIONSDISC BRAKE SPECIFICATIONS
General Specifications
DiscBrakeType. . . . . . . . . . .
Location
..,,.,..__....__.,,.,,,................,,,................,....Disc Type
.._.......................................................I.-. -.
......................2 Piston Fixed Caliper - Disc
........................................Front Wheels Only
..............................................Solid Cast Iron
useuameter...................................................,..............................................................9.370Disc Lateral Runout (Maximum)
......................................................................................,004DiscThickness
(New).........................................................................................................430DiscThickness(Minimum)
................................................................................................,394DiscParallelism(ThicknessTolerance)
...........................................................................0006Brake Shoe and Lining Type
........................................................................................Bonded
Brake Shoe and Lining Thickness (New)
..........................................................................
,550Brake Shoe and Lining Minimum Thickness Before
Replacement
....................................................................................................................,280Disc Brake Master Cylinder Bore
.......................................................................................8 10Disc Brake Caliper Cylinder Bore
- GT..........................................................................1.770Disc Brake Caliper Cylinder Bore Opel
1900 and Manta..............................................
1.890Disc Brake Shoe Adjustment
..............................................................................Self-Adjusting
Torque Specifications
Use a reliable torque wrench to tighten the parts listed, to insure proper
tightness without straining or distorting parts. These specifications are for
clean and lightly-lubricated threads only; dry or dirty threads produce in-
creased friction which prevents accurate measurement of tightness.
Bolt
Bolt
Bolt
NutName
BrakeCalipertoSteeringKnuckle
BrakeDisctoWheelHub
Brake Disc Shield to Steering Knuckle and Steering
Arm.
Brake Pipe to Caliper
.,.,...............................,......................Torque
Lb.Ft.
72
36
47
22