OPEL GT-R 1973 Service Manual
Manufacturer: OPEL, Model Year: 1973, Model line: GT-R, Model: OPEL GT-R 1973Pages: 625, PDF Size: 17.22 MB
Page 361 of 625

Page 362 of 625
CLUTCH7A. 1
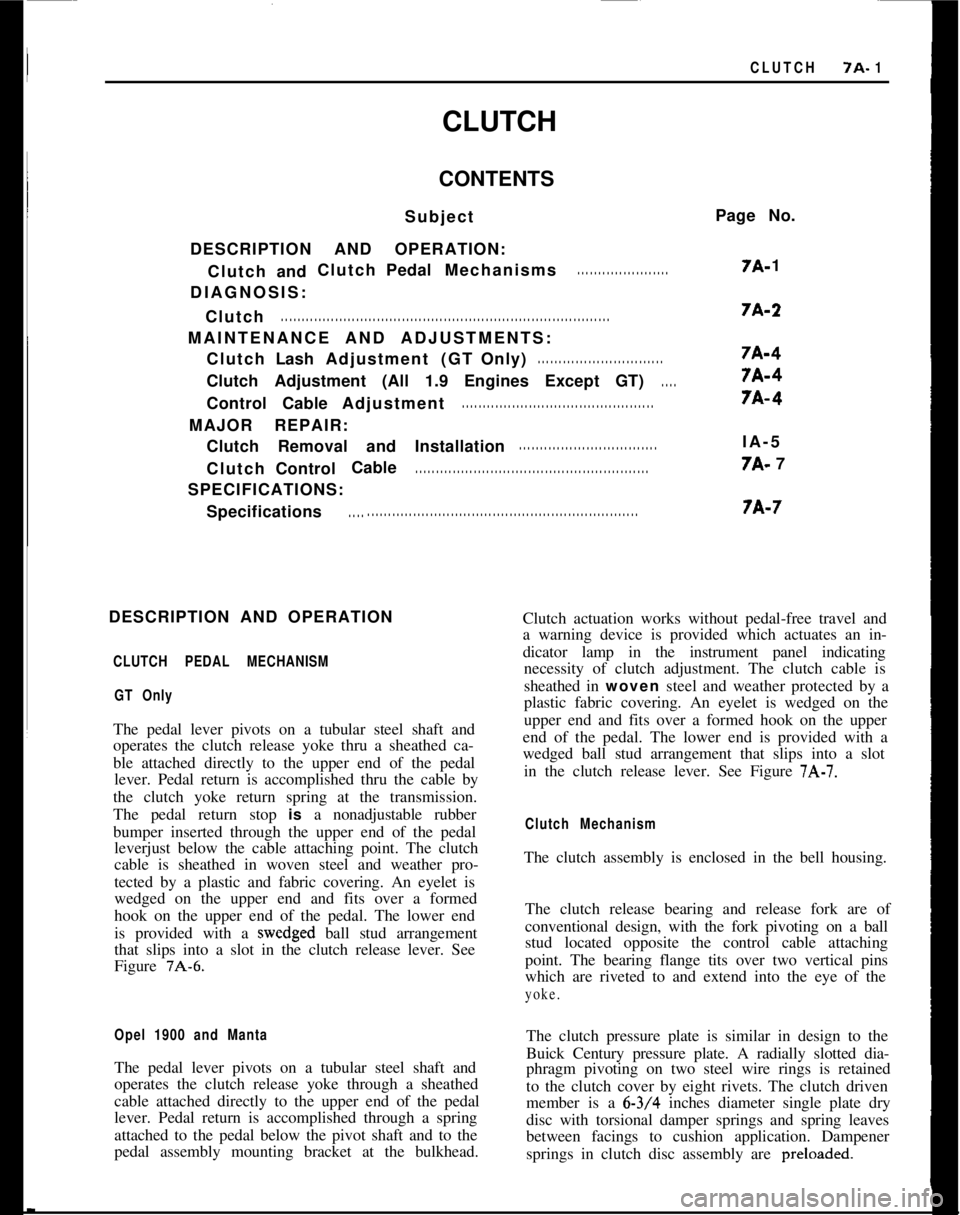
CLUTCH
CONTENTS
Subject
DESCRIPTION AND OPERATION: Clutch andClutch
PedalMechanisms
. . . . . . . . . . . . . . . . . . . . . .
DIAGNOSIS:
Clutch
. . . . . . . . . . . . . . . . . . . . . . . . . . . . . . . . . . . . \
. . . . . . . . . . . . . . . . . . . . . . . . . . . . . . . . . . . . \
. . . . . . .
MAINTENANCE AND ADJUSTMENTS: Clutch LashAdjustment (GTOnly)
. . . . . . . . . . . . . . . . . . . . . . . . . . . . . .
Clutch Adjustment (All 1.9 Engines Except GT). . . .
Control CableAdjustment. . . . . . . . . . . . . . . . . . . . . . . . . . . . . . . . . . . . \
. . . . . . . . . .
MAJOR REPAIR:
Clutch Removal and Installation
. . . . . . . . . . . . . . . . . . . . . . . . . . . . . . . . .
Clutch Control Cable. . . . . . . . . . . . . . . . . . . . . . . . . . . . . . . . . . . . \
. . . . . . . . . . . . . . . . . . . .
SPECIFICATIONS:
Specifications
. . . . . . . . . . . . . . . . . . . . . . . . . . . . . . . . . . . . . . . . \
. . . . . . . . . . . . . . . . . . . . . . . . . . . . .
Page No.
7A-
1
7A-2
7A-4
7A-4
7A-4
IA-5
7A- 7
7A-7
DESCRIPTION AND OPERATION
CLUTCH PEDAL MECHANISM GT Only
The pedal lever pivots on a tubular steel shaft and
operates the clutch release yoke thru a sheathed ca-
ble attached directly to the upper end of the pedallever. Pedal return is accomplished thru the cable by
the clutch yoke return spring at the transmission.
The pedal return stop
is a nonadjustable rubber
bumper inserted through the upper end of the pedal leverjust below the cable attaching point. The clutch
cable is sheathed in woven steel and weather pro-
tected by a plastic and fabric covering. An eyelet is
wedged on the upper end and fits over a formed
hook on the upper end of the pedal. The lower end
is provided with a
wedged ball stud arrangement
that slips into a slot in the clutch release lever. See
Figure
7A-6.
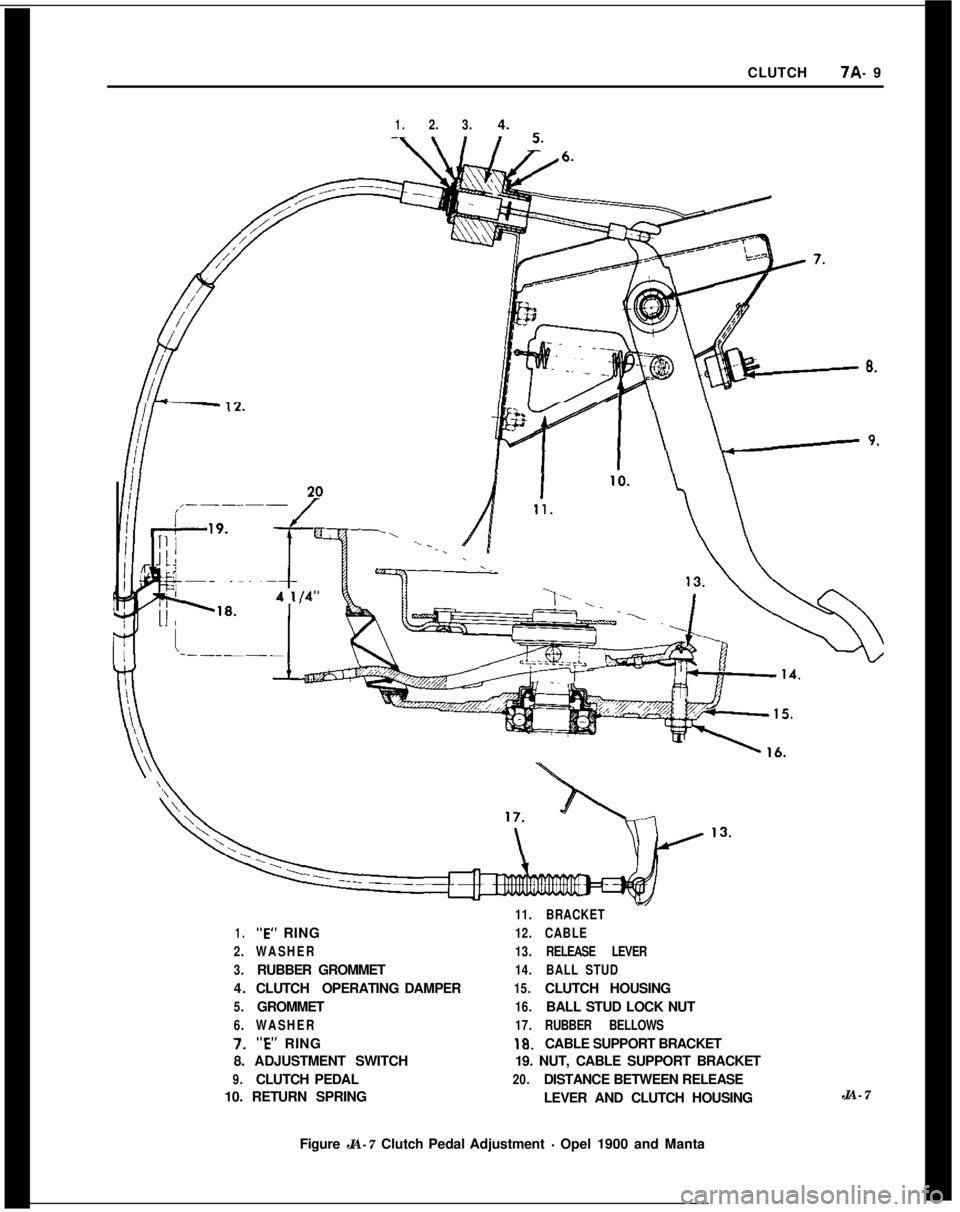
Opel 1900 and Manta
The pedal lever pivots on a tubular steel shaft and
operates the clutch release yoke through a sheathed
cable attached directly to the upper end of the pedal
lever. Pedal return is accomplished through a spring
attached to the pedal below the pivot shaft and to the
pedal assembly mounting bracket at the bulkhead. Clutch actuation works without pedal-free travel and
a warning device is provided which actuates an in-
dicator lamp in the instrument panel indicating
necessity of clutch adjustment. The clutch cable is
sheathed in
woven steel and weather protected by a
plastic fabric covering. An eyelet is wedged on the
upper end and fits over a formed hook on the upper
end of the pedal. The lower end is provided with a
wedged ball stud arrangement that slips into a slot in the clutch release lever. See Figure
7A-7.
Clutch Mechanism
The clutch assembly is enclosed in the bell housing.
The clutch release bearing and release fork are of
conventional design, with the fork pivoting on a ball
stud located opposite the control cable attaching
point. The bearing flange tits over two vertical pins
which are riveted to and extend into the eye of the
yoke.
The clutch pressure plate is similar in design to the
Buick Century pressure plate. A radially slotted dia-
phragm pivoting on two steel wire rings is retained
to the clutch cover by eight rivets. The clutch driven
member is a
6-3/4 inches diameter single plate dry
disc with torsional damper springs and spring leaves
between facings to cushion application. Dampener
springs in clutch disc assembly are
preloaded.
Page 363 of 625
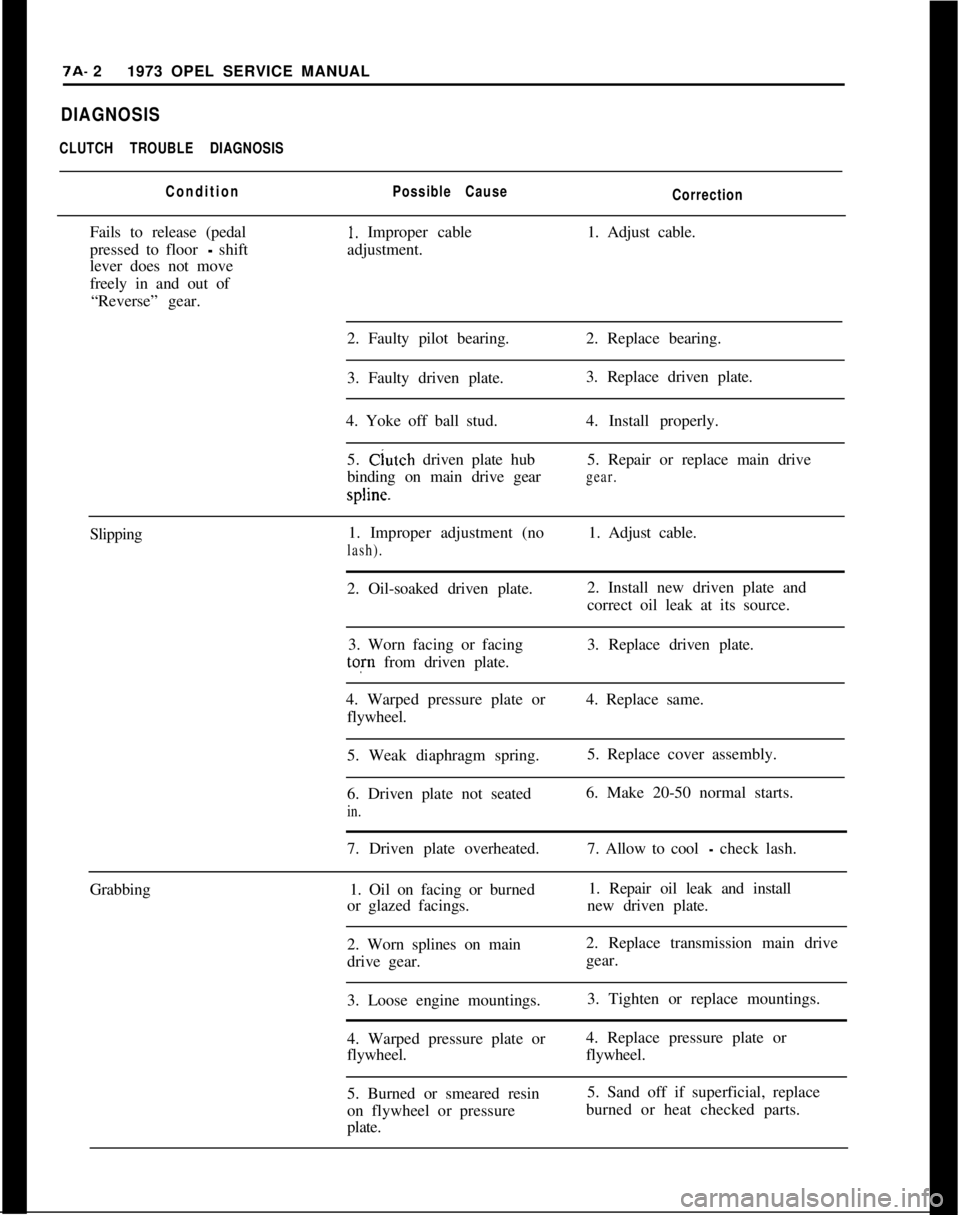
7A- 21973 OPEL SERVICE MANUALDIAGNOSIS
CLUTCH TROUBLE DIAGNOSIS
ConditionPossible Cause
CorrectionFails to release (pedal
1. Improper cable1. Adjust cable.
pressed to floor
- shiftadjustment.
lever does not move
freely in and out of
“Reverse” gear.
2. Faulty pilot bearing.2. Replace bearing.
3. Faulty driven plate.3. Replace driven plate.
4. Yoke off ball stud.4. Install properly.
5. Clutch driven plate hub5. Repair or replace main drive
binding on main drive gear
gear.spline.
Slipping1. Improper adjustment (no1. Adjust cable.
lash).2. Oil-soaked driven plate.2. Install new driven plate and
correct oil leak at its source.
3. Worn facing or facing3. Replace driven plate.tofn from driven plate.
4. Warped pressure plate or4. Replace same.
flywheel.
5. Weak diaphragm spring.5. Replace cover assembly.
6. Driven plate not seated6. Make 20-50 normal starts.
in.7. Driven plate overheated.7. Allow to cool
- check lash.
Grabbing1. Oil on facing or burned1. Repair oil leak and install
or glazed facings.new driven plate.
2. Worn splines on main2. Replace transmission main drive
drive gear.gear.
3. Loose engine mountings.3. Tighten or replace mountings.
4. Warped pressure plate or4. Replace pressure plate or
flywheel.flywheel.
5. Burned or smeared resin5. Sand off if superficial, replace
on flywheel or pressureburned or heat checked parts.
plate.
Page 364 of 625
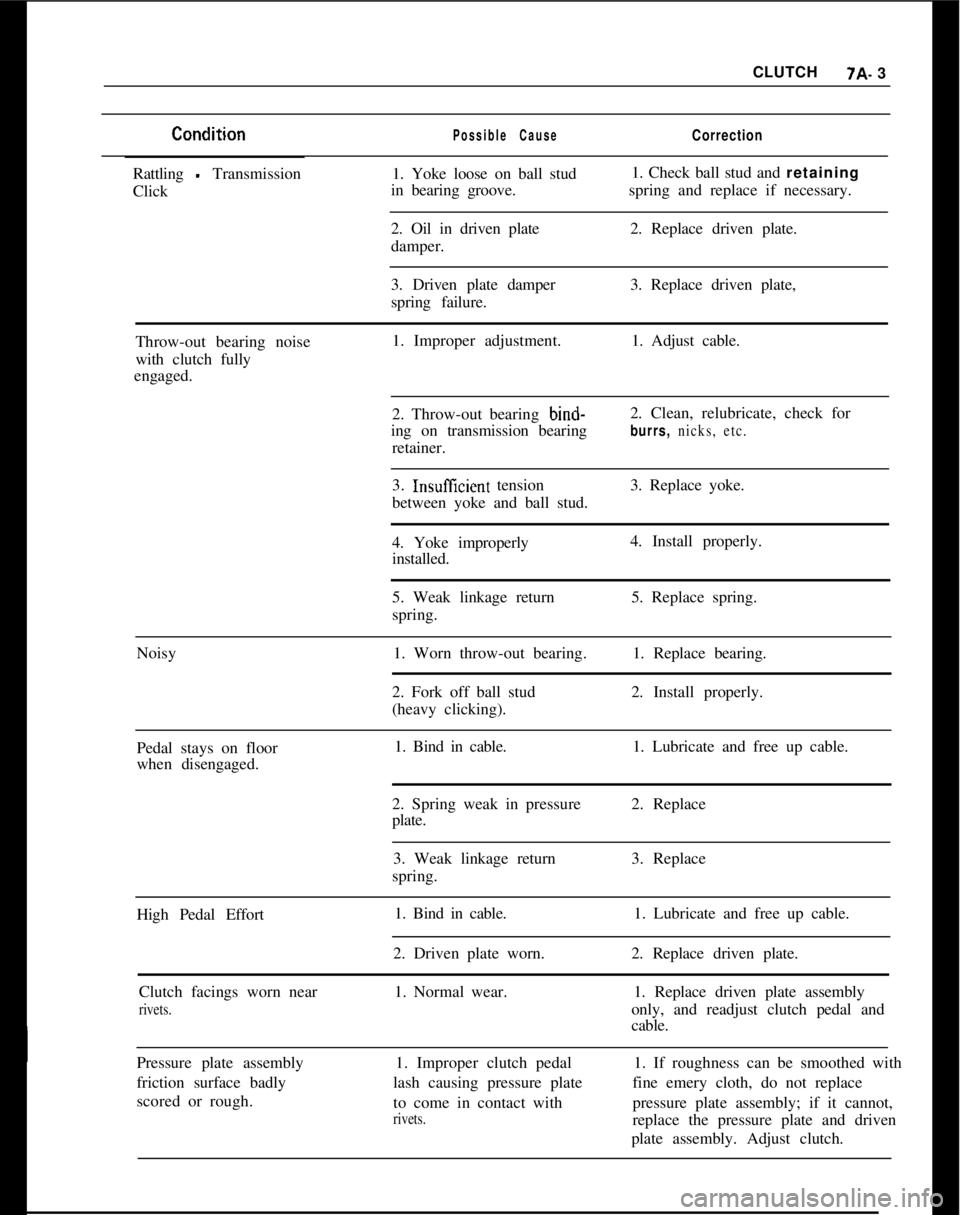
CLUTCH7A- 3Possible CauseCorrectionRattling
- Transmission
Click1. Yoke loose on ball stud
in bearing groove.1. Check ball stud and retaining
spring and replace if necessary.
2. Oil in driven plate
damper.2. Replace driven plate.
3. Driven plate damper
spring failure.3. Replace driven plate,
Throw-out bearing noise
with clutch fully
engaged.1. Improper adjustment.1. Adjust cable.
2. Throw-out bearing bind-
ing on transmission bearing
retainer.2. Clean, relubricate, check for
burrs, nicks, etc.3.
InsuffIcient tension
between yoke and ball stud.3. Replace yoke.
4. Yoke improperly
installed.4. Install properly.
5. Weak linkage return
spring.5. Replace spring.
Noisy1. Worn throw-out bearing.1. Replace bearing.
2. Fork off ball stud
(heavy clicking).2. Install properly.
Pedal stays on floor
when disengaged.1. Bind in cable.1. Lubricate and free up cable.
2. Spring weak in pressure
plate.2. Replace
3. Weak linkage return
spring.3. Replace
High Pedal Effort1. Bind in cable.
2. Driven plate worn.1. Lubricate and free up cable.
2. Replace driven plate.
Clutch facings worn near
rivets.1. Normal wear.1. Replace driven plate assembly
only, and readjust clutch pedal and
cable.
Pressure plate assembly
friction surface badly
scored or rough.1. Improper clutch pedal
lash causing pressure plate
to come in contact with
rivets.1. If roughness can be smoothed with
fine emery cloth, do not replace
pressure plate assembly; if it cannot,
replace the pressure plate and driven
plate assembly. Adjust clutch.
Page 365 of 625
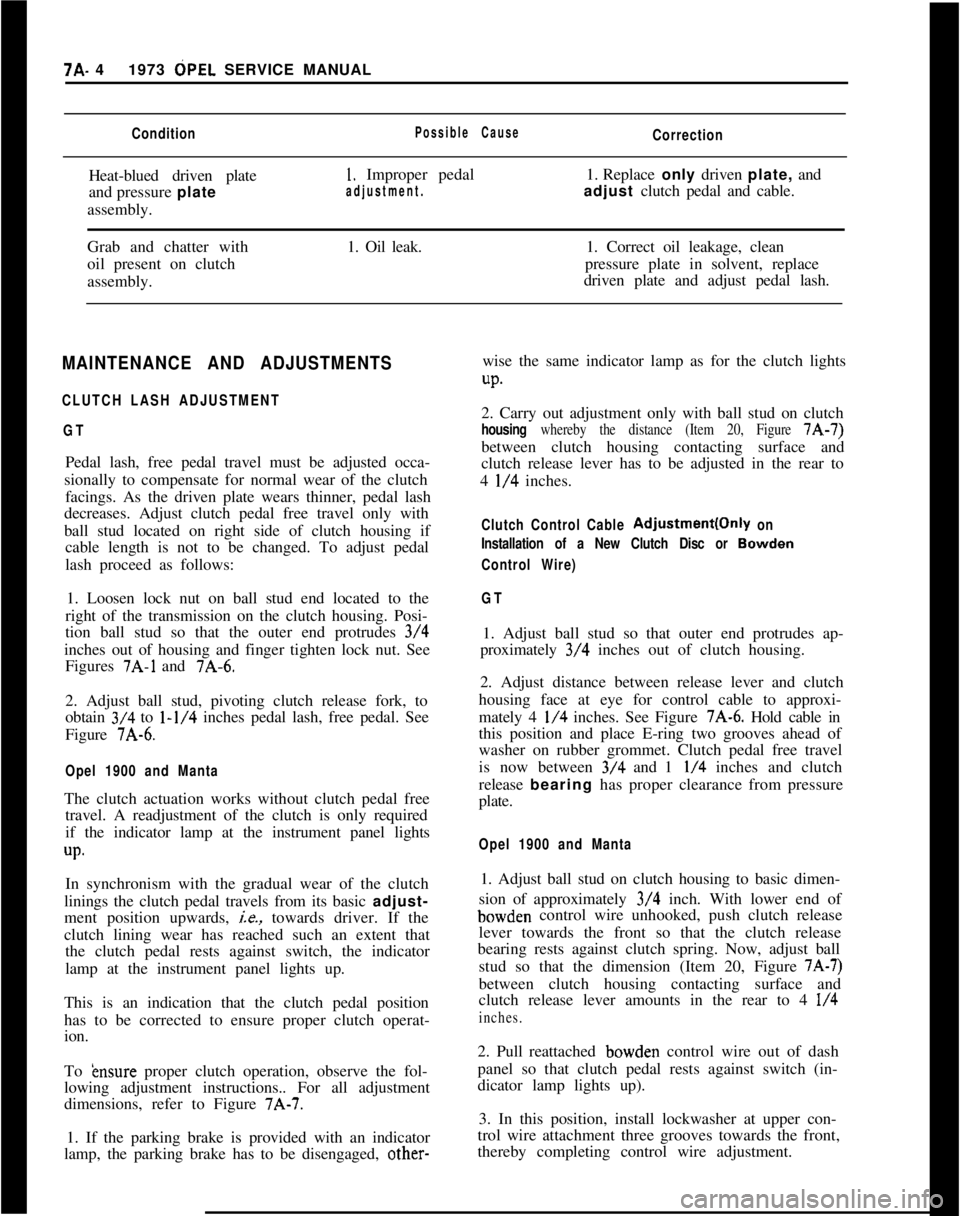
7A- 41973 dPEL SERVICE MANUALConditionPossible CauseCorrectionHeat-blued driven plate
and pressure plate
assembly.
1. Improper pedal1. Replace only driven plate, and
adjustment.adjust clutch pedal and cable.
Grab and chatter with
oil present on clutch
assembly.1. Oil leak.1. Correct oil leakage, clean
pressure plate in solvent, replace
driven plate and adjust pedal lash.
MAINTENANCE AND ADJUSTMENTS
CLUTCH LASH ADJUSTMENT
GTPedal lash, free pedal travel must be adjusted occa-
sionally to compensate for normal wear of the clutch
facings. As the driven plate wears thinner, pedal lash
decreases. Adjust clutch pedal free travel only with
ball stud located on right side of clutch housing if
cable length is not to be changed. To adjust pedal
lash proceed as follows:
1. Loosen lock nut on ball stud end located to the
right of the transmission on the clutch housing. Posi-
tion ball stud so that the outer end protrudes 3/4
inches out of housing and finger tighten lock nut. See
Figures
7A-1 and 7A-6.
2. Adjust ball stud, pivoting clutch release fork, to
obtain 3/4 to
l-1/4 inches pedal lash, free pedal. See
Figure 7A-6.
Opel 1900 and MantaThe clutch actuation works without clutch pedal free
travel. A readjustment of the clutch is only required
if the indicator lamp at the instrument panel lights
up.In synchronism with the gradual wear of the clutch
linings the clutch pedal travels from its basic adjust-
ment position upwards,
ie., towards driver. If the
clutch lining wear has reached such an extent that
the clutch pedal rests against switch, the indicator
lamp at the instrument panel lights up.
This is an indication that the clutch pedal position
has to be corrected to ensure proper clutch operat-
ion.
To
&~sure proper clutch operation, observe the fol-
lowing adjustment instructions.. For all adjustment
dimensions, refer to Figure 7A-7.
1. If the parking brake is provided with an indicator
lamp, the parking brake has to be disengaged, other-wise the same indicator lamp as for the clutch lights
UP.2. Carry out adjustment only with ball stud on clutch
housing whereby the distance (Item 20, Figure 7A-7)
between clutch housing contacting surface and
clutch release lever has to be adjusted in the rear to
4
l/4 inches.
Clutch Control Cable Adjustment(Only on
Installation of a New Clutch Disc or
Bowden
Control Wire)
GT1. Adjust ball stud so that outer end protrudes ap-
proximately 3/4 inches out of clutch housing.
2. Adjust distance between release lever and clutch
housing face at eye for control cable to approxi-
mately 4
l/4 inches. See Figure 7A-6. Hold cable in
this position and place E-ring two grooves ahead of
washer on rubber grommet. Clutch pedal free travel
is now between 3/4 and 1
l/4 inches and clutch
release bearing has proper clearance from pressure
plate.
Opel 1900 and Manta1. Adjust ball stud on clutch housing to basic dimen-
sion of approximately 3/4 inch. With lower end ofbowden control wire unhooked, push clutch release
lever towards the front so that the clutch release
bearing rests against clutch spring. Now, adjust ball
stud so that the dimension (Item 20, Figure
7A-7)between clutch housing contacting surface and
clutch release lever amounts in the rear to 4
l/4
inches.2. Pull reattached bowden control wire out of dash
panel so that clutch pedal rests against switch (in-
dicator lamp lights up).
3. In this position, install lockwasher at upper con-
trol wire attachment three grooves towards the front,
thereby completing control wire adjustment.
Page 366 of 625
CLUTCH?A- 5MAJOR REPAIR
CLUTCH REMOVAL AND INSTALLATION
Remove Clutch1. Remove transmission. Refer to Manual Transmis-
sion for removal procedure.
2. Remove bolts from engine support brackets, both
sides. Let brackets hang by front bolts.
3. Remove flywheel cover pan.
4. Remove flywheel housing to engine attaching
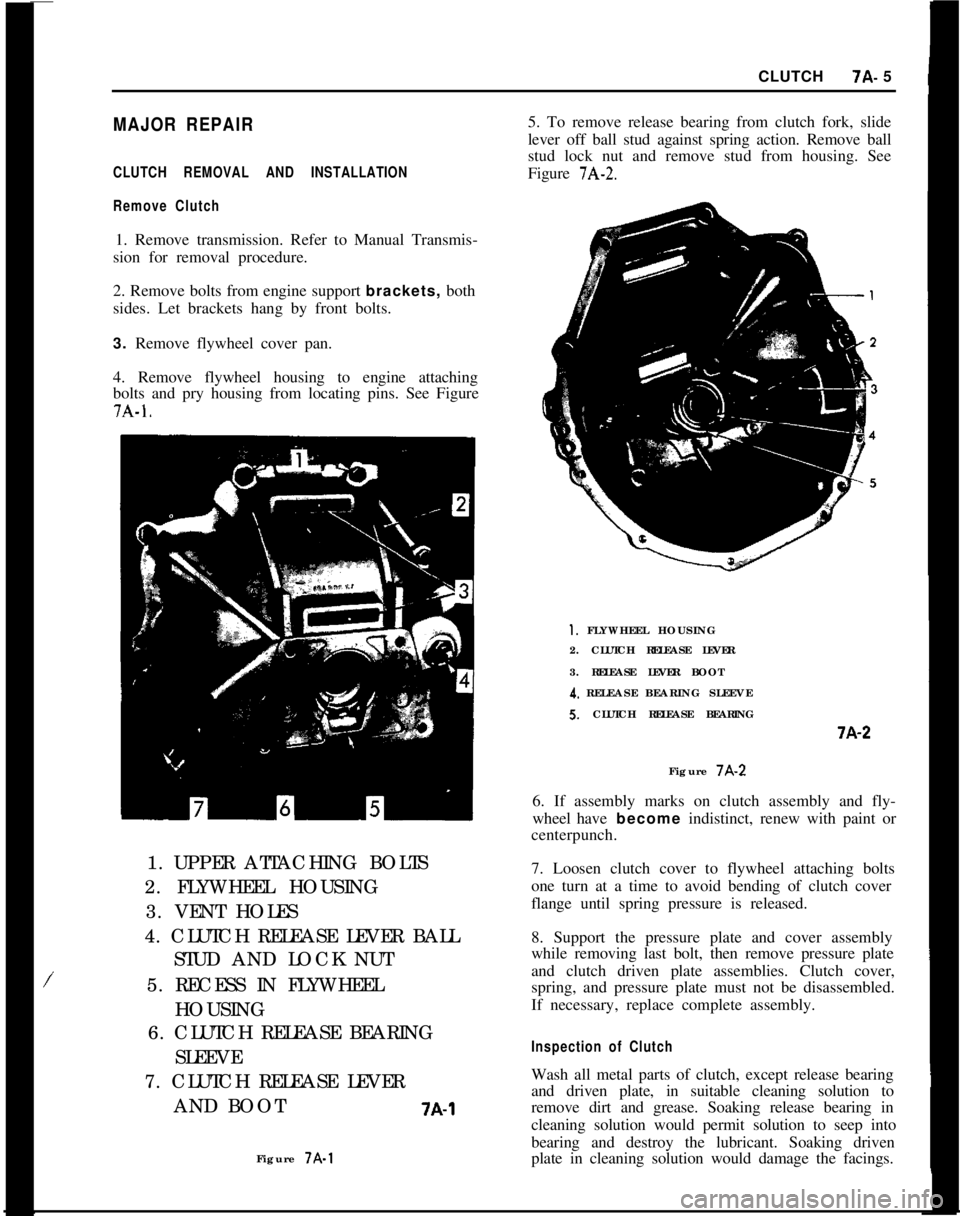
bolts and pry housing from locating pins. See Figure7A-1.
/1. UPPER ATTACHING BOLTS
2. FLYWHEEL HOUSING
3. VENT HOLES
4. CLUTCH RELEASE LEVER BALL
STUD AND LOCK NUT
5. RECESS IN FLYWHEEL
HOUSING
6. CLUTCH RELEASE BEARING
SLEEVE
7. CLUTCH RELEASE LEVER
AND BOOT
7A-1Figure 7A-15. To remove release bearing from clutch fork, slide
lever off ball stud against spring action. Remove ball
stud lock nut and remove stud from housing. See
Figure
7A-2.
1. FLYWHEEL HOUSING
2. CLUTCH RELEASE LEVER
3. RELEASE LEVER BOOT
4. RELEASE BEARING SLEEVES. CLUTCH RELEASE BEARINGi-A-2
Figure 7A-2
6. If assembly marks on clutch assembly and fly-
wheel have become indistinct, renew with paint or
centerpunch.
7. Loosen clutch cover to flywheel attaching bolts
one turn at a time to avoid bending of clutch cover
flange until spring pressure is released.
8. Support the pressure plate and cover assembly
while removing last bolt, then remove pressure plate
and clutch driven plate assemblies. Clutch cover,
spring, and pressure plate must not be disassembled.
If necessary, replace complete assembly.
Inspection of ClutchWash all metal parts of clutch, except release bearing
and driven plate, in suitable cleaning solution to
remove dirt and grease. Soaking release bearing in
cleaning solution would permit solution to seep into
bearing and destroy the lubricant. Soaking driven
plate in cleaning solution would damage the facings.
Page 367 of 625
7A- 61973 OPEL SERVICE MANUAL1. FIywheeI and Pressure PlateExamine friction surfaces of flywheel and pressure
plate for scoring or roughness. Slight roughness may
be smoothed with fine emery cloth, but if surface is
deeply scored or grooved the part should be re-
placed.
2.
CJutch Driven Plate
Inspect driven plate for condition of facings, loose
rivets, broken or very loose torsional springs.
If facings are worn down near rivets or are oily, the
plate assembly should be replaced. A very slight
amount of oil on clutch facings will cause clutch grab
and chatter. A large amount of oil on facings will
cause slippage. Removal of oil by solvents or by buff-
ing is not practical since oil will continue to bleed
from facing material when hot.
When oil is found on driven plate facings, examine
transmission drainback hole, pilot bushing, engine
rear main bearing and other points of possible oil
leakage.
Test the fit of driven plate hub on transmission main
drive gear for an easy sliding fit.
Regardless of whether the old plate or a new one is
to be installed, the plate should be checked for run-
out. Lateral run-out measured at disc circumference
should not exceed
.016 inch.
Inspect clutch release bearing for scoring or exces-
sive wear on front contact face. Test for roughness of
balls and races by pressing and turning front race
slowly. Inspect main drive gear pilot bushing in
crankshaft. If bushing is rough or worn it should be
Figure JA-3replaced. If replacement is necessary, remove bear-
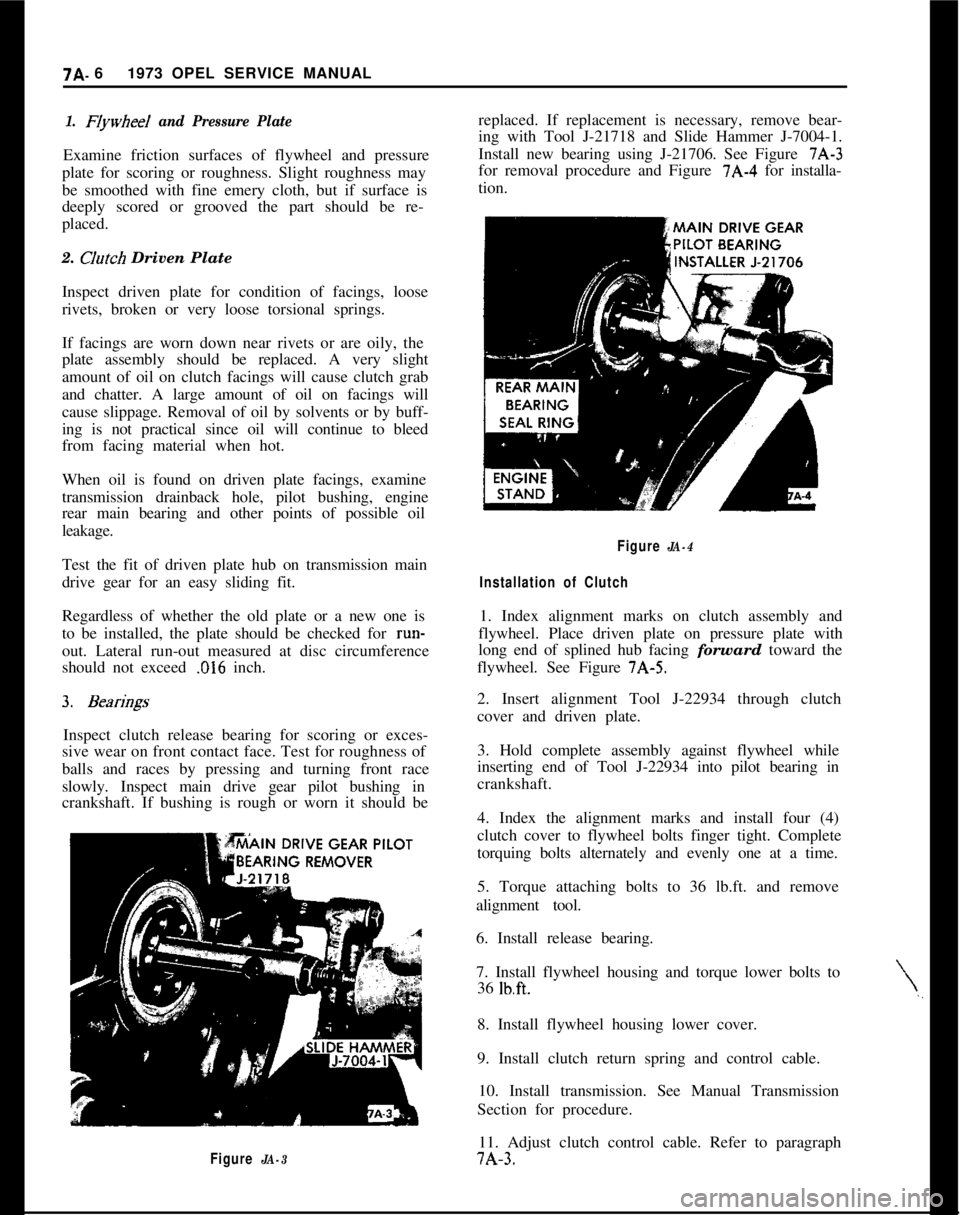
ing with Tool J-21718 and Slide Hammer J-7004-1.
Install new bearing using J-21706. See Figure 7A-3
for removal procedure and Figure 7A-4 for installa-
tion.
\,,
Figure JA-4
Installation of Clutch1. Index alignment marks on clutch assembly and
flywheel. Place driven plate on pressure plate with
long end of splined hub facing forward toward the
flywheel. See Figure 7A-5.
2. Insert alignment Tool J-22934 through clutch
cover and driven plate.
3. Hold complete assembly against flywheel while
inserting end of Tool J-22934 into pilot bearing in
crankshaft.
4. Index the alignment marks and install four (4)
clutch cover to flywheel bolts finger tight. Complete
torquing bolts alternately and evenly one at a time.
5. Torque attaching bolts to 36 lb.ft. and remove
alignment tool.
6. Install release bearing.
7. Install flywheel housing and torque lower bolts to
36
lb.ft.8. Install flywheel housing lower cover.
9. Install clutch return spring and control cable.
10. Install transmission. See Manual Transmission
Section for procedure.
11. Adjust clutch control cable. Refer to paragraph7A-3.
Page 368 of 625
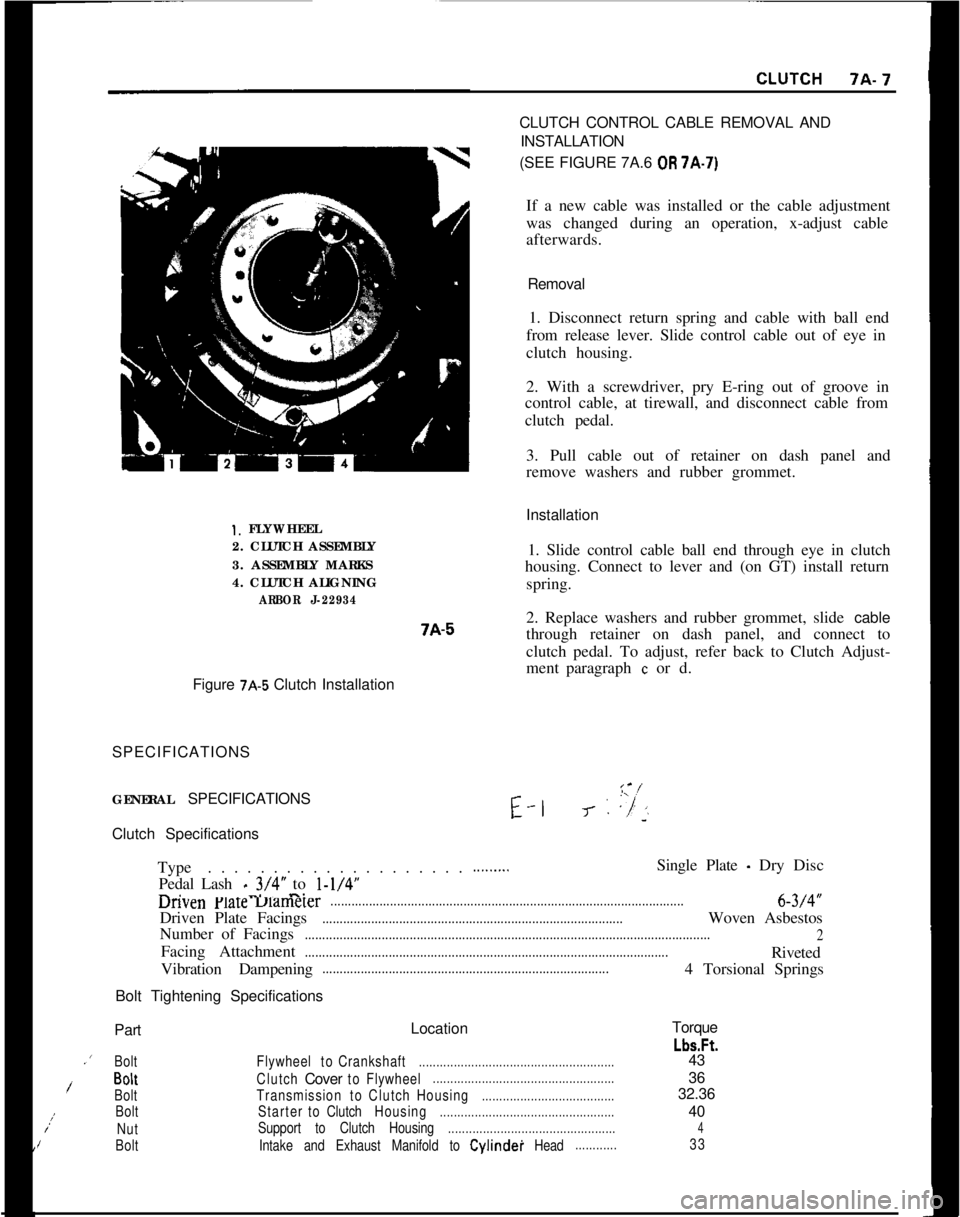
Installation1. FLYWHEEL
2. CLUTCH ASSEMBLY
3. ASSEMBLY MARKS
4. CLUTCH ALIGNING
ARBOR J-229347A-51. Slide control cable ball end through eye in clutch
housing. Connect to lever and (on GT) install return
spring.
2. Replace washers and rubber grommet, slide cable
through retainer on dash panel, and connect to
clutch pedal. To adjust, refer back to Clutch Adjust-
ment paragraph
c or d.
Figure
7A-5 Clutch Installation
SPECIFICATIONS
GENERAL SPECIFICATIONSE-l
I-‘-J- : ,“/’‘~Clutch Specifications
Type. . . . . . . . . . . . . . . . . . . .
Pedal Lash
_ 3/4” to l-1/4”-. -..-.
.........Single Plate - Dry Disc
unvenFlareuamerer.....................................................................................................6-3/4”
Driven Plate Facings
......................................................................................Woven Asbestos
Number of Facings
....................................................................................................................
2Facing Attachment
........................................................................................................Riveted
Vibration Dampening
..................................................................................4 Torsional Springs
Bolt Tightening SpecificationsCLUTCH CONTROL CABLE REMOVAL AND
INSTALLATION
(SEE FIGURE 7A.6
OR 7A-7)
If a new cable was installed or the cable adjustment
was changed during an operation, x-adjust cable
afterwards.
Removal
1. Disconnect return spring and cable with ball end
from release lever. Slide control cable out of eye in
clutch housing.
2. With a screwdriver, pry E-ring out of groove in
control cable, at tirewall, and disconnect cable from
clutch pedal.
3. Pull cable out of retainer on dash panel and
remove washers and rubber grommet.
PartLocationTorque
Lbs.Ft..’
BoltFlywheeltoCrankshaft........................................................43
/BoltClutchCovertoFlywheel....................................................36
BoltTransmissiontoClutchHousing......................................32.36;:
BoltStartertoClutchHousing..................................................40
NutSupport to Clutch Housing................................................4IBoltIntake and Exhaust Manifold to Cylindei Head............33
Page 369 of 625
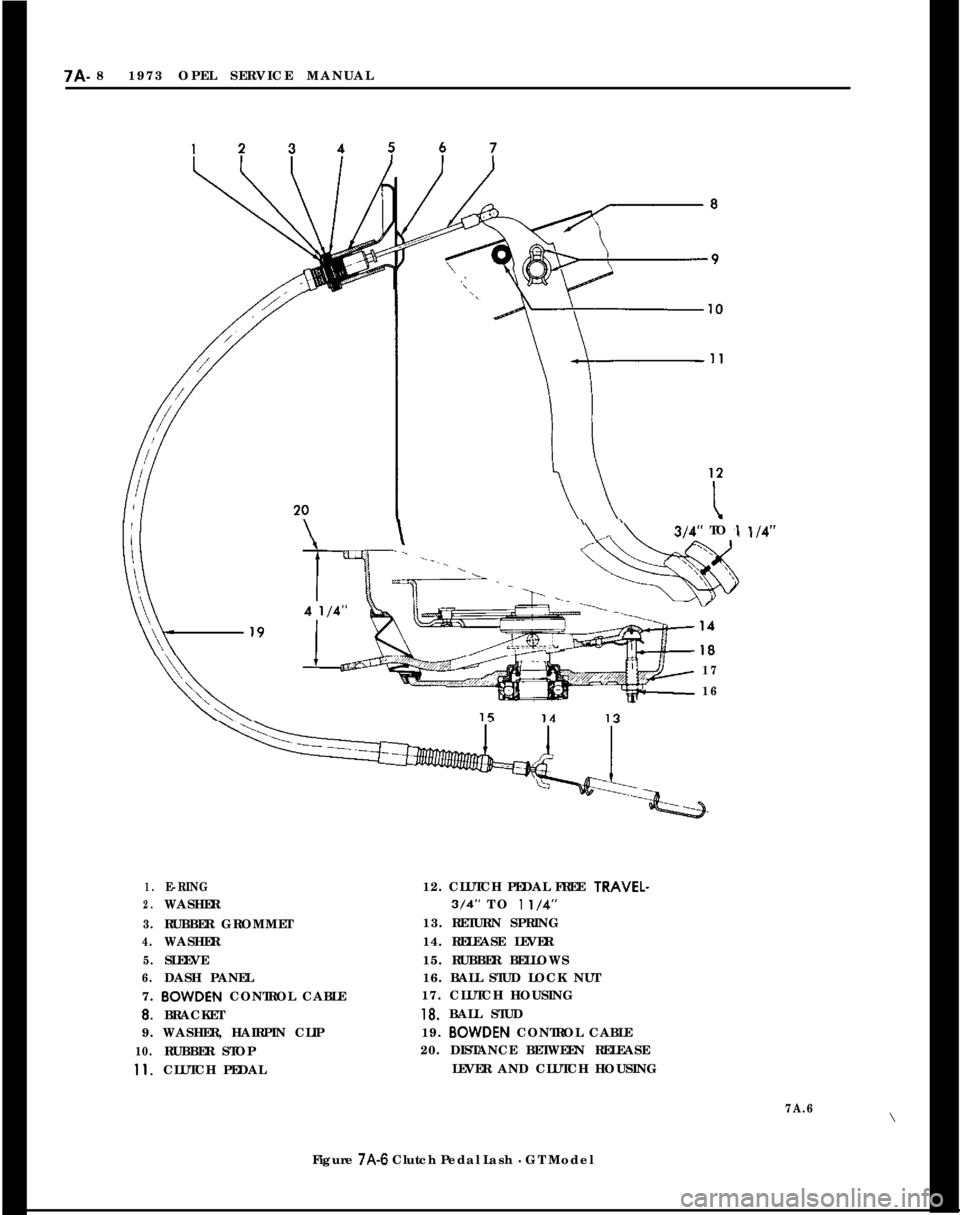
7A- 81973 OPEL SERVICE MANUAL\\“\314”TO ,l
17
16
1.E-RING12. CLUTCH PEDAL FREE TRAVEL-
2.WASHER3/4” TO 1 l/4”
3.RUBBER GROMMET13. RETURN SPRING
4.WASHER14. RELEASE LEVER
5.SLEEVE15. RUBBER BELLOWS
6.DASH PANEL16. BALL STUD LOCK NUT
7. BOWDEN CONTROL CABLE17. CLUTCH HOUSING
8.BRACKET18. BALL STUD
9. WASHER, HAIRPIN CLIP19. BOWDEN CONTROL CABLE
10.RUBBER STOP20. DISTANCE BETWEEN RELEASE
11.CLUTCH PEDALLEVER AND CLUTCH HOUSING
7A.6\
Figure
7A-6 Clutch Pedal Lash - GT Model
Page 370 of 625
CLUTCHlA- 9
1.2.3.4.
8.
-9.
-11.BRACKET
1.“E” RING12.CABLE
2.WASHER13.RELEASE LEVER
3.RUBBER GROMMET
14.BALL STUD4.CLUTCH OPERATINGDAMPER
15.CLUTCH HOUSING
5.GROMMET16.BALL STUD LOCK NUT
6.WASHER17.RUBBER BELLOWS7.
“E” RING18.CABLE SUPPORT BRACKET
8. ADJUSTMENT SWITCH19. NUT, CABLE SUPPORT BRACKET
9.CLUTCH PEDAL20.DISTANCE BETWEEN RELEASE
10. RETURN SPRING
LEVER AND CLUTCH HOUSINGJA-7
Figure JA-7 Clutch Pedal Adjustment
- Opel 1900 and Manta