SKODA FABIA 2014 2.G / 5J Service Manual
Manufacturer: SKODA, Model Year: 2014, Model line: FABIA, Model: SKODA FABIA 2014 2.G / 5JPages: 197, PDF Size: 13.56 MB
Page 41 of 197
The following message is shown in the MAXI DOT display.Error: ABS
The vehicle will only be braked by the normal brake system without the ABS.
Seek help from a specialist garage.WARNING■ If you have to stop for technical reasons, then park the vehicle at a safe
distance from the traffic, switch off the engine and activate the hazard
warning light system » page 59.■
If the warning light
» page 36 is displayed simultaneously with the ABS
warning light
,
do not continue your journey! Seek help from a special-
ist garage.
■
A fault to the ABS system or the braking system can increase the vehi-
cle's braking distance – there is a risk of accident.
The rear fog light
Read and observe
on page 35 first.
The warning light comes on when the rear fog lights are operat-
ing » page 58 .
Bulb failure
Read and observe
on page 35 first.
The warning light comes on if a bulb is faulty:
› within a few seconds of the ignition being switched on;
› when a light with a defective bulb is switched on.
The following message may be shown in the MAXI DOT display, for example. INFORMATION Check front right low beam!
Note
The rear side lights and the licence plate lighting have several light bulbs. The
indicator light only lights up if all light bulbs of the licence plate lighting or
the parking light (in one rear light) are defective. For this reason, regular check
that these light bulbs are working correctly. Exhaust inspection system
Read and observe
on page 35 first.
If the warning light
lights up, there is a fault in the exhaust inspection sys-
tem. The engine control unit allows the vehicle to run in emergency mode.
Seek help from a specialist garage.
Glow plug system (diesel engine)
Read and observe
on page 35 first.
The warning light comes on after the ignition has been switched on. The
engine can be started immediately after the pre-glow warning light goes out.
There is a fault in the glow plug system if the warning light
does not come
on at all or lights up continuously .
If the warning light begins to
flash while driving, a fault exists in the engine
control. The engine control unit allows the vehicle to run in emergency mode.
Seek help from a specialist garage.
EPC fault light (petrol engine)
Read and observe
on page 35 first.
If the warning light comes on or begins to flash while driving, a fault exists
in the engine control unit. The engine control unit allows the vehicle to run in
emergency mode.
Seek help from a specialist garage.
Diesel particulate filter (diesel engine)
Read and observe
on page 35 first.
The diesel particulate filter separates the soot particles from the exhaust. The soot particles collect in the diesel particulate filter where they are burnt on a
regular basis.
The warning light comes on if soot has accumulated in the filter.
39Instruments and Indicator Lights
Page 42 of 197
In order to clean the filter, and where traffic conditions permit » , the vehicle
should be driven at an even speed of at least 60 km/h at engine speeds of 1
800 - 2 500 rpm for at least 15 minutes or until the warning light goes out with
the 4th or 5th gear engaged (automatic gearbox: position S).
The
warning light only goes out once the diesel particulate filter has been
successfully cleaned.
If the filter is not properly cleaned, the warning light
does not go out and
the warning light
begins to flash.
The following message is shown in the MAXI DOT display. Diesel particulate filter: Log book!
The engine control unit allows the vehicle to run in emergency mode. After
switching the ignition off and on again the indicator light, the indicator light
also lights up.
Seek help from a specialist garage.WARNING■ The diesel particulate filter reaches very high temperatures - there is a
fire hazard and serious injury could be caused. Therefore, never stop the
vehicle at places where the underside of your vehicle can come into contact
with flammable materials such as dry grass, undergrowth, leaves, spilled
fuel or such like.■
Always adjust your speed to suit weather, road, region and traffic condi-
tions. The recommendations indicated by the warning light must not tempt
you to disregard the national regulations for road traffic.
CAUTION
As long as the warning light lights up, one must take into account an in-
creased fuel consumption and in certain circumstances a power reduction of
the engine.
Note
■ We recommend avoiding regularly driving short distances to assist the com-
bustion process of the soot particles in the filter.■
Using diesel fuel with an increased sulphur content can considerably reduce
the service life of the filter. A ŠKODA Service Partner will be able to tell you
which countries use diesel fuel with a high sulphur content.
■
If the engine is turned off during the filter cleaning process or shortly after-
wards, the cooling fan may turn on automatically for a few minutes.
Fuel reserve
Read and observe
on page 35 first.
The indicator light
will come on if the fuel level is less than 7 litres.
An audible signal sounds as a warning signal.
The following message is shown in the MAXI DOT display.
Please refuel. Range: ... km
Note
The text in the MAXI DOT display only goes out after the vehicle has been re-
fuelled and driven a short distance.
Airbag system
Read and observe
on page 35 first.
If the warning light lights up, there is a fault in the airbag system.
The following message is shown in the MAXI DOT display. Error: Airbag
The operational capability of the airbag system is monitored electronically,
even if one of the airbags is switched off.
If a front, side or head airbag or belt tensioner has been switched off using
the vehicle system tester:
› The
warning light comes on for around 4 seconds after the ignition is
switched on and then flashes for approximately another 12 seconds at 2 sec-
ond intervals.
The following message is shown in the MAXI DOT display. Airbag/belt tensioner deactivated.
If the front passenger's front airbag was switched off using the key-operat-
ed switch on the side of the dash panel on the passenger side:
› The
warning light comes on for around 4 seconds after the ignition has
been switched on.
› switching off the airbag is indicated in the middle of the dash panel by the
lighting up of the yellow indicator light in display
» page 18 .
40Using the system
Page 43 of 197
WARNINGWhen a fault of the airbag system occurs, there is a risk of the system not
being triggered in the event of an accident. Therefore, this is to be checked
immediately by a specialized company.
Tyre pressure
Read and observe
on page 35 first.
The warning light lights up, if there is a substantial drop in inflation pres-
sure in one of the tyres. Check and adjust the pressure in all tyres.
If the indicator light flashes, there is a fault in the tyre pressure monitoring
system. Stop the car, turn the ignition off and on again.
If the warning light flashes again after re-starting the engine, then the help
of a professional service provider is to be sought.
Further information » page 154, Tyre pressure monitor .
WARNINGIf you have to stop for technical reasons, then park the vehicle at a safe
distance from the traffic, switch off the engine and activate the hazard
warning lights system » page 59.
Note
If the battery has been disconnected, the warning light illuminates after the
ignition is switched on. The warning light should go out after driving a short
distance.
Windscreen washer fluid level
Read and observe
on page 35 first.
If the windscreen washer fluid level is too low, the warning light comes on.
The following message is shown in the MAXI DOT display. Top up wash fluid!
Top up with liquid » page 140.
Traction control (TCS) switched off
Read and observe
on page 35 first.
The ASR is switched off by pressing the button » page 115 and the warning
light
illuminates.
The following message is shown in the MAXI DOT display.
Traction control (ASR) deactivated.
Turn signal system
Read and observe
on page 35 first.
Either the left or right
warning light flashes depending on the position of
the turn signal lever.
If a turn signal light fails, the warning light flashes at twice its normal rate.
Switching off the hazard warning light system is switched on will cause all of
the turn signal lights as well as both warning lights to flash.
Further information » page 57, Turn signal and main beam lights .
Low beam
Read and observe
on page 35 first.
The warning light comes on when low beam is selected
» page 56.
Fog lights
Read and observe
on page 35 first.
The warning light comes on when the fog lights are operating
» page 58.
Cruise control system
Read and observe
on page 35 first.
The warning light comes on when the cruise control is operat-
ing » page 117 .
41Instruments and Indicator Lights
Page 44 of 197
Selector lever lockRead and observe
on page 35 first.
If the warning light
lights up, operate the brake pedal. This is necessary to
be able to move the selector lever from position P or N » page 106 .
Main beam
Read and observe
on page 35 first.
The warning light
comes on when the main beam or headlight flasher are
selected » page 57 .
Unlocking and locking
Unlocking and locking
Introduction
This chapter contains information on the following subjects:
Vehicle key
42
Replacing the battery in the remote control key
43
Child safety lock
44
Opening/closing the door
44
Locking/unlocking the vehicle without central locking
45
Emergency locking of the doors
45
Vehicle key
Fig. 25
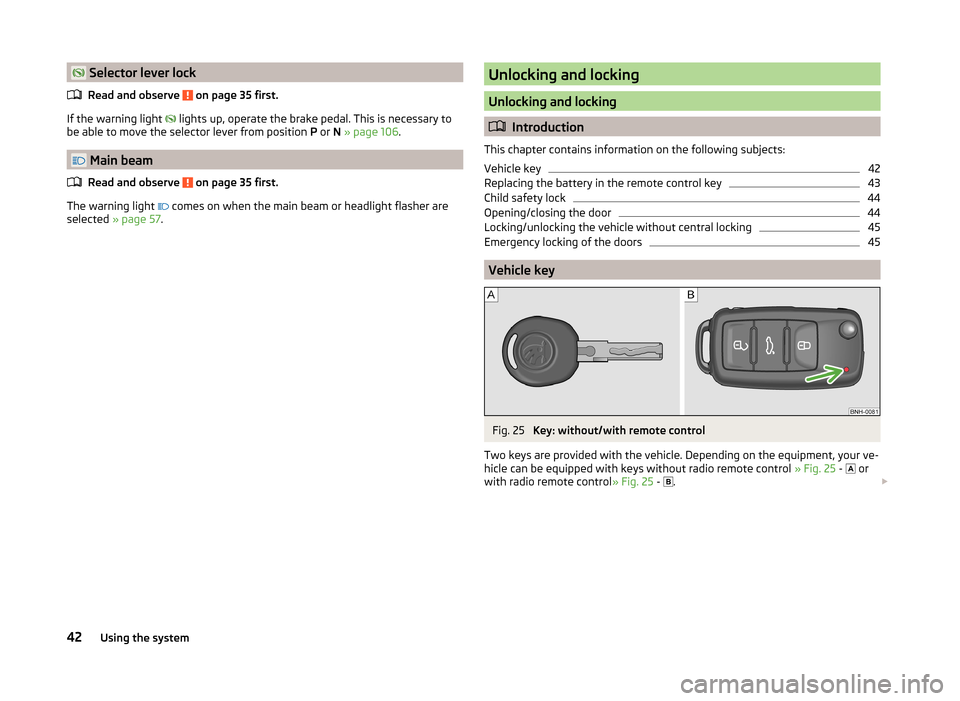
Key: without/with remote control
Two keys are provided with the vehicle. Depending on the equipment, your ve-
hicle can be equipped with keys without radio remote control » Fig. 25 -
or
with radio remote control » Fig. 25 -
.
42Using the system
Page 45 of 197
WARNING■Never leave the key in the vehicle when you exit the vehicle. Unauthor-
ized persons, such as children, for example, could lock the car, turn on the
ignition or start the engine - there is the danger of injury and accidents oc-
curring!■
When leaving the vehicle, never leave people who are not completely in-
dependent, such as children, unattended in the vehicle. The children might,
for example, release the handbrake or take the vehicle out of gear. The
vehicle could then start to move – risk of accident! These individuals would
possibly not be able to leave the vehicle on their own or to help them-
selves. At very high or very low temperatures can be fatal!
CAUTION
■ Each key contains electronic components; therefore it must be protected
against moisture and severe shocks.■
Keep the groove of the keys absolutely clean. Impurities (textile fibres, dust,
etc.) have a negative effect on the functionality of the locking cylinder and ig-
nition lock.
■
Operation of the remote control may temporarily be affected by interference
from transmitters close to the car operating in the same frequency range (e.g.
mobile phone, TV transmitter).
■
The battery must be replaced if the central locking only reacts to the remote
control at less than 3 metres away » page 43.
Note
■
When leaving the vehicle, always check if this is locked.■Please contact a specialist garage if you lose a key as they can obtain a new
one for you.Replacing the battery in the remote control keyFig. 26
Remote control key: Remove cover/remove battery
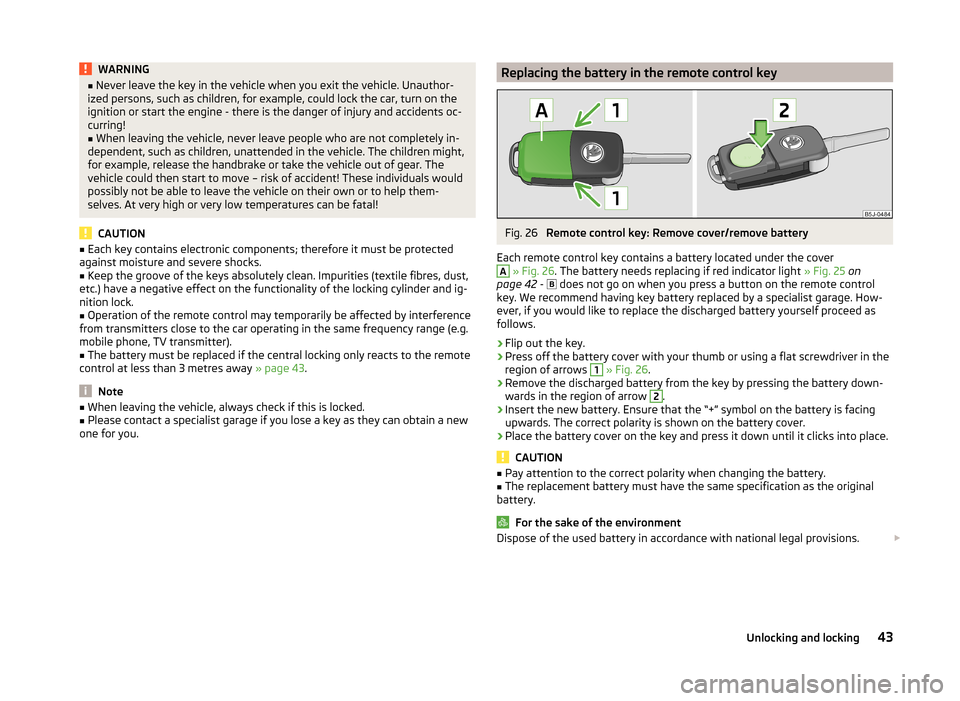
Each remote control key contains a battery located under the cover
A
» Fig. 26 . The battery needs replacing if red indicator light » Fig. 25 on
page 42 -
does not go on when you press a button on the remote control
key. We recommend having key battery replaced by a specialist garage. How-
ever, if you would like to replace the discharged battery yourself proceed as
follows.
›
Flip out the key.
›
Press off the battery cover with your thumb or using a flat screwdriver in the
region of arrows
1
» Fig. 26 .
›
Remove the discharged battery from the key by pressing the battery down-
wards in the region of arrow
2
.
›
Insert the new battery. Ensure that the “+” symbol on the battery is facing upwards. The correct polarity is shown on the battery cover.
›
Place the battery cover on the key and press it down until it clicks into place.
CAUTION
■ Pay attention to the correct polarity when changing the battery.■The replacement battery must have the same specification as the original
battery.
For the sake of the environment
Dispose of the used battery in accordance with national legal provisions. 43Unlocking and locking
Page 46 of 197
Note■The system has to be synchronised, if the vehicle cannot be unlocked or
locked with the remote control key after replacing the battery » page 49.■
Replacing the battery in the key a glued decorative cover requires the cover
to be destroyed. A replacement cover can be purchased from a ŠKODA Partner.
Child safety lock
Fig. 27
Switching child safety lock on: for vehicles without or with central
locking system
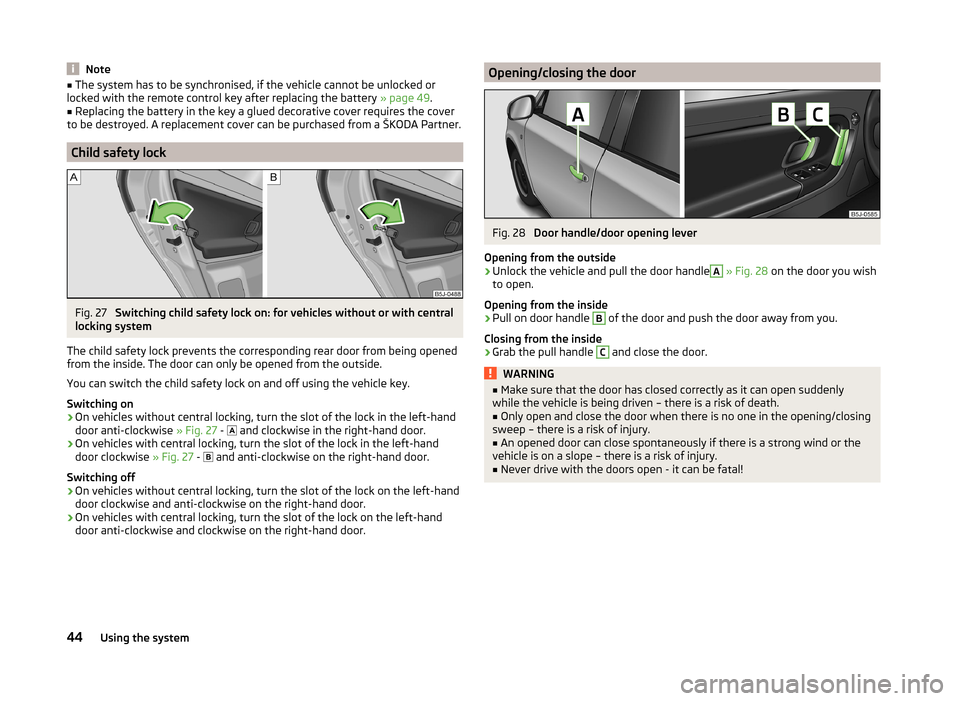
The child safety lock prevents the corresponding rear door from being opened
from the inside. The door can only be opened from the outside.
You can switch the child safety lock on and off using the vehicle key.
Switching on
›
On vehicles without central locking, turn the slot of the lock in the left-hand
door anti-clockwise » Fig. 27 -
and clockwise in the right-hand door.
›
On vehicles with central locking, turn the slot of the lock in the left-hand
door clockwise » Fig. 27 -
and anti-clockwise on the right-hand door.
Switching off
›
On vehicles without central locking, turn the slot of the lock on the left-hand
door clockwise and anti-clockwise on the right-hand door.
›
On vehicles with central locking, turn the slot of the lock on the left-hand
door anti-clockwise and clockwise on the right-hand door.
Opening/closing the doorFig. 28
Door handle/door opening lever
Opening from the outside
›
Unlock the vehicle and pull the door handle
A
» Fig. 28 on the door you wish
to open.
Opening from the inside
›
Pull on door handle
B
of the door and push the door away from you.
Closing from the inside
›
Grab the pull handle
C
and close the door.
WARNING■ Make sure that the door has closed correctly as it can open suddenly
while the vehicle is being driven – there is a risk of death.■
Only open and close the door when there is no one in the opening/closing
sweep – there is a risk of injury.
■
An opened door can close spontaneously if there is a strong wind or the
vehicle is on a slope – there is a risk of injury.
■
Never drive with the doors open - it can be fatal!
44Using the system
Page 47 of 197
Locking/unlocking the vehicle without central lockingFig. 29
Securing knob in the front door/rear door
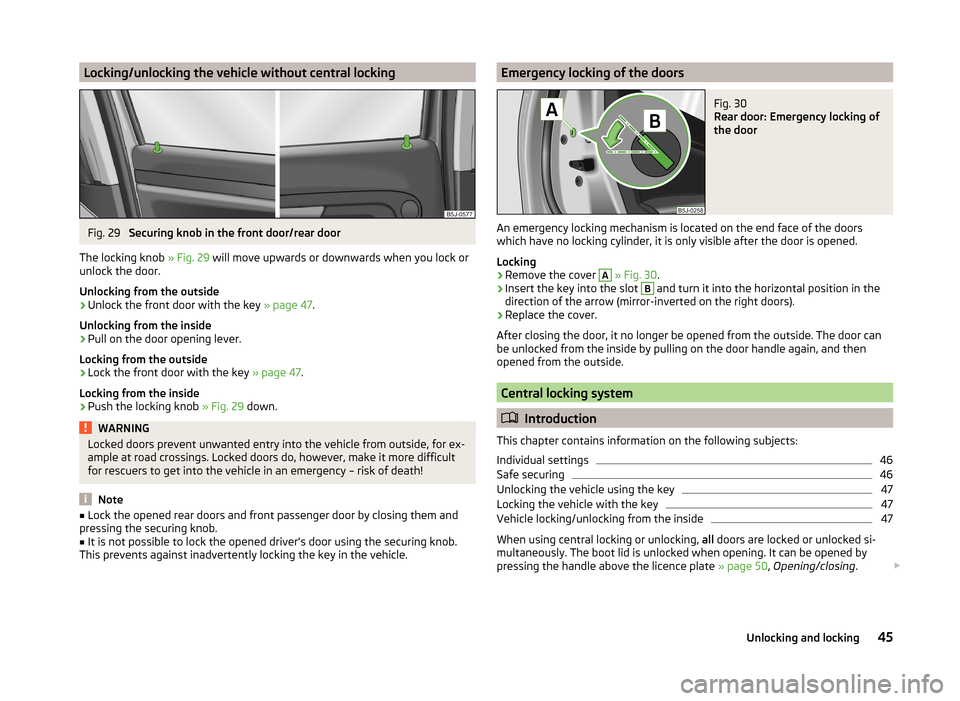
The locking knob » Fig. 29 will move upwards or downwards when you lock or
unlock the door.
Unlocking from the outside
›
Unlock the front door with the key » page 47.
Unlocking from the inside
›
Pull on the door opening lever.
Locking from the outside
›
Lock the front door with the key » page 47.
Locking from the inside
›
Push the locking knob » Fig. 29 down.
WARNINGLocked doors prevent unwanted entry into the vehicle from outside, for ex-
ample at road crossings. Locked doors do, however, make it more difficult
for rescuers to get into the vehicle in an emergency – risk of death!
Note
■ Lock the opened rear doors and front passenger door by closing them and
pressing the securing knob.■
It is not possible to lock the opened driver's door using the securing knob.
This prevents against inadvertently locking the key in the vehicle.
Emergency locking of the doorsFig. 30
Rear door: Emergency locking of
the door
An emergency locking mechanism is located on the end face of the doors
which have no locking cylinder, it is only visible after the door is opened.
Locking
›
Remove the cover
A
» Fig. 30 .
›
Insert the key into the slot
B
and turn it into the horizontal position in the
direction of the arrow (mirror-inverted on the right doors).
›
Replace the cover.
After closing the door, it no longer be opened from the outside. The door can
be unlocked from the inside by pulling on the door handle again, and then
opened from the outside.
Central locking system
Introduction
This chapter contains information on the following subjects:
Individual settings
46
Safe securing
46
Unlocking the vehicle using the key
47
Locking the vehicle with the key
47
Vehicle locking/unlocking from the inside
47
When using central locking or unlocking, all doors are locked or unlocked si-
multaneously. The boot lid is unlocked when opening. It can be opened by
pressing the handle above the licence plate » page 50, Opening/closing .
45Unlocking and locking
Page 48 of 197
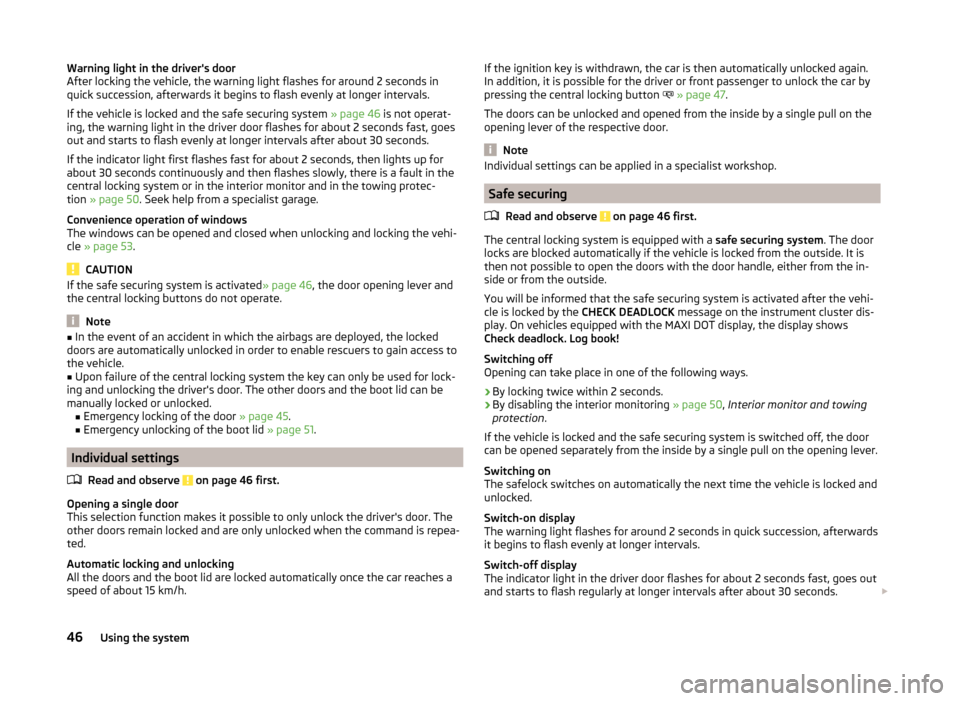
Warning light in the driver's door
After locking the vehicle, the warning light flashes for around 2 seconds in
quick succession, afterwards it begins to flash evenly at longer intervals.
If the vehicle is locked and the safe securing system » page 46 is not operat-
ing, the warning light in the driver door flashes for about 2 seconds fast, goes
out and starts to flash evenly at longer intervals after about 30 seconds.
If the indicator light first flashes fast for about 2 seconds, then lights up for
about 30 seconds continuously and then flashes slowly, there is a fault in the
central locking system or in the interior monitor and in the towing protec-
tion » page 50 . Seek help from a specialist garage.
Convenience operation of windows
The windows can be opened and closed when unlocking and locking the vehi-
cle » page 53 .
CAUTION
If the safe securing system is activated » page 46, the door opening lever and
the central locking buttons do not operate.
Note
■ In the event of an accident in which the airbags are deployed, the locked
doors are automatically unlocked in order to enable rescuers to gain access to
the vehicle.■
Upon failure of the central locking system the key can only be used for lock-
ing and unlocking the driver's door. The other doors and the boot lid can be
manually locked or unlocked. ■ Emergency locking of the door » page 45.
■ Emergency unlocking of the boot lid » page 51.
Individual settings
Read and observe
on page 46 first.
Opening a single door
This selection function makes it possible to only unlock the driver's door. The other doors remain locked and are only unlocked when the command is repea-
ted.
Automatic locking and unlocking
All the doors and the boot lid are locked automatically once the car reaches a
speed of about 15 km/h.
If the ignition key is withdrawn, the car is then automatically unlocked again.
In addition, it is possible for the driver or front passenger to unlock the car by
pressing the central locking button
» page 47 .
The doors can be unlocked and opened from the inside by a single pull on the
opening lever of the respective door.
Note
Individual settings can be applied in a specialist workshop.
Safe securing
Read and observe
on page 46 first.
The central locking system is equipped with a safe securing system. The door
locks are blocked automatically if the vehicle is locked from the outside. It is
then not possible to open the doors with the door handle, either from the in-
side or from the outside.
You will be informed that the safe securing system is activated after the vehi-
cle is locked by the CHECK DEADLOCK message on the instrument cluster dis-
play. On vehicles equipped with the MAXI DOT display, the display shows
Check deadlock. Log book!
Switching off
Opening can take place in one of the following ways.
›
By locking twice within 2 seconds.
›
By disabling the interior monitoring » page 50, Interior monitor and towing
protection .
If the vehicle is locked and the safe securing system is switched off, the door can be opened separately from the inside by a single pull on the opening lever.
Switching on
The safelock switches on automatically the next time the vehicle is locked and
unlocked.
Switch-on display
The warning light flashes for around 2 seconds in quick succession, afterwards
it begins to flash evenly at longer intervals.
Switch-off display
The indicator light in the driver door flashes for about 2 seconds fast, goes out
and starts to flash regularly at longer intervals after about 30 seconds.
46Using the system
Page 49 of 197
WARNINGIf the car is locked from the outside and the safelock system is switched on,
no-one must be in the car, as it is then not possible to open either a door or
a window from the inside. The locked doors make it more difficult for rescu-
ers to get into the vehicle in an emergency – risk to life!
Note
This function is only enabled in certain countries.
Unlocking the vehicle using the key
Fig. 31
Turning the key for unlocking
and locking the vehicle
Read and observe on page 46 first.
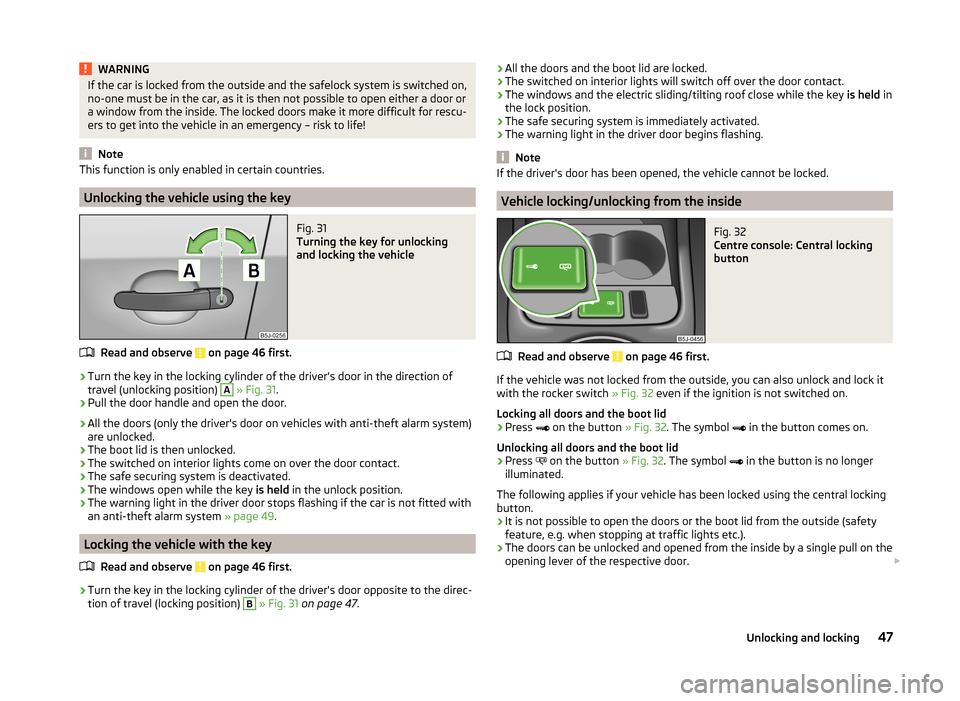
›
Turn the key in the locking cylinder of the driver's door in the direction of
travel (unlocking position)
A
» Fig. 31 .
›
Pull the door handle and open the door.
› All the doors (only the driver's door on vehicles with anti-theft alarm system)
are unlocked.
› The boot lid is then unlocked.
› The switched on interior lights come on over the door contact.
› The safe securing system is deactivated.
› The windows open while the key
is held in the unlock position.
› The warning light in the driver door stops flashing if the car is not fitted with
an anti-theft alarm system » page 49.
Locking the vehicle with the key
Read and observe
on page 46 first.
›
Turn the key in the locking cylinder of the driver's door opposite to the direc-
tion of travel (locking position)
B
» Fig. 31 on page 47 .
›All the doors and the boot lid are locked.
› The switched on interior lights will switch off over the door contact.
› The windows and the electric sliding/tilting roof close while the key
is held in
the lock position.
› The safe securing system is immediately activated.
› The warning light in the driver door begins flashing.
Note
If the driver's door has been opened, the vehicle cannot be locked.
Vehicle locking/unlocking from the inside
Fig. 32
Centre console: Central locking
button
Read and observe on page 46 first.
If the vehicle was not locked from the outside, you can also unlock and lock it
with the rocker switch » Fig. 32 even if the ignition is not switched on.
Locking all doors and the boot lid
›
Press
on the button » Fig. 32. The symbol
in the button comes on.
Unlocking all doors and the boot lid
›
Press
on the button » Fig. 32. The symbol
in the button is no longer
illuminated.
The following applies if your vehicle has been locked using the central locking button.
› It is not possible to open the doors or the boot lid from the outside (safety
feature, e.g. when stopping at traffic lights etc.).
› The doors can be unlocked and opened from the inside by a single pull on the
opening lever of the respective door.
47Unlocking and locking
Page 50 of 197
›If at least one door has been opened, the vehicle cannot be locked.
› In the event of an accident in which the airbags are deployed, the locked
doors are automatically unlocked in order to enable rescuers to gain access
to the vehicle.WARNING■ Doors locked from the inside make it difficult for rescuers to get into the
vehicle in an emergency – danger to life!■
If the safelock system is switched on » page 46, the door opening lever
and the central locking buttons do not operate.
Remote control
Introduction
This chapter contains information on the following subjects:
Unlocking/locking
48
Synchronization
49
You can use the remote control key to:
› unlock and lock the vehicle,
› unlocking boot lid;
› open and close the windows
» page 53, Window convenience operation .
The transmitter with the battery is housed in the handle of the remote control
key. The receiver is located in the interior of the vehicle. The operating range of the remote control key is approx. 30 m. But this range of the remote control
can be reduced if the batteries are weak.
The key has a fold-open key bit which can be used for unlocking and locking
the car manually and also for starting the engine.
The system must be initialised by a specialist garage if a lost key is replaced or
if the receiver unit has been repaired or replaced. Only then can the remote
control key be used again.
Note
■ The remote control is automatically deactivated when the ignition is switch-
ed on.■
Operation of the remote control may temporarily be affected by interference
from transmitters close to the car operating in the same frequency range (e.g.
mobile phone, TV transmitter).
■ The battery must be replaced if the central locking or anti-theft alarm system
does react to the remote control at less than 3 metres away » page 43.■
If the driver door is open, the vehicle cannot be locked using the remote con-
trol key.
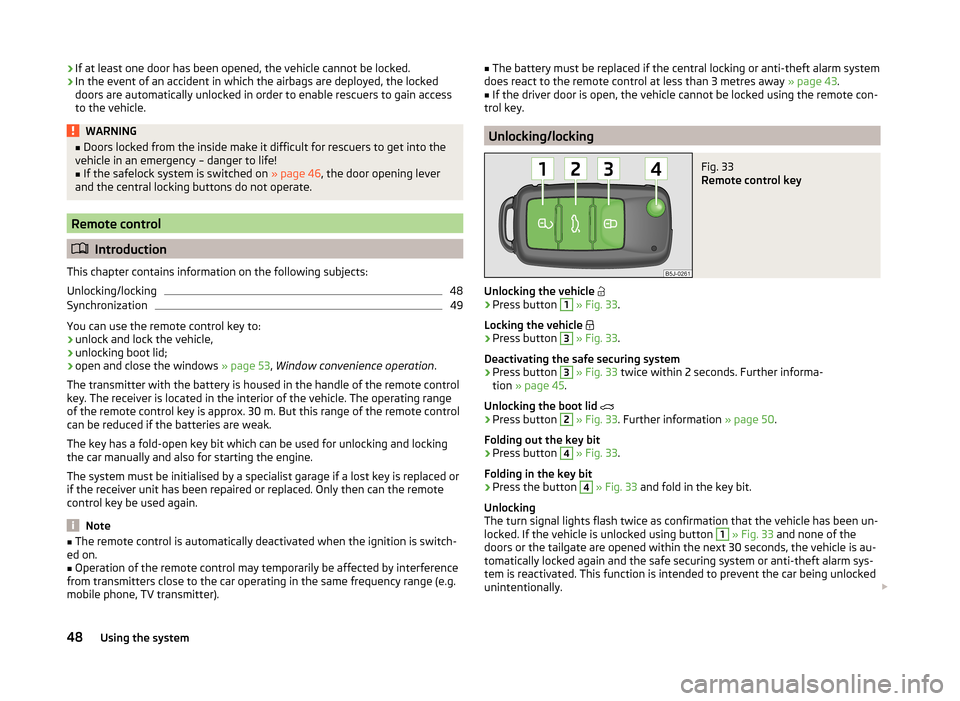
Unlocking/locking
Fig. 33
Remote control key
Unlocking the vehicle
›
Press button
1
» Fig. 33 .
Locking the vehicle
›
Press button
3
» Fig. 33 .
Deactivating the safe securing system
›
Press button
3
» Fig. 33 twice within 2 seconds. Further informa-
tion » page 45 .
Unlocking the boot lid
›
Press button
2
» Fig. 33 . Further information » page 50.
Folding out the key bit
›
Press button
4
» Fig. 33 .
Folding in the key bit
›
Press the button
4
» Fig. 33 and fold in the key bit.
Unlocking
The turn signal lights flash twice as confirmation that the vehicle has been un-
locked. If the vehicle is unlocked using button
1
» Fig. 33 and none of the
doors or the tailgate are opened within the next 30 seconds, the vehicle is au-
tomatically locked again and the safe securing system or anti-theft alarm sys-
tem is reactivated. This function is intended to prevent the car being unlocked
unintentionally.
48Using the system