head SSANGYONG KORANDO 1997 Service Owner's Manual
[x] Cancel search | Manufacturer: SSANGYONG, Model Year: 1997, Model line: KORANDO, Model: SSANGYONG KORANDO 1997Pages: 2053, PDF Size: 88.33 MB
Page 96 of 2053

M162 ENGINE MECHANICAL 1B1 -- 69
D AEW OO M Y_2000
4. Lightly apply the grease to the seal (2) and install the
screw plug (1).
Installation Notice
Tightening Torque
40 NSm (30 lb-ft)
5. Check for leaks by operating the engine.
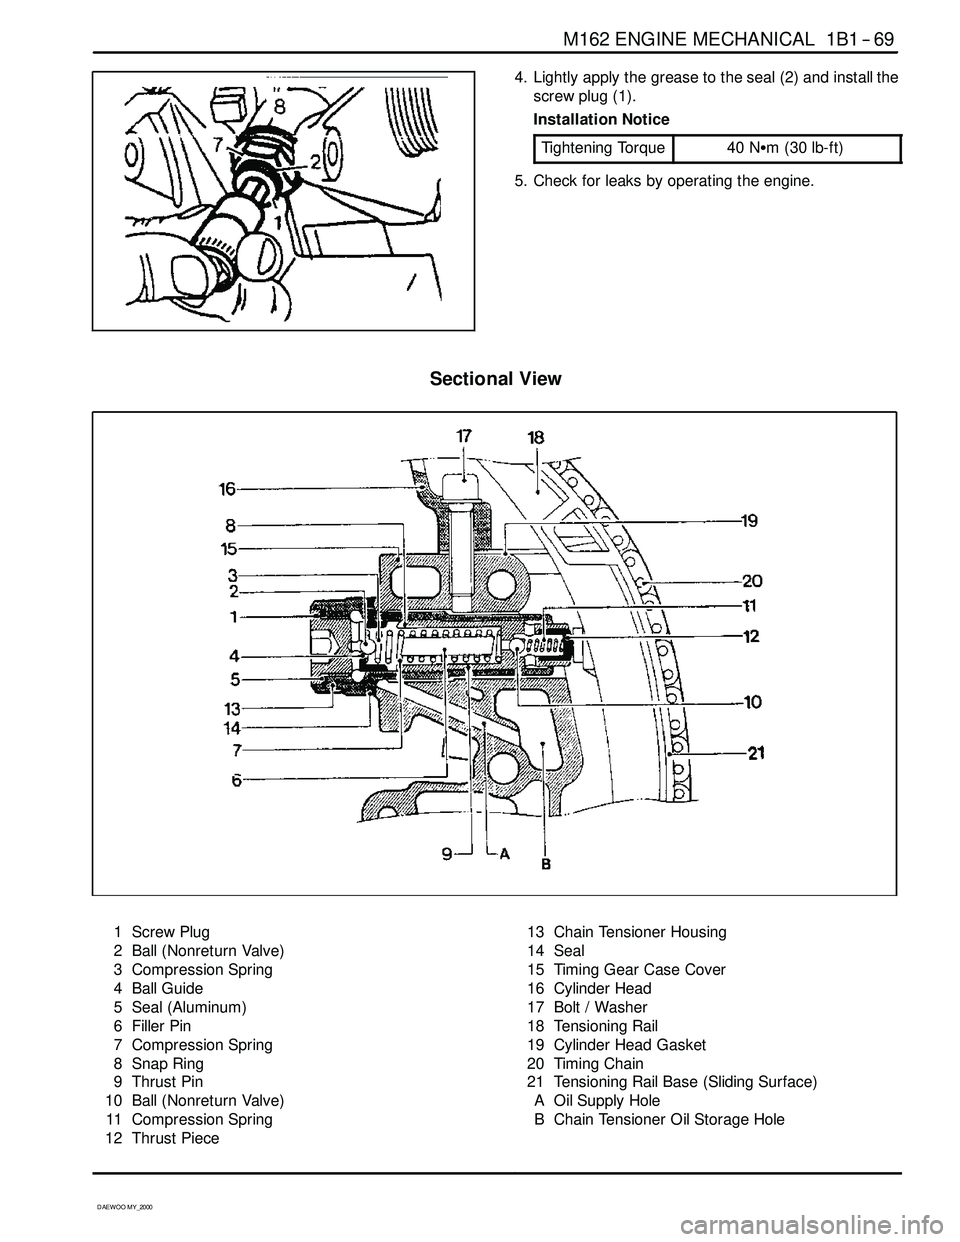
Sectional View
1 Screw Plug
2 Ball (Nonreturn Valve)
3 Compression Spring
4 Ball Guide
5 Seal (Aluminum)
6 Filler Pin
7 Compression Spring
8 Snap Ring
9 Thrust Pin
10 Ball (Nonreturn Valve)
11 Compression Spring
12 Thrust Piece13 Chain Tensioner Housing
14 Seal
15 Timing Gear Case Cover
16 Cylinder Head
17 Bolt / Washer
18 Tensioning Rail
19 Cylinder Head Gasket
20 Timing Chain
21 Tensioning Rail Base (Sliding Surface)
A Oil Supply Hole
B Chain Tensioner Oil Storage Hole
Page 97 of 2053

1B1 -- 70 M162 ENGINE MECHANICAL
D AEW OO M Y_2000
TIMING CHAIN
Preceding Work: Removal of cylinder head cover
Removal of spark plug
1Pin
2 New Timing Chain
3 Timing Chain (Used)
4 Wedge5Link
6 Center Plate
7 Outer Plate
Page 103 of 2053

1B1 -- 76 M162 ENGINE MECHANICAL
D AEW OO M Y_2000
CYLINDER HEAD GUIDE RAIL
Preceding Work: Removal of cylinder head front cover
1 Chain Tensioner
2 Upper Guide Rail3 Upper Guide Rail Pin
4 Wrench
Removal & Installation Procedure
1. Remove the chain tensioner (1).
2. Turn the exhaust camshaft to the camshaft rotating
direction using the wrench (4) and loosen the timing
chain at upper guide rail (2).
3. Pull out the upper guide rail pin from the guide rail (2).
4. Turn the exhaust camshaft to the opposite direction
of rotation using the wrench.
5. Check for damages at the upper sliding rail and re-
place it if necessary. Install the upper guide rail pin.
6. Install the chain tensioner.
Installation Notice
Ti
ghteningScrew Plug40 NSm
(30 lb-ft)
Tightening
TorqueTensioner
Assembly72 -- 88 NSm
(53 -- 65 lb-ft)
Page 106 of 2053

1B1 -- 80 M162 ENGINE MECHANICAL
D AEW OO M Y_2000
PISTON
Preceding Work: Removal of engine
Removal of cylinder head
Removal of oil pan
Removal of oil pump
Removal of baffle plate
1 Connecting Rod Bearing Cap
2 Connecting Rod
3 Connecting Rod Bearing Cap Bolt
(M9 x 52, 12 pieces)
1ststep40NSm (30 lb-ft) ..................
2nd step 90°4Piston
5 Snap Ring
6 Piston Pin
Page 108 of 2053

1B1 -- 82 M162 ENGINE MECHANICAL
D AEW OO M Y_2000
Installation Procedure
1. Check the piston ring gap and apply the engine oil to
the piston pin and the connecting rod bushing.
2. Connect the piston and the connecting rod by press-
ing in the piston pin (6) and install the snap ring to the
groove.
3. Clean the cylinder bore, connecting rod bearing jour-
nal, connecting rod bearing shell and the piston and
coat them with engine oil.
4. Install the piston ring.
5. Install the piston so that the arrow on the piston head
faces to the forward of the vehicle.
6. After aligning the connecting rod and the bearing cap
mark (// or a number), tighten the bolts.
Installation Notice
TighteningTorque1st step: 40 NSm (30 lb-ft)TighteningTorque2nd step: 90°
Apply the engine oil to the bearing cap upper and low-
er bearing shells.
7. Check if the crankshaft rotates without any trouble by
rotating it.
Page 115 of 2053

M162 ENGINE MECHANICAL 1B1 -- 89
D AEW OO M Y_2000
Oil Circulation
1OilPump
2 Oil Gallery (to oil filter)
3 Oil Filter
4 Oil Pressure Switch
5 Main Oil Gallery
6 Cylinder Head Closing Cover
7 Oil Gallery (At Chain Tensioner)
8 Oil Non-- return Valve
9 Chain Tensioner
10 Vent (Chain Tensioner)
11 Front Closing Cover (φ17 mm)
12 Oil Gallery (Perpendicular to The Shaft)
13 Ball (φ6 mm)
14 Oil Spray Nozzle (Timing Chain)
15 Oil Gallery (At Cylinder Head)
16 Ball (φ15mm)
17 Oil Restriction Inner (φ4mm)
18 Oil Supply (To Exhaust Camshaft)19 Oil Supply (To Intake Camshaft)
20 Oil Supply (To Exhaust Camshaft Bearing)
21 Oil Supply (To Intake Camshaft Bearing)
22 Oil Gallery (Oil Supply to Exhaust Valve Tappet)
23 Oil Gallery (Oil Supply to Exhaust Valve Tappet)
24 Camshaft Closing Cover
25 Ball (φ8 mm)
26 Screw Plug
27 Camshaft Adjuster
28 Front Closing Cover (Intake Camshaft)
29 Front Treaded Bushing (Exhaust Camshaft)
30 Valve tappet
a Oil Gallery (From Oil Pump to Oil Filter)
b Main Oil Gallery
c Oil Return Line (Oil Returns to the Oil Pan
when Replacing the Filter Element)
Page 127 of 2053

M162 ENGINE MECHANICAL 1B1 -- 101
D AEW OO M Y_2000
OIL GALLERY IN CYLINDER HEAD
Preceding Work: Removal of cylinder head
Removal of camshaft
Removal of tappet
1 Screw Plug 15 NSm (11 lb-ft) ................
2 Seal3SteelBall(φ8mm)
Page 129 of 2053

M162 ENGINE MECHANICAL 1B1 -- 103
D AEW OO M Y_2000
4. Enlarge the oil gallery at the rear of the cylinder
head to be diameter 9mm, depth 8mm.
5. Tap in the steel ball (3) from the side to the oil gallery
using the punch (13).
6. Pull out the steel ball (3) using the round bar (12).
7. Enlarge the oil gallery to be diameter 9mm, depth
8mm.
8. Make a screw hole at the oil gallery using M10 x 1
thread.
9. All the oil gallery should be cleaned with the com-
pressed air.
10. Apply the Loctite 270 to new plug and press in using
a suitable drift (arrow).
11. Tighten the screw plug with the seal (arrow).
Page 136 of 2053

1B1 -- 110 M162 ENGINE MECHANICAL
D AEW OO M Y_2000
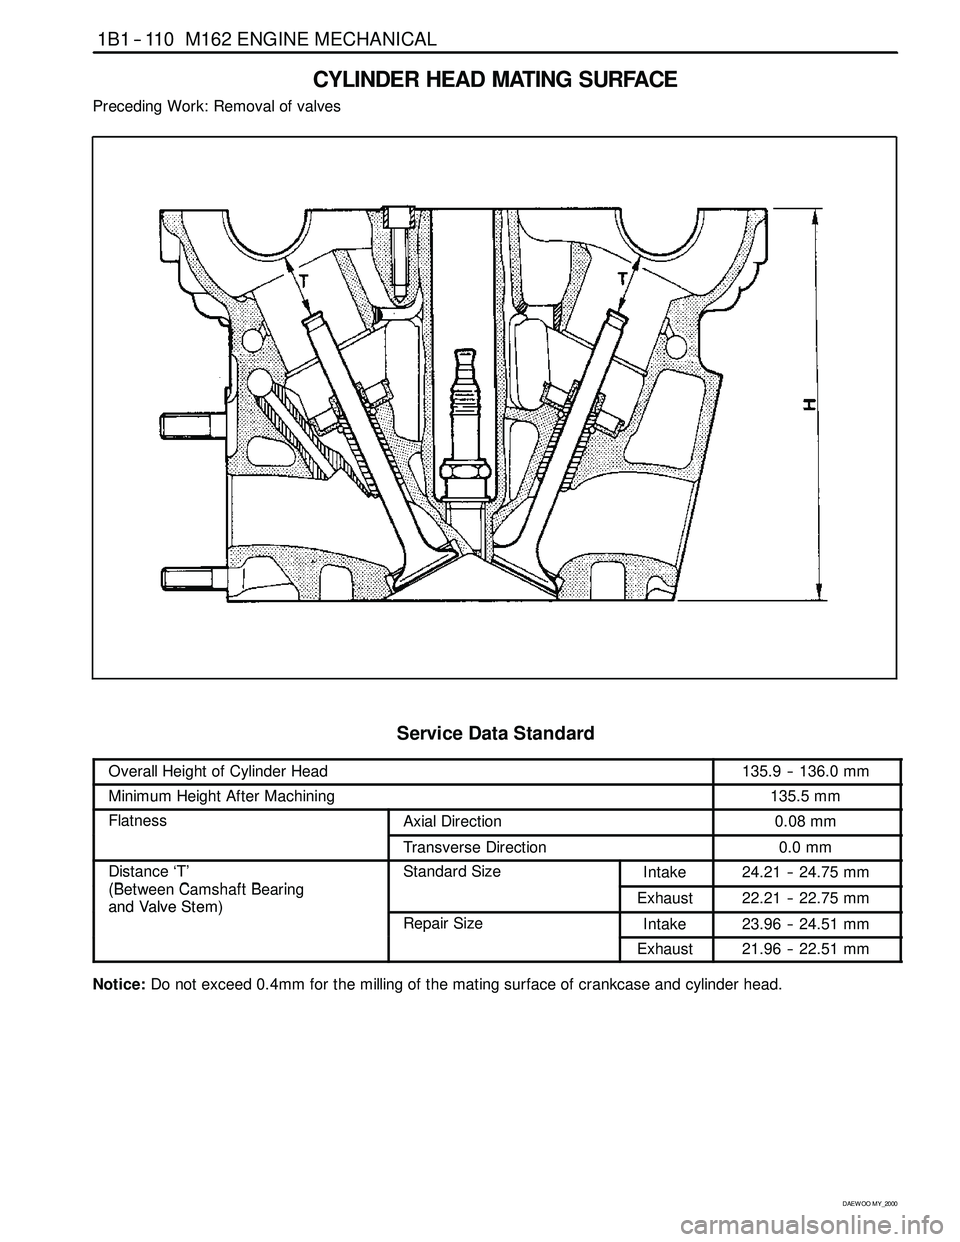
CYLINDER HEAD MATING SURFACE
Preceding Work: Removal of valves
ServiceDataStandard
Overall Height of Cylinder Head135.9 -- 136.0 mm
Minimum Height After Machining135.5 mm
FlatnessAxial Direction0.08 mm
Transverse Direction0.0 mm
Distance ‘T’
(BtChftBi
Standard SizeIntake24.21 -- 24.75 mm
(Between Camshaft Bearing
andValveStem)Exhaust22.21 -- 22.75 mmandValveStem)
Repair SizeIntake23.96 -- 24.51 mmp
Exhaust21.96 -- 22.51 mm
Notice:Do not exceed 0.4mm for the milling of the mating surface of crankcase and cylinder head.
Page 161 of 2053

M162 ENGINE ELECTRICAL 1E 1 -- 9
D AEW OO M Y_2000
Functions
1. Firing order : 1 -- 5 -- 3 -- 6 -- 2 -- 4
2. The ignition cables are located on the cylinder head
cover. Each ignition coil provides the high voltage to
two spark plugs simultaneously.
-- T1/1 : cylinder 2 and 5
-- T1/2 : cylinder 3 and 4
-- T1/3 : cylinder 1 and 6
3. The secondary output voltage (5a) is supplied to the
No.2 cylinder spark plug through the spark plug con-
nector. The secondary output voltage (5b) is supplied
to the No.5 cylinder spark plug through the ignition
cable. The guide pin (W) acts as a ground while the
ignition cable is operated.
Removal & Installation Procedure
1. Disconnect the negative battery cable (1).
2. Remove the ignition cable connector from the ignition
cable.
3. Disconnect the secondary spark plug connectors
from the each spark plugs and remove the ignition
cable bolt and ignition cable.
Installation Notice
Tightening Torque
9--11NSm (80 -- 97 lb-in)
DMake sure that the ignition cables are correctly
routed.
DExactly install the ignition cable guide pin into the
vehicle to be grounded.
4. Installation should follow the removal procedure in
the reverse order.