TOYOTA RAV4 1996 Service Repair Manual
Manufacturer: TOYOTA, Model Year: 1996, Model line: RAV4, Model: TOYOTA RAV4 1996Pages: 1632, PDF Size: 41.64 MB
Page 321 of 1632
Fig. 18: Shift Interlock System Wiring Diagram (1999 4Runner)
1999 Toyota RAV4
1999 AUTOMATIC TRANSMISSIONS Toyota & Lexus Shift Lock System
Microsoft
Sunday, November 22, 2009 10:46:00 AMPage 44 © 2005 Mitchell Repair Information Company, LLC.
Page 322 of 1632
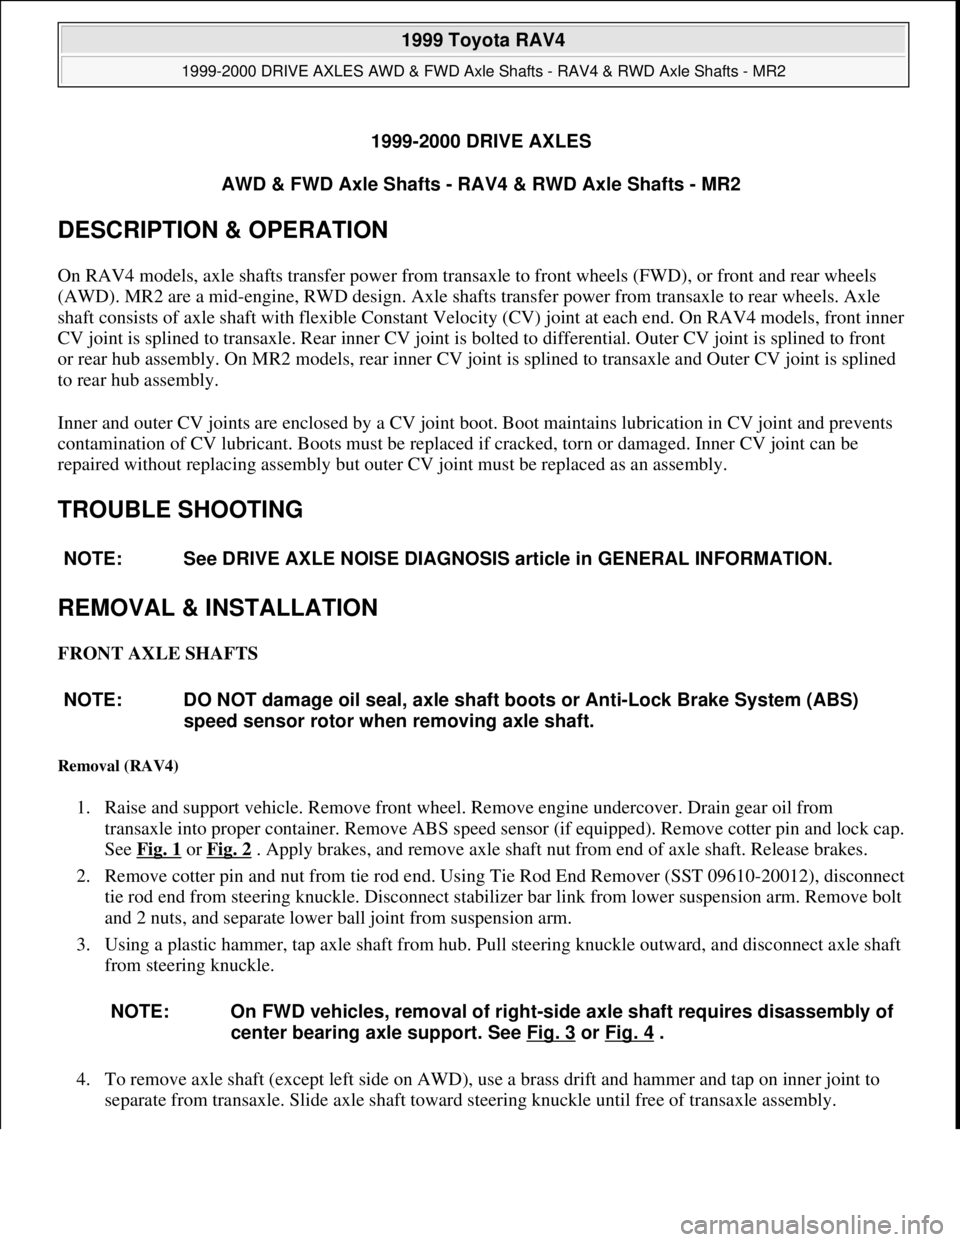
1999-2000 DRIVE AXLES
AWD & FWD Axle Shafts - RAV4 & RWD Axle Shafts - MR2
DESCRIPTION & OPERATION
On RAV4 models, axle shafts transfer power from transaxle to front wheels (FWD), or front and rear wheels
(AWD). MR2 are a mid-engine, RWD design. Axle shafts transfer power from transaxle to rear wheels. Axle
shaft consists of axle shaft with flexible Constant Velocity (CV) joint at each end. On RAV4 models, front inner
CV joint is splined to transaxle. Rear inner CV joint is bolted to differential. Outer CV joint is splined to front
or rear hub assembly. On MR2 models, rear inner CV joint is splined to transaxle and Outer CV joint is splined
to rear hub assembly.
Inner and outer CV joints are enclosed by a CV joint boot. Boot maintains lubrication in CV joint and prevents
contamination of CV lubricant. Boots must be replaced if cracked, torn or damaged. Inner CV joint can be
repaired without replacing assembly but outer CV joint must be replaced as an assembly.
TROUBLE SHOOTING
REMOVAL & INSTALLATION
FRONT AXLE SHAFTS
Removal (RAV4)
1. Raise and support vehicle. Remove front wheel. Remove engine undercover. Drain gear oil from
transaxle into proper container. Remove ABS speed sensor (if equipped). Remove cotter pin and lock cap.
See Fig. 1
or Fig. 2 . Apply brakes, and remove axle shaft nut from end of axle shaft. Release brakes.
2. Remove cotter pin and nut from tie rod end. Using Tie Rod End Remover (SST 09610-20012), disconnect
tie rod end from steering knuckle. Disconnect stabilizer bar link from lower suspension arm. Remove bolt
and 2 nuts, and separate lower ball joint from suspension arm.
3. Using a plastic hammer, tap axle shaft from hub. Pull steering knuckle outward, and disconnect axle shaft
from steering knuckle.
4. To remove axle shaft (except left side on AWD), use a brass drift and hammer and tap on inner joint to
separate from transaxle. Slide axle shaft toward steering knuckle until free of transaxle assembly. NOTE: See DRIVE AXLE NOISE DIAGNOSIS article in GENERAL INFORMATION.
NOTE: DO NOT damage oil seal, axle shaft boots or Anti-Lock Brake System (ABS)
speed sensor rotor when removing axle shaft.
NOTE: On FWD vehicles, removal of right-side axle shaft requires disassembly of
center bearing axle support. See Fig. 3
or Fig. 4 .
1999 Toyota RAV4
1999-2000 DRIVE AXLES AWD & FWD Axle Shafts - RAV4 & RWD Axle Shafts - MR2
1999 Toyota RAV4
1999-2000 DRIVE AXLES AWD & FWD Axle Shafts - RAV4 & RWD Axle Shafts - MR2
Microsoft
Sunday, November 22, 2009 10:08:21 AMPage 1 © 2005 Mitchell Repair Information Company, LLC.
Microsoft
Sunday, November 22, 2009 10:08:25 AMPage 1 © 2005 Mitchell Repair Information Company, LLC.
Page 323 of 1632
5. To remove left-side axle shaft on AWD, remove air cleaner and transaxle case protector. Using an
appropriate pry bar, pry axle from transaxle assembly. See Fig. 5
. Slide axle shaft toward steering
knuckle until free of transaxle assembl
y.
1999 Toyota RAV4
1999-2000 DRIVE AXLES AWD & FWD Axle Shafts - RAV4 & RWD Axle Shafts - MR2
Microsoft
Sunday, November 22, 2009 10:08:21 AMPage 2 © 2005 Mitchell Repair Information Company, LLC.
Page 324 of 1632
1999 Toyota RAV4
1999-2000 DRIVE AXLES AWD & FWD Axle Shafts - RAV4 & RWD Axle Shafts - MR2
Microsoft
Sunday, November 22, 2009 10:08:21 AMPage 3 © 2005 Mitchell Repair Information Company, LLC.
Page 325 of 1632
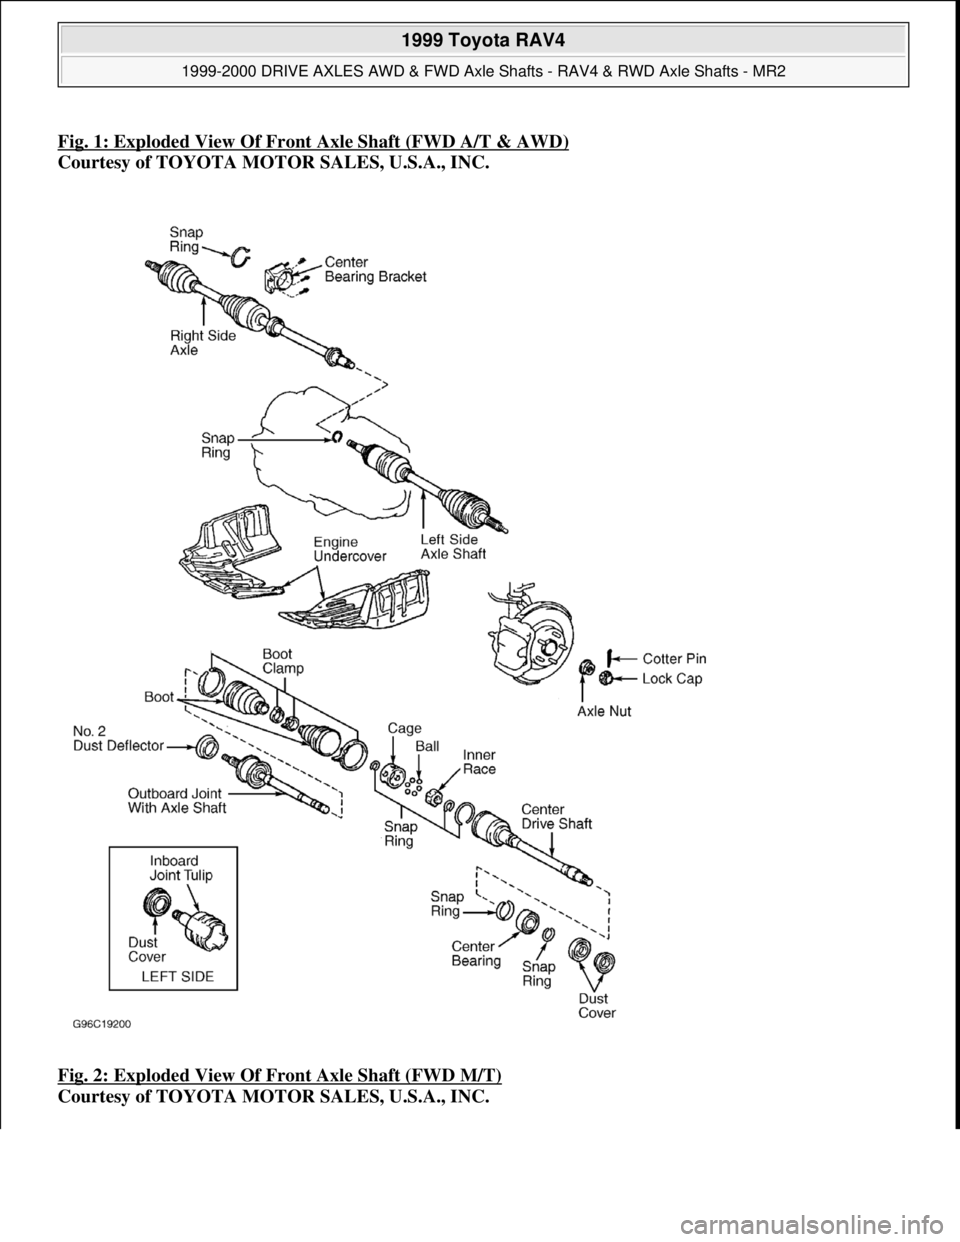
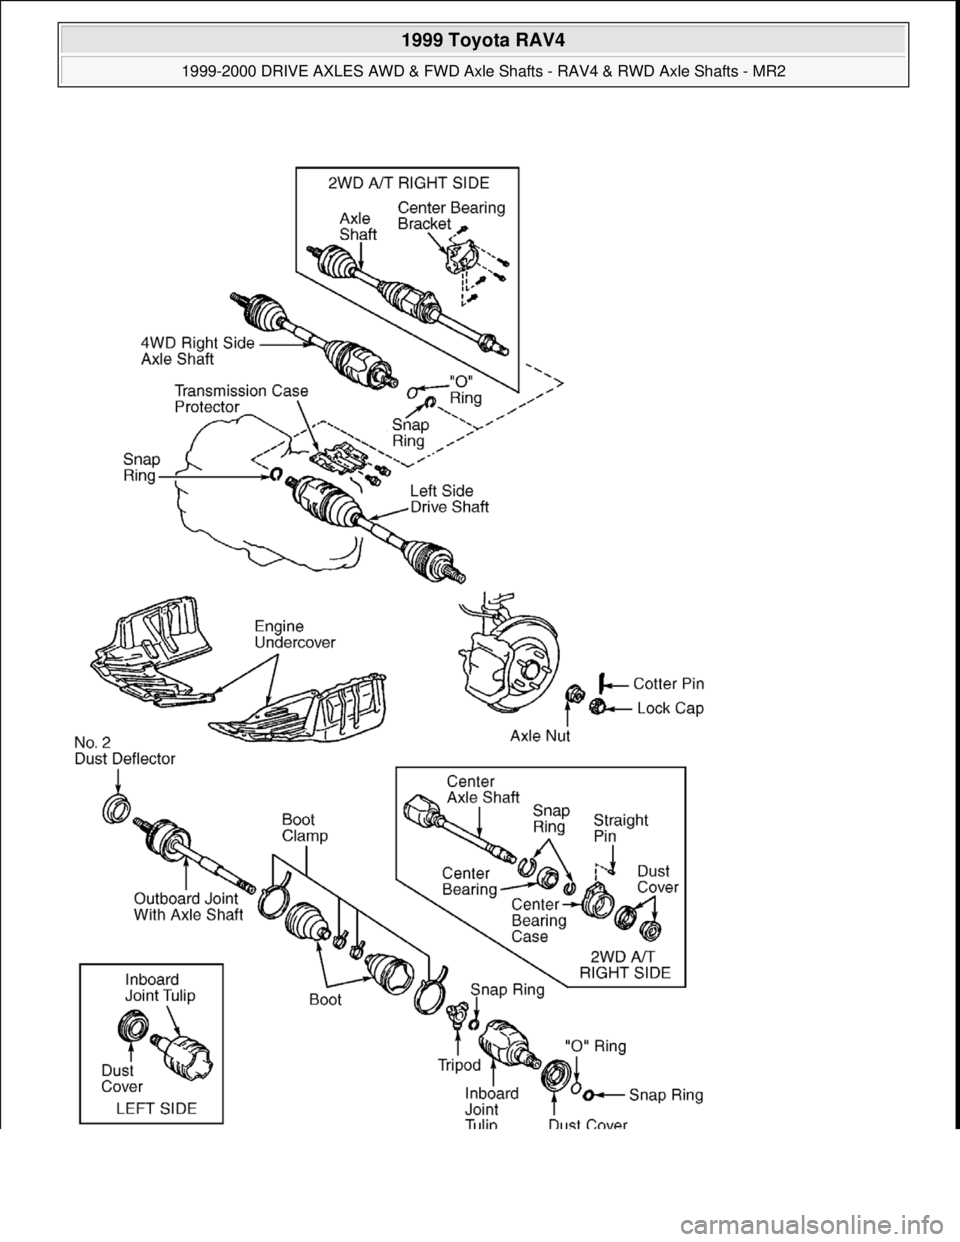
Fig. 1: Exploded View Of Front Axle Shaft (FWD A/T & AWD)
Courtesy of TOYOTA MOTOR SALES, U.S.A., INC.
Fig. 2: Exploded View Of Front Axle Shaft (FWD M/T)
Courtesy of TOYOTA MOTOR SALES, U.S.A., INC.
1999 Toyota RAV4
1999-2000 DRIVE AXLES AWD & FWD Axle Shafts - RAV4 & RWD Axle Shafts - MR2
Microsoft
Sunday, November 22, 2009 10:08:21 AMPage 4 © 2005 Mitchell Repair Information Company, LLC.
Page 326 of 1632
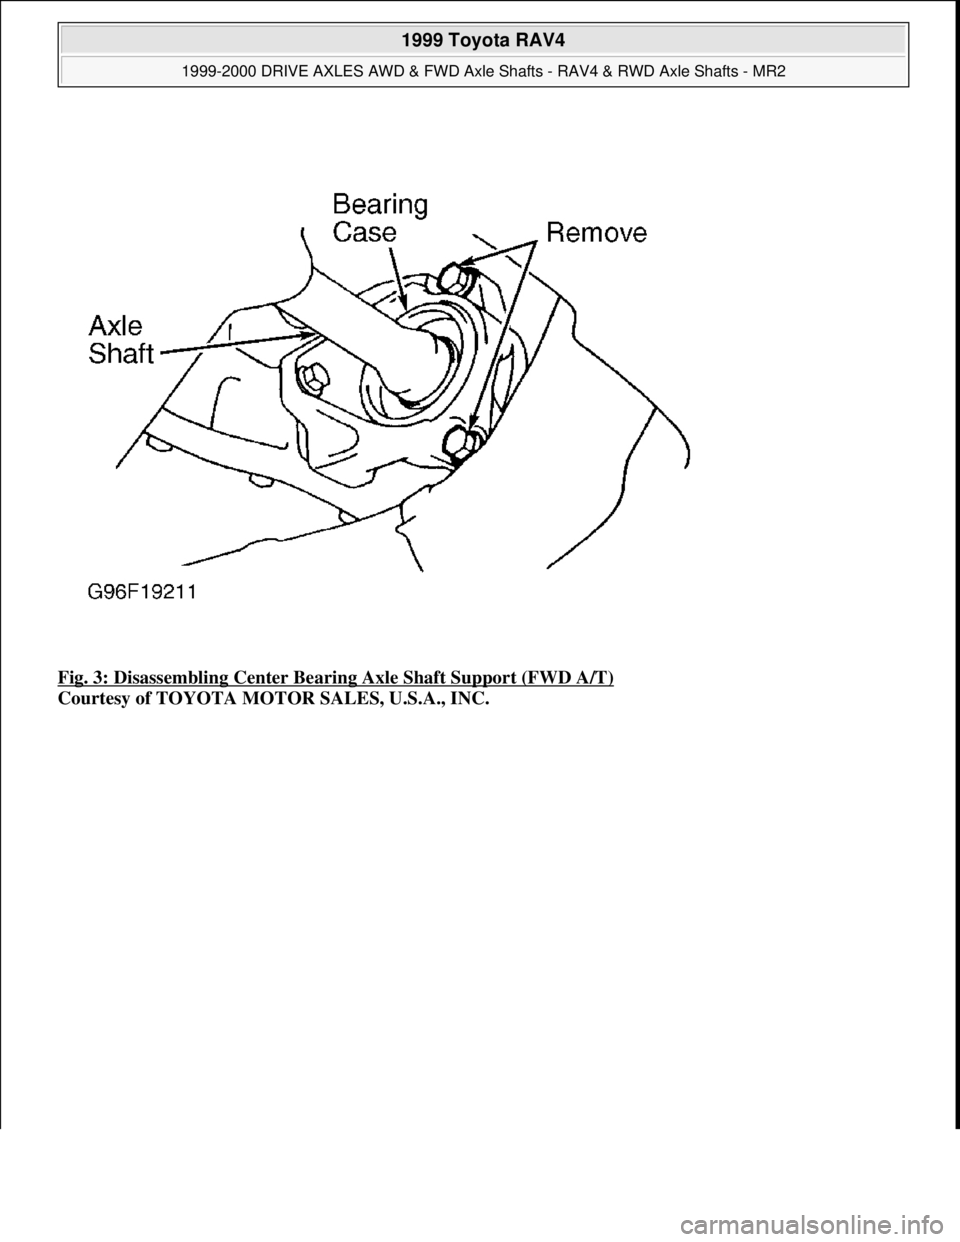
Fig. 3: Disassembling Center Bearing Axle Shaft Support (FWD A/T)
Courtesy of TOYOTA MOTOR SALES, U.S.A., INC.
1999 Toyota RAV4
1999-2000 DRIVE AXLES AWD & FWD Axle Shafts - RAV4 & RWD Axle Shafts - MR2
Microsoft
Sunday, November 22, 2009 10:08:21 AMPage 5 © 2005 Mitchell Repair Information Company, LLC.
Page 327 of 1632
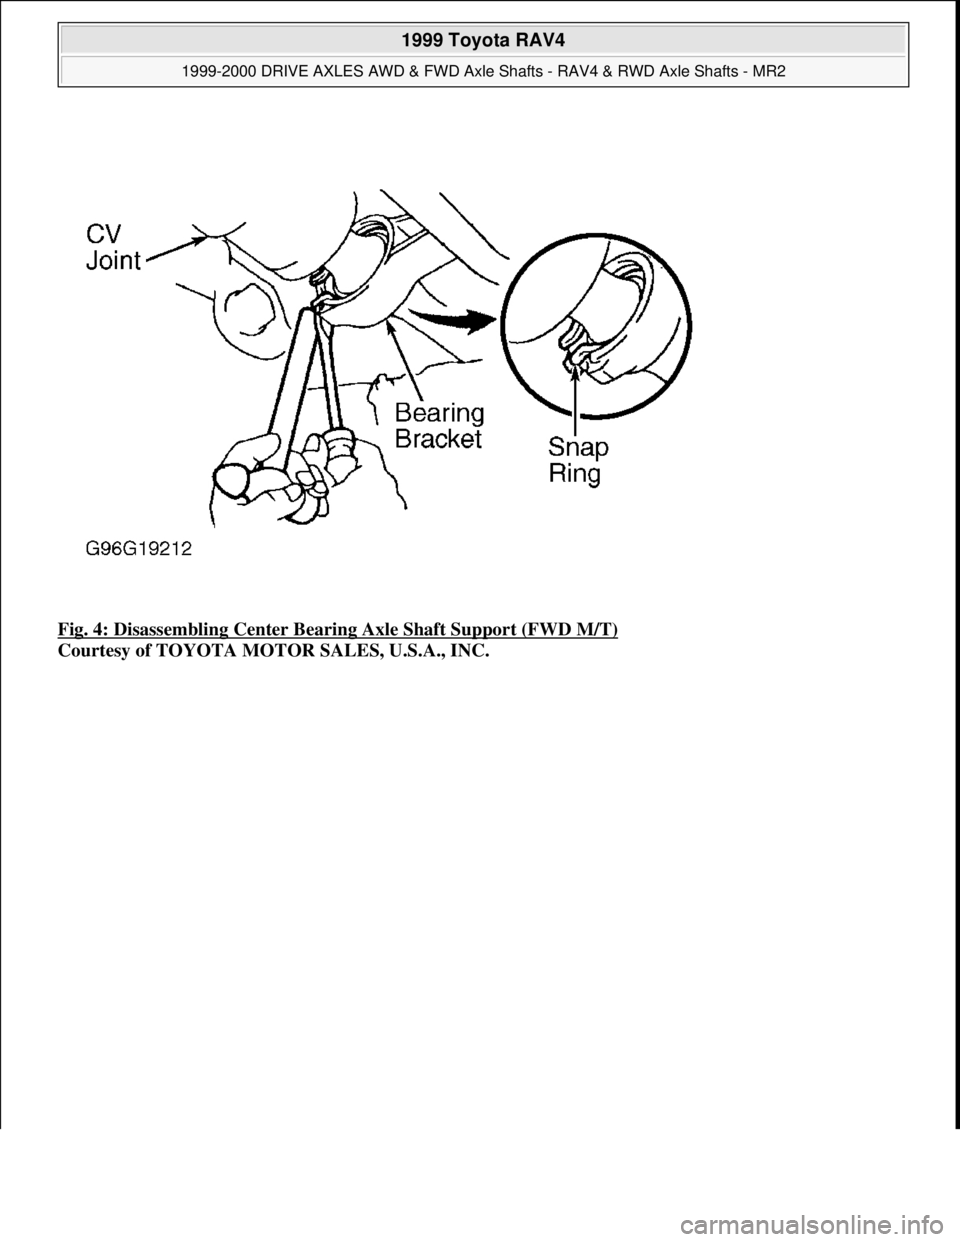
Fig. 4: Disassembling Center Bearing Axle Shaft Support (FWD M/T)
Courtesy of TOYOTA MOTOR SALES, U.S.A., INC.
1999 Toyota RAV4
1999-2000 DRIVE AXLES AWD & FWD Axle Shafts - RAV4 & RWD Axle Shafts - MR2
Microsoft
Sunday, November 22, 2009 10:08:21 AMPage 6 © 2005 Mitchell Repair Information Company, LLC.
Page 328 of 1632
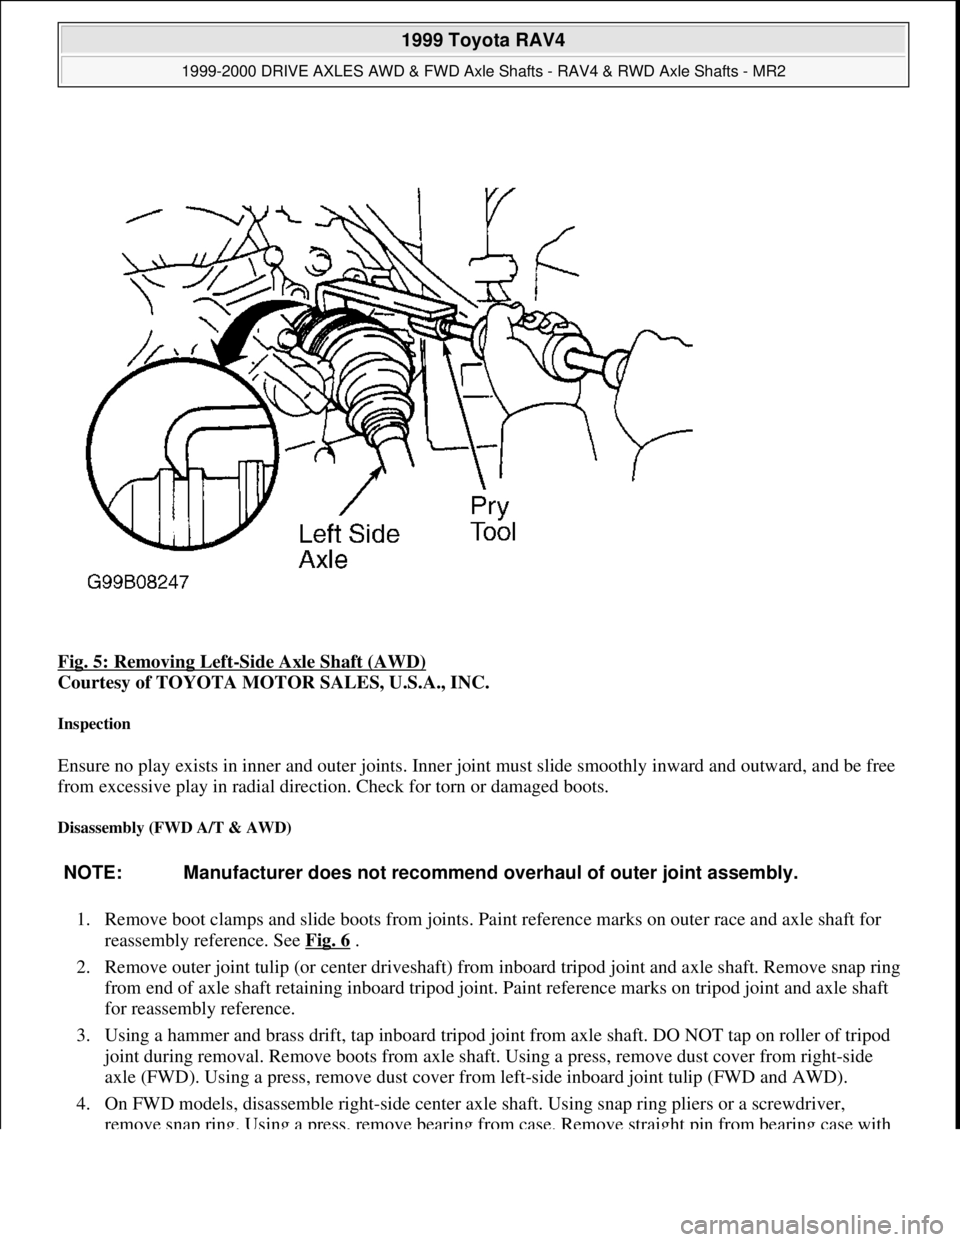
Fig. 5: Removing Left-Side Axle Shaft (AWD)
Courtesy of TOYOTA MOTOR SALES, U.S.A., INC.
Inspection
Ensure no play exists in inner and outer joints. Inner joint must slide smoothly inward and outward, and be free
from excessive play in radial direction. Check for torn or damaged boots.
Disassembly (FWD A/T & AWD)
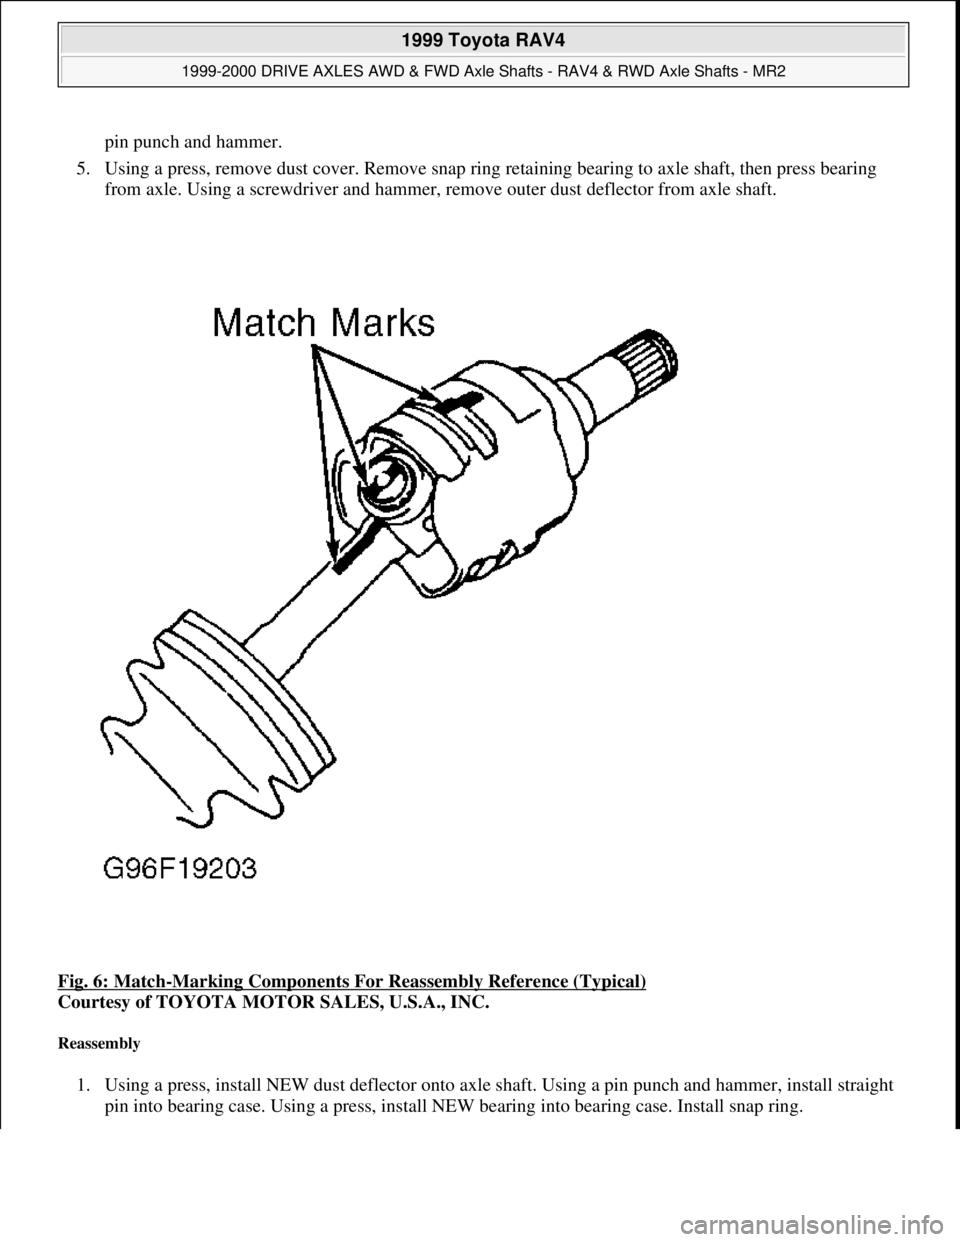
1. Remove boot clamps and slide boots from joints. Paint reference marks on outer race and axle shaft for
reassembly reference. See Fig. 6
.
2. Remove outer joint tulip (or center driveshaft) from inboard tripod joint and axle shaft. Remove snap ring
from end of axle shaft retaining inboard tripod joint. Paint reference marks on tripod joint and axle shaft
for reassembly reference.
3. Using a hammer and brass drift, tap inboard tripod joint from axle shaft. DO NOT tap on roller of tripod
joint during removal. Remove boots from axle shaft. Using a press, remove dust cover from right-side
axle (FWD). Using a press, remove dust cover from left-side inboard joint tulip (FWD and AWD).
4. On FWD models, disassemble right-side center axle shaft. Using snap ring pliers or a screwdriver,
remove snap ring. Using a press, remove bearing from case. Remove straight pin from bearing case with
NOTE: Manufacturer does not recommend overhaul of outer joint assembly.
1999 Toyota RAV4
1999-2000 DRIVE AXLES AWD & FWD Axle Shafts - RAV4 & RWD Axle Shafts - MR2
Microsoft
Sunday, November 22, 2009 10:08:21 AMPage 7 © 2005 Mitchell Repair Information Company, LLC.
Page 329 of 1632
pin punch and hammer.
5. Using a press, remove dust cover. Remove snap ring retaining bearing to axle shaft, then press bearing
from axle. Using a screwdriver and hammer, remove outer dust deflector from axle shaft.
Fig. 6: Match
-Marking Components For Reassembly Reference (Typical)
Courtesy of TOYOTA MOTOR SALES, U.S.A., INC.
Reassembly
1. Using a press, install NEW dust deflector onto axle shaft. Using a pin punch and hammer, install straight
pin into bearin
g case. Using a press, install NEW bearing into bearing case. Install snap ring.
1999 Toyota RAV4
1999-2000 DRIVE AXLES AWD & FWD Axle Shafts - RAV4 & RWD Axle Shafts - MR2
Microsoft
Sunday, November 22, 2009 10:08:21 AMPage 8 © 2005 Mitchell Repair Information Company, LLC.
Page 330 of 1632
2. Using a press, install bearing assembly on axle shaft. Install NEW snap ring. Press NEW dust cover
against bearing, leaving .039" (1.0 mm) between bearing and dust cover.
3. Using a press, install NEW dust cover onto axle shaft. Right-side (transaxle side) dust cover must be
positioned 3.39-3.43" (86.0-87.0 mm) from end of axle shaft. Wrap splines on axle shaft with tape to
prevent damaging boots during installation. Install NEW boots and NEW boot clamps onto axle shaft.
4. Apply grease supplied with overhaul kit to outboard joint and boot. Install boot and boot clamps onto
outboard joint.
5. Install inboard tripod joint onto axle shaft, with reference mark aligned. Using a hammer and brass drift,
drive on inner race until fully seated on axle shaft. DO NOT allow brass drift to contact cage on inboard
tripod joint during installation.
6. Install NEW snap ring on end of axle shaft. Apply grease supplied with overhaul kit into inboard joint
housing and boot.
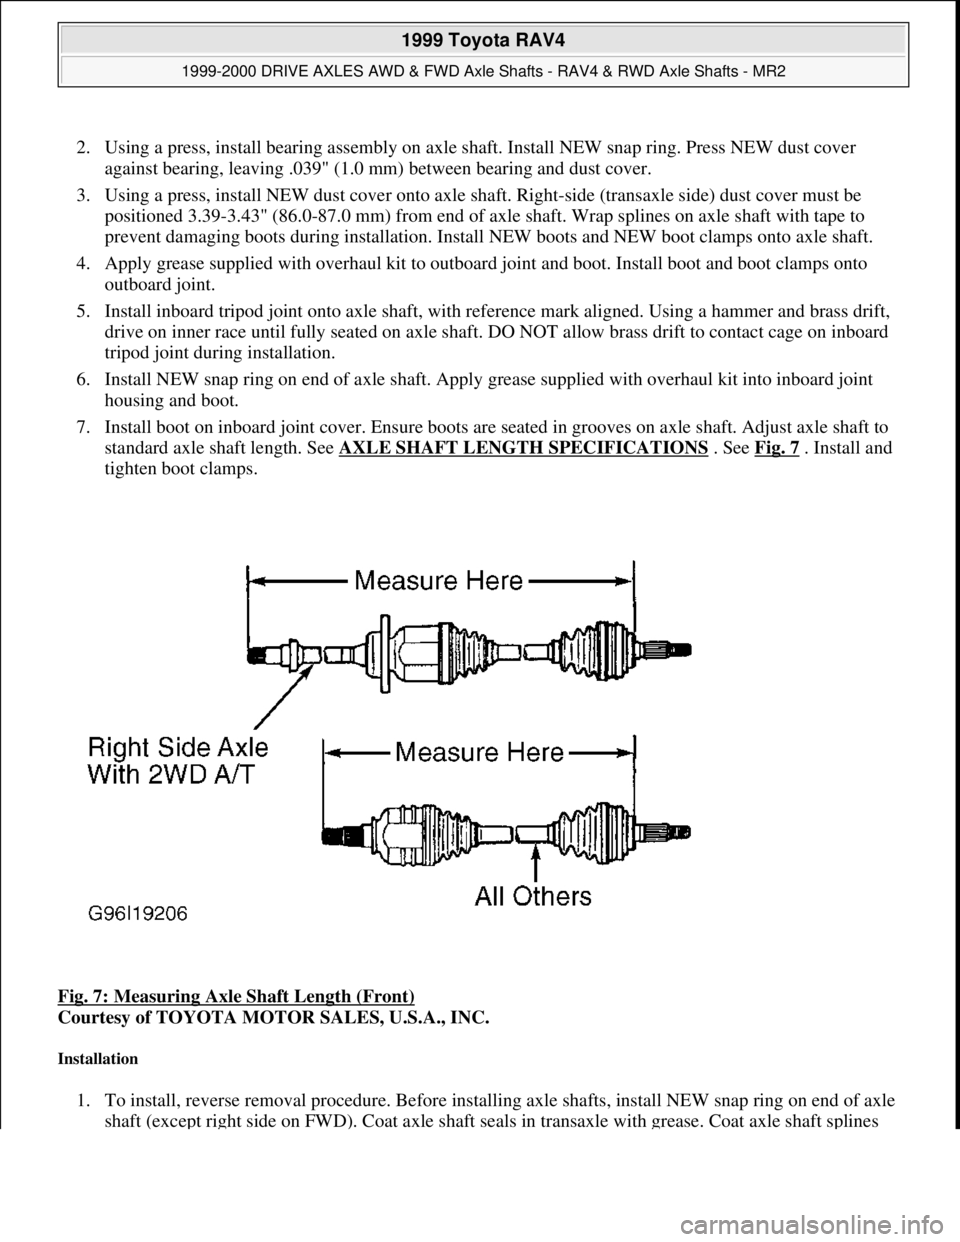
7. Install boot on inboard joint cover. Ensure boots are seated in grooves on axle shaft. Adjust axle shaft to
standard axle shaft length. See AXLE SHAFT LENGTH SPECIFICATIONS
. See Fig. 7 . Install and
tighten boot clamps.
Fig. 7: Measuring Axle Shaft Length (Front)
Courtesy of TOYOTA MOTOR SALES, U.S.A., INC.
Installation
1. To install, reverse removal procedure. Before installing axle shafts, install NEW snap ring on end of axle
shaft (except ri
ght side on FWD). Coat axle shaft seals in transaxle with grease. Coat axle shaft splines
1999 Toyota RAV4
1999-2000 DRIVE AXLES AWD & FWD Axle Shafts - RAV4 & RWD Axle Shafts - MR2
Microsoft
Sunday, November 22, 2009 10:08:21 AMPage 9 © 2005 Mitchell Repair Information Company, LLC.