TOYOTA RAV4 1996 Service Repair Manual
Manufacturer: TOYOTA, Model Year: 1996, Model line: RAV4, Model: TOYOTA RAV4 1996Pages: 1632, PDF Size: 41.64 MB
Page 361 of 1632
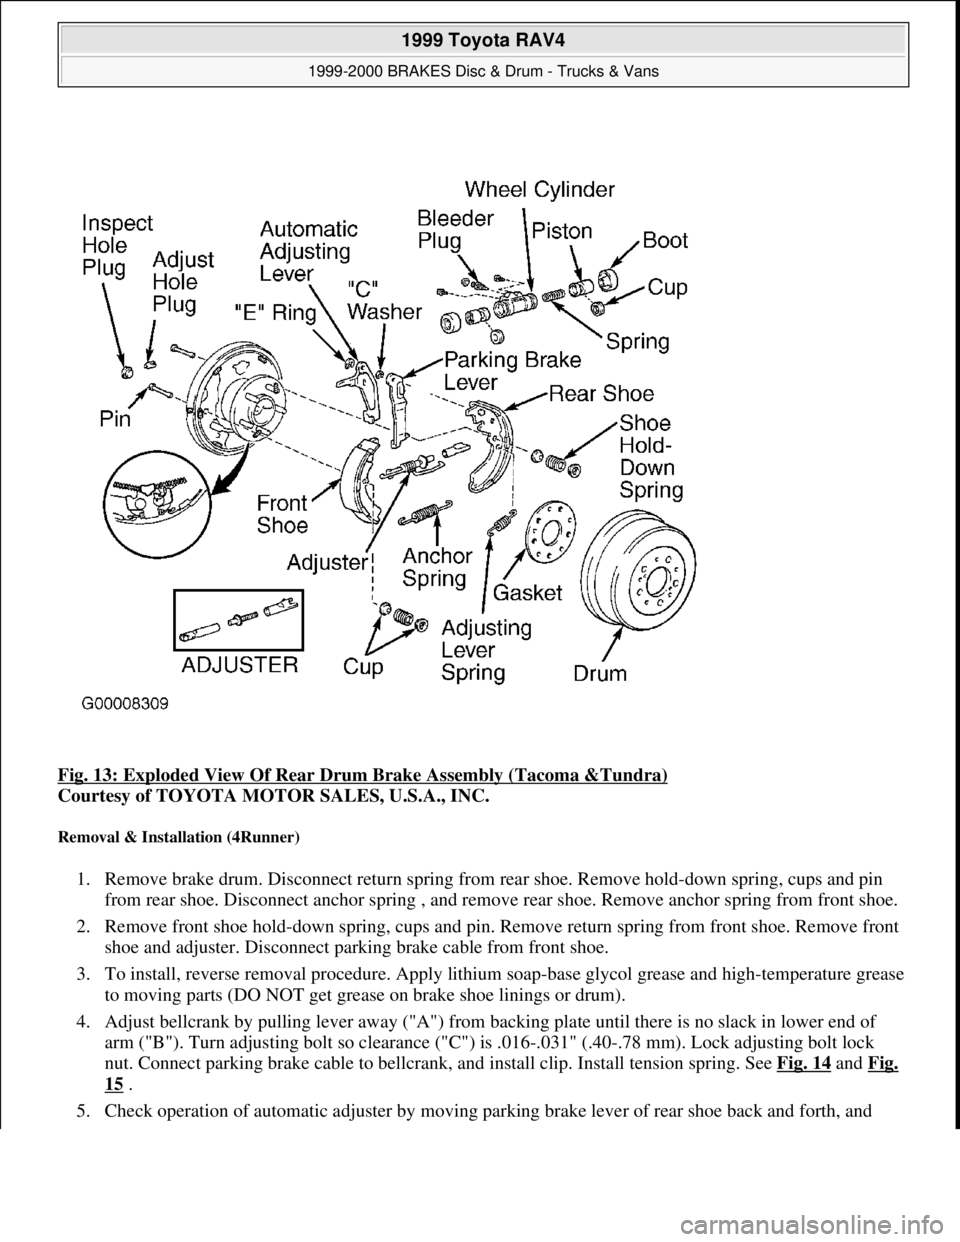
Fig. 13: Exploded View Of Rear Drum Brake Assembly (Tacoma &Tundra)
Courtesy of TOYOTA MOTOR SALES, U.S.A., INC.
Removal & Installation (4Runner)
1. Remove brake drum. Disconnect return spring from rear shoe. Remove hold-down spring, cups and pin
from rear shoe. Disconnect anchor spring , and remove rear shoe. Remove anchor spring from front shoe.
2. Remove front shoe hold-down spring, cups and pin. Remove return spring from front shoe. Remove front
shoe and adjuster. Disconnect parking brake cable from front shoe.
3. To install, reverse removal procedure. Apply lithium soap-base glycol grease and high-temperature grease
to moving parts (DO NOT get grease on brake shoe linings or drum).
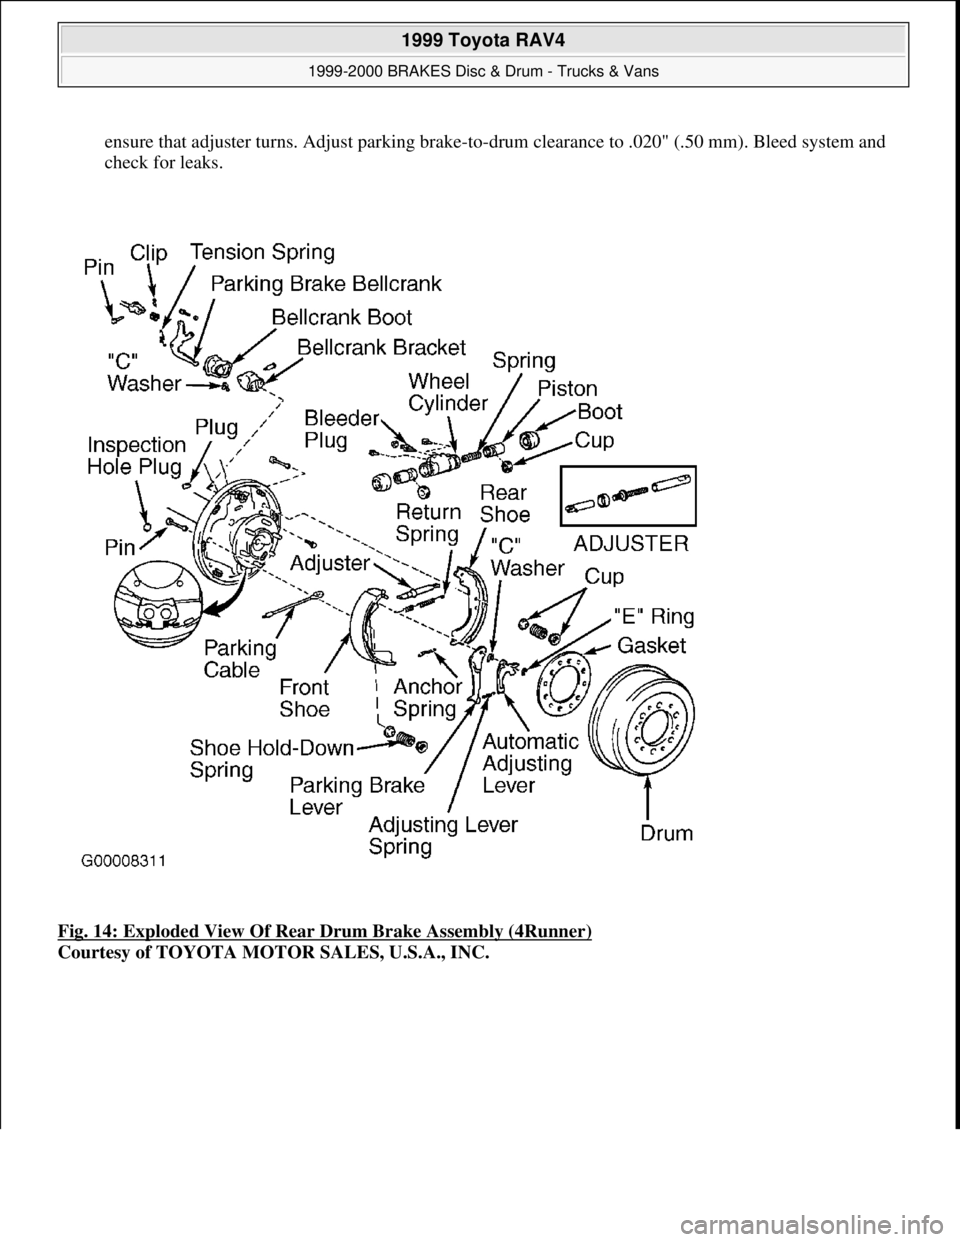
4. Adjust bellcrank by pulling lever away ("A") from backing plate until there is no slack in lower end of
arm ("B"). Turn adjusting bolt so clearance ("C") is .016-.031" (.40-.78 mm). Lock adjusting bolt lock
nut. Connect parking brake cable to bellcrank, and install clip. Install tension spring. See Fig. 14
and Fig.
15 .
5. Check operation of automatic adjuster by moving parking brake lever of rear shoe back and forth, and
1999 Toyota RAV4
1999-2000 BRAKES Disc & Drum - Trucks & Vans
Microsoft
Sunday, November 22, 2009 10:07:28 AMPage 22 © 2005 Mitchell Repair Information Company, LLC.
Page 362 of 1632
ensure that adjuster turns. Adjust parking brake-to-drum clearance to .020" (.50 mm). Bleed system and
check for leaks.
Fig. 14: Exploded View Of Rear Drum Brake Assembly (4Runner)
Courtesy of TOYOTA MOTOR SALES, U.S.A., INC.
1999 Toyota RAV4
1999-2000 BRAKES Disc & Drum - Trucks & Vans
Microsoft
Sunday, November 22, 2009 10:07:28 AMPage 23 © 2005 Mitchell Repair Information Company, LLC.
Page 363 of 1632
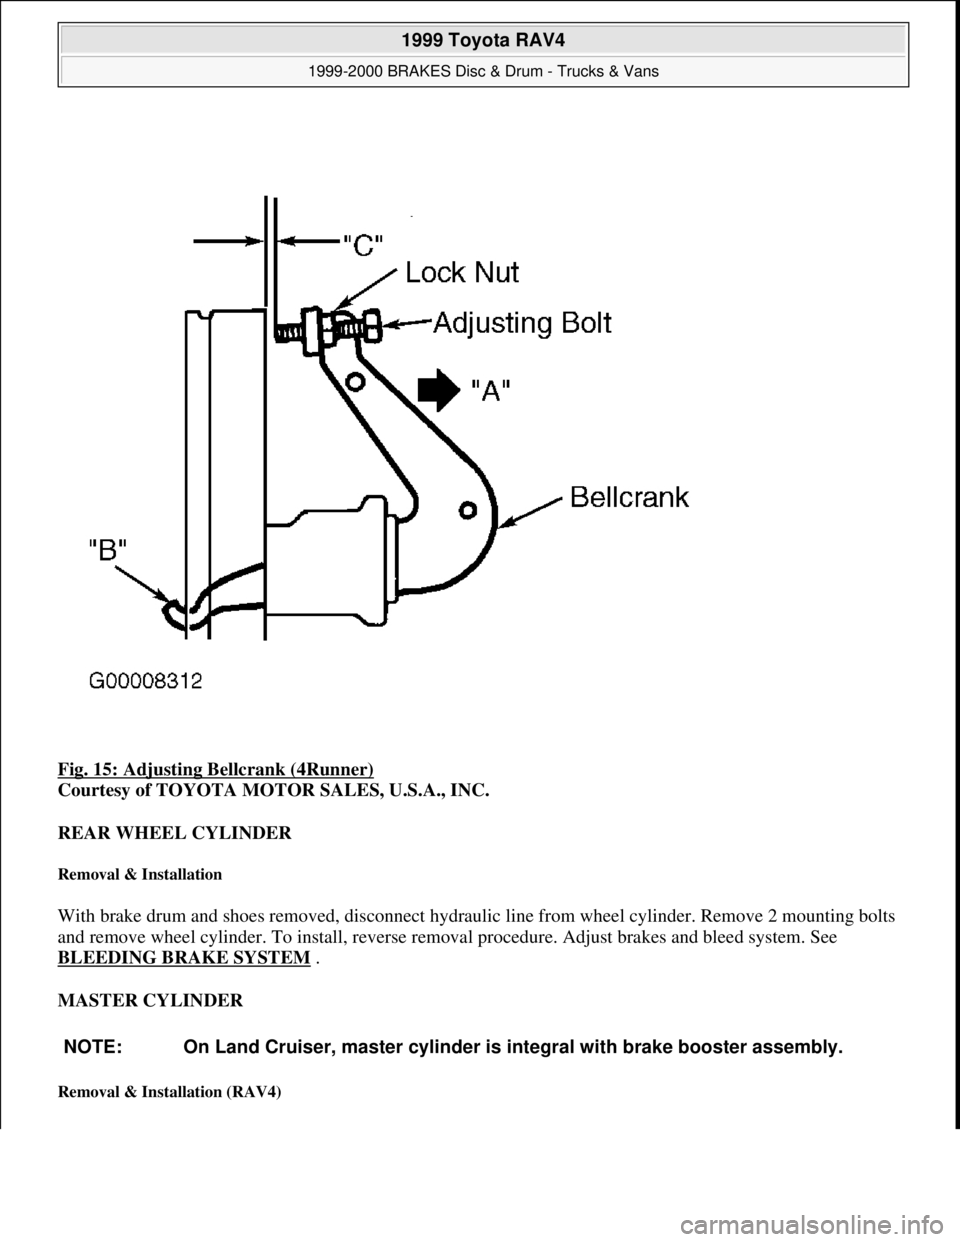
Fig. 15: Adjusting Bellcrank (4Runner)
Courtesy of TOYOTA MOTOR SALES, U.S.A., INC.
REAR WHEEL CYLINDER
Removal & Installation
With brake drum and shoes removed, disconnect hydraulic line from wheel cylinder. Remove 2 mounting bolts
and remove wheel cylinder. To install, reverse removal procedure. Adjust brakes and bleed system. See
BLEEDING BRAKE SYSTEM
.
MASTER CYLINDER
Removal & Installation (RAV4)
NOTE: On Land Cruiser, master cylinder is integral with brake booster assembly.
1999 Toyota RAV4
1999-2000 BRAKES Disc & Drum - Trucks & Vans
Microsoft
Sunday, November 22, 2009 10:07:28 AMPage 24 © 2005 Mitchell Repair Information Company, LLC.
Page 364 of 1632
1. Disconnect fluid level warning switch connector. Remove fluid from master cylinder with syringe.
Remove 2 bolts, and move relay box aside. Remove air cleaner housing and hose.
2. Disconnect brake lines and 3-way line connector from master cylinder. If equipped with M/T, disconnect
clutch reservoir hose. On all models, remove 2 bolts and master cylinder.
3. Prior to installation, adjust length of brake booster push rod if necessary. See POWER BRAKE UNIT
PUSH ROD under ADJUSTMENTS.
4. Install master cylinder in reverse of removal procedure. Use NEW gasket. Fill and bleed system. Check
for leaks and adjust pedal, if needed. Bleed clutch system, if equipped.
Removal & Installation (Sienna)
1. Remove air cleaner assembly. Disconnect fluid level warning switch connector. Remove fluid from
master cylinder with syringe. Remove fluid reservoir tank and bracket (2 bolts).
2. Disconnect brake lines from master cylinder. Remove 2 bolts and master cylinder.
3. Prior to installation, adjust length of brake booster push rod if necessary. See POWER BRAKE UNIT
PUSH ROD under ADJUSTMENTS.
4. Install master cylinder in reverse of removal procedure. Use NEW gasket. Fill and bleed system. Check
for leaks and adjust pedal, if needed. Bleed clutch system, if equipped.
Removal & Installation (Tacoma, Tundra & 4Runner)
1. Unplug fluid level sensor lead. Drain brake fluid from reservoir. Disconnect and plug hydraulic lines.
Remove master cylinder-to-power brake unit nuts. Remove master cylinder.
2. If master cylinder has been overhauled or replaced, check and adjust power brake unit push rod. See
POWER BRAKE UNIT PUSH ROD
under ADJUSTMENTS. To install, reverse removal procedure.
Bleed brake system. See BLEEDING BRAKE SYSTEM
.
POWER BRAKE UNIT
Removal & Installation (RAV4, Tacoma, Tundra & 4Runner)
1. Remove master cylinder. See MASTER CYLINDER . On RAV4, remove charcoal canister. On all
models, disconnect vacuum hose. On Tundra, remove scuff plate LH, cowl side trim LH, lower finish
panel and No. 2 heater to register duct. On all models, remove brake pedal return spring, clip and clevis
pin. On Tundra, remove 4 nuts, clevis, brake booster and gasket. Remove 2 stopper rings, brake booster
bracket and gasket from brake booster. Remove power brake unit.
2. Install power brake unit. On Tundra, install NEW gasket to power brake unit. Install bracket and stopper
rings. Install clevis to operating rod. On all models, attach clevis pin, clip and return spring. Adjust push
rod length. See POWER BRAKE UNIT PUSH ROD
under ADJUSTMENTS.
3. Install master cylinder with NEW gasket. Connect vacuum hose. Fill master cylinder. Bleed system and
check for leaks. Adjust brake pedal, if necessary.
Removal & Installation (Sienna)
1. Remove 2 cowl top vent louvers and outer front cowl top panel. See Fig. 16 . Remove master cylinder.
1999 Toyota RAV4
1999-2000 BRAKES Disc & Drum - Trucks & Vans
Microsoft
Sunday, November 22, 2009 10:07:28 AMPage 25 © 2005 Mitchell Repair Information Company, LLC.
Page 365 of 1632
See MASTER CYLINDER .
2. Remove ABS actuator assembly. Disconnect vacuum hose from power brake unit. Remove lower
instrument panel finish panels to access brake pedal arm. Remove Cruise Control Engine Control Unit
(ECU). Remove pedal return spring, clip and clevis pin.
3. Remove 4 nuts and clevis, and remove power brake unit.
4. Install power brake unit. Attach clevis pin, clip and return spring. Install Cruise Control Engine Control
Unit (ECU). Adjust push rod length. See POWER BRAKE UNIT PUSH ROD
under ADJUSTMENTS.
5. Install master cylinder with NEW gasket. Connect vacuum hose. Fill master cylinder. Bleed system and
check for leads. Adjust brake pedal, if necessary. Install cowl panel and vent louvers.
1999 Toyota RAV4
1999-2000 BRAKES Disc & Drum - Trucks & Vans
Microsoft
Sunday, November 22, 2009 10:07:28 AMPage 26 © 2005 Mitchell Repair Information Company, LLC.
Page 366 of 1632
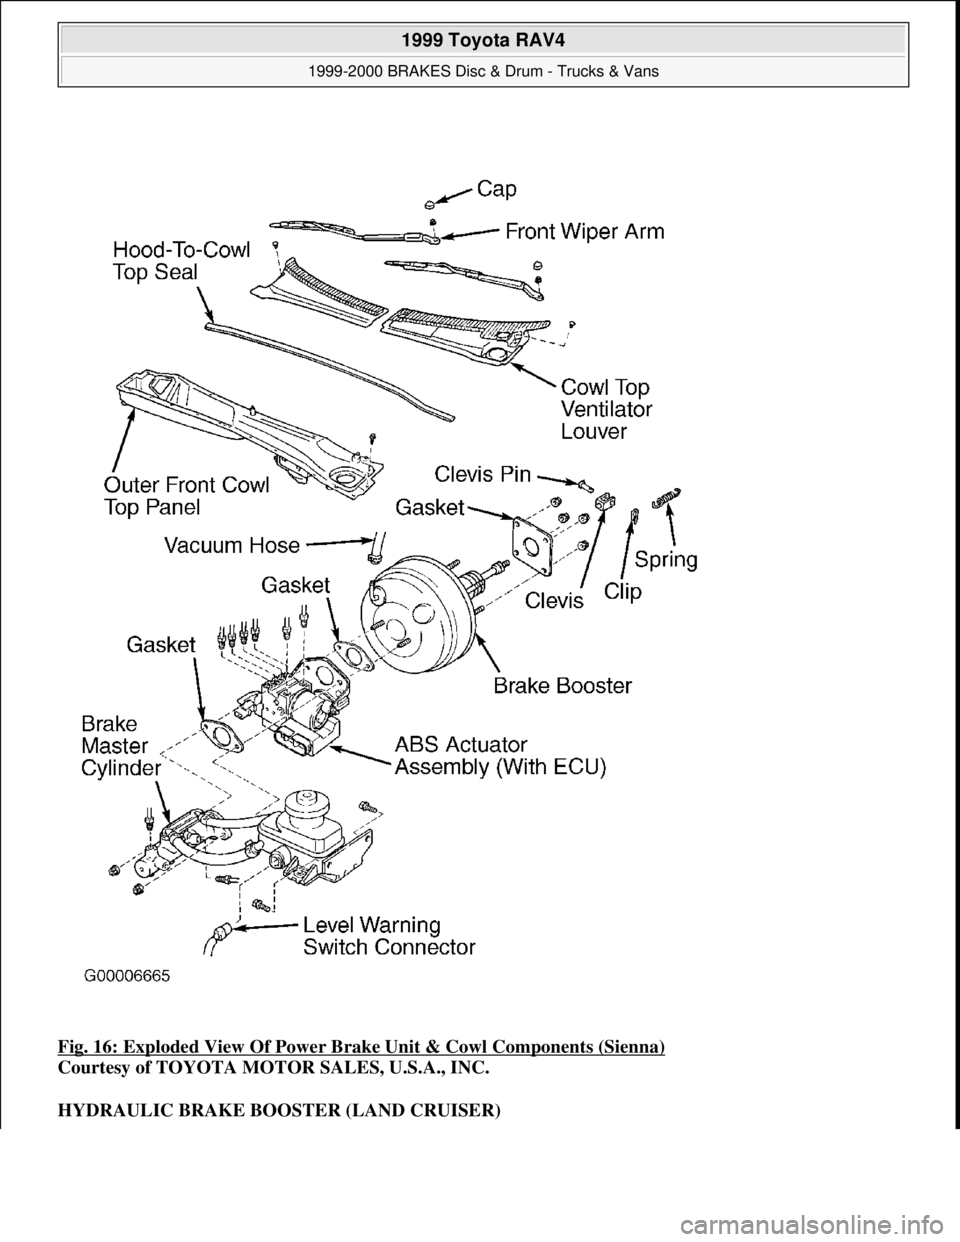
Fig. 16: Exploded View Of Power Brake Unit & Cowl Components (Sienna)
Courtesy of TOYOTA MOTOR SALES, U.S.A., INC.
HYDRAULIC BRAKE BOOSTER (LAND CRUISER)
1999 Toyota RAV4
1999-2000 BRAKES Disc & Drum - Trucks & Vans
Microsoft
Sunday, November 22, 2009 10:07:28 AMPage 27 © 2005 Mitchell Repair Information Company, LLC.
Page 367 of 1632
Removal & Installation
1. Turn ignition switch off. Pump brake pedal at least 40 times (pedal stroke will become lighter and
longer). Draw brake fluid from reservoir with a syringe.
2. Remove cowl side trim, lower panels and No. 2 heater duct for access. Remove ABS ECU. Remove
charcoal canister. See Fig. 17
.
3. Disconnect connectors from brake booster. Disconnect brake lines from brake booster. Remove clip and
clevis pin from inside passenger compartment. Remove 4 mounting nuts, and remove brake booster
assembly.
4. To install, reverse removal procedure.
1999 Toyota RAV4
1999-2000 BRAKES Disc & Drum - Trucks & Vans
Microsoft
Sunday, November 22, 2009 10:07:28 AMPage 28 © 2005 Mitchell Repair Information Company, LLC.
Page 368 of 1632
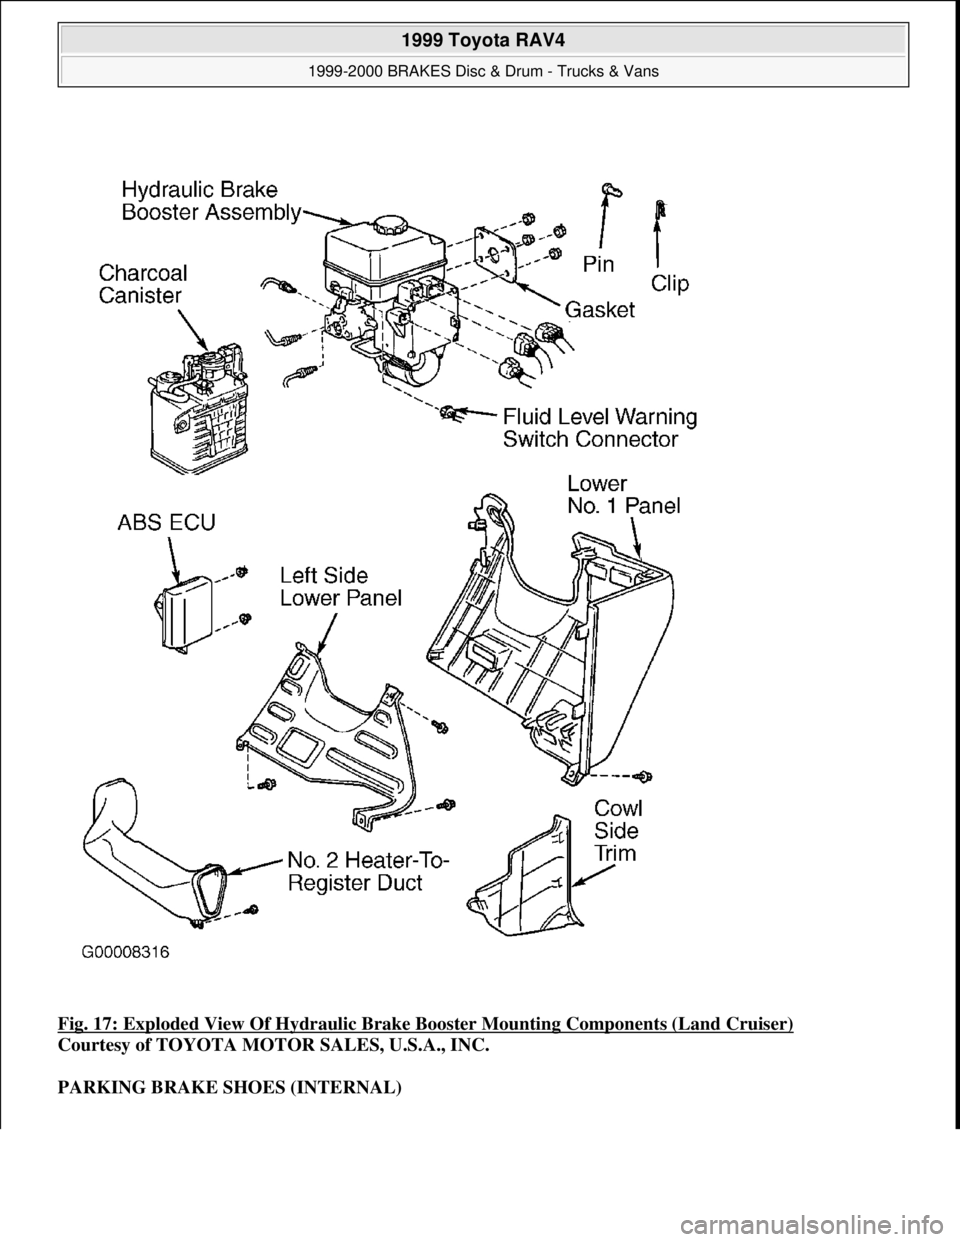
Fig. 17: Exploded View Of Hydraulic Brake Booster Mounting Components (Land Cruiser)
Courtesy of TOYOTA MOTOR SALES, U.S.A., INC.
PARKING BRAKE SHOES (INTERNAL)
1999 Toyota RAV4
1999-2000 BRAKES Disc & Drum - Trucks & Vans
Microsoft
Sunday, November 22, 2009 10:07:28 AMPage 29 © 2005 Mitchell Repair Information Company, LLC.
Page 369 of 1632
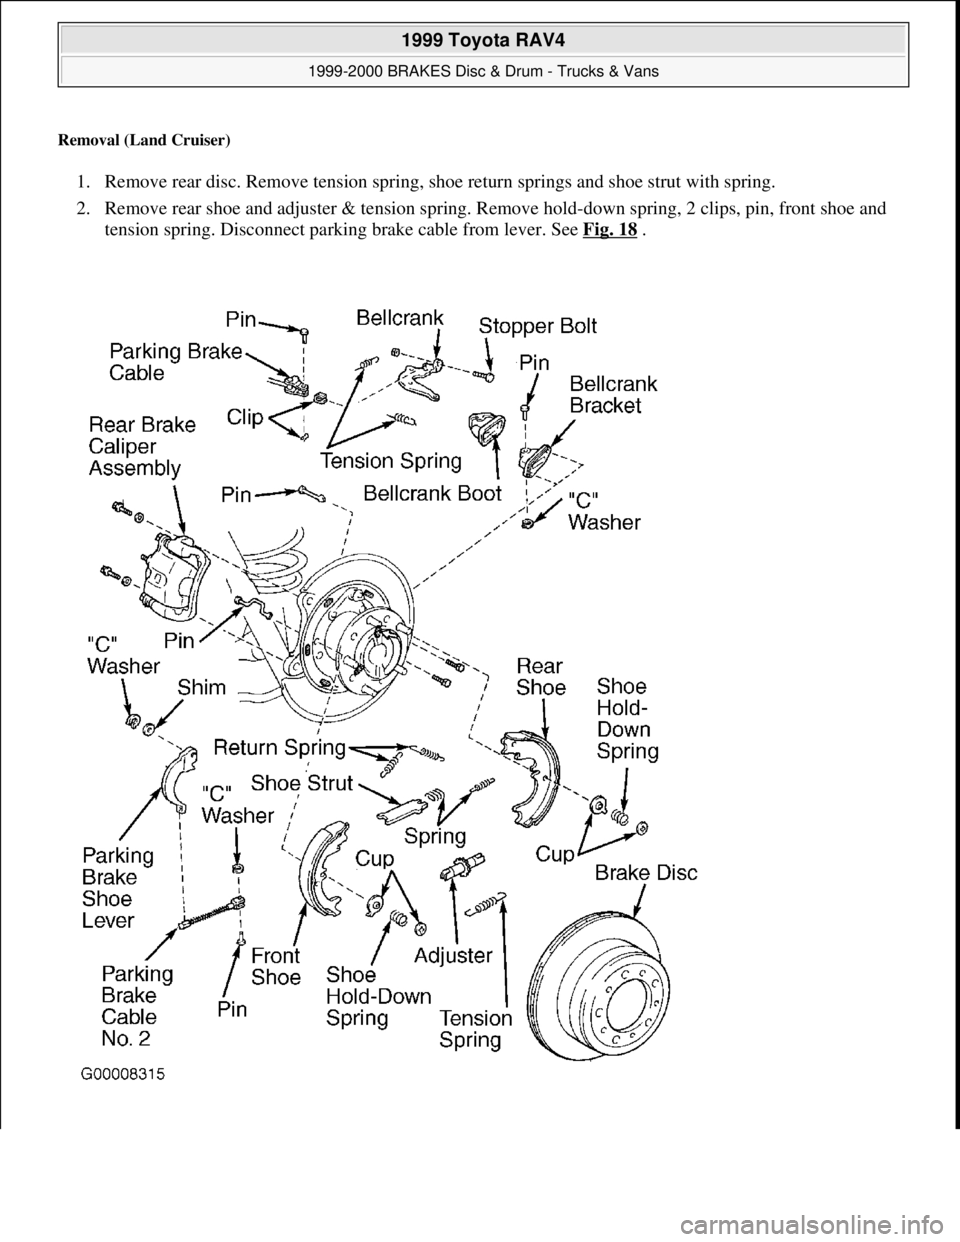
Removal (Land Cruiser)
1. Remove rear disc. Remove tension spring, shoe return springs and shoe strut with spring.
2. Remove rear shoe and adjuster & tension spring. Remove hold-down spring, 2 clips, pin, front shoe and
tension spring. Disconnect parking brake cable from lever. See Fig. 18
.
1999 Toyota RAV4
1999-2000 BRAKES Disc & Drum - Trucks & Vans
Microsoft
Sunday, November 22, 2009 10:07:28 AMPage 30 © 2005 Mitchell Repair Information Company, LLC.
Page 370 of 1632
Fig. 18: Exploded View Of Internal Parking Brake Assembly (Land Cruiser)
Courtesy of TOYOTA MOTOR SALES, U.S.A., INC.
Inspection
Clearance between parking brake shoe and lever should be .014" (.35 mm) or less. If clearance exceeds
specification, replace shim under parking brake lever. Shims are available in sizes from .012" (.30 mm)
to .035" (.90 mm) in .012" (.30 mm) increments. Use NEW "C" washer when installing lever.
Installation
To complete installation, reverse removal procedure. Apply non-melting grease to sliding surfaces of shoes and
adjusting screw threads. Align groove of rear axle shaft flange with service hole on disc. Install disc.
LOAD-SENSING PROPORTIONING VALVE (LSPV) & BY-PASS VALVE (BPV)
Removal (Tacoma & Tundra)
1. Raise and support vehicle. Remove nut, and disconnect shackle No. 2. Remove cushion retainer, 2
cushions and collar. Disconnect No. 2 shackle from bracket. See Fig. 19
.
2. Disconnect brake lines from valve body.
3. On Tacoma, remove clip from flexible hose bracket. On 2WD, remove 3 valve bracket mounting bolts
and spacer. Remove LSPV and BPV assembly. On 4WD, remove 3 mounting bolts, spacer and flexible
hose bracket mounting bolt. Remove LSPV and BPV assembly and flexible hose bracket.
4. On Tundra, remove 2 valve mountin
g bolts, and LSPV and BPV assembly. NOTE: RAV4 & Sienna do not use a Load-Sensing Proportioning Valve (LSPV) or By-
Pass Valve (BPV).
NOTE: Proportioning valve and by-pass valve removal and installation procedures for
Land Cruiser, RAV4 and Sienna not available from manufacturer.
1999 Toyota RAV4
1999-2000 BRAKES Disc & Drum - Trucks & Vans
Microsoft
Sunday, November 22, 2009 10:07:28 AMPage 31 © 2005 Mitchell Repair Information Company, LLC.