TOYOTA RAV4 1996 Service Repair Manual
Manufacturer: TOYOTA, Model Year: 1996, Model line: RAV4, Model: TOYOTA RAV4 1996Pages: 1632, PDF Size: 41.64 MB
Page 351 of 1632
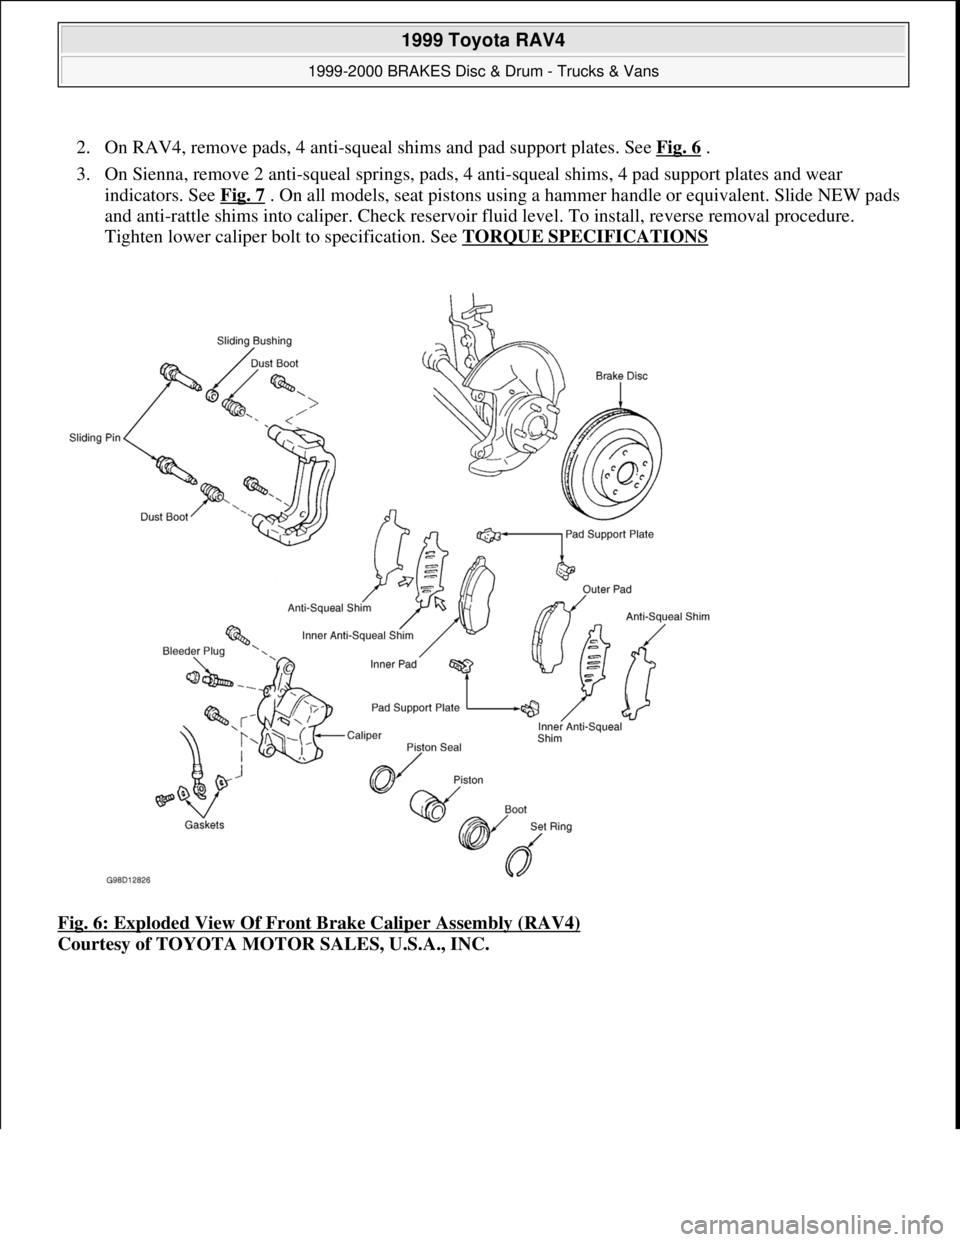
2. On RAV4, remove pads, 4 anti-squeal shims and pad support plates. See Fig. 6 .
3. On Sienna, remove 2 anti-squeal springs, pads, 4 anti-squeal shims, 4 pad support plates and wear
indicators. See Fig. 7
. On all models, seat pistons using a hammer handle or equivalent. Slide NEW pads
and anti-rattle shims into caliper. Check reservoir fluid level. To install, reverse removal procedure.
Tighten lower caliper bolt to specification. See TORQUE SPECIFICATIONS
Fig. 6: Exploded View Of Front Brake Caliper Assembly (RAV4)
Courtesy of TOYOTA MOTOR SALES, U.S.A., INC.
1999 Toyota RAV4
1999-2000 BRAKES Disc & Drum - Trucks & Vans
Microsoft
Sunday, November 22, 2009 10:07:28 AMPage 12 © 2005 Mitchell Repair Information Company, LLC.
Page 352 of 1632
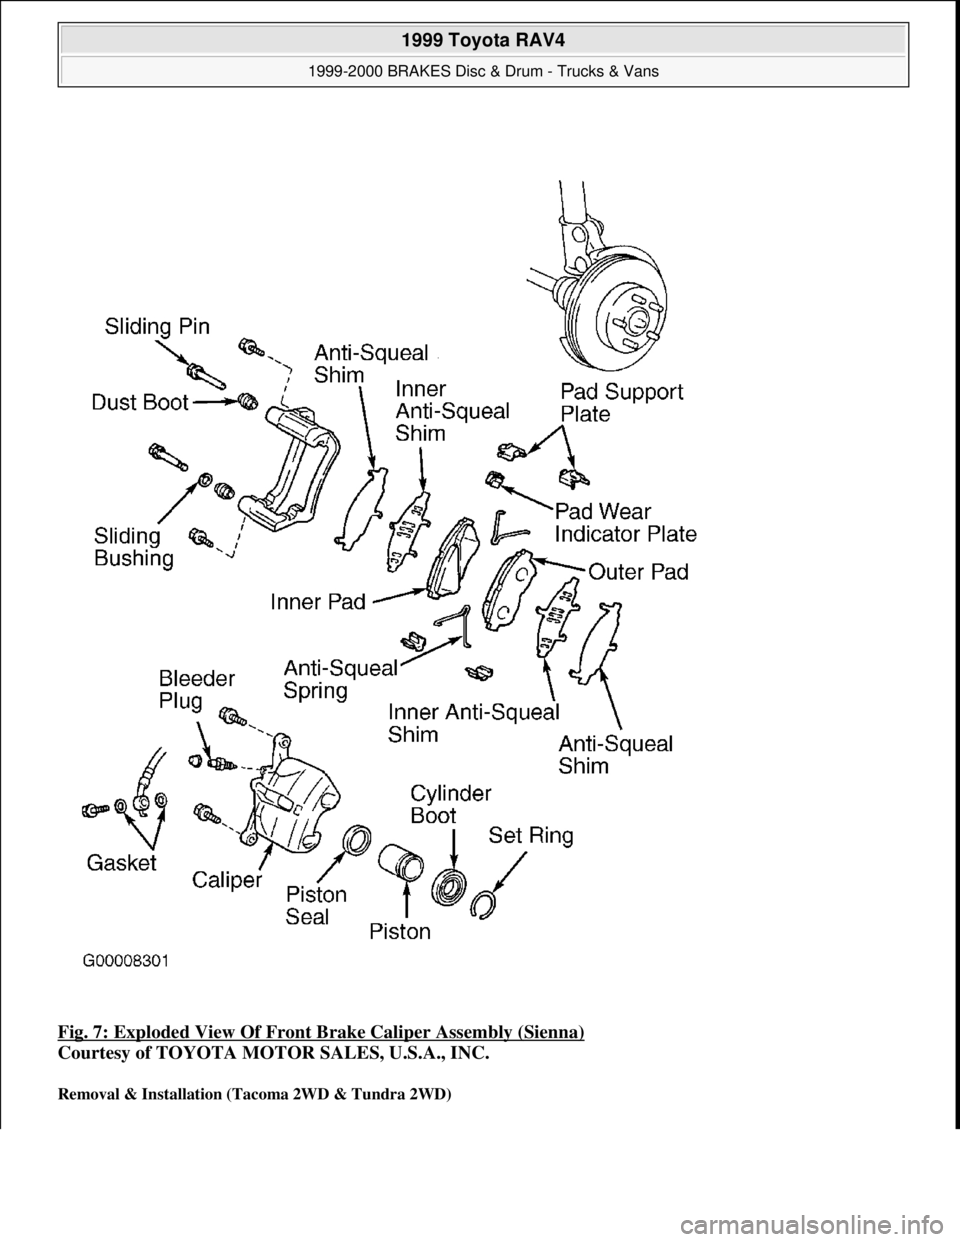
Fig. 7: Exploded View Of Front Brake Caliper Assembly (Sienna)
Courtesy of TOYOTA MOTOR SALES, U.S.A., INC.
Removal & Installation (Tacoma 2WD & Tundra 2WD)
1999 Toyota RAV4
1999-2000 BRAKES Disc & Drum - Trucks & Vans
Microsoft
Sunday, November 22, 2009 10:07:28 AMPage 13 © 2005 Mitchell Repair Information Company, LLC.
Page 353 of 1632
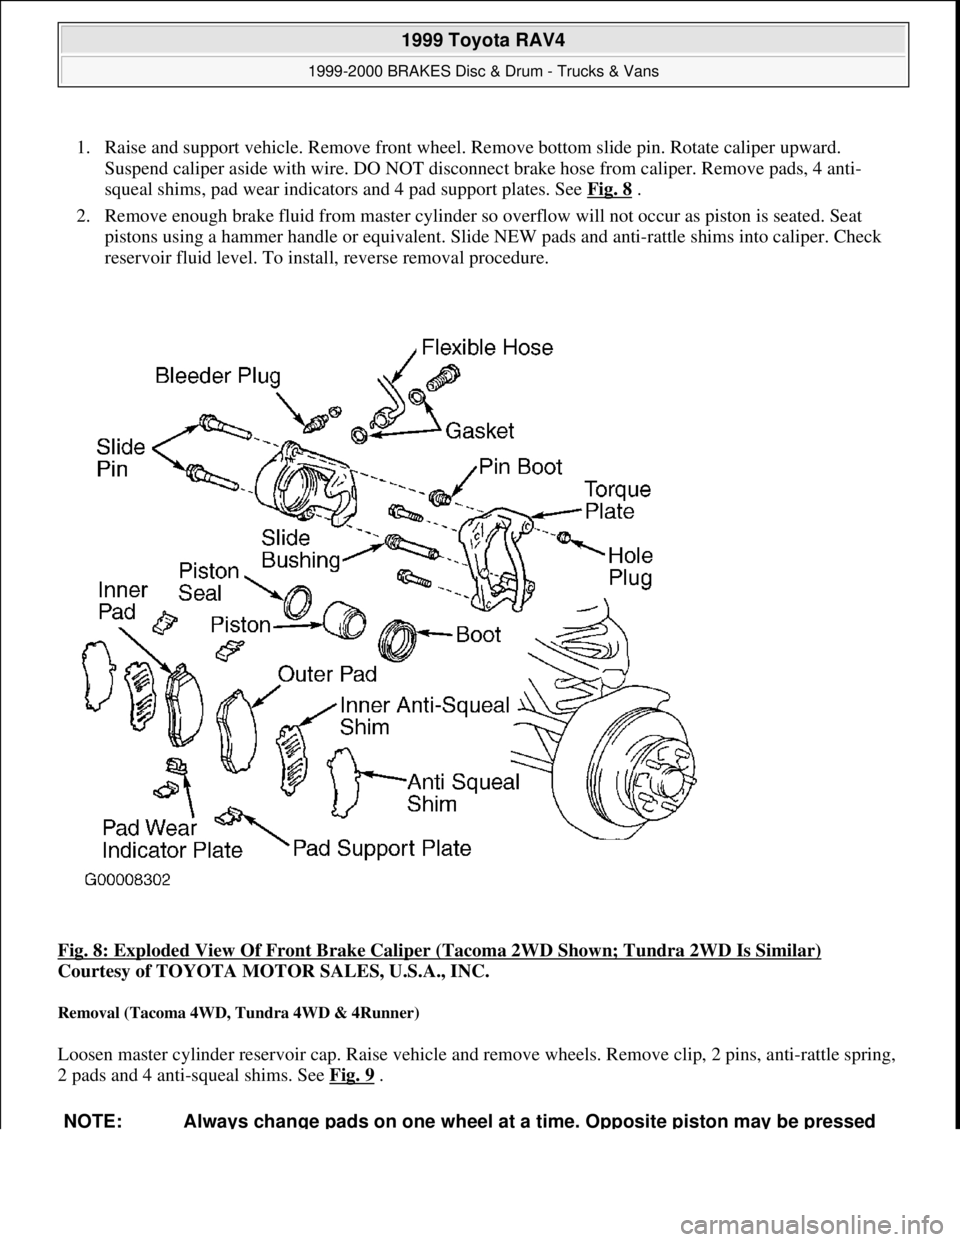
1. Raise and support vehicle. Remove front wheel. Remove bottom slide pin. Rotate caliper upward.
Suspend caliper aside with wire. DO NOT disconnect brake hose from caliper. Remove pads, 4 anti-
squeal shims, pad wear indicators and 4 pad support plates. See Fig. 8
.
2. Remove enough brake fluid from master cylinder so overflow will not occur as piston is seated. Seat
pistons using a hammer handle or equivalent. Slide NEW pads and anti-rattle shims into caliper. Check
reservoir fluid level. To install, reverse removal procedure.
Fig. 8: Exploded View Of Front Brake Caliper (Tacoma 2WD Shown; Tundra 2WD Is Similar)
Courtesy of TOYOTA MOTOR SALES, U.S.A., INC.
Removal (Tacoma 4WD, Tundra 4WD & 4Runner)
Loosen master cylinder reservoir cap. Raise vehicle and remove wheels. Remove clip, 2 pins, anti-rattle spring,
2 pads and 4 anti-squeal shims. See Fig. 9
.
NOTE: Always change pads on one wheel at a time. Opposite piston may be pressed
1999 Toyota RAV4
1999-2000 BRAKES Disc & Drum - Trucks & Vans
Microsoft
Sunday, November 22, 2009 10:07:28 AMPage 14 © 2005 Mitchell Repair Information Company, LLC.
Page 354 of 1632
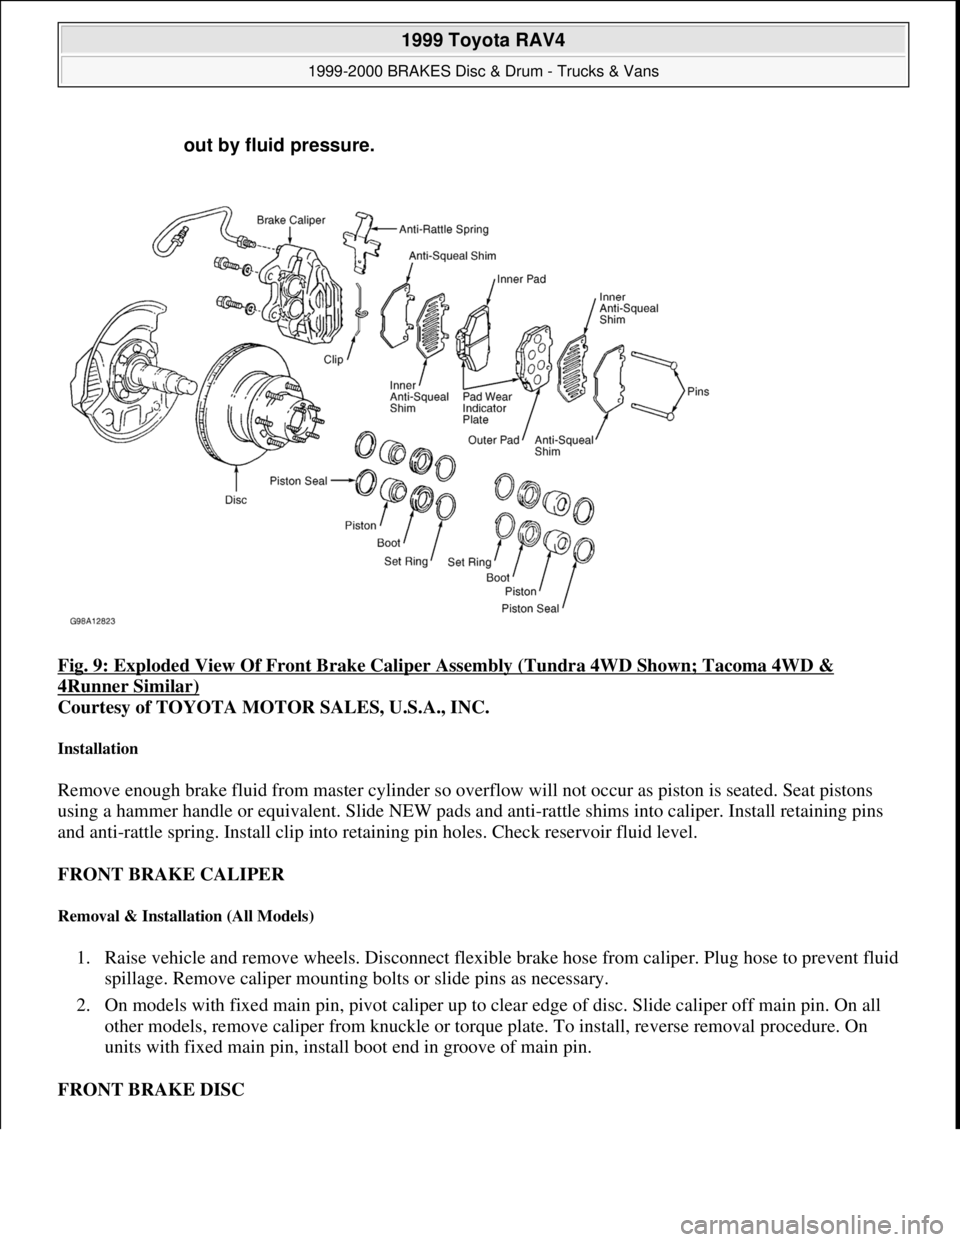
Fig. 9: Exploded View Of Front Brake Caliper Assembly (Tundra 4WD Shown; Tacoma 4WD &
4Runner Similar)
Courtesy of TOYOTA MOTOR SALES, U.S.A., INC.
Installation
Remove enough brake fluid from master cylinder so overflow will not occur as piston is seated. Seat pistons
using a hammer handle or equivalent. Slide NEW pads and anti-rattle shims into caliper. Install retaining pins
and anti-rattle spring. Install clip into retaining pin holes. Check reservoir fluid level.
FRONT BRAKE CALIPER
Removal & Installation (All Models)
1. Raise vehicle and remove wheels. Disconnect flexible brake hose from caliper. Plug hose to prevent fluid
spillage. Remove caliper mounting bolts or slide pins as necessary.
2. On models with fixed main pin, pivot caliper up to clear edge of disc. Slide caliper off main pin. On all
other models, remove caliper from knuckle or torque plate. To install, reverse removal procedure. On
units with fixed main pin, install boot end in groove of main pin.
FRONT BRAKE DISC out by fluid pressure.
1999 Toyota RAV4
1999-2000 BRAKES Disc & Drum - Trucks & Vans
Microsoft
Sunday, November 22, 2009 10:07:28 AMPage 15 © 2005 Mitchell Repair Information Company, LLC.
Page 355 of 1632
Removal & Installation (Land Cruiser)
Raise vehicle and remove wheels. Remove bolt and disconnect brakeline from steering knuckle. Remove 2
bolts, washer and brake caliper. Support brake caliper securely. Remove grease cap from flange. Remove snap
ring. Remove 6 nuts and washers. Remove 6 nuts and cone washers. Remove flange and gaskets. Remove lock
nut, lock washer and adjusting nut. Remove disc with axle hub. To install, reverse removal procedure. Tighten
bolts and nut to specifications. See TORQUE SPECIFICATIONS
.
Removal & Installation (RAV4 & Tundra)
Raise and support vehicle. Remove front wheel. Remove 2 caliper retaining bolts and remove caliper. Support
caliper securely out of way. Remove brake disc. To install, reverse removal procedure. Tighten bolts and nut to
specifications. See TORQUE SPECIFICATIONS
.
Removal & Installation (Sienna)
Raise and support vehicle. Remove front wheel. Remove cotter pin and hub lock cap. Remove hub nut. Remove
2 caliper retaining bolts and remove caliper. Support caliper securely out of way. Remove claw washer, outer
bearing and axle hub with brake disc. To install, reverse removal procedure. Tighten bolts and nut to
specifications. See TORQUE SPECIFICATIONS
.
Removal & Installation (Tacoma 2WD)
Raise and support vehicle. Remove front wheel. Remove 2 caliper retaining bolts and remove caliper. Support
caliper securely out of way. Remove cotter pin and hub lock cap. Remove hub nut. Remove claw washer, outer
bearing and axle hub with brake disc. To install, reverse removal procedure. Tighten bolts and nut to
specifications. See TORQUE SPECIFICATIONS
.
Removal & Installation (Tacoma 4WD & 4Runner)
Raise and support vehicle. Remove front wheel. Remove and plug flexible brake hose from caliper. On Tacoma,
remove snap ring. Remove 2 bolts and remove brake caliper and brake disc. Secure caliper out of way. To
install, reverse removal procedure. Be sure to install brake hose lock securely into lock hole in caliper. Tighten
bolts and nut to specifications. See TORQUE SPECIFICATIONS
.
REAR DISC BRAKE PADS
Removal & Installation (Land Cruiser)
1. Raise and support vehicle. Remove wheels. Secure disc with lug nuts. Remove guide bolts from torque
plate. Leave hose connected and suspend caliper from suspension. Remove pads, anti-squeal shims, wear
indicators and pad support plates. See Fig. 10
.
2. Install NEW pad support plates on torque plate. Install NEW pad wear indicators, anti-squeal shims and
pads. Position wear indicators on lower edge of pad. Anti-squeal shims go on outside of pads. NOTE: Pushing piston into caliper bore will force fluid back into master cylinder
reservoir. Remove small amount of fluid from reservoir with syringe.
1999 Toyota RAV4
1999-2000 BRAKES Disc & Drum - Trucks & Vans
Microsoft
Sunday, November 22, 2009 10:07:28 AMPage 16 © 2005 Mitchell Repair Information Company, LLC.
Page 356 of 1632
3. Push piston into bore with "C" clamp or wooden hammer handle. Slide caliper onto torque plate carefully
to avoid dama
ging boot on edge of pad.
1999 Toyota RAV4
1999-2000 BRAKES Disc & Drum - Trucks & Vans
Microsoft
Sunday, November 22, 2009 10:07:28 AMPage 17 © 2005 Mitchell Repair Information Company, LLC.
Page 357 of 1632
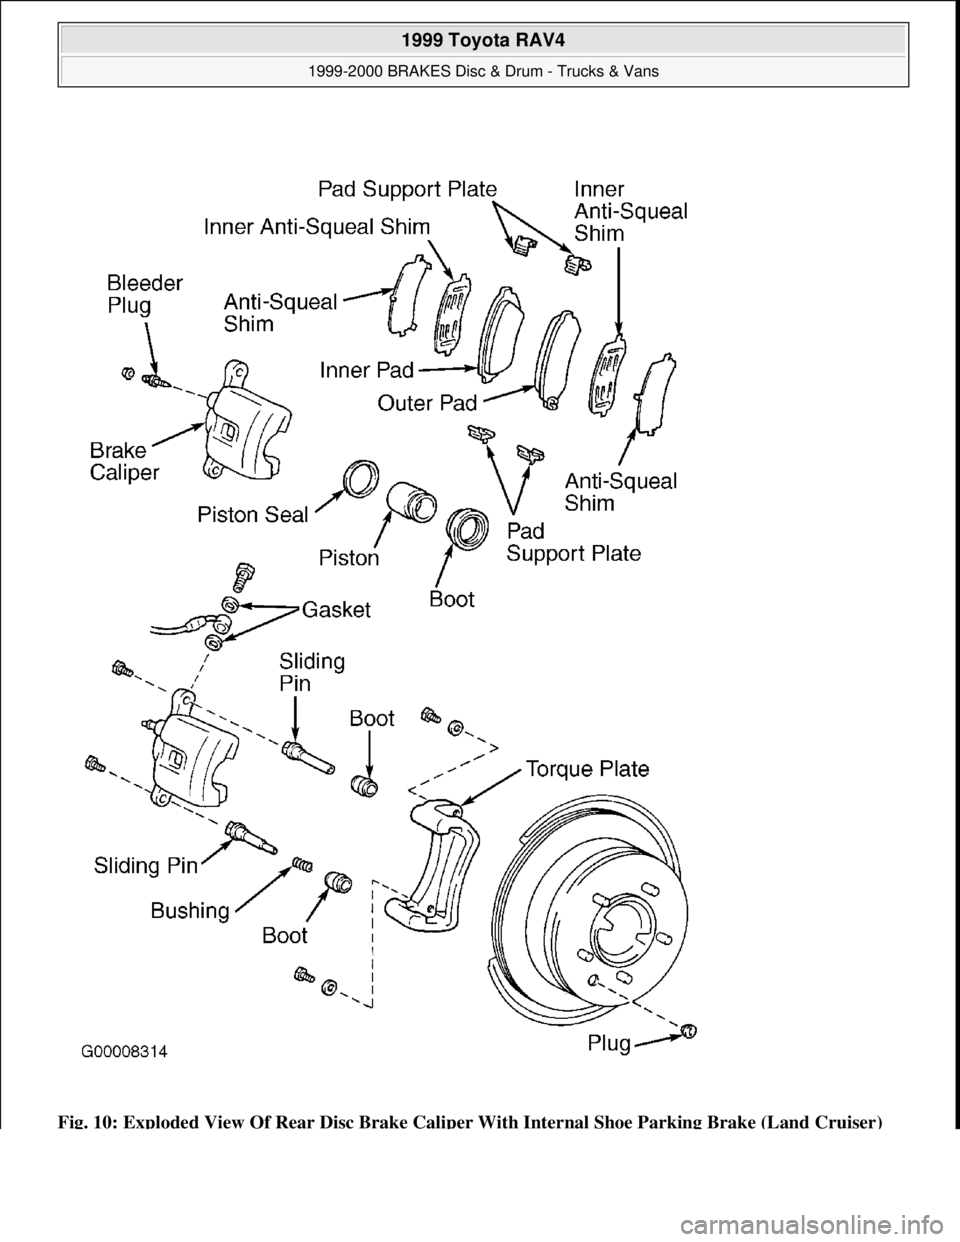
Fig. 10: Exploded View Of Rear Disc Brake Caliper With Internal Shoe Parking Brake (Land Cruiser)
1999 Toyota RAV4
1999-2000 BRAKES Disc & Drum - Trucks & Vans
Microsoft
Sunday, November 22, 2009 10:07:28 AMPage 18 © 2005 Mitchell Repair Information Company, LLC.
Page 358 of 1632
Courtesy of TOYOTA MOTOR SALES, U.S.A., INC.
REAR BRAKE CALIPER
Removal & Installation (Land Cruiser)
Disconnect brake hose and mounting bolts. Remove caliper from knuckle or torque plate. To install, reverse
removal procedure. Bleed hydraulic system. See BLEEDING BRAKE SYSTEM
.
REAR BRAKE DRUM
Removal
Ensure parking brake is released. Raise and support vehicle. Remove wheel. Remove set screws from brake
drum (if equipped). Pull drum from axle flange. It may be necessary to loosen brake shoe adjuster before
removing drum.
Installation
Measure inside diameter of brake drum and diameter of brake shoes. Turn brake adjuster until difference
between diameters is .024" (.60 mm) for RAV4 and Tacoma or .020" (.50 mm) for Sienna, Tundra and
4Runner. Install brake drum and adjust brakes, if necessary.
REAR BRAKE SHOES
Removal & Installation (RAV4)
1. Remove brake drum. Disconnect return spring from both shoes. Remove hold-down spring, cups and pin
from front shoe. Disconnect anchor spring, and remove front shoe. Remove anchor spring from rear shoe.
2. Remove rear shoe hold-down spring, cups and pin. Disconnect parking brake cable from brake lever.
Remove rear shoe with adjuster. See Fig. 11
.
3. To install, reverse removal procedure. Apply lithium soap-base glycol grease and high-temperature grease
to moving parts (DO NOT get grease on brake shoe linings or drum).
4. Check operation of automatic adjuster by moving parking brake lever of rear shoe back and forth, and
ensure that adjuster turns. Adjust parking brake-to-drum clearance to .024" (.60 mm). Bleed system and
check for leaks.
1999 Toyota RAV4
1999-2000 BRAKES Disc & Drum - Trucks & Vans
Microsoft
Sunday, November 22, 2009 10:07:28 AMPage 19 © 2005 Mitchell Repair Information Company, LLC.
Page 359 of 1632
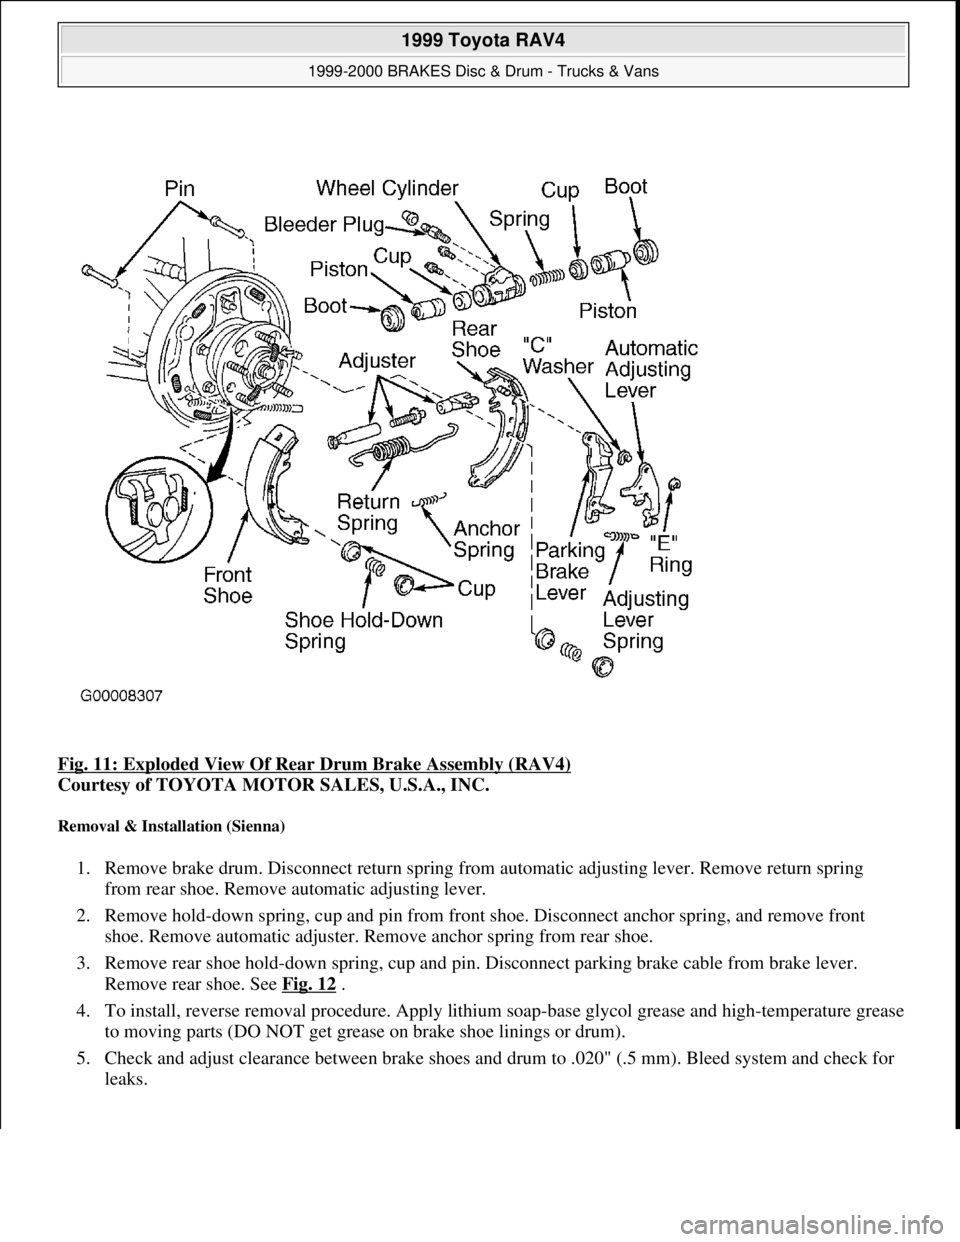
Fig. 11: Exploded View Of Rear Drum Brake Assembly (RAV4)
Courtesy of TOYOTA MOTOR SALES, U.S.A., INC.
Removal & Installation (Sienna)
1. Remove brake drum. Disconnect return spring from automatic adjusting lever. Remove return spring
from rear shoe. Remove automatic adjusting lever.
2. Remove hold-down spring, cup and pin from front shoe. Disconnect anchor spring, and remove front
shoe. Remove automatic adjuster. Remove anchor spring from rear shoe.
3. Remove rear shoe hold-down spring, cup and pin. Disconnect parking brake cable from brake lever.
Remove rear shoe. See Fig. 12
.
4. To install, reverse removal procedure. Apply lithium soap-base glycol grease and high-temperature grease
to moving parts (DO NOT get grease on brake shoe linings or drum).
5. Check and adjust clearance between brake shoes and drum to .020" (.5 mm). Bleed system and check for
leaks.
1999 Toyota RAV4
1999-2000 BRAKES Disc & Drum - Trucks & Vans
Microsoft
Sunday, November 22, 2009 10:07:28 AMPage 20 © 2005 Mitchell Repair Information Company, LLC.
Page 360 of 1632
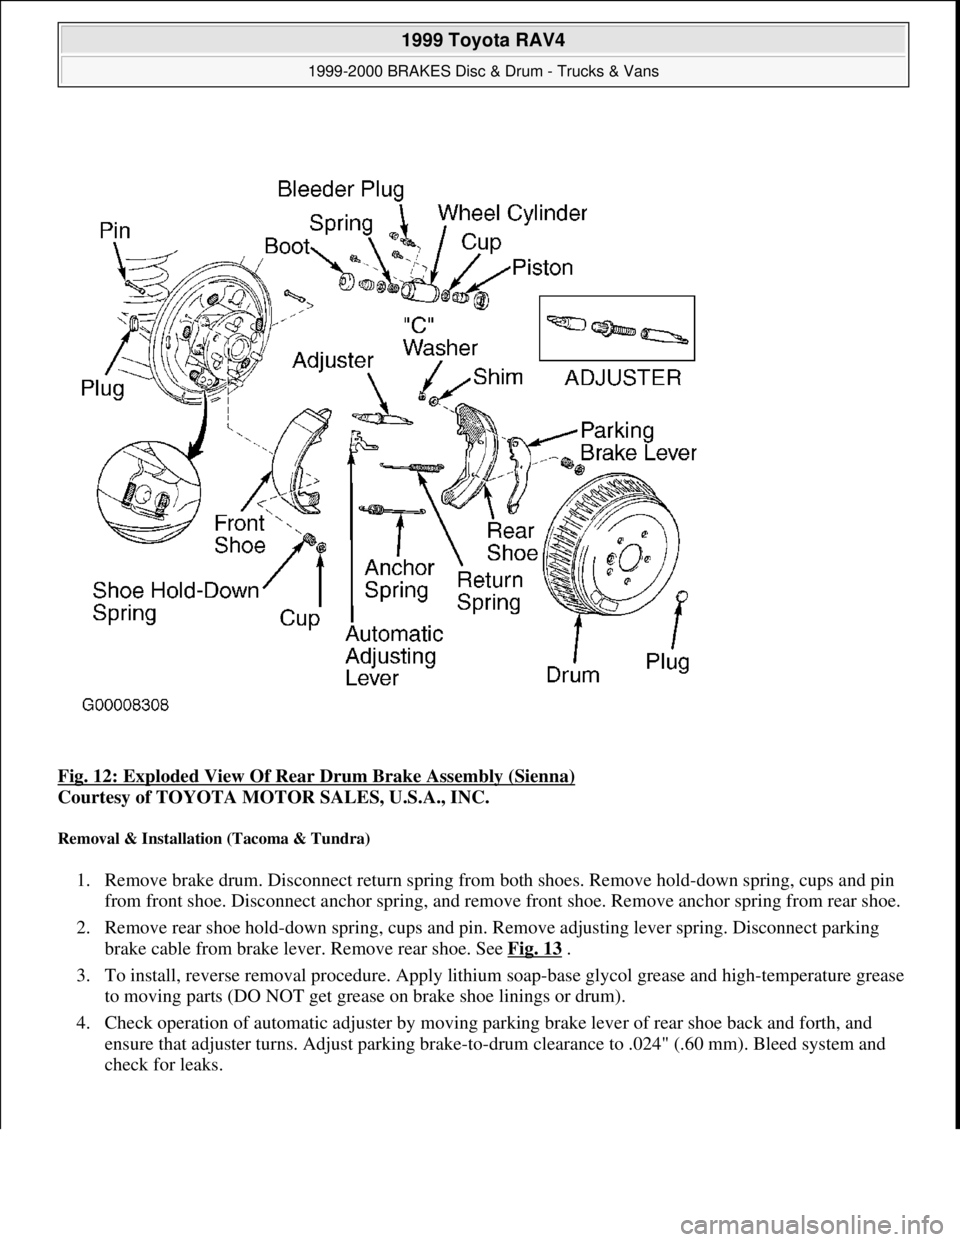
Fig. 12: Exploded View Of Rear Drum Brake Assembly (Sienna)
Courtesy of TOYOTA MOTOR SALES, U.S.A., INC.
Removal & Installation (Tacoma & Tundra)
1. Remove brake drum. Disconnect return spring from both shoes. Remove hold-down spring, cups and pin
from front shoe. Disconnect anchor spring, and remove front shoe. Remove anchor spring from rear shoe.
2. Remove rear shoe hold-down spring, cups and pin. Remove adjusting lever spring. Disconnect parking
brake cable from brake lever. Remove rear shoe. See Fig. 13
.
3. To install, reverse removal procedure. Apply lithium soap-base glycol grease and high-temperature grease
to moving parts (DO NOT get grease on brake shoe linings or drum).
4. Check operation of automatic adjuster by moving parking brake lever of rear shoe back and forth, and
ensure that adjuster turns. Adjust parking brake-to-drum clearance to .024" (.60 mm). Bleed system and
check for leaks.
1999 Toyota RAV4
1999-2000 BRAKES Disc & Drum - Trucks & Vans
Microsoft
Sunday, November 22, 2009 10:07:28 AMPage 21 © 2005 Mitchell Repair Information Company, LLC.