TOYOTA RAV4 1996 Service Repair Manual
Manufacturer: TOYOTA, Model Year: 1996, Model line: RAV4, Model: TOYOTA RAV4 1996Pages: 1632, PDF Size: 41.64 MB
Page 461 of 1632
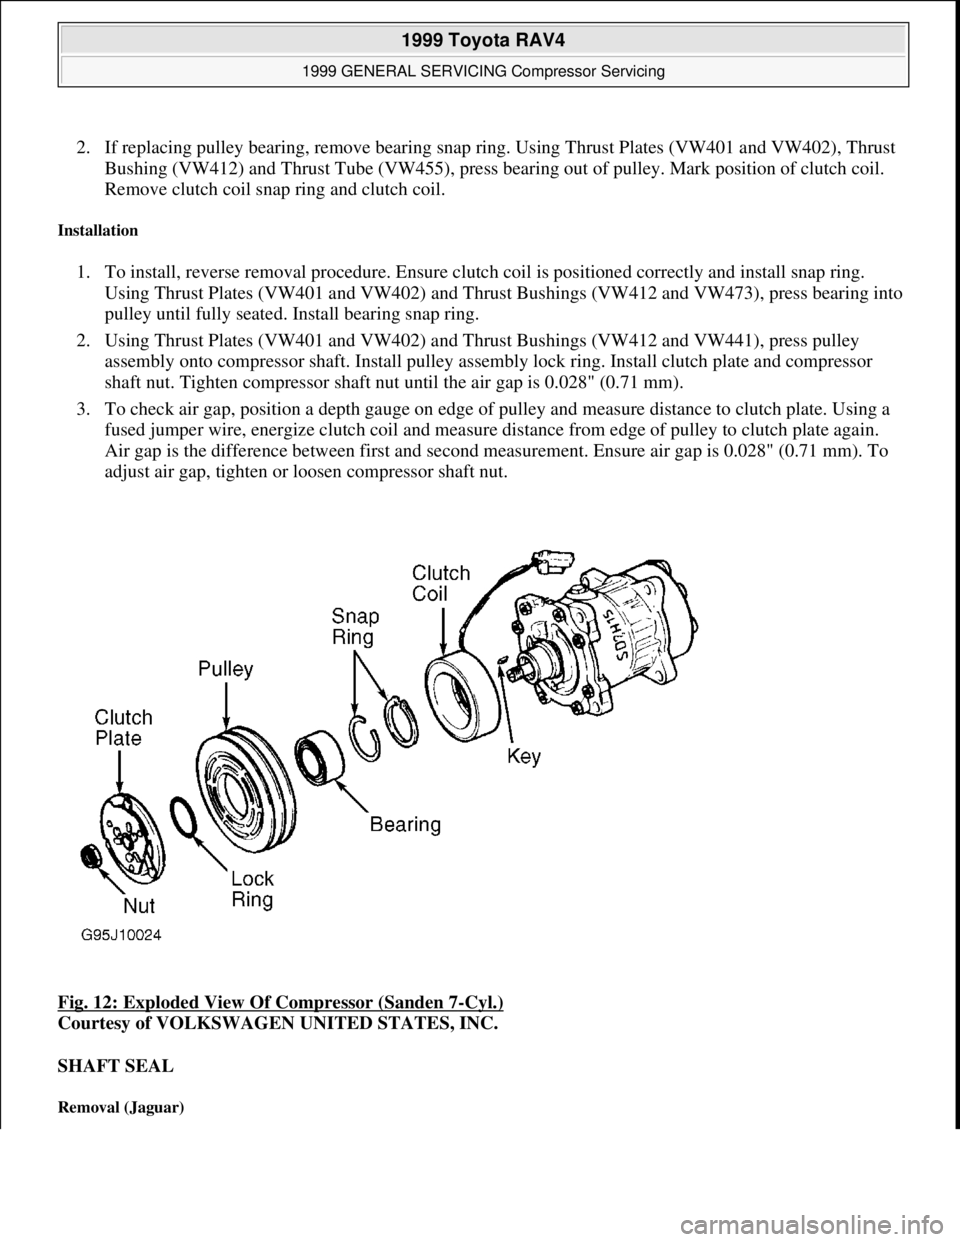
2. If replacing pulley bearing, remove bearing snap ring. Using Thrust Plates (VW401 and VW402), Thrust
Bushing (VW412) and Thrust Tube (VW455), press bearing out of pulley. Mark position of clutch coil.
Remove clutch coil snap ring and clutch coil.
Installation
1. To install, reverse removal procedure. Ensure clutch coil is positioned correctly and install snap ring.
Using Thrust Plates (VW401 and VW402) and Thrust Bushings (VW412 and VW473), press bearing into
pulley until fully seated. Install bearing snap ring.
2. Using Thrust Plates (VW401 and VW402) and Thrust Bushings (VW412 and VW441), press pulley
assembly onto compressor shaft. Install pulley assembly lock ring. Install clutch plate and compressor
shaft nut. Tighten compressor shaft nut until the air gap is 0.028" (0.71 mm).
3. To check air gap, position a depth gauge on edge of pulley and measure distance to clutch plate. Using a
fused jumper wire, energize clutch coil and measure distance from edge of pulley to clutch plate again.
Air gap is the difference between first and second measurement. Ensure air gap is 0.028" (0.71 mm). To
adjust air gap, tighten or loosen compressor shaft nut.
Fig. 12: Exploded View Of Compressor (Sanden 7
-Cyl.)
Courtesy of VOLKSWAGEN UNITED STATES, INC.
SHAFT SEAL
Removal (Jaguar)
1999 Toyota RAV4
1999 GENERAL SERVICING Compressor Servicing
Microsoft
Sunday, November 22, 2009 10:31:50 AMPage 24 © 2005 Mitchell Repair Information Company, LLC.
Page 462 of 1632
1. Using 3 bolts, attach Puller (JD166-1) to clutch plate. While holding clutch plate with puller, remove
shaft nut. Install puller bolt in center of puller, and tighten bolt to remove clutch plate.
2. Remove Woodruff key, felt seal, and seal seat snap ring. Engage Seal Seat Remover/Installer (JD167) to
seal seat, and remove seal seat. Engage Seal Remover/Installer (JD168) to shaft seal, and remove shaft
seal.
Installation
Lubricate shaft seal protector and shaft seal with refrigerant oil. Using seal remover/installer, install shaft seal.
Lubricate seal seat "O" ring with refrigerant oil, and install seal seat. To complete installation, reverse removal
procedure.
CLUTCH COIL
Removal (Suzuki)
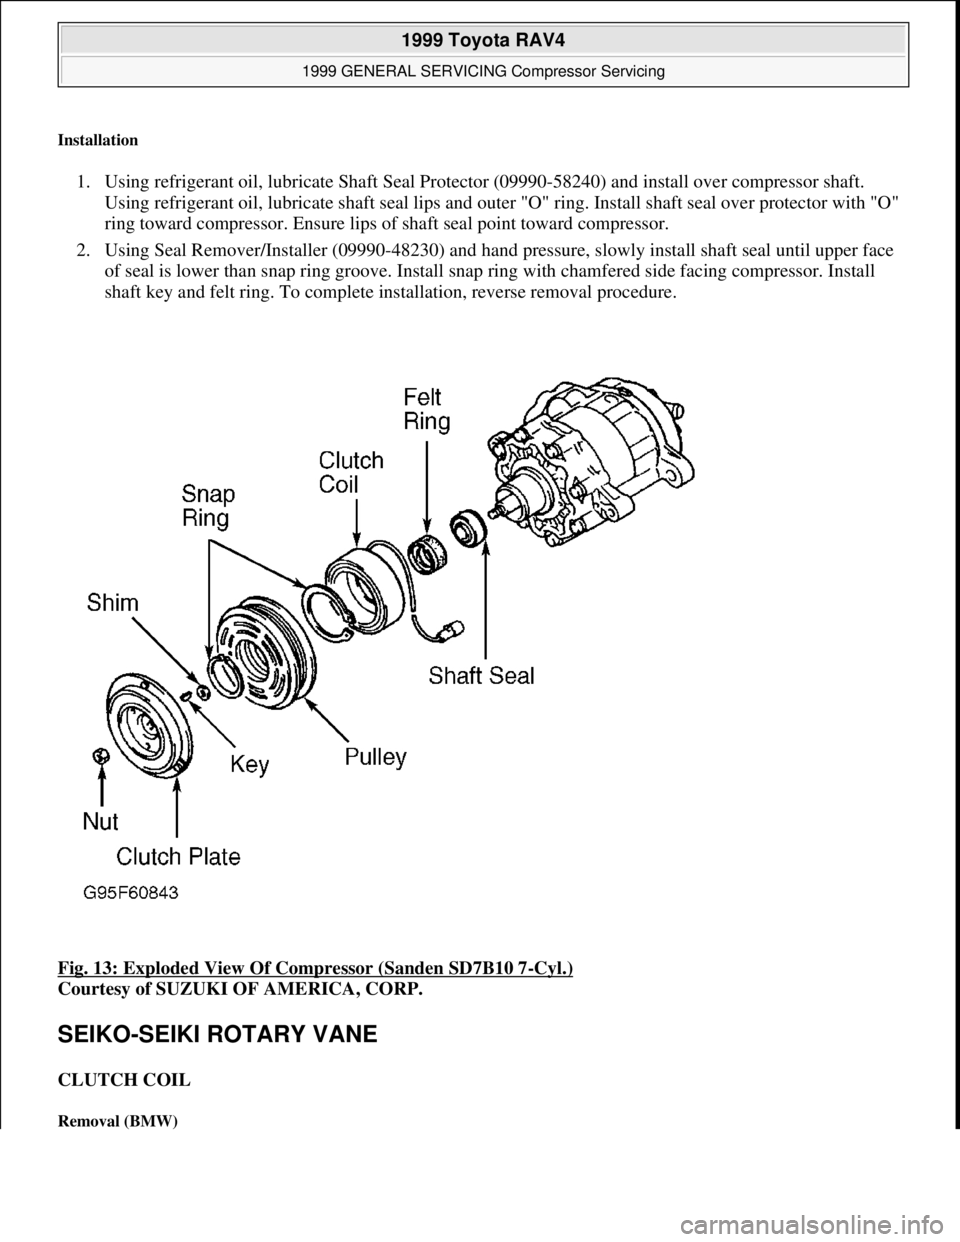
1. Remove compressor shaft nut and discard, while holding clutch plate with Clutch Holder (09920-55810).
Remove clutch plate using Clutch Plate Remover (09930-35210). Remove shaft key and shim(s). See Fi
g.
13 .
2. Remove pulley snap ring. Install a 2-jaw puller to outer diameter of pulley and Shaft Protector (09951-
65510) to compressor boss, and remove pulley. DO NOT engage puller on belt area. Hold puller in place
and tighten screw to remove pulley. Disconnect clutch coil lead from compressor housing. Remove clutch
coil snap ring and clutch coil.
Installation
1. To install, reverse removal procedure. Align lug on clutch coil with hole in front housing of compressor.
Install snap ring with chamfered side facing out. Position pulley squarely over coil. Ensure compressor
boss and inside area of pulley bearing are clean and free of foreign material. Using Pulley Installer
(09951-15510), press pulley onto compressor boss. Install pulley snap ring.
2. Install shim(s) and shaft key. Install clutch plate using a plastic hammer and a tube with an inside
diameter more than 0.34" (8.5 mm) and an outside diameter less than 0.75" (19 mm). Using feeler gauge,
ensure air gap between clutch plate and pulley is 0.014-0.025" (0.35-0.65 mm). If air gap is incorrect, add
or remove shim(s) as necessary. Connect clutch coil lead to compressor housing. Hold clutch plate and
tighten compressor shaft nut to 13 ft. lbs. (18 N.m).
SHAFT SEAL
Removal (Suzuki)
Remove clutch plate, pulley and clutch coil. See CLUTCH COIL . Remove felt ring, shaft key and shaft seal
snap ring. See Fig. 13
. Insert Seal Remover/Installer (09990-48230) into seal seat and twist remover to engage
seal. Pull up on remover/installer and remove seal. NOTE: On Volkswagen, shaft seal removal and installation procedure is not available
from manufacturer.
1999 Toyota RAV4
1999 GENERAL SERVICING Compressor Servicing
Microsoft
Sunday, November 22, 2009 10:31:50 AMPage 25 © 2005 Mitchell Repair Information Company, LLC.
Page 463 of 1632
Installation
1. Using refrigerant oil, lubricate Shaft Seal Protector (09990-58240) and install over compressor shaft.
Using refrigerant oil, lubricate shaft seal lips and outer "O" ring. Install shaft seal over protector with "O"
ring toward compressor. Ensure lips of shaft seal point toward compressor.
2. Using Seal Remover/Installer (09990-48230) and hand pressure, slowly install shaft seal until upper face
of seal is lower than snap ring groove. Install snap ring with chamfered side facing compressor. Install
shaft key and felt ring. To complete installation, reverse removal procedure.
Fig. 13: Exploded View Of Compressor (Sanden SD7B10 7
-Cyl.)
Courtesy of SUZUKI OF AMERICA, CORP.
SEIKO-SEIKI ROTARY VANE
CLUTCH COIL
Removal (BMW)
1999 Toyota RAV4
1999 GENERAL SERVICING Compressor Servicing
Microsoft
Sunday, November 22, 2009 10:31:50 AMPage 26 © 2005 Mitchell Repair Information Company, LLC.
Page 464 of 1632
Using Clutch Plate Holder (64-5-020), hold clutch plate stationary and remove compressor shaft bolt. Remove
clutch plate and shims. Remove pulley snap ring. Using a 3-jaw puller attached between clutch coil and pulley,
remove pulley. Disconnect clutch coil wiring harness. Remove snap ring and clutch coil.
Installation
Install clutch coil with wire facing downward. Use new snap ring. Ensure snap ring is installed with beveled
side facing out and fully seated in snap ring groove. Install pulley using Pulley Driver (33-1-020) and plastic
hammer. Install shims and clutch plate and shaft bolt. Ensure air gap between clutch plate and pulley is 0.020-
0.031" (0.50-0.80 mm). If air gap is incorrect, add or remove shim(s) as necessary.
Removal (Suzuki)
1. Remove compressor shaft bolt and washer, while holding clutch plate with Clutch Holder (09991-06020).
Remove clutch plate using Clutch Plate Remover (09991-06030). Remove shim(s) and felt ring. See Fig.
14 .
2. Remove pulley snap ring. Install a 2-jaw puller to outer diameter of pulley and remove pulley. DO NOT
engage puller on belt area. Hold puller in place and tighten screw to remove pulley. Disconnect clutch
coil lead from compressor housing. Remove clutch coil snap ring and clutch coil.
Installation
1. To install, reverse removal procedure. Align lug on clutch coil with hole in front housing of compressor.
Install snap ring with chamfered side facing out. Connect clutch coil lead to compressor housing. Install
felt ring and shim(s). See Fig. 14
.
2. Position pulley squarely over coil. Ensure compressor boss and inside area of pulley bearing are clean and
free of foreign material. Using Pulley Installer (09991-06010), press pulley onto compressor boss. Install
pulley snap ring.
3. Install clutch plate. Using feeler gauge, ensure air gap between clutch plate and pulley is 0.012-
0.020" (0.30-0.50 mm). If air gap is incorrect, add or remove shim(s) as necessary. Hold clutch plate and
tighten NEW compressor shaft bolt to 10 ft. lbs. (13 N.m).
1999 Toyota RAV4
1999 GENERAL SERVICING Compressor Servicing
Microsoft
Sunday, November 22, 2009 10:31:50 AMPage 27 © 2005 Mitchell Repair Information Company, LLC.
Page 465 of 1632
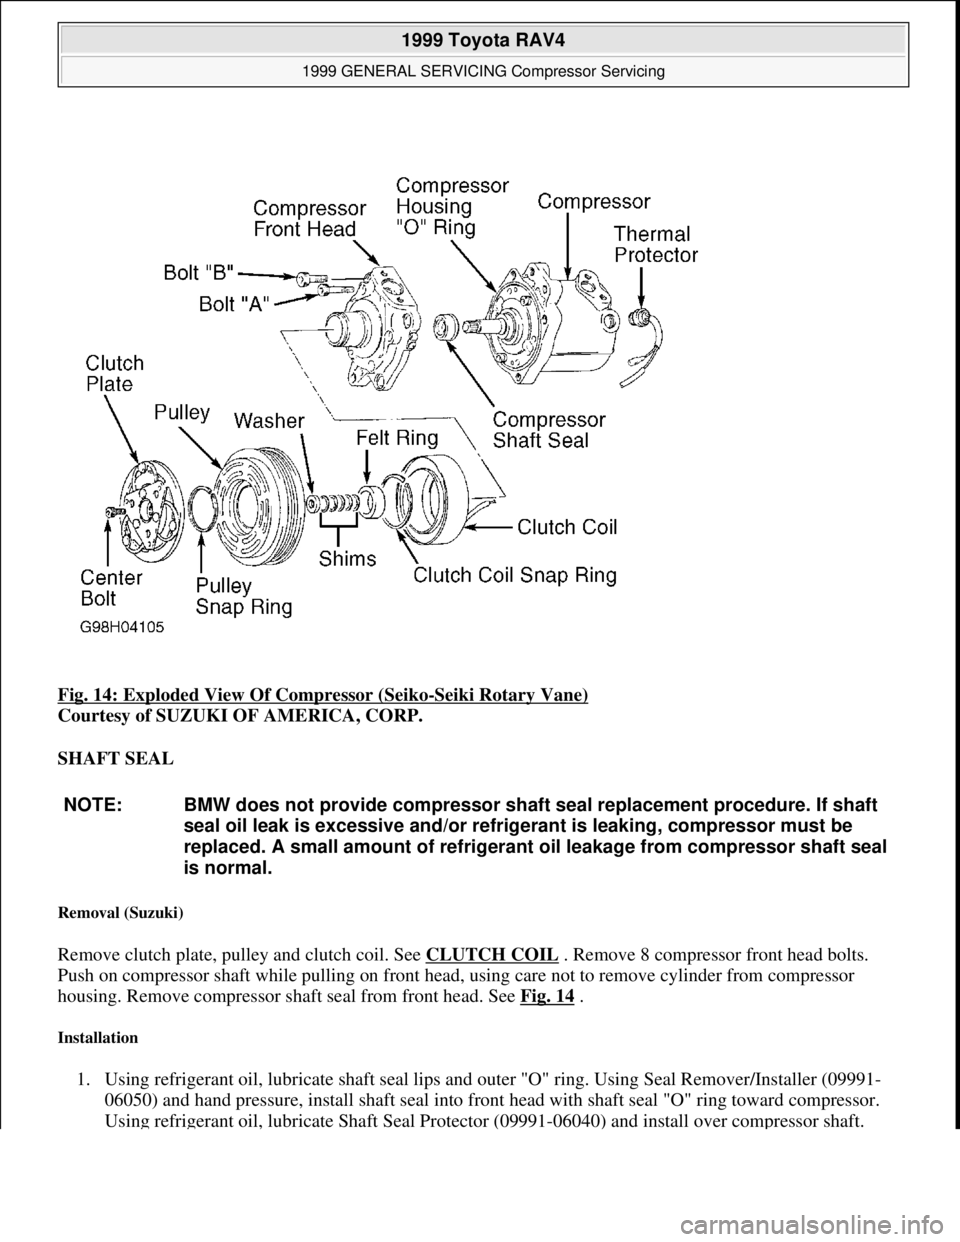
Fig. 14: Exploded View Of Compressor (Seiko-Seiki Rotary Vane)
Courtesy of SUZUKI OF AMERICA, CORP.
SHAFT SEAL
Removal (Suzuki)
Remove clutch plate, pulley and clutch coil. See CLUTCH COIL . Remove 8 compressor front head bolts.
Push on compressor shaft while pulling on front head, using care not to remove cylinder from compressor
housing. Remove compressor shaft seal from front head. See Fig. 14
.
Installation
1. Using refrigerant oil, lubricate shaft seal lips and outer "O" ring. Using Seal Remover/Installer (09991-
06050) and hand pressure, install shaft seal into front head with shaft seal "O" ring toward compressor.
Usin
g refrigerant oil, lubricate Shaft Seal Protector (09991-06040) and install over compressor shaft.
NOTE: BMW does not provide compressor shaft seal replacement procedure. If shaft
seal oil leak is excessive and/or refrigerant is leaking, compressor must be
replaced. A small amount of refrigerant oil leakage from compressor shaft seal
is normal.
1999 Toyota RAV4
1999 GENERAL SERVICING Compressor Servicing
Microsoft
Sunday, November 22, 2009 10:31:50 AMPage 28 © 2005 Mitchell Repair Information Company, LLC.
Page 466 of 1632
2. Install compressor housing "O" ring to compressor housing. Align compressor front head with
compressor housing and install. Tighten front head bolts "A" first and then front head bolts "B" in a
crisscross pattern. See Fig. 14
. Tighten bolts "A" to 10 ft. lbs. (13 N.m) and bolts "B" to 17 ft. lbs. (23
N.m). Remove shaft seal protector. To complete installation, reverse removal procedure.
ZEXEL ROTARY VANE
CLUTCH COIL & BEARING
Removal (Honda, Isuzu & Kia)
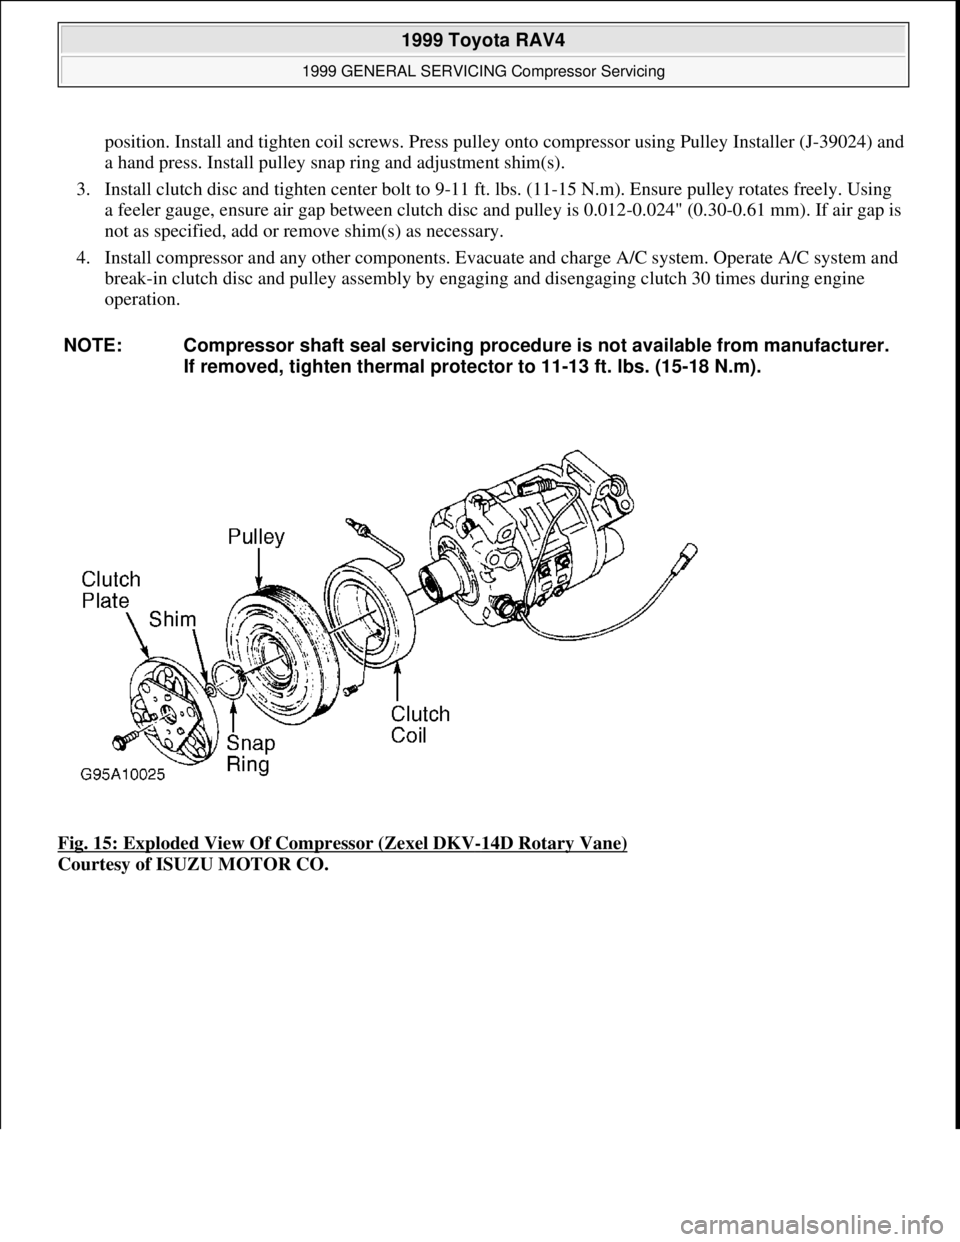
1. Using clutch disc/plate holder, remove clutch disc/plate bolt. Using puller and forcing screw, remove
clutch disc/plate. See Fig. 15
or Fig. 16 .
2. Remove shim(s) and snap ring. On DKV-14D compressor, use pulley puller pilot to protect compressor
shaft. On all models, use a puller to remove pulley. Remove screw for clutch coil lead. Remove 3 clutch
coil screws and clutch coil.
Installation
1. To install, reverse removal procedure. Align clutch coil pin with hole in front head of compressor and
install clutch coil. Tighten clutch coil screws to 44 INCH lbs. (5 N.m). Using pulley installer and drive
handle, tap pulley onto compressor. On all models, install new snap ring.
2. On DKV-14D compressor, tighten clutch plate bolt to 113 INCH lbs. (13 N.m) Using feeler gauge, ensure
air gap between clutch plate and pulley is 0.012-0.024" (0.30-0.60 mm). If air gap is incorrect, add or
remove shim(s) as necessary.
Removal (Nissan)
1. Hold clutch disc using clutch disc holder and remove center bolt. Using Clutch Disc Puller (J-38874),
remove clutch disc and adjustment shim(s).
2. Remove snap ring. Remove pulley using Pilot (J-39023) and universal 2-jaw puller. Position puller jaws
onto edge of pulley to prevent pulley groove from being deformed. Remove clutch coil lead, 3 clutch coil
retaining screws, and clutch coil. See Fig. 15
or Fig. 16 .
Installation
1. Ensure clutch disc and pulley contact surfaces are clean and free of excessive grooving and/or excessive
heat damage. Check clutch coil for loose connection or cracked insulation. Replace components as
necessary. Replace clutch disc and pulley assembly as a set.
2. Align pin in clutch coil with hole in front head of compressor. Ensure coil lead is installed in original NOTE: Subaru recommends replacing compressor as an assembly if there is a clutch
or compressor shaft seal failure.
NOTE: On Kia, shaft seal servicing procedure is not available from manufacturer.
1999 Toyota RAV4
1999 GENERAL SERVICING Compressor Servicing
Microsoft
Sunday, November 22, 2009 10:31:50 AMPage 29 © 2005 Mitchell Repair Information Company, LLC.
Page 467 of 1632
position. Install and tighten coil screws. Press pulley onto compressor using Pulley Installer (J-39024) and
a hand press. Install pulley snap ring and adjustment shim(s).
3. Install clutch disc and tighten center bolt to 9-11 ft. lbs. (11-15 N.m). Ensure pulley rotates freely. Using
a feeler gauge, ensure air gap between clutch disc and pulley is 0.012-0.024" (0.30-0.61 mm). If air gap is
not as specified, add or remove shim(s) as necessary.
4. Install compressor and any other components. Evacuate and charge A/C system. Operate A/C system and
break-in clutch disc and pulley assembly by engaging and disengaging clutch 30 times during engine
operation.
Fig. 15: Exploded View Of Compressor (Zexel DKV
-14D Rotary Vane)
Courtesy of ISUZU MOTOR CO. NOTE: Compressor shaft seal servicing procedure is not available from manufacturer.
If removed, tighten thermal protector to 11-13 ft. lbs. (15-18 N.m).
1999 Toyota RAV4
1999 GENERAL SERVICING Compressor Servicing
Microsoft
Sunday, November 22, 2009 10:31:50 AMPage 30 © 2005 Mitchell Repair Information Company, LLC.
Page 468 of 1632
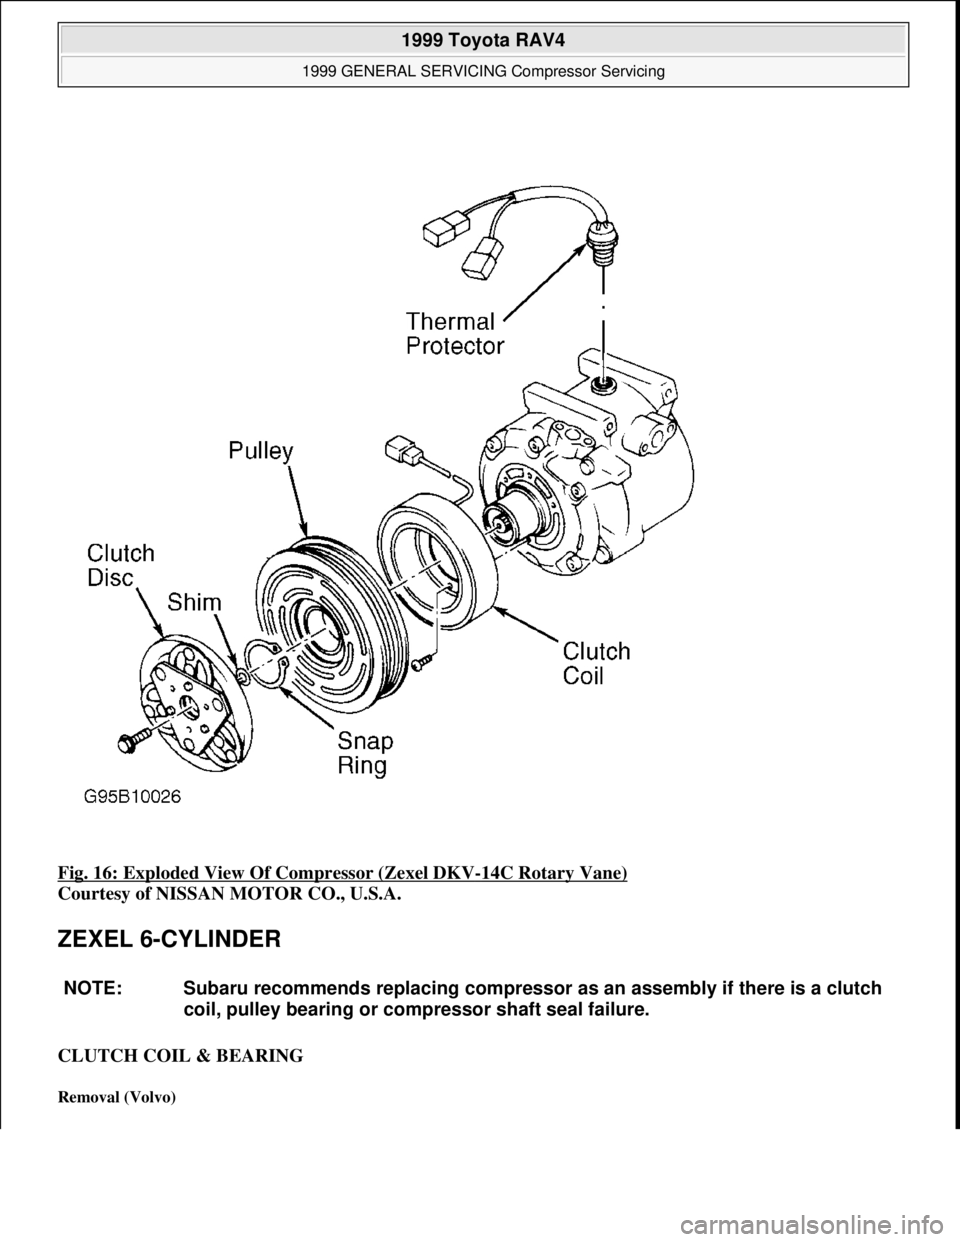
Fig. 16: Exploded View Of Compressor (Zexel DKV-14C Rotary Vane)
Courtesy of NISSAN MOTOR CO., U.S.A.
ZEXEL 6-CYLINDER
CLUTCH COIL & BEARING
Removal (Volvo)
NOTE: Subaru recommends replacing compressor as an assembly if there is a clutch
coil, pulley bearing or compressor shaft seal failure.
1999 Toyota RAV4
1999 GENERAL SERVICING Compressor Servicing
Microsoft
Sunday, November 22, 2009 10:31:50 AMPage 31 © 2005 Mitchell Repair Information Company, LLC.
Page 469 of 1632
1. Using Clutch Plate Holder (999-5596-5), hold clutch plate stationary and remove compressor shaft nut.
Remove clutch plate and shim(s) using Puller (999-5597-3). Keep shims in the order in which they were
removed. See Fig. 17
.
2. Remove pulley snap ring. Using Puller (999-5598-1) and Adapter (999-5599-3 or 999-5618-7), remove
pulley. Mark position of clutch coil for installation. Disconnect electrical lead. Remove clutch coil snap
ring and clutch coil, as necessary.
Installation
1. Install clutch coil and snap ring. Ensure clutch coil electrical lead is properly positioned on compressor
housing. Position pulley on compressor. Using Puller (999-5598-1) and Adapter (999-5519-5 or 999-
5600-5), press pulley onto compressor and install snap ring.
2. Install shims in reverse order of removal and clutch plate. Hold clutch plate stationary and tighten
compressor shaft nut to 11 ft. lbs. (15 N.m). Using a feeler gauge, ensure air gap between pulley and
clutch plate is 0.012-0.020" (0.30-0.50 mm). If air
gap is incorrect, add or remove shims as necessary.
1999 Toyota RAV4
1999 GENERAL SERVICING Compressor Servicing
Microsoft
Sunday, November 22, 2009 10:31:50 AMPage 32 © 2005 Mitchell Repair Information Company, LLC.
Page 470 of 1632
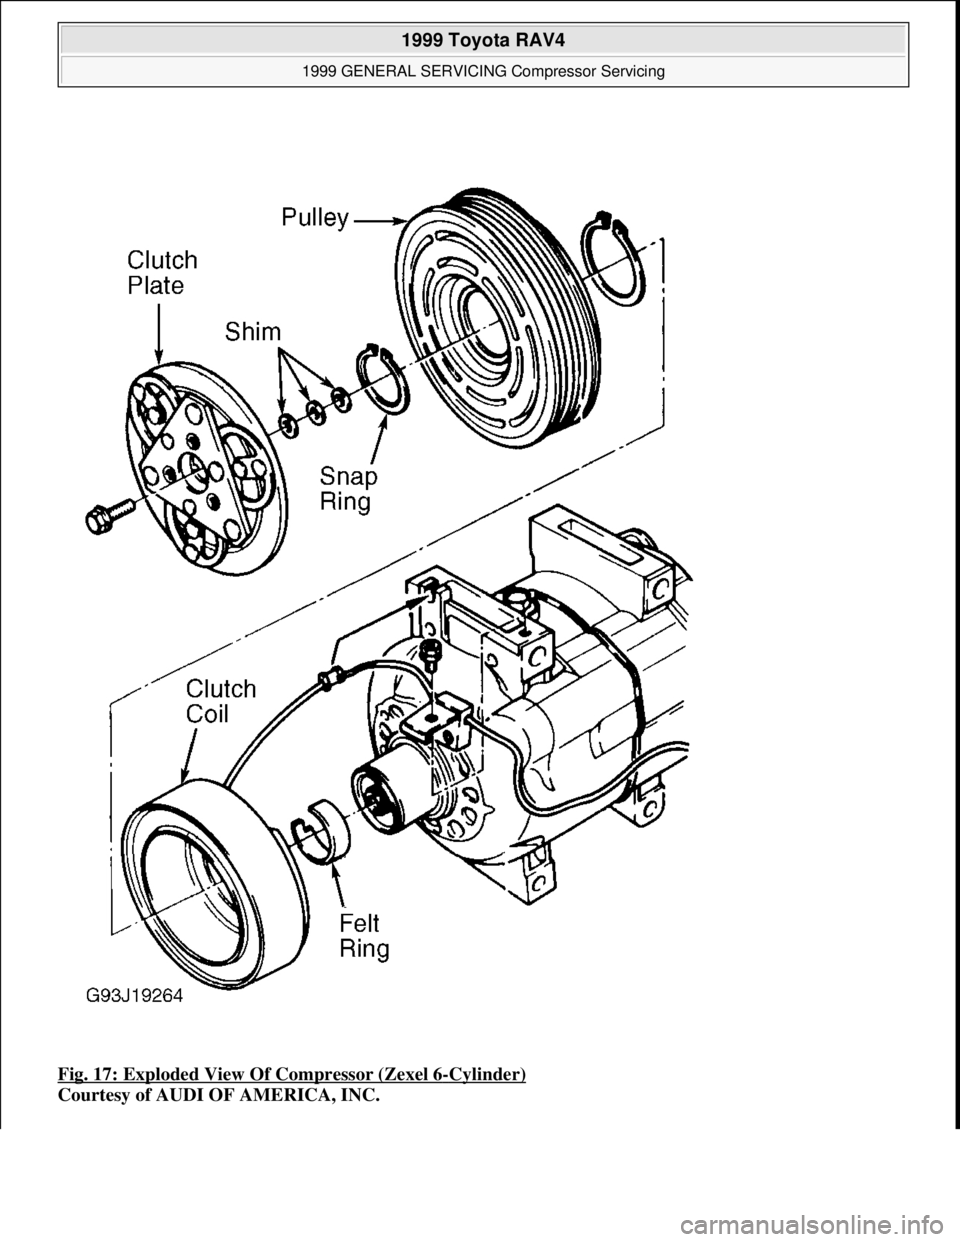
Fig. 17: Exploded View Of Compressor (Zexel 6-Cylinder)
Courtesy of AUDI OF AMERICA, INC.
1999 Toyota RAV4
1999 GENERAL SERVICING Compressor Servicing
Microsoft
Sunday, November 22, 2009 10:31:50 AMPage 33 © 2005 Mitchell Repair Information Company, LLC.