TOYOTA RAV4 1996 Service Repair Manual
Manufacturer: TOYOTA, Model Year: 1996,
Model line: RAV4,
Model: TOYOTA RAV4 1996
Pages: 1632, PDF Size: 41.64 MB
TOYOTA RAV4 1996 Service Repair Manual
RAV4 1996
TOYOTA
TOYOTA
https://www.carmanualsonline.info/img/14/57464/w960_57464-0.png
TOYOTA RAV4 1996 Service Repair Manual
Trending: rear view mirror, ABS, timing belt, parking sensors, oil dipstick, instrument panel, roof
Page 681 of 1632
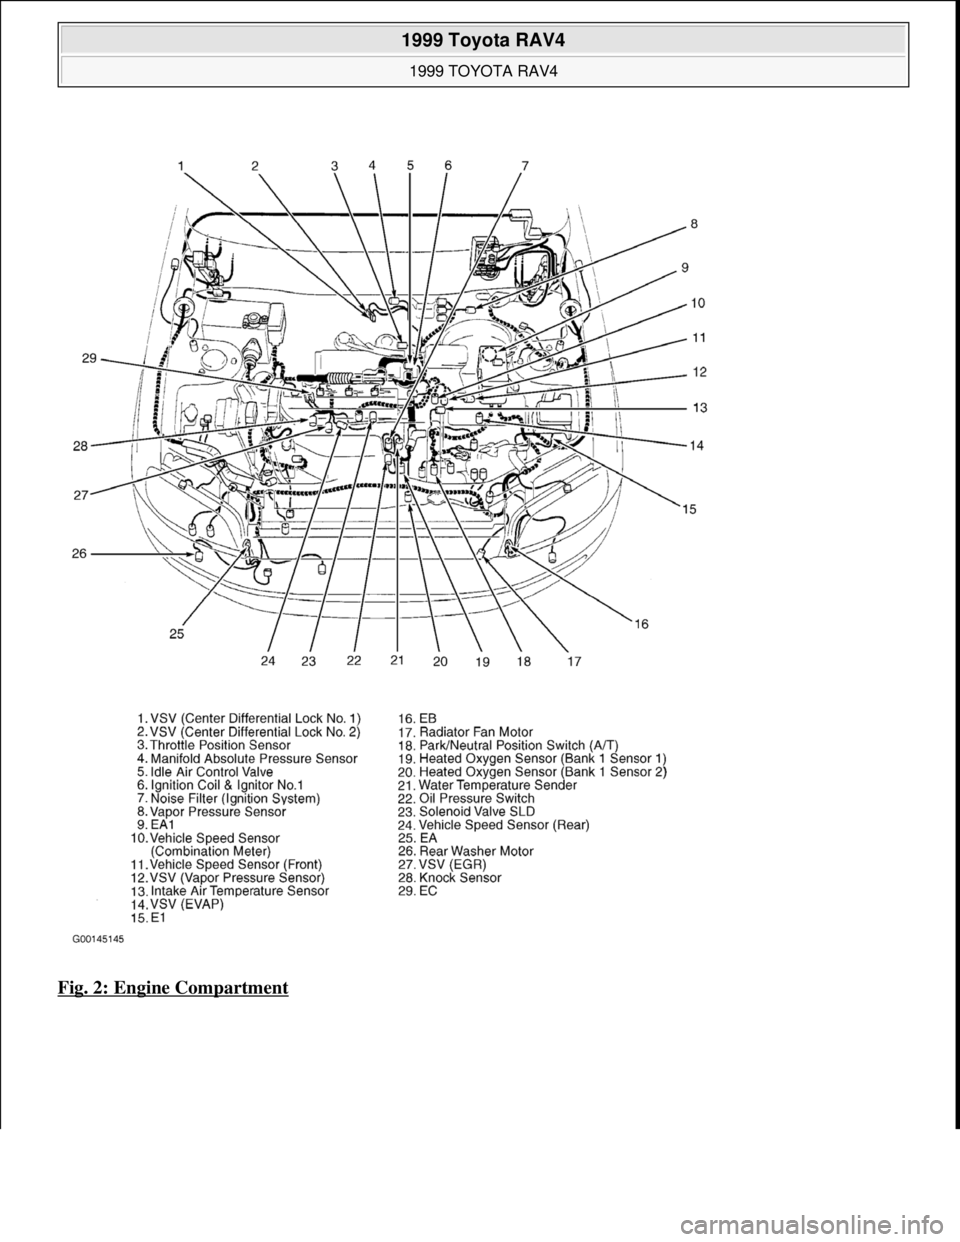
Fig. 2: Engine Compartment
1999 Toyota RAV4
1999 TOYOTA RAV4
Microsoft
Sunday, November 22, 2009 10:17:32 AMPage 8 © 2005 Mitchell Repair Information Company, LLC.
Page 682 of 1632
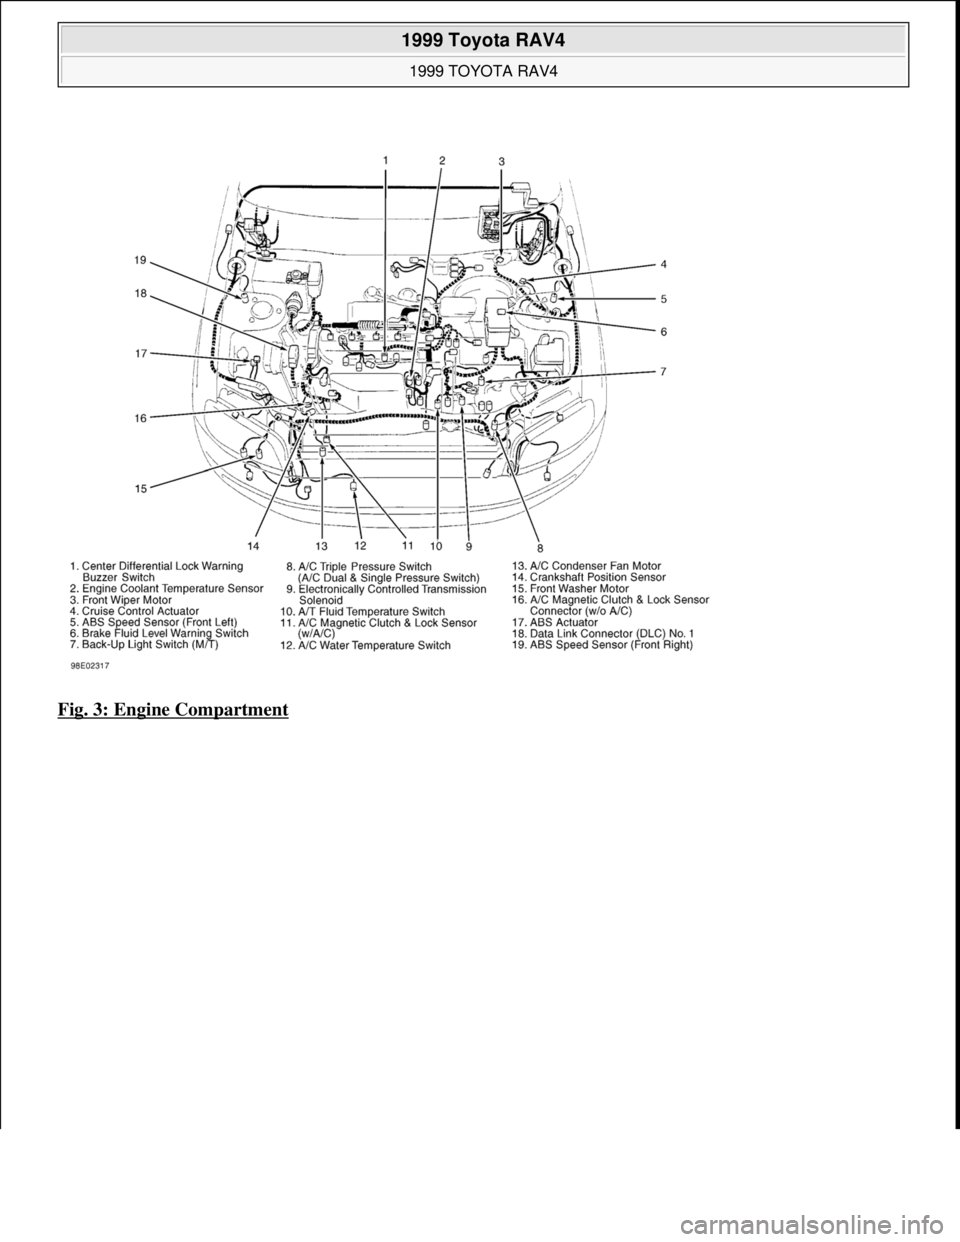
Fig. 3: Engine Compartment
1999 Toyota RAV4
1999 TOYOTA RAV4
Microsoft
Sunday, November 22, 2009 10:17:32 AMPage 9 © 2005 Mitchell Repair Information Company, LLC.
Page 683 of 1632
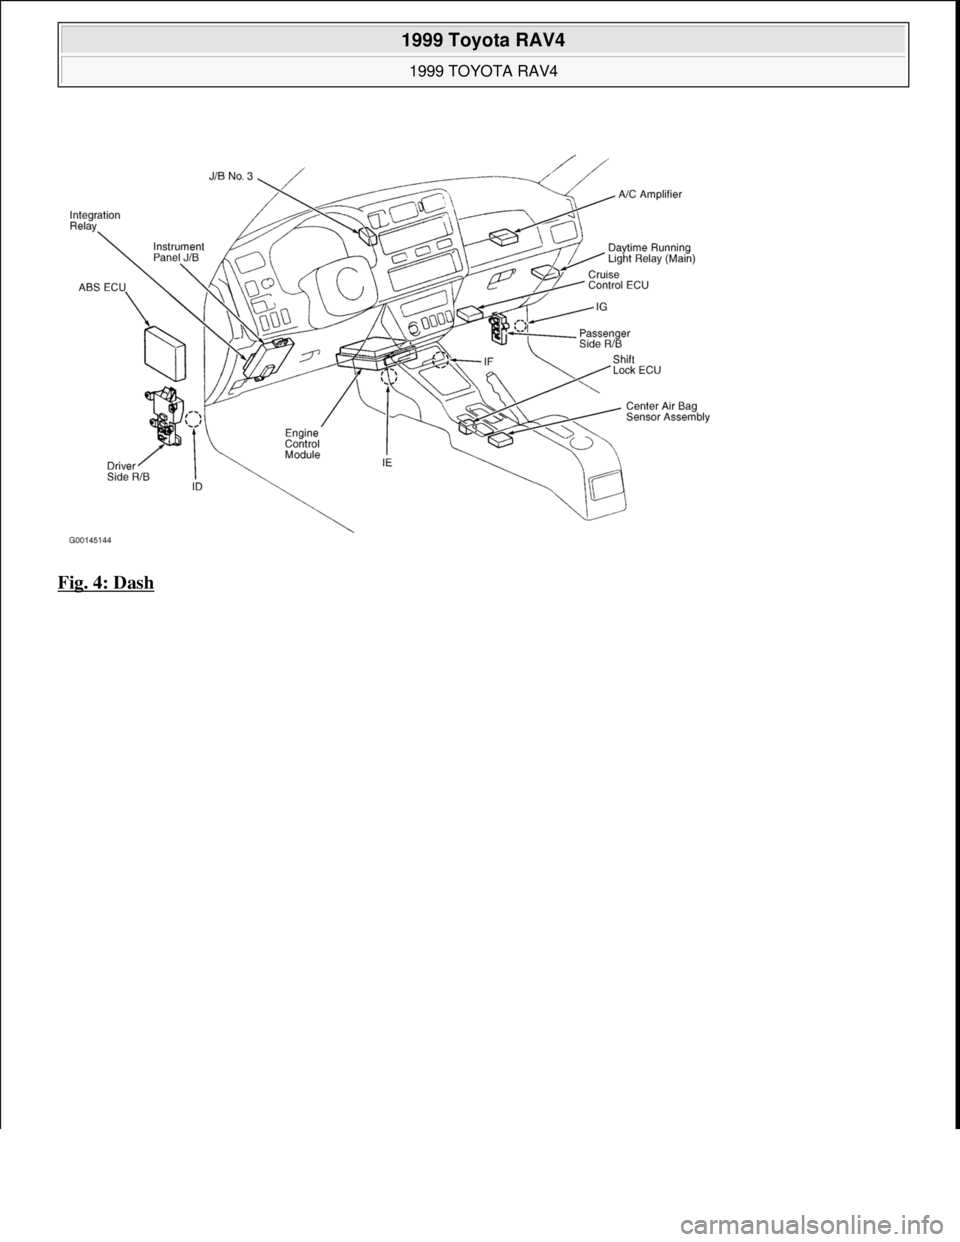
Fig. 4: Dash
1999 Toyota RAV4
1999 TOYOTA RAV4
Microsoft
Sunday, November 22, 2009 10:17:32 AMPage 10 © 2005 Mitchell Repair Information Company, LLC.
Page 684 of 1632
1999-2000 ENGINES
2.0L 4-Cylinder
ENGINE IDENTIFICATION
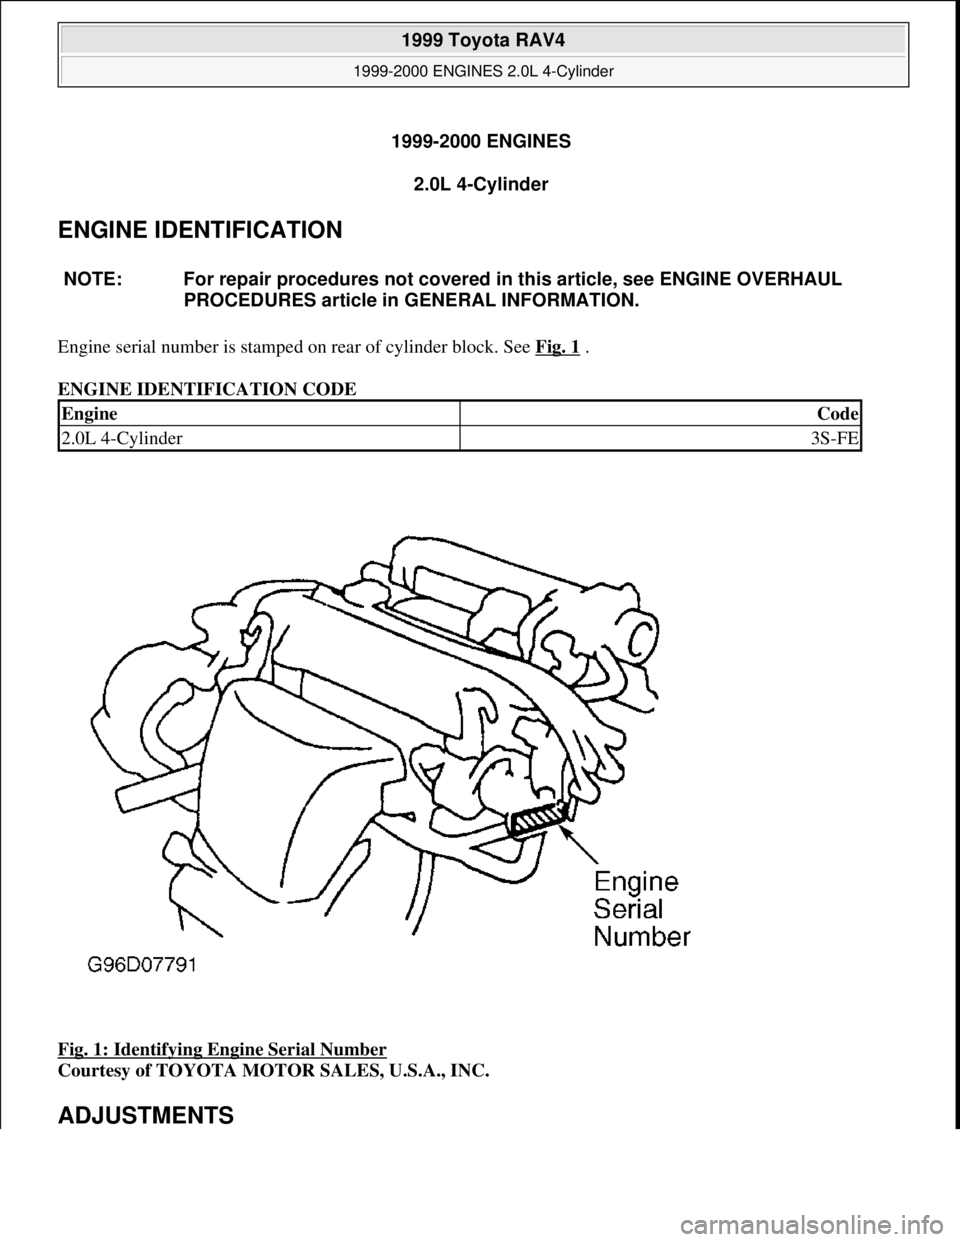
Engine serial number is stamped on rear of cylinder block. See Fig. 1 .
ENGINE IDENTIFICATION CODE
Fig. 1: Identifying Engine Serial Number
Courtesy of TOYOTA MOTOR SALES, U.S.A., INC.
ADJUSTMENTS
NOTE: For repair procedures not covered in this article, see ENGINE OVERHAUL
PROCEDURES article in GENERAL INFORMATION.
EngineCode
2.0L 4-Cylinder3S-FE
1999 Toyota RAV4
1999-2000 ENGINES 2.0L 4-Cylinder
1999 Toyota RAV4
1999-2000 ENGINES 2.0L 4-Cylinder
Microsoft
Sunday, November 22, 2009 10:22:26 AMPage 1 © 2005 Mitchell Repair Information Company, LLC.
Microsoft
Sunday, November 22, 2009 10:22:31 AMPage 1 © 2005 Mitchell Repair Information Company, LLC.
Page 685 of 1632
VALVE CLEARANCE ADJUSTMENT
1. Disconnect power steering fluid reservoir, PCV hoses, cable brackets and control cables for access to
valve cover. Disconnect spark plug wires from spark plugs.
2. Disconnect engine wiring harness protector at rear of timing belt cover for access to valve cover. When
disconnecting engine wiring harness protector, remove bolt on intake manifold side of engine first, and
then bolt on exhaust manifold side of engine.
3. Remove nuts, grommets, valve cover and gasket. Note location of grommets for reassembly reference, as
grommets must be installed in original location.
4. Rotate crankshaft clockwise, as viewed from timing belt end of engine, so cylinder No. 1 is at TDC on
compression stroke, and timing mark on crankshaft pulley aligns with "0" mark on timing belt cover.
Cylinder No. 1 is front cylinder at timing belt end of engine.
5. Ensure valve lifters are loose on cylinder No. 1 and tight on cylinder No. 4. If conditions are not as
described, rotate crankshaft clockwise one complete revolution (360 degrees).
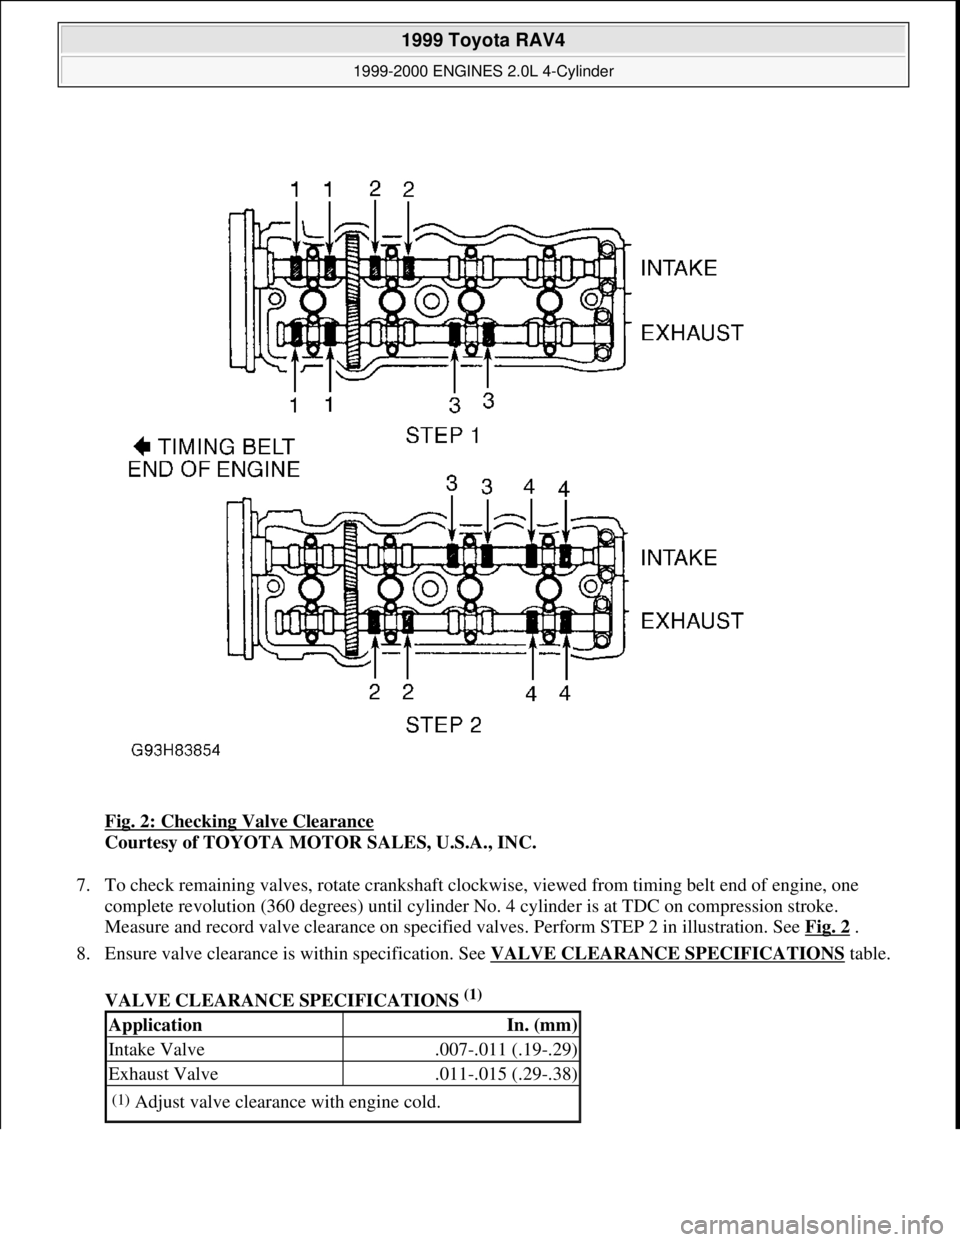
6. With cylinder No. 1 at TDC on compression stroke, check valve clearance on specified valves. Perform
STEP 1 in illustration. See Fig. 2
. Using feeler gauge, measure and record valve clearance between valve
lifter and camshaft. NOTE: Adjust valve clearance with engine cold.
1999 Toyota RAV4
1999-2000 ENGINES 2.0L 4-Cylinder
Microsoft
Sunday, November 22, 2009 10:22:26 AMPage 2 © 2005 Mitchell Repair Information Company, LLC.
Page 686 of 1632
Fig. 2: Checking Valve Clearance
Courtesy of TOYOTA MOTOR SALES, U.S.A., INC.
7. To check remaining valves, rotate crankshaft clockwise, viewed from timing belt end of engine, one
complete revolution (360 degrees) until cylinder No. 4 cylinder is at TDC on compression stroke.
Measure and record valve clearance on specified valves. Perform STEP 2 in illustration. See Fig. 2
.
8. Ensure valve clearance is within specification. See VALVE CLEARANCE SPECIFICATIONS
table.
VALVE CLEARANCE SPECIFICATIONS
(1)
ApplicationIn. (mm)
Intake Valve.007-.011 (.19-.29)
Exhaust Valve.011-.015 (.29-.38)
(1)Adjust valve clearance with engine cold.
1999 Toyota RAV4
1999-2000 ENGINES 2.0L 4-Cylinder
Microsoft
Sunday, November 22, 2009 10:22:26 AMPage 3 © 2005 Mitchell Repair Information Company, LLC.
Page 687 of 1632
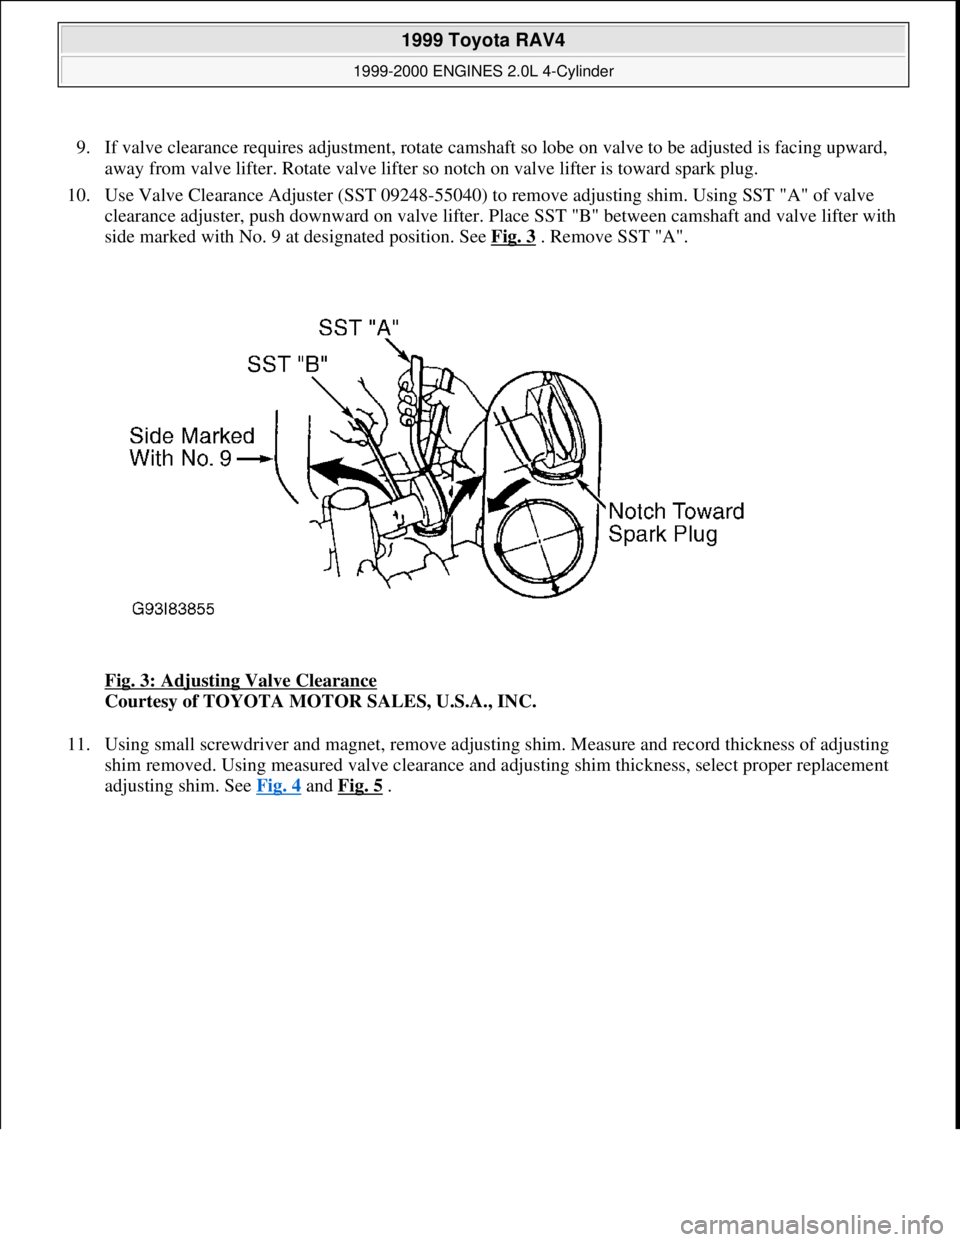
9. If valve clearance requires adjustment, rotate camshaft so lobe on valve to be adjusted is facing upward,
away from valve lifter. Rotate valve lifter so notch on valve lifter is toward spark plug.
10. Use Valve Clearance Adjuster (SST 09248-55040) to remove adjusting shim. Using SST "A" of valve
clearance adjuster, push downward on valve lifter. Place SST "B" between camshaft and valve lifter with
side marked with No. 9 at designated position. See Fig. 3
. Remove SST "A".
Fig. 3: Adjusting Valve Clearance
Courtesy of TOYOTA MOTOR SALES, U.S.A., INC.
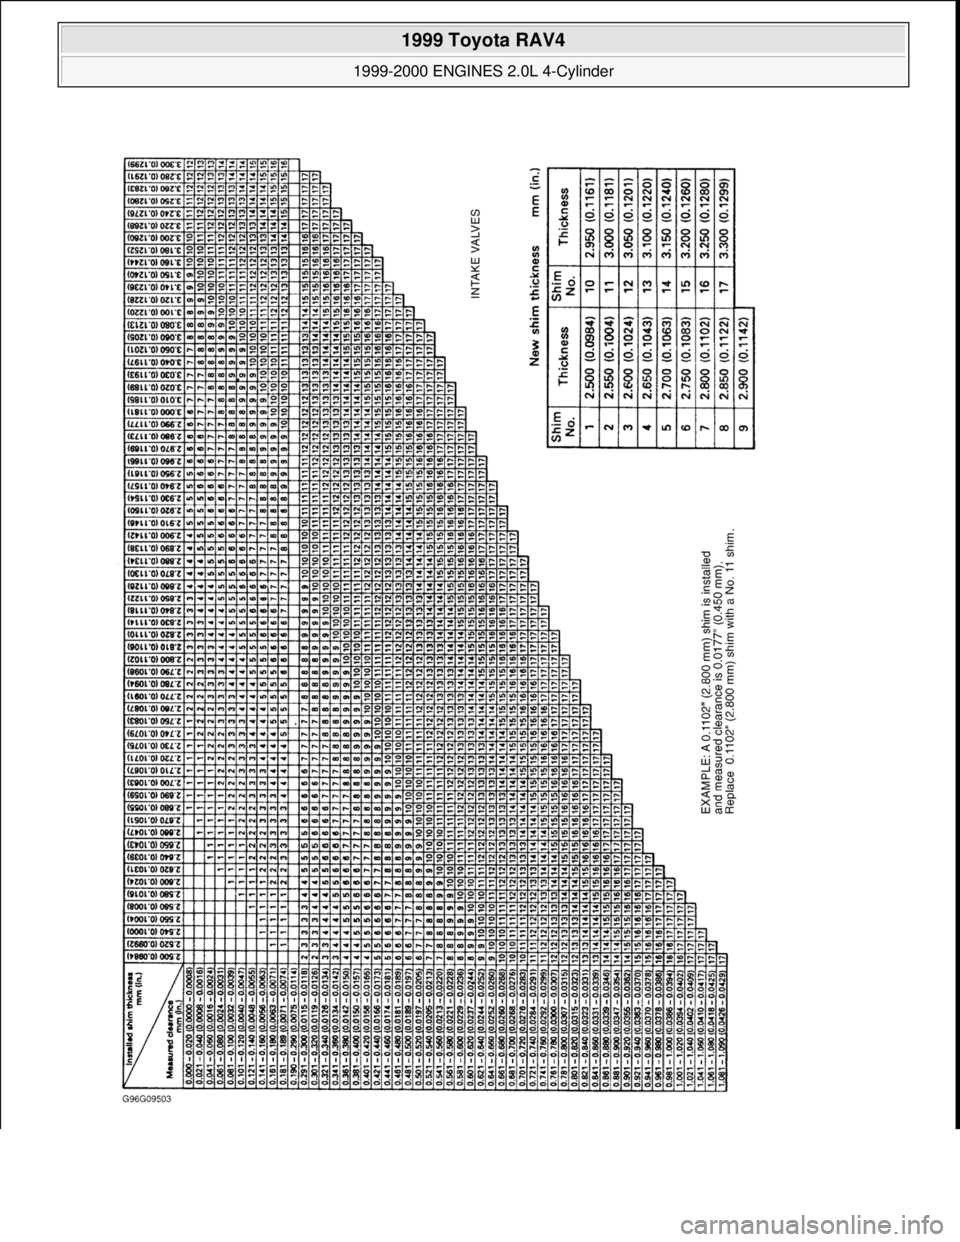
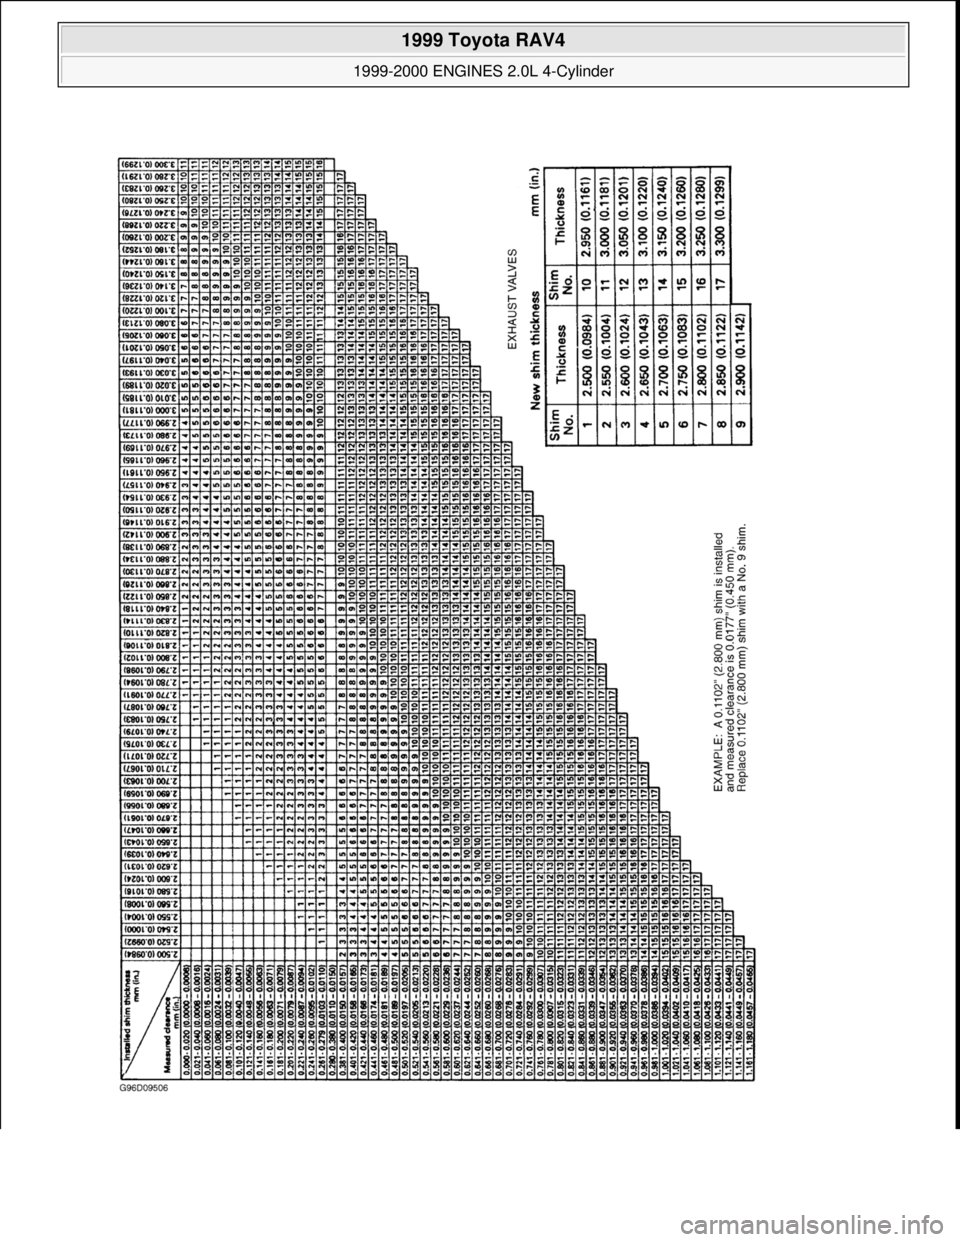
11. Using small screwdriver and magnet, remove adjusting shim. Measure and record thickness of adjusting
shim removed. Using measured valve clearance and adjusting shim thickness, select proper replacement
adjusting shim. See Fig. 4
and Fig. 5 .
1999 Toyota RAV4
1999-2000 ENGINES 2.0L 4-Cylinder
Microsoft
Sunday, November 22, 2009 10:22:26 AMPage 4 © 2005 Mitchell Repair Information Company, LLC.
Page 688 of 1632
1999 Toyota RAV4
1999-2000 ENGINES 2.0L 4-Cylinder
Microsoft
Sunday, November 22, 2009 10:22:26 AMPage 5 © 2005 Mitchell Repair Information Company, LLC.
Page 689 of 1632
Fig. 4: Intake Valve Adjusting Shim Selection Chart
Courtesy of TOYOTA MOTOR SALES, U.S.A., INC.
1999 Toyota RAV4
1999-2000 ENGINES 2.0L 4-Cylinder
Microsoft
Sunday, November 22, 2009 10:22:26 AMPage 6 © 2005 Mitchell Repair Information Company, LLC.
Page 690 of 1632
1999 Toyota RAV4
1999-2000 ENGINES 2.0L 4-Cylinder
Microsoft
Sunday, November 22, 2009 10:22:26 AMPage 7 © 2005 Mitchell Repair Information Company, LLC.
Trending: cam belt, turn signal, spark plugs, wheel, radiator, torque, timing belt
