TOYOTA RAV4 1996 Service Repair Manual
Manufacturer: TOYOTA, Model Year: 1996, Model line: RAV4, Model: TOYOTA RAV4 1996Pages: 1632, PDF Size: 41.64 MB
Page 651 of 1632
by prying up on front of plastic switch retaining plate and disconnect electrical harness connector. See
Fig. 24
and Fig. 25 . Remove door courtesy light and harness connector. Remove 3 screws and 4 clips.
Pry out to remove door panel.
2. Remove interior door handle screw and 2 cables. Remove door handle assembly. Remove service hole
cover and move door handle control cables and wiring harness through hole. Remove door molding at top
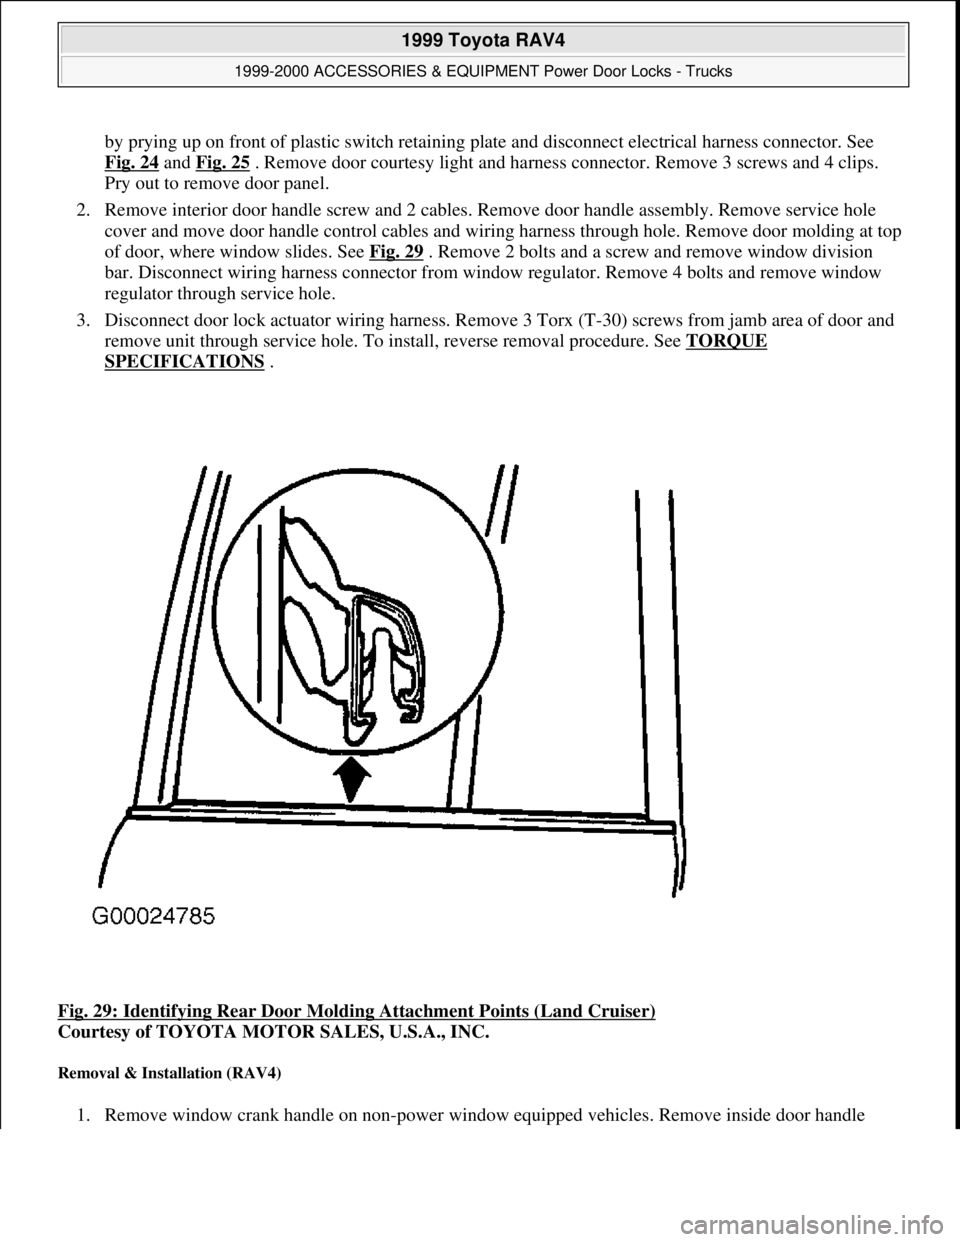
of door, where window slides. See Fig. 29
. Remove 2 bolts and a screw and remove window division
bar. Disconnect wiring harness connector from window regulator. Remove 4 bolts and remove window
regulator through service hole.
3. Disconnect door lock actuator wiring harness. Remove 3 Torx (T-30) screws from jamb area of door and
remove unit through service hole. To install, reverse removal procedure. See TORQUE
SPECIFICATIONS .
Fig. 29: Identifying Rear Door Molding Attachment Points (Land Cruiser)
Courtesy of TOYOTA MOTOR SALES, U.S.A., INC.
Removal & Installation (RAV4)
1. Remove window crank handle on non-power window equipped vehicles. Remove inside door handle
1999 Toyota RAV4
1999-2000 ACCESSORIES & EQUIPMENT Power Door Locks - Trucks
Microsoft
Sunday, November 22, 2009 10:53:11 AMPage 30 © 2005 Mitchell Repair Information Company, LLC.
Page 652 of 1632
bezel. Remove 2 screws from inside door pull. Pry interior door panel loose from door. Remove power
window switch if equipped.
2. Remove 2 screws, linkage rod and inside door handle assembly. Remove service hole cover. Remove
door molding at top of door, where window slides. Remove window track. Remove division bar. Remove
rear door quarter window and glass.
3. Remove electrical connector from window regulator (if equipped) and remove window regulator through
service hole. Remove door lock actuator linkage, 3 screws and remove door lock actuator through service
hole. To install reverse removal procedure. See TORQUE SPECIFICATIONS
.
Removal & Installation (Tundra)
1. Remove one screw and inside door handle bezel. Remove one screw and remove armrest. Pry door trim
away from door. Remove 4 screws and remove speaker. Remove inside door handle screw and slide door
handle forward and disconnect cable.
2. Remove service hole cover. Remove access door controller cables, links and clamps. Remove 3 access
door controller bolts and access door controller. Disconnect lower door lock harness connector. Remove 3
Torx screws (T-30) and remove lower door lock assembly.
3. To install reverse removal procedure. See TORQUE SPECIFICATIONS
.
Removal & Installation (4Runner)
1. Remove window crank handle on non-power window equipped vehicles. Remove interior door handle
screw and slide door handle forward. Disconnect door handle from link and remove door handle. Remove
door arm rest. Remove interior window control switch by prying up on front of plastic switch retaining
plate. Remove 2 clips and 2 screws and pry door trim away from door.
2. Remove service hole cover. Remove inner and outer weather strip from door. Remove division bar.
Remove quarter window glass with weatherstrip and glass channel. Disconnect harness connector.
Remove clip and pull down on locking knob. Disconnect linkage from door handle. Remove 3 door lock
mounting screws and remove door lock actuator assembly.
3. To install reverse removal procedure. See TORQUE SPECIFICATIONS
.
POWER DOOR LOCK ACTUATORS (LIFTGATE & BACK DOOR)
Removal & Installation (Land Cruiser)
1. Remove assist grip. Remove inside handle bezel. Remove back door garnish around rear window.
Remove rear wiper arm and grommet. Remove 2 bolts from rear wiper linkage assembly and remove 3
bolts from rear wiper motor assembly. Remove lower back door weather stripping. Remove 2 inside back
door handle mounting bolts and remove inside back door handle linkage rod and remove back door inside
handle.
2. Remove linkage and 3 mounting bolts from back door controller and lock actuator assembly. Remove
back door linkage and lock actuator assembly. To install, reverse removal procedure. See TORQUE
SPECIFICATIONS .
Removal & Installation (RAV4)
1999 Toyota RAV4
1999-2000 ACCESSORIES & EQUIPMENT Power Door Locks - Trucks
Microsoft
Sunday, November 22, 2009 10:53:11 AMPage 31 © 2005 Mitchell Repair Information Company, LLC.
Page 653 of 1632
Remove liftgate upper garnish. Remove liftgate inner door panel. Remove service hole cover. Remove 4 bolts
and spare tire bracket. Remove rear wiper arm. Remove rear wiper motor assembly. Remove 3 screws for rear
door lock, disconnect electrical connector and 2 linkage rods and remove rear door lock assembly. To install,
reverse removal procedure.
Removal & Installation (Sienna)
1. Remove liftgate assist grip. Remove liftgate pull strap. Remove liftgate center garnish around rear
window. Remove side garnish from liftgate. Remove liftgate inner door panel. Remove 2 screws and
remove high mounted stoplight. Remove rear wiper arm.
2. Remove 3 bolts from wiper motor and 2 bolts from wiper motor and linkage assembly. Remove rear
license plate light assembly. Remove liftgate key lock cylinder assembly. Remove linkage connectors,
harness connectors and 3 bolts and remove liftgate door lock actuator. To install, reverse removal
procedure.
TORQUE SPECIFICATIONS
TORQUE SPECIFICATIONS
Application & ComponentINCH Lbs. (N.m)
Land Cruiser
Door Lock Actuator44 (5.0)
Front Door Lock Cylinder44 (5.0)
Front Door Glass44 (5.0)
Window Regulators44 (5.0)
RAV4
Front Door Glass44 (5.0)
Door Lock Actuators48 (5.4)
Window Regulators44 (5.0)
Sienna
Front Door Glass48 (5.4)
Front Door Lock Actuator43 (4.9)
Window Regulators48 (5.4)
Rear Door Lock Actuator69 (7.8)
Rear Wiper Arm48 (5.4)
Tacoma
Window Regulator43 (4.9)
Door Lock Cylinder43 (4.9)
Tundra
Front Door Glass44 (5.0)
Outside Rear View Mirror71 (8.0)
Power Door Lock Actuator44 (5.0)
Power Window Regulator44 (5.0)
Lower Access Door Lock44 (5.0)
1999 Toyota RAV4
1999-2000 ACCESSORIES & EQUIPMENT Power Door Locks - Trucks
Microsoft
Sunday, November 22, 2009 10:53:11 AMPage 32 © 2005 Mitchell Repair Information Company, LLC.
Page 654 of 1632
WIRING DIAGRAMS
Upper Access Door Lock120 (13)
Access Door Controller120 (13)
4Runner
Front Door Glass43 (5.0)
Door Lock Actuators43 (5.0)
Window Regulators43 (5.0)
1999 Toyota RAV4
1999-2000 ACCESSORIES & EQUIPMENT Power Door Locks - Trucks
Microsoft
Sunday, November 22, 2009 10:53:11 AMPage 33 © 2005 Mitchell Repair Information Company, LLC.
Page 655 of 1632
1999 Toyota RAV4
1999-2000 ACCESSORIES & EQUIPMENT Power Door Locks - Trucks
Microsoft
Sunday, November 22, 2009 10:53:11 AMPage 34 © 2005 Mitchell Repair Information Company, LLC.
Page 656 of 1632
Fig. 30: Power Door Lock System Wiring Diagram (1999-2000 RAV4)
1999 Toyota RAV4
1999-2000 ACCESSORIES & EQUIPMENT Power Door Locks - Trucks
Microsoft
Sunday, November 22, 2009 10:53:11 AMPage 35 © 2005 Mitchell Repair Information Company, LLC.
Page 657 of 1632
1999 Toyota RAV4
1999-2000 ACCESSORIES & EQUIPMENT Power Door Locks - Trucks
Microsoft
Sunday, November 22, 2009 10:53:11 AMPage 36 © 2005 Mitchell Repair Information Company, LLC.
Page 658 of 1632
Fig. 31: Power Door Lock System Wiring Diagram (1999-2000 Sienna)
1999 Toyota RAV4
1999-2000 ACCESSORIES & EQUIPMENT Power Door Locks - Trucks
Microsoft
Sunday, November 22, 2009 10:53:11 AMPage 37 © 2005 Mitchell Repair Information Company, LLC.
Page 659 of 1632
1999 Toyota RAV4
1999-2000 ACCESSORIES & EQUIPMENT Power Door Locks - Trucks
Microsoft
Sunday, November 22, 2009 10:53:11 AMPage 38 © 2005 Mitchell Repair Information Company, LLC.
Page 660 of 1632
Fig. 32: Power Door Lock System Wiring Diagram (1999-2000 Tacoma)
1999 Toyota RAV4
1999-2000 ACCESSORIES & EQUIPMENT Power Door Locks - Trucks
Microsoft
Sunday, November 22, 2009 10:53:11 AMPage 39 © 2005 Mitchell Repair Information Company, LLC.