TOYOTA RAV4 1996 Service Repair Manual
Manufacturer: TOYOTA, Model Year: 1996, Model line: RAV4, Model: TOYOTA RAV4 1996Pages: 1632, PDF Size: 41.64 MB
Page 641 of 1632
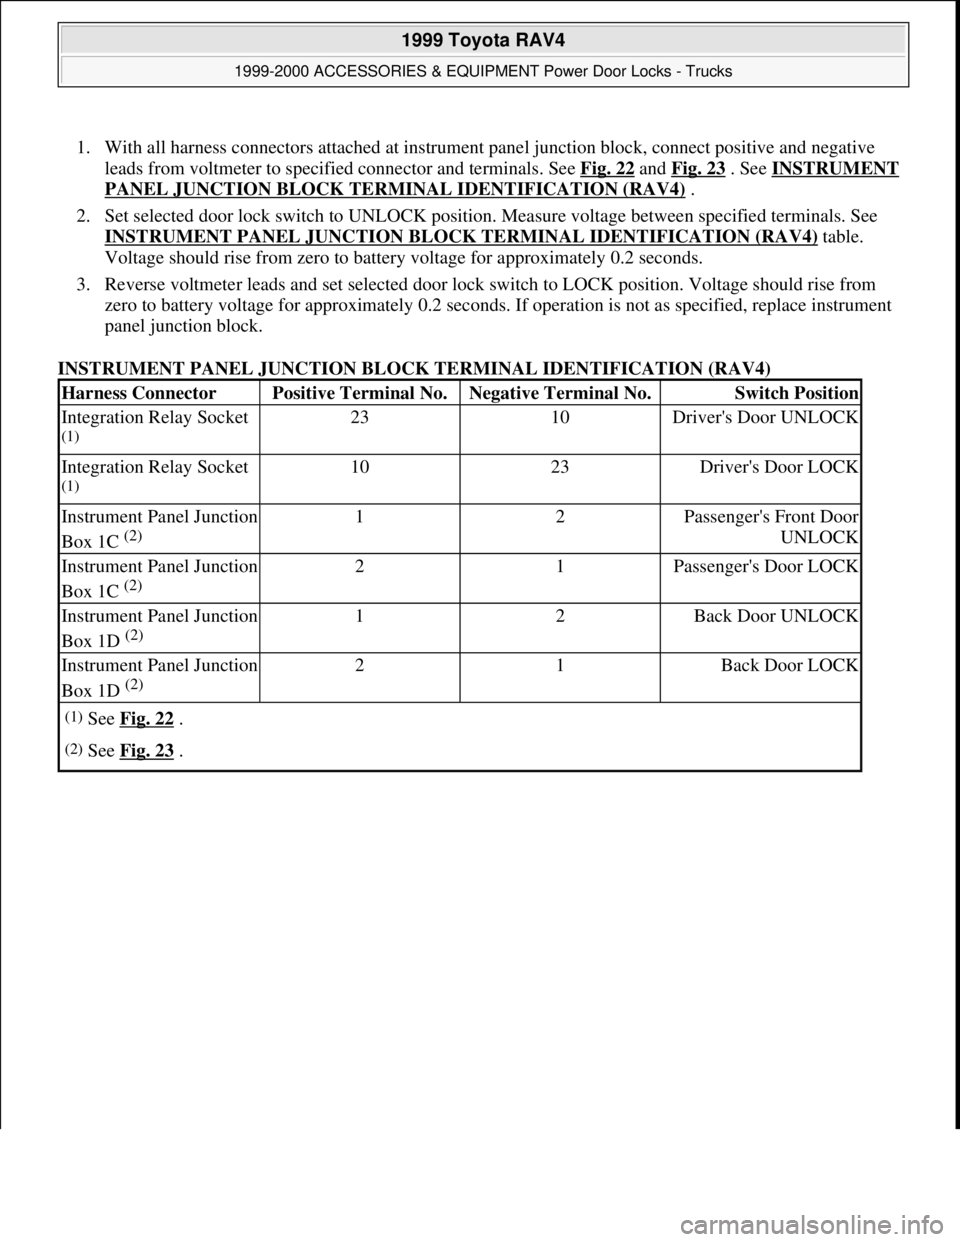
1. With all harness connectors attached at instrument panel junction block, connect positive and negative
leads from voltmeter to specified connector and terminals. See Fig. 22
and Fig. 23 . See INSTRUMENT
PANEL JUNCTION BLOCK TERMINAL IDENTIFICATION (RAV4) .
2. Set selected door lock switch to UNLOCK position. Measure voltage between specified terminals. See
INSTRUMENT PANEL JUNCTION BLOCK TERMINAL IDENTIFICATION (RAV4)
table.
Voltage should rise from zero to battery voltage for approximately 0.2 seconds.
3. Reverse voltmeter leads and set selected door lock switch to LOCK position. Voltage should rise from
zero to battery voltage for approximately 0.2 seconds. If operation is not as specified, replace instrument
panel junction block.
INSTRUMENT PANEL JUNCTION BLOCK TERMINAL IDENTIFICATION (RAV4)
Harness ConnectorPositive Terminal No.Negative Terminal No.Switch Position
Integration Relay Socket
(1)
2310Driver's Door UNLOCK
Integration Relay Socket
(1)
1023Driver's Door LOCK
Instrument Panel Junction
Box 1C
(2)
12Passenger's Front Door
UNLOCK
Instrument Panel Junction
Box 1C
(2)
21Passenger's Door LOCK
Instrument Panel Junction
Box 1D
(2)
12Back Door UNLOCK
Instrument Panel Junction
Box 1D
(2)
21Back Door LOCK
(1)See Fig. 22 .
(2)See Fig. 23 .
1999 Toyota RAV4
1999-2000 ACCESSORIES & EQUIPMENT Power Door Locks - Trucks
Microsoft
Sunday, November 22, 2009 10:53:11 AMPage 20 © 2005 Mitchell Repair Information Company, LLC.
Page 642 of 1632
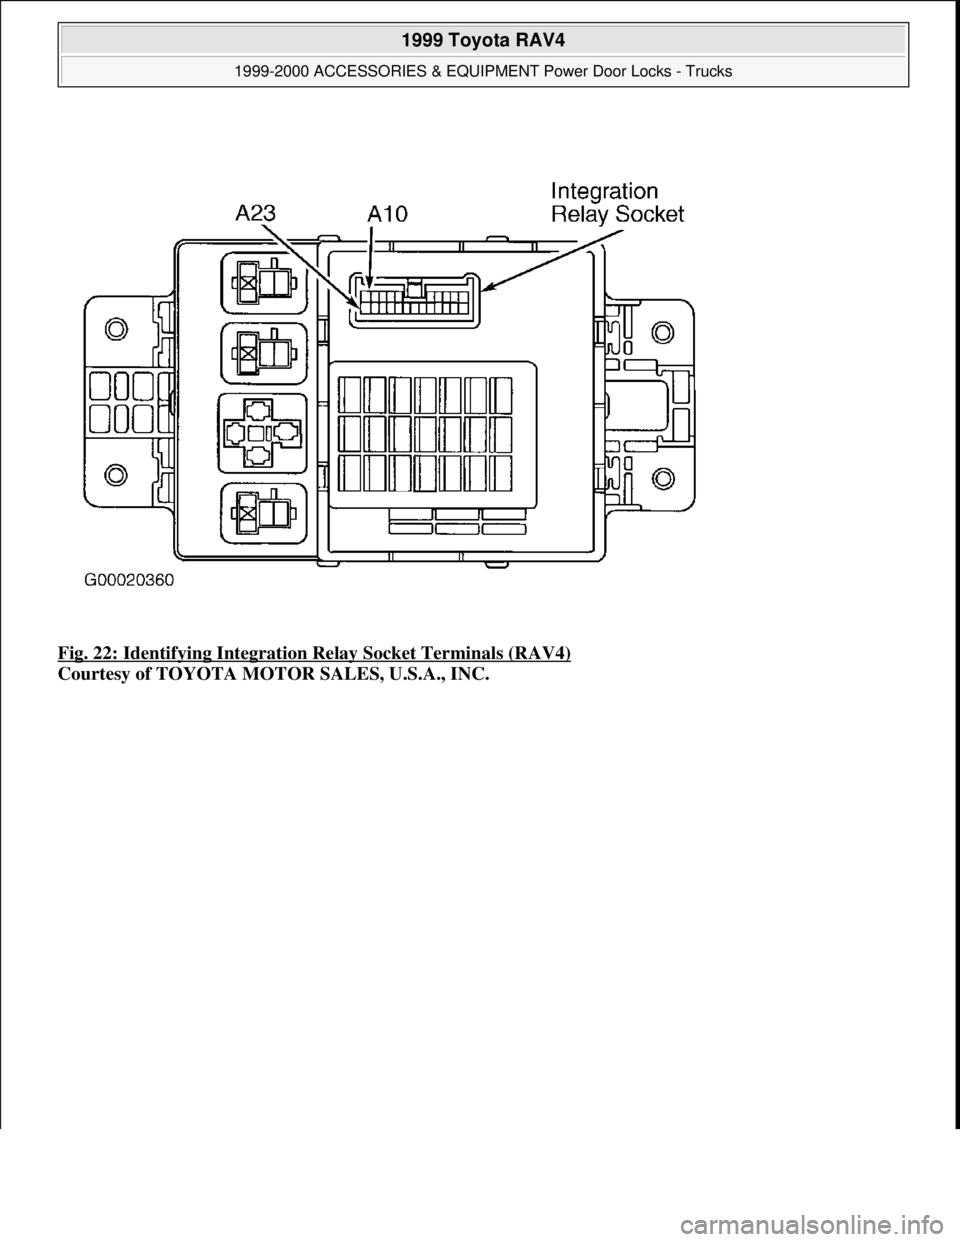
Fig. 22: Identifying Integration Relay Socket Terminals (RAV4)
Courtesy of TOYOTA MOTOR SALES, U.S.A., INC.
1999 Toyota RAV4
1999-2000 ACCESSORIES & EQUIPMENT Power Door Locks - Trucks
Microsoft
Sunday, November 22, 2009 10:53:11 AMPage 21 © 2005 Mitchell Repair Information Company, LLC.
Page 643 of 1632
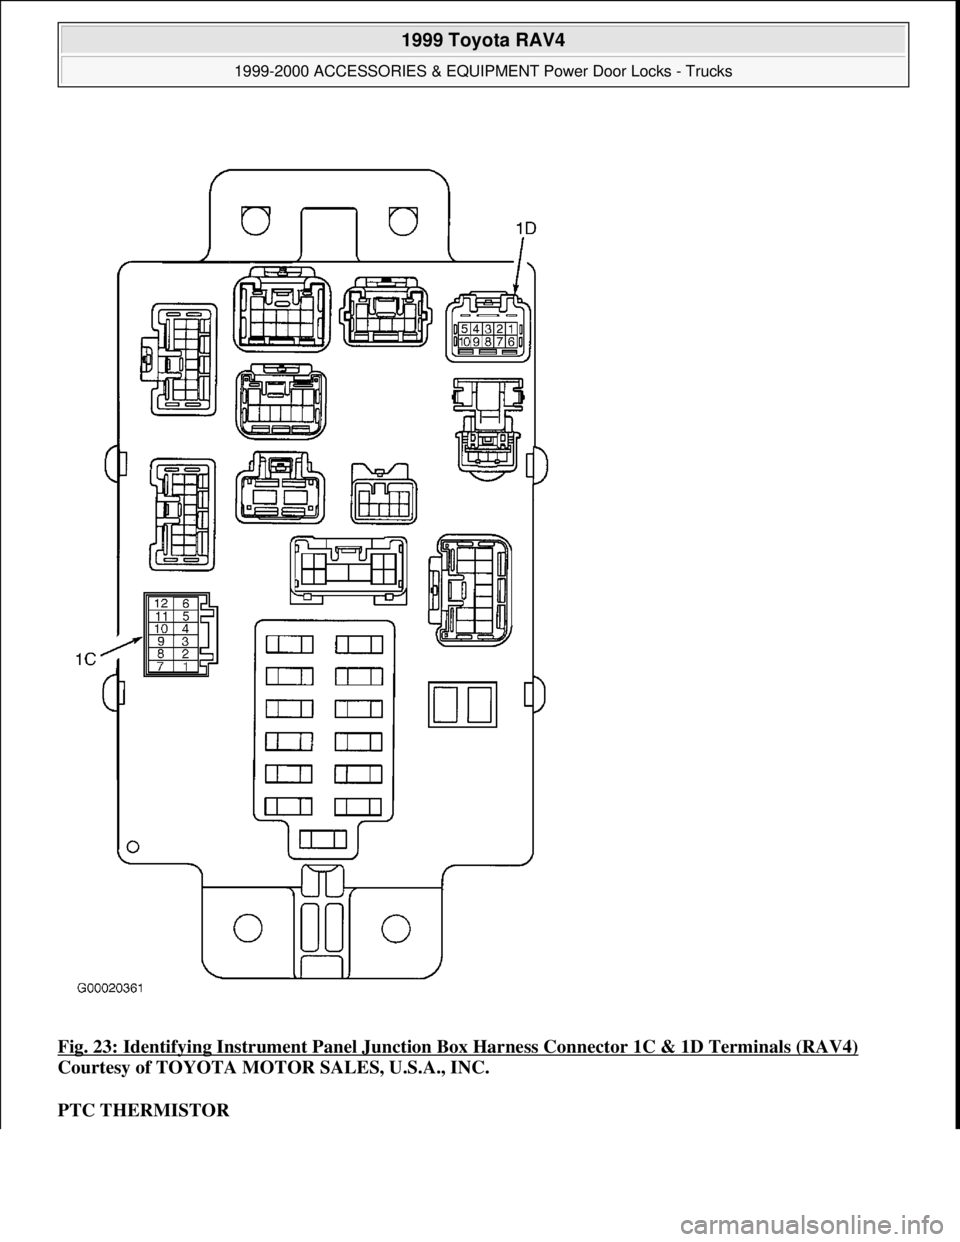
Fig. 23: Identifying Instrument Panel Junction Box Harness Connector 1C & 1D Terminals (RAV4)
Courtesy of TOYOTA MOTOR SALES, U.S.A., INC.
PTC THERMISTOR
1999 Toyota RAV4
1999-2000 ACCESSORIES & EQUIPMENT Power Door Locks - Trucks
Microsoft
Sunday, November 22, 2009 10:53:11 AMPage 22 © 2005 Mitchell Repair Information Company, LLC.
Page 644 of 1632
Land Cruiser
1. Connect negative lead from battery to door lock actuator terminal No. 2. Connect positive lead from
ammeter to door lock actuator terminal No. 3 and negative ammeter lead to positive battery terminal. See
Fig. 16
. Current should change from 3.2 amps to less than 0.5 amps within 20-70 seconds.
2. Wait approximately 60 seconds and connect positive lead from battery to terminal No. 2 and negative
lead to terminal No. 3. Door lock actuator should move to LOCK position. If operation is not as specified,
replace door lock actuator assembly.
REMOVAL & INSTALLATION
POWER DOOR LOCK ACTUATORS (FRONT DOORS)
Removal & Installation (Land Cruiser)
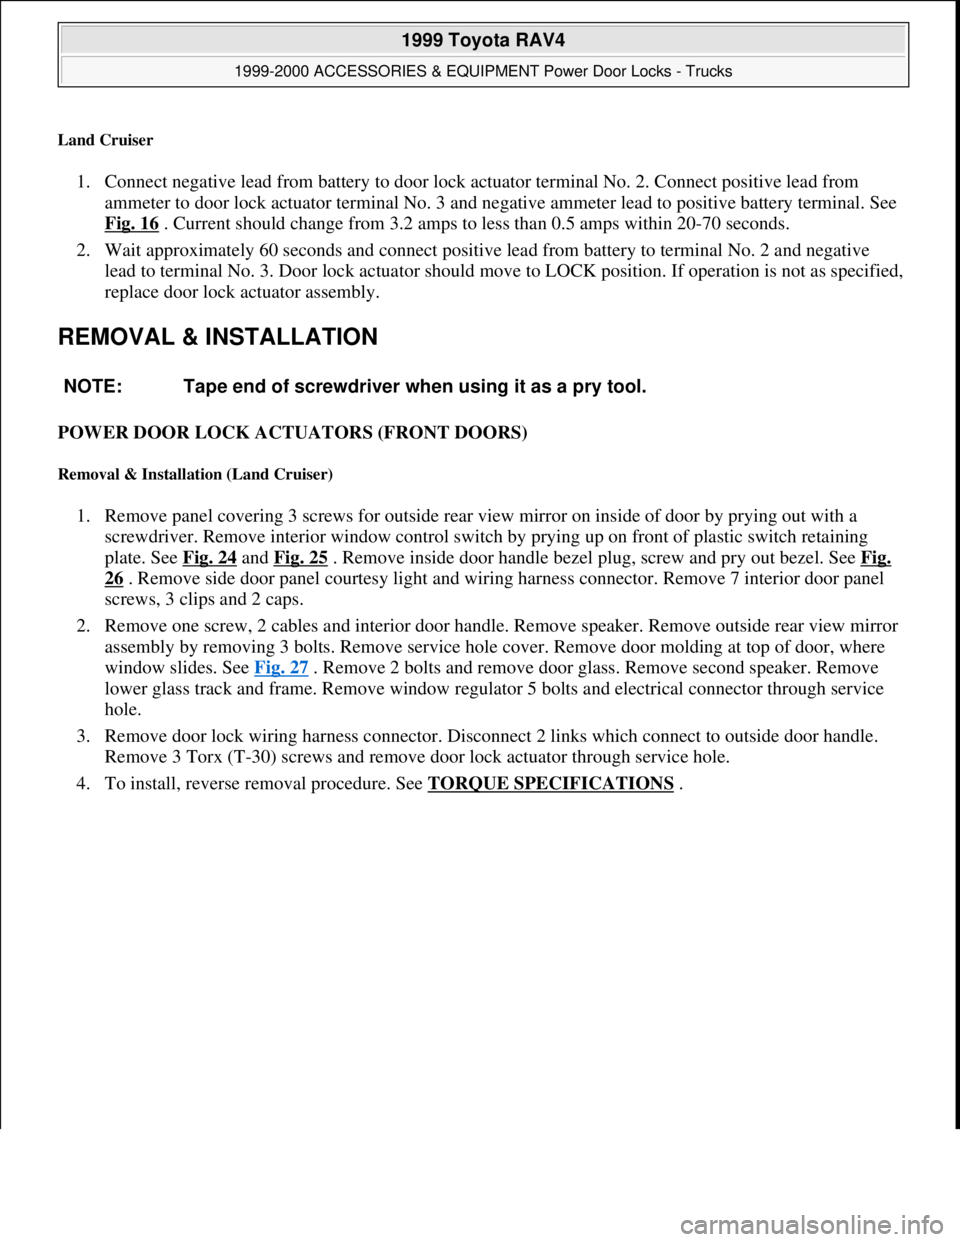
1. Remove panel covering 3 screws for outside rear view mirror on inside of door by prying out with a
screwdriver. Remove interior window control switch by prying up on front of plastic switch retaining
plate. See Fig. 24
and Fig. 25 . Remove inside door handle bezel plug, screw and pry out bezel. See Fig.
26 . Remove side door panel courtesy light and wiring harness connector. Remove 7 interior door panel
screws, 3 clips and 2 caps.
2. Remove one screw, 2 cables and interior door handle. Remove speaker. Remove outside rear view mirror
assembly by removing 3 bolts. Remove service hole cover. Remove door molding at top of door, where
window slides. See Fig. 27
. Remove 2 bolts and remove door glass. Remove second speaker. Remove
lower glass track and frame. Remove window regulator 5 bolts and electrical connector through service
hole.
3. Remove door lock wiring harness connector. Disconnect 2 links which connect to outside door handle.
Remove 3 Torx (T-30) screws and remove door lock actuator through service hole.
4. To install, reverse removal procedure. See TORQUE SPECIFICATIONS
. NOTE: Tape end of screwdriver when using it as a pry tool.
1999 Toyota RAV4
1999-2000 ACCESSORIES & EQUIPMENT Power Door Locks - Trucks
Microsoft
Sunday, November 22, 2009 10:53:11 AMPage 23 © 2005 Mitchell Repair Information Company, LLC.
Page 645 of 1632
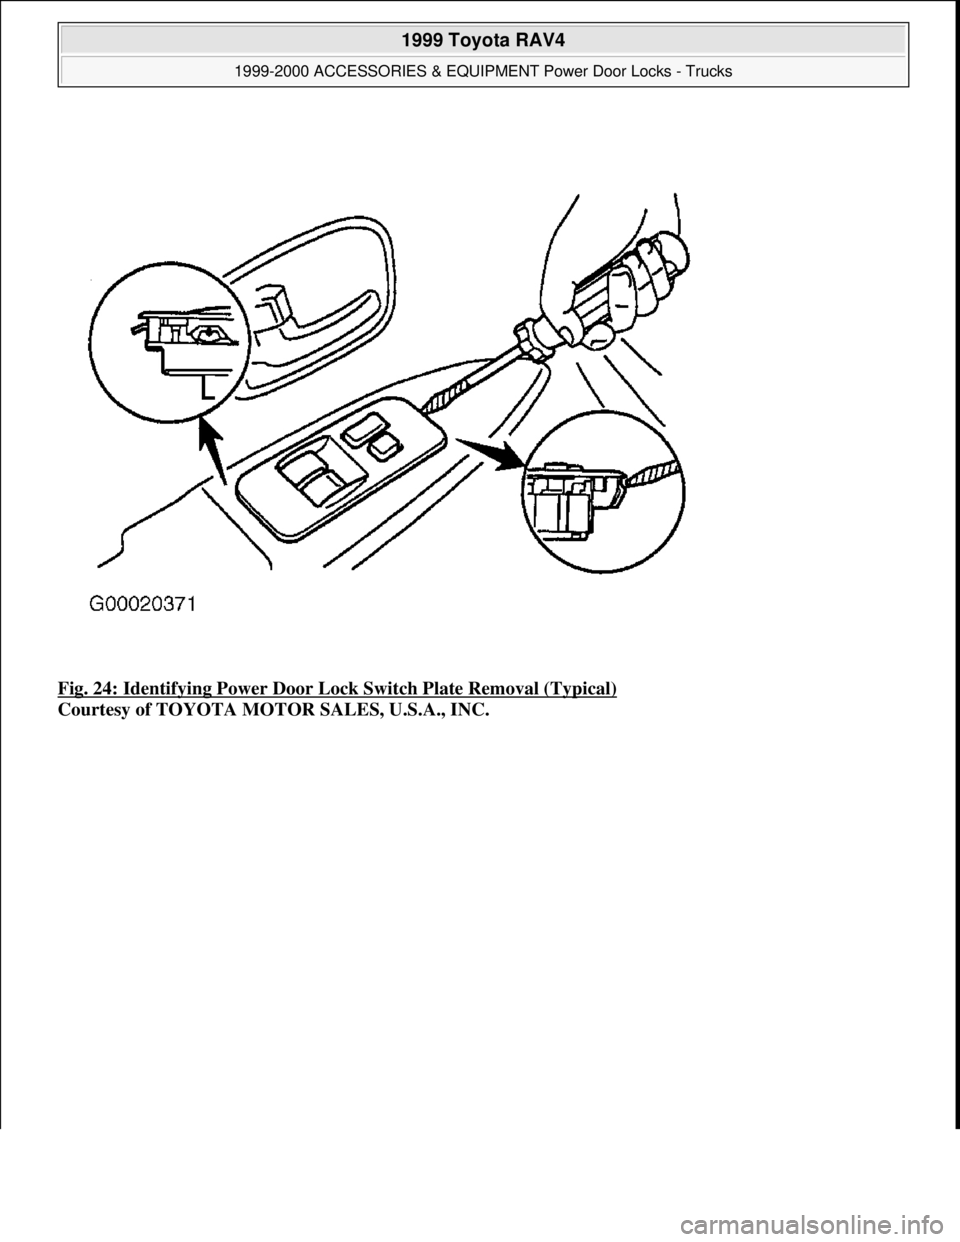
Fig. 24: Identifying Power Door Lock Switch Plate Removal (Typical)
Courtesy of TOYOTA MOTOR SALES, U.S.A., INC.
1999 Toyota RAV4
1999-2000 ACCESSORIES & EQUIPMENT Power Door Locks - Trucks
Microsoft
Sunday, November 22, 2009 10:53:11 AMPage 24 © 2005 Mitchell Repair Information Company, LLC.
Page 646 of 1632
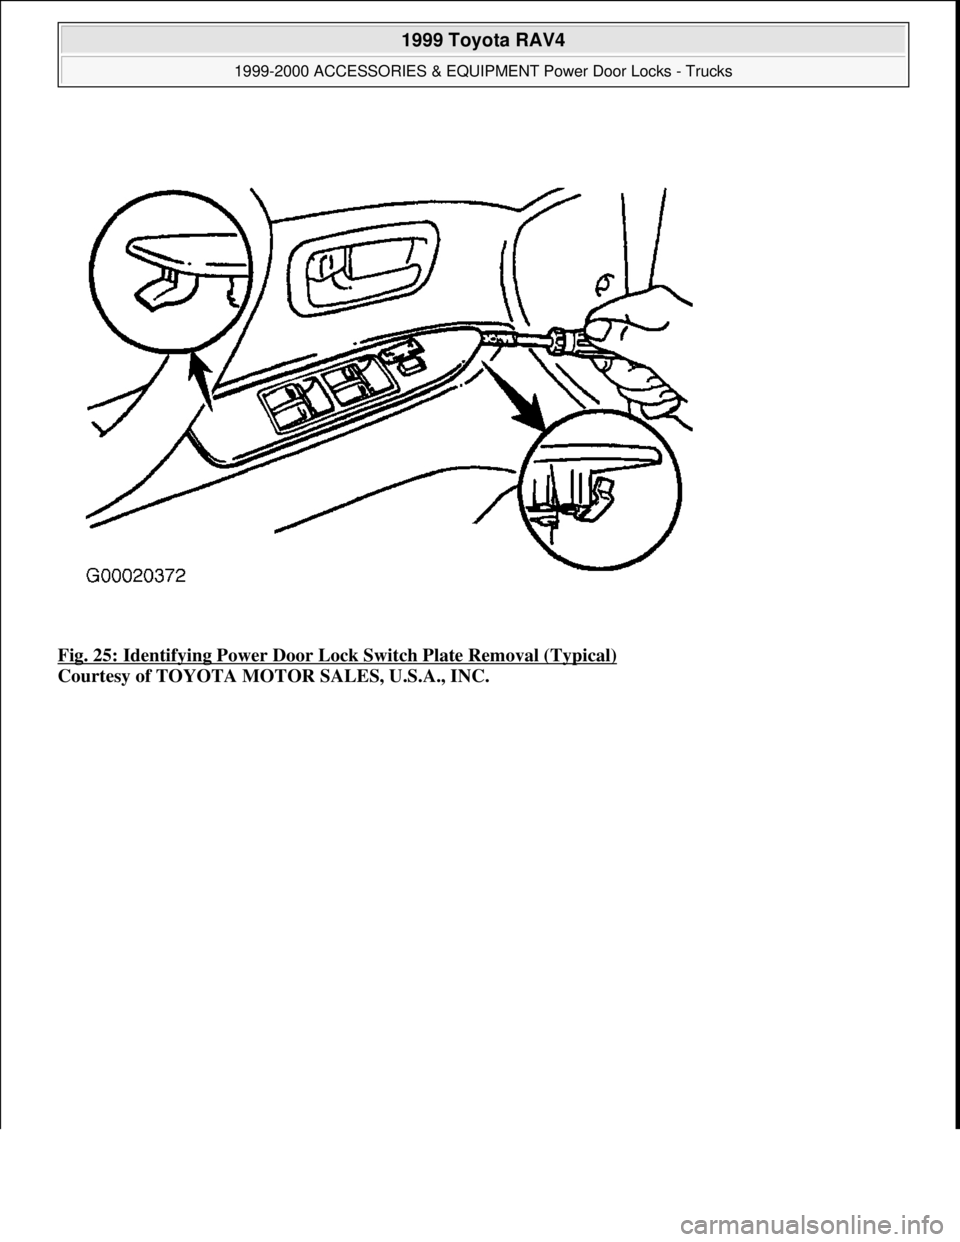
Fig. 25: Identifying Power Door Lock Switch Plate Removal (Typical)
Courtesy of TOYOTA MOTOR SALES, U.S.A., INC.
1999 Toyota RAV4
1999-2000 ACCESSORIES & EQUIPMENT Power Door Locks - Trucks
Microsoft
Sunday, November 22, 2009 10:53:11 AMPage 25 © 2005 Mitchell Repair Information Company, LLC.
Page 647 of 1632
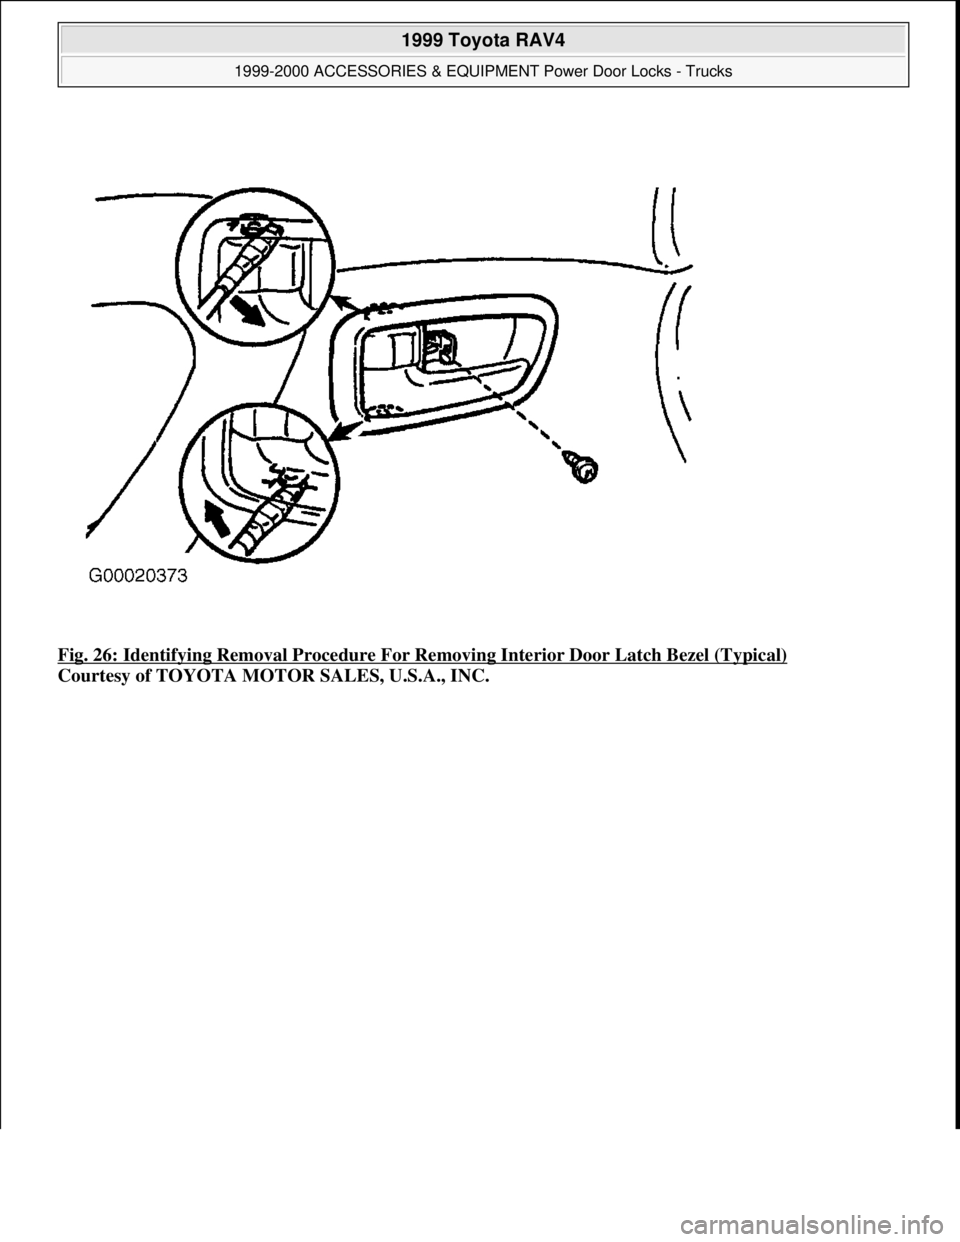
Fig. 26: Identifying Removal Procedure For Removing Interior Door Latch Bezel (Typical)
Courtesy of TOYOTA MOTOR SALES, U.S.A., INC.
1999 Toyota RAV4
1999-2000 ACCESSORIES & EQUIPMENT Power Door Locks - Trucks
Microsoft
Sunday, November 22, 2009 10:53:11 AMPage 26 © 2005 Mitchell Repair Information Company, LLC.
Page 648 of 1632
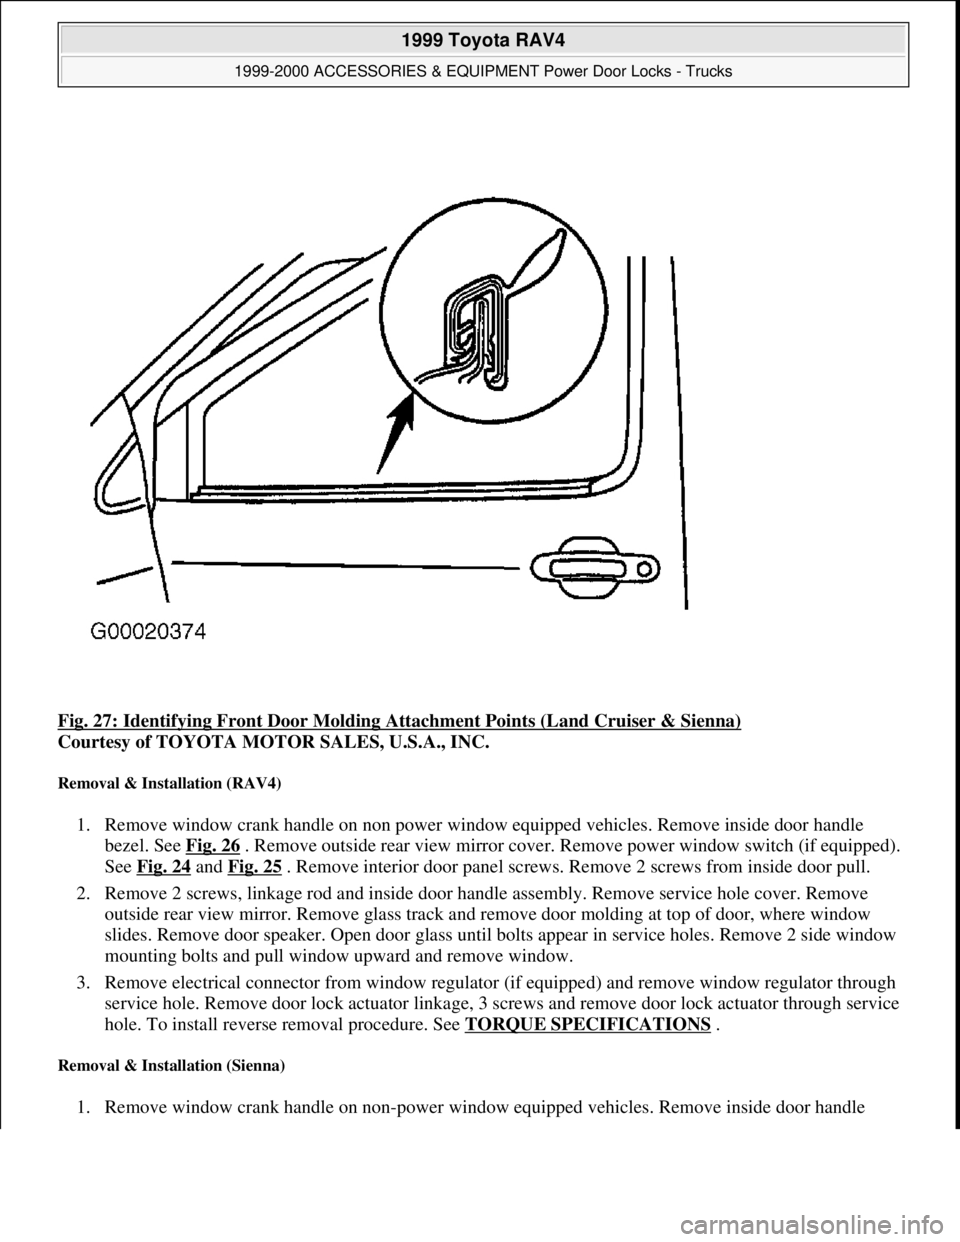
Fig. 27: Identifying Front Door Molding Attachment Points (Land Cruiser & Sienna)
Courtesy of TOYOTA MOTOR SALES, U.S.A., INC.
Removal & Installation (RAV4)
1. Remove window crank handle on non power window equipped vehicles. Remove inside door handle
bezel. See Fig. 26
. Remove outside rear view mirror cover. Remove power window switch (if equipped).
See Fig. 24
and Fig. 25 . Remove interior door panel screws. Remove 2 screws from inside door pull.
2. Remove 2 screws, linkage rod and inside door handle assembly. Remove service hole cover. Remove
outside rear view mirror. Remove glass track and remove door molding at top of door, where window
slides. Remove door speaker. Open door glass until bolts appear in service holes. Remove 2 side window
mounting bolts and pull window upward and remove window.
3. Remove electrical connector from window regulator (if equipped) and remove window regulator through
service hole. Remove door lock actuator linkage, 3 screws and remove door lock actuator through service
hole. To install reverse removal procedure. See TORQUE SPECIFICATIONS
.
Removal & Installation (Sienna)
1. Remove window crank handle on non-power window equipped vehicles. Remove inside door handle
1999 Toyota RAV4
1999-2000 ACCESSORIES & EQUIPMENT Power Door Locks - Trucks
Microsoft
Sunday, November 22, 2009 10:53:11 AMPage 27 © 2005 Mitchell Repair Information Company, LLC.
Page 649 of 1632
bezel. Remove interior window control switch by prying up on front of plastic switch retaining plate. See
Fig. 24
and Fig. 25 . Remove armrest. Remove side door panel courtesy light and wiring harness
connector. Remove upper armrest base panel. Remove 3 screws. Pry door trim away from door.
2. Remove 2 screws, linkage rod and inside door handle assembly. Remove service hole cover. Disconnect
harness connector from power mirror, if equipped. Remove 3 bolts and remove outside rear view mirror
assembly. Remove 3 screws and remove speaker. Remove 2 bolts and remove window glass. Remove
door molding at top of door, where window slides. See Fig. 27
.
3. Remove window track. Remove electrical connector from window regulator (if equipped) and remove
window regulator through service hole. Remove door lock actuator linkage, 3 screws and remove door
lock actuator through service hole. To install reverse removal procedure. See TORQUE
SPECIFICATIONS .
Removal & Installation (Tacoma)
1. Remove window crank handle on non-power window equipped vehicles. Remove screw and slide interior
door handle forward and remove handle from control link. Remove door lock bezel. Remove clip from
armrest panel and disconnect electrical connectors. Remove 2 screws. Pry interior door panel loose from
door. Lift upward and remove door panel.
2. Remove 5 screws and remove speaker. Remove service hole cover. With power remote mirrors, remove
electrical connectors and 3 bolts. Remove weather stripping and glass channel. Remove front lower glass
frame. Open door glass until nut appears in service hole. Remove 2 bolts and remove door glass by lifting
upward. Remove rear lower glass frame.
3. Disconnect harness connector and remove 6 bolts and remove window regulator. Disconnect 3 screws
and linkage from door lock assembly. Remove door lock assembly. To install, reverse removal procedure.
See TORQUE SPECIFICATIONS
.
Removal & Installation (Tundra)
1. Remove window crank handle on non-power window equipped vehicles. Remove inside door handle
bezel. See Fig. 26
. Remove interior window control switch by prying up on front of plastic switch
retaining plate. See Fig. 24
and Fig. 25 . Remove side door panel courtesy light and wiring harness
connector. Remove tweeter speaker. Remove 2 screws and pry door trim away from door.
2. Remove inner and lower weather strip from door. Remove screw and slide inside door handle backward
and remove it. Disconnect 2 cables from inside door handle. Remove service hole cover. Remove 3
speaker screws and remove speaker. Disconnect remote mirror wiring harness. Remove 3 screws from
mirror and remove mirror assembly. Remove glass track and remove door molding at top of door, where
window slides. See Fig. 28
. Remove door glass channel. Remove front and lower frames. Open door
glass until bolts appear in service hole. Remove 2 bolts and remove door glass.
3. Remove harness connector, nut and bolts for window regulator and remove regulator through service
hole. Disconnect linkage from door lock actuator, remove bolt and remove 3 Torx (T-30) screws and
remove door lock actuator. To install, reverse removal procedure. See TORQUE SPECIFICATIONS
.
1999 Toyota RAV4
1999-2000 ACCESSORIES & EQUIPMENT Power Door Locks - Trucks
Microsoft
Sunday, November 22, 2009 10:53:11 AMPage 28 © 2005 Mitchell Repair Information Company, LLC.
Page 650 of 1632
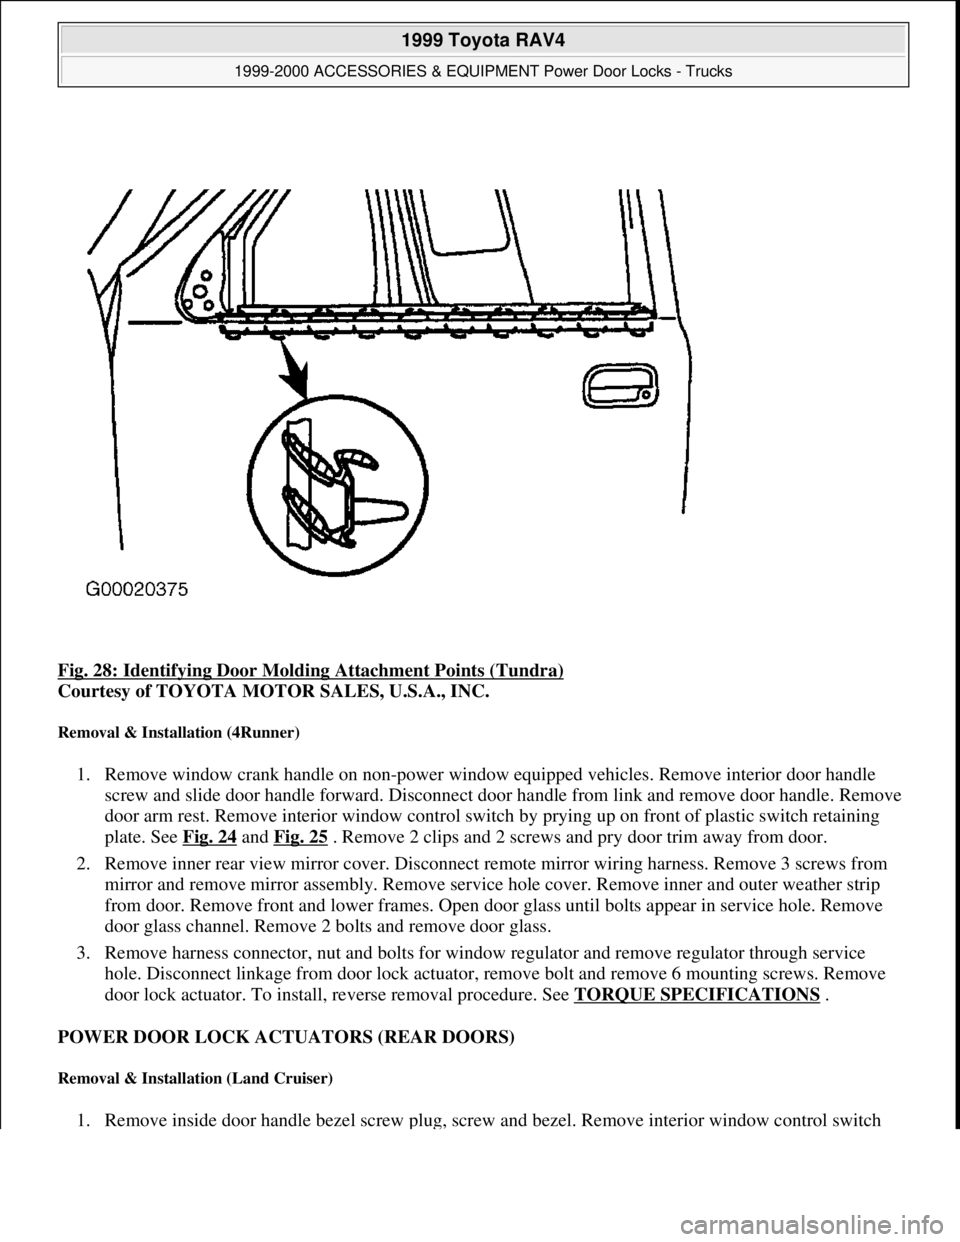
Fig. 28: Identifying Door Molding Attachment Points (Tundra)
Courtesy of TOYOTA MOTOR SALES, U.S.A., INC.
Removal & Installation (4Runner)
1. Remove window crank handle on non-power window equipped vehicles. Remove interior door handle
screw and slide door handle forward. Disconnect door handle from link and remove door handle. Remove
door arm rest. Remove interior window control switch by prying up on front of plastic switch retaining
plate. See Fig. 24
and Fig. 25 . Remove 2 clips and 2 screws and pry door trim away from door.
2. Remove inner rear view mirror cover. Disconnect remote mirror wiring harness. Remove 3 screws from
mirror and remove mirror assembly. Remove service hole cover. Remove inner and outer weather strip
from door. Remove front and lower frames. Open door glass until bolts appear in service hole. Remove
door glass channel. Remove 2 bolts and remove door glass.
3. Remove harness connector, nut and bolts for window regulator and remove regulator through service
hole. Disconnect linkage from door lock actuator, remove bolt and remove 6 mounting screws. Remove
door lock actuator. To install, reverse removal procedure. See TORQUE SPECIFICATIONS
.
POWER DOOR LOCK ACTUATORS (REAR DOORS)
Removal & Installation (Land Cruiser)
1. Remove inside door handle bezel screw plug, screw and bezel. Remove interior window control switch
1999 Toyota RAV4
1999-2000 ACCESSORIES & EQUIPMENT Power Door Locks - Trucks
Microsoft
Sunday, November 22, 2009 10:53:11 AMPage 29 © 2005 Mitchell Repair Information Company, LLC.