TOYOTA RAV4 1996 Service Manual PDF
Manufacturer: TOYOTA, Model Year: 1996, Model line: RAV4, Model: TOYOTA RAV4 1996Pages: 1632, PDF Size: 41.64 MB
Page 71 of 1632
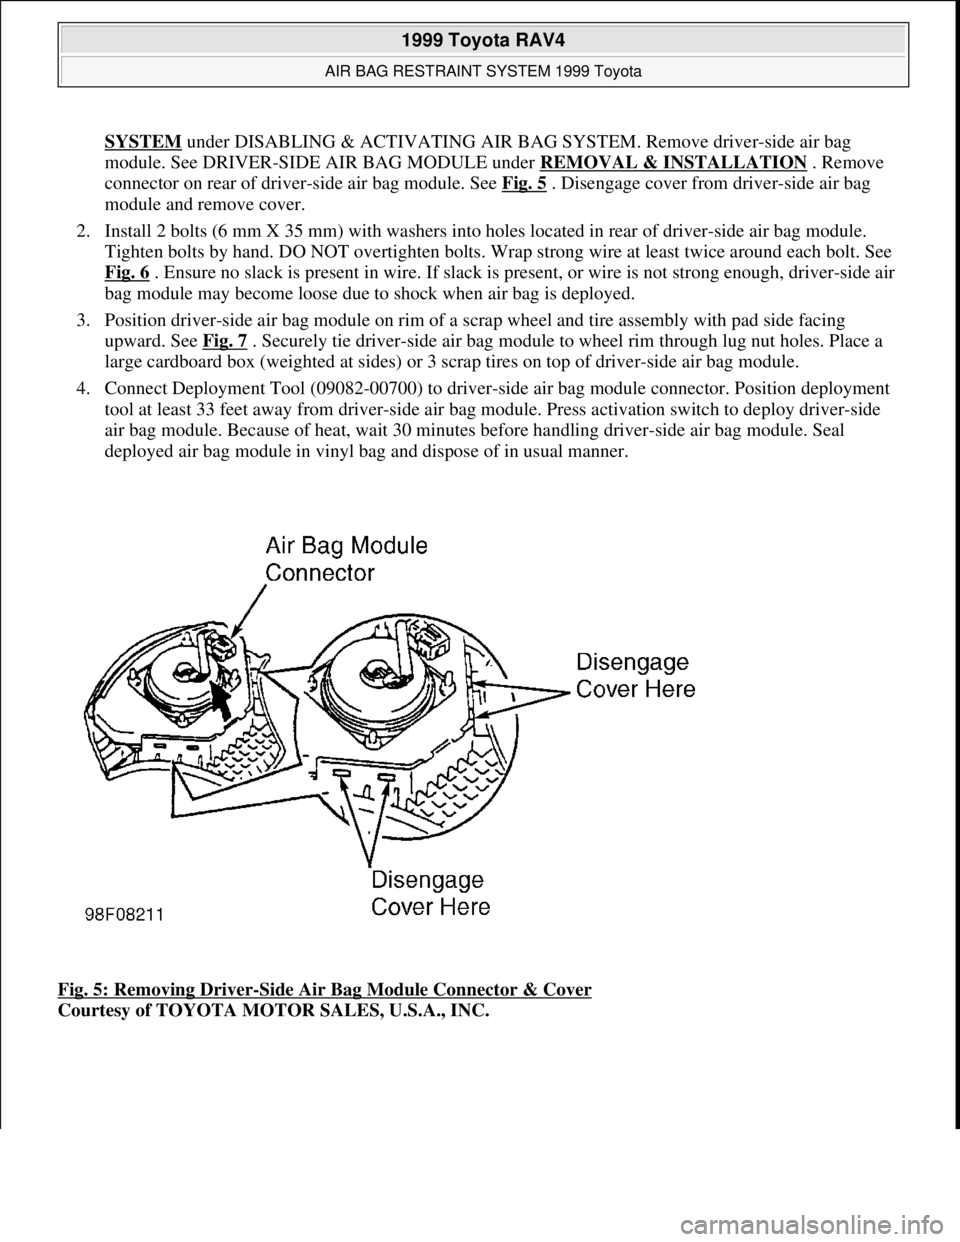
SYSTEM under DISABLING & ACTIVATING AIR BAG SYSTEM. Remove driver-side air bag
module. See DRIVER-SIDE AIR BAG MODULE under REMOVAL & INSTALLATION
. Remove
connector on rear of driver-side air bag module. See Fig. 5
. Disengage cover from driver-side air bag
module and remove cover.
2. Install 2 bolts (6 mm X 35 mm) with washers into holes located in rear of driver-side air bag module.
Tighten bolts by hand. DO NOT overtighten bolts. Wrap strong wire at least twice around each bolt. See
Fig. 6
. Ensure no slack is present in wire. If slack is present, or wire is not strong enough, driver-side air
bag module may become loose due to shock when air bag is deployed.
3. Position driver-side air bag module on rim of a scrap wheel and tire assembly with pad side facing
upward. See Fig. 7
. Securely tie driver-side air bag module to wheel rim through lug nut holes. Place a
large cardboard box (weighted at sides) or 3 scrap tires on top of driver-side air bag module.
4. Connect Deployment Tool (09082-00700) to driver-side air bag module connector. Position deployment
tool at least 33 feet away from driver-side air bag module. Press activation switch to deploy driver-side
air bag module. Because of heat, wait 30 minutes before handling driver-side air bag module. Seal
deployed air bag module in vinyl bag and dispose of in usual manner.
Fig. 5: Removing Driver
-Side Air Bag Module Connector & Cover
Courtesy of TOYOTA MOTOR SALES, U.S.A., INC.
1999 Toyota RAV4
AIR BAG RESTRAINT SYSTEM 1999 Toyota
Microsoft
Sunday, November 22, 2009 10:33:22 AMPage 8 © 2005 Mitchell Repair Information Company, LLC.
Page 72 of 1632
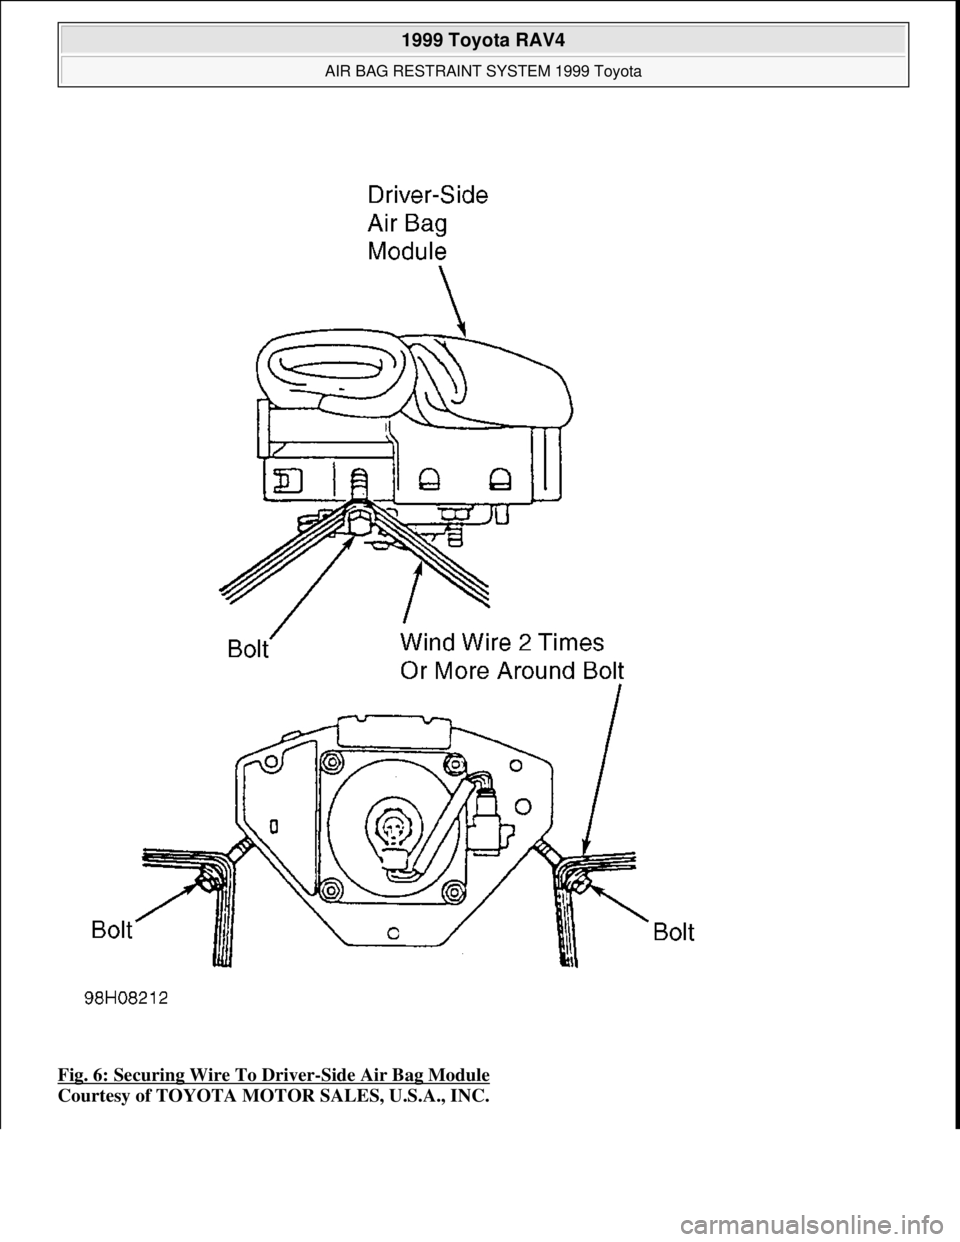
Fig. 6: Securing Wire To Driver-Side Air Bag Module
Courtesy of TOYOTA MOTOR SALES, U.S.A., INC.
1999 Toyota RAV4
AIR BAG RESTRAINT SYSTEM 1999 Toyota
Microsoft
Sunday, November 22, 2009 10:33:22 AMPage 9 © 2005 Mitchell Repair Information Company, LLC.
Page 73 of 1632
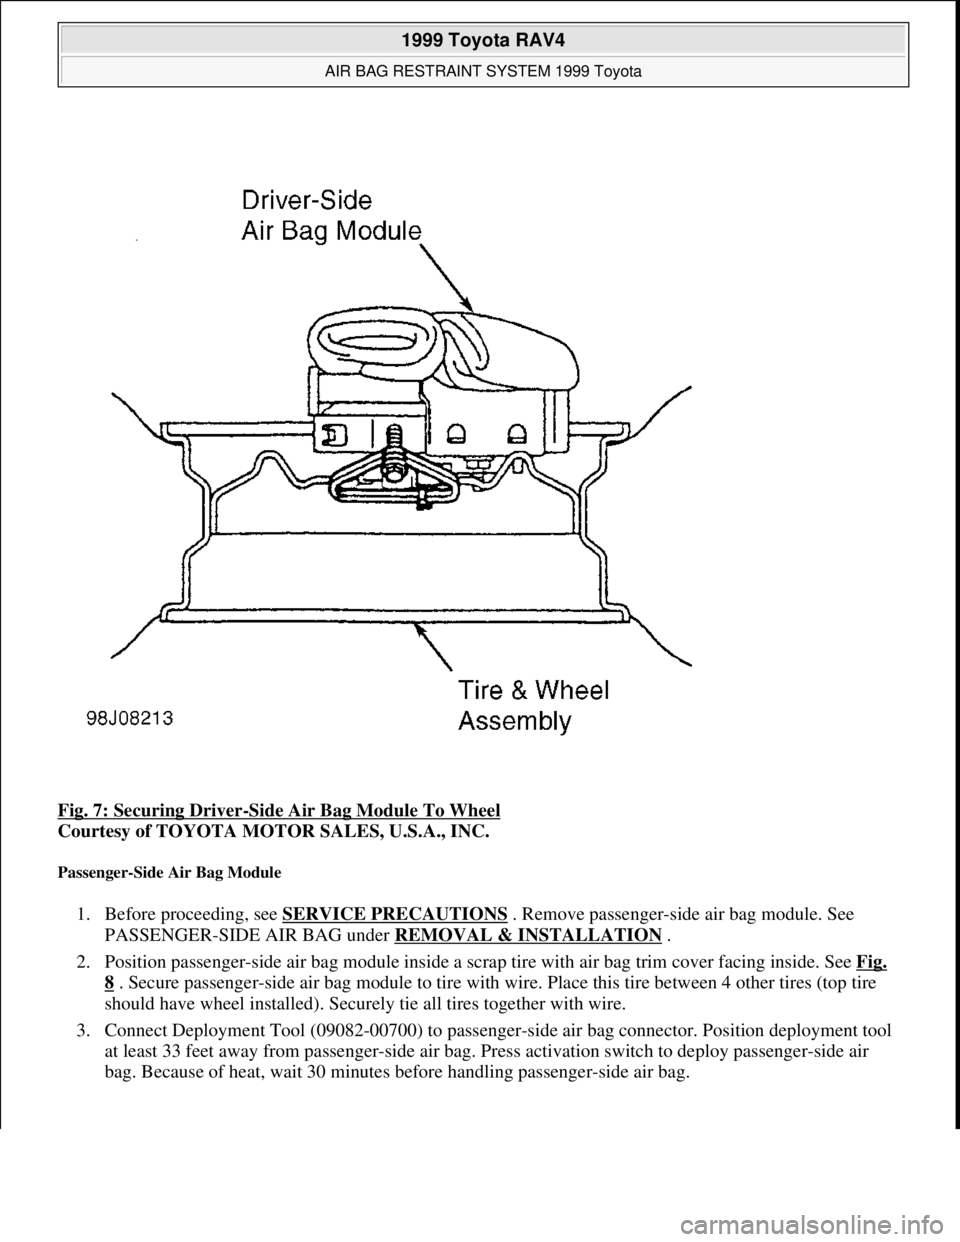
Fig. 7: Securing Driver-Side Air Bag Module To Wheel
Courtesy of TOYOTA MOTOR SALES, U.S.A., INC.
Passenger-Side Air Bag Module
1. Before proceeding, see SERVICE PRECAUTIONS . Remove passenger-side air bag module. See
PASSENGER-SIDE AIR BAG under REMOVAL & INSTALLATION
.
2. Position passenger-side air bag module inside a scrap tire with air bag trim cover facing inside. See Fig.
8 . Secure passenger-side air bag module to tire with wire. Place this tire between 4 other tires (top tire
should have wheel installed). Securely tie all tires together with wire.
3. Connect Deployment Tool (09082-00700) to passenger-side air bag connector. Position deployment tool
at least 33 feet away from passenger-side air bag. Press activation switch to deploy passenger-side air
bag. Because of heat, wait 30 minutes before handling passenger-side air bag.
1999 Toyota RAV4
AIR BAG RESTRAINT SYSTEM 1999 Toyota
Microsoft
Sunday, November 22, 2009 10:33:22 AMPage 10 © 2005 Mitchell Repair Information Company, LLC.
Page 74 of 1632
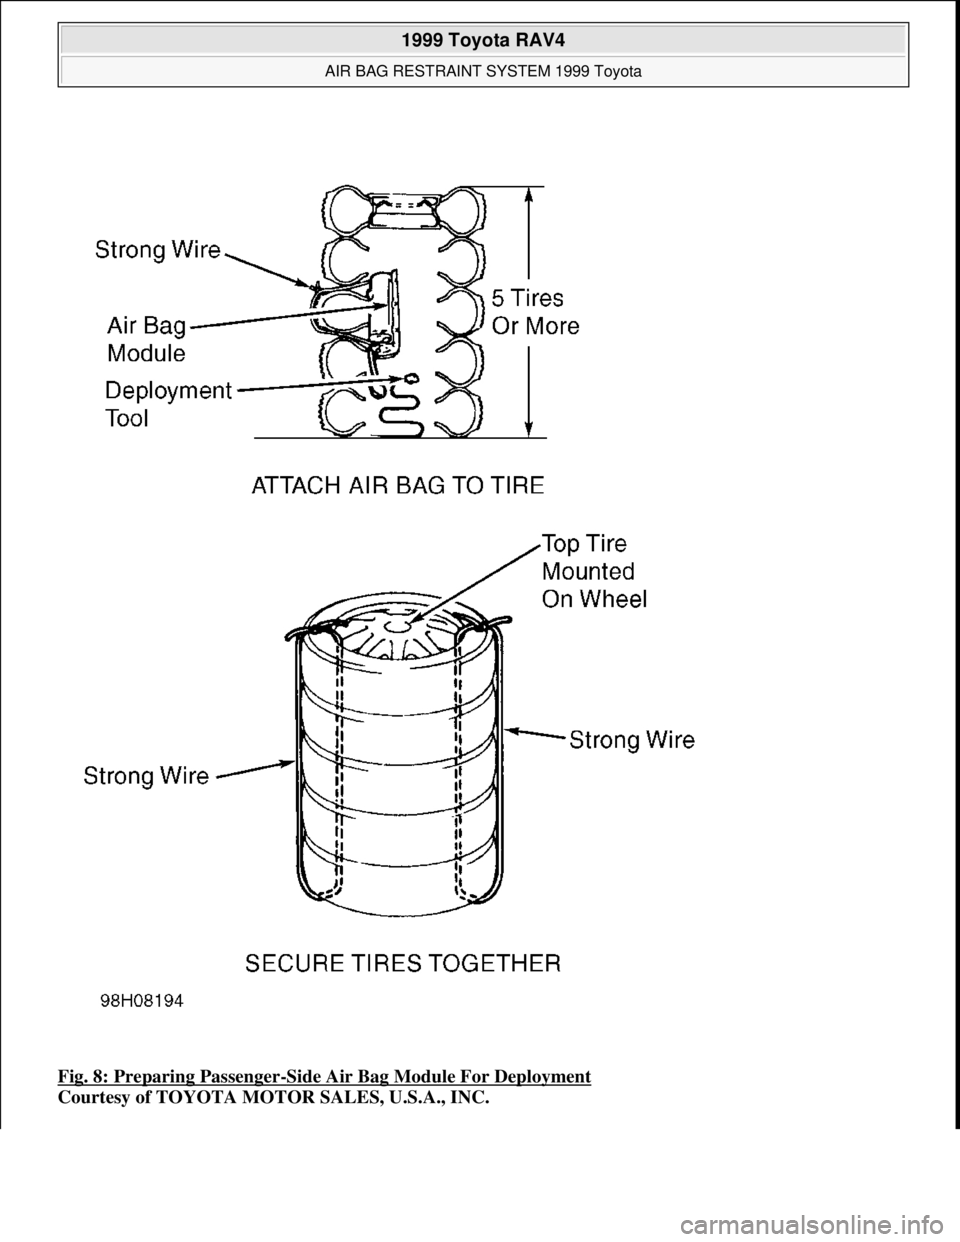
Fig. 8: Preparing Passenger-Side Air Bag Module For Deployment
Courtesy of TOYOTA MOTOR SALES, U.S.A., INC.
1999 Toyota RAV4
AIR BAG RESTRAINT SYSTEM 1999 Toyota
Microsoft
Sunday, November 22, 2009 10:33:22 AMPage 11 © 2005 Mitchell Repair Information Company, LLC.
Page 75 of 1632
Seat Belt Pretensioner
1. Before proceeding, see SERVICE PRECAUTIONS . Remove appropriate seat belt pretensioner. See
SEAT BELT PRETENSIONER under REMOVAL & INSTALLATION
.
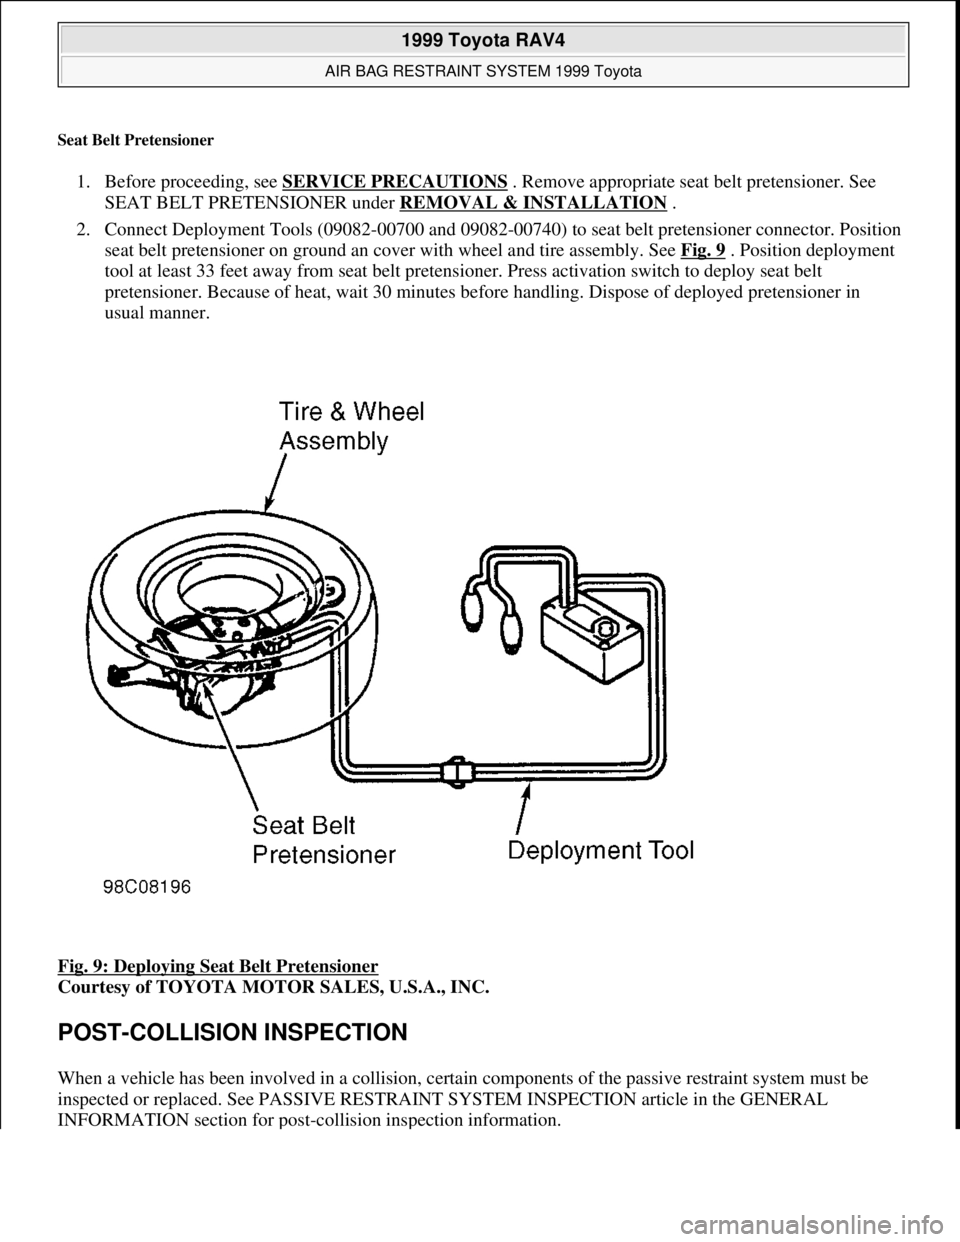
2. Connect Deployment Tools (09082-00700 and 09082-00740) to seat belt pretensioner connector. Position
seat belt pretensioner on ground an cover with wheel and tire assembly. See Fig. 9
. Position deployment
tool at least 33 feet away from seat belt pretensioner. Press activation switch to deploy seat belt
pretensioner. Because of heat, wait 30 minutes before handling. Dispose of deployed pretensioner in
usual manner.
Fig. 9: Deploying Seat Belt Pretensioner
Courtesy of TOYOTA MOTOR SALES, U.S.A., INC.
POST-COLLISION INSPECTION
When a vehicle has been involved in a collision, certain components of the passive restraint system must be
inspected or replaced. See PASSIVE RESTRAINT SYSTEM INSPECTION article in the GENERAL
INFORMATION section for post-collision inspection information.
1999 Toyota RAV4
AIR BAG RESTRAINT SYSTEM 1999 Toyota
Microsoft
Sunday, November 22, 2009 10:33:22 AMPage 12 © 2005 Mitchell Repair Information Company, LLC.
Page 76 of 1632
REMOVAL & INSTALLATION
AIR BAG SENSOR ASSEMBLY
Removal & Installation
1. Before proceeding, see SERVICE PRECAUTIONS . Air bag sensor assembly is located on the floor
inside center console box. See Fig. 10
. Turn ignition switch to LOCK position. Disconnect negative
battery cable. Wait at least 90 seconds.
2. Remove shift lever and boot. Ash tray and console box hole cover. Remove console box. Remove 4 Torx
screws retaining air bag sensor assembly. Remove air bag sensor assembly.
3. To install, reverse removal procedure. Tighten air bag sensor assembly Torx screws to specification. See
TORQUE SPECIFICATIONS
. Check AIR BAG warning light to ensure system is functioning
properl
y. See SYSTEM OPERATION CHECK. WARNING:Failure to follow service precautions may result in air bag deployment and
personal injury. See SERVICE PRECAUTIONS
. After component
replacement, check system operation. See SYSTEM OPERATION CHECK
.
1999 Toyota RAV4
AIR BAG RESTRAINT SYSTEM 1999 Toyota
Microsoft
Sunday, November 22, 2009 10:33:22 AMPage 13 © 2005 Mitchell Repair Information Company, LLC.
Page 77 of 1632
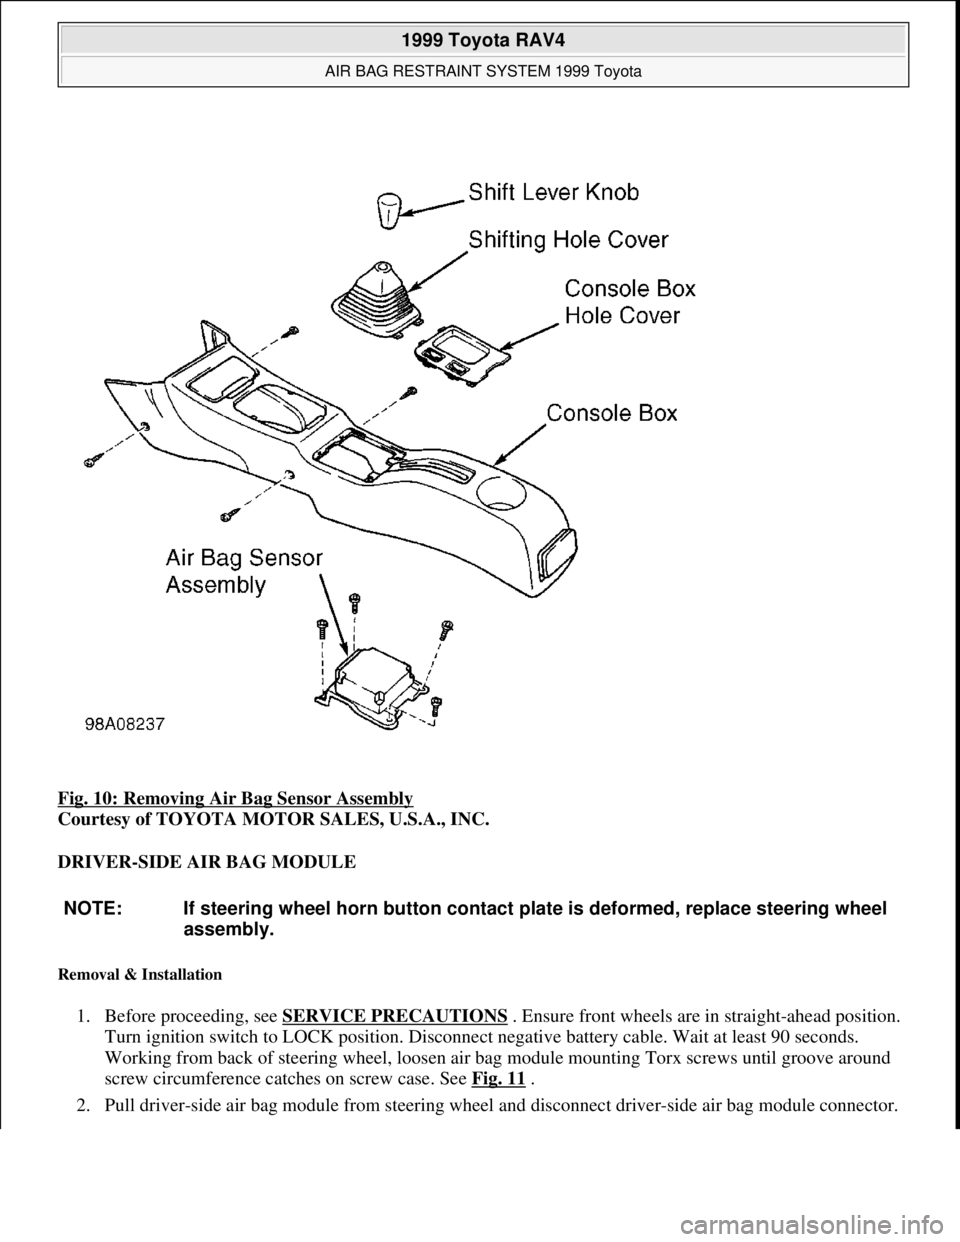
Fig. 10: Removing Air Bag Sensor Assembly
Courtesy of TOYOTA MOTOR SALES, U.S.A., INC.
DRIVER-SIDE AIR BAG MODULE
Removal & Installation
1. Before proceeding, see SERVICE PRECAUTIONS . Ensure front wheels are in straight-ahead position.
Turn ignition switch to LOCK position. Disconnect negative battery cable. Wait at least 90 seconds.
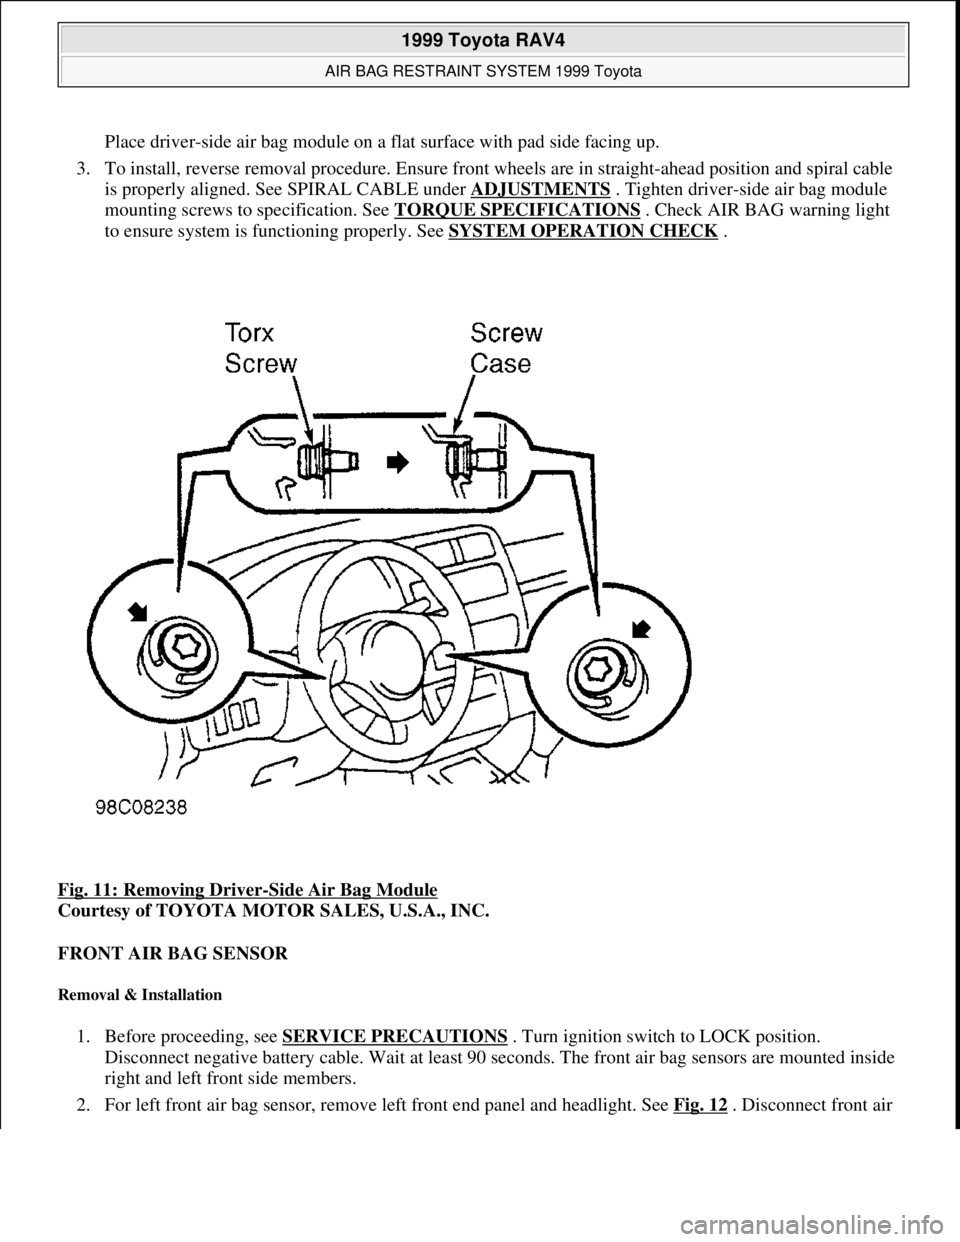
Working from back of steering wheel, loosen air bag module mounting Torx screws until groove around
screw circumference catches on screw case. See Fig. 11
.
2. Pull drive
r-side air bag module from steering wheel and disconnect driver-side air bag module connector.
NOTE: If steering wheel horn button contact plate is deformed, replace steering wheel
assembly.
1999 Toyota RAV4
AIR BAG RESTRAINT SYSTEM 1999 Toyota
Microsoft
Sunday, November 22, 2009 10:33:22 AMPage 14 © 2005 Mitchell Repair Information Company, LLC.
Page 78 of 1632
Place driver-side air bag module on a flat surface with pad side facing up.
3. To install, reverse removal procedure. Ensure front wheels are in straight-ahead position and spiral cable
is properly aligned. See SPIRAL CABLE under ADJUSTMENTS
. Tighten driver-side air bag module
mounting screws to specification. See TORQUE SPECIFICATIONS
. Check AIR BAG warning light
to ensure system is functioning properly. See SYSTEM OPERATION CHECK
.
Fig. 11: Removing Driver
-Side Air Bag Module
Courtesy of TOYOTA MOTOR SALES, U.S.A., INC.
FRONT AIR BAG SENSOR
Removal & Installation
1. Before proceeding, see SERVICE PRECAUTIONS . Turn ignition switch to LOCK position.
Disconnect negative battery cable. Wait at least 90 seconds. The front air bag sensors are mounted inside
right and left front side members.
2. For left front air ba
g sensor, remove left front end panel and headlight. See Fig. 12 . Disconnect front air
1999 Toyota RAV4
AIR BAG RESTRAINT SYSTEM 1999 Toyota
Microsoft
Sunday, November 22, 2009 10:33:22 AMPage 15 © 2005 Mitchell Repair Information Company, LLC.
Page 79 of 1632
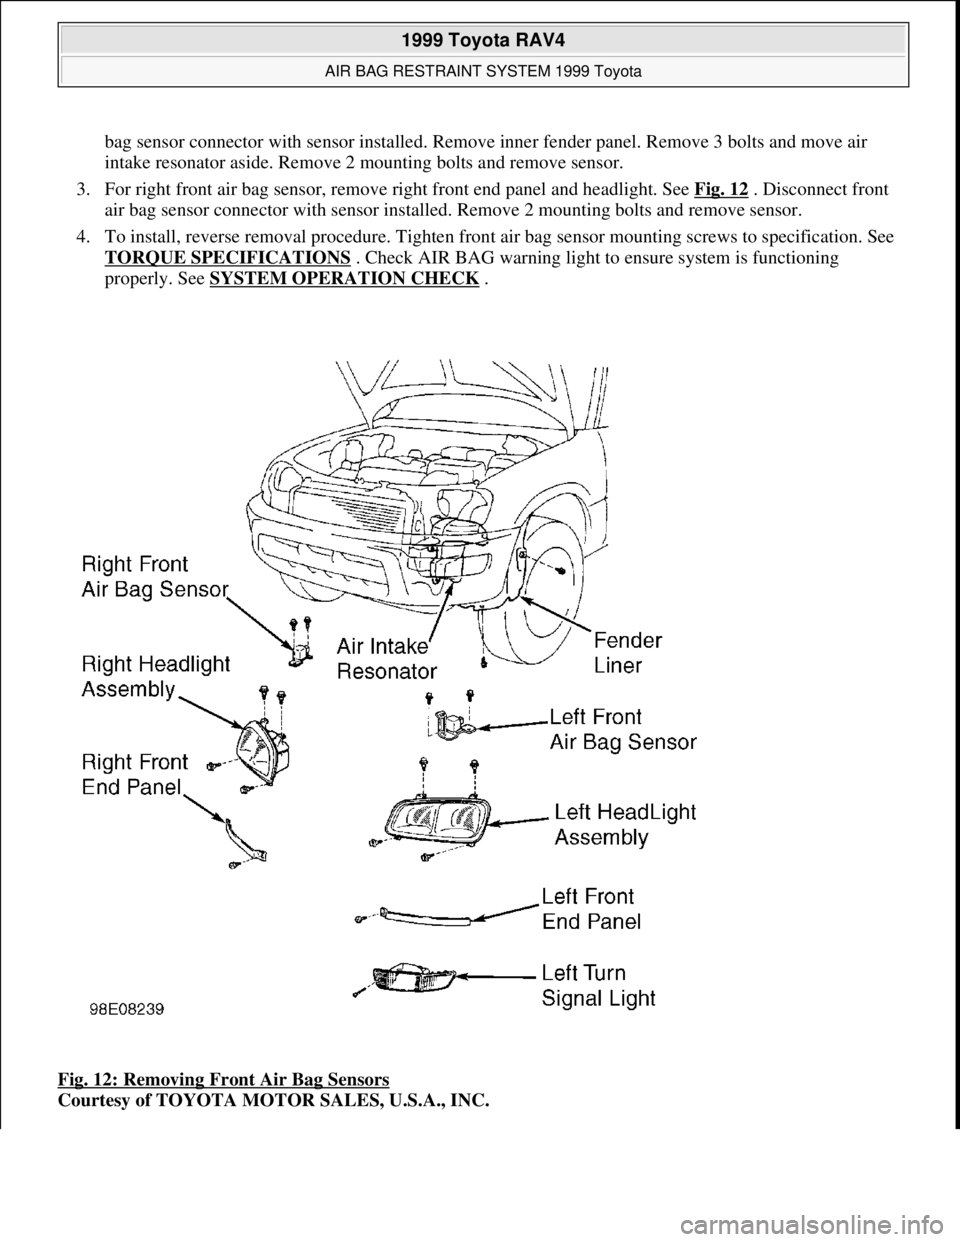
bag sensor connector with sensor installed. Remove inner fender panel. Remove 3 bolts and move air
intake resonator aside. Remove 2 mounting bolts and remove sensor.
3. For right front air bag sensor, remove right front end panel and headlight. See Fig. 12
. Disconnect front
air bag sensor connector with sensor installed. Remove 2 mounting bolts and remove sensor.
4. To install, reverse removal procedure. Tighten front air bag sensor mounting screws to specification. See
TORQUE SPECIFICATIONS
. Check AIR BAG warning light to ensure system is functioning
properly. See SYSTEM OPERATION CHECK
.
Fig. 12: Removing Front Air Bag Sensors
Courtesy of TOYOTA MOTOR SALES, U.S.A., INC.
1999 Toyota RAV4
AIR BAG RESTRAINT SYSTEM 1999 Toyota
Microsoft
Sunday, November 22, 2009 10:33:22 AMPage 16 © 2005 Mitchell Repair Information Company, LLC.
Page 80 of 1632
INSTRUMENT PANEL
Removal & Installation
1. Before proceeding, see SERVICE PRECAUTIONS . Turn ignition switch to LOCK position.
Disconnect negative battery cable. Wait at least 90 seconds.
2. Access and disconnect right and left seat belt pretensioner connectors. See SEAT BELT
PRETENSIONERS . Remove front door scuff plates and cowl side trim boards. See Fig. 13 . Remove
steering wheel. See STEERING WHEEL
. Remove steering column covers and cluster finish panel.
Remove instrument cluster. Remove hood lock release lever.
3. Remove lower finish panel and instrument panel lower insert. Remove No. 2 heater-to-register duct.
Remove steering column assembly. See STEERING COLUMN
. Remove 2 screws and center cluster
finish panel. Pull off heater control knobs and pry off heater control name plate. Pry off cluster instrument
panel, then remove 3 screws from heater control assembly. Disconnect connectors and remove cluster
instrument panel.
4. Disconnect control cables and remove heater control assembly. Remove radio assembly. Remove console
box. Tape tip of screwdriver and remove lower center cluster finish panel. Disconnect connectors.
Remove stereo opening cover. Remove glove box assembly. Remove side trim cover. Disconnect
remaining connectors and remove bolts, then remove instrument panel.
5. To install, reverse removal procedure. Tighten fasteners to specification. See TORQUE
SPECIFICATIONS . Check AIR BAG warning light to ensure system is functioning properly. See
SYSTEM OPERATION CHECK
.
1999 Toyota RAV4
AIR BAG RESTRAINT SYSTEM 1999 Toyota
Microsoft
Sunday, November 22, 2009 10:33:22 AMPage 17 © 2005 Mitchell Repair Information Company, LLC.