TOYOTA RAV4 1996 Service Owner's Guide
Manufacturer: TOYOTA, Model Year: 1996, Model line: RAV4, Model: TOYOTA RAV4 1996Pages: 1632, PDF Size: 41.64 MB
Page 31 of 1632
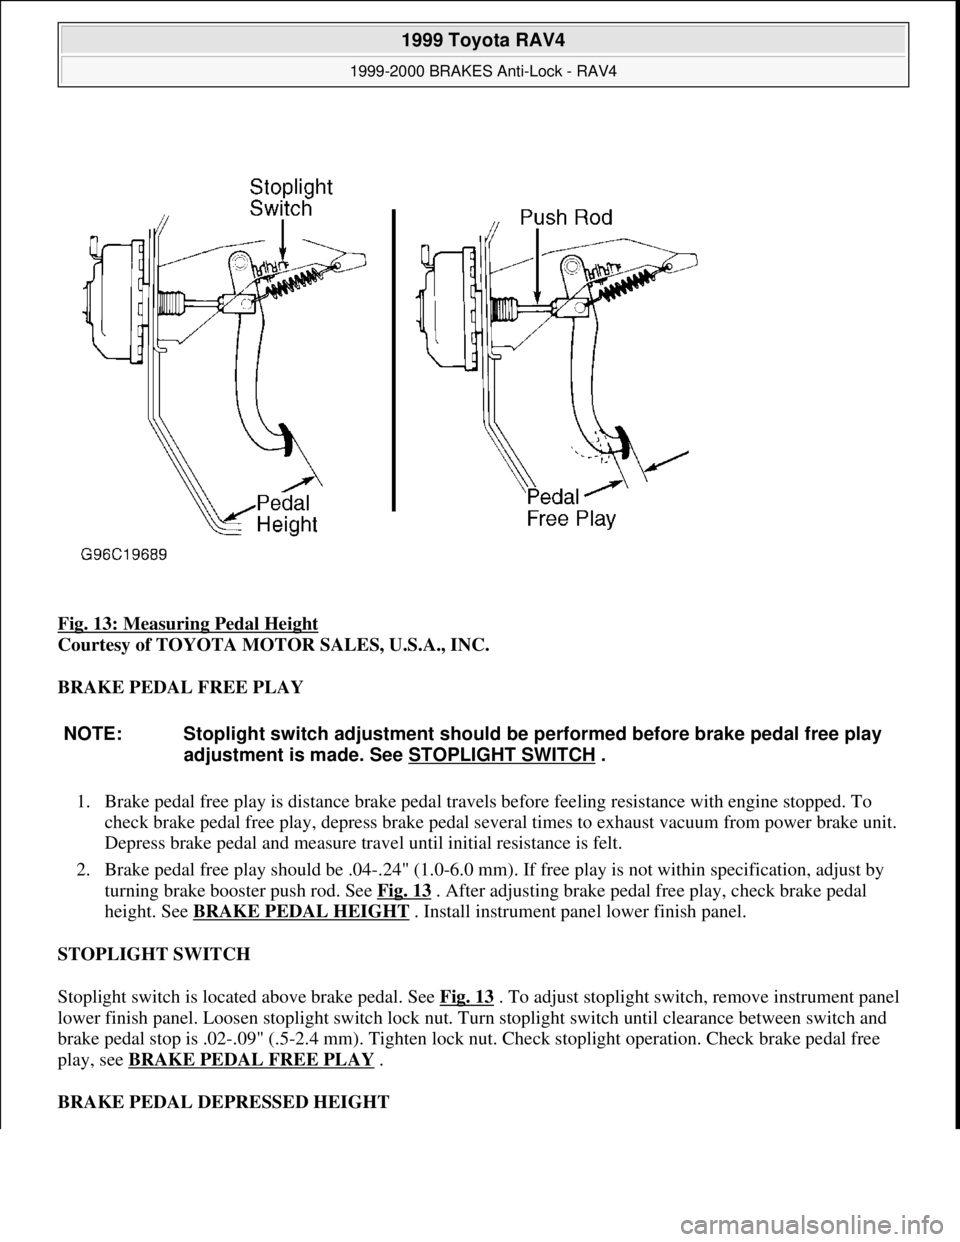
Fig. 13: Measuring Pedal Height
Courtesy of TOYOTA MOTOR SALES, U.S.A., INC.
BRAKE PEDAL FREE PLAY
1. Brake pedal free play is distance brake pedal travels before feeling resistance with engine stopped. To
check brake pedal free play, depress brake pedal several times to exhaust vacuum from power brake unit.
Depress brake pedal and measure travel until initial resistance is felt.
2. Brake pedal free play should be .04-.24" (1.0-6.0 mm). If free play is not within specification, adjust by
turning brake booster push rod. See Fig. 13
. After adjusting brake pedal free play, check brake pedal
height. See BRAKE PEDAL HEIGHT
. Install instrument panel lower finish panel.
STOPLIGHT SWITCH
Stoplight switch is located above brake pedal. See Fig. 13
. To adjust stoplight switch, remove instrument panel
lower finish panel. Loosen stoplight switch lock nut. Turn stoplight switch until clearance between switch and
brake pedal stop is .02-.09" (.5-2.4 mm). Tighten lock nut. Check stoplight operation. Check brake pedal free
play, see BRAKE PEDAL FREE PLAY .
BRAKE PEDAL DEPRESSED HEIGHT
NOTE: Stoplight switch adjustment should be performed before brake pedal free play
adjustment is made. See STOPLIGHT SWITCH
.
1999 Toyota RAV4
1999-2000 BRAKES Anti-Lock - RAV4
Microsoft
Sunday, November 22, 2009 10:06:17 AMPage 31 © 2005 Mitchell Repair Information Company, LLC.
Page 32 of 1632
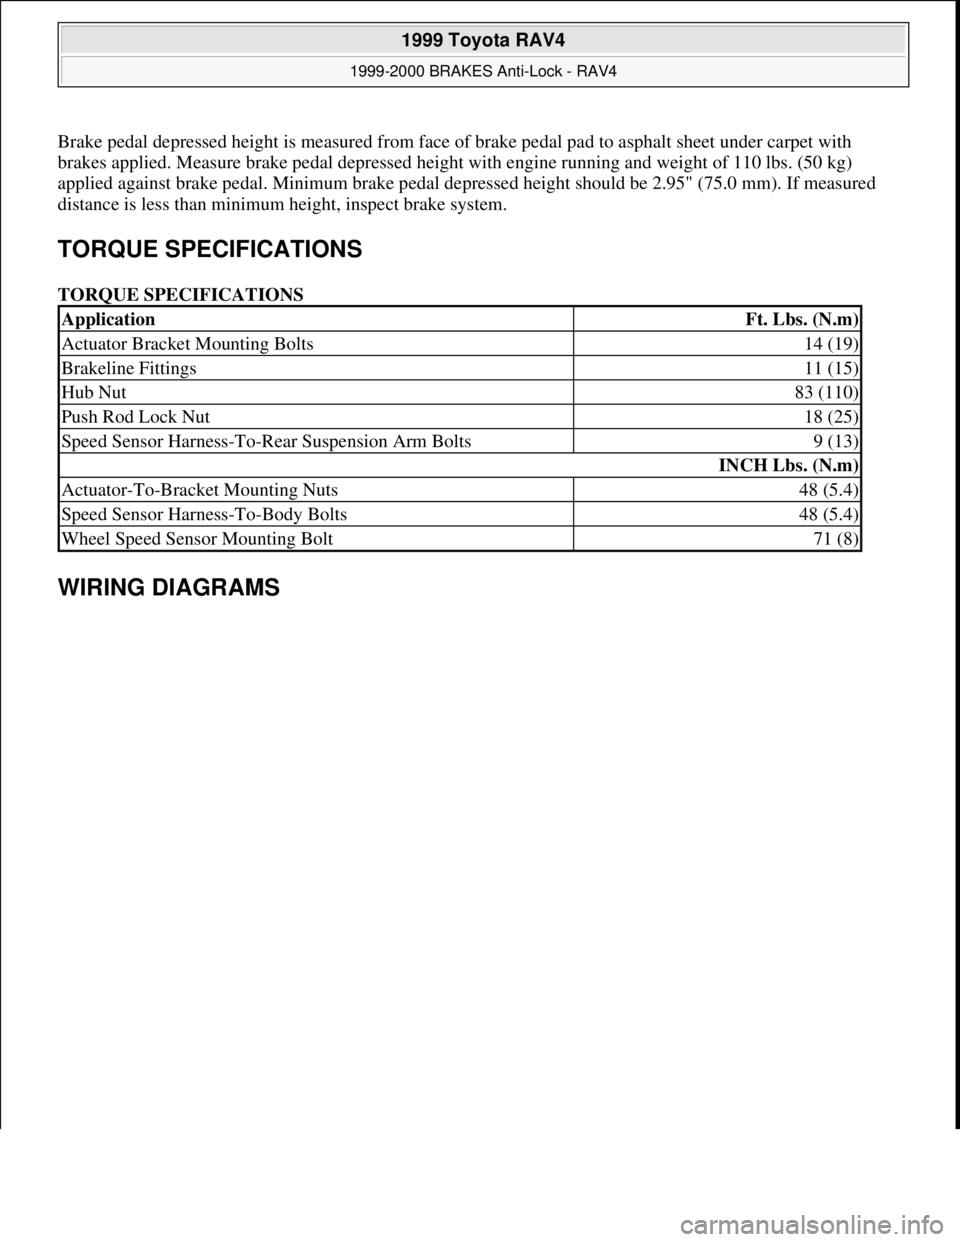
Brake pedal depressed height is measured from face of brake pedal pad to asphalt sheet under carpet with
brakes applied. Measure brake pedal depressed height with engine running and weight of 110 lbs. (50 kg)
applied against brake pedal. Minimum brake pedal depressed height should be 2.95" (75.0 mm). If measured
distance is less than minimum height, inspect brake system.
TORQUE SPECIFICATIONS
TORQUE SPECIFICATIONS
WIRING DIAGRAMS
ApplicationFt. Lbs. (N.m)
Actuator Bracket Mounting Bolts14 (19)
Brakeline Fittings11 (15)
Hub Nut83 (110)
Push Rod Lock Nut18 (25)
Speed Sensor Harness-To-Rear Suspension Arm Bolts9 (13)
INCH Lbs. (N.m)
Actuator-To-Bracket Mounting Nuts48 (5.4)
Speed Sensor Harness-To-Body Bolts48 (5.4)
Wheel Speed Sensor Mounting Bolt71 (8)
1999 Toyota RAV4
1999-2000 BRAKES Anti-Lock - RAV4
Microsoft
Sunday, November 22, 2009 10:06:17 AMPage 32 © 2005 Mitchell Repair Information Company, LLC.
Page 33 of 1632

1999 Toyota RAV4
1999-2000 BRAKES Anti-Lock - RAV4
Microsoft
Sunday, November 22, 2009 10:06:17 AMPage 33 © 2005 Mitchell Repair Information Company, LLC.
Page 34 of 1632

Fig. 14: Anti-Lock Brake System Wiring Diagram (1999-2000 RAV4)
1999 Toyota RAV4
1999-2000 BRAKES Anti-Lock - RAV4
Microsoft
Sunday, November 22, 2009 10:06:18 AMPage 34 © 2005 Mitchell Repair Information Company, LLC.
Page 35 of 1632
AIR BAG RESTRAINT SYSTEM
1996 ACCESSORIES/SAFETY EQUIPMENT Toyota Air Bag Restraint System
DESCRIPTION & OPERATION
Supplemental Restraint System (SRS) deploys a steering wheel pad (driver-side air bag) and passenger-side air
bag during a frontal impact of sufficient force. See Fig. 1. WARNING:To avoid injury from accidental air bag deployment, read and carefully
follow all WARNINGS and SERVICE PRECAUTIONS.
1996 Toyota 4Runner
AIR BAG RESTRAINT SYSTEM 1996 ACCESSORIES/SAFETY EQUIPMENT Toyota Air Bag Restraint System
1996 Toyota 4Runner
AIR BAG RESTRAINT SYSTEM 1996 ACCESSORIES/SAFETY EQUIPMENT Toyota Air Bag Restraint System
Microsoft
Tuesday, August 18, 2009 7:33:32 PMPage 1 © 2005 Mitchell Repair Information Company, LLC.
Microsoft
Tuesday, August 18, 2009 7:33:37 PMPage 1 © 2005 Mitchell Repair Information Company, LLC.
Page 36 of 1632
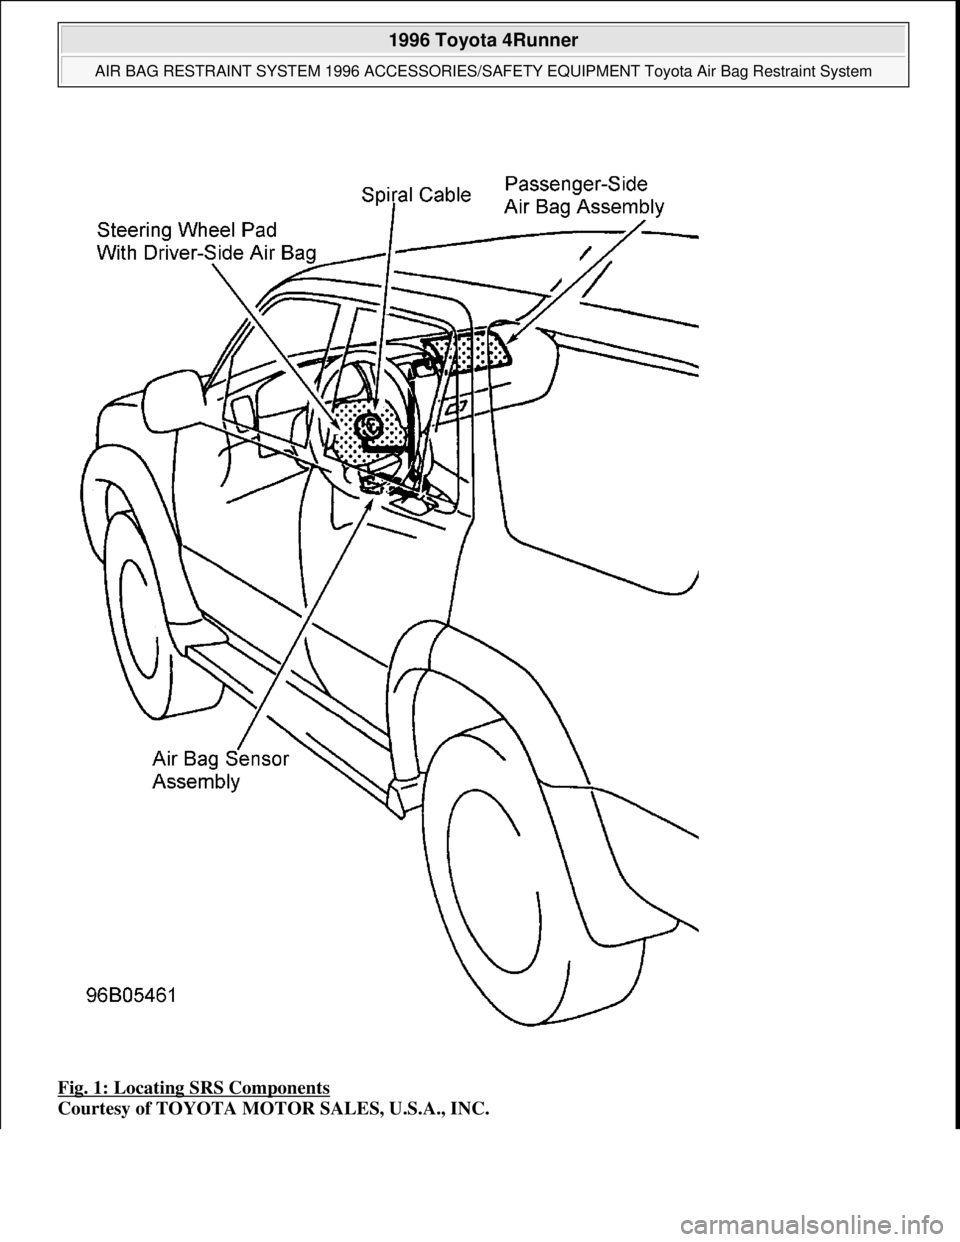
Fig. 1: Locating SRS Components
Courtesy of TOYOTA MOTOR SALES, U.S.A., INC.
1996 Toyota 4Runner
AIR BAG RESTRAINT SYSTEM 1996 ACCESSORIES/SAFETY EQUIPMENT Toyota Air Bag Restraint System
Microsoft
Tuesday, August 18, 2009 7:33:32 PMPage 2 © 2005 Mitchell Repair Information Company, LLC.
Page 37 of 1632
The air bag sensor, which deploys air bags, contains a back-up power supply, safing sensor and diagnostic code
memory. Spiral cable (clockspring) maintains a complete circuit to the steering wheel pad.
SYSTEM OPERATION CHECK
Turn ignition switch to ACC or ON position. Air bag warning light in instrument cluster should come on for
about 6 seconds and then go out. If light does not respond as specified, SRS is malfunctioning and needs repair.
See DIAGNOSIS
.
SERVICE PRECAUTIONS
Observe the following precautions when working on SRS:
Before servicing any SRS or steering column component, disable SRS. See DISABLING &
ACTIVATING AIR BAG SYSTEM . Failure to disable system could result in accidental air bag
deployment and personal injury.
When diagnosing SRS, always check for diagnostic codes before disconnecting battery.
After ignition switch is turned to LOCK position and negative battery cable is disconnected, wait at least
90 seconds before working on SRS. SRS is equipped with a back-up power source that may allow air bag
to deploy within 90 seconds of disconnecting negative battery cable.
In a minor collision in which air bags do not deploy, steering wheel pad must be inspected.
NEVER use air bag parts from another vehicle. Replace air bag parts with new parts.
Air bag sensor assembly contains mercury. After replacement, DO NOT destroy the old part. When
scrapping vehicle or replacing air bag sensor assembly, remove air bag sensor assembly and dispose of as
toxic waste.
Never disassemble or repair system components. Replace cracked, dented or otherwise damaged system
components.
Remove air bag sensor if shocks are likely to be applied to the sensor during repairs.
When diagnosing electrical circuits, use a Digital Volt/Ohmmeter (DVOM) with high impedance (10,000
ohms minimum).
Information labels are attached to air bag components. Follow all notices on labels.
After servicing SRS, check air bag warning light to ensure system is functioning properly. See SYSTEM
OPERATION CHECK .
Always wear safety glasses when servicing or handling an air bag.
When placing a live air bag on a bench or other surface, always face air bag and trim cover up, away from
surface. This will reduce motion of module if accidentally deployed.
After deployment, air bag surface may contain deposits of sodium hydroxide which irritates skin. During
clean-up, always wear safety glasses, rubber gloves and long-sleeved shirt. After clean-up, wash hands
using mild soap and water.
When carrying a live air bag module, trim cover must be pointed away from your body to minimize
injury in case of accidental deployment.
If SRS is not fully functional for any reason, vehicle should not be driven until system is repaired and
a
gain becomes operational. DO NOTremove bulbs, modules, sensors or other components or in any way
1996 Toyota 4Runner
AIR BAG RESTRAINT SYSTEM 1996 ACCESSORIES/SAFETY EQUIPMENT Toyota Air Bag Restraint System
Microsoft
Tuesday, August 18, 2009 7:33:32 PMPage 3 © 2005 Mitchell Repair Information Company, LLC.
Page 38 of 1632
disable system from operating normally. If SRS is not functional, park vehicle until it is repaired and
functions properly.
DISABLING & ACTIVATING AIR BAG SYSTEM
DISABLING SYSTEM
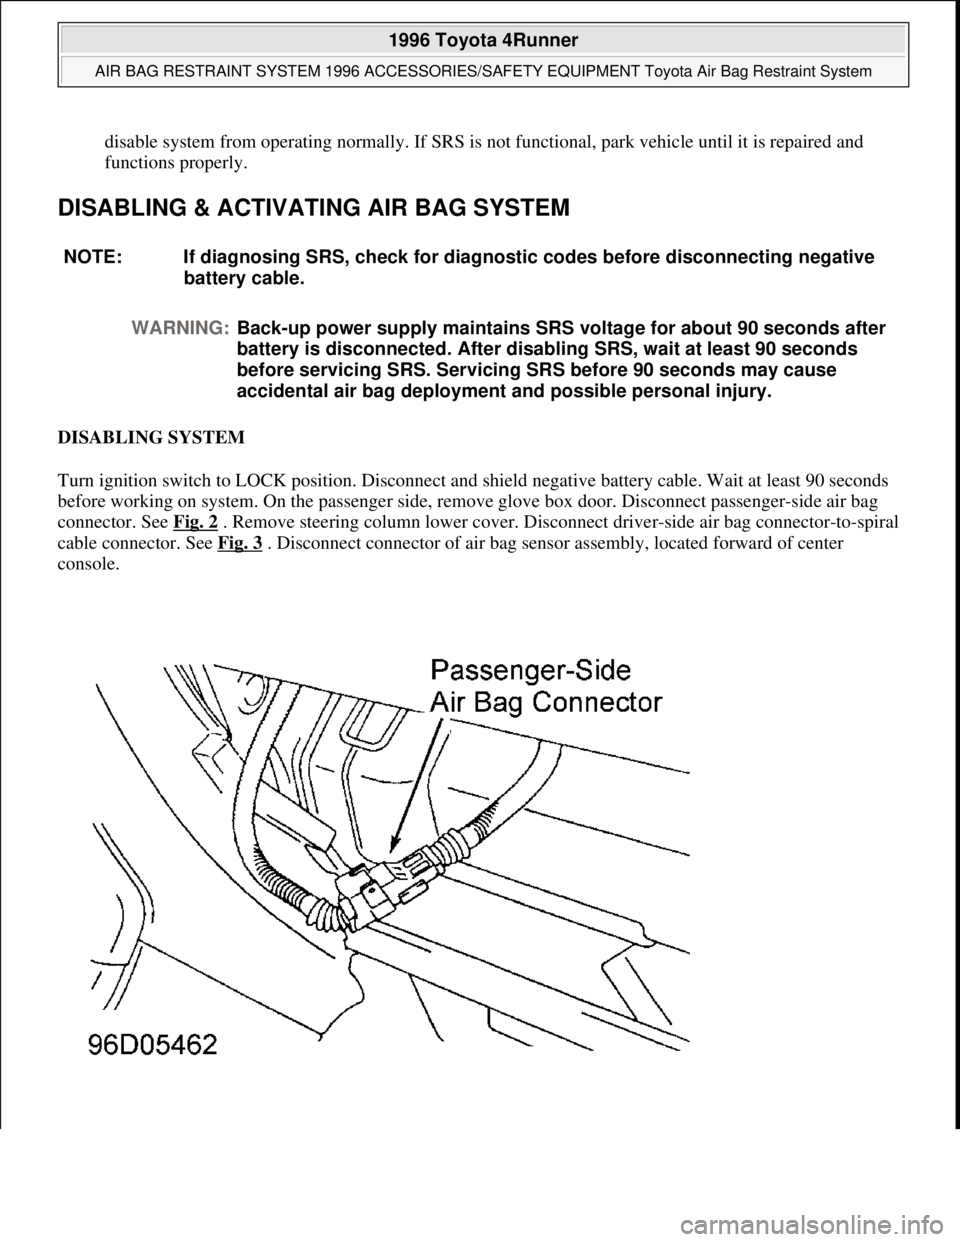
Turn ignition switch to LOCK position. Disconnect and shield negative battery cable. Wait at least 90 seconds
before working on system. On the passenger side, remove glove box door. Disconnect passenger-side air bag
connector. See Fig. 2
. Remove steering column lower cover. Disconnect driver-side air bag connector-to-spiral
cable connector. See Fig. 3
. Disconnect connector of air bag sensor assembly, located forward of center
console. NOTE: If diagnosing SRS, check for diagnostic codes before disconnecting negative
battery cable.
WARNING:Back-up power supply maintains SRS voltage for about 90 seconds after
battery is disconnected. After disabling SRS, wait at least 90 seconds
before servicing SRS. Servicing SRS before 90 seconds may cause
accidental air bag deployment and possible personal injury.
1996 Toyota 4Runner
AIR BAG RESTRAINT SYSTEM 1996 ACCESSORIES/SAFETY EQUIPMENT Toyota Air Bag Restraint System
Microsoft
Tuesday, August 18, 2009 7:33:32 PMPage 4 © 2005 Mitchell Repair Information Company, LLC.
Page 39 of 1632
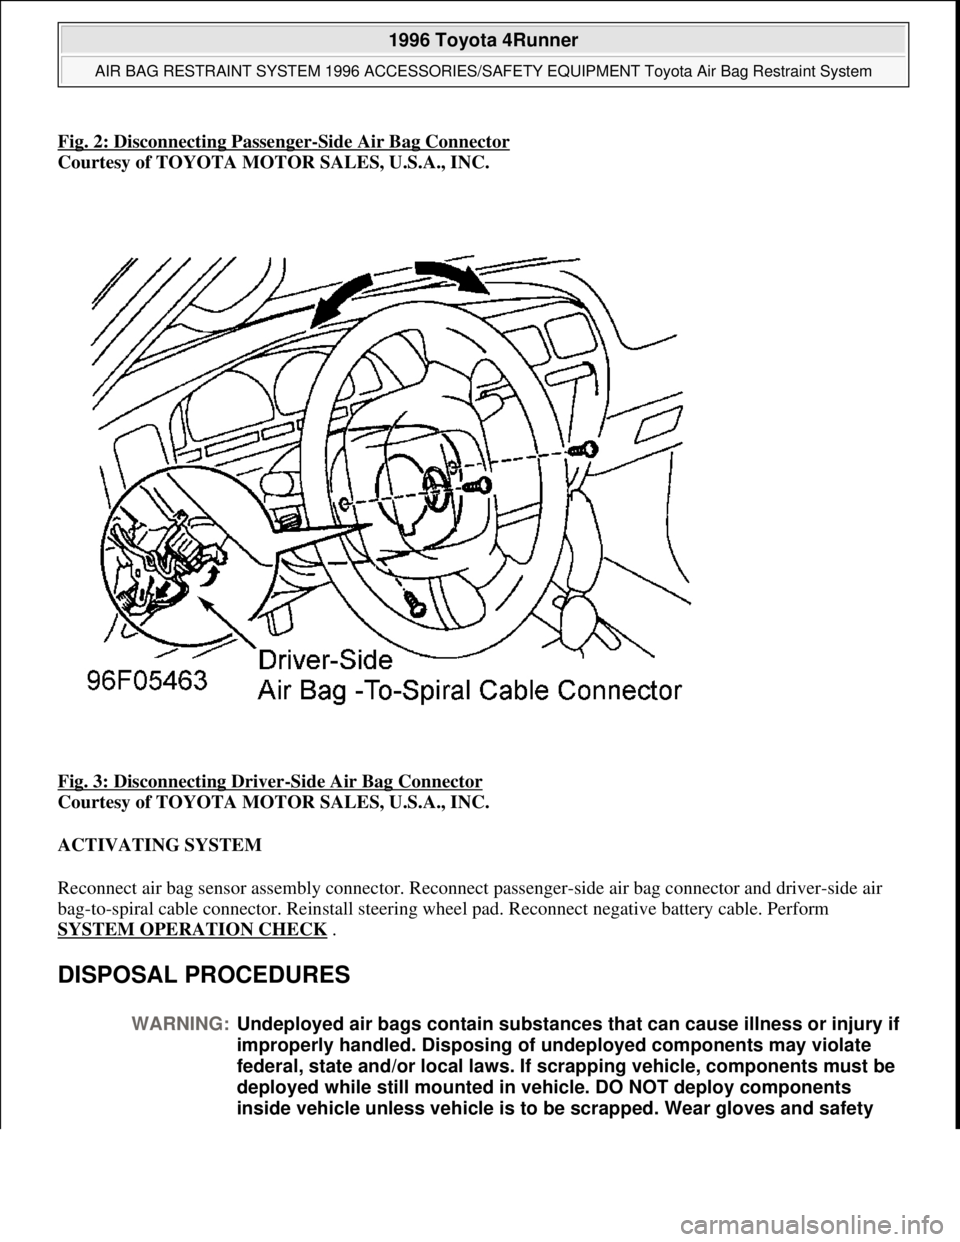
Fig. 2: Disconnecting Passenger-Side Air Bag Connector
Courtesy of TOYOTA MOTOR SALES, U.S.A., INC.
Fig. 3: Disconnecting Driver
-Side Air Bag Connector
Courtesy of TOYOTA MOTOR SALES, U.S.A., INC.
ACTIVATING SYSTEM
Reconnect air bag sensor assembly connector. Reconnect passenger-side air bag connector and driver-side air
bag-to-spiral cable connector. Reinstall steering wheel pad. Reconnect negative battery cable. Perform
SYSTEM OPERATION CHECK
.
DISPOSAL PROCEDURES
WARNING:Undeployed air bags contain substances that can cause illness or injury if
improperly handled. Disposing of undeployed components may violate
federal, state and/or local laws. If scrapping vehicle, components must be
deployed while still mounted in vehicle. DO NOT deploy components
inside vehicle unless vehicle is to be scrapped. Wear gloves and safety
1996 Toyota 4Runner
AIR BAG RESTRAINT SYSTEM 1996 ACCESSORIES/SAFETY EQUIPMENT Toyota Air Bag Restraint System
Microsoft
Tuesday, August 18, 2009 7:33:32 PMPage 5 © 2005 Mitchell Repair Information Company, LLC.
Page 40 of 1632
DEPLOYING AIR BAG
On-Vehicle Deployment (Scrapped Vehicles Only)
1. Before proceeding, follow service precautions. See SERVICE PRECAUTIONS . Turn ignition switch
to LOCK position. Disconnect and shield negative battery cable. Wait at least 90 seconds before working
on system.
2. Disable air bag system. See DISABLING & ACTIVATING AIR BAG SYSTEM
. Connect
Deployment Tool (09082-00700) to air bag connector. Position deployment tool at least 33 feet from
front of vehicle.
3. Close all doors and windows of vehicle. Connect deployment tool Red clip to positive battery terminal
and Black clip to negative battery terminal. Ensure no one is within 33 feet of vehicle. Press deployment
tool activation switch to deploy air bag. Because of heat, DO NOT touch air bag for at least 30 minutes
after deployment.
Off-Vehicle Deployment (Driver-Side)
1. Before proceeding, see SERVICE PRECAUTIONS . Disable SRS. See DISABLING &
ACTIVATING AIR BAG SYSTEM . Remove steering wheel pad from vehicle. See STEERING
WHEEL PAD & SPIRAL CABLE under REMOVAL & INSTALLATION.
2. Remove connector on steering wheel pad rear surface and install 2.236" (6.0 mm) bolts (1.38" 35 mm
long) with washers in steering wheel pad. Bolts should have a pitch of .039" (1.0 mm). Tighten bolts by
hand until they become difficult to turn. DO NOT overtighten bolts. Obtain a wheel and tire assembly.
Using a service-purpose wire harness, tie down the steering wheel pad to the wheel and tire assembly.
3. Wrap heavy-gauge 3-wire harness around bolts at least twice. See Fig. 4
. Ensure no slack is present in
wire. If slack is present, or if wire is not strong enough, steering wheel pad may become loose due to
shock when air ba
g is deployed. glasses when handling components. Wrap deployed components in a
sturdy plastic bag. Dispose of components like any other part.
WARNING:When attaching air bag assembly to tire, ensure wire is tight. If slack
is present, or if wire is not strong enough, air bag assembly may
become loose due to shock when air bag is deployed.
1996 Toyota 4Runner
AIR BAG RESTRAINT SYSTEM 1996 ACCESSORIES/SAFETY EQUIPMENT Toyota Air Bag Restraint System
Microsoft
Tuesday, August 18, 2009 7:33:32 PMPage 6 © 2005 Mitchell Repair Information Company, LLC.