ACURA NSX 1991 Service Repair Manual
Manufacturer: ACURA, Model Year: 1991, Model line: NSX, Model: ACURA NSX 1991Pages: 1640, PDF Size: 60.48 MB
Page 1561 of 1640
Removal
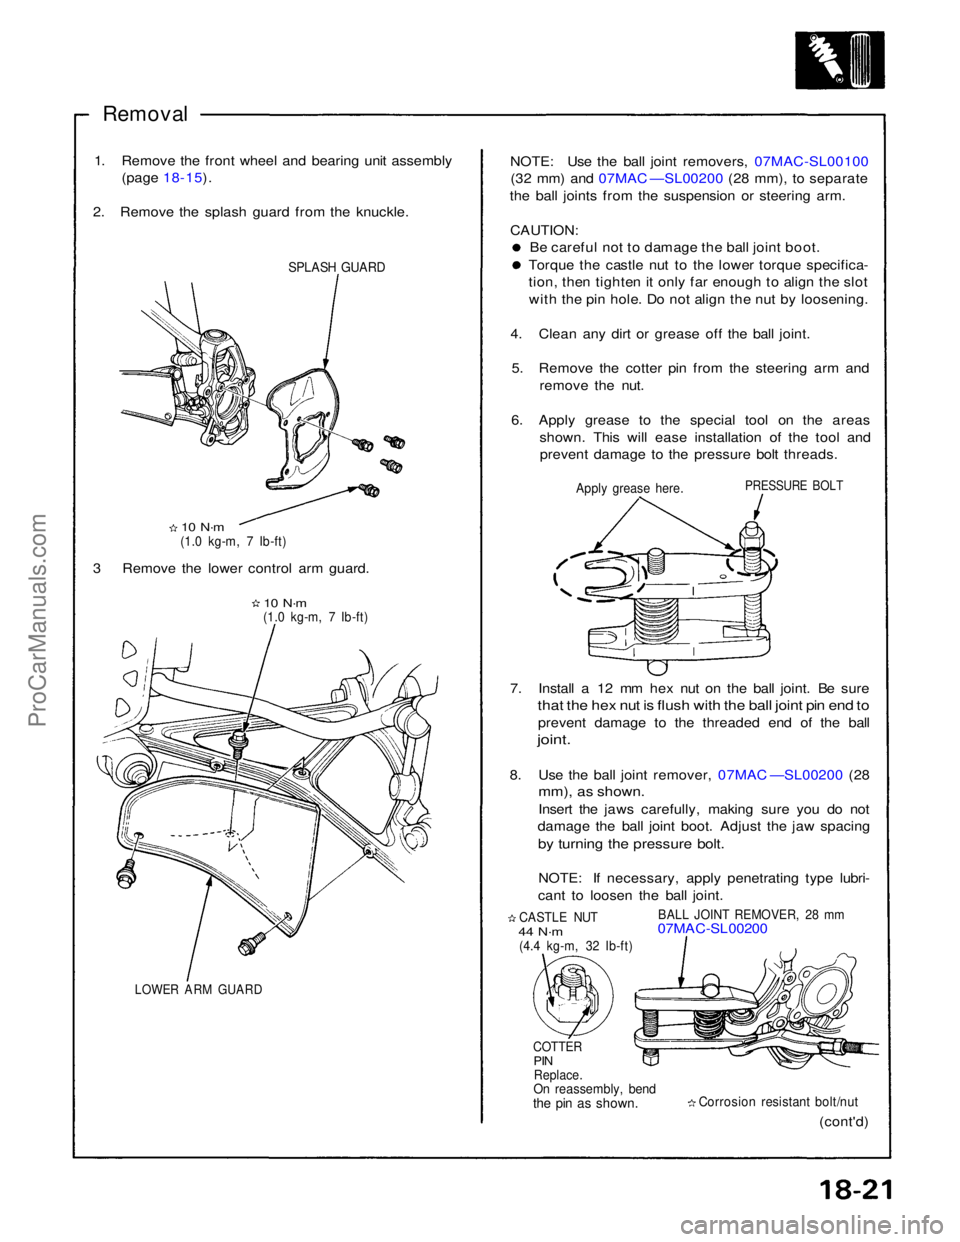
1. Remove the front wheel and bearing unit assembly (page 18-15).
2. Remove the splash guard from the knuckle.
SPLASH GUARD
10 N·m
(1.0 kg-m, 7 Ib-ft)
3 Remove the lower control arm guard.
10 N·m
(1.0 kg-m, 7 Ib-ft)
LOWER ARM GUARD
(cont'd)
Corrosion resistant bolt/nut
COTTER
PIN
Replace.
On reassembly, bend
the pin as shown.
CASTLE NUT
44 N·m
(4.4 kg-m, 32 Ib-ft)
BALL JOINT REMOVER, 28 mm
07MAC-SL00200
7. Install a 12 mm hex nut on the ball joint. Be sure
that the hex nut is flush with the ball joint pin end to
prevent damage to the threaded end of the ball
joint.
8. Use the ball joint remover, 07MAC —SL00200 (28
mm), as shown.
Insert the jaws carefully, making sure you do not
damage the ball joint boot. Adjust the jaw spacing
by turning the pressure bolt.
NOTE: If necessary, apply penetrating type lubri-
cant to loosen the ball joint.
PRESSURE BOLT
Apply grease here.
NOTE: Use the ball joint removers, 07MAC-SL00100
(32 mm) and 07MAC —SL00200 (28 mm), to separate
the ball joints from the suspension or steering arm.
CAUTION: Be careful not to damage the ball joint boot. Torque the castle nut to the lower torque specifica-
tion, then tighten it only far enough to align the slot
with the pin hole. Do not align the nut by loosening.
4. Clean any dirt or grease off the ball joint. 5. Remove the cotter pin from the steering arm and remove the nut.
6. Apply grease to the special tool on the areas shown. This will ease installation of the tool andprevent damage to the pressure bolt threads.ProCarManuals.com
Page 1562 of 1640
Knuckle/Control Arms/Compliance Pivot
Removal (cont'd)
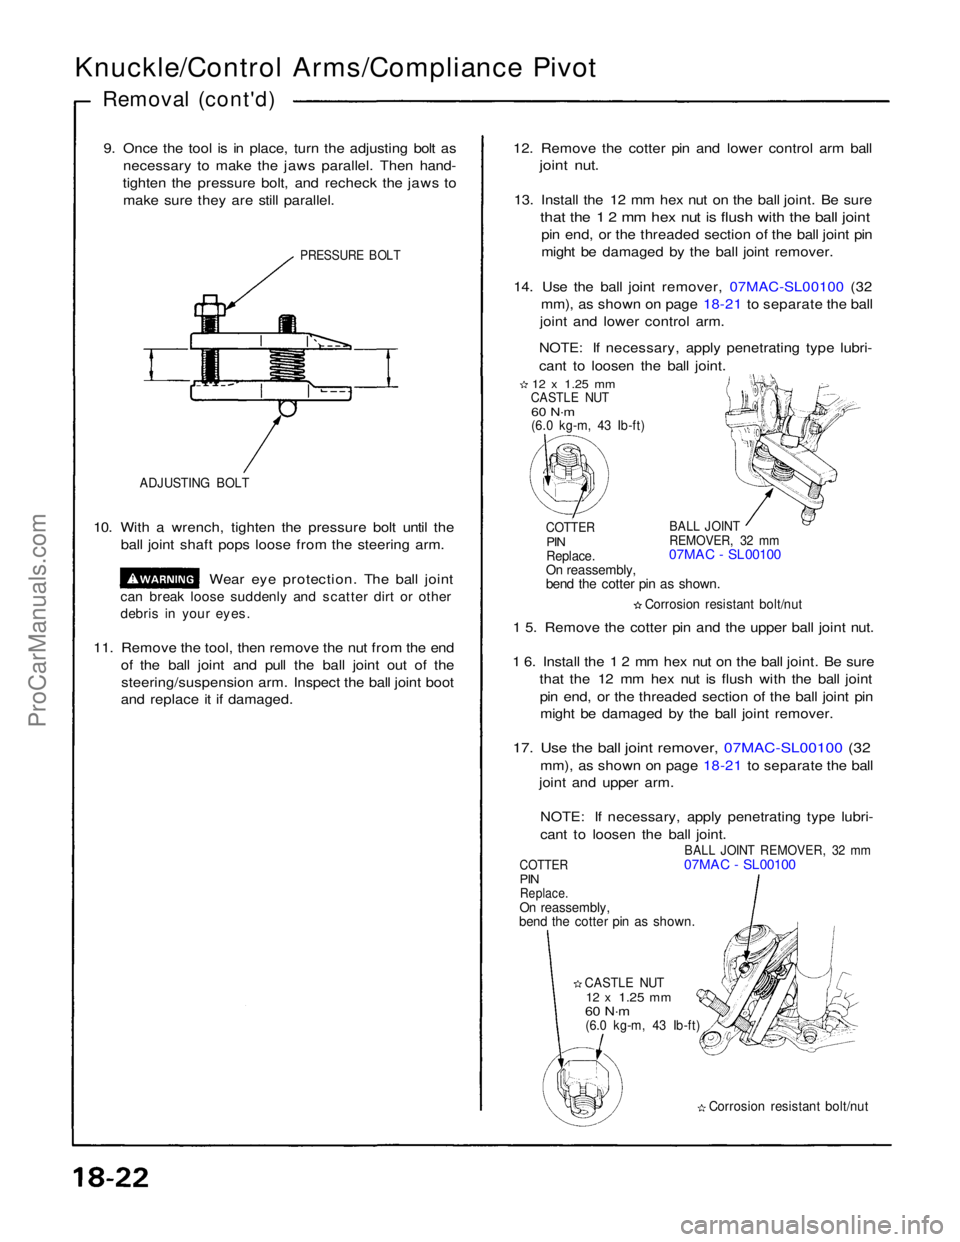
9. Once the tool is in place, turn the adjusting bolt as necessary to make the jaws parallel. Then hand-
tighten the pressure bolt, and recheck the jaws to make sure they are still parallel.
PRESSURE BOLT
ADJUSTING BOLT
10. With a wrench, tighten the pressure bolt until the ball joint shaft pops loose from the steering arm.
Wear eye protection. The ball joint
can break loose suddenly and scatter dirt or other
debris in your eyes.
11. Remove the tool, then remove the nut from the end of the ball joint and pull the ball joint out of thesteering/suspension arm. Inspect the ball joint boot
and replace it if damaged. 12. Remove the cotter pin and lower control arm ball
joint nut.
13. Install the 12 mm hex nut on the ball joint. Be sure
that the 1 2 mm hex nut is flush with the ball joint
pin end, or the threaded section of the ball joint pin
might be damaged by the ball joint remover.
14. Use the ball joint remover, 07MAC-SL00100 (32 mm), as shown on page 18-21 to separate the ball
joint and lower control arm.
NOTE: If necessary, apply penetrating type lubri-
cant to loosen the ball joint.
12 x
1.25
mm
CASTLE NUT
60 N·m
(6.0 kg-m, 43 Ib-ft)
COTTER
PIN
Replace.
On reassembly,
bend the cotter pin as shown.
BALL JOINT
REMOVER, 32 mm
07MAC - SL00100
Corrosion resistant bolt/nut
1 5. Remove the cotter pin and the upper ball joint nut.
1 6. Install the 1 2 mm hex nut on the ball joint. Be sure that the 12 mm hex nut is flush with the ball joint
pin end, or the threaded section of the ball joint pinmight be damaged by the ball joint remover.
17. Use the ball joint remover, 07MAC-SL00100 (32
mm), as shown on page 18-21 to separate the ball
joint and upper arm.
NOTE: If necessary, apply penetrating type lubri-
cant to loosen the ball joint.
BALL JOINT REMOVER, 32 mm
07MAC - SL00100
COTTER
PIN
Replace.
On reassembly,
bend the cotter pin as shown.
CASTLE NUT
12 x
1.25
mm
60 N·m
(6.0 kg-m, 43 Ib-ft)
Corrosion resistant bolt/nutProCarManuals.com
Page 1563 of 1640
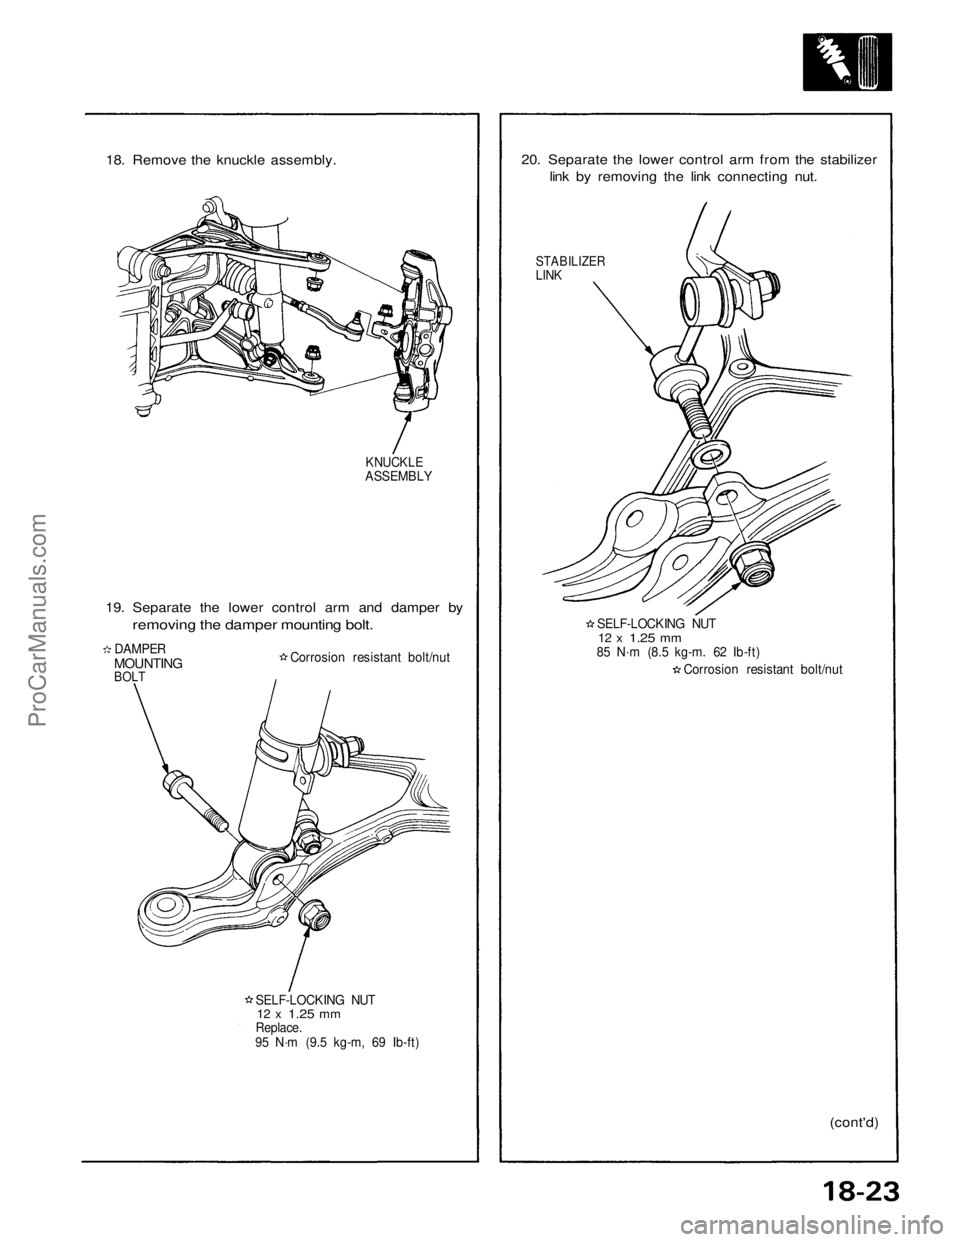
18. Remove the knuckle assembly.
KNUCKLE
ASSEMBLY
19. Separate the lower control arm and damper by
removing the damper mounting bolt.
DAMPER
MOUNTING
BOLT
Corrosion resistant bolt/nut
SELF-LOCKING NUT
12 x
1.25
mm
Replace.
95 N·m (9.5 kg-m, 69 Ib-ft)
(cont'd)
Corrosion resistant bolt/nut
SELF-LOCKING NUT
12 x
1.25
mm
85 N·m (8.5 kg-m. 62 Ib-ft)
STABILIZER
LINK
20. Separate the lower control arm from the stabilizer
link by removing the link connecting nut.ProCarManuals.com
Page 1564 of 1640
Knuckle/Control Arms/Compliance Pivot
Removal (cont'd)
21. Remove the cotter pin and lower arm ball joint nut.
22. Install the 12 mm hex nut on the ball joint. Be sure that the 1 2 mm hex nut is flush with the ball jointpin end, or the threaded section of the ball joint pin
might be damaged by the ball joint remover.
23. Use the ball joint remover, 07MAC - SL00100 (32 mm), as shown on page 18-21 to separate the ball
joint and compliance pivot.
NOTE: If necessary, apply penetrating type lubri-
cant to loosen the ball joint.
CAUTION: Avoid damaging the ball joint boot.
CASTLE NUT
12 x
1.25
mm
60 N·m
(6.0 kg-m, 43 Ib-ft)
COTTER
PIN
Replace.
On reassembly,
bend the cotter pin
as shown.
BALL JOINT REMOVER, 32 mm
07MAC-SL00100
Corrosion resistant bolt/nut
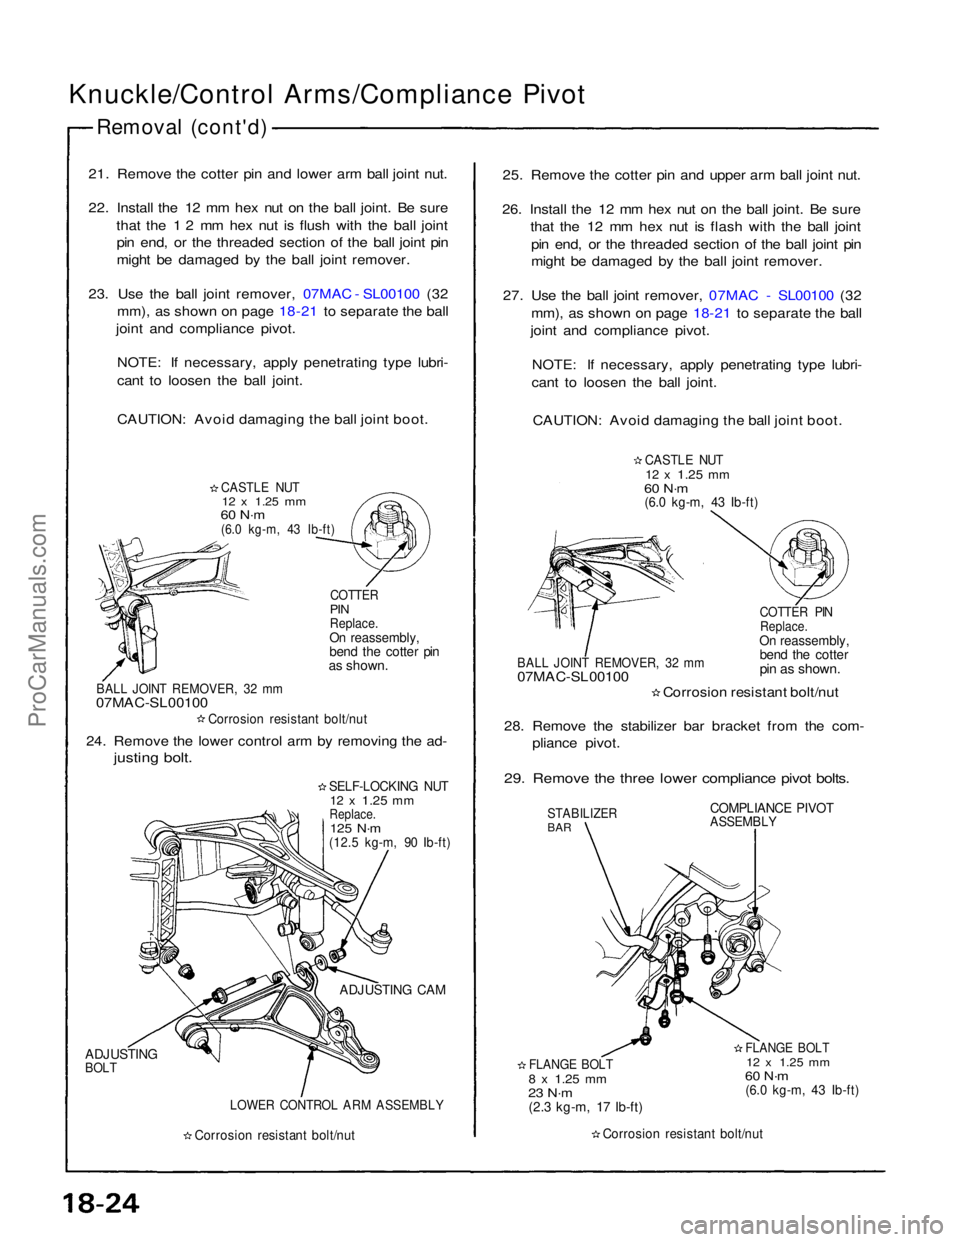
24. Remove the lower control arm by removing the ad-
justing bolt.
SELF-LOCKING NUT
12 x
1.25
mm
Replace.
125 N·m
(12.5 kg-m, 90 Ib-ft)
ADJUSTING CAM
LOWER CONTROL ARM ASSEMBLY
ADJUSTING
BOLT
Corrosion resistant bolt/nut
Corrosion resistant bolt/nut
FLANGE BOLT
8 x
1.25
mm
23 N·m
(2.3 kg-m, 17 Ib-ft)
FLANGE BOLT
12 x 1.25 mm
60 N·m
(6.0 kg-m, 43 Ib-ft)
COMPLIANCE PIVOT
ASSEMBLY
STABILIZER
BAR
28. Remove the stabilizer bar bracket from the com-
pliance pivot.
29. Remove the three lower compliance pivot bolts.
Corrosion resistant bolt/nut
BALL JOINT REMOVER, 32 mm
07MAC-SL00100
COTTER PIN
Replace.
On reassembly,
bend the cotter
pin as shown.
CASTLE NUT
12 x
1.25
mm
60 N·m
(6.0 kg-m, 43 Ib-ft)
25. Remove the cotter pin and upper arm ball joint nut.
26. Install the 12 mm hex nut on the ball joint. Be sure that the 12 mm hex nut is flash with the ball joint
pin end, or the threaded section of the ball joint pin
might be damaged by the ball joint remover.
27. Use the ball joint remover, 07MAC - SL00100 (32 mm), as shown on page 18-21 to separate the ball
joint and compliance pivot.
NOTE: If necessary, apply penetrating type lubri-
cant to loosen the ball joint.
CAUTION: Avoid damaging the ball joint boot.ProCarManuals.com
Page 1565 of 1640
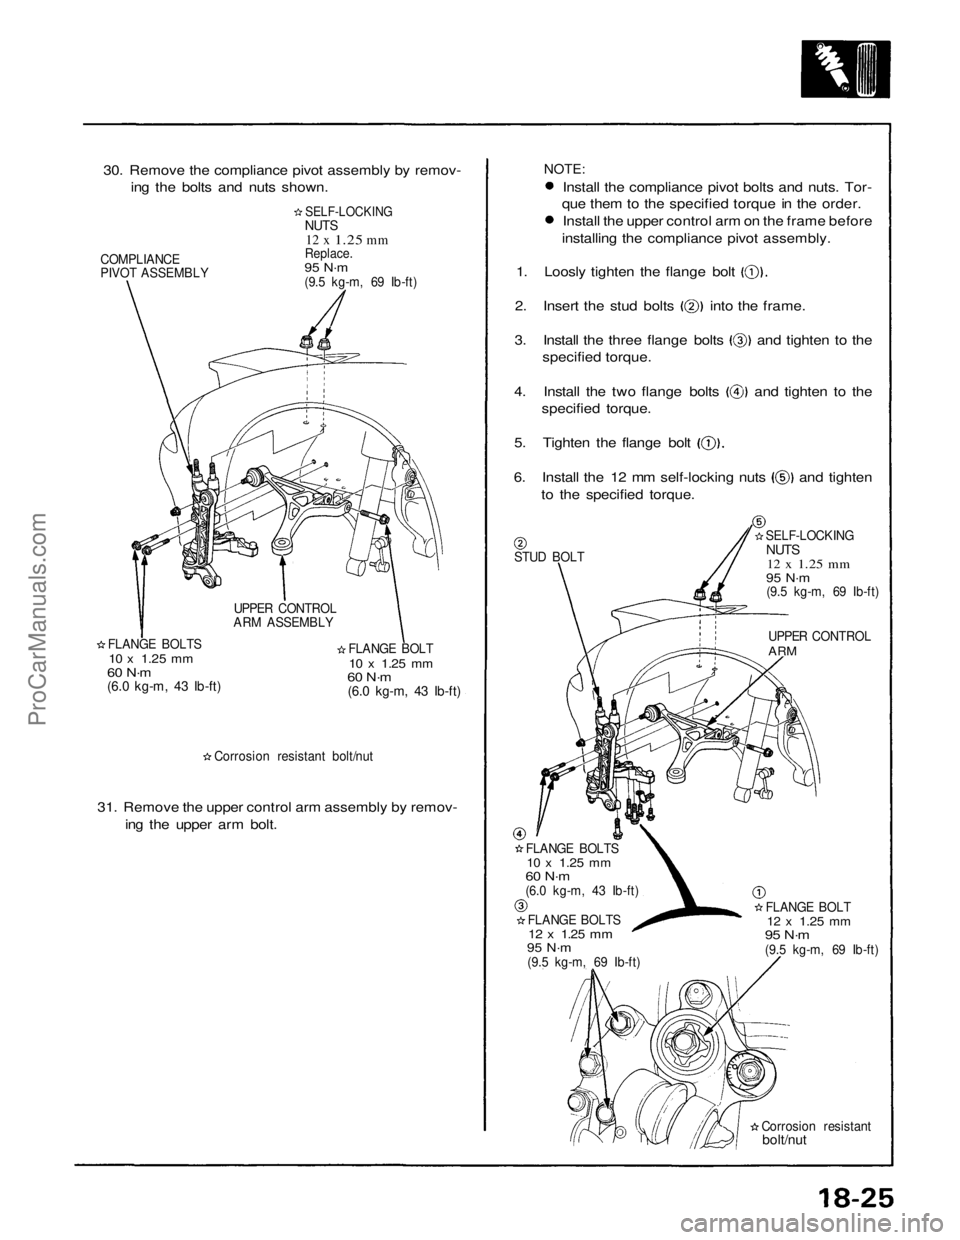
30. Remove the compliance pivot assembly by remov-
ing the bolts and nuts shown.
COMPLIANCE
PIVOT ASSEMBLY
SELF-LOCKING
NUTS
12 x
1.25
mm
Replace.
95 N·m
(9.5 kg-m, 69 Ib-ft)
UPPER CONTROL
ARM ASSEMBLY
FLANGE BOLTS
10 x
1.25
mm
60 N·m
(6.0 kg-m, 43 Ib-ft)
FLANGE BOLT
10 x
1.25
mm
60 N·m
(6.0 kg-m, 43 Ib-ft)
Corrosion resistant bolt/nut
31. Remove the upper control arm assembly by remov-
ing the upper arm bolt.
Corrosion resistant
bolt/nut
FLANGE BOLT
12 x
1.25
mm
95 N·m
(9.5 kg-m, 69 Ib-ft)
FLANGE BOLTS
12 x
1.25
mm
95 N·m
(9.5 kg-m, 69 Ib-ft)
FLANGE BOLTS
10 x
1.25
mm
60 N·m
(6.0 kg-m, 43 Ib-ft)
UPPER CONTROL
ARM
SELF-LOCKING
NUTS
12 x
1.25
mm
95 N·m
(9.5 kg-m, 69 Ib-ft)
STUD BOLT
NOTE:
Install the compliance pivot bolts and nuts. Tor-
que them to the specified torque in the order.
Install the upper control arm on the frame before
installing the compliance pivot assembly.
1. Loosly tighten the flange bolt
2. Insert the stud bolts into the frame.
3. Install the three flange bolts and tighten to the
specified torque.
4. Install the two flange bolts and tighten to the
specified torque.
5. Tighten the flange bolt
6. Install the 12 mm self-locking nuts and tighten
to the specified torque.ProCarManuals.com
Page 1566 of 1640
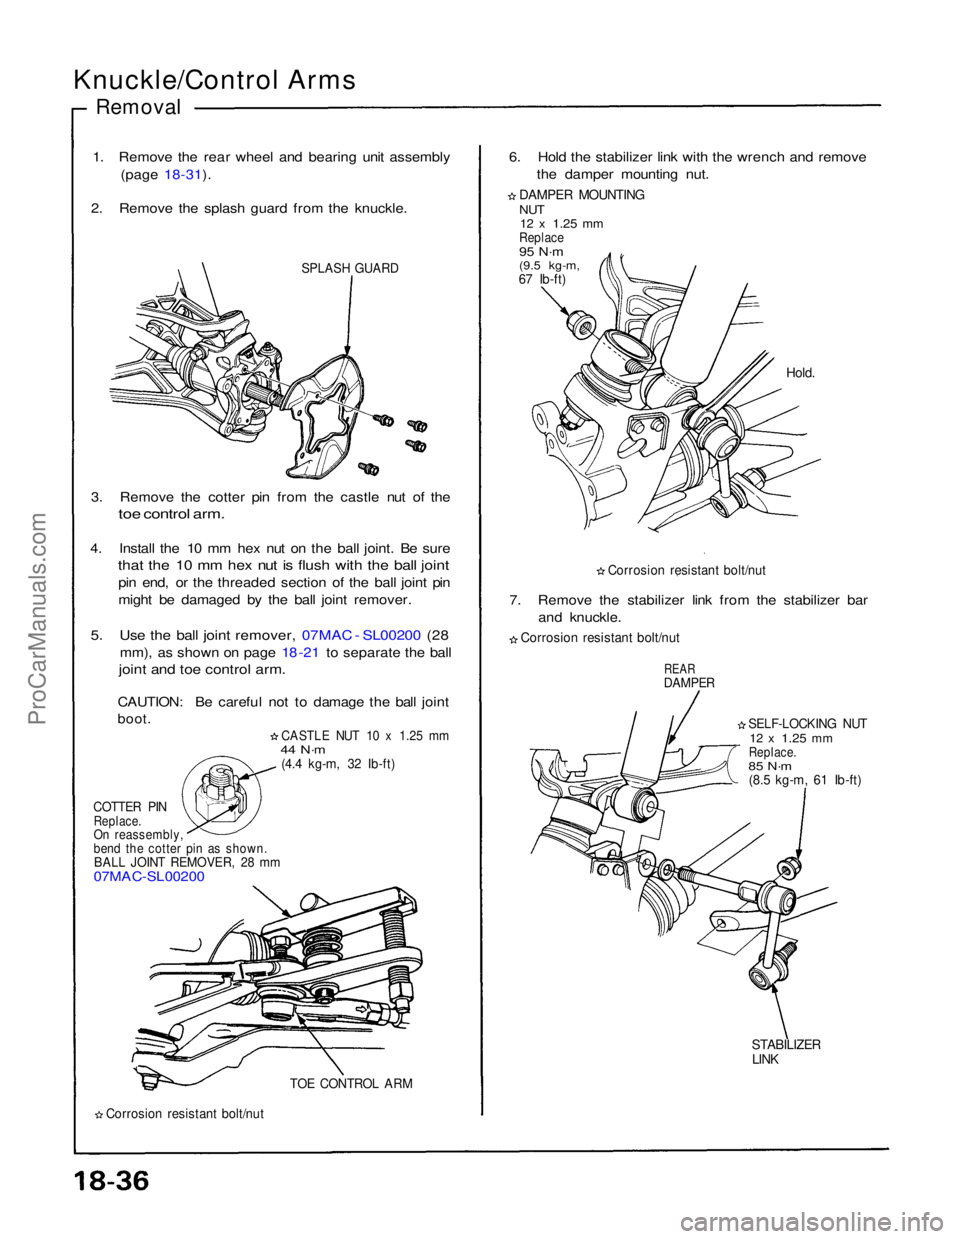
Knuckle/Control Arms
Removal
1. Remove the rear wheel and bearing unit assembly (page 18-31).
2. Remove the splash guard from the knuckle.
SPLASH GUARD
3. Remove the cotter pin from the castle nut of the
toe control arm.
4. Install the 10 mm hex nut on the ball joint. Be sure
that the 10 mm hex nut is flush with the ball joint
pin end, or the threaded section of the ball joint pin
might be damaged by the ball joint remover.
5. Use the ball joint remover, 07MAC - SL00200 (28
mm), as shown on page 18 -21 to separate the ball
joint and toe control arm.
CAUTION: Be careful not to damage the ball joint
boot.
CASTLE NUT 10 x 1.25 mm
44 N·m
(4.4 kg-m, 32 Ib-ft)
COTTER PIN
Replace.
On reassembly,
bend the cotter pin as shown.
BALL JOINT REMOVER, 28 mm
07MAC-SL00200
TOE CONTROL ARM
Corrosion resistant bolt/nut
STABILIZER
LINK
SELF-LOCKING NUT
12 x
1.25
mm
Replace.
85 N·m
(8.5 kg-m, 61 Ib-ft)
REAR
DAMPER
Corrosion resistant bolt/nut
7. Remove the stabilizer link from the stabilizer bar
and knuckle.
Corrosion resistant bolt/nut
Hold.
DAMPER MOUNTING
NUT
12 x
1.25
mm
Replace
95 N·m
(9.5 kg-m,
67 Ib-ft)
6. Hold the stabilizer link with the wrench and remove
the damper mounting nut.ProCarManuals.com
Page 1567 of 1640
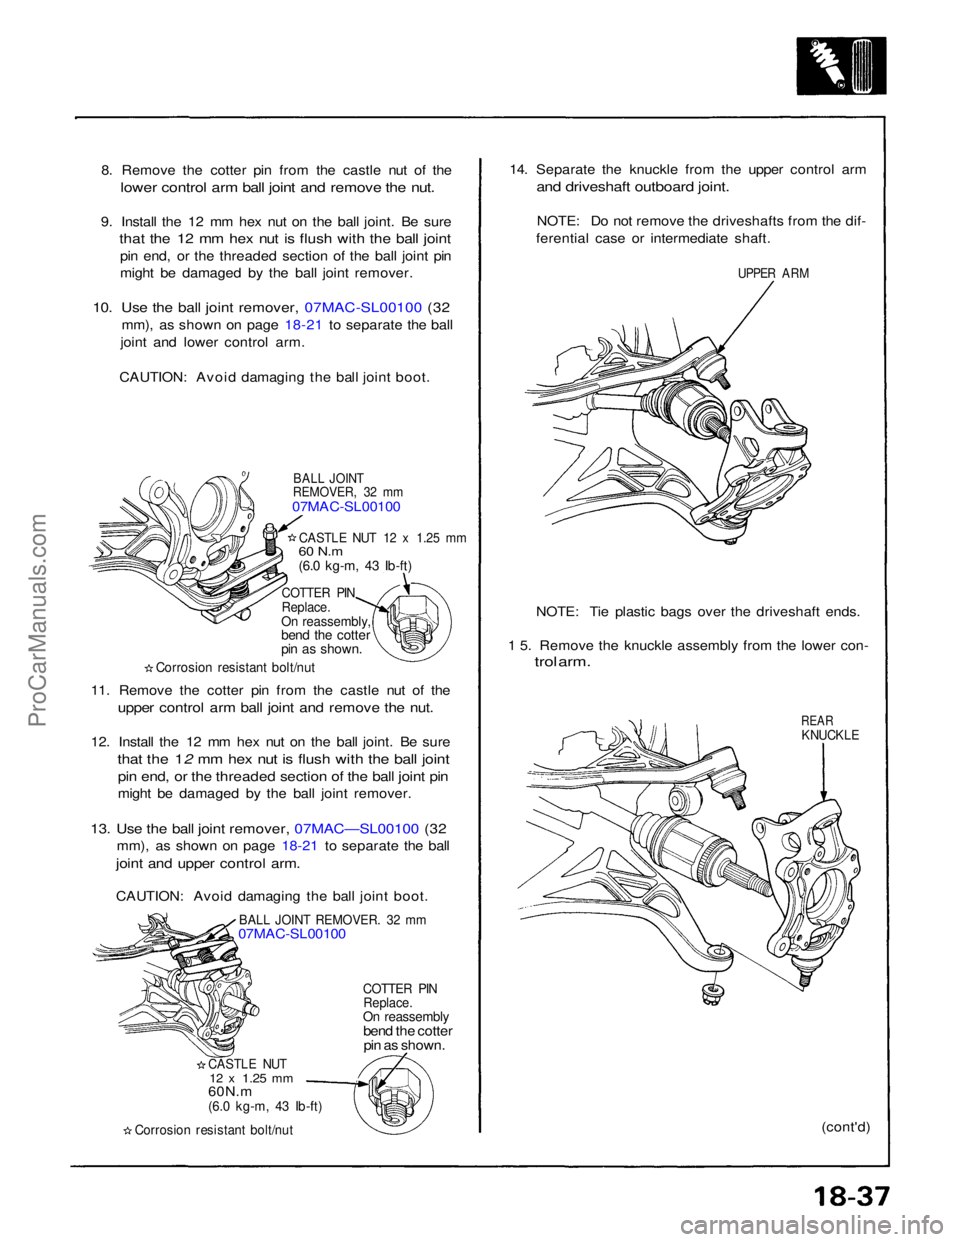
8. Remove the cotter pin from the castle nut of the
lower control arm ball joint and remove the nut.
9. Install the 12 mm hex nut on the ball joint. Be sure
that the 12 mm hex nut is flush with the ball joint
pin end, or the threaded section of the ball joint pin
might be damaged by the ball joint remover.
10. Use the ball joint remover, 07MAC-SL00100 (32
mm), as shown on page 18-21 to separate the ball
joint and lower control arm.
CAUTION: Avoid damaging the ball joint boot.
BALL JOINT
REMOVER, 32 mm
07MAC-SL00100
CASTLE NUT 12 x 1.25 mm
60 N.m
(6.0 kg-m, 43 Ib-ft)
COTTER PIN
Replace.
On reassembly,
bend the cotter
pin as shown.
Corrosion resistant bolt/nut
11. Remove the cotter pin from the castle nut of the
upper control arm ball joint and remove the nut.
12. Install the 12 mm hex nut on the ball joint. Be sure
that the 12 mm hex nut is flush with the ball joint
pin end, or the threaded section of the ball joint pin
might be damaged by the ball joint remover.
13. Use the ball joint remover, 07MAC—SL00100 (32
mm), as shown on page 18-21 to separate the ball
joint and upper control arm.
CAUTION: Avoid damaging the ball joint boot.
BALL JOINT REMOVER. 32 mm
07MAC-SL00100
COTTER PIN
Replace.
On reassembly
bend the cotterpin as shown.
CASTLE NUT
12 x
1.25
mm
60N.m
(6.0 kg-m, 43 Ib-ft)
Corrosion resistant bolt/nut
(cont'd)
REAR
KNUCKLE
1 5. Remove the knuckle assembly from the lower con-
trol arm.
NOTE: Tie plastic bags over the driveshaft ends.
UPPER ARM
14. Separate the knuckle from the upper control arm
and driveshaft outboard joint.
NOTE: Do not remove the driveshafts from the dif-
ferential case or intermediate shaft.ProCarManuals.com
Page 1568 of 1640
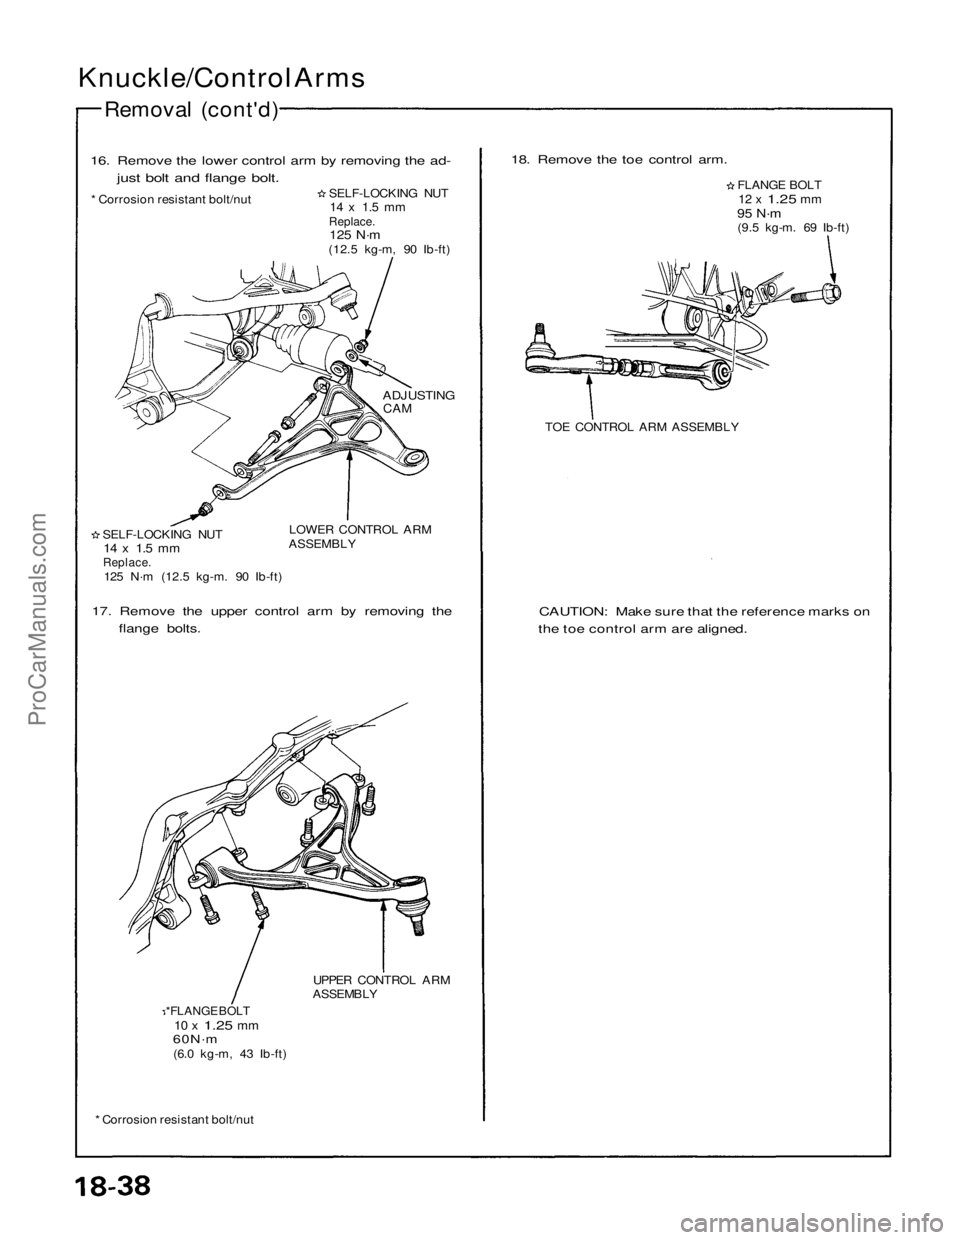
Knuckle/Control Arms
Removal (cont'd)
16. Remove the lower control arm by removing the ad-
just bolt and flange bolt.
* Corrosion resistant bolt/nut
SELF-LOCKING NUT
14 x 1.5 mm
Replace.
125 N·m
(12.5 kg-m, 90 Ib-ft)
ADJUSTING
CAM
SELF-LOCKING NUT
14 x 1.5 mm
Replace.
125 N·m (12.5 kg-m. 90 Ib-ft) LOWER CONTROL ARM
ASSEMBLY
17. Remove the upper control arm by removing the flange bolts.
UPPER CONTROL ARM
ASSEMBLY
*FLANGE BOLT
10 x
1.25
mm
60N·m
(6.0 kg-m, 43 Ib-ft)
* Corrosion resistant bolt/nut
CAUTION: Make sure that the reference marks on
the toe control arm are aligned.
TOE CONTROL ARM ASSEMBLY FLANGE BOLT
12 x
1.25
mm
95 N·m
(9.5 kg-m. 69 Ib-ft)
18. Remove the toe control arm.ProCarManuals.com
Page 1569 of 1640
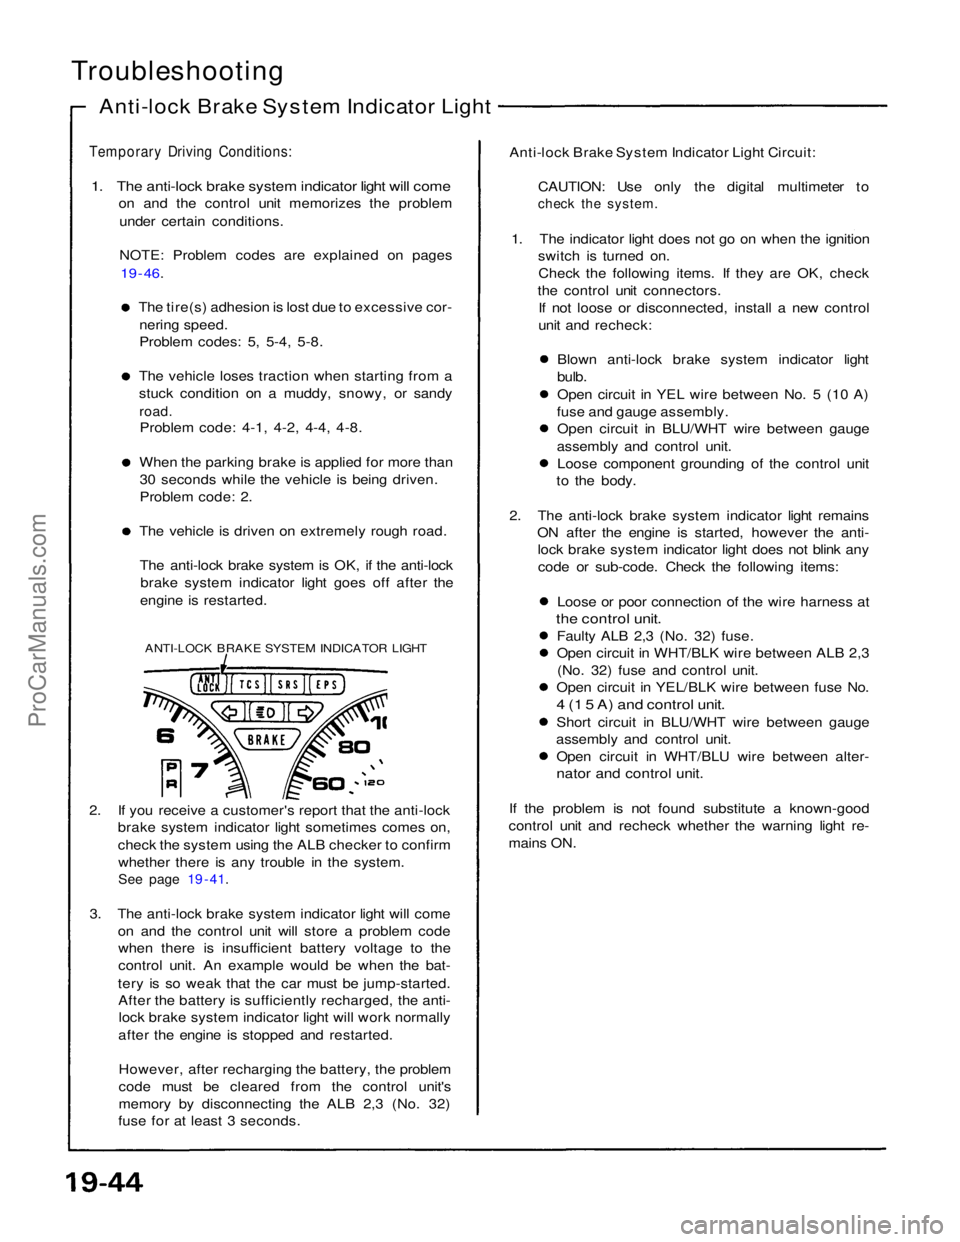
Troubleshooting
Anti-lock Brake System Indicator Light
Temporary Driving Conditions:
1. The anti-lock brake system indicator light will come
on and the control unit memorizes the problem
under certain conditions.
NOTE: Problem codes are explained on pages
19 - 46.
The tire(s) adhesion is lost due to excessive cor-
nering speed.
Problem codes: 5, 5-4, 5-8. The vehicle loses traction when starting from a
stuck condition on a muddy, snowy, or sandy
road.
Problem code: 4-1, 4-2, 4-4, 4-8. When the parking brake is applied for more than
30 seconds while the vehicle is being driven.
Problem code: 2. The vehicle is driven on extremely rough road.
The anti-lock brake system is OK, if the anti-lock brake system indicator light goes off after the
engine is restarted.
ANTI-LOCK BRAKE SYSTEM INDICATOR LIGHT
2. If you receive a customer's report that the anti-lock brake system indicator light sometimes comes on,
check the system using the ALB checker to confirm
whether there is any trouble in the system.
See page 19 - 41.
3. The anti-lock brake system indicator light will come on and the control unit will store a problem codewhen there is insufficient battery voltage to the
control unit. An example would be when the bat-
tery is so weak that the car must be jump-started. After the battery is sufficiently recharged, the anti-lock brake system indicator light will work normally
after the engine is stopped and restarted.
However, after recharging the battery, the problem
code must be cleared from the control unit's
memory by disconnecting the ALB 2,3 (No. 32)
fuse for at least 3 seconds. Anti-lock Brake System Indicator Light Circuit:
CAUTION: Use only the digital multimeter to
check the system.
1. The indicator light does not go on when the ignition switch is turned on.
Check the following items. If they are OK, check
the control unit connectors. If not loose or disconnected, install a new control
unit and recheck:
Blown anti-lock brake system indicator light
bulb.
Open circuit in YEL wire between No. 5 (10 A)
fuse and gauge assembly. Open circuit in BLU/WHT wire between gauge
assembly and control unit. Loose component grounding of the control unit
to the body.
2. The anti-lock brake system indicator light remains ON after the engine is started, however the anti-lock brake system indicator light does not blink any
code or sub-code. Check the following items:
Loose or poor connection of the wire harness at
the control unit.
Faulty ALB 2,3 (No. 32) fuse.
Open circuit in WHT/BLK wire between ALB 2,3(No. 32) fuse and control unit.
Open circuit in YEL/BLK wire between fuse No.
4 (1 5 A) and control unit.
Short circuit in BLU/WHT wire between gauge
assembly and control unit. Open circuit in WHT/BLU wire between alter-
nator and control unit.
If the problem is not found substitute a known-good
control unit and recheck whether the warning light re-
mains ON.ProCarManuals.com
Page 1570 of 1640
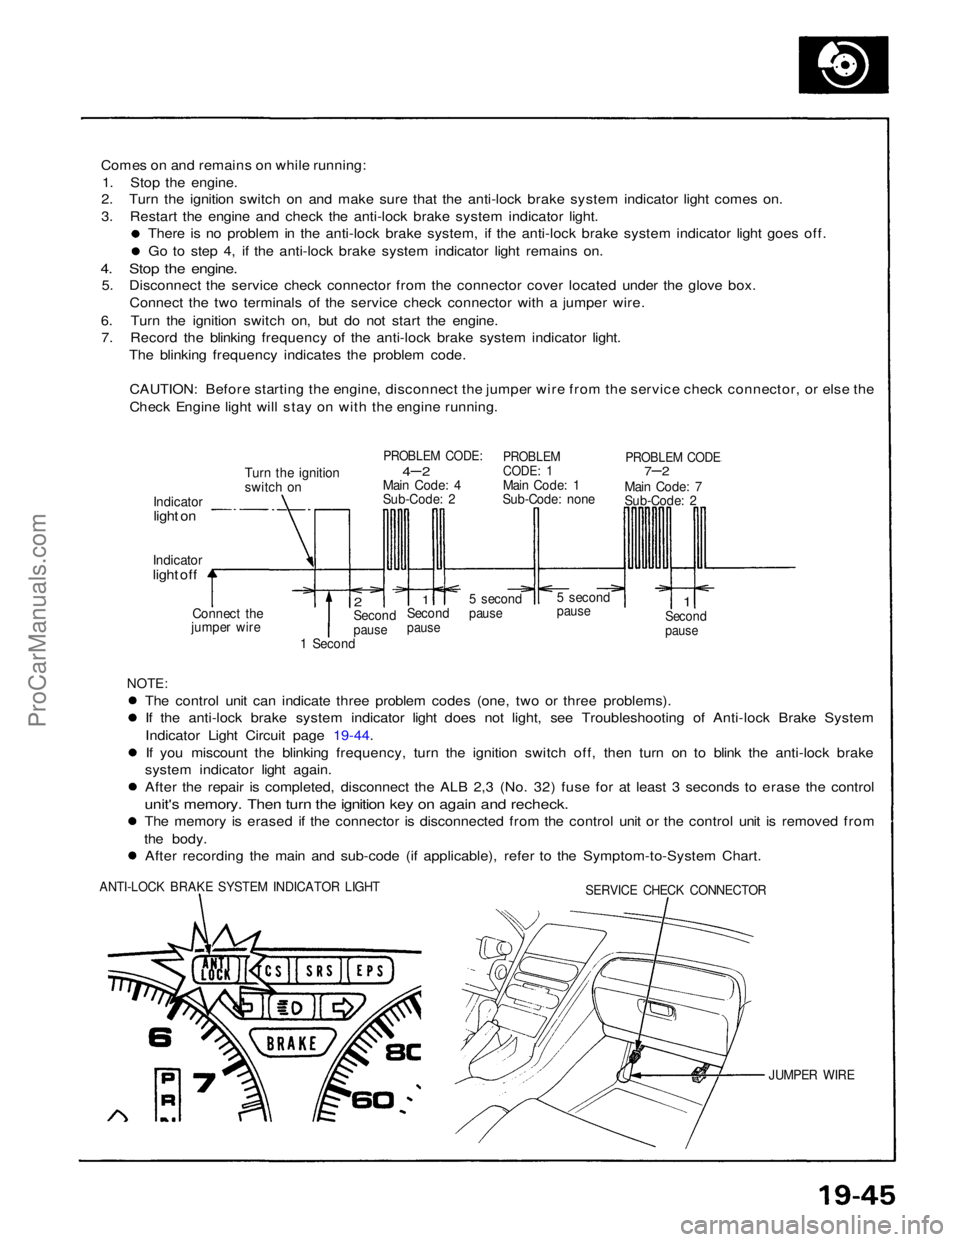
Comes on and remains on while running:
1. Stop the engine.
2. Turn the ignition switch on and make sure that the anti-lock brake system indicator light comes on.
3. Restart the engine and check the anti-lock brake system indicator light.
There is no problem in the anti-lock brake system, if the anti-lock brake system indicator light goes off. Go to step 4, if the anti-lock brake system indicator light remains on.
4. Stop the engine.
5. Disconnect the service check connector from the connector cover located under the glove box.
Connect the two terminals of the service check connector with a jumper wire.
6. Turn the ignition switch on, but do not start the engine. 7. Record the blinking frequency of the anti-lock brake system indicator light.
The blinking frequency indicates the problem code.
CAUTION: Before starting the engine, disconnect the jumper wire from the service check connector, or else the
Check Engine light will stay on with the engine running.
Turn the ignition
switch on
PROBLEM CODE:
4– 2
Main Code: 4
Sub-Code: 2
PROBLEM
CODE: 1
Main Code: 1
Sub-Code: none
PROBLEM CODE
7–2
Main Code: 7
Sub-Code: 2
Indicator
light on
Indicator
light off
Connect the
jumper wire
2
Second
pause
1
Second
pause
5 second
pause
5 second
pause
1
Second
pause
1 Second
NOTE:
The control unit can indicate three problem codes (one, two or three problems). If the anti-lock brake system indicator light does not light, see Troubleshooting of Anti-lock Brake System
Indicator Light Circuit page 19-44.
If you miscount the blinking frequency, turn the ignition switch off, then turn on to blink the anti-lock brake
system indicator light again. After the repair is completed, disconnect the ALB 2,3 (No. 32) fuse for at least 3 seconds to erase the control
unit's memory. Then turn the ignition key on again and recheck.
The memory is erased if the connector is disconnected from the control unit or the control unit is removed from
the body. After recording the main and sub-code (if applicable), refer to the Symptom-to-System Chart.
ANTI-LOCK BRAKE SYSTEM INDICATOR LIGHT
SERVICE CHECK CONNECTOR
JUMPER WIREProCarManuals.com