ACURA NSX 1991 Service Repair Manual
Manufacturer: ACURA, Model Year: 1991, Model line: NSX, Model: ACURA NSX 1991Pages: 1640, PDF Size: 60.48 MB
Page 1531 of 1640
Emission Control System
Positive Crankcase Ventilation System
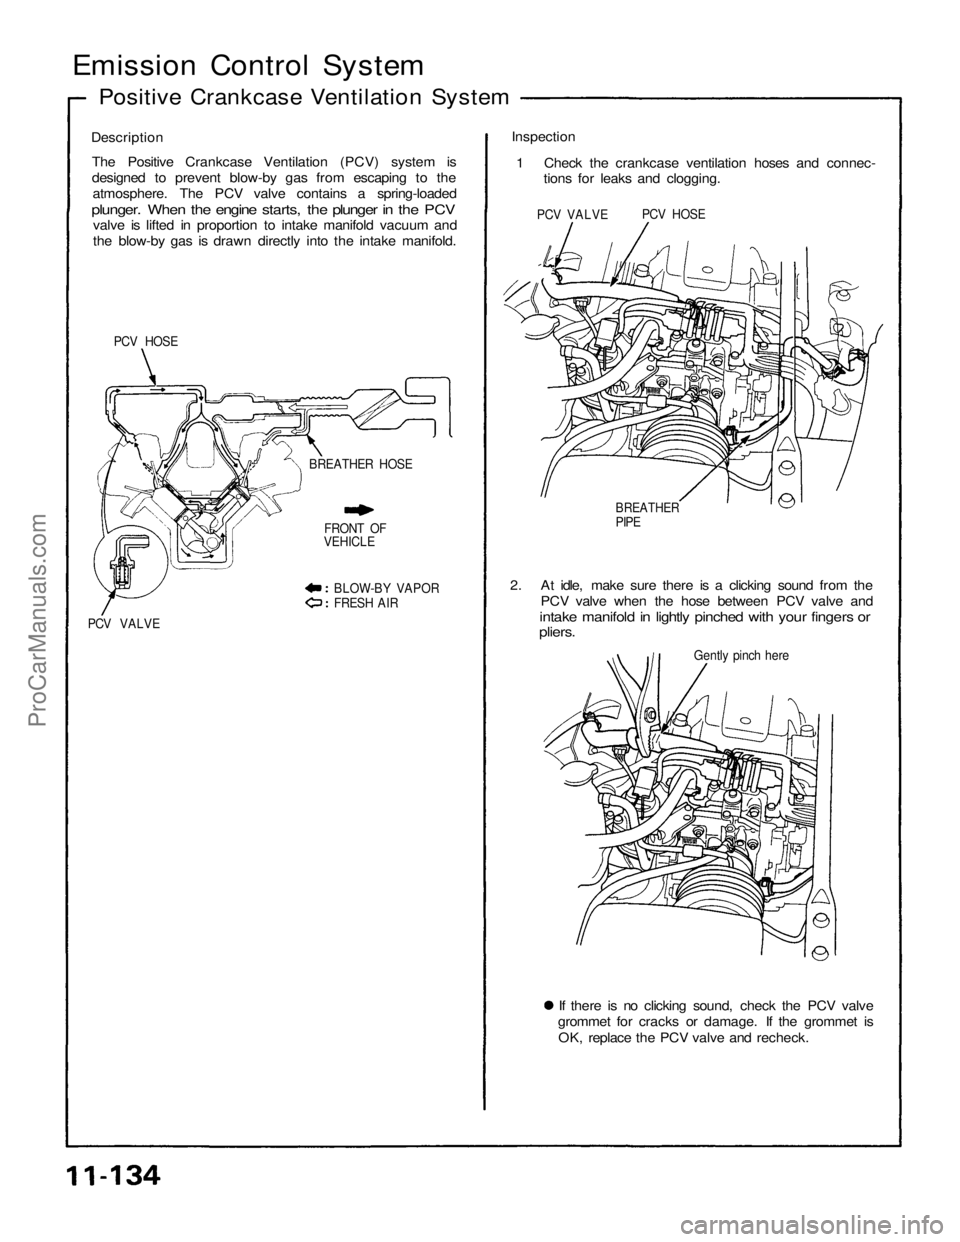
Description The Positive Crankcase Ventilation (PCV) system is
designed to prevent blow-by gas from escaping to theatmosphere. The PCV valve contains a spring-loaded
plunger. When the engine starts, the plunger in the PCV
valve is lifted in proportion to intake manifold vacuum and
the blow-by gas is drawn directly into the intake manifold.
PCV HOSE
BLOW-BY VAPOR
FRESH AIR
PCV VALVE
Inspection
1 Check the crankcase ventilation hoses and connec- tions for leaks and clogging.
BREATHER
PIPE
2. At idle, make sure there is a clicking sound from the PCV valve when the hose between PCV valve and
intake manifold in lightly pinched with your fingers or
pliers.
If there is no clicking sound, check the PCV valve
grommet for cracks or damage. If the grommet is
OK, replace the PCV valve and recheck.
PCV VALVE
PCV HOSE
Gently pinch here
BREATHER HOSE
FRONT OF
VEHICLEProCarManuals.com
Page 1532 of 1640
Evaporative Emission Controls
Description
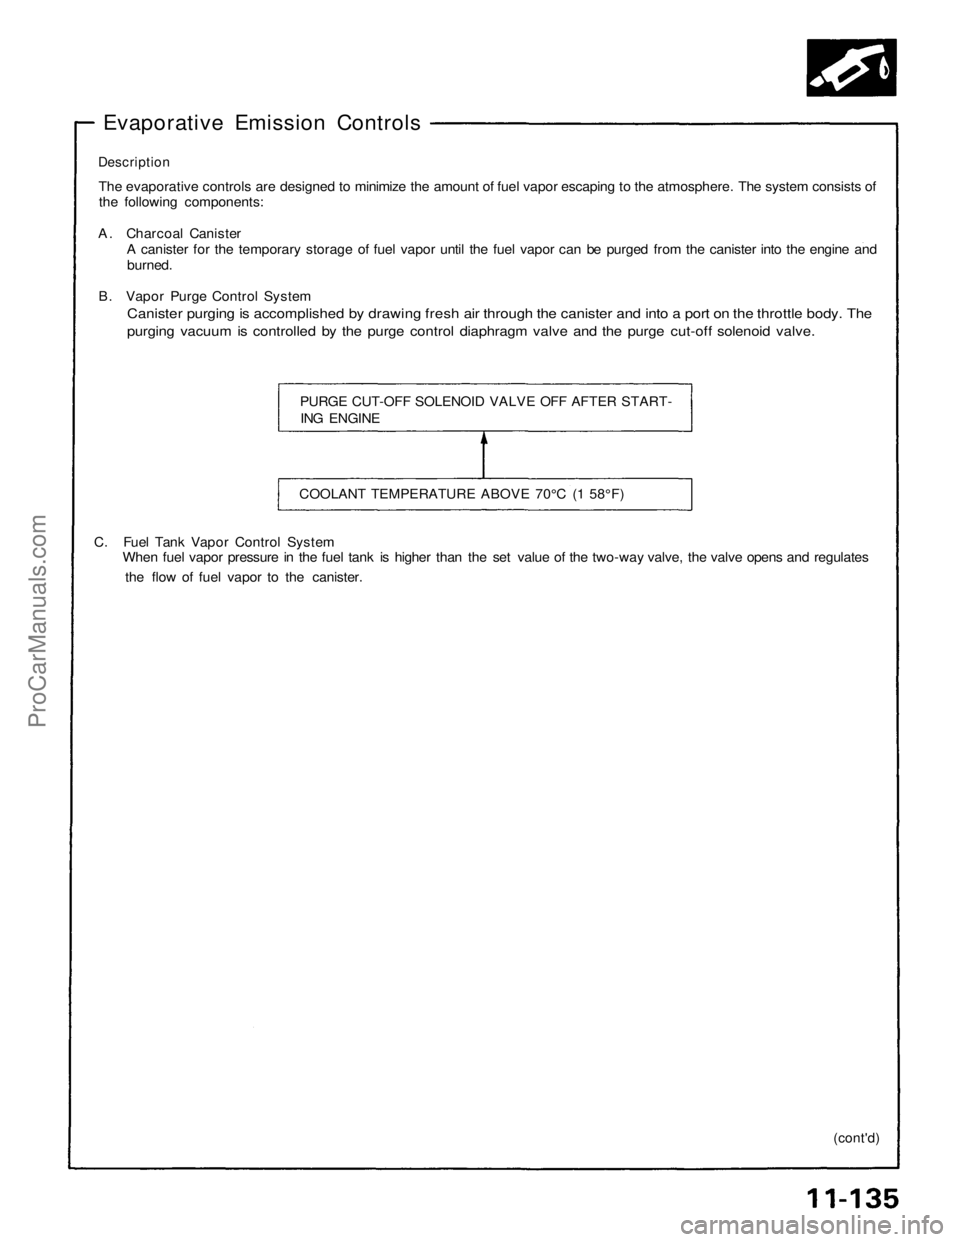
The evaporative controls are designed to minimize the amount of fuel vapor escaping to the atmosphere. The system consists of
the following components:
A. Charcoal Canister
A canister for the temporary storage of fuel vapor until the fuel vapor can be purged from the canister into the engine and
burned.
B. Vapor Purge Control System
Canister purging is accomplished by drawing fresh air through the canister and into a port on the throttle body. The
purging vacuum is controlled by the purge control diaphragm valve and the purge cut-off solenoid valve.
C. Fuel Tank Vapor Control System
When fuel vapor pressure in the fuel tank is higher than the set value of the two-way valve, the valve opens and regulates
the flow of fuel vapor to the canister.
(cont'd)
PURGE CUT-OFF SOLENOID VALVE OFF AFTER START-
ING ENGINE
COOLANT TEMPERATURE ABOVE 70°C (1 58°F)ProCarManuals.com
Page 1533 of 1640
Emission Control System
Evaporative Emission Controls (cont'd)
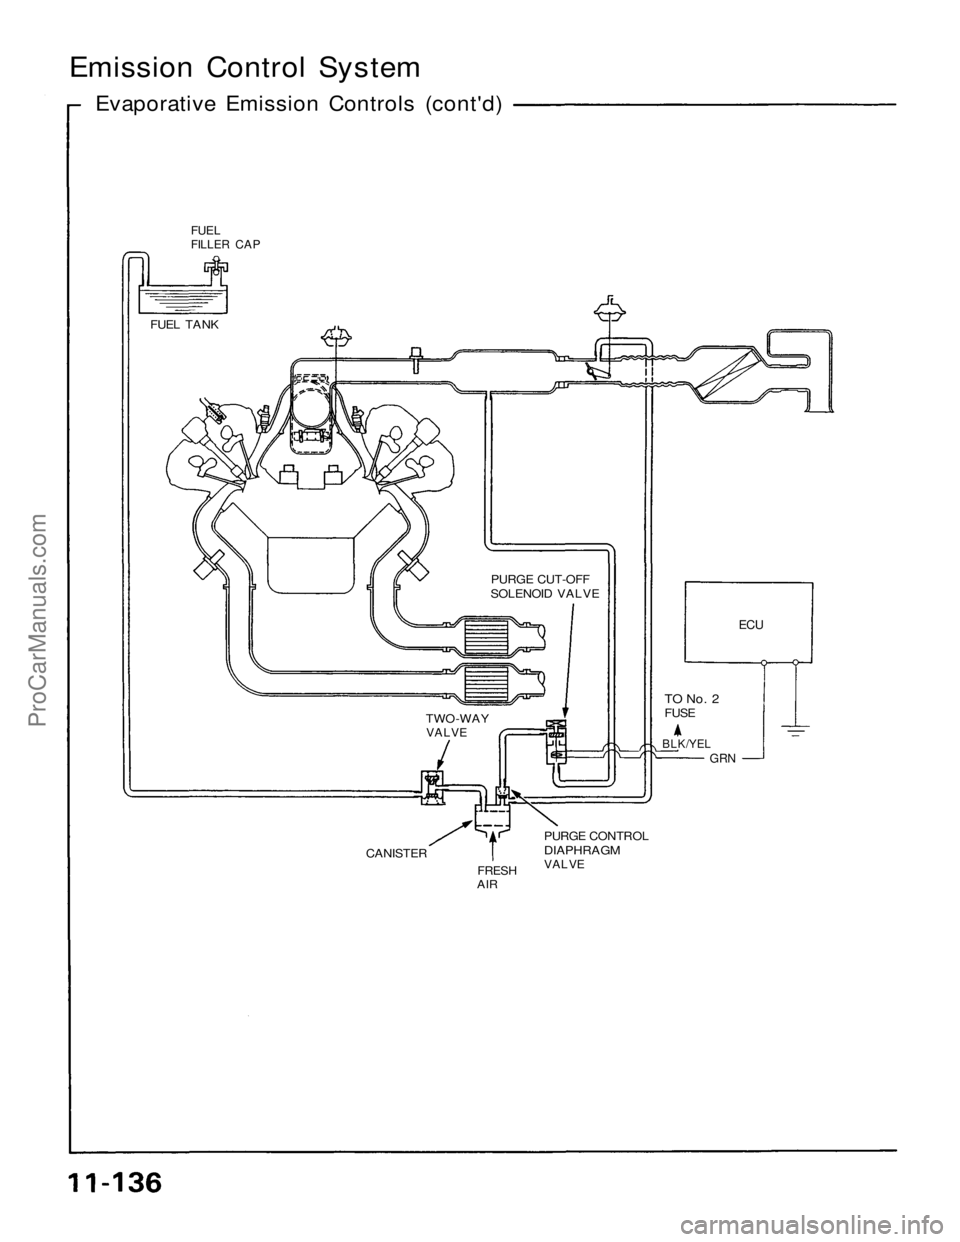
FUEL
FILLER CAP
FUEL TANK
PURGE CUT-OFF
SOLENOID VALVE
ECU
TO No. 2
FUSE
BLK/YEL
GRN
TWO-WAY
VALVE
CANISTER
FRESH
AIR
PURGE CONTROL
DIAPHRAGM
VALVEProCarManuals.com
Page 1534 of 1640
Troubleshooting Flowchart
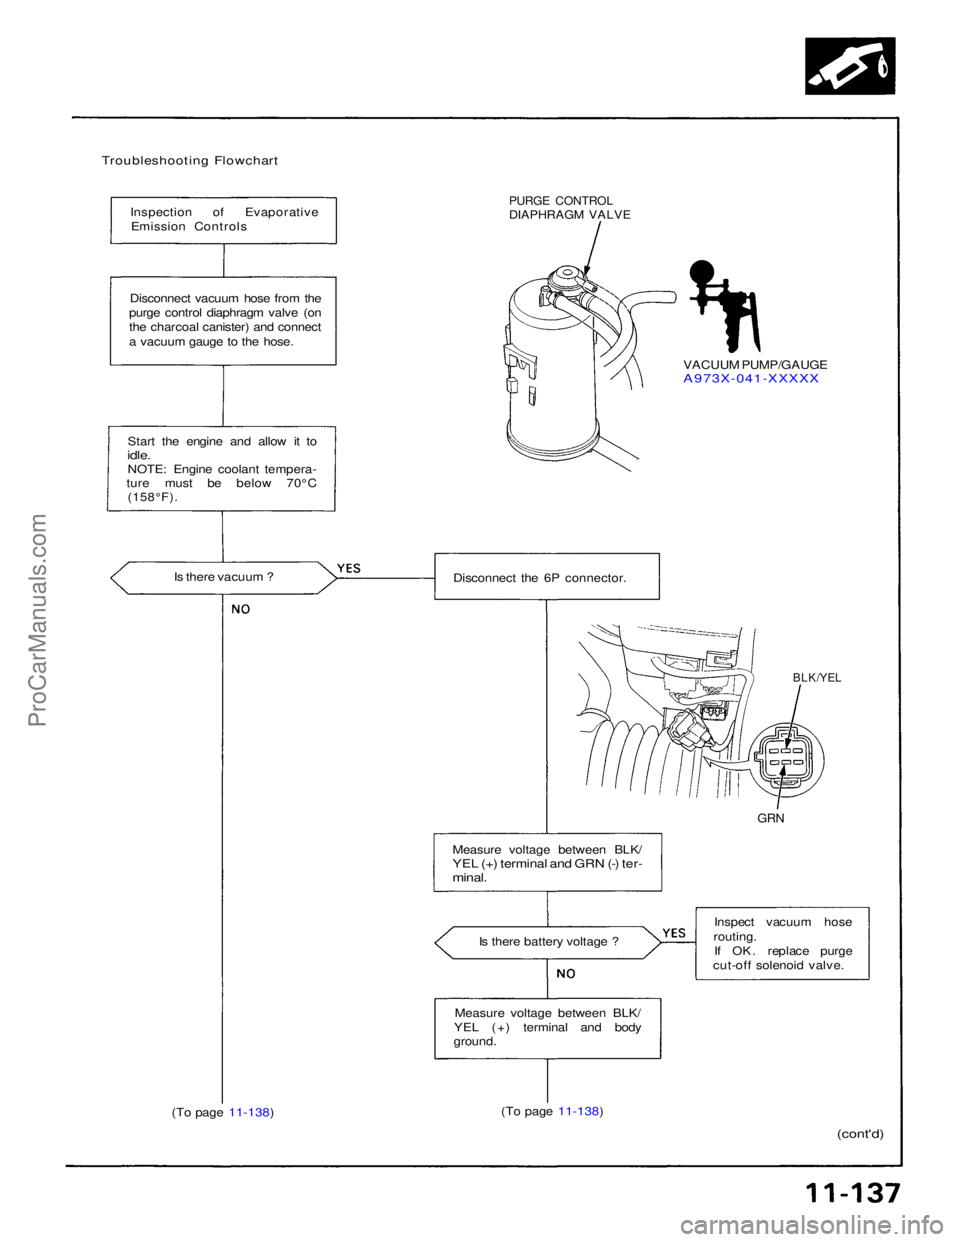
Inspection of EvaporativeEmission Controls
PURGE CONTROL
DIAPHRAGM VALVE
VACUUM PUMP/GAUGE
A973X-041-XXXXX
Disconnect vacuum hose from the
purge control diaphragm valve (on
the charcoal canister) and connect
a vacuum gauge to the hose.
Start the engine and allow it to
idle.
NOTE: Engine coolant tempera-
ture must be below 70°C
(158°F).
Is there vacuum ? Disconnect the 6P connector.
BLK/YEL
GRN
Measure voltage between BLK/
YEL (+) terminal and GRN (-) ter-
minal.
Is there battery voltage ? Inspect vacuum hose
routing. If OK. replace purge
cut-off solenoid valve.
Measure voltage between BLK/
YEL (+) terminal and body
ground.
(To page 11-138)
(To page 11-138)
(cont'd)ProCarManuals.com
Page 1535 of 1640
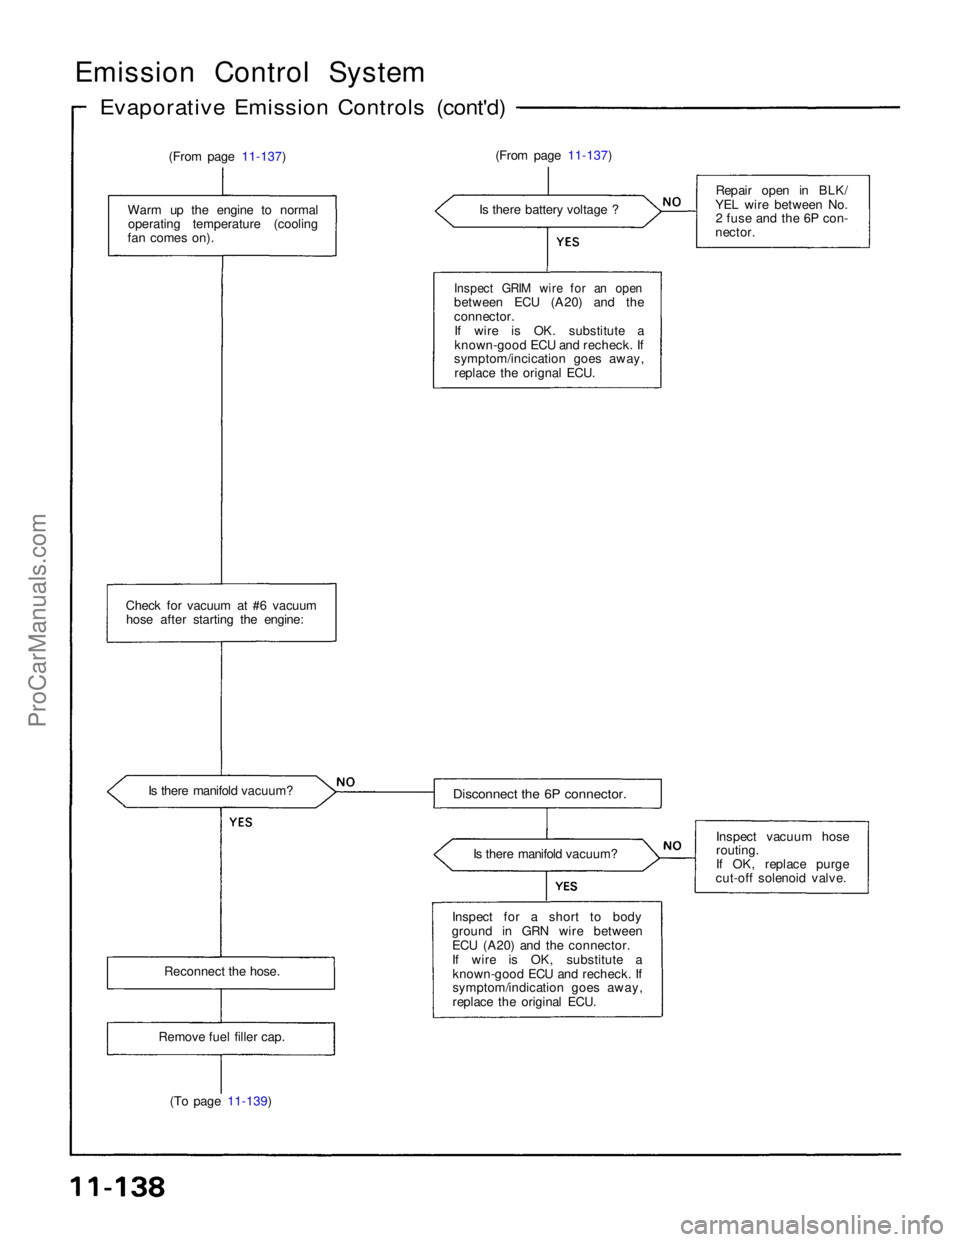
Emission Control System
Evaporative Emission Controls (cont'd)
(From page 11-137)
Warm up the engine to normal operating temperature (cooling
fan comes on). (From page 11-137)
Is there battery voltage ?
Inspect GRIM wire for an open
between ECU (A20) and the
connector. If wire is OK. substitute a
known-good ECU and recheck. If
symptom/incication goes away,
replace the orignal ECU.
Check for vacuum at #6 vacuum hose after starting the engine:
Is there manifold vacuum?
Disconnect the 6P connector.
Is there manifold vacuum?
Reconnect the hose. Inspect for a short to body
ground in GRN wire between ECU (A20) and the connector.
If wire is OK, substitute aknown-good ECU and recheck. If
symptom/indication goes away,
replace the original ECU.
Remove fuel filler cap.
(To page 11-139) Inspect vacuum hose
routing.
If OK, replace purge
cut-off solenoid valve. Repair open in BLK/
YEL wire between No. 2 fuse and the 6P con-
nector.ProCarManuals.com
Page 1536 of 1640
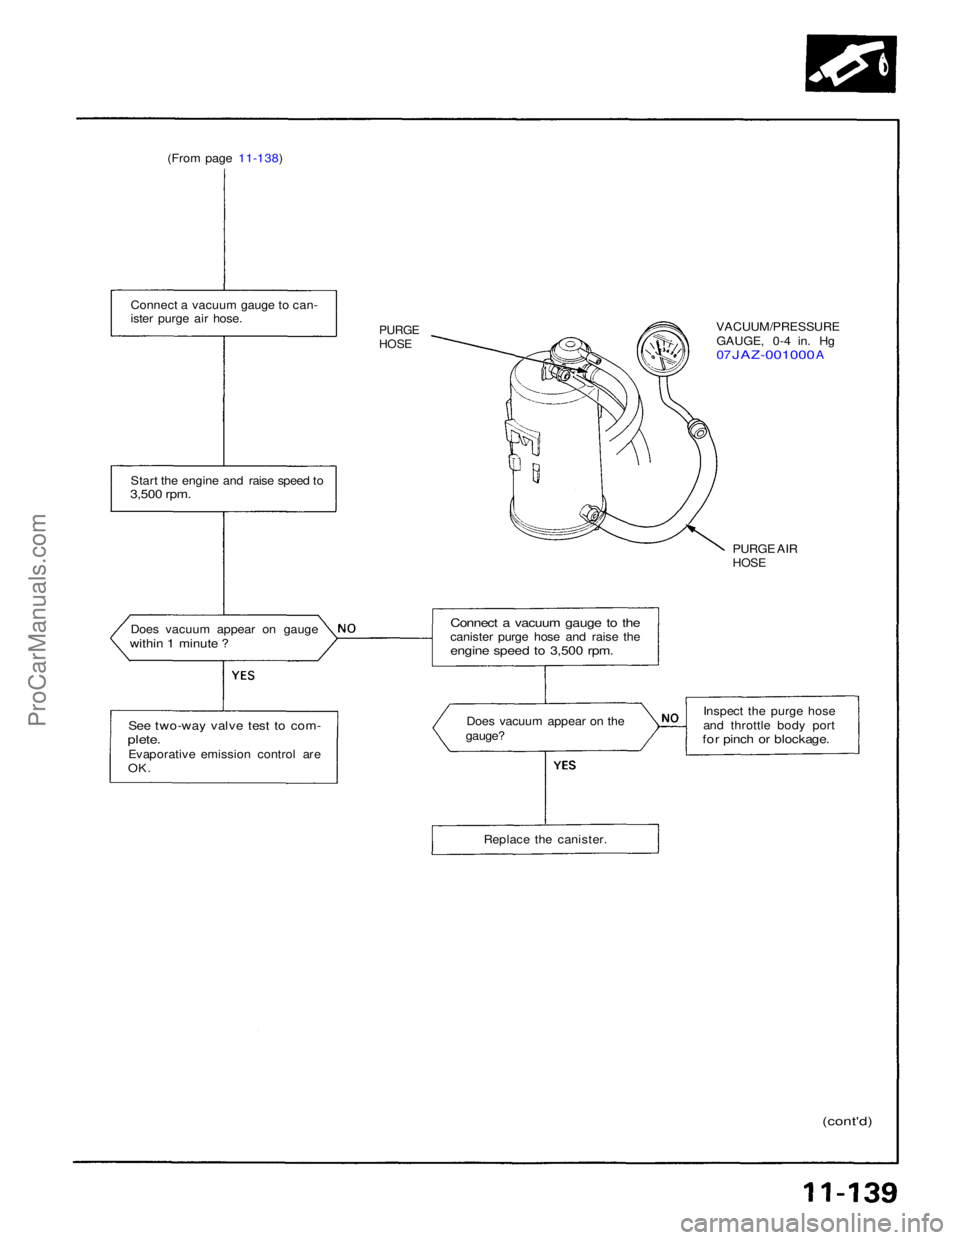
(From page 11-138)
Connect a vacuum gauge to can-
ister purge air hose.
PURGE
HOSE
Start the engine and raise speed to
3,500 rpm.
Does vacuum appear on gauge
within 1 minute ?
See two-way valve test to com-
plete.
Evaporative emission control are
OK.
Connect a vacuum gauge to the
canister purge hose and raise the
engine speed to 3,500 rpm.
Does vacuum appear on the
gauge?
Replace the canister.
(cont'd)
Inspect the purge hose
and throttle body port
for pinch or blockage.
PURGE AIR
HOSE
VACUUM/PRESSURE
GAUGE, 0-4 in. Hg
07
JAZ-001000
AProCarManuals.com
Page 1537 of 1640
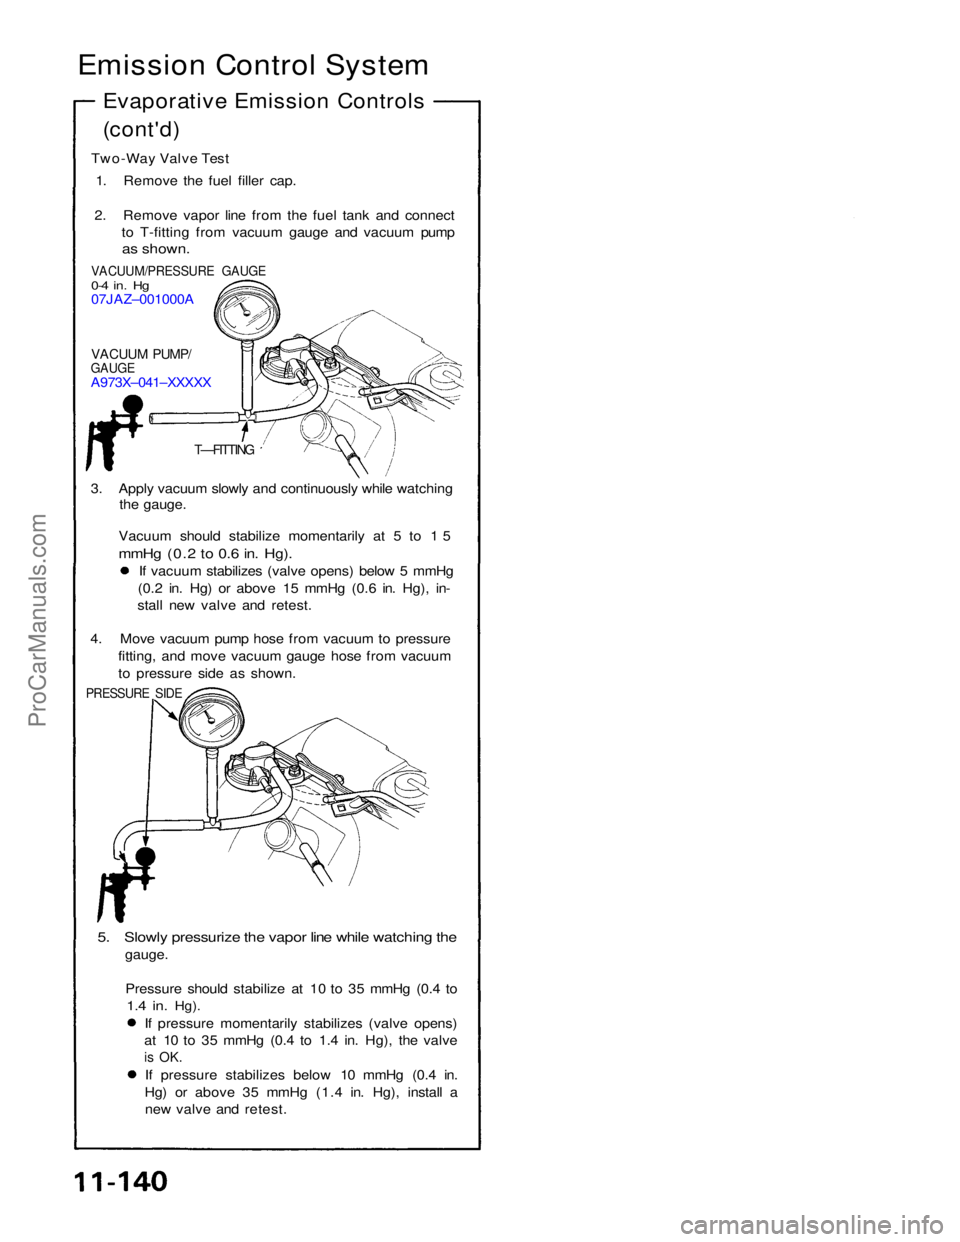
Emission Control System
Evaporative Emission Controls
(cont'd)
Two-Way Valve Test 1. Remove the fuel filler cap.
2. Remove vapor line from the fuel tank and connect to T-fitting from vacuum gauge and vacuum pump
as shown.
VACUUM/PRESSURE GAUGE
0-4 in. Hg
07JAZ–001000A
VACUUM PUMP/
GAUGE
A973X–041–XXXXX
T—FITTING
3. Apply vacuum slowly and continuously while watching the gauge.
Vacuum should stabilize momentarily at 5 to 1 5
mmHg (0.2 to 0.6 in. Hg).
If vacuum stabilizes (valve opens) below 5 mmHg
(0.2 in. Hg) or above 15 mmHg (0.6 in. Hg), in-
stall new valve and retest.
4. Move vacuum pump hose from vacuum to pressure fitting, and move vacuum gauge hose from vacuum
to pressure side as shown.
PRESSURE SIDE
5. Slowly pressurize the vapor line while watching the
gauge.
Pressure should stabilize at 10 to 35 mmHg (0.4 to
1.4 in.
Hg).
If pressure momentarily stabilizes (valve opens)
at 10 to 35 mmHg (0.4 to 1.4 in. Hg), the valve
is OK.
If pressure stabilizes below 10 mmHg (0.4 in. Hg) or above 35 mmHg (1.4 in. Hg), install a
new valve and retest.ProCarManuals.com
Page 1538 of 1640
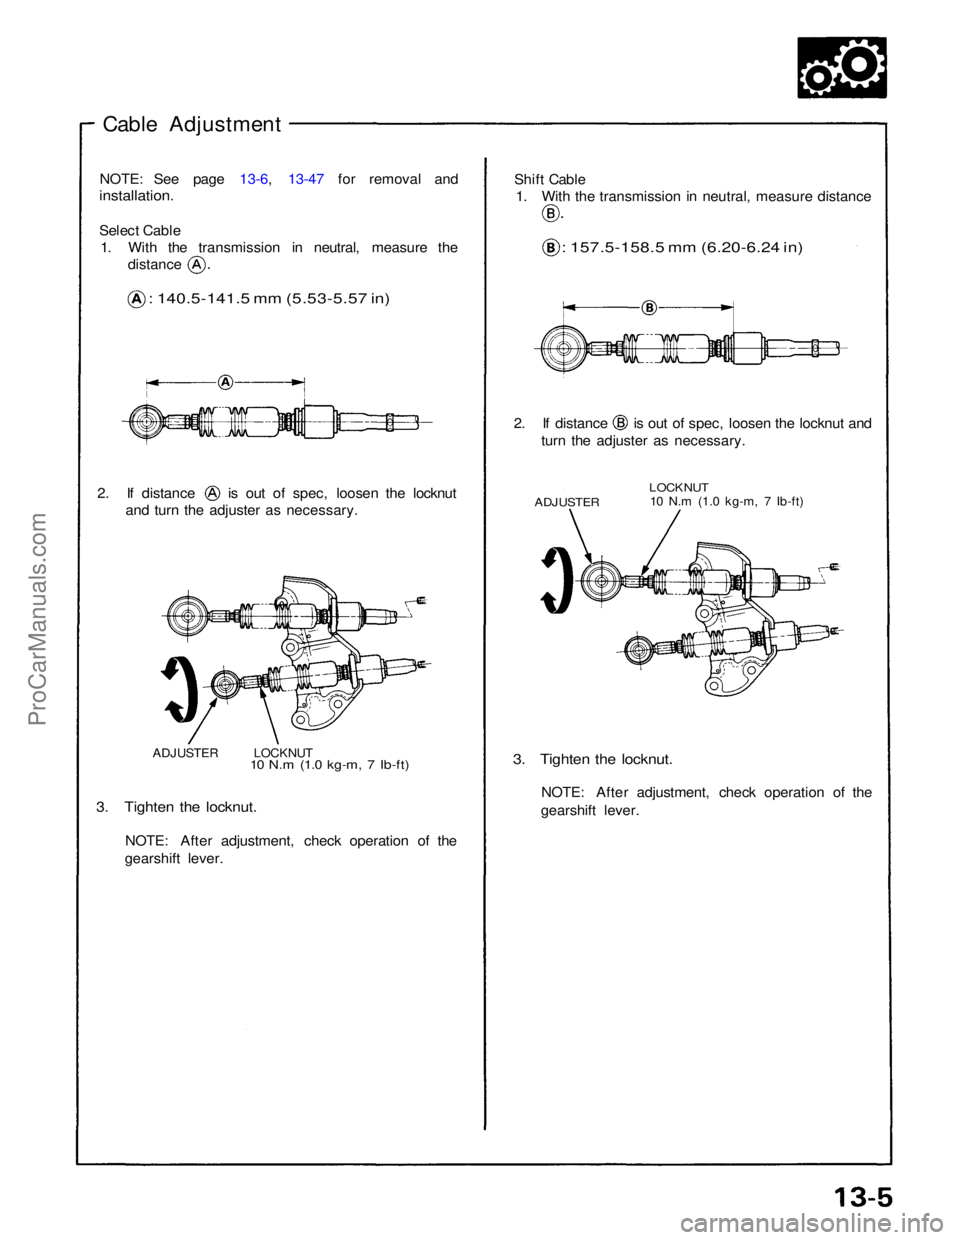
Cable Adjustment
NOTE: See page 13-6, 13-47 for removal and
installation.
Select Cable
1. With the transmission in neutral, measure the distance
: 140.5-141.5 mm (5.53-5.57 in)
2. If distance is out of spec, loosen the locknut
and turn the adjuster as necessary.
ADJUSTER
LOCKNUT
10 N.m (1.0 kg-m, 7 Ib-ft)
3. Tighten the locknut.
NOTE: After adjustment, check operation of the
gearshift lever.
3. Tighten the locknut.
NOTE: After adjustment, check operation of the
gearshift lever.
ADJUSTER
LOCKNUT
10 N.m (1.0 kg-m, 7 Ib-ft) 2. If distance is out of spec, loosen the locknut and
turn the adjuster as necessary.
Shift Cable
1. With the transmission in neutral, measure distance
: 157.5-158.5 mm (6.20-6.24 in)ProCarManuals.com
Page 1539 of 1640
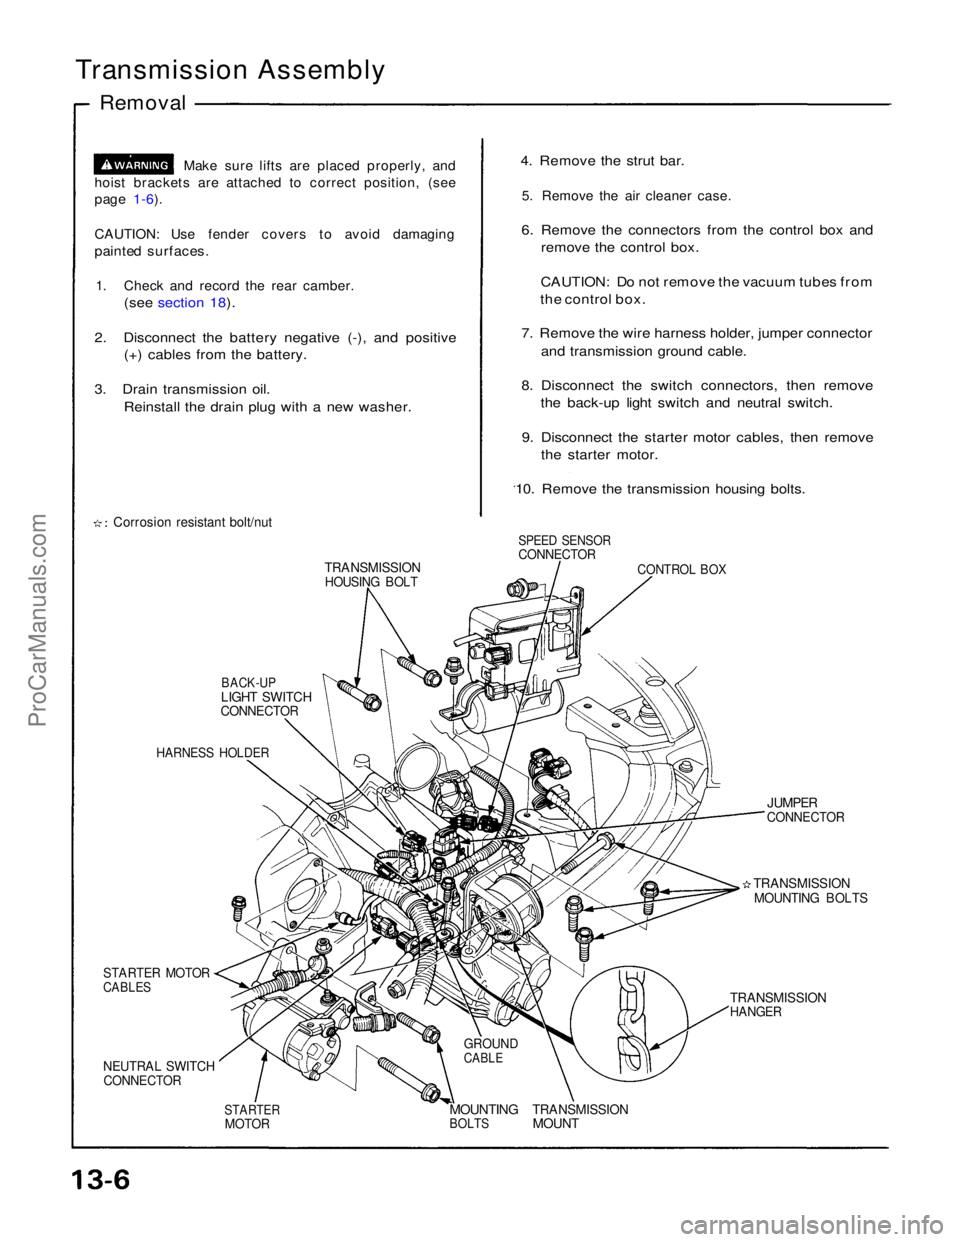
Transmission Assembly
Removal
Make sure lifts are placed properly, and
hoist brackets are attached to correct position, (see
page 1-6).
CAUTION: Use fender covers to avoid damaging
painted surfaces.
1. Check and record the rear camber.
(see section 18).
2. Disconnect the battery negative (-), and positive (+) cables from the battery.
3. Drain transmission oil. Reinstall the drain plug with a new washer.
Corrosion resistant bolt/nut
TRANSMISSION
HOUSING BOLT
BACK-UP
LIGHT SWITCH
CONNECTOR
HARNESS HOLDER
STARTER MOTOR
CABLES
NEUTRAL SWITCH
CONNECTOR
STARTER
MOTOR
MOUNTING
BOLTS
TRANSMISSION
MOUNT
GROUND
CABLE
TRANSMISSION
HANGER
TRANSMISSION
MOUNTING BOLTS
JUMPER
CONNECTOR
CONTROL BOX
SPEED SENSOR
CONNECTOR
4. Remove the strut bar.
5. Remove the air cleaner case.
6. Remove the connectors from the control box and remove the control box.
CAUTION: Do not remove the vacuum tubes from
the control box.
7. Remove the wire harness holder, jumper connector and transmission ground cable.
8. Disconnect the switch connectors, then remove the back-up light switch and neutral switch.
9. Disconnect the starter motor cables, then remove the starter motor.
10. Remove the transmission housing bolts.ProCarManuals.com
Page 1540 of 1640
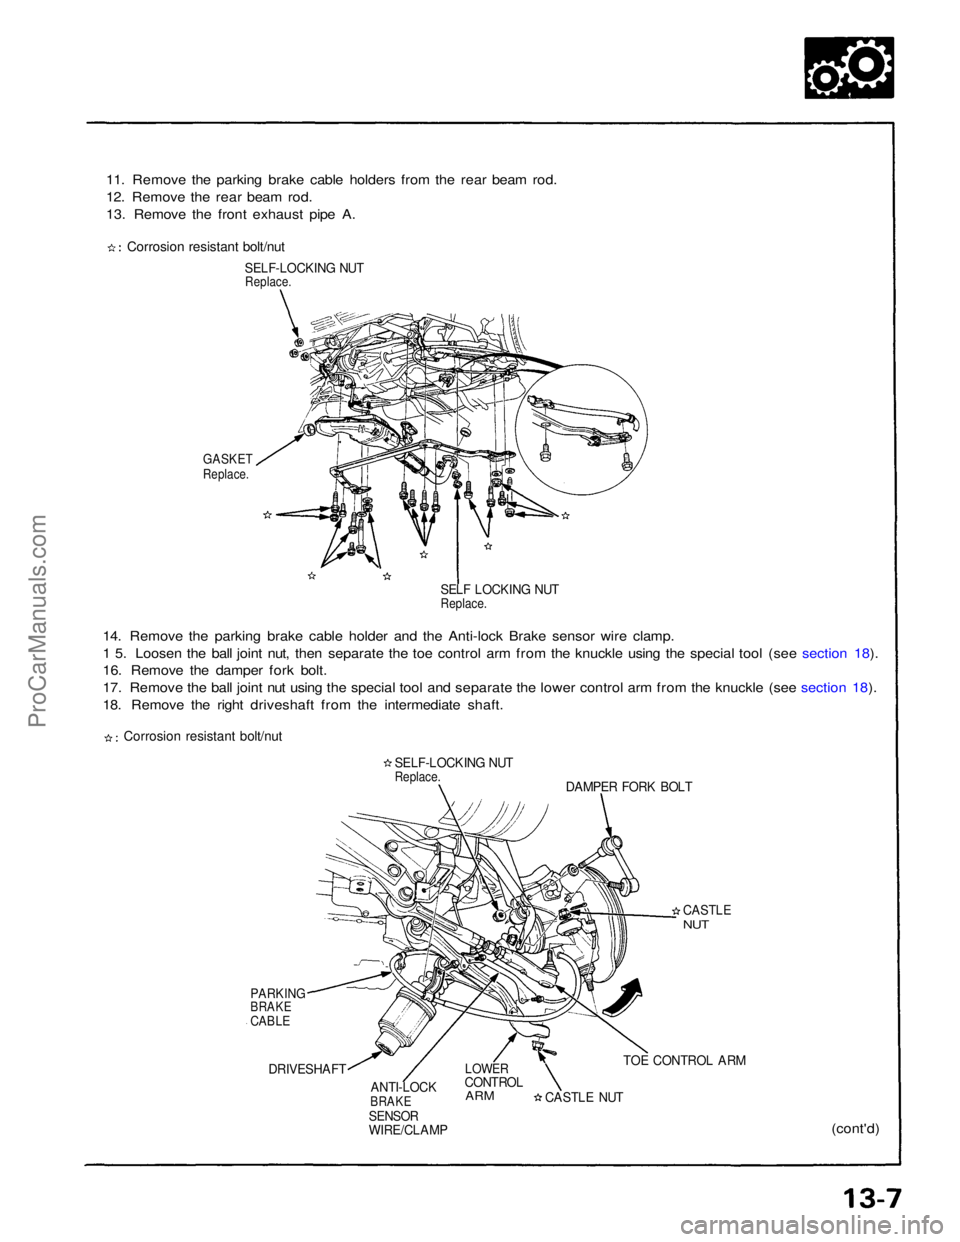
11. Remove the parking brake cable holders from the rear beam rod.
12. Remove the rear beam rod.
13. Remove the front exhaust pipe A.
Corrosion resistant bolt/nut
SELF-LOCKING NUT
Replace.
GASKET
Replace.
SELF LOCKING NUT
Replace.
14. Remove the parking brake cable holder and the Anti-lock Brake sensor wire clamp.
1 5. Loosen the ball joint nut, then separate the toe control arm from the knuckle using the special tool (see section 18).
16. Remove the damper fork bolt.
17. Remove the ball joint nut using the special tool and separate the lower control arm from the knuckle (see section 18).
18. Remove the right driveshaft from the intermediate shaft.
Corrosion resistant bolt/nut
SELF-LOCKING NUT
Replace.
DAMPER FORK BOLT
PARKING
BRAKE
CABLE
DRIVESHAFT ANTI-LOCK
BRAKE
SENSOR
WIRE/CLAMP
LOWER
CONTROL
ARM
CASTLE NUTTOE CONTROL ARM
(cont'd)
CASTLE
NUTProCarManuals.com