ACURA NSX 1997 Service Repair Manual
Manufacturer: ACURA, Model Year: 1997,
Model line: NSX,
Model: ACURA NSX 1997
Pages: 1503, PDF Size: 57.08 MB
ACURA NSX 1997 Service Repair Manual
NSX 1997
ACURA
ACURA
https://www.carmanualsonline.info/img/32/56989/w960_56989-0.png
ACURA NSX 1997 Service Repair Manual
Trending: fuses, length, driver seat adjustment, spare tire, horn, differential, height adjustment
Page 1371 of 1503
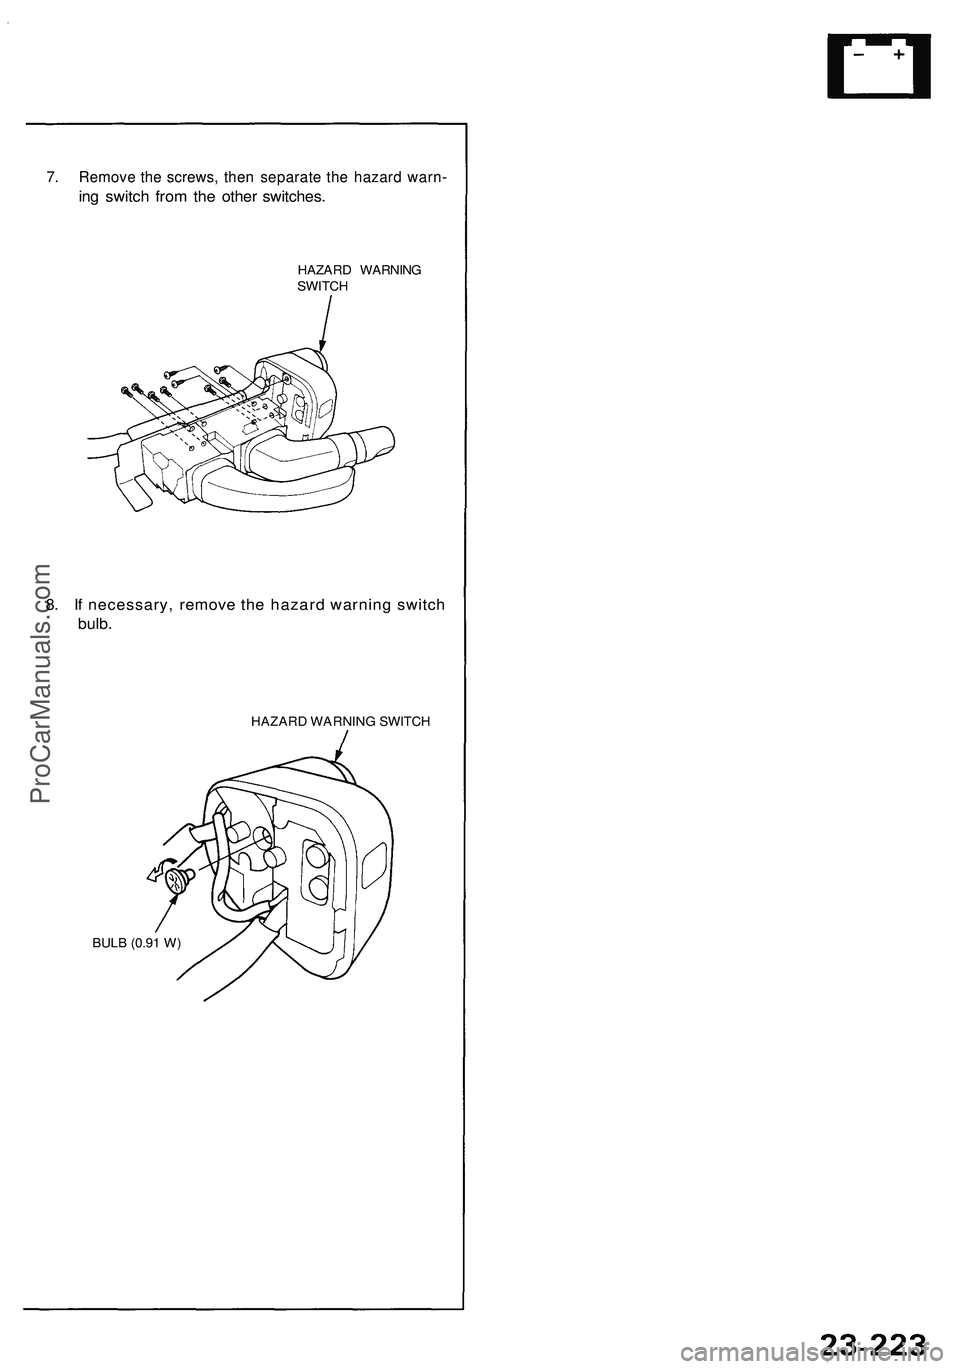
7. Remove the screws, then separate the hazard warn-
ing switch from the other switches.
HAZARD WARNING
SWITCH
8. If necessary, remove the hazard warning switch
bulb.
HAZARD WARNING SWITCH
BULB (0.91 W)ProCarManuals.com
Page 1372 of 1503
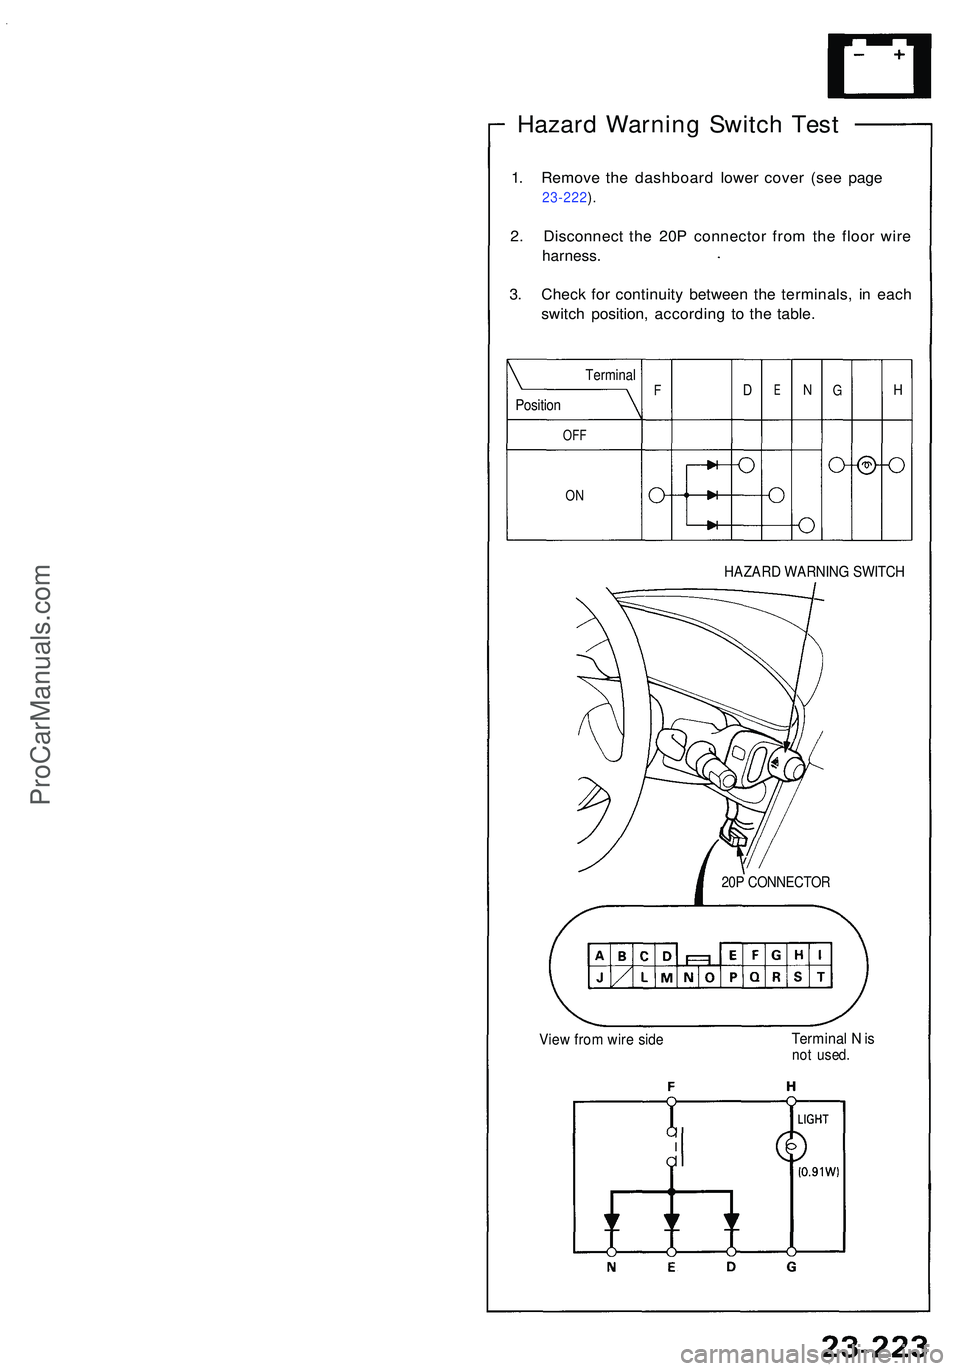
Hazard Warnin g Switc h Tes t
1. Remov e th e dashboar d lowe r cove r (se e pag e
23-222 ).
2 . Disconnec t th e 20 P connecto r fro m th e floo r wir e
harness .
3. Chec k fo r continuit y betwee n th e terminals , i n eac h
switc h position , accordin g t o th e table .
HAZAR D WARNIN G SWITC H
20P CONNECTO R
View fro m wir e sid eTermina l N isno t used .
OFF
ON
Positio n
Termina lFDENGH
ProCarManuals.com
Page 1373 of 1503
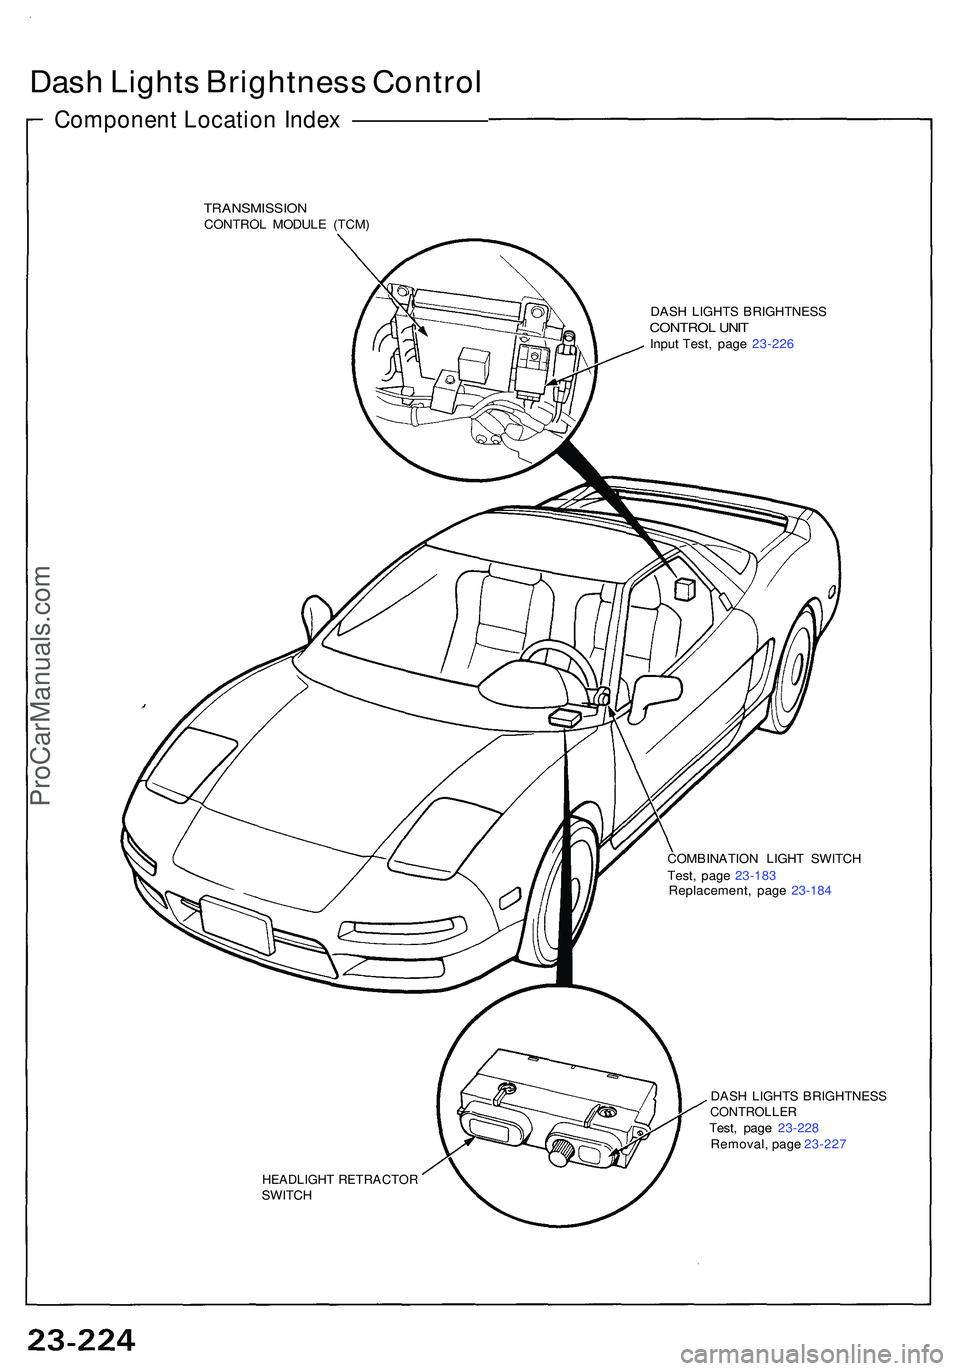
Dash Light s Brightnes s Contro l
Componen t Locatio n Inde x ——————
TRANSMISSIO NCONTROL MODUL E (TCM )
DASH LIGHT S BRIGHTNES S
CONTROL UNI TInpu t Test , pag e 23-22 6
COMBINATIO N LIGH T SWITC H
Test , pag e 23-18 3
Replacement , pag e 23-18 4
HEADLIGH T RETRACTO RSWITCH DAS
H LIGHT S BRIGHTNES S
CONTROLLERTest, pag e 23-22 8
Removal , pag e 23-22 7
ProCarManuals.com
Page 1374 of 1503
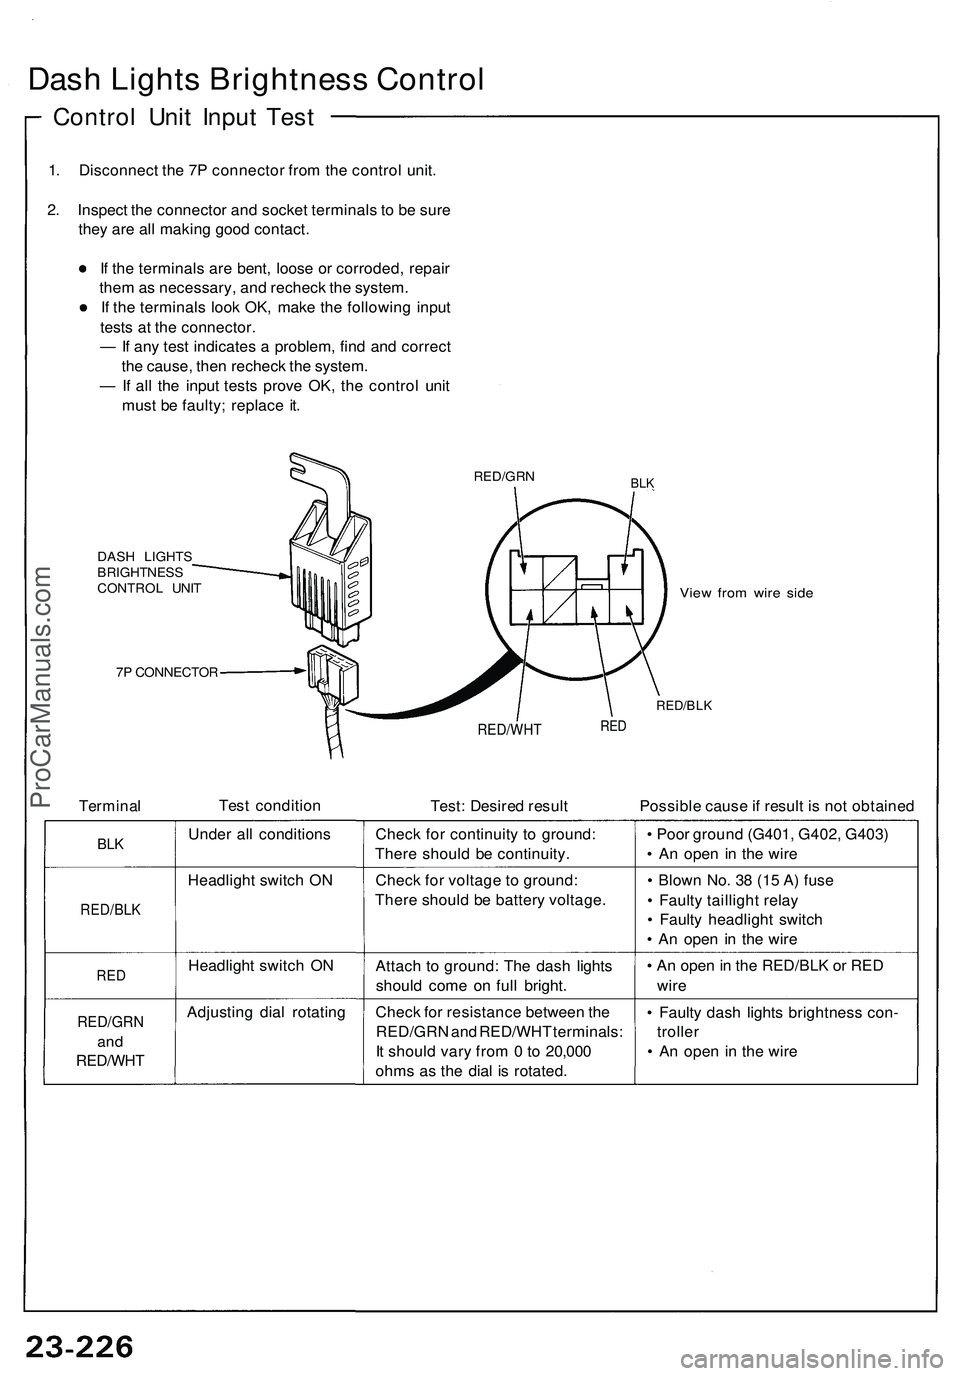
Dash Lights Brightness Control
Control Unit Input Test
1. Disconnect the 7P connector from the control unit.
2. Inspect the connector and socket terminals to be sure
they are all making good contact.
If the terminals are bent, loose or corroded, repair
them as necessary, and recheck the system.
If the terminals look OK, make the following input
tests at the connector.
— If any test indicates a problem, find and correct
the cause, then recheck the system.
— If all the input tests prove OK, the control unit
must be faulty; replace it.
BLK
DASH LIGHTS
BRIGHTNESS
CONTROL UNIT
7P CONNECTOR
View from wire side
RED/BLK
Terminal
Test condition
RED/WHT
Test: Desired result
RED
Possible cause if result is not obtained
BLK
RED/BLK
RED
RED/GRN
and
RED/WHT
Under all conditions
Headlight switch ON
Headlight switch ON
Adjusting dial rotating
Check for continuity to ground:
There should be continuity.
Check for voltage to ground:
There should be battery voltage.
Attach to ground: The dash lights
should come on full bright.
Check for resistance between the
RED/GRN and RED/WHT terminals:
It should vary from 0 to 20,000
ohms as the dial is rotated.
• Poor ground (G401, G402, G403)
• An open in the wire
• Blown No. 38 (15 A) fuse
• Faulty taillight relay
• Faulty headlight switch
• An open in the wire
• An open in the RED/BLK or RED
wire
• Faulty dash lights brightness con-
troller
• An open in the wire
RED/GRNProCarManuals.com
Page 1375 of 1503
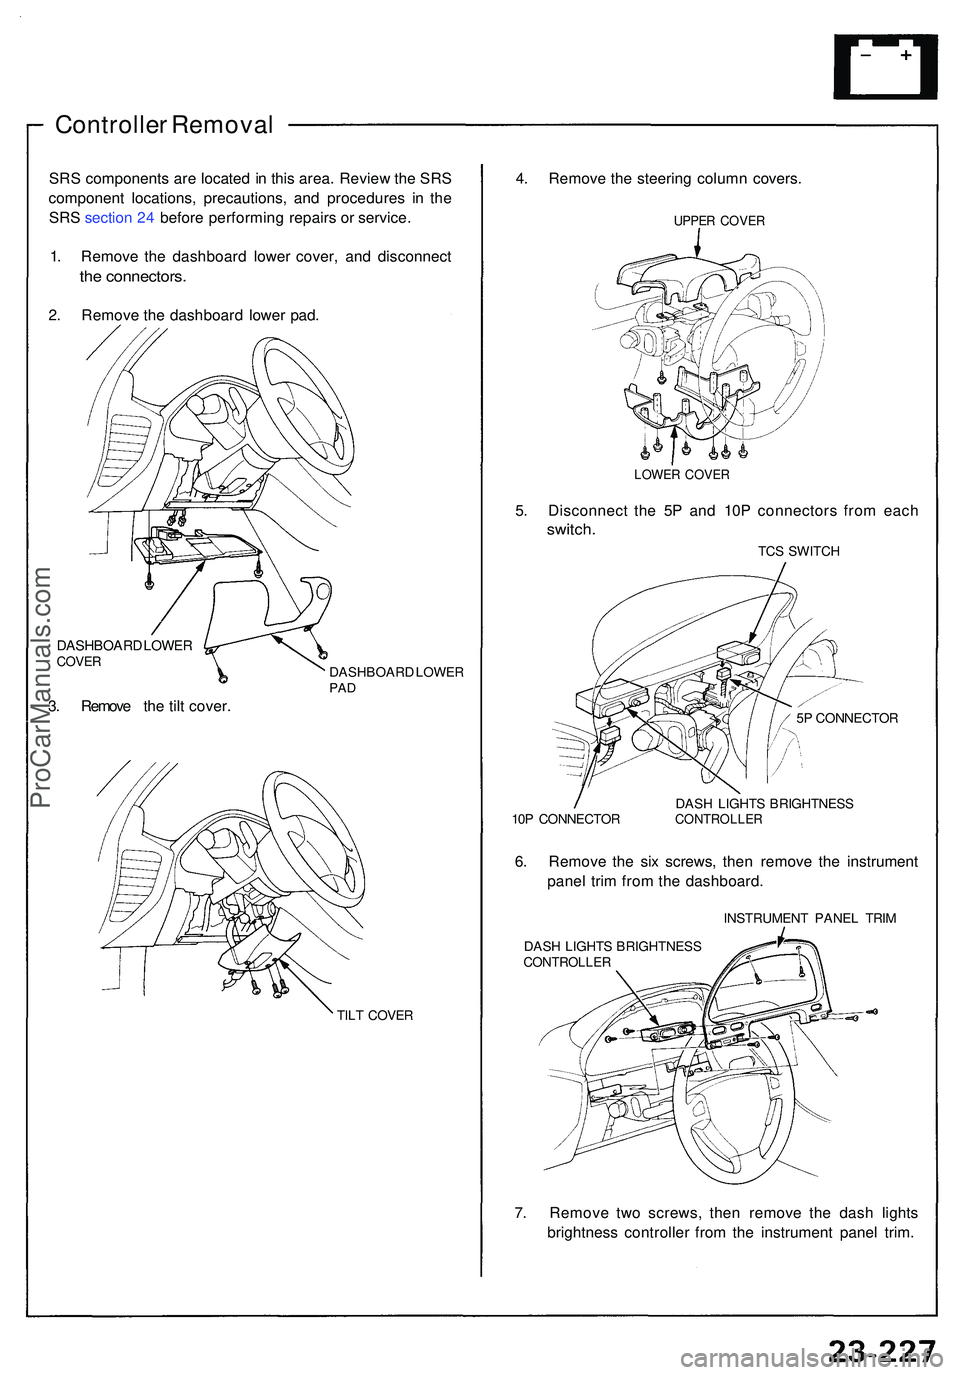
Controller Remova l
SRS component s ar e locate d in thi s area . Revie w th e SR S
componen t locations , precautions , an d procedure s i n th e
SR S sectio n 24 befor e performin g repair s o r service .
1 . Remov e th e dashboar d lowe r cover , an d disconnec t
the connectors .
2. Remov e th e dashboar d lowe r pad .
DASHBOAR D LOWE RCOVER
3. Remov e th e til t cover .
DASHBOAR D LOWE RPAD
TIL T COVE R
4. Remov e th e steerin g colum n covers .
UPPER COVE R
LOWER COVE R
5P CONNECTO R
10 P CONNECTO RDAS
H LIGHT S BRIGHTNES S
CONTROLLE R
6. Remov e th e si x screws , the n remov e th e instrumen t
pane l tri m fro m th e dashboard .
INSTRUMEN T PANE L TRI M
DAS H LIGHT S BRIGHTNES S
CONTROLLE R
7. Remov e tw o screws , the n remov e th e das h light s
brightnes s controlle r fro m th e instrumen t pane l trim .
5
. Disconnec t th e 5 P an d 10 P connector s fro m eac h
switch .
TCS SWITC H
ProCarManuals.com
Page 1376 of 1503
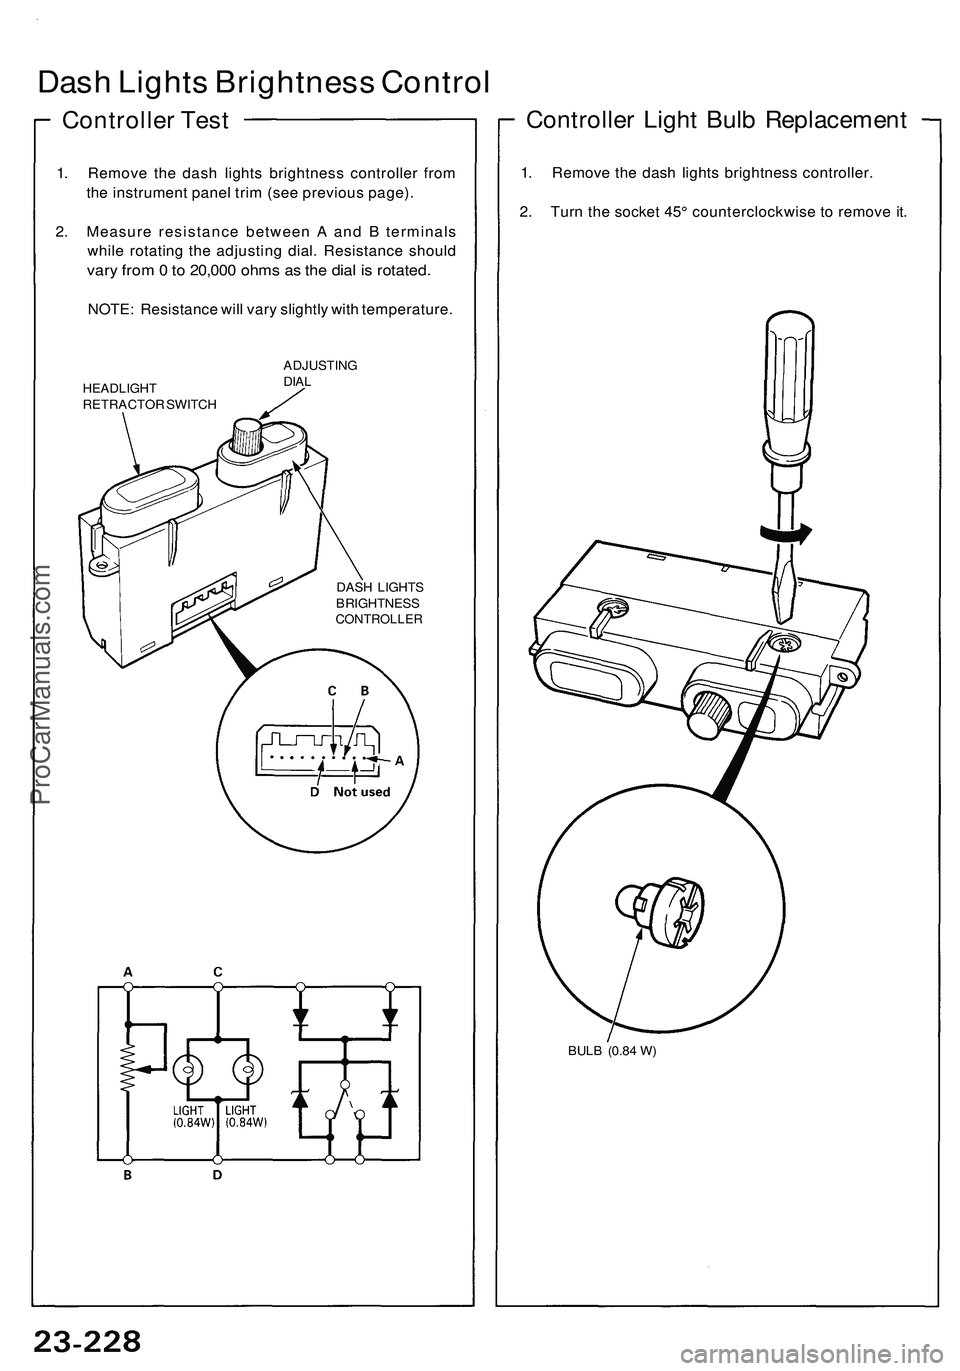
1. Remove the dash lights brightness controller from
the instrument panel trim (see previous page).
2. Measure resistance between A and B terminals
while rotating the adjusting dial. Resistance should
vary from 0 to 20,000 ohms as the dial is rotated.
NOTE: Resistance will vary slightly with temperature.
HEADLIGHT
RETRACTOR SWITCH
ADJUSTING
DIAL
DASH LIGHTS
BRIGHTNESS
CONTROLLER
Controller Light Bulb Replacement
1. Remove the dash lights brightness controller.
2. Turn the socket 45° counterclockwise to remove it.
BULB (0.84 W)
Dash Lights Brightness Control
Controller TestProCarManuals.com
Page 1377 of 1503
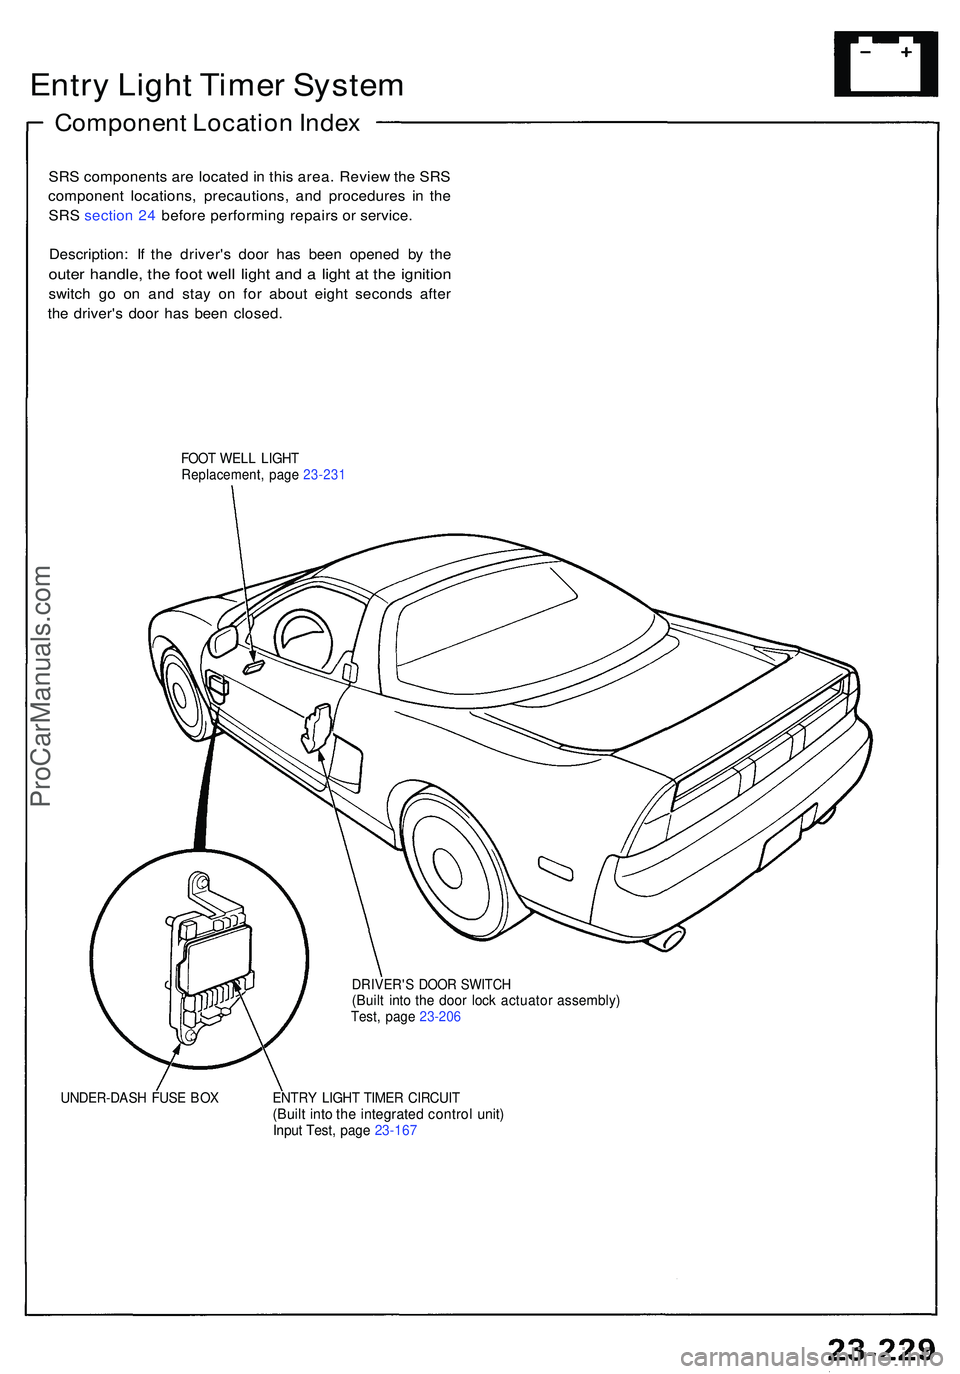
Entry Ligh t Time r Syste m
Componen t Locatio n Inde x
SRS component s ar e locate d in thi s area . Revie w th e SR S
componen t locations , precautions , an d procedure s i n th e
SR S sectio n 24 befor e performin g repair s o r service .
Description : I f th e driver' s doo r ha s bee n opene d b y th e
oute r handle , th e foo t wel l ligh t an d a ligh t a t th e ignitio n
switch g o o n an d sta y o n fo r abou t eigh t second s afte r
th e driver' s doo r ha s bee n closed .
FOOT WEL L LIGH TReplacement , pag e 23-23 1
UNDER-DAS H FUS E BO X
DRIVER' S DOO R SWITC H(Built into the doo r loc k actuato r assembly )Test, pag e 23-20 6
ENTRY LIGH T TIME R CIRCUI T(Built into the integrate d contro l unit )Input Test , pag e 23-16 7
ProCarManuals.com
Page 1378 of 1503
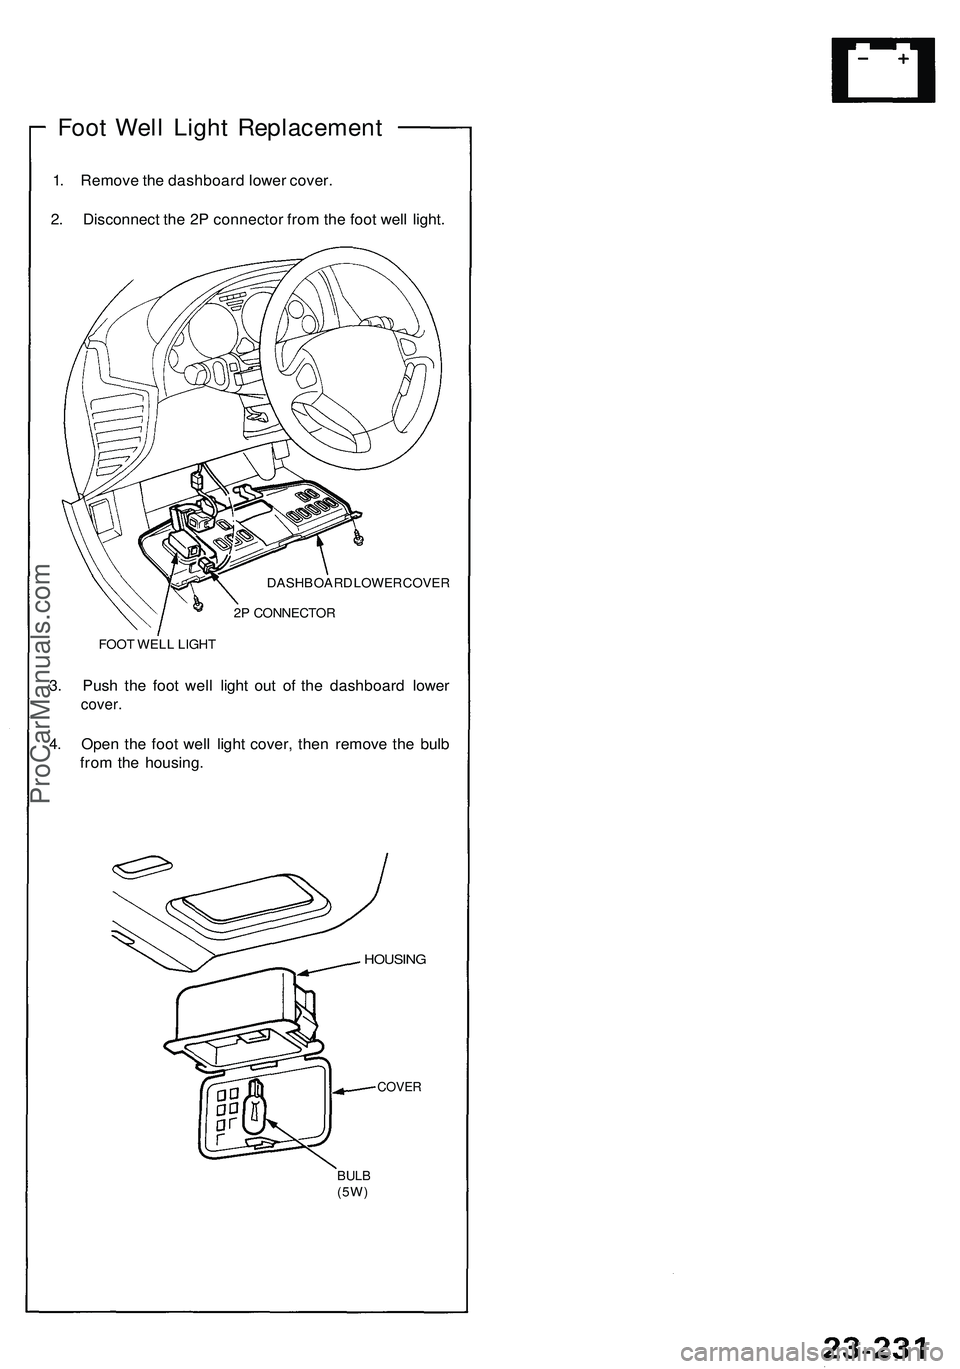
Foot Well Light Replacement
1. Remove the dashboard lower cover.
2. Disconnect the 2P connector from the foot well light.
DASHBOARD LOWER COVER
2P CONNECTOR
FOOT WELL LIGHT
3. Push the foot well light out of the dashboard lower
cover.
4. Open the foot well light cover, then remove the bulb
from the housing.
HOUSING
COVER
BULB
(5W)ProCarManuals.com
Page 1379 of 1503
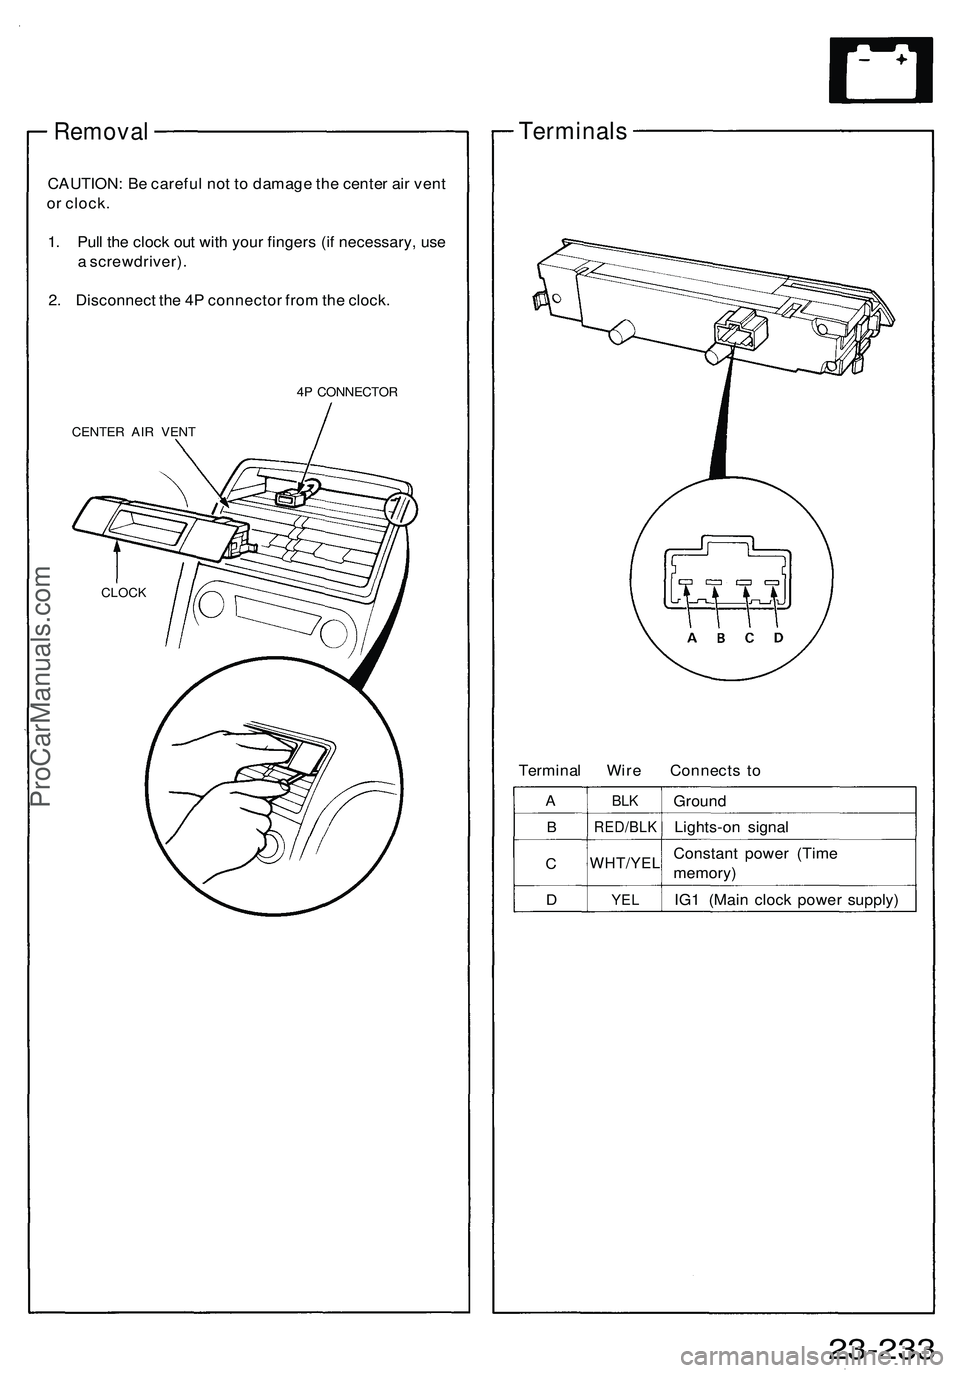
Removal
CAUTION: Be careful not to damage the center air vent
or clock.
1. Pull the clock out with your fingers (if necessary, use
a screwdriver).
2. Disconnect the 4P connector from the clock.
4P CONNECTOR
CENTER AIR VENT
Terminals
Terminal Wire Connects to
A
B
C
D
BLK
RED/BLK
WHT/YEL
YEL
Ground
Lights-on signal
Constant power (Time
memory)
IG1 (Main clock power supply)
23-233
CLOCKProCarManuals.com
Page 1380 of 1503
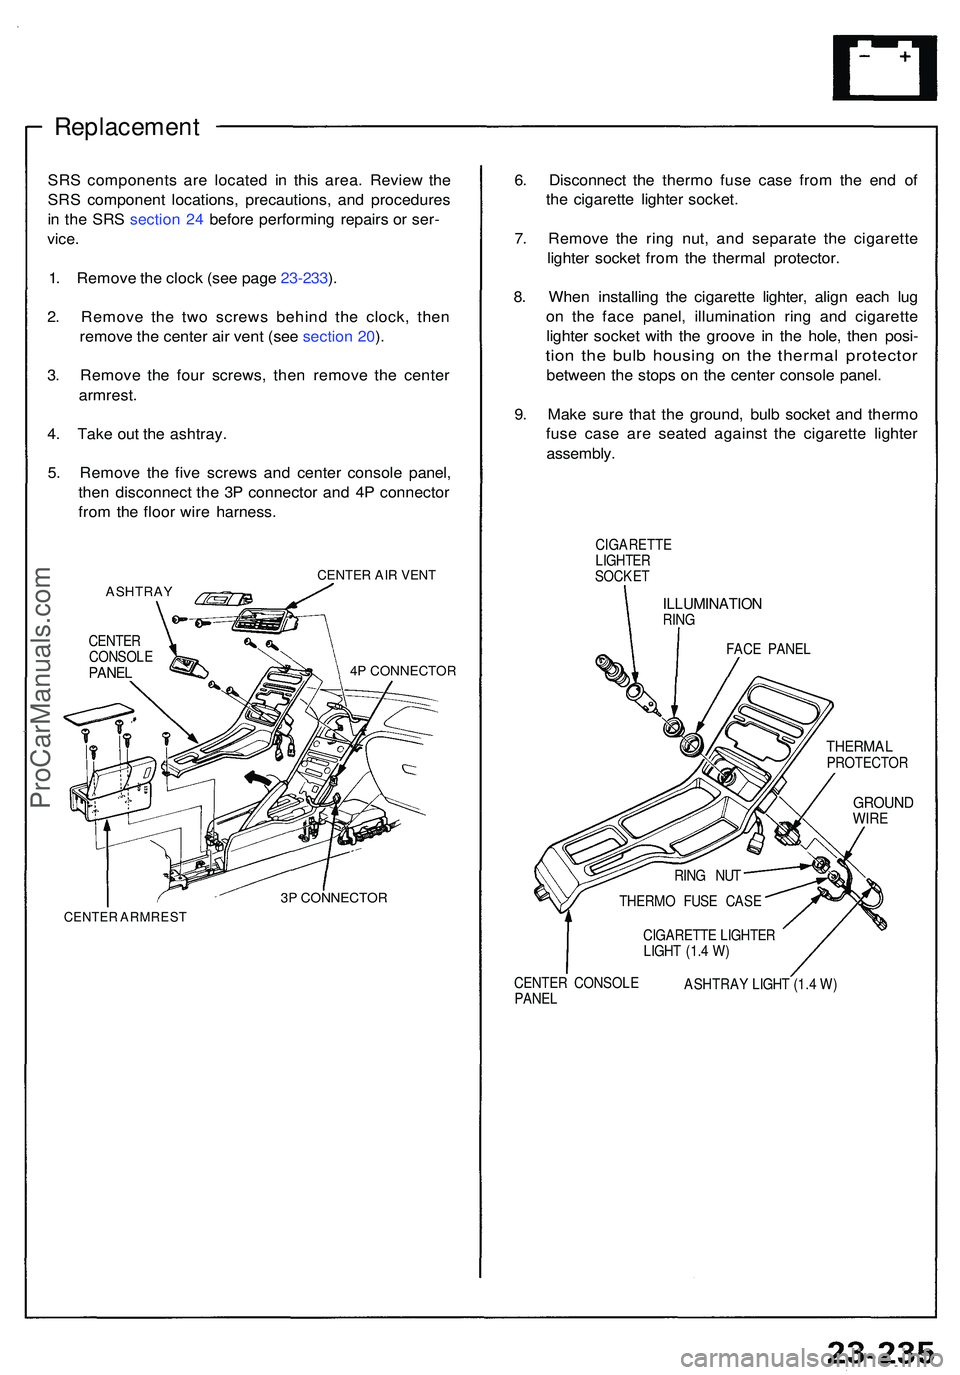
Replacement
SRS component s ar e locate d i n thi s area . Revie w th e
SR S componen t locations , precautions , an d procedure s
i n th e SR S sectio n 24 befor e performin g repair s o r ser -
vice .
1. Remov e th e cloc k (se e pag e 23-233 ).
2 . Remov e th e tw o screw s behin d th e clock , the n
remov e th e cente r ai r ven t (se e sectio n 20 ).
3 . Remov e th e fou r screws , the n remov e th e cente r
armrest .
4 . Tak e ou t th e ashtray .
5 . Remov e th e fiv e screw s an d cente r consol e panel ,
the n disconnec t th e 3 P connecto r an d 4 P connecto r
fro m th e floo r wir e harness .
ASHTRA YCENTER AIR VENT
4P CONNECTOR
3P CONNECTOR
CENTER ARMRES T
6. Disconnec t th e therm o fus e cas e fro m th e en d o f
th e cigarett e lighte r socket .
7 . Remov e th e rin g nut , an d separat e th e cigarett e
lighte r socke t fro m th e therma l protector .
8 . Whe n installin g th e cigarett e lighter , alig n eac h lu g
o n th e fac e panel , illuminatio n rin g an d cigarett e
lighte r socke t wit h th e groov e i n th e hole , the n posi -
tion th e bul b housin g o n th e therma l protecto r
between th e stop s o n th e cente r consol e panel .
9 . Mak e sur e tha t th e ground , bul b socke t an d therm o
fus e cas e ar e seate d agains t th e cigarett e lighte r
assembly .
CIGARETT E
LIGHTE R
SOCKE T
ILLUMINATIO NRING
FACE PANE L
THERMA LPROTECTO R
GROUNDWIRE
RING NU T
THERM O FUS E CAS E
CIGARETT E LIGHTE R
LIGH T (1. 4 W )
CENTE R CONSOL E
PANE L ASHTRA
Y LIGH T (1. 4 W )
CENTE
R
CONSOL E
PANEL
ProCarManuals.com
Trending: brakes, heater, wheel bolts, odometer, ad blue, engine, oil viscosity
