ACURA RL KA9 1996 Service Repair Manual
Manufacturer: ACURA, Model Year: 1996, Model line: RL KA9, Model: ACURA RL KA9 1996Pages: 1954, PDF Size: 61.44 MB
Page 651 of 1954
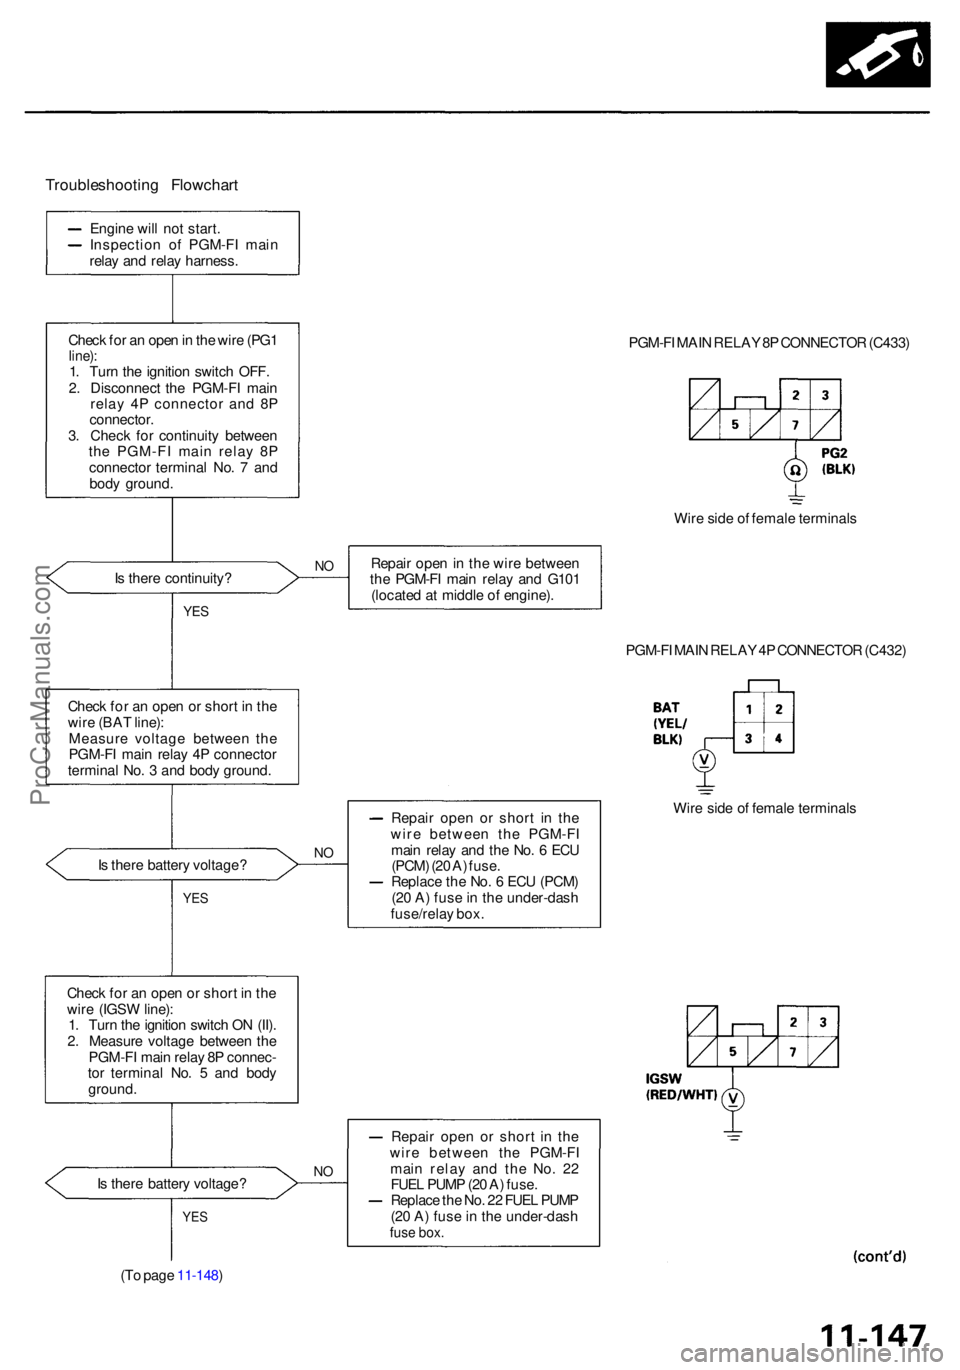
Troubleshooting Flowchar t
Check fo r a n ope n o r shor t i n th e
wir e (BA T line) :
Measur e voltag e betwee n th e
PGM-F I mai n rela y 4 P connecto r
termina l No . 3 an d bod y ground .
I s ther e batter y voltage ?
YES
Chec k fo r a n ope n o r shor t i n th e
wir e (IGS W line) :
1 . Tur n th e ignitio n switc h O N (II) .
2 . Measur e voltag e betwee n th e
PGM-F I mai n rela y 8 P connec -
to r termina l No . 5 an d bod y
ground .
I s ther e batter y voltage ?
YES
(To pag e 11-148 ) PGM-F
I MAI N RELA Y 8P CONNECTO R (C433 )
Wir e sid e o f femal e terminal s
NORepai r ope n in th e wir e betwee n
th e PGM-F I mai n rela y an d G10 1
(locate d a t middl e o f engine) .
NO
Repai r ope n o r shor t i n th e
wir e betwee n th e PGM-F I
mai n rela y an d th e No . 6 EC U
(PCM ) (2 0 A ) fuse .
Replac e th e No . 6 EC U (PCM )
(2 0 A ) fus e in th e under-das h
fuse/rela y box . PGM-F
I MAI N RELA Y 4P CONNECTO R (C432 )
Wir e sid e o f femal e terminal s
NO
Repai r ope n o r shor t i n th e
wir e betwee n th e PGM-F I
mai n rela y an d th e No . 2 2
FUE L PUM P (2 0 A ) fuse .
Replac e th e No . 2 2 FUE L PUM P
(2 0 A ) fus e in th e under-das h
fuse box .
YES
Is ther e continuity ?
Engin
e wil l no t start .
Inspectio n o f PGM-F I mai n
rela y an d rela y harness .
Chec k fo r a n ope n in th e wir e (PG 1
line) :1. Tur n th e ignitio n switc h OFF .
2 . Disconnec t th e PGM-F I mai n
rela y 4 P connecto r an d 8 P
connector .
3 . Chec k fo r continuit y betwee n
th e PGM-F I mai n rela y 8 P
connecto r termina l No . 7 an d
bod y ground .
ProCarManuals.com
Page 652 of 1954
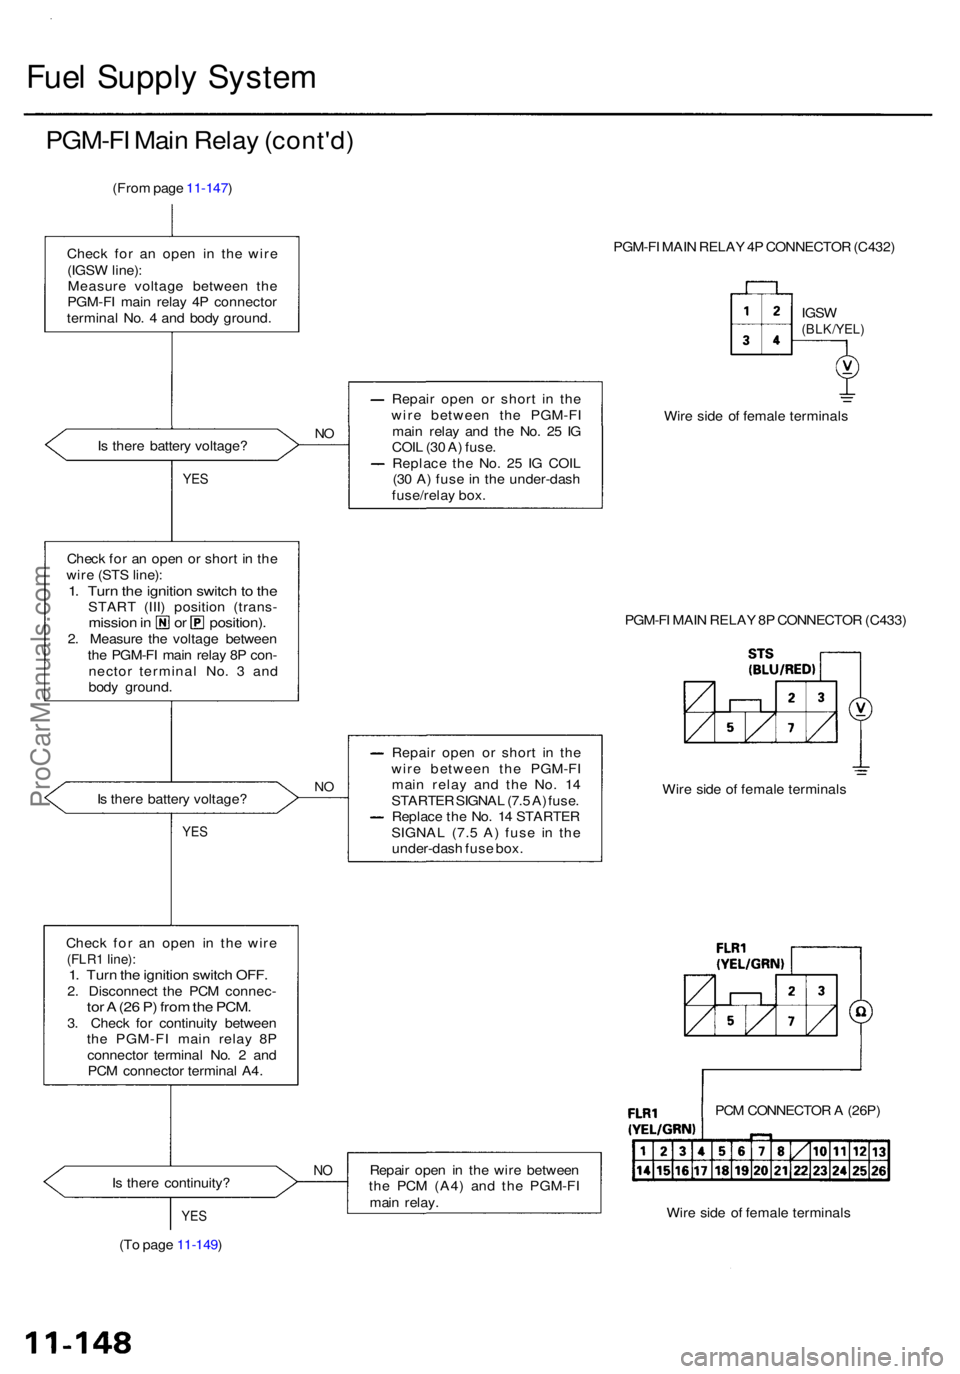
Fuel Suppl y Syste m
PGM-F I Mai n Rela y (cont'd )
(From pag e 11-147 )
Chec k fo r a n ope n i n th e wir e
(IGS W line) :
Measur e voltag e betwee n th e
PGM-F I mai n rela y 4 P connecto r
termina l No . 4 an d bod y ground .
I s ther e batter y voltage ?
YES
Chec k fo r a n ope n o r shor t i n th e
wir e (ST S line) :
1. Tur n th e ignitio n switc h to th eSTAR T (III ) positio n (trans -mission in o r position) .2. Measur e th e voltag e betwee n
th e PGM-F I mai n rela y 8 P con -
necto r termina l No . 3 an d
bod y ground .
I s ther e batter y voltage ?
YES
Chec k fo r a n ope n i n th e wir e(FLR 1 line) :1. Tur n th e ignitio n switc h OFF .2. Disconnec t th e PC M connec -tor A (2 6 P ) fro m th e PCM .3. Chec k fo r continuit y betwee n
th e PGM-F I mai n rela y 8 P
connecto r termina l No . 2 an d
PC M connecto r termina l A4 . PGM-F
I MAI N RELA Y 4P CONNECTO R (C432 )
IGSW(BLK/YEL )
NO
Repai r ope n o r shor t i n th e
wir e betwee n th e PGM-F I
mai n rela y an d th e No . 2 5 I G
COI L (3 0 A ) fuse .
Replac e th e No . 2 5 I G COI L
(3 0 A ) fus e in th e under-das h
fuse/rela y box . Wir
e sid e o f femal e terminal s
PGM-F I MAI N RELA Y 8 P CONNECTO R (C433 )
NO
Repai r ope n o r shor t i n th e
wir e betwee n th e PGM-F I
mai n rela y an d th e No . 1 4
STARTE R SIGNA L (7. 5 A ) fuse .
Replac e th e No . 1 4 STARTE R
SIGNA L (7. 5 A ) fus e i n the
under-das h fus e box . Wir
e sid e o f femal e terminal s
I s ther e continuity ? Repai
r ope n in th e wir e betwee n
the PC M (A4 ) an d the PGM-F I
mai n relay . PC
M CONNECTO R A (26P )
Wir e sid e o f femal e terminal s
(T o pag e 11-149 )
YES
NO
ProCarManuals.com
Page 653 of 1954
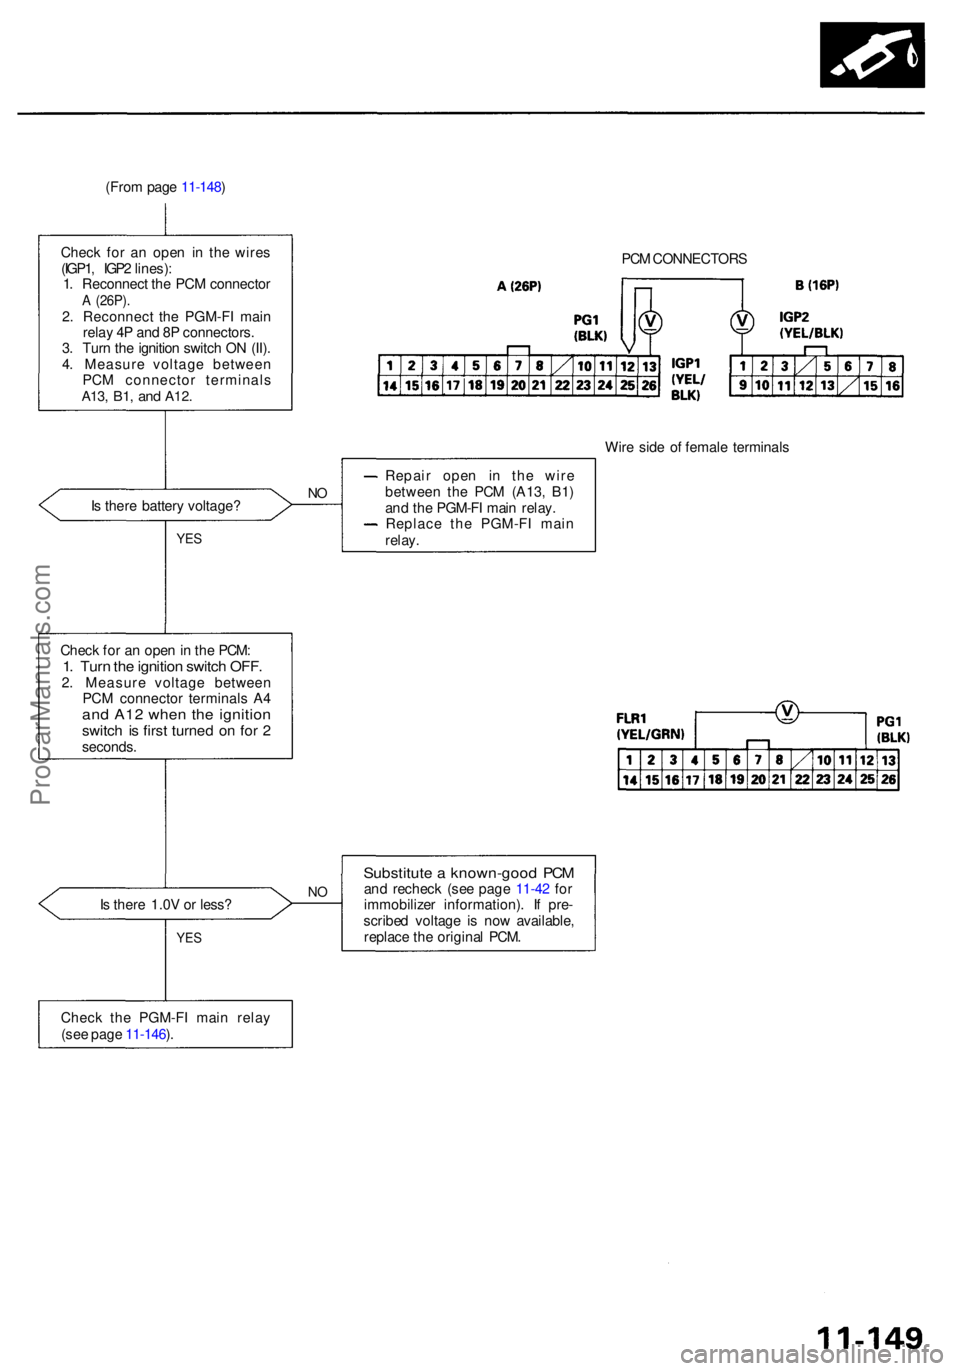
(From pag e 11-148 )
Chec k fo r a n ope n i n th e wire s
(IGP1 , IGP 2 lines) :
1 . Reconnec t th e PC M connecto r
A (26P) .2. Reconnec t th e PGM-F I mai n
rela y 4 P an d 8 P connectors .
3 . Tur n th e ignitio n switc h O N (II) .
4 . Measur e voltag e betwee n
PC M connecto r terminal s
A13, B1, an d A12 .
PCM CONNECTOR S
Wir e sid e o f femal e terminal s
I s ther e batter y voltage ?
YES
Repai r ope n i n th e wir e
betwee n th e PC M (A13 , B1 )
an d th e PGM-F I mai n relay .
Replac e th e PGM-F I mai n
relay .
Chec k fo r a n ope n in th e PCM :
1. Tur n th e ignitio n switc h OFF .2. Measur e voltag e betwee n
PC M connecto r terminal s A 4
an d A1 2 whe n th e ignitio nswitch i s firs t turne d o n fo r 2seconds .
I s ther e 1.0 V o r less ?
YES
Substitut e a known-goo d PC Mand rechec k (se e pag e 11-42 fo r
immobilize r information) . I f pre -
scribe d voltag e i s no w available ,
replac e th e origina l PCM .
Chec k th e PGM-F I mai n rela y
(se e pag e 11-146 ).N O
NO
ProCarManuals.com
Page 654 of 1954
Fuel Suppl y Syste m
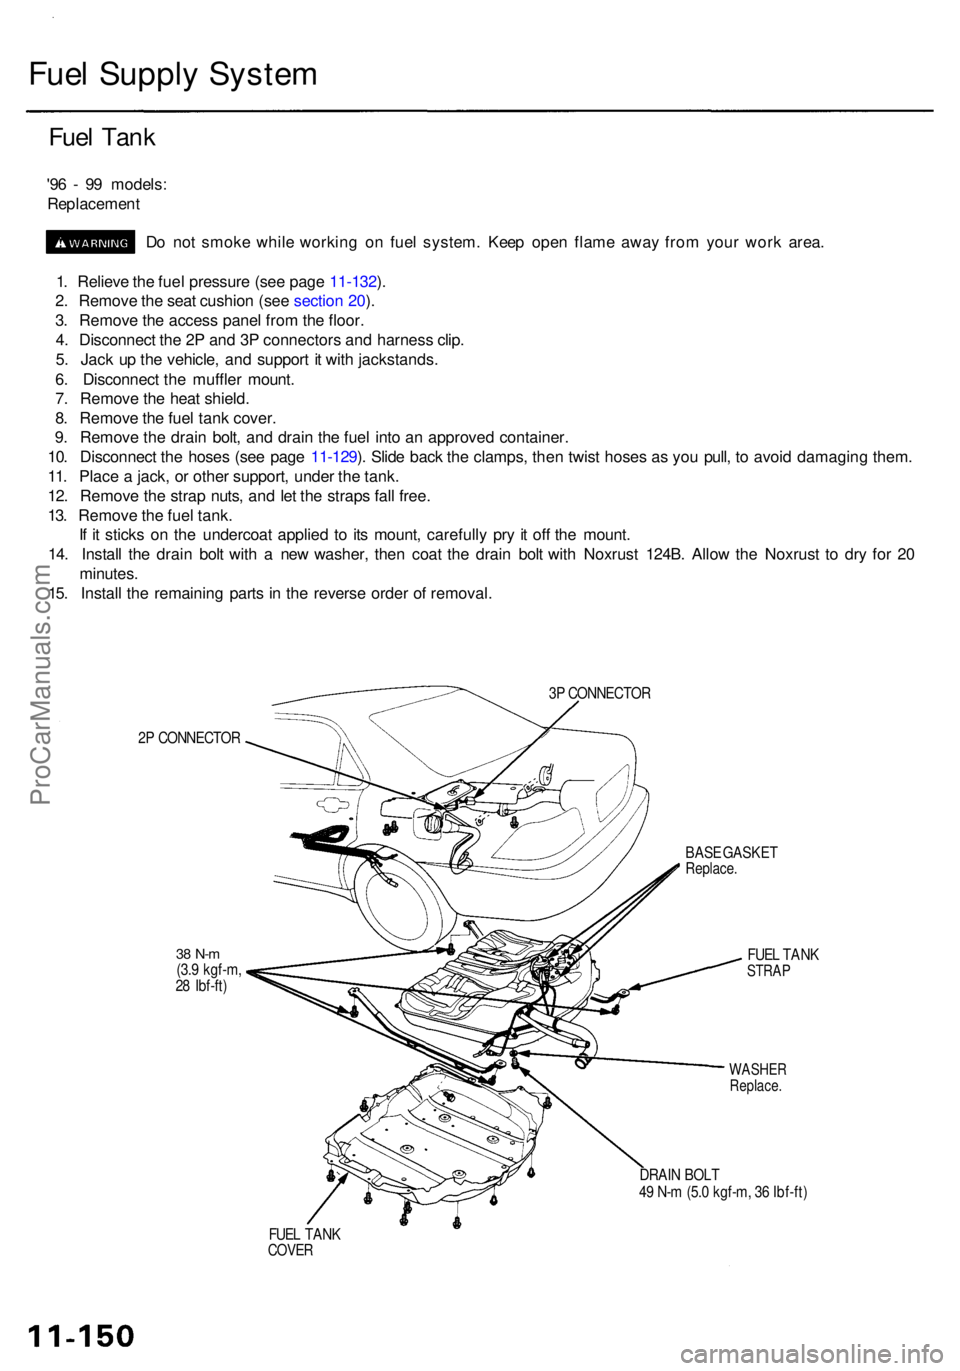
Fuel Tan k
'96 - 9 9 models :
Replacemen t
D o no t smok e whil e workin g o n fue l system . Kee p ope n flam e awa y fro m you r wor k area .
1 . Reliev e th e fue l pressur e (se e pag e 11-132 ).
2 . Remov e th e sea t cushio n (se e sectio n 20 ).
3 . Remov e th e acces s pane l fro m th e floor .
4 . Disconnec t th e 2 P an d 3 P connector s an d harnes s clip .
5 . Jac k u p th e vehicle , an d suppor t i t wit h jackstands .
6 . Disconnec t th e muffle r mount .
7 . Remov e th e hea t shield .
8 . Remov e th e fue l tan k cover .
9 . Remov e th e drai n bolt , an d drai n th e fue l int o a n approve d container .
10 . Disconnec t th e hose s (se e pag e 11-129 ). Slid e bac k th e clamps , the n twis t hose s a s yo u pull , t o avoi d damagin g them .
11 . Plac e a jack , o r othe r support , unde r th e tank .
12 . Remov e th e stra p nuts , an d le t th e strap s fal l free .
13 . Remov e th e fue l tank .
I f i t stick s o n th e undercoa t applie d t o it s mount , carefull y pr y i t of f th e mount .
14 . Instal l th e drai n bol t wit h a ne w washer , the n coa t th e drai n bol t wit h Noxrus t 124B . Allo w th e Noxrus t t o dr y fo r 2 0
minutes .
15 . Instal l th e remainin g part s i n th e revers e orde r o f removal .
3P CONNECTO R
2 P CONNECTO R
BASE GASKE T
Replace .
38 N- m(3.9 kgf-m ,
2 8 Ibf-ft ) FUE
L TAN KSTRA P
WASHE RReplace .
DRAIN BOL T
4 9 N- m (5. 0 kgf-m , 3 6 Ibf-ft )
FUE L TAN K
COVE R
ProCarManuals.com
Page 655 of 1954
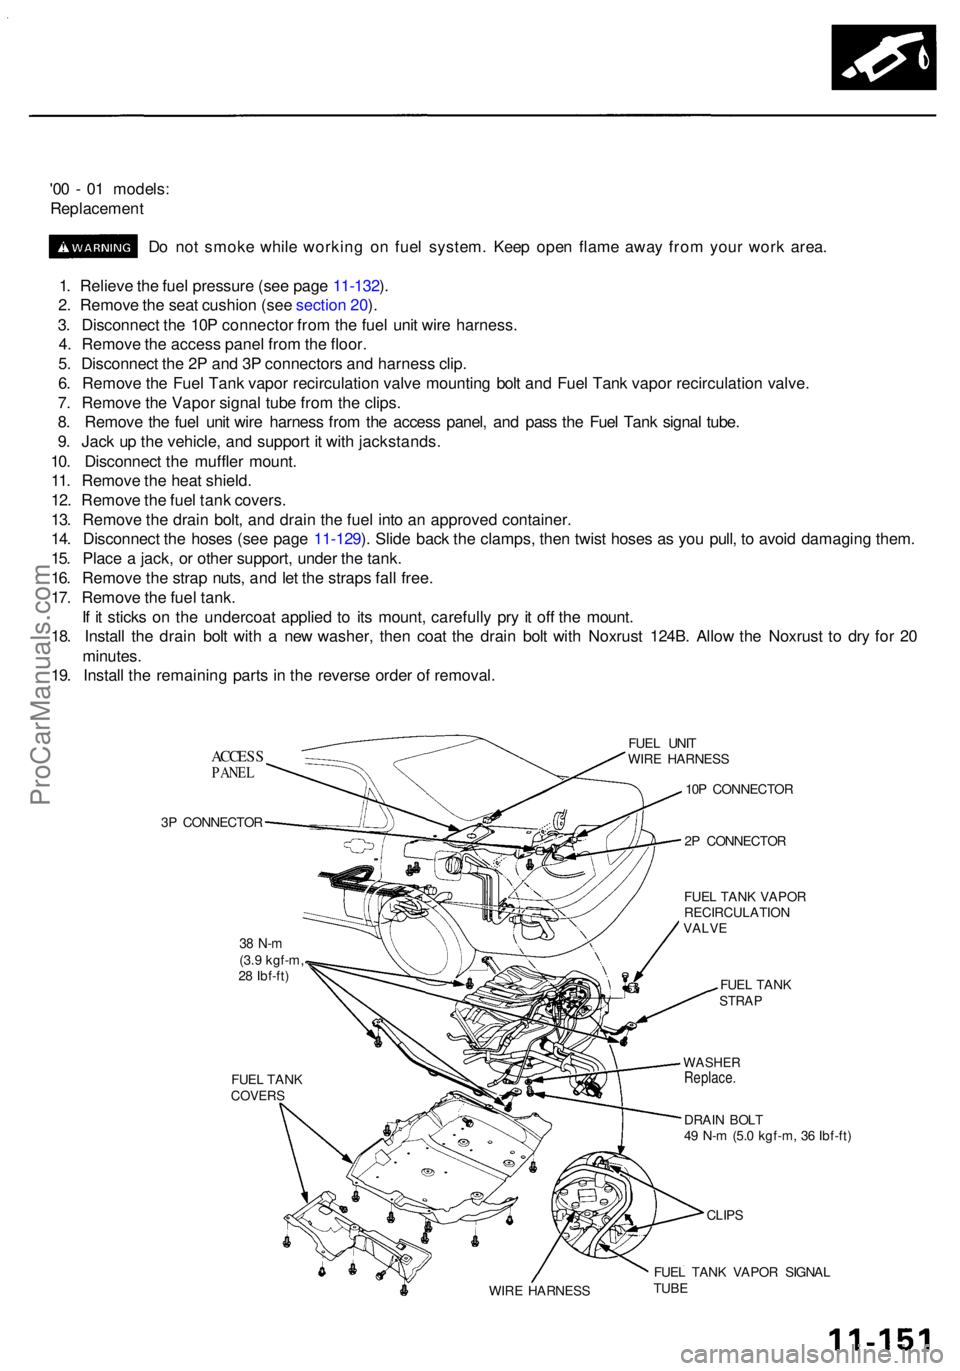
'00 - 0 1 models :
Replacemen t
D o no t smok e whil e workin g o n fue l system . Kee p ope n flam e awa y fro m you r wor k area .
1 . Reliev e th e fue l pressur e (se e pag e 11-132 ).
2 . Remov e th e sea t cushio n (se e sectio n 20 ).
3 . Disconnec t th e 10 P connecto r fro m th e fue l uni t wir e harness .
4 . Remov e th e acces s pane l fro m th e floor .
5 . Disconnec t th e 2 P an d 3 P connector s an d harnes s clip .
6 . Remov e th e Fue l Tan k vapo r recirculatio n valv e mountin g bol t an d Fue l Tan k vapo r recirculatio n valve .
7 . Remov e th e Vapo r signa l tub e fro m th e clips .
8 . Remov e th e fue l uni t wir e harnes s fro m th e acces s panel , an d pas s th e Fue l Tan k signa l tube .
9 . Jac k u p th e vehicle , an d suppor t i t wit h jackstands .
10 . Disconnec t th e muffle r mount .
11 . Remov e th e hea t shield .
12 . Remov e th e fue l tan k covers .
13 . Remov e th e drai n bolt , an d drai n th e fue l int o a n approve d container .
14 . Disconnec t th e hose s (se e pag e 11-129 ). Slid e bac k th e clamps , the n twis t hose s a s yo u pull , t o avoi d damagin g them .
15 . Plac e a jack , o r othe r support , unde r th e tank .
16 . Remov e th e stra p nuts , an d le t th e strap s fal l free .
17 . Remov e th e fue l tank .
I f i t stick s o n th e undercoa t applie d t o it s mount , carefull y pr y i t of f th e mount .
18 . Instal l th e drai n bol t wit h a ne w washer , the n coa t th e drai n bol t wit h Noxrus t 124B . Allo w th e Noxrus t t o dr y fo r 2 0
minutes .
19 . Instal l th e remainin g part s i n th e revers e orde r o f removal .
ACCESSPANEL
3P CONNECTO R FUE
L UNI T
WIR E HARNES S
38 N- m(3.9 kgf-m ,
2 8 Ibf-ft )
FUE L TAN K
COVER S
WIRE HARNES S 10
P CONNECTO R
2 P CONNECTO R
FUE L TAN K VAPO R
RECIRCULATIO N
VALVE
FUEL TAN KSTRA P
CLIPS
FUE L TAN K VAPO R SIGNA L
TUB E
WASHE RReplace .
DRAIN BOL T
4 9 N- m (5. 0 kgf-m , 3 6 Ibf-ft )
ProCarManuals.com
Page 656 of 1954
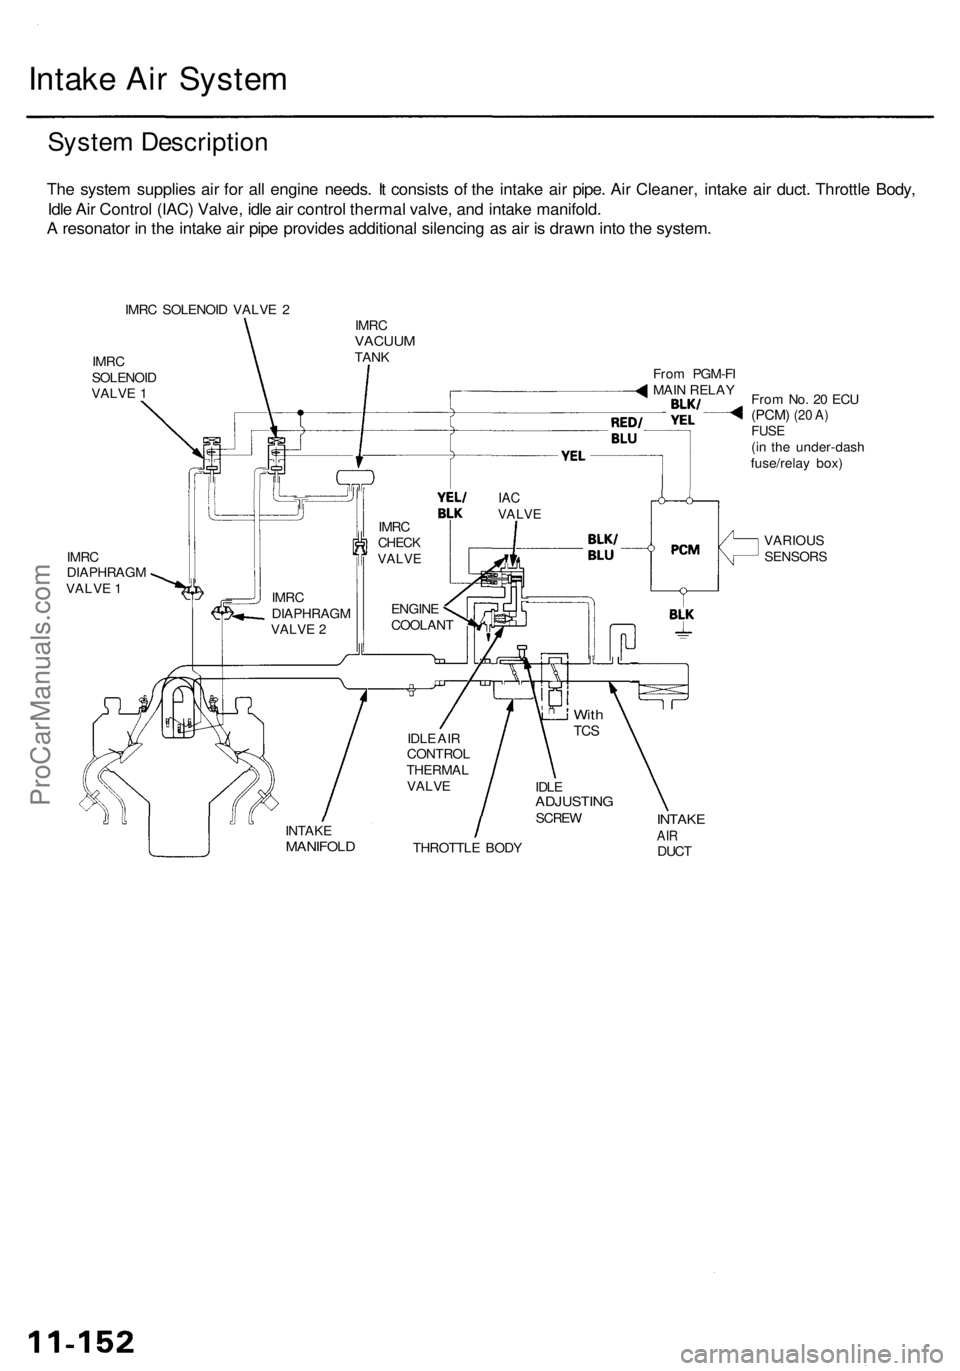
Intake Air System
System Description
The system supplies air for all engine needs. It consists of the intake air pipe. Air Cleaner, intake air duct. Throttle Body,
Idle Air Control (IAC) Valve, idle air control thermal valve, and intake manifold.
A resonator in the intake air pipe provides additional silencing as air is drawn into the system.
IMRC SOLENOID VALVE 2
IMRC
SOLENOID
VALVE 1
IMRC
VACUUM
TANK
From No. 20 ECU
(PCM)
(20 A)
FUSE
(in the under-dash
fuse/relay box)
IMRC
DIAPHRAGM
VALVE 1
VARIOUS
SENSORS
THROTTLE BODY
INTAKE
AIR
DUCT
INTAKE
MANIFOLD
IDLE
ADJUSTING
SCREW
With
TCS
IDLE AIR
CONTROL
THERMAL
VALVE
IAC
VALVE
From PGM-FI
MAIN RELAY
IMRC
DIAPHRAGM
VALVE 2
IMRC
CHECK
VALVE
ENGINE
COOLANTProCarManuals.com
Page 657 of 1954
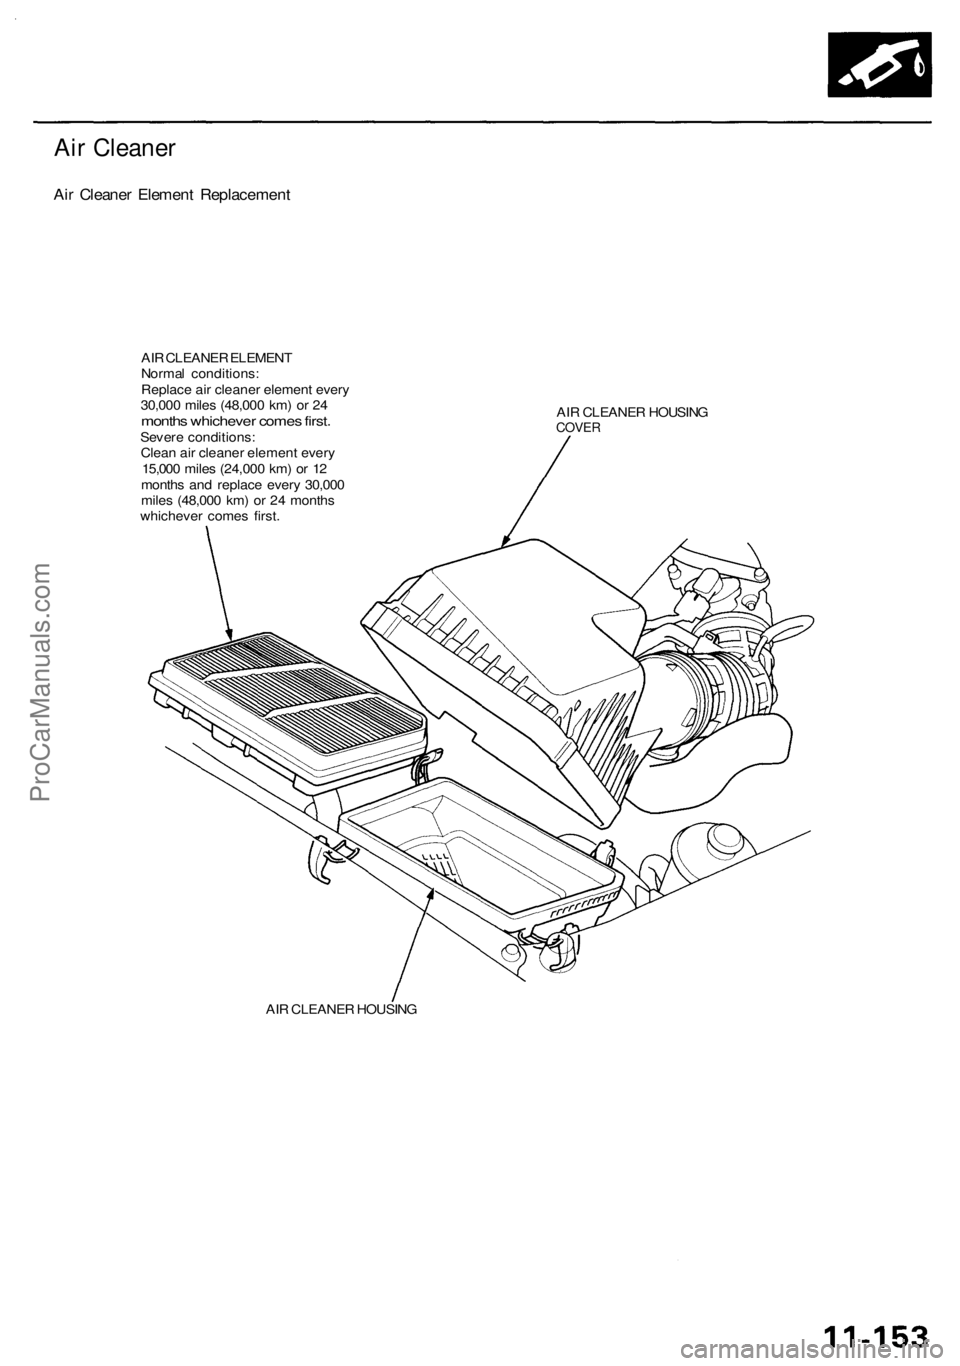
Air Cleaner
Air Cleaner Element Replacement
AIR CLEANER ELEMENT
Normal conditions:
Replace air cleaner element every
30,000 miles (48,000 km) or 24
months whichever comes first.
Severe conditions:
Clean air cleaner element every
15,000 miles (24,000 km) or 12
months and replace every 30,000
miles (48,000 km) or 24 months
whichever comes first.
AIR CLEANER HOUSING
COVER
AIR CLEANER HOUSINGProCarManuals.com
Page 658 of 1954
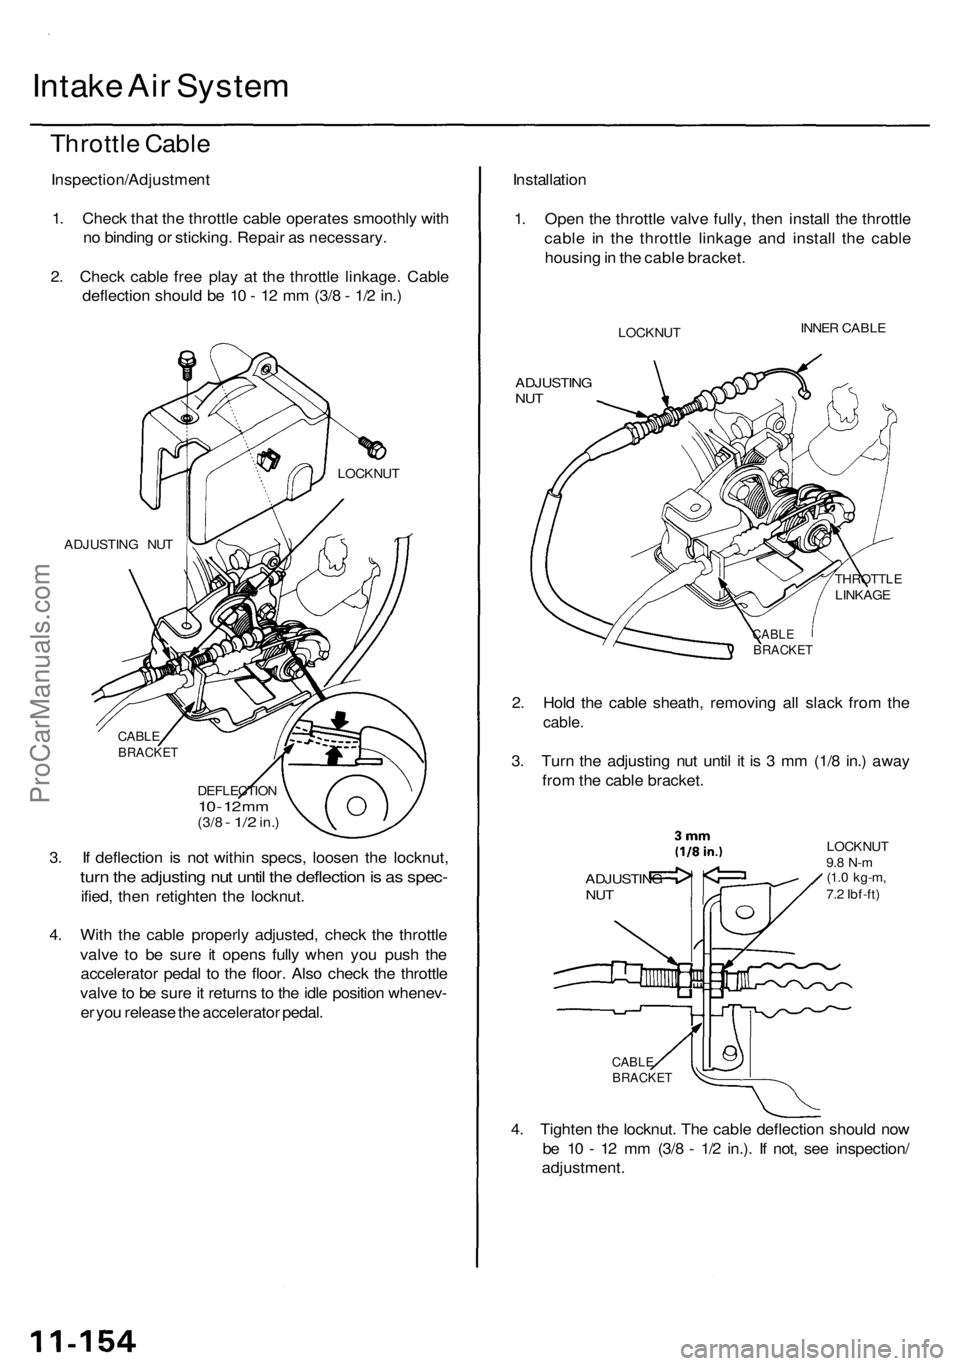
Intake Ai r Syste m
Throttl e Cabl e
Inspection/Adjustmen t
1 . Chec k tha t th e throttl e cabl e operate s smoothl y wit h
n o bindin g o r sticking . Repai r a s necessary .
2 . Chec k cabl e fre e pla y a t th e throttl e linkage . Cabl e
deflectio n shoul d b e 1 0 - 1 2 m m (3/ 8 - 1/ 2 in. )
ADJUSTIN G NU T
CABL EBRACKE T
DEFLECTIO N10 - 1 2 m m(3/ 8 - 1/ 2 in. )
3. I f deflectio n i s no t withi n specs , loose n th e locknut ,
turn th e adjustin g nu t unti l th e deflectio n is a s spec -
ified, the n retighte n th e locknut .
4 . Wit h th e cabl e properl y adjusted , chec k th e throttl e
valv e t o b e sur e i t open s full y whe n yo u pus h th e
accelerato r peda l t o th e floor . Als o chec k th e throttl e
valv e to b e sur e it return s t o th e idl e positio n whenev -
e r yo u releas e th e accelerato r pedal . Installatio
n
1 . Ope n th e throttl e valv e fully , the n instal l th e throttl e
cabl e i n th e throttl e linkag e an d instal l th e cabl e
housin g in th e cabl e bracket .
LOCKNU TINNER CABL E
ADJUSTIN GNUT
THROTTL ELINKAGE
CABLEBRACKE T
2. Hol d th e cabl e sheath , removin g al l slac k fro m th e
cable .
3. Tur n th e adjustin g nu t unti l i t i s 3 m m (1/ 8 in. ) awa y
fro m th e cabl e bracket .
LOCKNU T9.8 N- m(1.0 kg-m ,7.2 Ibf-ft )
CABL EBRACKE T
4. Tighte n th e locknut . Th e cabl e deflectio n shoul d no w
b e 1 0 - 1 2 m m (3/ 8 - 1/ 2 in.) . I f not , se e inspection /
adjustment .
ADJUSTINGNUT
LOCKNU T
ProCarManuals.com
Page 659 of 1954
Throttle Bod y
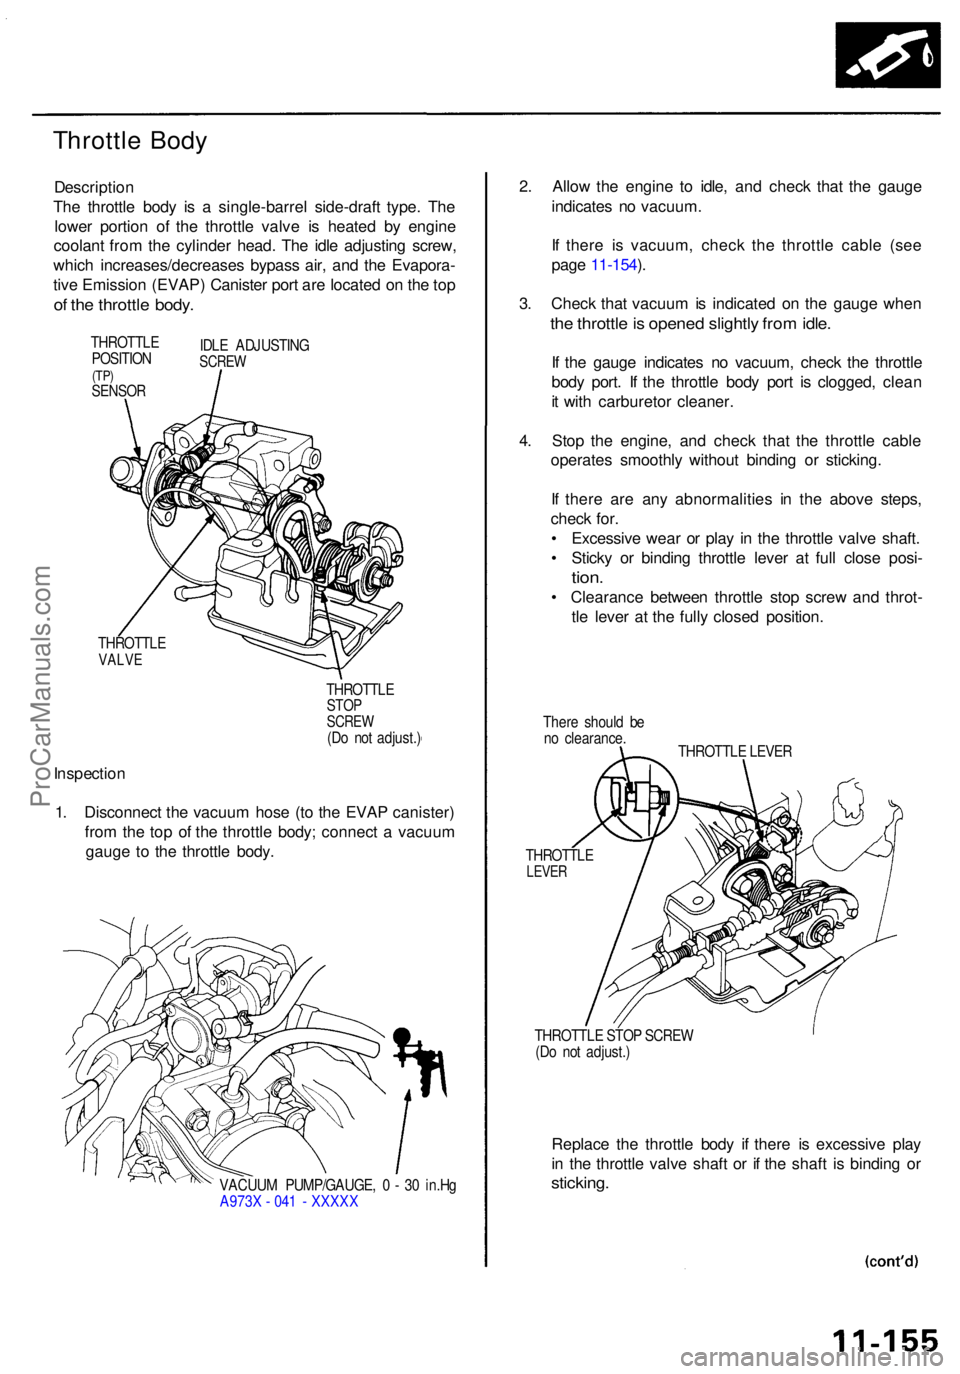
Descriptio n
The throttl e bod y i s a single-barre l side-draf t type . Th e
lowe r portio n o f th e throttl e valv e i s heate d b y engin e
coolan t fro m th e cylinde r head . Th e idl e adjustin g screw ,
whic h increases/decrease s bypas s air , an d th e Evapora -
tiv e Emissio n (EVAP ) Caniste r por t ar e locate d o n th e to p
of th e throttl e body .
THROTTL E
POSITIO N
(TP)SENSO R
IDLE ADJUSTIN GSCREW
THROTTL EVALVE
THROTTL ESTOPSCRE W(Do no t adjust. )
Inspectio n
1 . Disconnec t th e vacuu m hos e (t o th e EVA P canister )
fro m th e to p o f th e throttl e body ; connec t a vacuu m
gaug e t o th e throttl e body .
VACUU M PUMP/GAUGE , 0 - 3 0 in.H g
A973 X - 04 1 - XXXX X
2. Allo w th e engin e t o idle , an d chec k tha t th e gaug e
indicate s n o vacuum .
I f ther e i s vacuum , chec k th e throttl e cabl e (se e
pag e 11-154 ).
3 . Chec k tha t vacuu m is indicate d o n th e gaug e whe n
the throttl e is opene d slightl y fro m idle .
If th e gaug e indicate s n o vacuum , chec k th e throttl e
bod y port . I f th e throttl e bod y por t i s clogged , clea n
i t wit h carbureto r cleaner .
4 . Sto p th e engine , an d chec k tha t th e throttl e cabl e
operate s smoothl y withou t bindin g o r sticking .
I f ther e ar e an y abnormalitie s i n th e abov e steps ,
chec k for .
• Excessiv e wea r o r pla y i n th e throttl e valv e shaft .
• Stick y o r bindin g throttl e leve r a t ful l clos e posi -
tion.
• Clearanc e betwee n throttl e sto p scre w an d throt -
tl e leve r a t th e full y close d position .
There shoul d b e
n o clearance .
THROTTL E LEVE R
THROTTL E
LEVER
THROTTL E STO P SCRE W
(D o no t adjust. )
Replace th e throttl e bod y i f ther e i s excessiv e pla y
i n th e throttl e valv e shaf t o r i f th e shaf t i s bindin g o r
sticking .
ProCarManuals.com
Page 660 of 1954
Intake Ai r Syste m
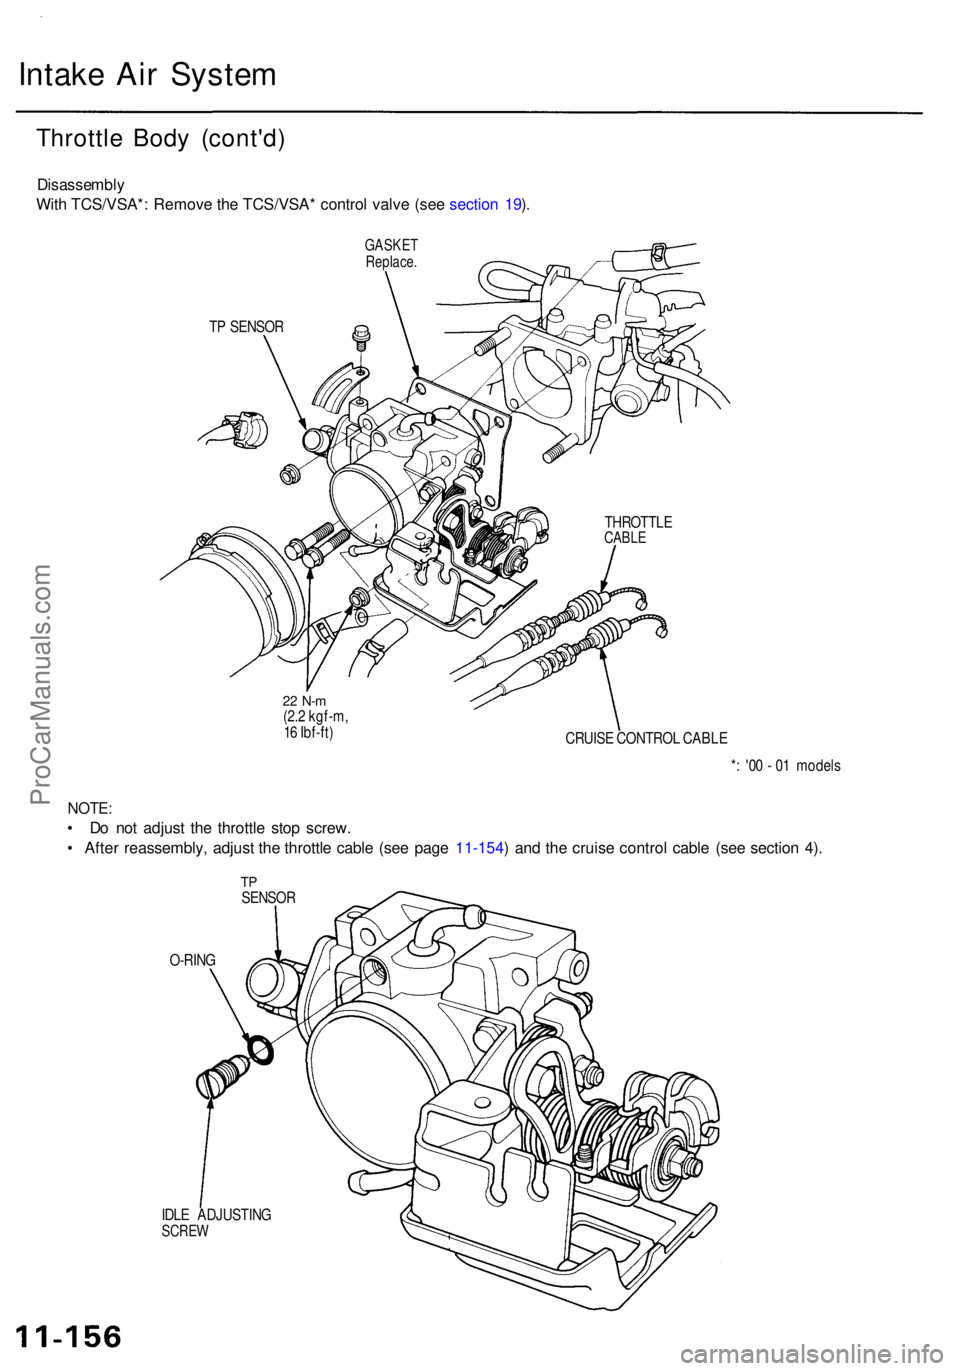
TP SENSO R
22 N- m(2.2 kgf-m ,
1 6 Ibf-ft )
CRUISE CONTRO L CABL E
*: '0 0 - 0 1 model s
O-RIN G
IDL E ADJUSTIN G
SCREW
TPSENSO R
NOTE:
• D o no t adjus t th e throttl e sto p screw .
• Afte r reassembly , adjus t th e throttl e cabl e (se e pag e 11-154 ) an d th e cruis e contro l cabl e (se e sectio n 4) .
THROTTL ECABLE
GASKE TReplace .
Disassembl y
Wit h TCS/VSA* : Remov e th e TCS/VSA * contro l valv e (se e sectio n 19 ).
Throttl e Bod y (cont'd )
ProCarManuals.com