ACURA TL 1995 Service Repair Manual
Manufacturer: ACURA, Model Year: 1995, Model line: TL, Model: ACURA TL 1995Pages: 1771, PDF Size: 62.49 MB
Page 901 of 1771
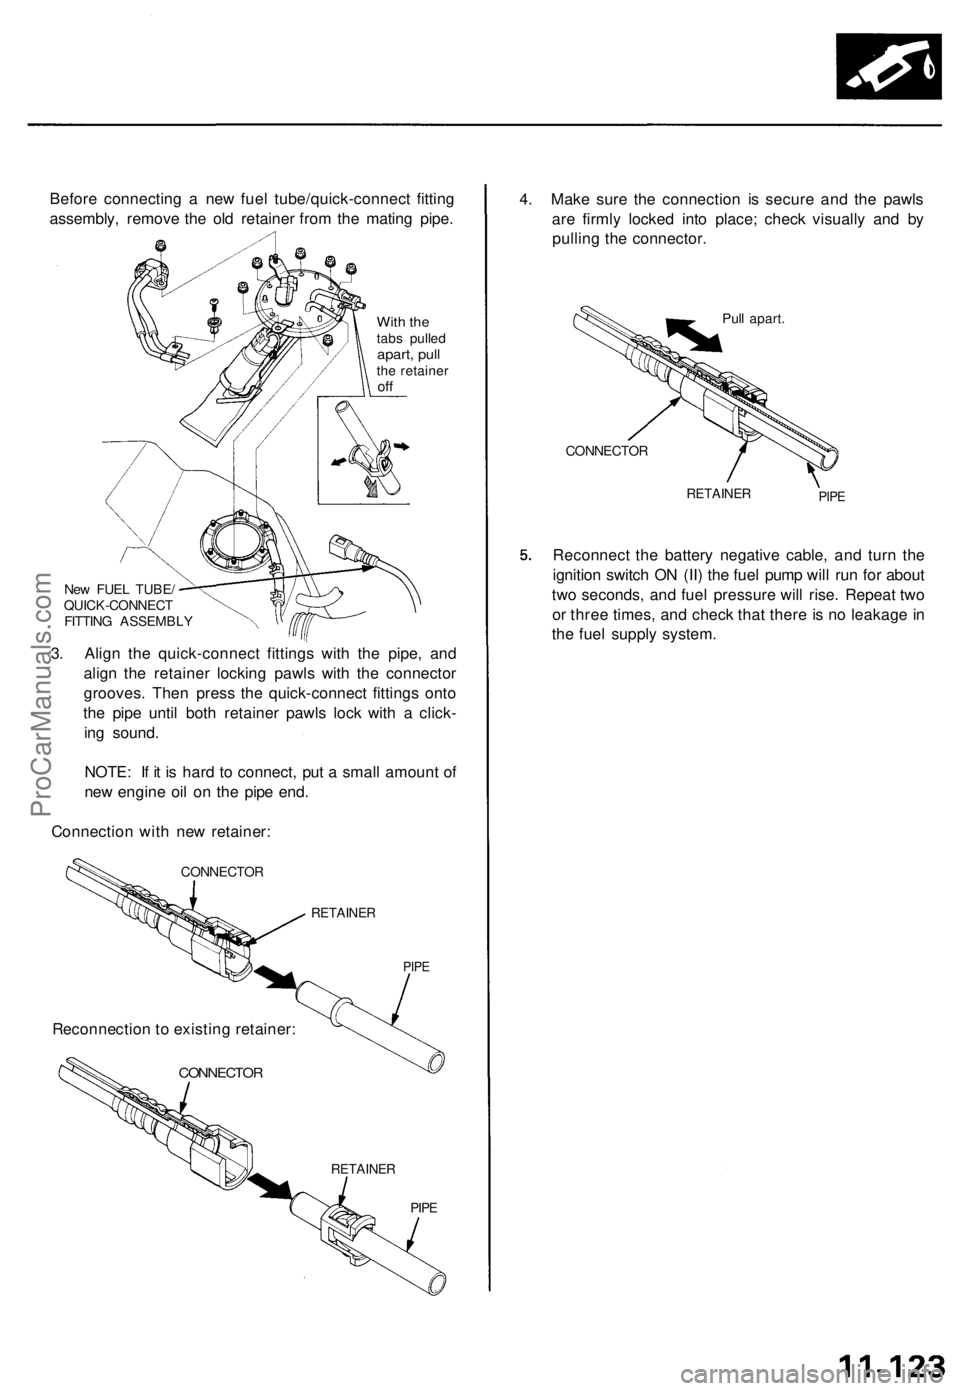
Before connecting a new fuel tube/quick-connect fitting
assembly, remove the old retainer from the mating pipe.
With the
tabs pulled
apart, pull
the retainer
off
New FUEL TUBE/
QUICK-CONNECT
FITTING ASSEMBLY
3. Align the quick-connect fittings with the pipe, and
align the retainer locking pawls with the connector
grooves. Then press the quick-connect fittings onto
the pipe until both retainer pawls lock with a click-
ing sound.
NOTE: If it is hard to connect, put a small amount of
new engine oil on the pipe end.
Connection with new retainer:
CONNECTOR
RETAINER
PIPE
CONNECTOR
RETAINER
PIPE
4. Make sure the connection is secure and the pawls
are firmly locked into place; check visually and by
pulling the connector.
Pull apart.
CONNECTOR
RETAINER
PIPE
Reconnect the battery negative cable, and turn the
ignition switch ON (II) the fuel pump will run for about
two seconds, and fuel pressure will rise. Repeat two
or three times, and check that there is no leakage in
the fuel supply system.
Reconnection to existing retainer:ProCarManuals.com
Page 902 of 1771
Fuel Supply System
System Description
The fuel supply system consists of a fuel tank, in-tank
high pressure fuel pump, PGM-FI main relay, fuel filter,
fuel pressure regulator, fuel injectors, and fuel delivery
and return lines. This system delivers pressure-regulat-
ed fuel to the fuel injectors and cuts the fuel delivery
when the engine is not running.
11-124ProCarManuals.com
Page 903 of 1771
Fuel Supply System
Fuel Pressure
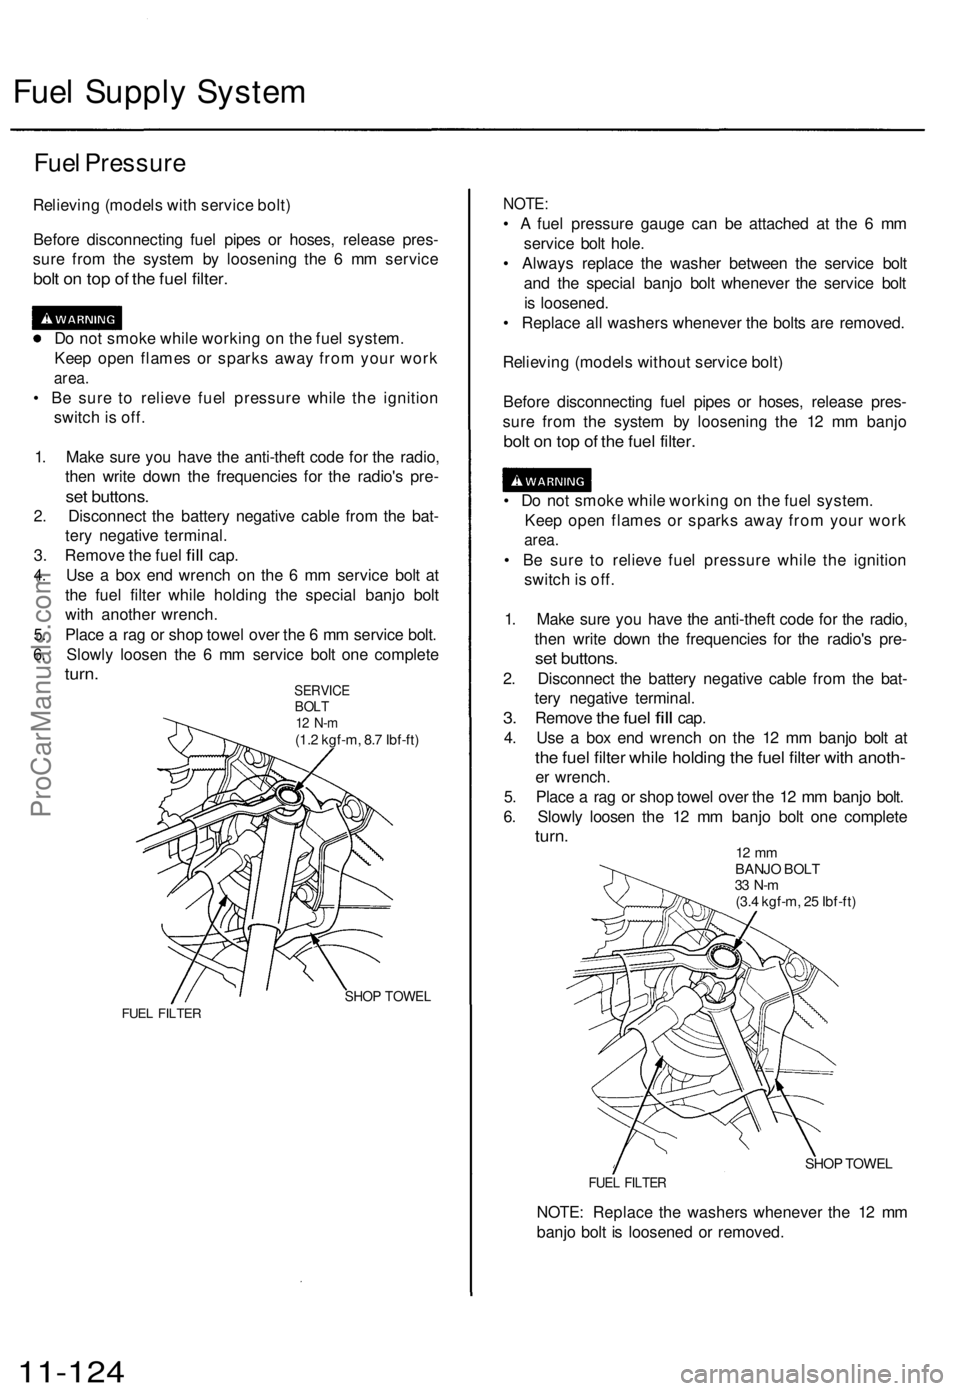
Relieving (models with service bolt)
Before disconnecting fuel pipes or hoses, release pres-
sure from the system by loosening the 6 mm service
bolt on top of the fuel filter.
Do not smoke while working on the fuel system.
Keep open flames or sparks away from your work
area.
• Be sure to relieve fuel pressure while the ignition
switch is off.
1. Make sure you have the anti-theft code for the radio,
then write down the frequencies for the radio's pre-
set buttons.
2. Disconnect the battery negative cable from the bat-
tery negative terminal.
3.
Remove
the
fuel
fill
cap.
4. Use a box end wrench on the 6 mm service bolt at
the fuel filter while holding the special banjo bolt
with another wrench.
5. Place a rag or shop towel over the 6 mm service bolt.
6. Slowly loosen the 6 mm service bolt one complete
turn.
SERVICE
BOLT
12 N-m
(1.2 kgf-m, 8.7 Ibf-ft)
SHOP TOWEL
FUEL FILTER
NOTE:
• A fuel pressure gauge can be attached at the 6 mm
service bolt hole.
• Always replace the washer between the service bolt
and the special banjo bolt whenever the service bolt
is loosened.
• Replace all washers whenever the bolts are removed.
Relieving (models without service bolt)
Before disconnecting fuel pipes or hoses, release pres-
sure from the system by loosening the 12 mm banjo
bolt on top of the fuel filter.
• Do not smoke while working on the fuel system.
Keep open flames or sparks away from your work
area.
• Be sure to relieve fuel pressure while the ignition
switch is off.
1. Make sure you have the anti-theft code for the radio,
then write down the frequencies for the radio's pre-
set buttons.
2. Disconnect the battery negative cable from the bat-
tery negative terminal.
3.
Remove
the
fuel
fill
cap.
4. Use a box end wrench on the 12 mm banjo bolt at
the fuel filter while holding the fuel filter with anoth-
er wrench.
5. Place a rag or shop towel over the 12 mm banjo bolt.
6. Slowly loosen the 12 mm banjo bolt one complete
turn.
12 mm
BANJO BOLT
33 N-m
(3.4 kgf-m, 25 Ibf-ft)
SHOP TOWEL
FUEL FILTER
NOTE: Replace the washers whenever the 12 mm
banjo bolt is loosened or removed.
11-124ProCarManuals.com
Page 904 of 1771
Inspection (model s wit h servic e bolt )
1 . Reliev e fue l pressur e (se e pag e 11-124 ).
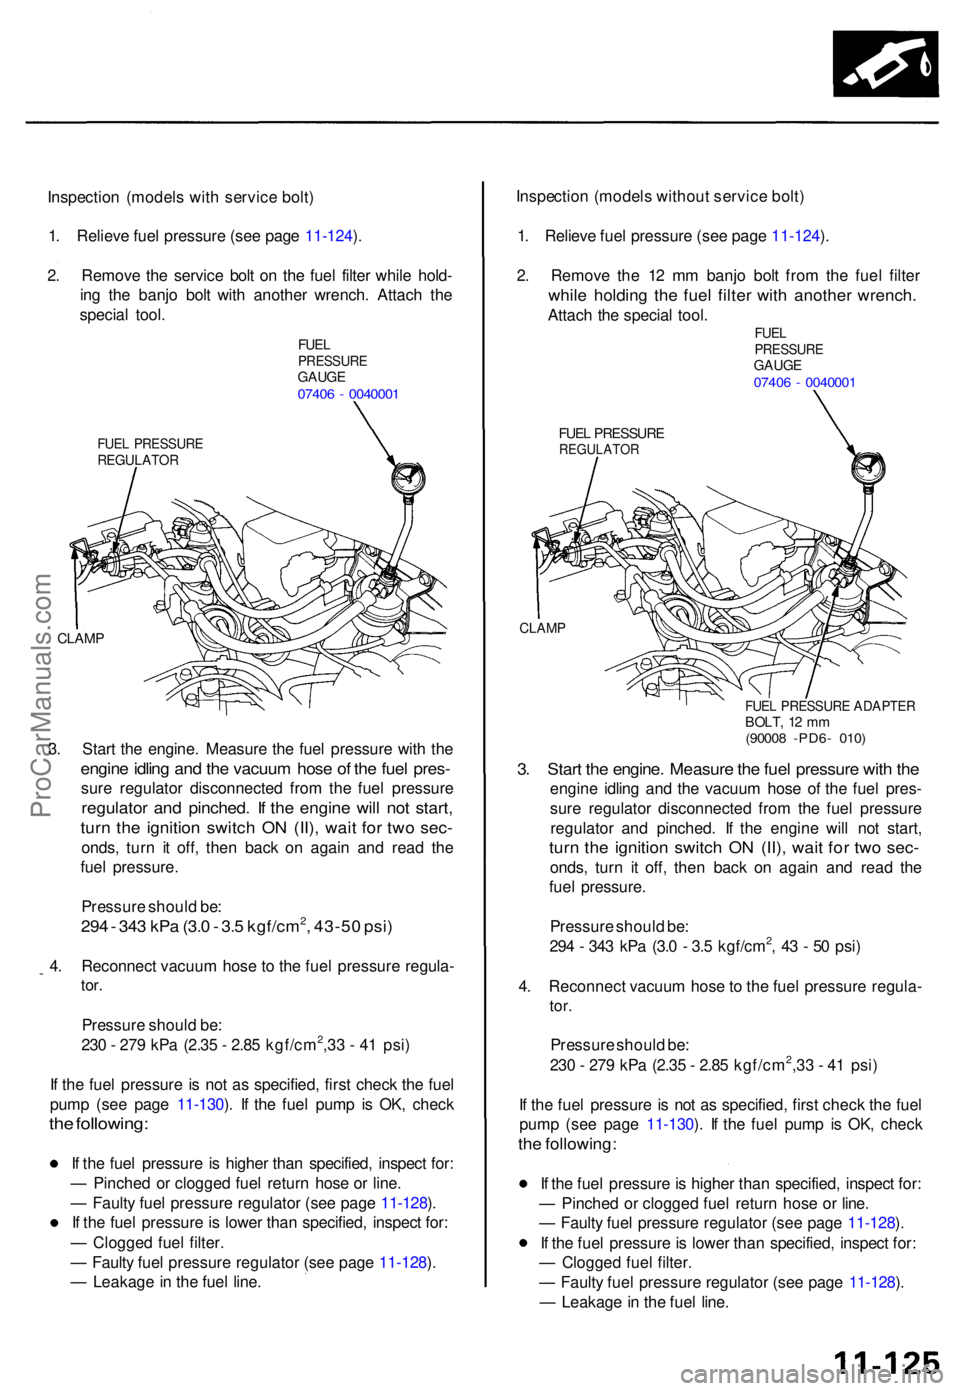
2 . Remov e th e servic e bol t o n th e fue l filte r whil e hold -
in g th e banj o bol t wit h anothe r wrench . Attac h th e
specia l tool .
FUELPRESSUR EGAUGE07406 - 004000 1
FUEL PRESSUR EREGULATO R
CLAMP
3. Star t th e engine . Measur e th e fue l pressur e wit h th e
engin e idlin g an d th e vacuu m hos e o f th e fue l pres -
sure regulato r disconnecte d fro m th e fue l pressur e
regulator an d pinched . I f th e engin e wil l no t start ,
turn th e ignitio n switc h O N (II) , wai t fo r tw o sec -
onds , tur n i t off , the n bac k o n agai n an d rea d th e
fue l pressure .
Pressur e shoul d be :
294 - 34 3 kP a (3. 0 - 3. 5 kgf/cm2, 43-5 0 psi )
4. Reconnec t vacuu m hos e to th e fue l pressur e regula -
tor.
Pressur e shoul d be :
23 0 - 27 9 kP a (2.3 5 - 2.8 5 kgf/cm2,3 3 - 4 1 psi )
I f th e fue l pressur e i s no t a s specified , firs t chec k th e fue l
pum p (se e pag e 11-130 ). I f th e fue l pum p i s OK , chec k
the following :
If th e fue l pressur e i s highe r tha n specified , inspec t for :
— Pinche d o r clogge d fue l retur n hos e o r line .
— Fault y fue l pressur e regulato r (se e pag e 11-128 ).
I f th e fue l pressur e is lowe r tha n specified , inspec t for :
— Clogge d fue l filter .
— Fault y fue l pressur e regulato r (se e pag e 11-128 ).
— Leakag e in th e fue l line . Inspectio
n (model s withou t servic e bolt )
1 . Reliev e fue l pressur e (se e pag e 11-124 ).
2 . Remov e th e 1 2 m m banj o bol t fro m th e fue l filte r
while holdin g th e fue l filte r wit h anothe r wrench .
Attach th e specia l tool .FUELPRESSUR EGAUGE07406 - 004000 1
FUEL PRESSUR EREGULATO R
CLAMP
FUEL PRESSUR E ADAPTE RBOLT, 1 2 m m(9000 8 -PD6 - 010 )
3. Star t th e engine . Measur e th e fue l pressur e wit h th e
engin e idlin g an d th e vacuu m hos e o f th e fue l pres -
sur e regulato r disconnecte d fro m th e fue l pressur e
regulato r an d pinched . I f th e engin e wil l no t start ,
turn th e ignitio n switc h O N (II) , wai t fo r tw o sec -
onds , tur n i t off , the n bac k o n agai n an d rea d th e
fue l pressure .
Pressur e shoul d be :
29 4 - 34 3 kP a (3. 0 - 3. 5 kgf/cm
2, 4 3 - 5 0 psi )
4 . Reconnec t vacuu m hos e to th e fue l pressur e regula -
tor.
Pressur e shoul d be :
23 0 - 27 9 kP a (2.3 5 - 2.8 5 kgf/cm2,3 3 - 4 1 psi )
I f th e fue l pressur e is no t a s specified , firs t chec k th e fue l
pum p (se e pag e 11-130 ). I f th e fue l pum p i s OK , chec k
the following :
If th e fue l pressur e is highe r tha n specified , inspec t for :
— Pinche d o r clogge d fue l retur n hos e o r line .
— Fault y fue l pressur e regulato r (se e pag e 11-128 ).
I f th e fue l pressur e is lowe r tha n specified , inspec t for :
— Clogged fuel filter .
— Fault y fue l pressur e regulato r (se e pag e 11-128 ).
— Leakag e in th e fue l line .
ProCarManuals.com
Page 905 of 1771
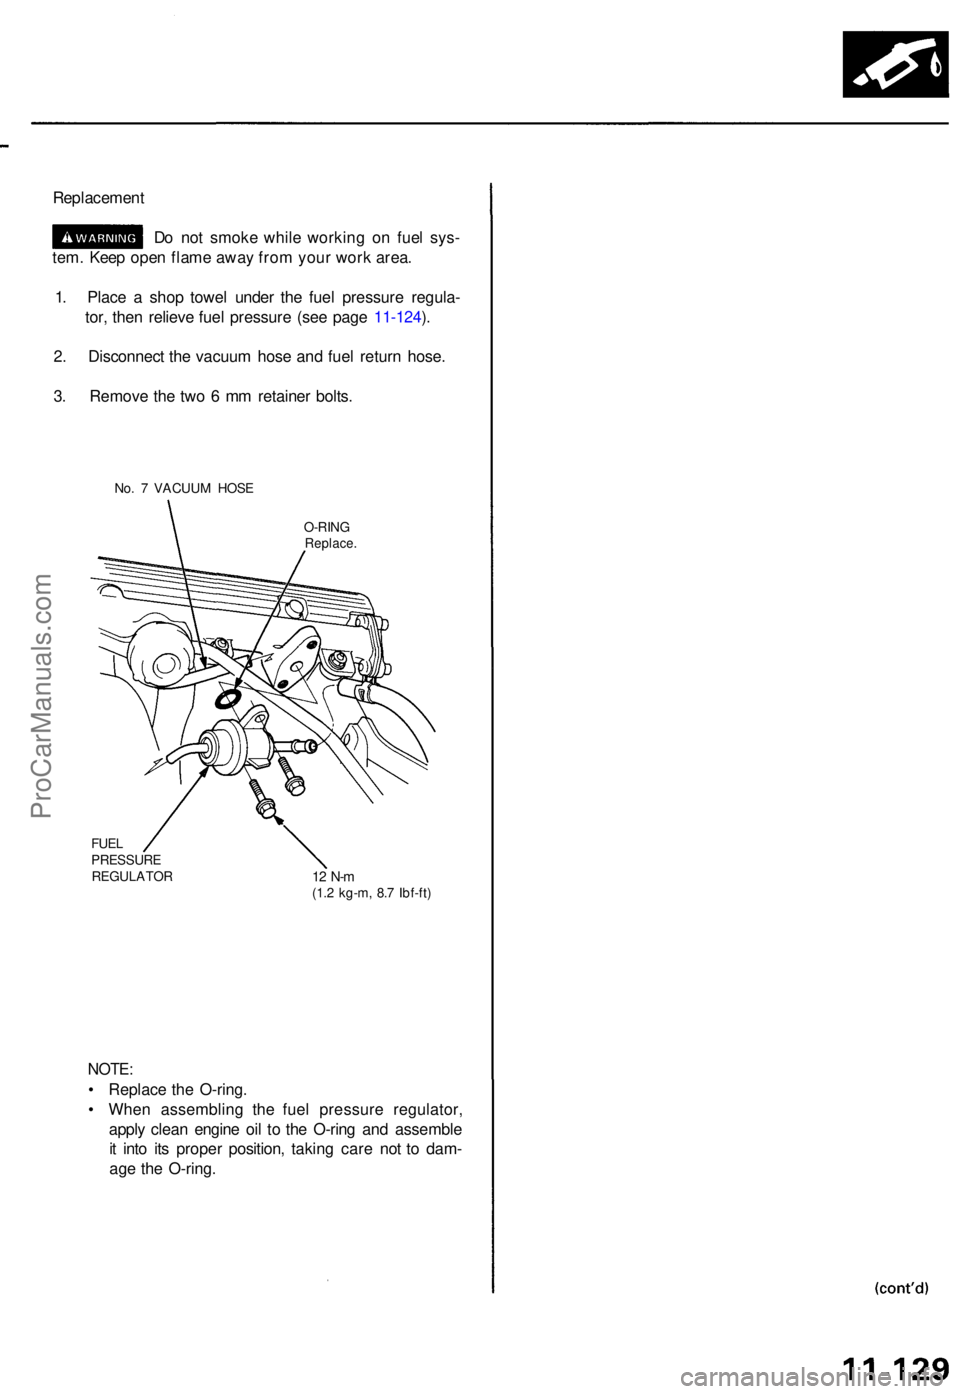
Replacement
Do no t smok e whil e workin g o n fue l sys -
tem . Kee p ope n flam e awa y fro m you r wor k area .
1 . Plac e a sho p towe l unde r th e fue l pressur e regula -
tor , the n reliev e fue l pressur e (se e pag e 11-124 ).
2 . Disconnec t th e vacuu m hos e an d fue l retur n hose .
3 . Remov e th e tw o 6 m m retaine r bolts .
No. 7 VACUU M HOS E
O-RING
Replace .
FUELPRESSUR EREGULATO R12 N- m(1.2 kg-m , 8. 7 Ibf-ft )
NOTE :
• Replac e th e O-ring .
• Whe n assemblin g th e fue l pressur e regulator ,
appl y clea n engin e oi l t o th e O-rin g an d assembl e
i t int o it s prope r position , takin g car e no t t o dam -
ag e th e O-ring .
ProCarManuals.com
Page 906 of 1771
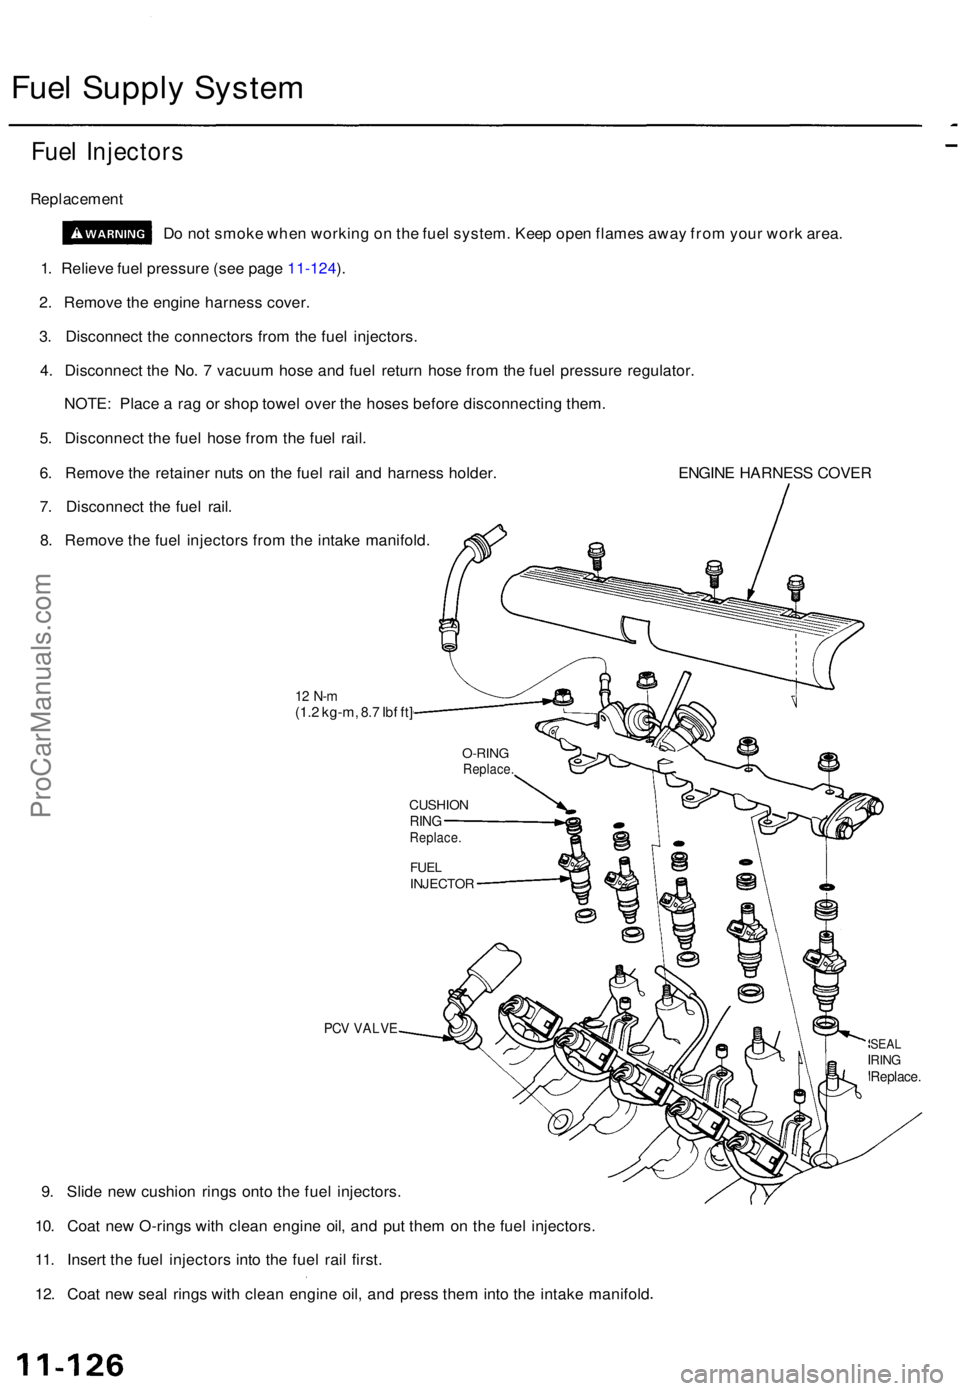
Fuel Suppl y Syste m
Fuel Injector s
Replacemen t
Do no t smok e whe n workin g o n th e fue l system . Kee p ope n flame s awa y fro m you r wor k area .
1 . Reliev e fue l pressur e (se e pag e 11-124 ).
2 . Remov e th e engin e harnes s cover .
3 . Disconnec t th e connector s fro m th e fue l injectors .
4 . Disconnec t th e No . 7 vacuu m hos e an d fue l retur n hos e fro m th e fue l pressur e regulator .
NOTE : Plac e a ra g o r sho p towe l ove r th e hose s befor e disconnectin g them .
5 . Disconnec t th e fue l hos e fro m th e fue l rail .
6 . Remov e th e retaine r nut s o n th e fue l rai l an d harnes s holder . ENGIN E HARNES S COVE R
7 . Disconnec t th e fue l rail .
8 . Remov e th e fue l injector s fro m th e intak e manifold .
12 N- m(1.2 kg-m , 8.7 Ib f ft ]
PC V VALV E
9. Slid e ne w cushio n ring s ont o th e fue l injectors .
10 . Coa t ne w O-ring s wit h clea n engin e oil , an d pu t the m o n th e fue l injectors .
11 . Inser t th e fue l injector s int o th e fue l rai l first .
12 . Coa t ne w sea l ring s wit h clea n engin e oil , an d pres s the m int o th e intak e manifol d
SEALRINGReplace .
FUELINJECTO R
CUSHIONRINGReplace .
O-RINGReplace .
ProCarManuals.com
Page 907 of 1771
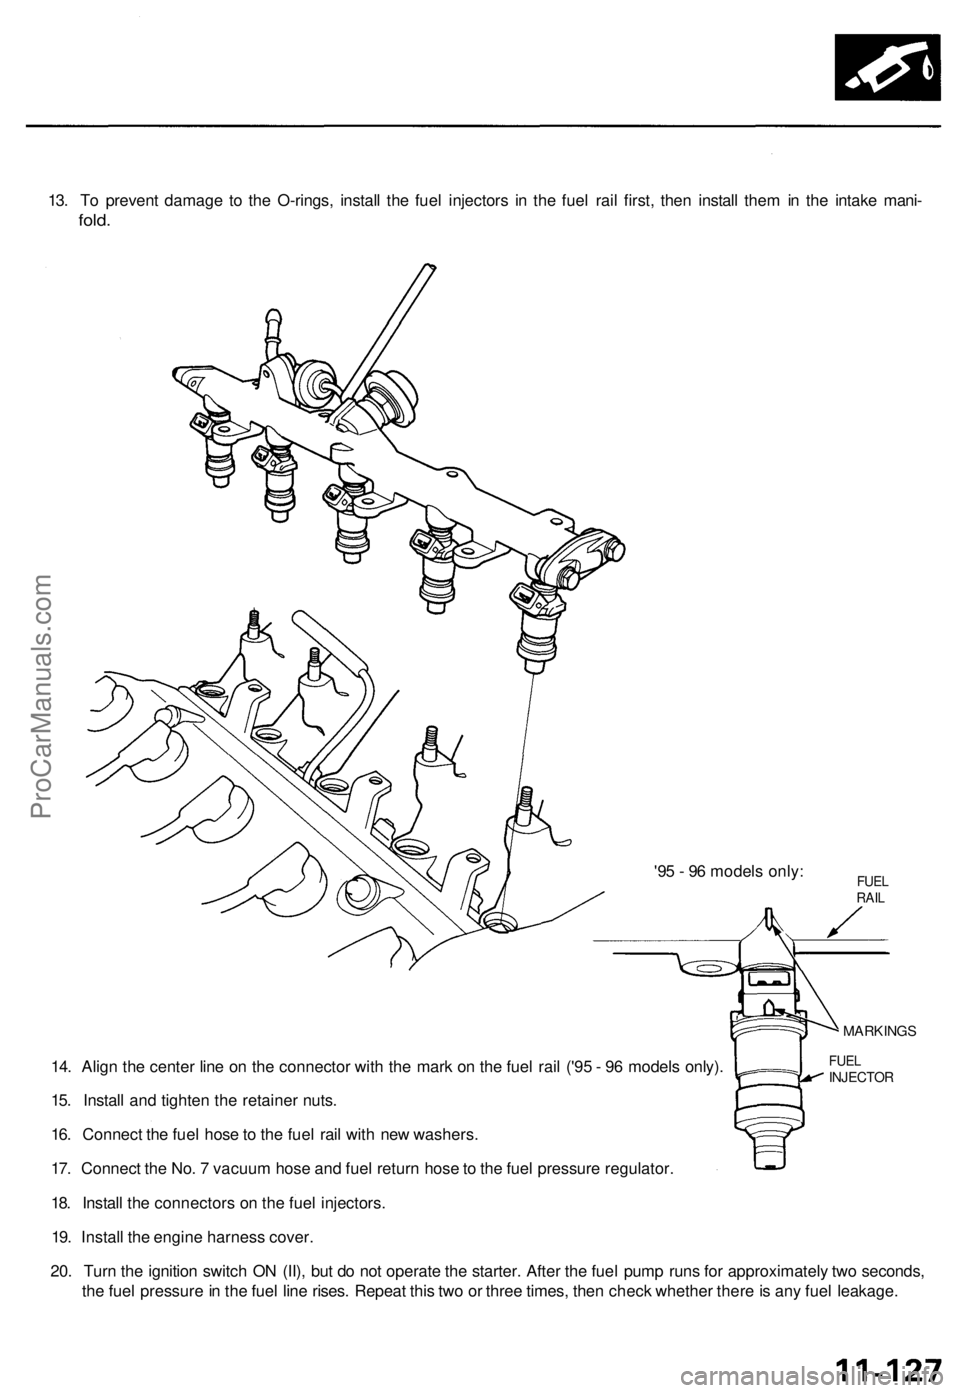
13. To prevent damage to the O-rings, install the fuel injectors in the fuel rail first, then install them in the intake mani-
fold.
'95 - 96 models only:
14. Align the center line on the connector with the mark on the fuel rail ('95 - 96 models only).
15. Install and tighten the retainer nuts.
16. Connect the fuel hose to the fuel rail with new washers.
17. Connect the No. 7 vacuum hose and fuel return hose to the fuel pressure regulator.
18. Install the connectors on the fuel injectors.
19. Install the engine harness cover.
20. Turn the ignition switch ON (II), but do not operate the starter. After the fuel pump runs for approximately two seconds,
the fuel pressure in the fuel line rises. Repeat this two or three times, then check whether there is any fuel leakage.
FUEL
INJECTOR
MARKINGS
FUEL
RAILProCarManuals.com
Page 908 of 1771
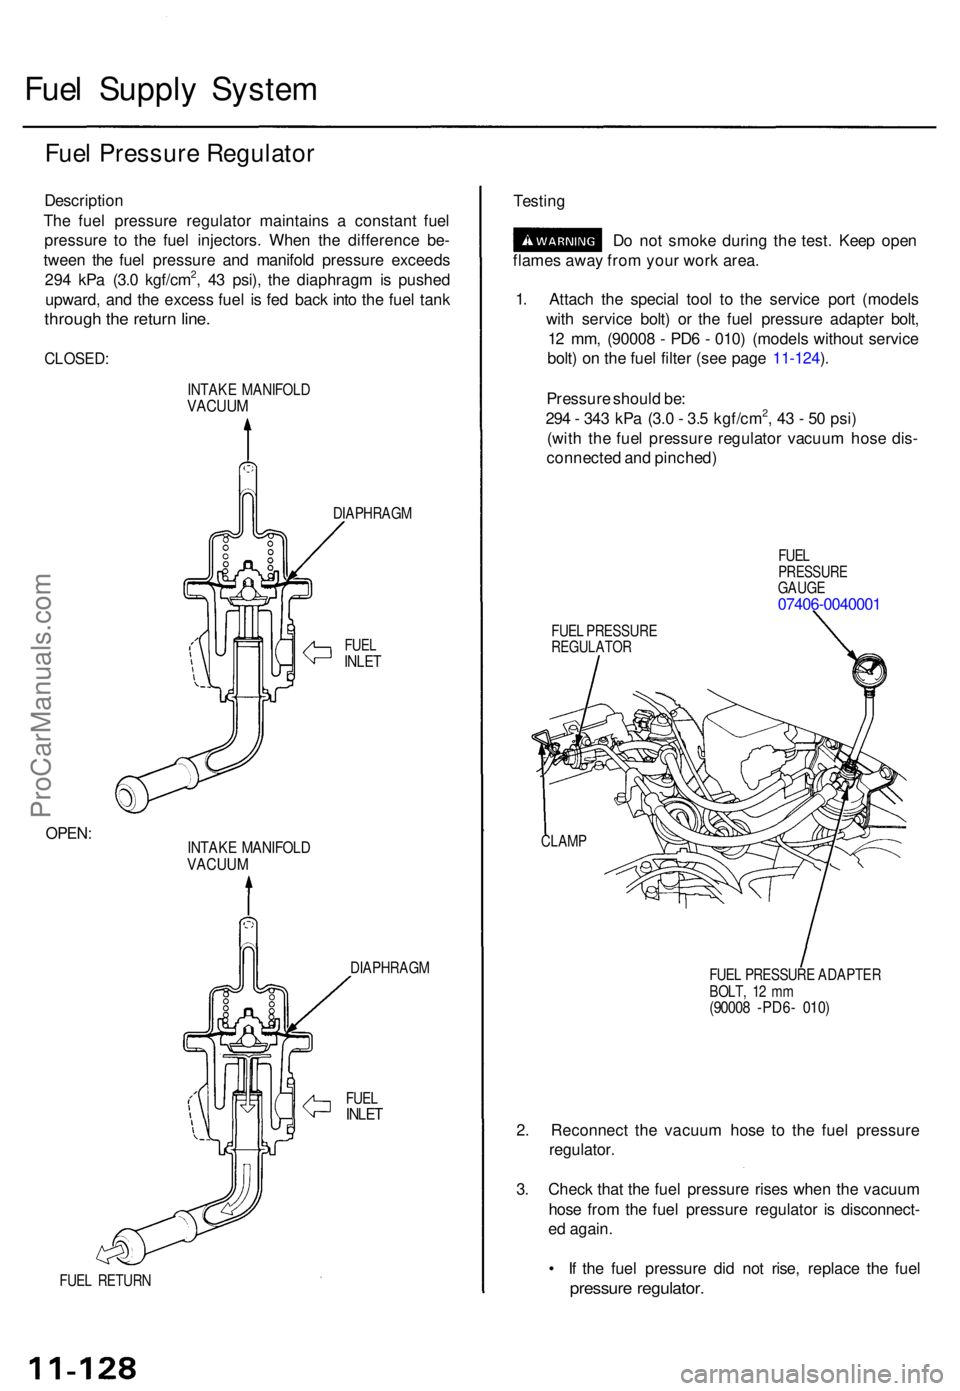
Fuel Suppl y Syste m
Fuel Pressur e Regulato r
Descriptio n
Th e fue l pressur e regulato r maintain s a constan t fue l
pressur e t o th e fue l injectors . Whe n th e differenc e be -
twee n th e fue l pressur e an d manifol d pressur e exceed s
29 4 kP a (3. 0 kgf/cm
2, 4 3 psi) , th e diaphrag m is pushe d
upward , an d th e exces s fue l i s fe d bac k int o th e fue l tan k
throug h th e retur n line .
CLOSED :
INTAKE MANIFOL DVACUUM
DIAPHRAG M
FUELINLE T
OPEN :INTAK E MANIFOL DVACUUM
FUEL RETUR N DIAPHRAG
M
FUE L
INLE T
Testin g
Do no t smok e durin g th e test . Kee p ope n
flame s awa y fro m you r wor k area .
1 . Attac h th e specia l too l t o th e servic e por t (model s
wit h servic e bolt ) o r th e fue l pressur e adapte r bolt ,
1 2 mm , (9000 8 - PD 6 - 010 ) (model s withou t servic e
bolt ) o n th e fue l filte r (se e pag e 11-124 ).
Pressur e shoul d be :
29 4 - 34 3 kP a (3. 0 - 3. 5 kgf/cm
2, 4 3 - 5 0 psi )
(wit h th e fue l pressur e regulato r vacuu m hos e dis -
connecte d an d pinched )
FUELPRESSUR EGAUGE07406-004000 1
FUEL PRESSUR EREGULATO R
FUEL PRESSUR E ADAPTE R
BOLT , 1 2 m m
(9000 8 -PD6 - 010 )
2. Reconnec t th e vacuu m hos e t o th e fue l pressur e
regulator .
3 . Chec k tha t th e fue l pressur e rise s whe n th e vacuu m
hos e fro m th e fue l pressur e regulato r i s disconnect -
e d again .
• I f th e fue l pressur e di d no t rise , replac e th e fue l
pressur e regulator .
CLAMP
ProCarManuals.com
Page 909 of 1771
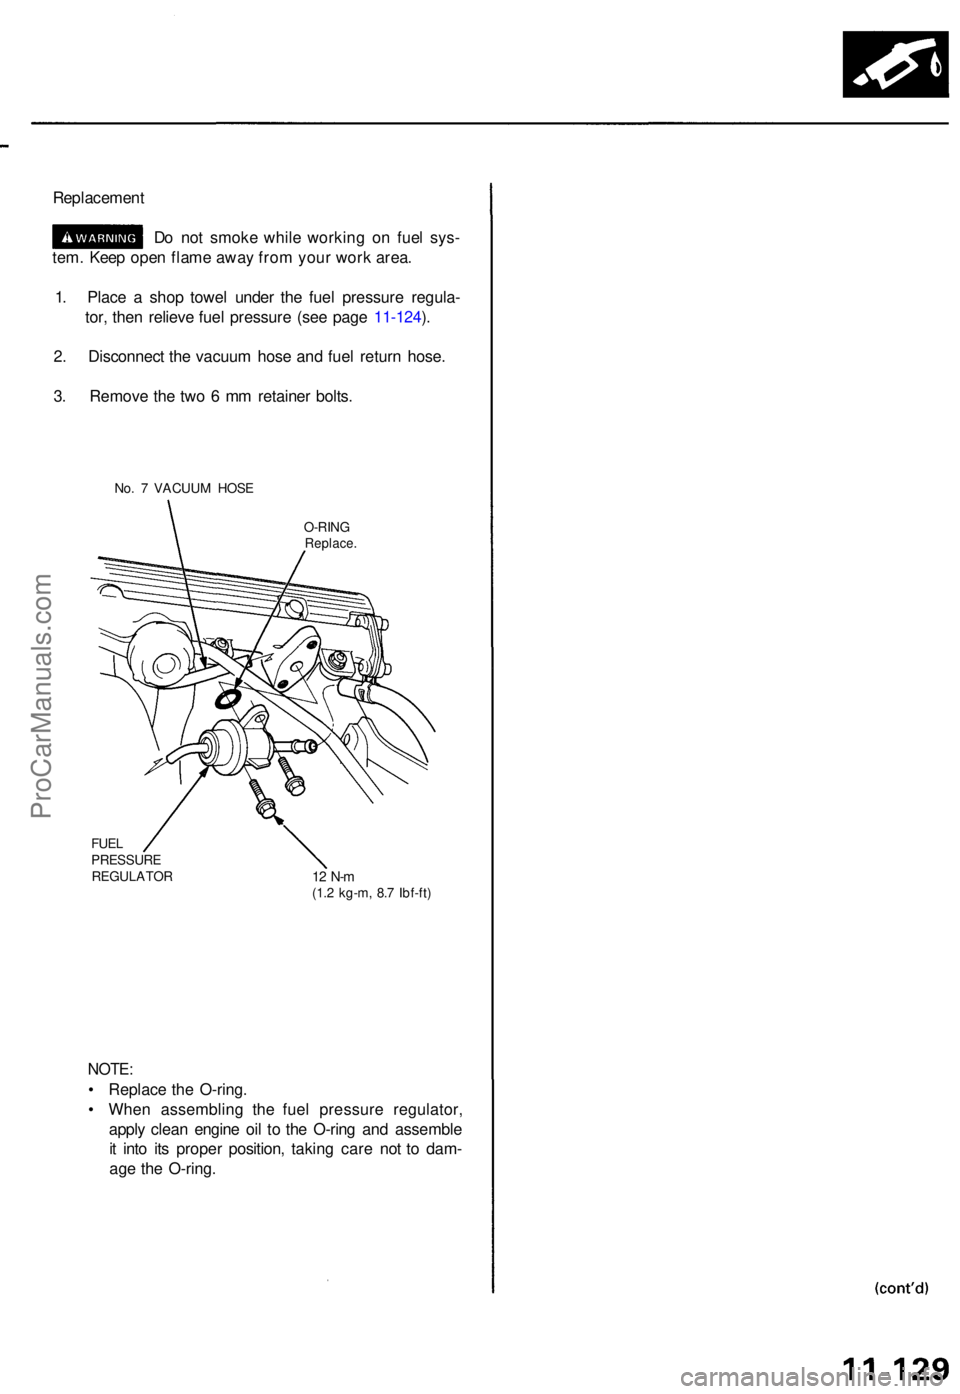
Replacement
Do no t smok e whil e workin g o n fue l sys -
tem . Kee p ope n flam e awa y fro m you r wor k area .
1 . Plac e a sho p towe l unde r th e fue l pressur e regula -
tor , the n reliev e fue l pressur e (se e pag e 11-124 ).
2 . Disconnec t th e vacuu m hos e an d fue l retur n hose .
3 . Remov e th e tw o 6 m m retaine r bolts .
No. 7 VACUU M HOS E
O-RING
Replace .
FUELPRESSUR EREGULATO R12 N- m(1.2 kg-m , 8. 7 Ibf-ft )
NOTE :
• Replac e th e O-ring .
• Whe n assemblin g th e fue l pressur e regulator ,
appl y clea n engin e oi l t o th e O-rin g an d assembl e
i t int o it s prope r position , takin g car e no t t o dam -
ag e th e O-ring .
ProCarManuals.com
Page 910 of 1771
Fuel Filte r
Replacemen t
Do no t smok e whil e workin g o n fue l system .
Kee p ope n flam e awa y fro m you r wor k area .
• Whil e replacin g th e fue l filter , b e carefu l t o kee p a saf e
distanc e betwee n batter y terminal s an d an y tools .
Th e fue l filte r shoul d b e replace d wheneve r th e fue l pres -
sur e drop s belo w th e specifie d valu e [29 4 - 34 3 kPa ,
3. 0 - 3. 5 kgf/cm
2, 4 3 - 5 0 ps i wit h th e fue l pressur e regula -
to r vacuu m hos e disconnecte d an d pinched ] afte r makin g
sur e tha t th e fue l pum p an d th e fue l pressur e regulato r
are OK .
1. Mak e sur e yo u hav e th e anti-thef t cod e fo r th e radio ,
the n writ e dow n th e frequencie s fo r th e radio' s pre -
set buttons .
2. Disconnec t th e batter y negativ e cabl e fro m th e bat -
ter y negativ e terminal .
3 . Plac e a sho p towe l unde r an d aroun d th e fue l filter .
4 . Reliev e fue l pressur e (se e pag e 11-124 ).
5 . Remov e th e banj o bol t (model s wit h servic e bolt ) o r
1 2 m m banj o bol t (model s withou t servic e bolt ) an d
th e fue l fee d pip e whil e supportin g th e fue l filte r
wit h anothe r wrench , a s shown .
6 . Remov e th e fue l filte r clam p an d fue l filter .
7 . Instal l th e ne w fue l filte r i n th e revers e orde r of
removal , an d not e thes e items :
• Whe n assembling , us e ne w washer s a s shown .
• Clea n th e flare d join t o f hig h pressur e hose s
thoroughl y befor e reconnectin g them .
8 . Ente r th e anti-thef t cod e fo r th e radio , the n ente r th e
customer' s radi o statio n presets .
ProCarManuals.com