CHEVROLET CAMARO 1967 1.G Chassis Workshop Manual
Manufacturer: CHEVROLET, Model Year: 1967, Model line: CAMARO, Model: CHEVROLET CAMARO 1967 1.GPages: 659, PDF Size: 114.24 MB
Page 141 of 659
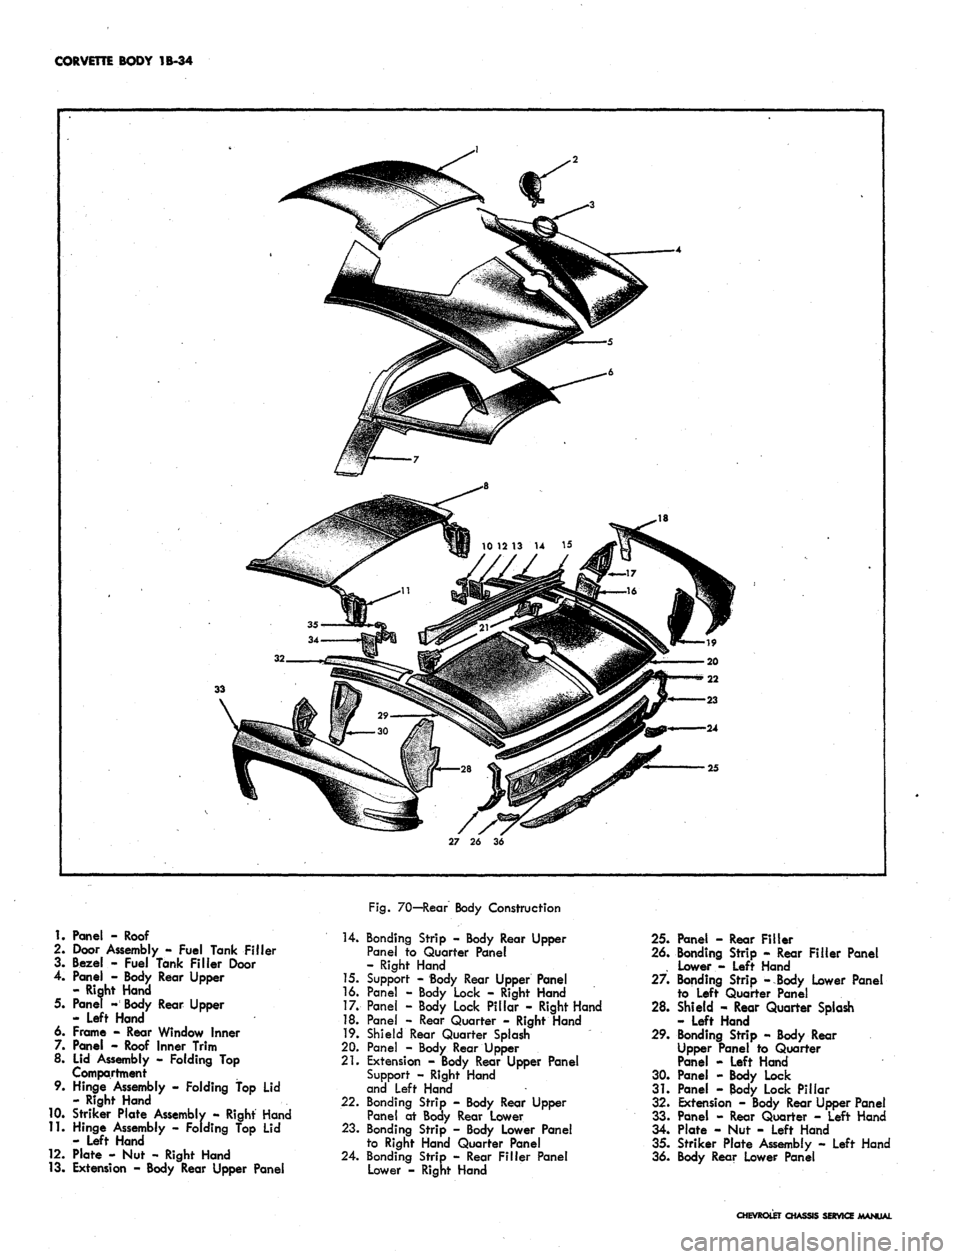
CORVETTE BODY 1B-34
1.
Panel - Roof
2.
Door Assembly - Fuel Tank Filler
3. Bezel - Fuel Tank Filler Door
4.
Panel - Body Rear Upper
- Right Hand
5. Panel - Body Rear Upper
- Left Hand
6. Frame - Rear Window Inner
7. Panel - Roof Inner Trim
8. Lid Assembly - Folding Top
Compartment
9. Hinge Assembly - Folding top Lid
- Right Hand
10.
Striker Plate Assembly - Right Hand
11.
Hinge Assembly - Folding Top Lid
- Left Hand
12.
Plate - Nut - Right Hand
13.
Extension - Body Rear Upper Panel
Fig.
70—Rear Body Construction
14.
Bonding Strip - Body Rear Upper
Panel to Quarter Panel
- Right Hand
15.
Support - Body Rear Upper Panel
16.
Panel - Body Lock - Right Hand
17.
Pane! - Body Lock Pillar - Right Hand
18.
Panel - Rear Quarter - Right Hand
19.
Shield Rear Quarter Splash
20.
Panel - Body Rear Upper
21.
Extension - Body Rear Upper Panel
Support - Right Hand
and Left Hand
22.
Bonding Strip - Body Rear Upper
Panel at Body Rear Lower
23.
Bonding Strip - Body Lower Panel
to Right Hand Quarter Panel
24.
Bonding Strip - Rear Filler Panel
Lower - Right Hand
25.
Panel - Rear Filler
26.
Bonding Strip - Rear Filler Panel
. Lower - Left Hand
27.
Bonding Strip -Body Lower Panel
to Left Quarter Panel
28.
Shield - Rear Quarter Splash
- Left Hand
29.
Bonding Strip - Body Rear
Upper Panel to Quarter
Panel - Left Hand
30.
Panel - Body Lock
31.
Panel - Body Lock Pillar
32.
Extension - Body Rear Upper Panel
33.
Panel - Rear Quarter - Left Hand
34.
Plate - Nut - Left Hand
35.
Striker Plate Assembly - Left Hand
36.
Body Rear Lower Panel
CHEVROLET CHASSIS SERVICE MANUAL
Page 142 of 659
CORVETTE BODY 1B-35
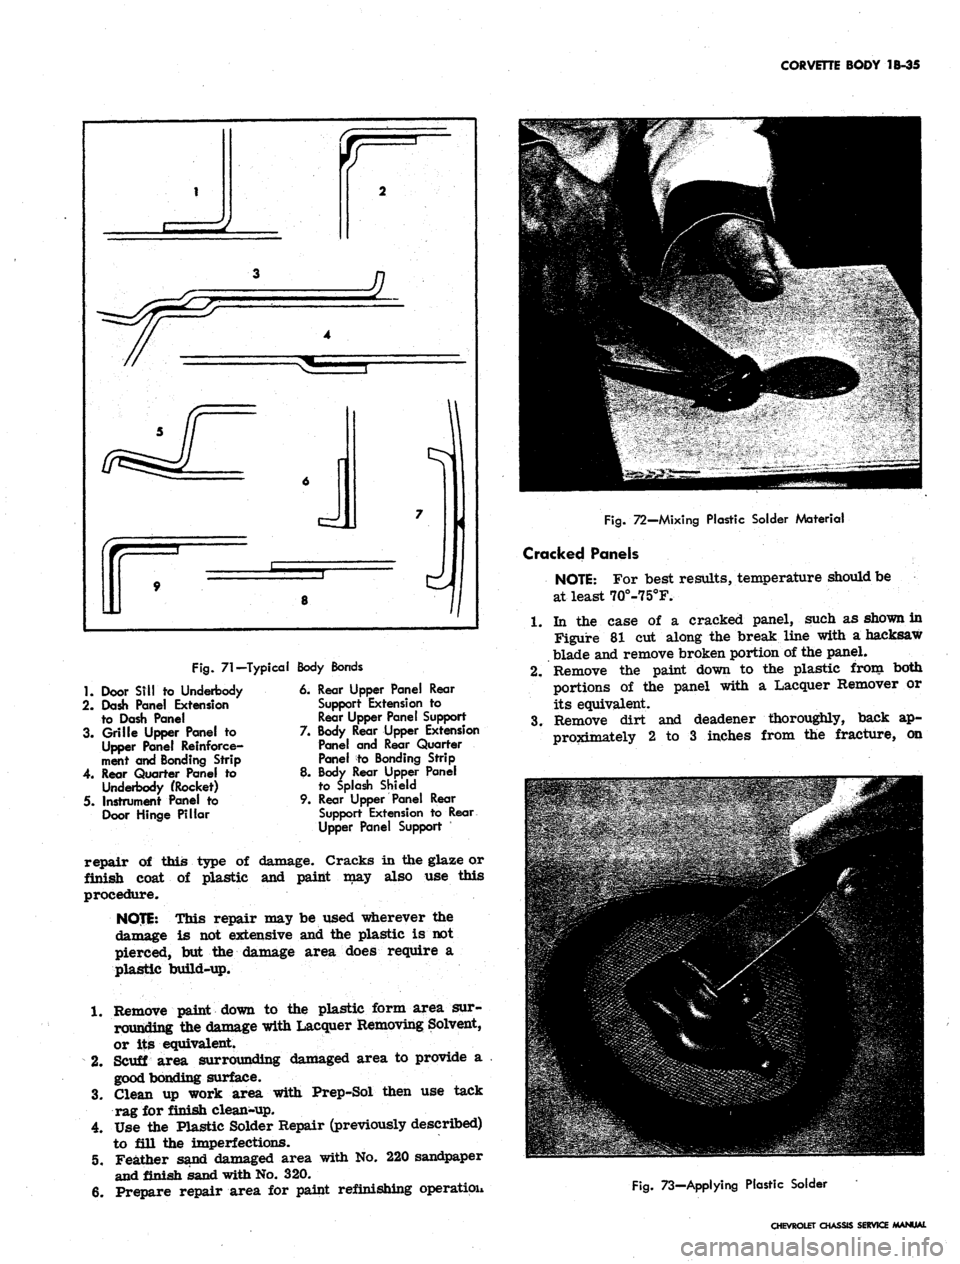
Fig.
71-Typical
1.
Door Sill to Underbody
2.
Dash Panel Extension
to Dash Panel
3. Grille Upper Panel to
Upper Panel Reinforce-
ment and Bonding Strip
4.
Rear Quarter Panel to
Underbody (Rocket)
5. Instrument Panel to
Door Hinge Pillar
Body Bonds
6. Rear Upper Panel Rear
Support Extension to
Rear Upper Panel Support
7. Body Rear Upper Extension
Panel and Rear Quarter
Panel to Bonding Strip
8. Body Rear Upper Panel
to Splash Shield
9. Rear Upper Panel Rear
Support Extension to Rear
Upper Panel Support
repair of this type of damage. Cracks in the glaze or
finish coat of plastic and paint may also use this
procedure.
NOTE:
This repair may be used wherever the
damage is not extensive and the plastic is not
pierced, but the damage area does require a
plastic build-up.
1.
Remove paint down to the plastic form area sur-
rounding the damage with Lacquer Removing Solvent,
or its equivalent.
2.
Scuff area surrounding damaged area to provide a
good bonding surface.
3.
Clean up work area with Prep-Sol then use tack
rag for finish clean-up.
4.
Use the Plastic Solder Repair (previously described)
to fill the imperfections.
5. Feather sand damaged area with No. 220 sandpaper
and finish sand with No. 320.
6. Prepare repair area for paint refinishing operatiou
Fig.
72—Mixing Plastic Solder Material
Cracked Panels
NOTE:
For best results, temperature should be
at least 70o-75°F.
1.
In the case of a cracked panel, such as shown in
Figure 81 cut along the break line with a hacksaw
blade and remove broken portion of the panel.
2.
Remove the paint down to the plastic from both
portions of the panel with a Lacquer Remover or
its equivalent.
3.
Remove dirt and deadener thoroughly, back ap-
proximately 2 to 3 inches from the fracture, on
Fig.
73—Applying Plastic Solder
CHEVROLET CHASSIS SERVICE MANUAL
Page 143 of 659
CORVETTE BODY 1B-36
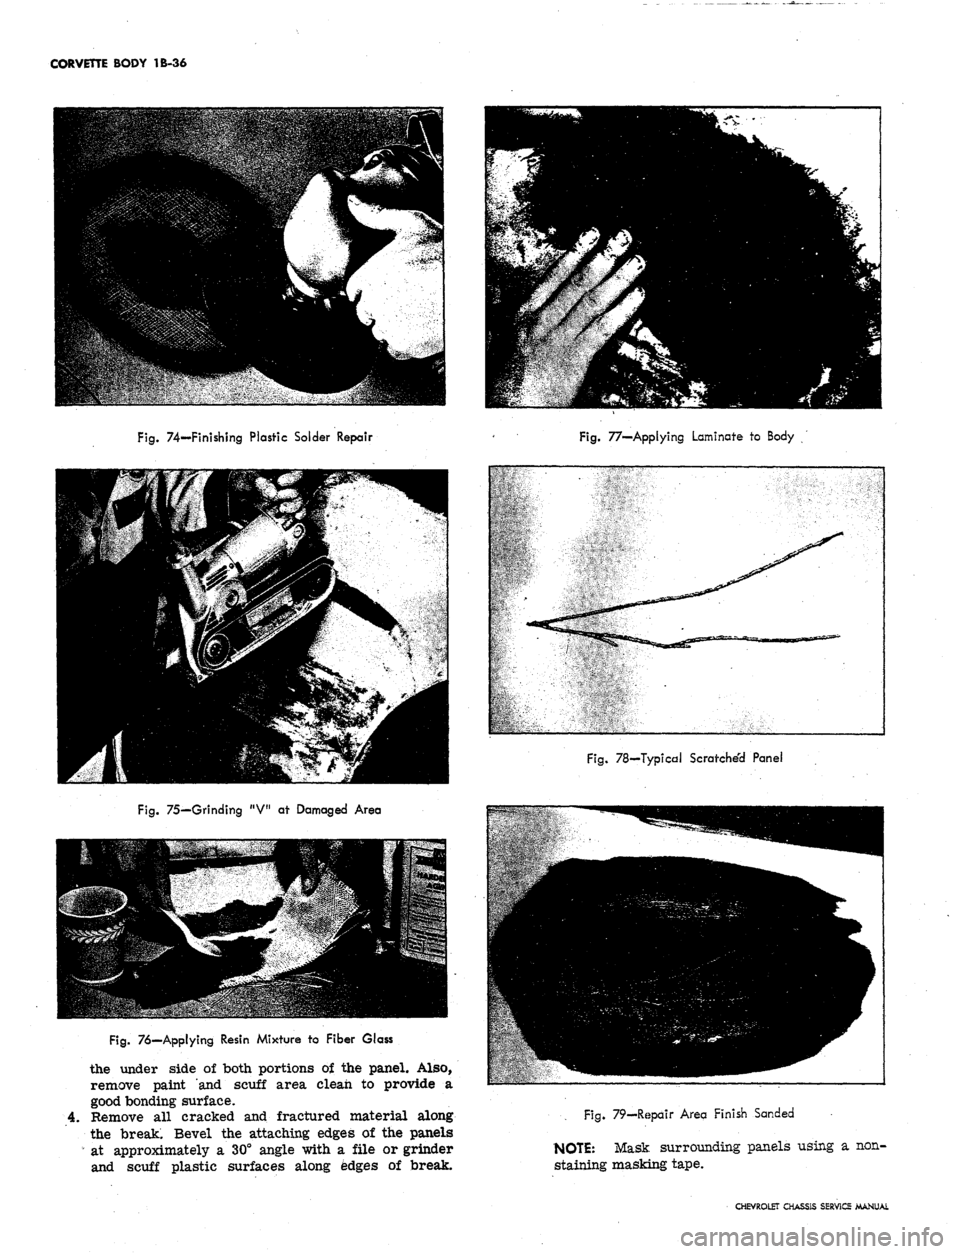
Fig.
74-Finishing Plastic Solder Repair
Fig.
77—Applying Laminate to Body
Fig.
75—Grinding "V" at Damaged Area
pig.
76—Applying Resin Mixture to Fiber Glass
the under side of both portions of the panel. Also,
remove paint and scuff area clean to provide a
good bonding surface.
Remove all cracked and fractured material along
the break: Bevel the attaching edges of the panels
at approximately a 30° angle with a file or grinder
and scuff plastic surfaces along edges of break.
Fig.
78—Typical Scratched Panel
Fig. 79—Repair Area Finish Sanded
NOTE:
Mask surrounding panels using a non-
staining masking tape.
CHEVROLET CHASSIS SERVICE MANUAL
Page 144 of 659
CORVETTE BODY 1B-37
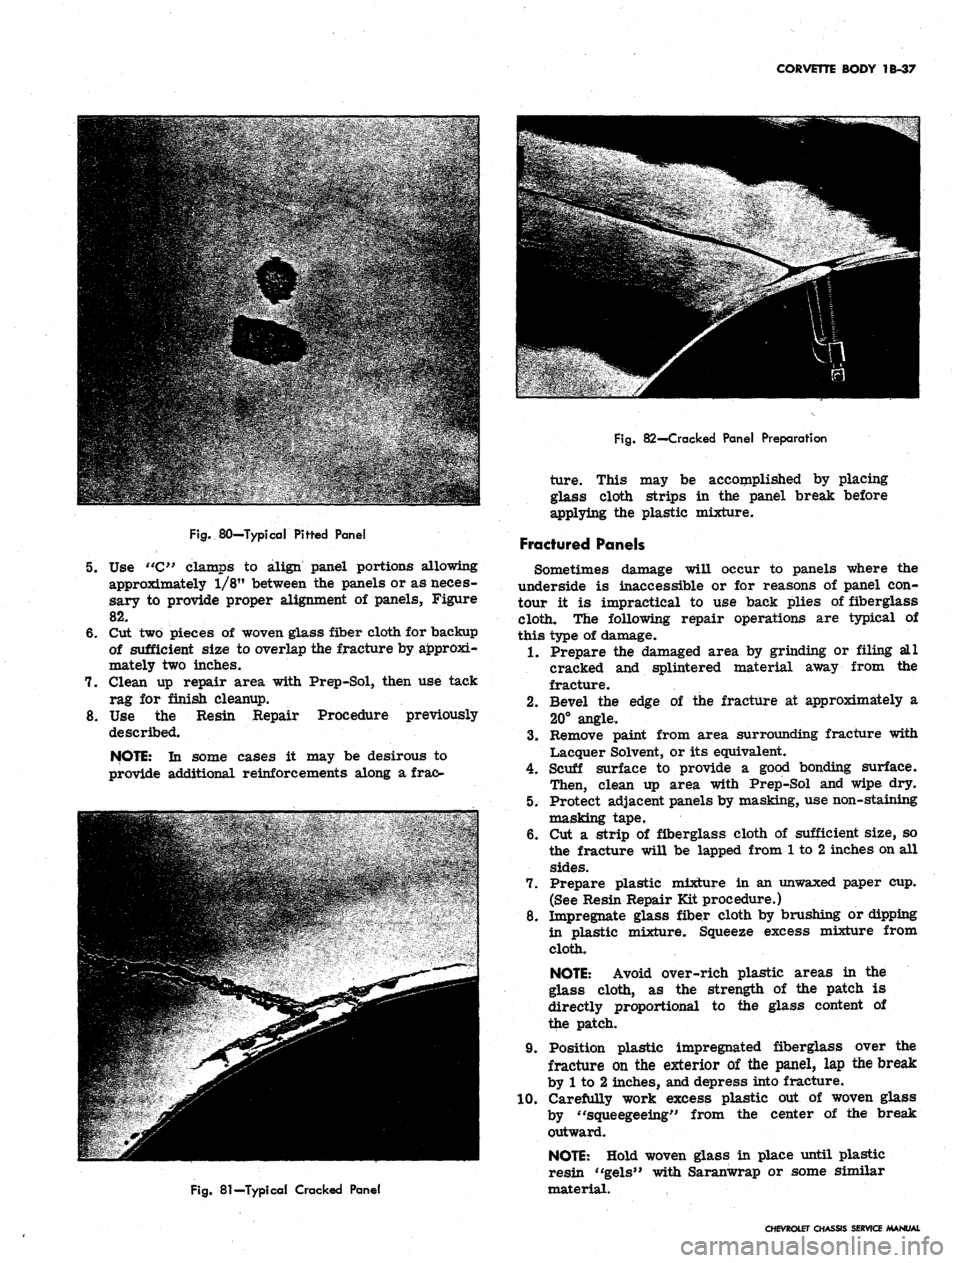
Fig.
80—Typical Pitted Panel
5. Use "C" clamps to align panel portions allowing
approximately 1/8" between the panels or as neces-
sary to provide proper alignment of panels, Figure
82.
6. Cut two pieces of woven glass fiber cloth for backup
of sufficient size to overlap the fracture by approxi-
mately two inches.
7. Clean up repair area with Prep-Sol, then use tack
rag for finish cleanup.
8. Use the Resin Repair Procedure previously
described.
NOTE:
In some cases it may be desirous to
provide additional reinforcements along a frac-
Fig.
81—Typical Cracked Panel
Fig.
82—Cracked Panel Preparation
ture. This may be accomplished by placing
glass cloth strips in the panel break before
applying the plastic mixture.
Fractured Panels
Sometimes damage will occur to panels where the
underside is inaccessible or for reasons of panel con-
tour it is impractical to use back plies of fiberglass
cloth. The following repair operations are typical of
this type of damage.
1.
Prepare the damaged area by grinding or filing all
cracked and splintered material away from the
fracture.
2.
Bevel the edge of the fracture at approximately a
20° angle.
3.
Remove paint from area surrounding fracture with
Lacquer Solvent, or its equivalent.
4.
Scuff surface to provide a good bonding surface.
Then, clean up area with Prep-Sol and wipe dry.
5. Protect adjacent panels by masking, use non-staining
masking tape.
6. Cut a strip of fiberglass cloth of sufficient size, so
the fracture will be lapped from 1 to 2 inches on all
sides.
7. Prepare plastic mixture in an unwaxed paper cup.
(See Resin Repair Kit procedure.)
8. Impregnate glass fiber cloth by brushing or dipping
in plastic mixture. Squeeze excess mixture from
cloth.
NOTE:
Avoid over-rich plastic areas in the
glass cloth, as the strength of the patch is
directly proportional to the glass content of
the patch.
9. Position plastic impregnated fiberglass over the
fracture on the exterior of the panel, lap the break
by 1 to 2 inches, and depress into fracture.
10.
Carefully work excess plastic out of woven glass
by "squeegeeing" from the center of the break
outward.
NOTE:
Hold woven glass in place until plastic
resin "gels" with Saranwrap or some similar
material.
CHEVROLET CHASSIS SERVICE MANUAL
Page 145 of 659
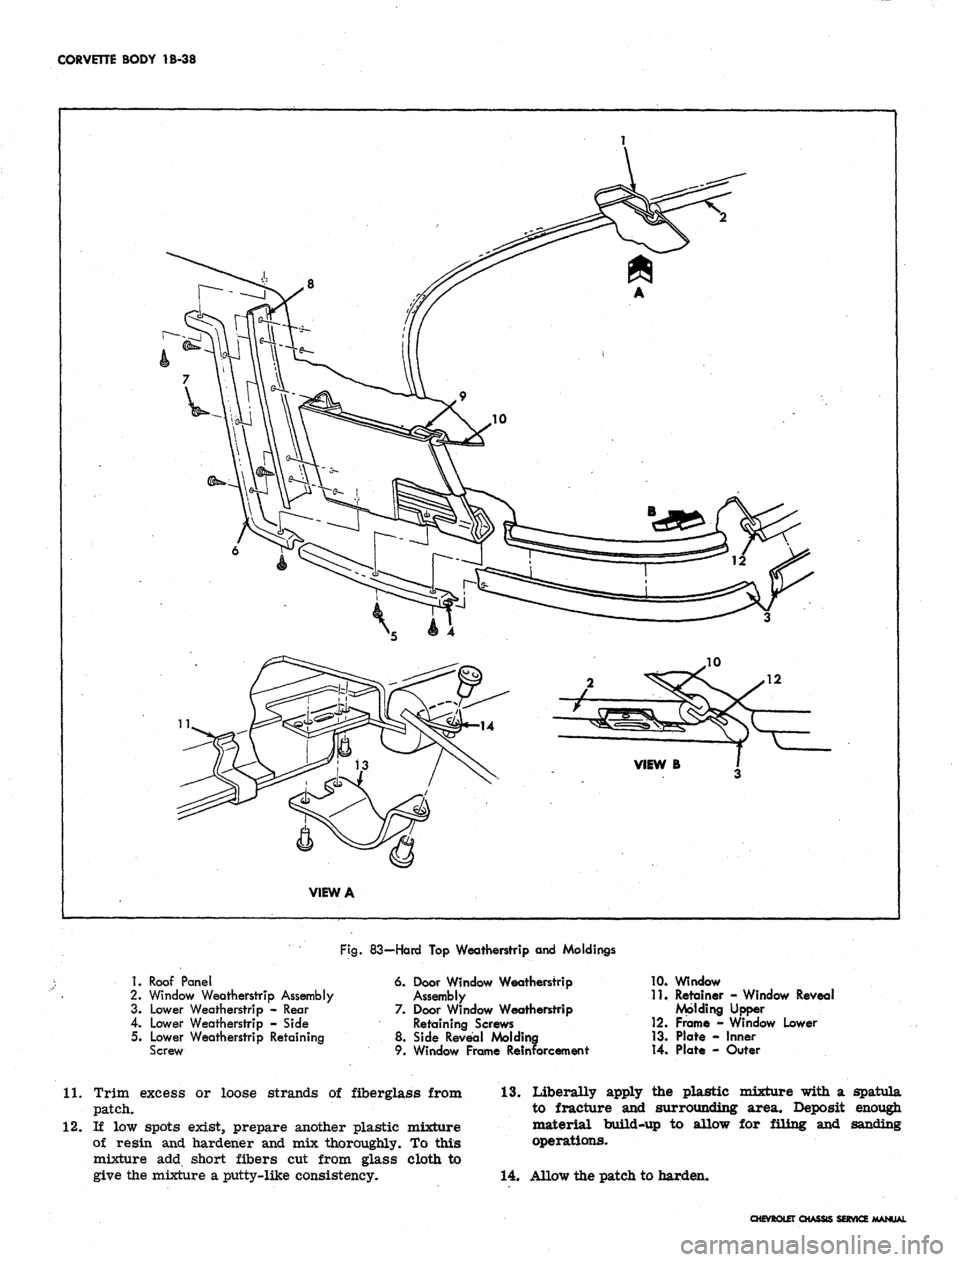
CORVETTE BODY 1B-38
1.
Roof Panel
2.
Window Weatherstrip Assembly
3. Lower Weatherstrip - Rear
4.
Lower Weatherstrip - Side
5. Lower Weatherstrip Retaining
Screw
Fig.
83—Hard Top Weatherstrip and Moldings
6. Door Window Weatherstrip
Assembly
7. Door Window Weatherstrip
Retaining Screws
8. Side Reveal Molding
9.
Window Frame Reinforcement
10.
Window
IK Retainer - Window Reveal
Molding Upper
12.
Frame - Window Lower
13.
Plate - Inner
14.
Plate - Outer
11.
Trim excess or loose strands of fiberglass from
patch.
12.
If low spots exist, prepare another plastic mixture
of resin and hardener and mix thoroughly. To this
mixture add short fibers cut from glass cloth to
give the mixture a putty-like consistency.
13.
Liberally apply the plastic mixture with a spatula
to fracture and surrounding area. Deposit enough
material build-up to allow for filing and sanding
operations.
14.
Allow the patch to harden.
CHEVROLET CHASSIS SERVICE MANUAL
Page 146 of 659
CORVETTE BODY 1B-39
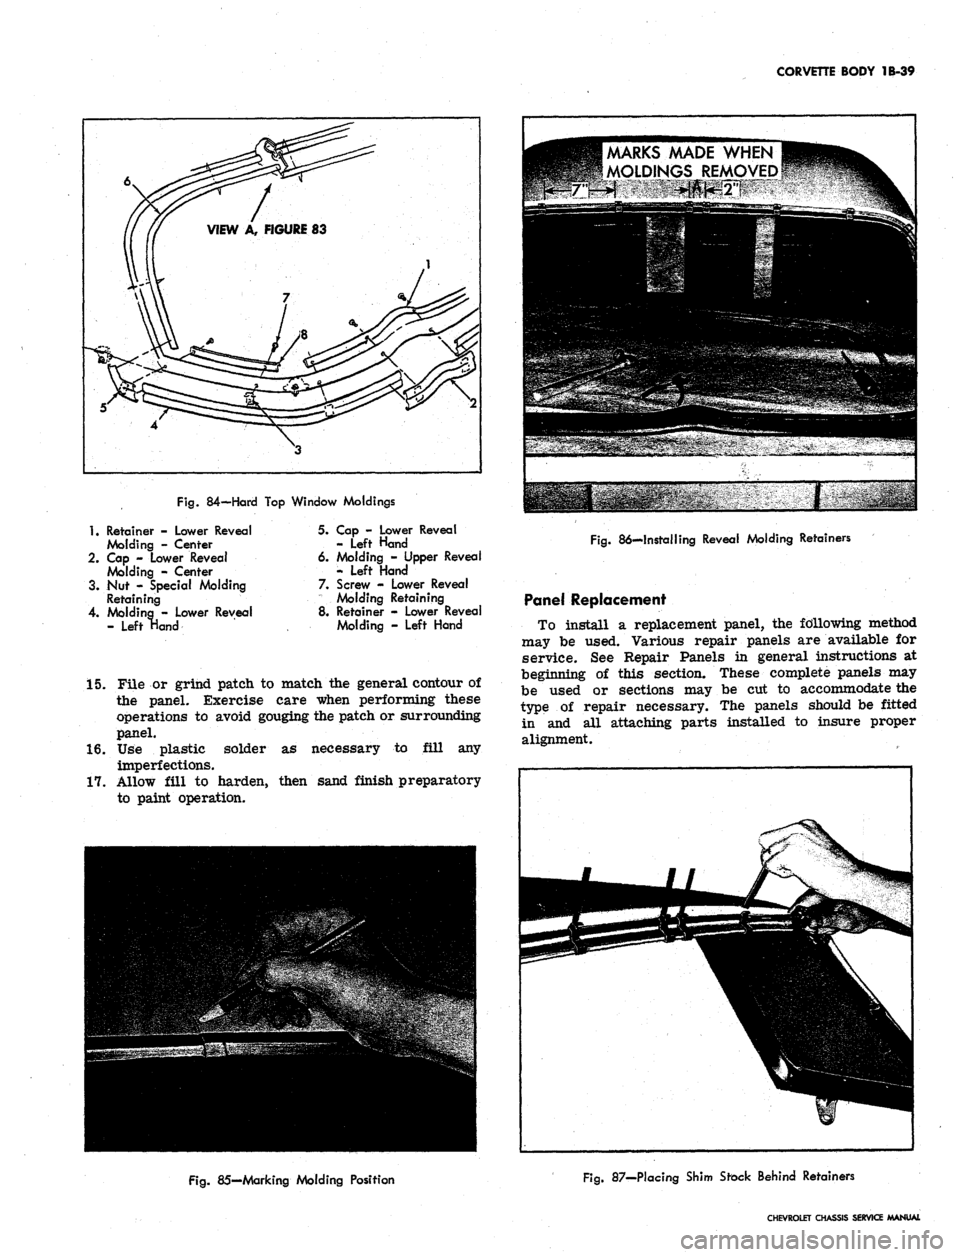
Fig.
84-Hard Top Window Moldings
1.
Retainer - Lower Reveal
Molding - Center
2.
Cap - Lower Reveal
Molding - Center
3. Nut - Special Molding
Retaining
4.
Molding - Lower Reveal
- Left Hand
5. Cap - Lower Reveal
- Left Hand
6. Molding - Upper Reveal
- Left Hand
7. Screw - Lower Reveal
Molding Retaining
8. Retainer - Lower Reveal
Molding - Left Hand
MARKS MADE WHEN
MOLDINGS REMOVED
15.
File or grind patch to match the general contour of
the panel. Exercise care when performing these
operations to avoid gouging the patch or surrounding
panel.
16.
Use plastic solder as necessary to fill any
imperfections.
17.
Allow fill to harden, then sand finish preparatory
to paint operation.
Fig.
86—Installing Reveal Molding Retainers
Panel Replacement
To install a replacement panel, the following method
may be used. Various repair panels are available for
service. See Repair Panels in general instructions at
beginning of this section. These complete panels may
be used or sections may be cut to accommodate the
type of repair necessary. The panels should be fitted
in and all attaching parts installed to insure proper
alignment.
Fig.
85-Marking Molding Position
Fig.
87—Placing Shim Stock Behind Retainers
CHEVROLET CHASSIS SERVICE MANUAL
Page 147 of 659
CORVETTE BODY 1B-40
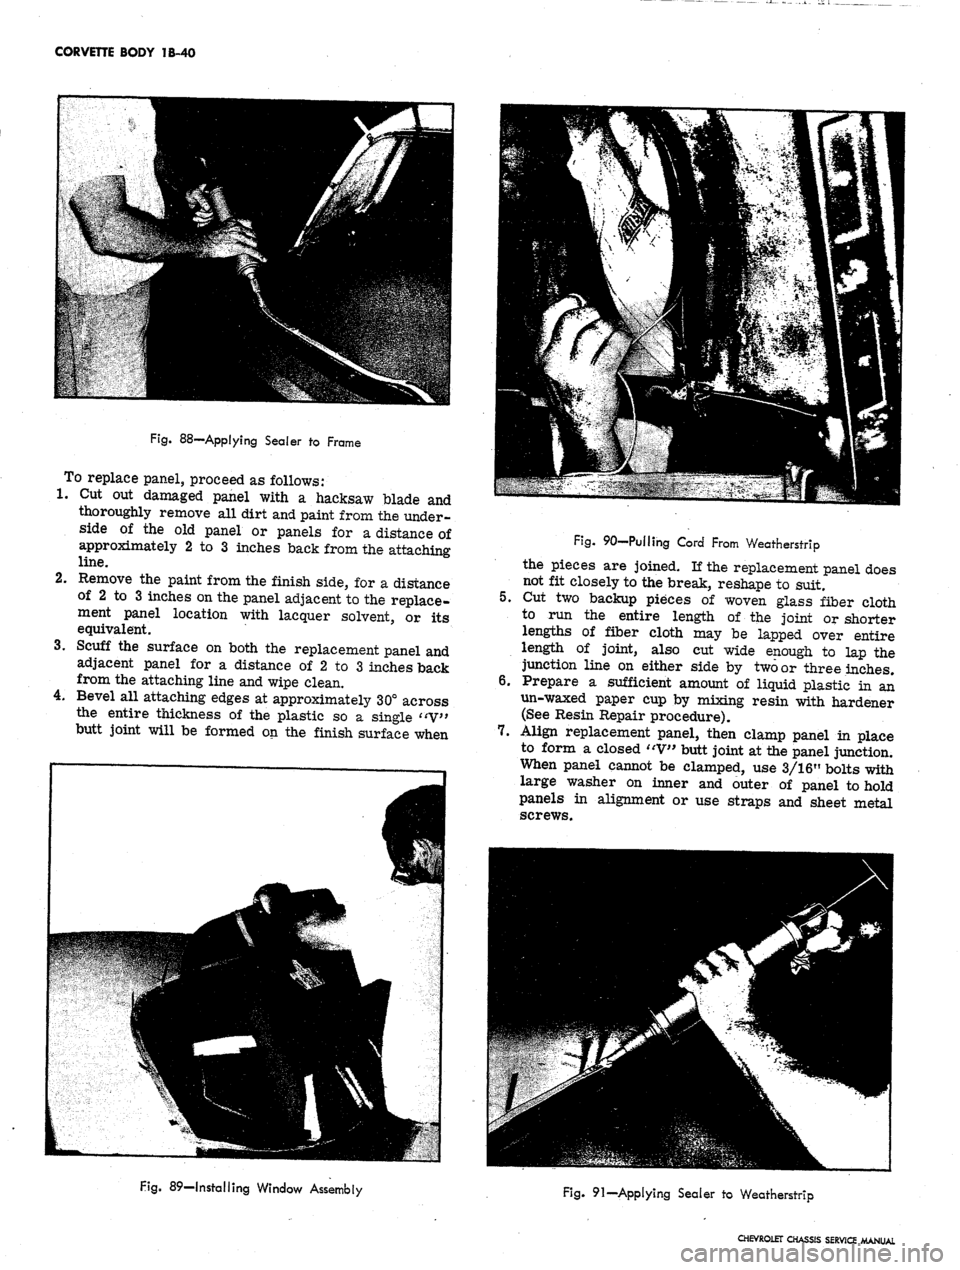
Fig.
88—Applying Sealer to Frame
To replace panel, proceed as follows:
1.
Cut out damaged panel with a hacksaw blade and
thoroughly remove all dirt and paint from the under-
side of the old panel or panels for a distance of
approximately 2 to 3 inches back from the attaching
line.
2.
Remove the paint from the finish side, for a distance
of 2 to 3 inches on the panel adjacent to the replace-
ment panel location with lacquer solvent, or its
equivalent.
Scuff the surface on both the replacement panel and
adjacent panel for a distance of 2 to 3 inches back
from the attaching line and wipe clean.
Bevel all attaching edges at approximately 30° across
the entire thickness of the plastic so a single "V"
butt joint will be formed on the finish surface when
3.
4.
Fig. 90—Pulling Cord From Weatherstrip
the pieces are joined. If the replacement panel does
not fit closely to the break, reshape to suit.
5.
Cut two backup pieces of woven glass fiber cloth
to run the entire length of the joint or shorter
lengths of fiber cloth may be lapped over entire
length of joint, also cut wide enough to lap the
junction line on either side by two or three inches.
6. Prepare a sufficient amount of liquid plastic in an
un-waxed paper cup by mixing resin with hardener
(See Resin Repair procedure).
7.
Align replacement panel, then clamp panel in place
to form a closed "V" butt joint at the panel junction.
When panel cannot be clamped, use 3/1.6" bolts with
large washer on inner and outer of panel to hold
panels in alignment or use straps and sheet metal
screws.
Fig. 89—Installing Window Assembly
Fig. 91—Applying Sealer to Weatherstrip
CHEVROLET CHASSIS SERVICE MANUAL
Page 148 of 659
CORVETTE BODY 1B-41
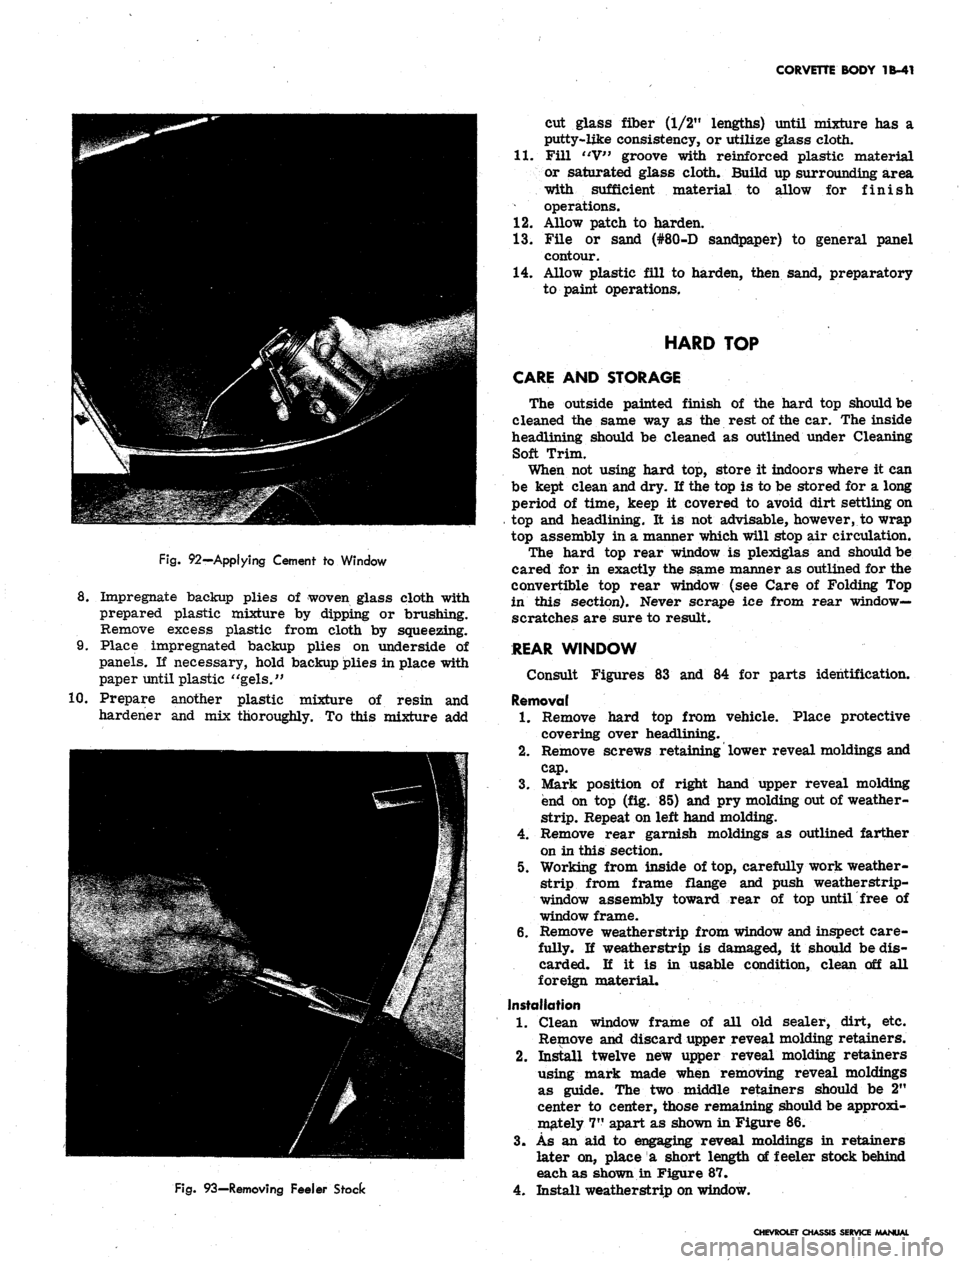
Fig.
92—Applying Cement to Window
8. Impregnate backup plies of woven glass cloth with
prepared plastic mixture by dipping or brushing.
Remove excess plastic from cloth by squeezing.
9. Place impregnated backup plies on underside of
panels. If necessary, hold backup plies in place with
paper until plastic "gels."
10.
Prepare another plastic mixture of resin and
hardener and mix thoroughly. To this mixture add
Fig.
93—Removing Feeler Stock
cut glass fiber (1/2" lengths) until mixture has a
putty-like consistency, or utilize glass cloth.
11.
Fill "V" groove with reinforced plastic material
or saturated glass cloth. Build up surrounding area
with sufficient material to allow for finish
operations.
12.
Allow patch to harden.
1.3. File or sand (#80-D sandpaper) to general panel
contour.
14.
Allow plastic fill to harden, then sand, preparatory
to paint operations.
HARD TOP
CARE AND STORAGE
The outside painted finish of the hard top should be
cleaned the same way as the rest of the car. The inside
headlining should be cleaned as outlined under Cleaning
Soft Trim.
When not using hard top, store it indoors where it can
be kept clean and dry. If the top is to be stored for a long
period of time, keep it covered to avoid dirt settling on
top and headlining. It is not advisable, however, to wrap
top assembly in a manner which will stop air circulation.
The hard top rear window is plexiglas and should be
cared for in exactly the same manner as outlined for the
convertible top rear window (see Care of Folding Top
in this section). Never scrape ice from rear window-
scratches are sure to result.
REAR WINDOW
Consult Figures 83 and 84 for parts identification.
Removal
1.
Remove hard top from vehicle. Place protective
covering over headlining.
2.
Remove screws retaining lower reveal moldings and
cap.
3.
Mark position of right hand upper reveal molding
end on top (fig. 85) and pry molding out of weather-
strip.
Repeat on left hand molding.
4.
Remove rear garnish moldings as outlined farther
on in this section.
5. Working from inside of top, carefully work weather-
strip from frame flange and push weatherstrip-
window assembly toward rear of top until free of
window frame.
6. Remove weatherstrip from window and inspect care-
fully. If weatherstrip is damaged, it should be dis-
carded. If it is in usable condition, clean off all
foreign material.
Installation
1.
Clean window frame of all old sealer, dirt, etc.
Remove and discard upper reveal molding retainers.
2.
Install twelve new upper reveal molding retainers
using mark made when removing reveal moldings
as guide. The two middle retainers should be 2"
center to center, those remaining should be approxi-
mately 7" apart as shown in Figure 86.
3.
As an aid to engaging reveal moldings in retainers
later on, place a short length of feeler stock behind
each as shown in Figure 87.
4.
Install weatherstrip on window.
CHEVROLET CHASSIS SERVICE MANUAL
Page 149 of 659
CORVETTE BODY 1B-42
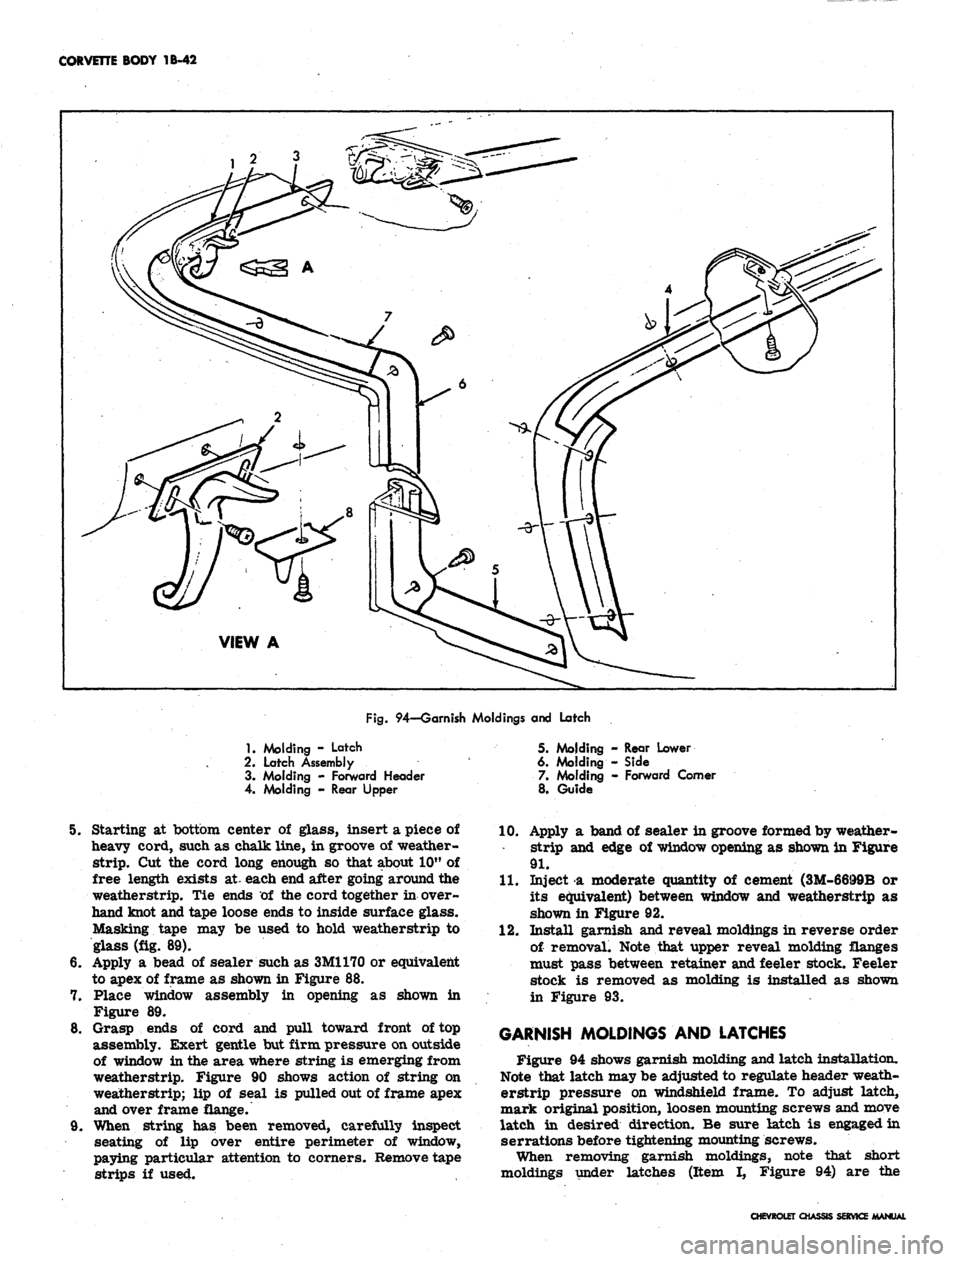
Fig.
94—Garnish Moldings and Latch
1.
Molding - Latch
2.
Latch Assembly
3. Molding - Forward Header
4. Molding - Rear Upper
5. Molding - Rear Lower
6. Molding - Side
7. Molding - Forward Comer
8. Guide
8.
9,
Starting at bottom center of glass, insert a piece of
heavy cord, such as chalk line, in groove of weather-
strip.
Cut the cord long enough so that about 10" of
free length exists at- each end after going around the
weatherstrip. Tie ends of the cord together in over-
hand knot and tape loose ends to inside surface glass.
Masking tape may be used to hold weatherstrip to
glass (fig. 89).
Apply a bead of sealer such as 3M1170 or equivalent
to apex of frame as shown in Figure 88.
Place window assembly in opening as shown in
Figure 89.
Grasp ends of cord and pull toward front of top
assembly. Exert gentle but firm pressure on outside
of window in the area where string is emerging from
weatherstrip. Figure 90 shows action of string on
weatherstrip; lip of seal is pulled out of frame apex
and over frame flange.
When string has been removed, carefully inspect
seating of lip over entire perimeter of window,
paying particular attention to corners. Remove tape
strips if used.
10.
Apply a band of sealer in groove formed by weather-
strip and edge of window opening as shown in Figure
91.
11.
Inject a moderate quantity of cement (3M-6699B or
its equivalent) between window and weatherstrip as
shown in Figure 92.
12.
Install garnish and reveal moldings in reverse order
of removal. Note that upper reveal molding flanges
must pass between retainer and feeler stock. Feeler
stock is removed as molding is installed as shown
in Figure 93.
GARNISH MOLDINGS AND LATCHES
Figure 94 shows garnish molding and latch installation.
Note that latch may be adjusted to regulate header weath-
erstrip pressure on windshield frame. To adjust latch,
mark original position, loosen mounting screws and move
latch in desired direction. Be sure latch is engaged in
serrations before tightening mounting screws.
When removing garnish moldings, note that short
moldings under latches (Item I, Figure 94) are the
CHEVROLET CHASSIS SERVICE MANUAL
Page 150 of 659
CORVETTE BODY 1B-43
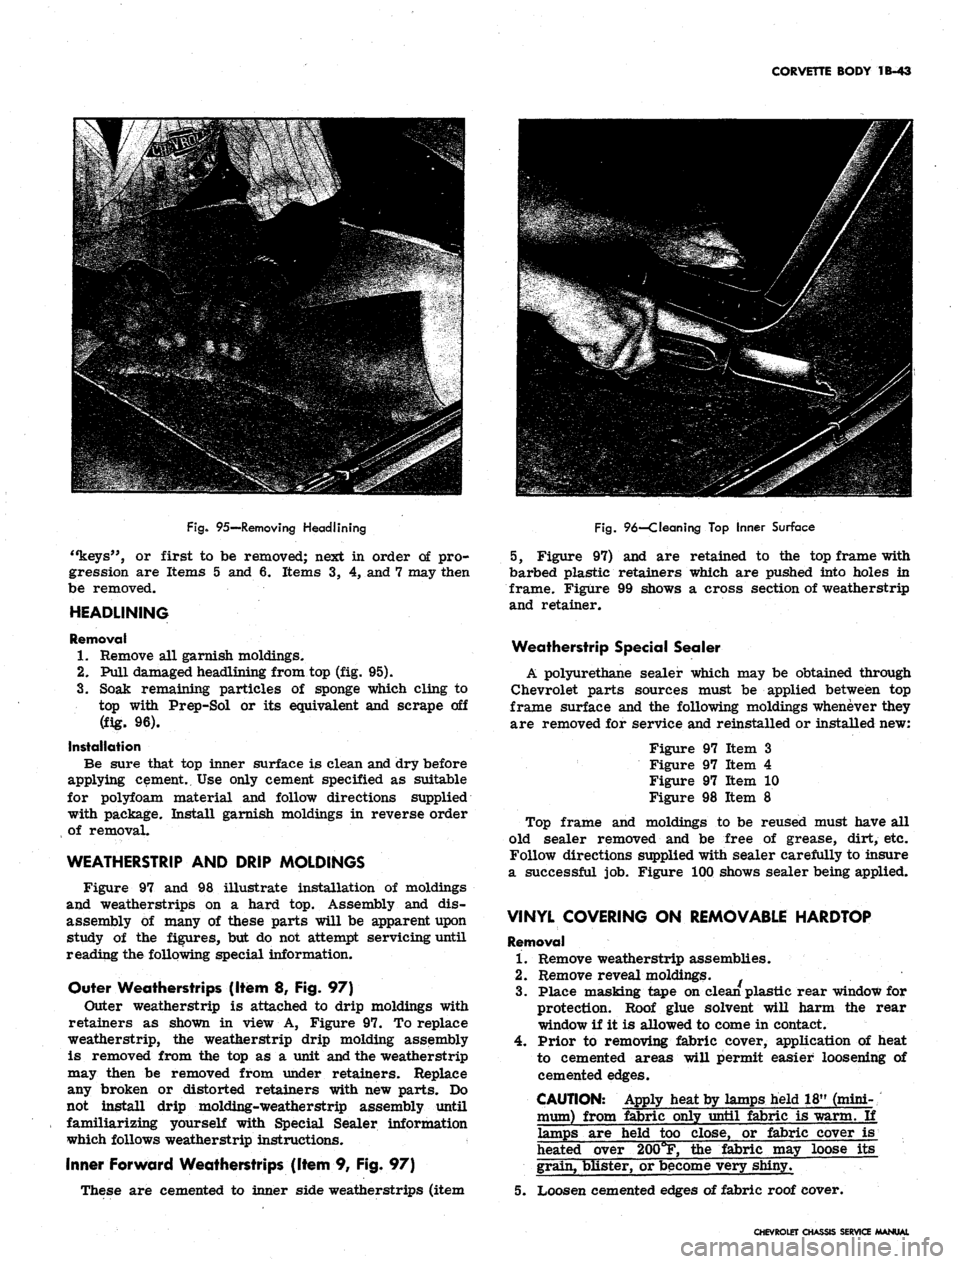
Fig.
95—Removing Headlining
or first to be removed; next in order of pro-
gression are Items 5 and 6. Items 3, 4, and 7 may then
be removed.
HEADLINING
Removal
1.
Remove all garnish moldings.
2.
Pull damaged headlining from top (fig. 95).
3.
Soak remaining particles of sponge which cling to
top with Prep-Sol or its equivalent and scrape off
(fig. 96).
Installation
Be sure that top inner surface is clean and dry before
applying cement. Use only cement specified as suitable
for polyfoam material and follow directions supplied
with package. Install garnish moldings in reverse order
of removal.
WEATHERSTRIP AND DRIP MOLDINGS
Figure 97 and 98 illustrate installation of moldings
and weatherstrips on a hard top. Assembly and dis-
assembly of many of these parts will be apparent upon
study of the figures, but do not attempt servicing until
reading the following special information.
Outer Weatherstrips (Item 8, Fig. 97)
Outer weatherstrip is attached to drip moldings with
retainers as shown in view A, Figure 97. To replace
weatherstrip, the weatherstrip drip molding assembly
is removed from the top as a unit and the weatherstrip
may then be removed from under retainers. Replace
any broken or distorted retainers with new parts. Do
not install drip molding-weatherstrip assembly until
familiarizing yourself with Special Sealer information
which follows weatherstrip instructions.
Inner Forward Weatherstrips (Item 9, Fig. 97)
These are cemented to inner side weatherstrips (item
Fig.
96—Cleaning Top Inner Surface
5, Figure 97) and are retained to the top frame with
barbed plastic retainers which are pushed into holes in
frame. Figure 99 shows a cross section of weatherstrip
and retainer.
Weatherstrip Special Sealer
A polyurethane sealer which may be obtained through
Chevrolet parts sources must be applied between top
frame surface and the following moldings whenever they
are removed for service and reinstalled or installed new:
Figure 97 Item 3
Figure 97 Item 4
Figure 97 Item 10
Figure 98 Item 8
Top frame and moldings to be reused must have all
old sealer removed and be free of grease, dirt, etc.
Follow directions supplied with sealer carefully to insure
a successful job. Figure 100 shows sealer being applied.
VINYL COVERING ON REMOVABLE HARDTOP
Removal
1.
Remove weatherstrip assemblies.
2.
Remove reveal moldings.
3.
Place masking tape on clean plastic rear window for
protection. Roof glue solvent will harm the rear
window if it is allowed to come in contact.
4.
Prior to removing fabric cover, application of heat
to cemented areas will permit easier loosening of
cemented edges.
CAUTION: Apply heat by lamps held 18" (mini-
mum) from fabric only until fabric is warm. If
lamps are held too close, or fabric cover is
heated over 200°F, the fabric may loose its
grain, blister, or become very shinyT
5. Loosen cemented edges of fabric roof cover.
CHEVROLET CHASSIS SERVICE MANUAL