DATSUN 210 1979 Manual PDF
Manufacturer: DATSUN, Model Year: 1979, Model line: 210, Model: DATSUN 210 1979Pages: 548, PDF Size: 28.66 MB
Page 71 of 548

Engine
M
hanical
SPECIAL
SERVICE
TOOLS
Kent
Moore
No
I
Kent
Moore
No
Tool
number
tool
name
Reference
page
or
Fig
No
Tool
numb
r
tool
name
Reference
page
or
Fig
No
ST0501S000
CD
ST050
11000
@
ST05012000
Engine
stand
aJSe1Ilbly
Engine
stand
Sase
126023
CD
J26
m
2
@126023
1
STII670000
valve
seat
cutter
set
Fig
EM
4
Page
EM
13
Page
EM
16
Fig
EM
26
KVIOI02500
Engine
attachment
126097
STl207oo00
Valve
lifter
125631
Fig
EM
4
Page
EM
13
Page
EM
16
Fig
EM
16
Fig
EM
53
KV
10
1039S0
Valve
guide
reamer
set
125618
KYIOl05300
Piston
pin
press
stand
CD
STl1081000
Reamer
12
2
mm
CD
125618
3
0
480
in
dia
@J25618
2
Fig
EM
15
2
STlI032000
8
0
mm
0
315
in
@
125618
1
Fig
EM
55
dia
3
STlI033000
Valve
guide
drift
Fig
EM
24
Fig
EM
25
I
Ju
STl611
0000
Camshaft
bearing
drift
125644
CD
Fig
EM
28
@
@
@
@
KV
10
104800
Valve
lip
seal
drift
125624
KV
10
I
02800
Pilot
bushing
puller
125657
Fig
EM
52
Fig
EM
45
EM
34
Page 72 of 548

Tool
number
tool
name
EM03470000
Piston
ring
compressor
Engine
Mechanical
Kent
Moore
No
Reference
page
or
Fig
No
Fig
EM
66
EM
35
Tool
number
tool
name
ST20610000
Clutch
aligning
bar
Kent
Moore
No
Reference
page
or
Fig
No
125673
Fig
EM
83
Page 73 of 548

DATSUN
210
Model
8310
Series
SECTIONEL
ENGINE
LUBRICATION
SYSTEM
CONTENTS
ENGINE
LUBRICATION
SYSTEM
LUBRICATION
CIRCUIT
01
L
PUMP
OIL
PRESSURE
REGULATOR
VALVE
OIL
PRESSURE
RELIEF
VALVE
OIL
FILTER
OIL
PRESSURE
WARNING
SWITCH
EL
2
EL
2
EL
3
EL
4
EL
4
EL
4
EL
4
SERVICE
DATA
AND
SPECIFICATIONS
TROUBLE
DIAGNOSES
AND
CORRECTIONS
SPECIAL
SERVICE
TOOL
EL
5
EL
5
EL
6
Page 74 of 548

Engine
Lubrication
System
ENGINE
LUBRICATION
SYSTEM
LUBRICATION
CIRCUIT
EL
ll2
Fig
EL
l
Lubrication
Circuit
Oil
pump
Oilf1lter
I
I
Main
bearing
I
I
Crankshaft
I
Connecting
rod
I
bearing
l
Oil
trainer
I
Camshaft
bearing
I
Rocker
shaft
Chain
tensioner
Rocker
arm
Camshaft
Valve
lifter
Piston
Cylinder
wall
OiIpan
EL
2
Page 75 of 548

OIL
PUMP
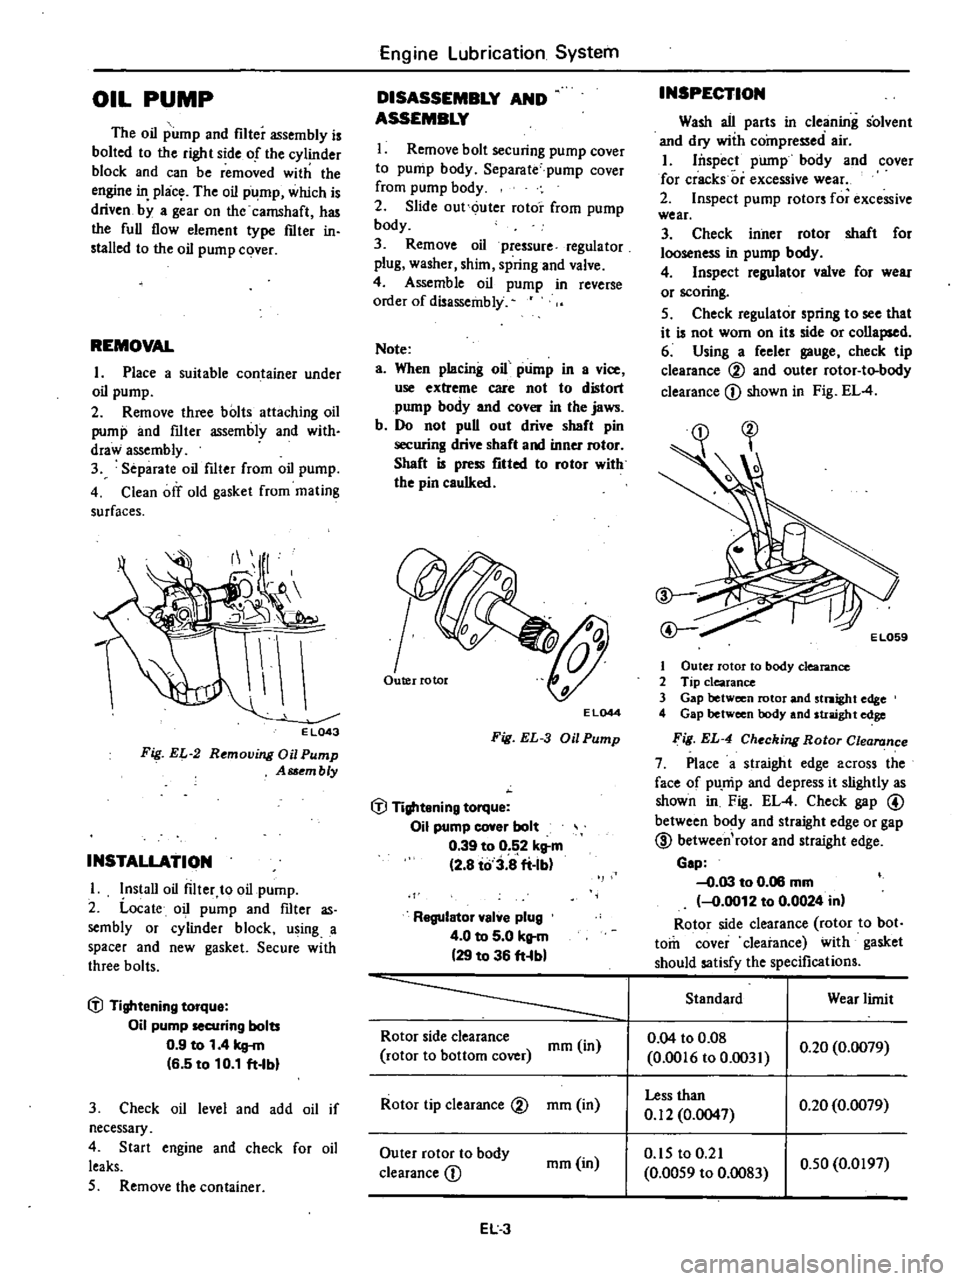
The
oil
pump
and
filter
assembly
is
bolted
to
the
right
side
of
the
cylinder
block
and
can
be
removed
with
the
engine
in
pl
c
The
oil
pump
which
is
driven
by
a
gear
on
the
camshaft
has
the
full
flow
element
type
filter
in
stalled
to
the
oil
pump
cover
REMOVAL
I
Place
a
suitable
container
under
oil
pump
2
Remove
three
bolts
attaching
oil
pump
and
filter
assembly
and
with
draw
assembly
3
Separate
oil
filter
from
oil
pump
4
Ciean
off
old
gasket
from
mating
surfaces
i
E
L043
F
EL
2
R
moving
Oil
Pump
Asso
mbly
INSTALLATION
I
Install
oil
filter
to
oil
pump
2
Locate
oil
pump
and
filter
as
sembly
or
cylinder
block
using
a
spacer
and
new
gasket
Secure
with
three
bolts
l
l
Tightening
torque
Oil
pump
securing
bolts
0
9
to
1
4
kg
m
6
5
to
10
1
ft
lbl
3
Check
oil
level
and
add
oil
if
necessary
4
Start
engine
and
check
for
oil
leaks
5
Remove
the
container
Engine
Lubrication
System
DISASSEMBLY
AND
ASSEMBLY
I
Remove
bolt
securing
pump
cover
to
pump
body
Separate
pump
cover
from
pump
body
2
Slide
out
outer
rotor
from
pump
body
3
Remove
oil
pressure
regulator
plug
washer
shim
spring
and
valve
4
Assemble
oil
pump
in
reverse
order
of
disassembly
Note
a
When
placing
oil
pump
in
a
vice
use
extreme
care
not
to
distort
pump
body
and
cover
in
the
jaws
b
Do
not
pull
out
drive
shaft
pin
securing
drive
shaft
and
inner
rotor
Shaft
is
press
fitted
to
rotor
with
the
pin
caulked
EL044
Fig
EL
3
Oil
Pump
l
l
Tightening
torque
Oil
pump
cove
bolt
0
39
to
0
5
2
kltm
2
8
to
3
8
ti
Ib
Regulator
valve
plug
4
0
to
5
0
kltm
29
to
36
ft
bl
INSPECTION
Wash
all
parts
in
cleaning
solvent
and
dry
wiih
compressed
air
I
hispect
pump
body
and
cover
for
cracks
or
excessive
wear
2
Inspect
pump
rotors
for
excessive
wear
3
Check
inner
rotor
shaft
for
looseness
in
pump
body
4
Inspect
regulator
valve
for
wear
or
scoring
5
Check
regulator
spring
to
see
that
it
is
not
worn
on
its
side
or
collapsed
6
Using
a
feeler
gauge
check
tip
clearance
00
and
outer
rotor
to
body
clearance
CD
shown
in
Fig
EL
4
EL059
1
Outer
rotor
to
body
clearance
2
Tip
clearance
3
Gap
between
rotor
and
stnight
edge
4
Gap
between
body
and
straight
edge
ig
EL
4
Checking
Rotor
Clea
nce
7
Place
a
straight
edge
across
the
face
of
pU
mp
and
depress
it
slightly
as
shown
in
Fig
EL
4
Check
gap
@
between
body
and
straight
edge
or
gap
@
between
rotor
and
straight
edge
Gap
0
03
to
0
06
mm
0
0012
to
0
0024
in
Rotor
side
clearance
rotor
to
bot
tom
cover
clearance
with
gasket
should
satisfy
the
specifications
Standard
Wear
limit
Rotor
side
clearance
mm
in
0
04
to
0
08
rotor
to
bottom
cover
0
0016
to
0
031
0
20
0
0079
Rotor
tip
clearance
V
mm
in
Less
than
0
20
0
0079
0
12
0
0047
Outer
rotor
to
body
mm
in
0
15
to
0
21
0
50
0
0197
clearance
CD
0
0059
to
0
083
EL3
Page 76 of 548

Not
Pump
rotors
and
body
are
not
serv
iced
separatdy
If
pump
rotors
or
body
are
damaged
or
worn
replace
ment
of
the
entire
oil
pump
assembly
isnecessary
OIL
PRESSURE
REGULATOR
VALVE
The
oil
pressure
regulator
valve
is
not
adjustable
At
the
released
posi
tion
the
valve
permits
the
oil
to
by
pass
through
the
passage
in
the
pump
cover
to
the
inlet
side
of
the
pump
Check
regulator
valve
spring
to
ensure
that
spring
tension
is
correct
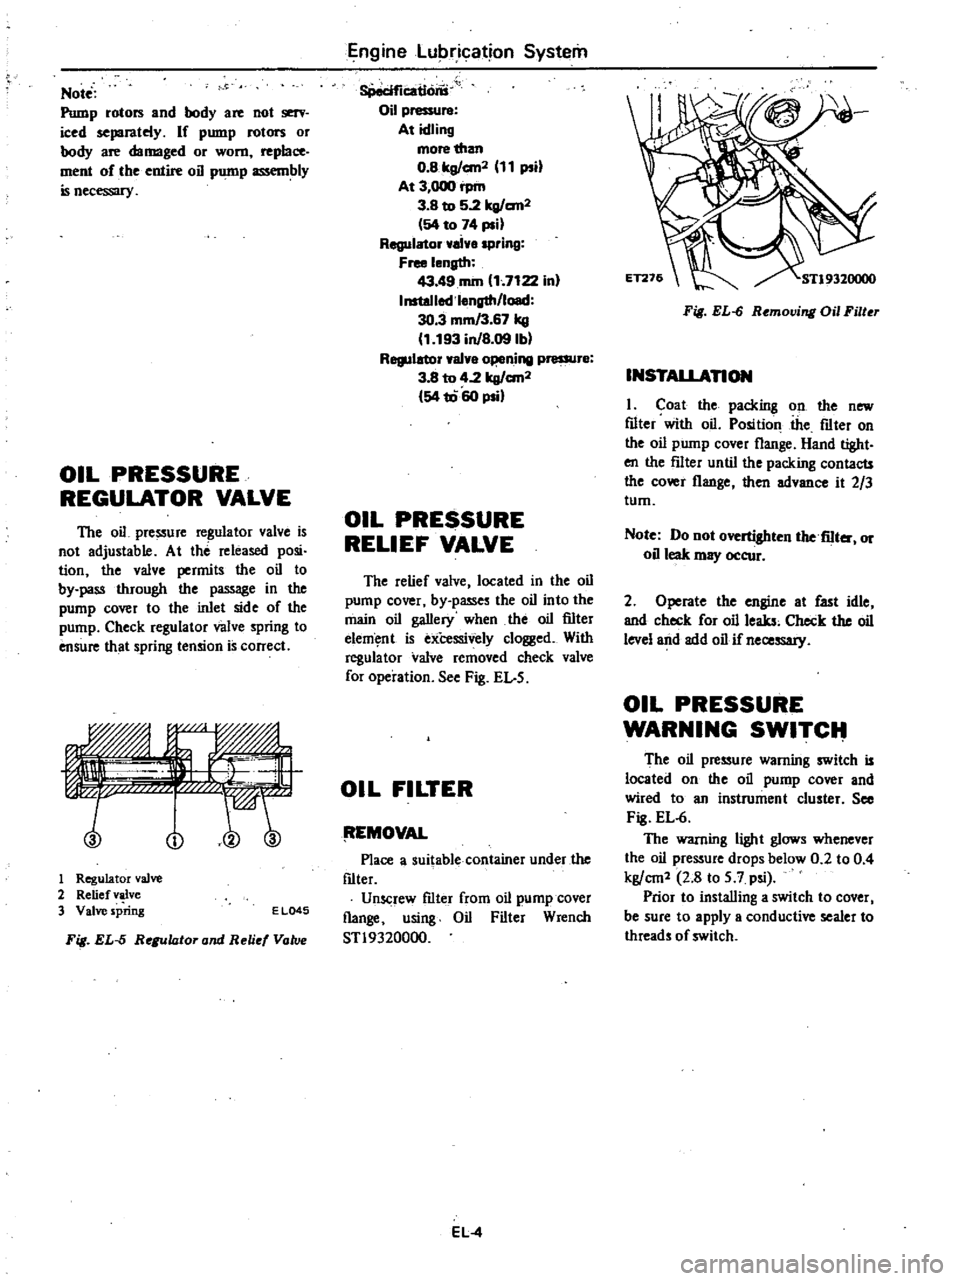
no
1
Regulator
valve
2
Relief
valve
3
Valve
spring
E
L045
Fig
EL
5
Regulator
and
Reli
Vatv
Engine
Lubrication
System
8Peciflcatlons
Oil
pressure
At
idling
more
than
O
Blrg
an2
11
psi
At
3
000
rpm
3
B
to
5
2lrg
an2
54
to
74
psi
Regulator
ai
spring
Free
length
43
49
rom
1
7122
in
InstoJlod
l
ngth
load
30
3
mm
3
67
kg
1
193
inJB
09lbl
Regulator
val
o
ning
pressur
3
8
to
4
2
lrg
an2
54
1060
psi
OIL
PRESSURE
RELIEF
VALVE
The
relief
valve
located
in
the
oil
pump
cover
by
passes
the
oil
into
the
main
oil
gallery
when
the
oil
filter
elem
nt
is
exCessively
clogged
With
regula
tor
valve
removed
check
valve
for
operation
See
Fig
EL
5
OIL
FILTER
tEMOVAL
Place
a
suitable
container
under
the
f1lter
Unscrew
f1lter
from
oil
pump
cover
flange
using
Oil
Filter
Wrench
STl9320000
EL
4
Fig
EL
6
Removing
Oil
Filter
INSTALLAnON
I
Coat
the
packing
on
the
new
f1lter
with
oil
Position
the
f1lter
on
the
oil
pump
cover
flange
Hand
tight
en
the
f11ter
until
the
packing
contacts
the
cover
flange
then
advance
it
2
3
tum
Note
Do
not
overtighten
the
fiIter
or
oil
leak
may
occur
2
Operate
the
engine
at
fast
idle
and
check
for
oil
leaks
Check
the
oil
level
and
add
oil
if
necessary
OIL
PRESSURE
WARNING
SWITCIt
The
oil
pressure
warning
switch
is
located
on
the
oil
pump
cover
and
wired
to
an
instrument
cluster
See
Fig
EL
6
The
warning
light
glows
whenever
the
oil
pressure
drops
below
0
2
to
0
4
kg
cm1
2
8
to
5
7
psi
Prior
to
installing
a
switch
to
cover
I
be
sure
to
apply
a
conductive
sealer
to
threads
of
switch
Page 77 of 548

Engine
Lubrication
System
SERVICE
DATA
AND
SPECIFICATIONS
Oil
pump
Standard
Wear
limit
Rotor
side
clearance
nun
in
0
04
to
0
08
0
20
0
0079
Rotor
to
bottom
cover
0
0016
to
0
0031
Rotor
tip
clearance
mm
in
less
than
0
20
0
0079
0
12
0
0047
Outer
rotor
to
body
clearance
nun
in
0
15
to
0
21
0
50
0
0197
0
0059
to
0
0083
Oil
pressure
regulator
valve
Oil
pressure
a
t
idling
Oil
pressure
at
3
000
rpm
Regulator
valve
spring
Free
length
Installed
length
load
kg
cm2
psi
kg
cm2
psi
more
than
0
8
II
3
8
to
5
2
54
to
74
nun
in
nun
kg
in
lb
43
49
I
7122
30
3
3
67
1
193
8
09
Tightening
torque
Oil
pump
securing
bolts
Oil
pump
cover
bolt
Regulator
valve
cap
nut
kg
m
ft
lb
kg
m
ft
lb
kg
m
ft
lb
0
9
to
I
4
6
5
to
10
1
0
39
to
0
52
2
8
to
3
8
4
0
to
5
0
29
to
36
TROUBLE
DIAGNOSES
AND
CORRECTIONS
Condition
Probable
cause
Corrective
action
Oil
leakage
Damaged
or
cracked
body
cover
Oil
leakage
from
gasket
Oil
leakage
from
regulator
valve
Oil
leakage
from
blind
plug
Replace
Replace
Tighten
or
replace
Replace
Decreased
oil
pressure
Leak
of
oil
in
engine
oil
pan
Dirty
oil
strainer
Damaged
or
worn
pump
rotors
Faulty
regulator
Used
of
poor
quality
engine
oil
Correct
Clean
or
replace
Replace
Adjust
or
replace
Replace
Noise
Excessive
backlash
in
pump
rotors
Replace
EL
5
Page 78 of 548

Engine
Lubrication
System
SPECIAL
SERVICE
TOOLS
Kent
Moore
No
I
Kent
Moore
No
Tool
number
tool
name
Reference
Pile
or
Fig
No
Tool
number
tool
name
Reference
page
or
Fig
No
STl9320000
Oil
filter
wrench
J2S664
Fig
EL
6
EL
6
Page 79 of 548

DATSUN
210
Model
8310
Series
SECTIONCD
COOLING
SYSTEM
em
CONTENTS
COOLING
SYSTEM
DESCRIPTION
WATER
PUMP
TORQUE
COUPLING
TEM
COUPLlNG
THERMOSTAT
CO
2
CO
2
CO
2
CO
3
CO
4
CO
4
RADIATOR
RADIATOR
RESERVOIR
TANk
SERVICE
DATA
AND
SPECIFICATIONS
TROUBLE
DIAGNOSES
AND
CORRECTIONS
CO
5
CO
5
CO
6
CO
7
Page 80 of 548

DESCRIPTION
The
cooling
system
is
of
the
con
ventional
pressure
type
A
centrifugal
1P
a
COOLANT
LEVEL
Pour
coolant
into
the
radiator
up
to
the
cap
and
also
into
the
reservoir
up
to
the
MAX
level
CAUTION
To
avoid
serious
personal
injury
never
remove
radiator
cap
quickly
when
engine
is
hot
Sudden
release
of
cool
ing
system
pressure
is
very
dangerous
If
it
is
necessary
to
remove
radiator
cap
when
radiator
is
hot
turn
cap
slowly
counterclockwise
to
the
first
step
After
all
pressure
in
the
cool
ing
system
is
released
turn
cap
passing
the
stop
and
remove
it
DRAINING
AND
FLUSHING
THE
COOLING
SYSTEM
To
drain
the
cooling
system
re
move
radiator
cap
release
drain
cock
C09ling
System
COOLING
SYSTEM
pump
installed
on
the
timing
chain
cover
serves
to
circulate
the
coolant
The
pressure
t
pe
radiator
filler
cap
at
the
bottom
of
radiator
and
drain
plug
on
the
left
side
of
cylinder
block
If
the
heater
system
is
instaDed
set
heater
control
valve
to
open
position
Mter
the
coolant
is
drained
complete
ly
close
drain
cock
and
plug
and
refdl
the
system
with
clean
soft
water
WATER
PUMP
The
water
pump
is
of
a
centrifugal
type
which
is
mounted
on
the
engine
front
cover
TJ
te
pump
shaft
is
sup
ported
by
a
double
row
of
baD
bear
ings
press
fit
in
an
aluminum
die
cast
pump
body
The
bearings
are
per
manently
lubricated
and
sealed
to
pre
vent
loss
of
lubricant
and
entry
of
dirt
CO
2
installed
on
the
radiator
operates
the
cooling
system
at
higher
than
atmos
pheric
pressure
To
heater
From
heater
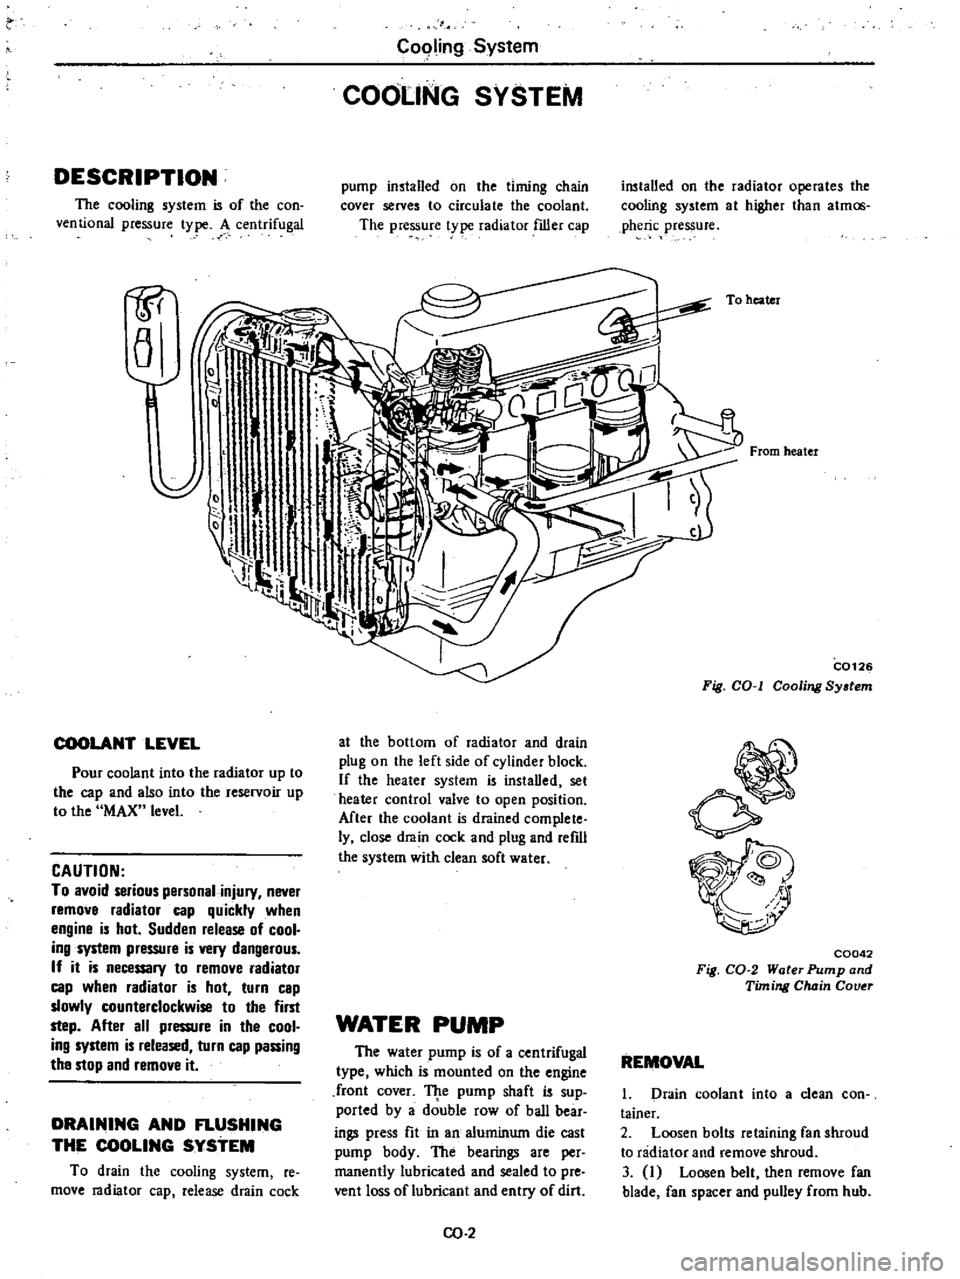
C0126
Fig
COol
Cooling
System
C0042
Fig
CO
2
Water
Pump
and
Timing
Chain
Couer
REMOVAL
1
Drain
coolant
into
a
clean
con
tainer
2
Loosen
bolts
retaining
fan
shroud
to
radiator
and
remove
shroud
3
I
Loosen
belt
then
remove
fan
blade
fan
spacer
and
pulley
from
hub