FORD FESTIVA 1991 Service Manual
Manufacturer: FORD, Model Year: 1991, Model line: FESTIVA, Model: FORD FESTIVA 1991Pages: 454, PDF Size: 9.53 MB
Page 401 of 454
and left brake lines in place. Install rear suspension struts and wheels. Block wheels and lower vehicle to load suspension to normal ride
height. Tighten torsion beam pivot bolts at body brackets to 69-87 ft. lbs. (93-118 N.m).
4. Check rear suspension alignment. Place an alignment mark at the center of the underbody, at a point of equal distance from the right and
left body bracket inboard mounting bolts. From this alignment mark, measure distance to centers of right and left strut lower mounting
bolts.
5. Both measurements must be within .20" (5 mm) of being the same. If not, shift torsion beam body brackets from side-to-side to center
suspension. Once centered, tighten upper body bracket mounting bolts to 40-50 ft. lbs. (54-68 N.m) and lower bolt to 69-87 ft. lbs. (93-
118 N.m). Bleed brakes.
TORSION BEAM BUSHINGS
Removal
1. Raise and support vehicle to fully extended rear struts. Remove wheels. Remove retaining clip at right brake line routing bracket and
disconnect brake line. Remove clip from left brake line and disconnect at body crossmember.
2. Remove torsion beam pivot bolt bolts and nuts at right and left body brackets. Swing torsion beam trailing arm downward to clear body
brackets.
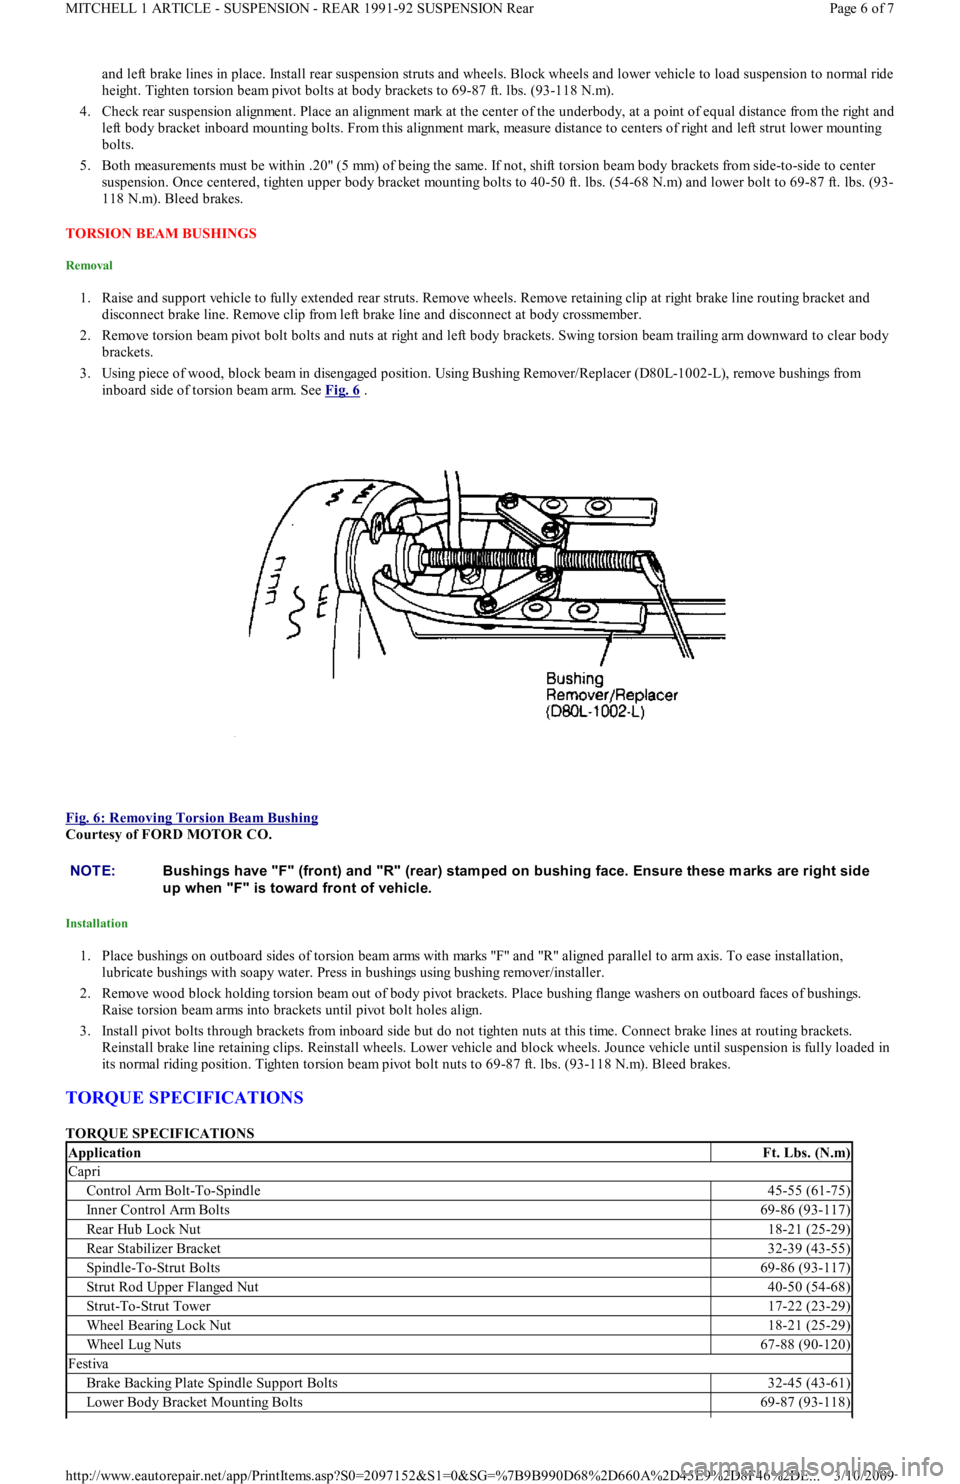
3. Using piece of wood, block beam in disengaged position. Using Bushing Remover/Replacer (D80L-1002-L), remove bushings from
inboard side of torsion beam arm. See Fig. 6
.
Fig. 6: Removing Torsion Beam Bushing
Courtesy of FORD MOTOR CO.
Installation
1. Place bushings on outboard sides of torsion beam arms with marks "F" and "R" aligned parallel to arm axis. To ease installation,
lubricate bushings with soapy water. Press in bushings using bushing remover/installer.
2. Remove wood block holding torsion beam out of body pivot brackets. Place bushing flange washers on outboard faces of bushings.
Raise torsion beam arms into brackets until pivot bolt holes align.
3. Install pivot bolts through brackets from inboard side but do not tighten nuts at this time. Connect brake lines at routing brackets.
Reinstall brake line retaining clips. Reinstall wheels. Lower vehicle and block wheels. Jounce vehicle until suspension is fully loaded in
its normal riding position. Tighten torsion beam pivot bolt nuts to 69-87 ft. lbs. (93-118 N.m). Bleed brakes.
TORQUE SPECIFICATIONS
TORQUE SPECIFICATIONS
NOTE:Bushings have "F" (front) and "R" (rear) stam ped on bushing face. Ensure these m arks are right side
up when "F" is toward front of vehicle.
ApplicationFt. Lbs. (N.m)
Capri
Control Arm Bolt-To-Spindle45-55 (61-75)
Inner Control Arm Bolts69-86 (93-117)
Rear Hub Lock Nut18-21 (25-29)
Rear Stabilizer Bracket32-39 (43-55)
Spindle-To-Strut Bolts69-86 (93-117)
Strut Rod Upper Flanged Nut40-50 (54-68)
Strut-To-Strut Tower17-22 (23-29)
Wheel Bearing Lock Nut18-21 (25-29)
Wheel Lug Nuts67-88 (90-120)
Festiva
Brake Backing Plate Spindle Support Bolts32-45 (43-61)
Lower Body Bracket Mounting Bolts69-87 (93-118)
Page 6 of 7 MITCHELL 1 ARTICLE - SUSPENSION - REAR 1991-92 SUSPENSION Rear
3/10/2009 http://www.eautorepair.net/app/PrintItems.asp?S0=2097152&S1=0&SG=%7B9B990D68%2D660A%2D45E9%2D8F46%2DE
...
Page 402 of 454
Rear Hub Lock Nut18-21 (25-29)
Spindle Attaching Nuts31-45 (43-61)
Strut Lower Mounting Bolt40-50 (54-68)
Strut Rod Upper Flanged Nut12-18 (16-25)
Torsion Beam Pivot Bolts69-87 (93-118)
Upper Body Bracket Mounting Bolts40-50 (54-68)
Wheel Lug Nuts67-88 (90-120)
Copyr ight 2009 Mitchell Repair Information Company, LLC. All Rights Reserved.
Article GUID: A00121555
Page 7 of 7 MITCHELL 1 ARTICLE - SUSPENSION - REAR 1991-92 SUSPENSION Rear
3/10/2009 http://www.eautorepair.net/app/PrintItems.asp?S0=2097152&S1=0&SG=%7B9B990D68%2D660A%2D45E9%2D8F46%2DE
...
Page 403 of 454
Back To Article
JACKING & HOISTING
1991-92 WHEEL ALIGNMENT Ford Motor Co. - Jacking & Hoisting
JACKING & HOISTING
FRAME & UNDERBODY
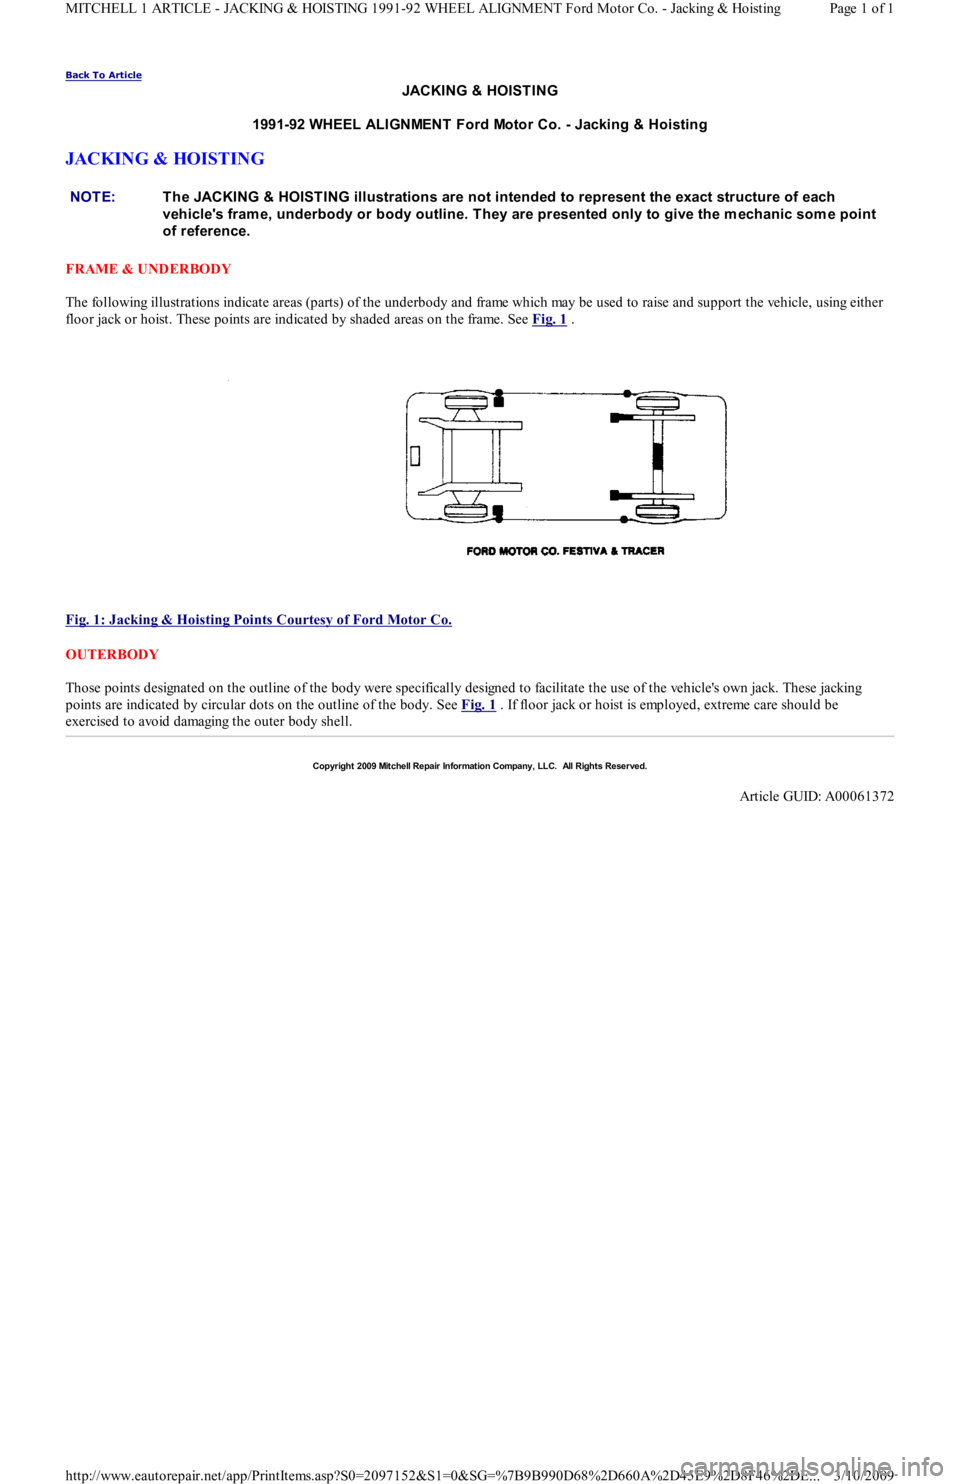
The following illustrations indicate areas (parts) of the underbody and frame which may be used to raise and support the vehicle, using either
floor jack or hoist. These points are indicated by shaded areas on the frame. See Fig. 1
.
Fig. 1: Jacking & Hoisting Points Courtesy of Ford Motor Co.
OUTERBODY
Those points designated on the outline of the body were specifically designed to facilitate the use of the vehicle's own jack. These jacking
points are indicated by circular dots on the outline of the body. See Fig. 1 . If floor jack or hoist is employed, extreme care should be
exercised to avoid damaging the outer body shell. NOTE:T he JACKING & HOIST ING illustrations are not intended to represent the exact structure of each
vehicle's fram e, underbody or body outline. T hey are presented only to give the m echanic som e point
of reference.
Copyr ight 2009 Mitchell Repair Information Company, LLC. All Rights Reserved.
Article GUID: A00061372
Page 1 of 1 MITCHELL 1 ARTICLE - JACKING & HOISTING 1991-92 WHEEL ALIGNMENT Ford Motor Co. - Jacking & Hoisting
3/10/2009 http://www.eautorepair.net/app/PrintItems.asp?S0=2097152&S1=0&SG=%7B9B990D68%2D660A%2D45E9%2D8F46%2DE
...
Page 404 of 454
Back To Article
1983-95 WHEEL ALIGNMENT
Pre-Alignm ent Inspection Procedures
PRE-ALIGNMENT CHECKS
Before making wheel alignment adjustment, perform the following checks:
1. Tires should be equal in size and runout must not be excessive. Tires and wheels should be in balance, and inflated to manufacturer's
specifications.
2. Wheel bearings must be properly adjusted. Steering linkage and suspension must not have excessive looseness. Check for wear in tie rod
ends and ball joints.
3. Steering gear box must not have excessive play. Check and adjust to manufacturer's specifications.
4. Vehicle must be at curb height with full fuel load and spare tire in vehicle. No extra load should be on vehicle.
5. Vehicle must be level with floor and with suspension settled. Jounce front and rear of vehicle several times and allow it to settle to
normal curb height.
6. If steering wheel is not centered with front wheels in straight-ahead position, correct by shortening one tie rod adjusting sleeve and
lengthening opposite sleeve equal amounts.
7. Ensure wheel lug nuts are tightened to torque specifications.
Copyr ight 2009 Mitchell Repair Information Company, LLC. All Rights Reserved.
Article GUID: A00060347
Page 1 of 1 MITCHELL 1 ARTICLE - 1983-95 WHEEL ALIGNMENT Pre-Alignment Inspection Procedures
3/10/2009 http://www.eautorepair.net/app/PrintItems.asp?S0=2097152&S1=0&SG=%7B9B990D68%2D660A%2D45E9%2D8F46%2DE
...
Page 405 of 454
Back To Article
RIDING HEIGHT ADJUSTMENT
1991-92 WHEEL ALIGNMENT Ford Motor Co. - Riding Height Adjustm ent
RIDING HEIGHT ADJUSTMENT
1. Examine vehicle and ensure front or rear end is not higher or lower than normal. Ensure vehicle is level from side to side. Remove any
unusual heavy items before checking suspension.
2. If loading is normal but vehicle is not level, check for spring damage, spring set, or non-standard replacement springs. Repair or replace
as necessary. If in doubt, compare with a new vehicle (if possible).
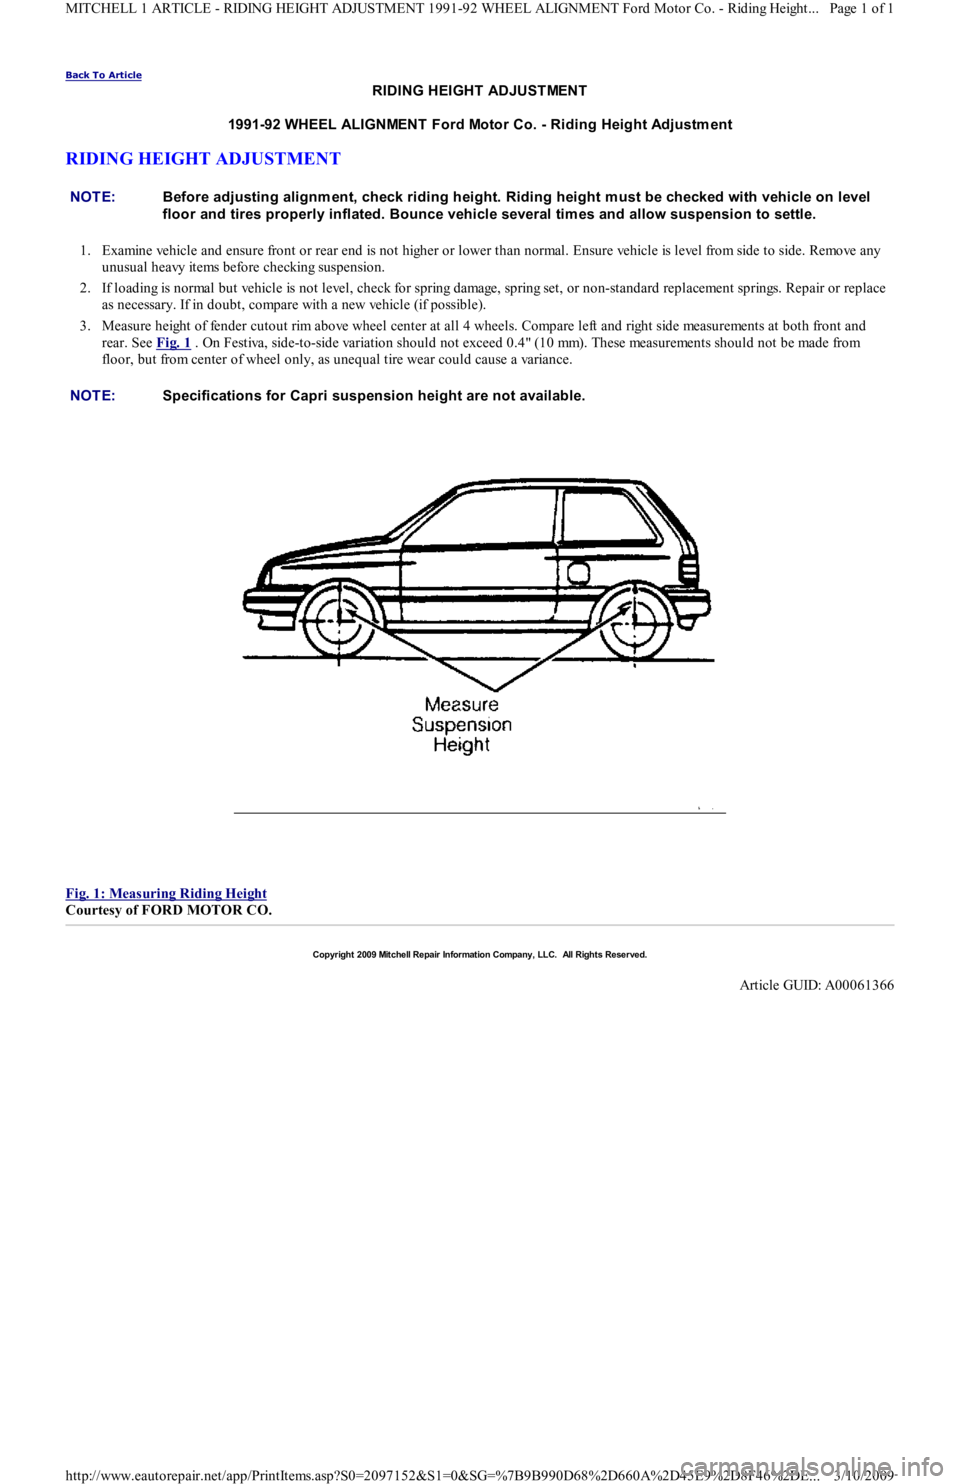
3. Measure height of fender cutout rim above wheel center at all 4 wheels. Compare left and right side measurements at both front and
rear. See Fig. 1
. On Festiva, side-to-side variation should not exceed 0.4" (10 mm). These measurements should not be made from
floor, but from center of wheel only, as unequal tire wear could cause a variance.
Fig. 1: Measuring Riding Height
Courtesy of FORD MOTOR CO. NOTE:Before adjusting alignm ent, check riding height. Riding height m ust be checked with vehicle on level
floor and tires properly inflated. Bounce vehicle several tim es and allow suspension to settle.
NOTE:Specifications for Capri suspension height are not available.
Copyr ight 2009 Mitchell Repair Information Company, LLC. All Rights Reserved.
Article GUID: A00061366
Page 1 of 1 MITCHELL 1 ARTICLE - RIDING HEIGHT ADJUSTMENT 1991-92 WHEEL ALIGNMENT Ford Motor Co. - Riding Height
...
3/10/2009 http://www.eautorepair.net/app/PrintItems.asp?S0=2097152&S1=0&SG=%7B9B990D68%2D660A%2D45E9%2D8F46%2DE
...
Page 406 of 454
Back To Article
WHEEL ALIGNMENT SPECIFICAT IONS & PROCEDURES
1991-92 WHEEL ALIGNMENT Ford Motor Co. - Specifications & Procedures
ADJUSTMENTS
CASTER
Caster is permanently set at factory and is not adjustable. Caster should be checked however as a possible cause of suspension complaint.
CAMBER
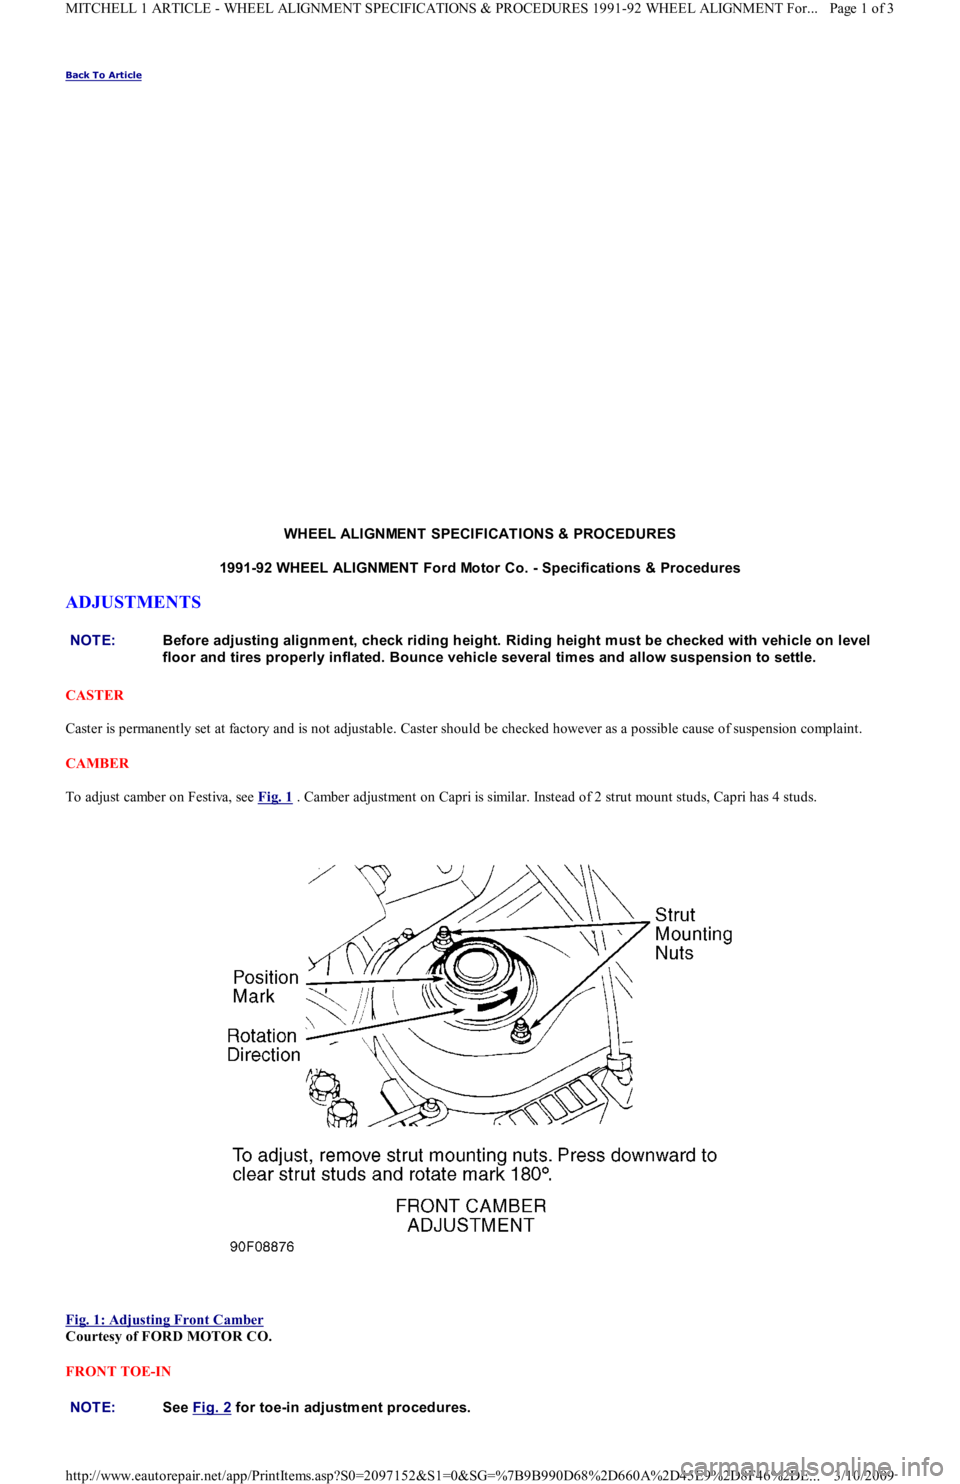
To adjust camber on Festiva, see Fig. 1
. Camber adjustment on Capri is similar. Instead of 2 strut mount studs, Capri has 4 studs.
Fig. 1: Adjusting Front Camber
Courtesy of FORD MOTOR CO.
FRONT TOE-IN NOTE:Before adjusting alignm ent, check riding height. Riding height m ust be checked with vehicle on level
floor and tires properly inflated. Bounce vehicle several tim es and allow suspension to settle.
NOTE:See Fig. 2 for toe-in adjustm ent procedures.
Page 1 of 3 MITCHELL 1 ARTICLE - WHEEL ALIGNMENT SPECIFICATIONS & PROCEDURES 1991-92 WHEEL ALIGNMENT For...
3/10/2009 http://www.eautorepair.net/app/PrintItems.asp?S0=2097152&S1=0&SG=%7B9B990D68%2D660A%2D45E9%2D8F46%2DE
...
Page 407 of 454
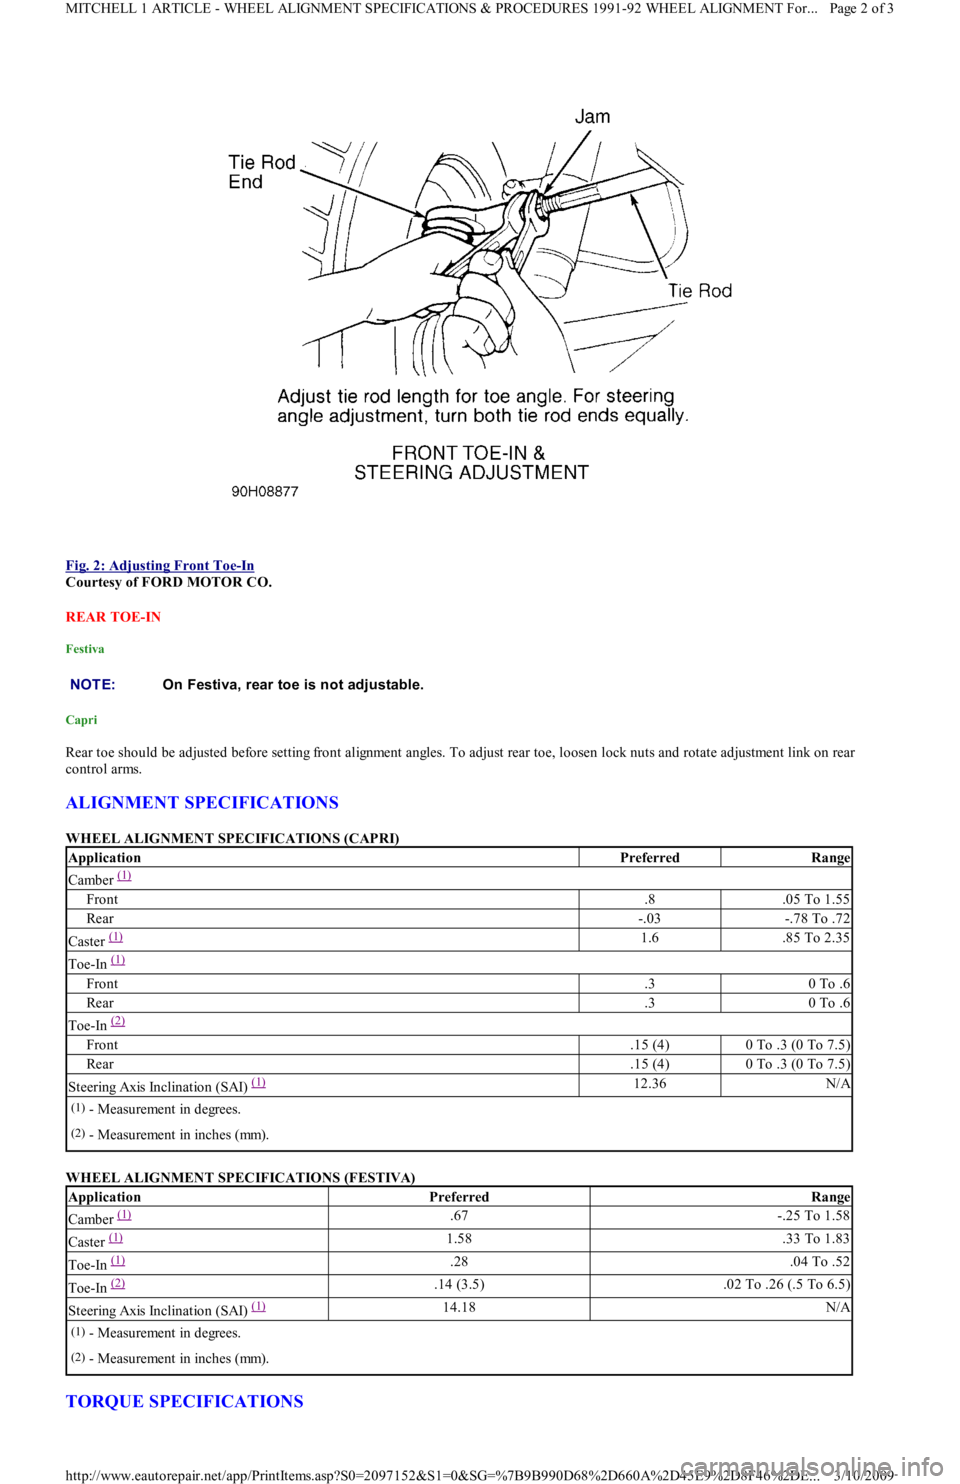
Fig. 2: Adjusting Front Toe
-In
Courtesy of FORD MOTOR CO.
REAR TOE-IN
Festiva
Capri
Rear toe should be adjusted before setting front alignment angles. To adjust rear toe, loosen lock nuts and rotate adjustment link on rear
control arms.
ALIGNMENT SPECIFICATIONS
WHEEL ALIGNMENT SPECIFICATIONS (CAPRI)
WHEEL ALIGNMENT SPECIFICATIONS (FESTIVA)
TORQUE SPECIFICATIONS
NOTE:On Festiva, rear toe is not adjustable.
ApplicationPreferredRange
Camber (1)
Front.8.05 To 1.55
Rear-.03-.78 To .72
Caster (1) 1.6.85 To 2.35
Toe-In (1)
Front.30 To .6
Rear.30 To .6
Toe-In (2)
Front.15 (4)0 To .3 (0 To 7.5)
Rear.15 (4)0 To .3 (0 To 7.5)
Steering Axis Inclination (SAI) (1) 12.36N/A
(1)- Measurement in degrees.
(2)- Measurement in inches (mm).
ApplicationPreferredRange
Camber (1) .67-.25 To 1.58
Caster (1) 1.58.33 To 1.83
Toe-In (1) .28.04 To .52
Toe-In (2) .14 (3.5).02 To .26 (.5 To 6.5)
Steering Axis Inclination (SAI) (1) 14.18N/A
(1)- Measurement in degrees.
(2)- Measurement in inches (mm).
Page 2 of 3 MITCHELL 1 ARTICLE - WHEEL ALIGNMENT SPECIFICATIONS & PROCEDURES 1991-92 WHEEL ALIGNMENT For...
3/10/2009 http://www.eautorepair.net/app/PrintItems.asp?S0=2097152&S1=0&SG=%7B9B990D68%2D660A%2D45E9%2D8F46%2DE
...
Page 408 of 454
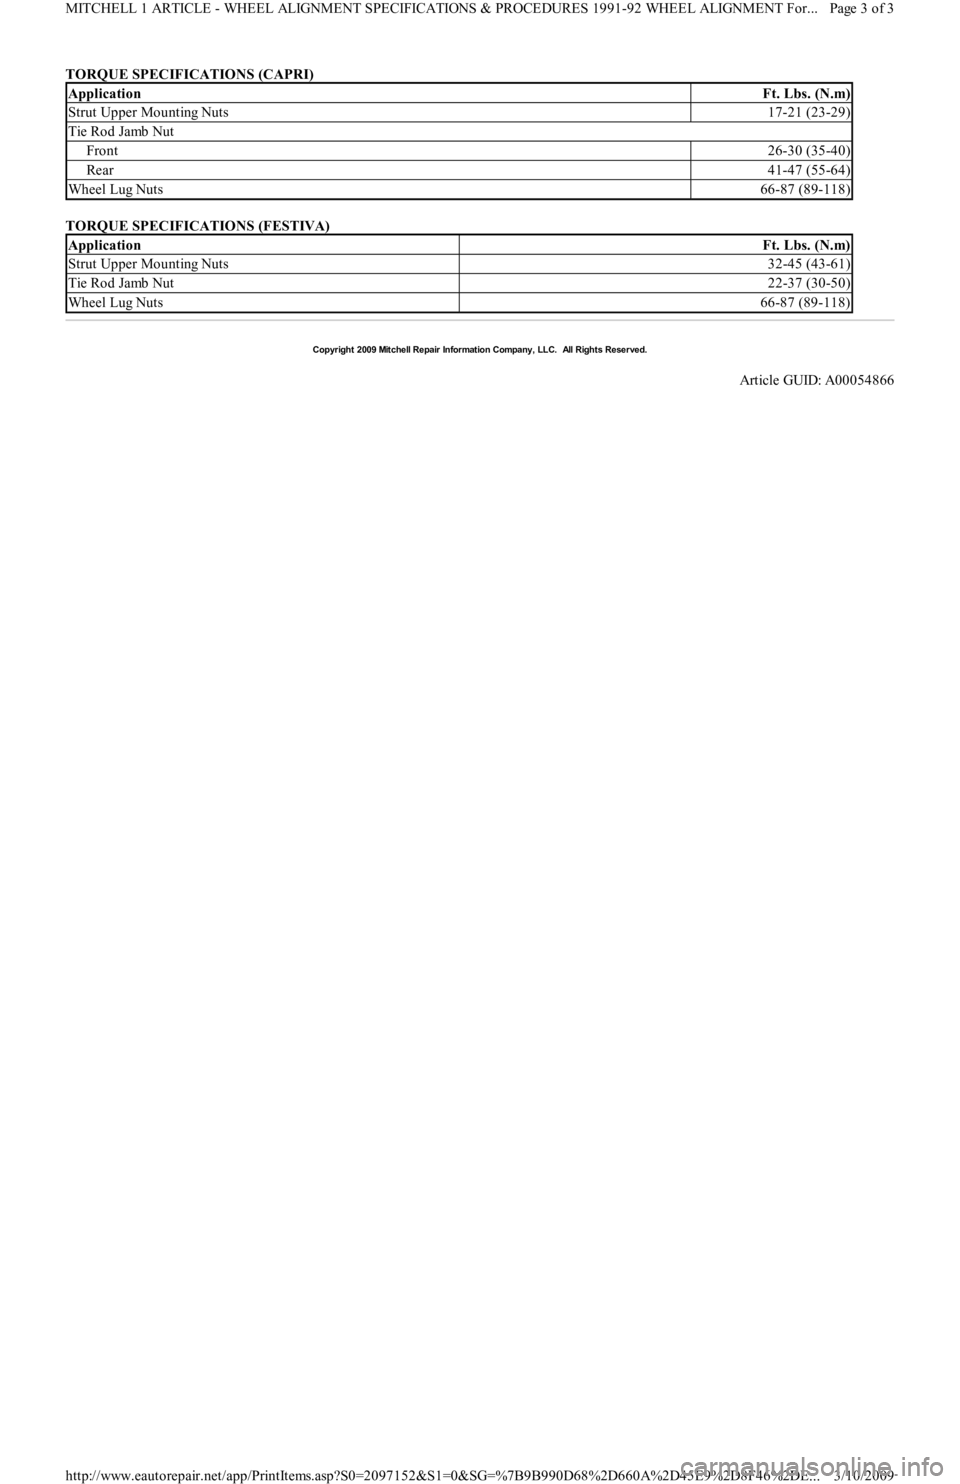
TORQUE SPECIFICATIONS (CAPRI)
TORQUE SPECIFICATIONS (FESTIVA)
ApplicationFt. Lbs. (N.m)
Strut Upper Mounting Nuts17-21 (23-29)
Tie Rod Jamb Nut
Front26-30 (35-40)
Rear41-47 (55-64)
Wheel Lug Nuts66-87 (89-118)
ApplicationFt. Lbs. (N.m)
Strut Upper Mounting Nuts32-45 (43-61)
Tie Rod Jamb Nut22-37 (30-50)
Wheel Lug Nuts66-87 (89-118)
Copyr ight 2009 Mitchell Repair Information Company, LLC. All Rights Reserved.
Article GUID: A00054866
Page 3 of 3 MITCHELL 1 ARTICLE - WHEEL ALIGNMENT SPECIFICATIONS & PROCEDURES 1991-92 WHEEL ALIGNMENT For...
3/10/2009 http://www.eautorepair.net/app/PrintItems.asp?S0=2097152&S1=0&SG=%7B9B990D68%2D660A%2D45E9%2D8F46%2DE
...
Page 409 of 454
Back To Article
1988-94 AUT OMAT IC T RANSMISSIONS
Ford ATX Overhaul
APPLICATION
APPLICATION
DESCRIPTION
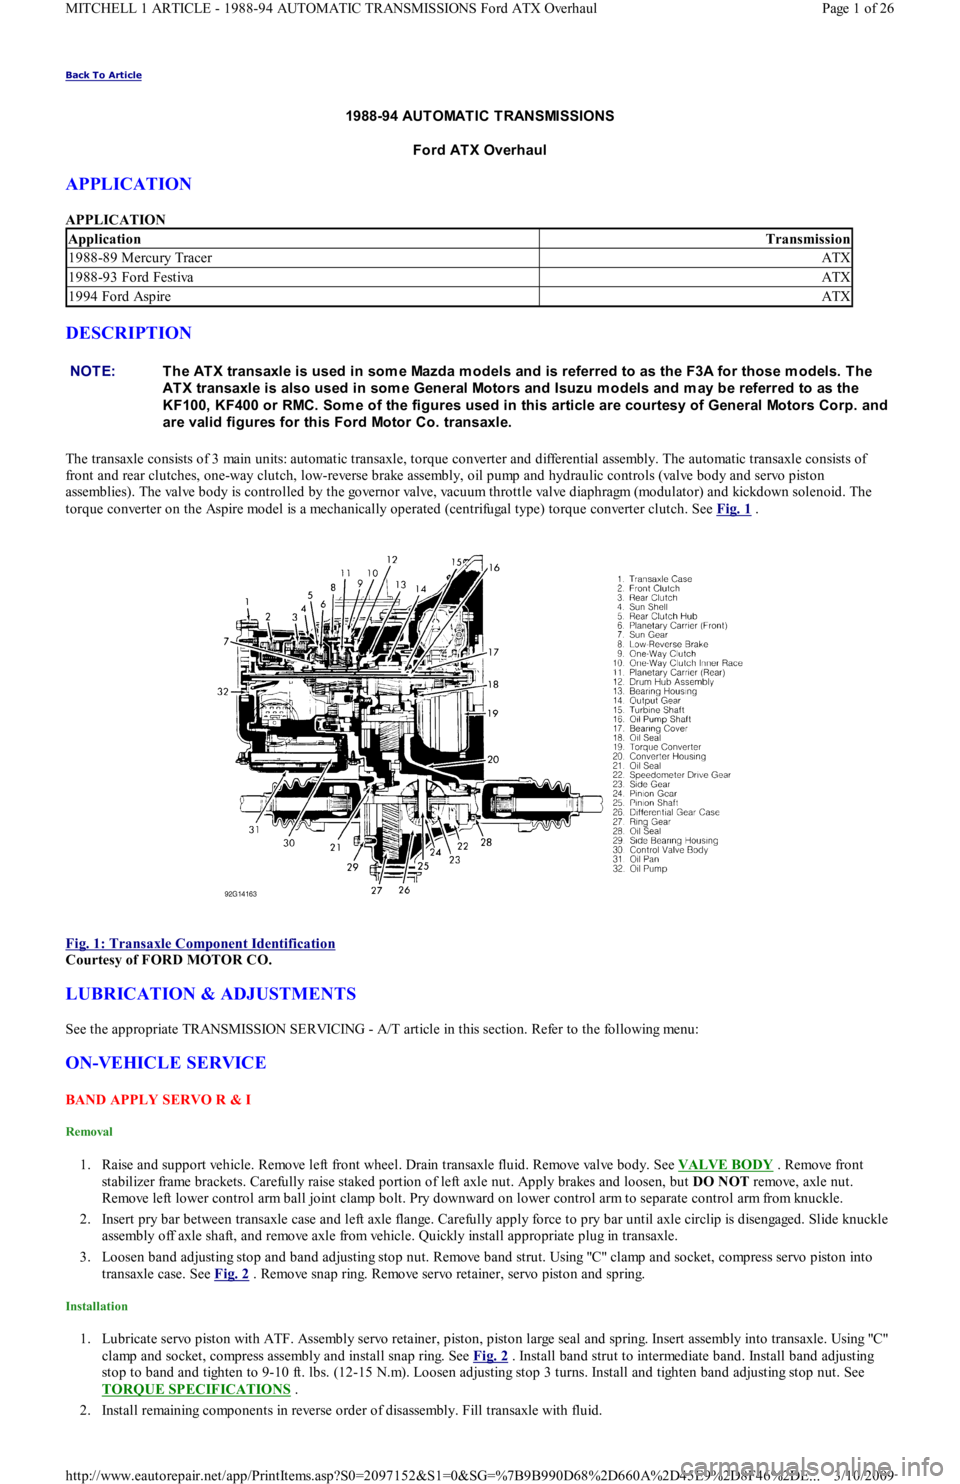
The transaxle consists of 3 main units: automatic transaxle, torque converter and differential assembly. The automatic transaxle consists of
front and rear clutches, one-way clutch, low-reverse brake assembly, oil pump and hydraulic controls (valve body and servo piston
assemblies). The valve body is controlled by the governor valve, vacuum throttle valve diaphragm (modulator) and kickdown solenoid. The
torque converter on the Aspire model is a mechanically operated (centrifugal type) torque converter clutch. See Fig. 1
.
Fig. 1: Transaxle Component Identification
Courtesy of FORD MOTOR CO.
LUBRICATION & ADJUSTMENTS
See the appropriate TRANSMISSION SERVICING - A/T article in this section. Refer to the following menu:
ON-VEHICLE SERVICE
BAND APPLY SERVO R & I
Removal
1. Raise and support vehicle. Remove left front wheel. Drain transaxle fluid. Remove valve body. See VALVE BODY . Remove front
stabilizer frame brackets. Carefully raise staked portion of left axle nut. Apply brakes and loosen, but DO NOT remove, axle nut.
Remove left lower control arm ball joint clamp bolt. Pry downward on lower control arm to separate control arm from knuckle.
2. Insert pry bar between transaxle case and left axle flange. Carefully apply force to pry bar until axle circlip is disengaged. Slide knuckle
assembly off axle shaft, and remove axle from vehicle. Quickly install appropriate plug in transaxle.
3. Loosen band adjusting stop and band adjusting stop nut. Remove band strut. Using "C" clamp and socket, compress servo piston into
transaxle case. See Fig. 2
. Remove snap ring. Remove servo retainer, servo piston and spring.
Installation
1. Lubricate servo piston with ATF. Assembly servo retainer, piston, piston large seal and spring. Insert assembly into transaxle. Usin g "C"
clamp and socket, compress assembly and install snap ring. See Fig. 2
. Install band strut to intermediate band. Install band adjusting
stop to band and tighten to 9-10 ft. lbs. (12-15 N.m). Loosen adjusting stop 3 turns. Install and tighten band adjusting stop nut. See
TORQUE SPECIFICATIONS
.
2. Install remaining components in reverse order of disassembly. Fill transaxle with fluid.
ApplicationTransmission
1988-89 Mercury TracerATX
1988-93 Ford FestivaATX
1994 Ford AspireATX
NOTE:T he AT X transaxle is used in som e Mazda m odels and is referred to as the F3A for those m odels. T he
AT X transaxle is also used in som e General Motors and Isuzu m odels and m ay be referred to as the
KF100, KF400 or RMC. Som e of the figures used in this article are courtesy of General Motors Corp. and
are valid figures for this Ford Motor Co. transaxle.
Page 1 of 26 MITCHELL 1 ARTICLE - 1988-94 AUTOMATIC TRANSMISSIONS Ford ATX Overhaul
3/10/2009 http://www.eautorepair.net/app/PrintItems.asp?S0=2097152&S1=0&SG=%7B9B990D68%2D660A%2D45E9%2D8F46%2DE
...
Page 410 of 454
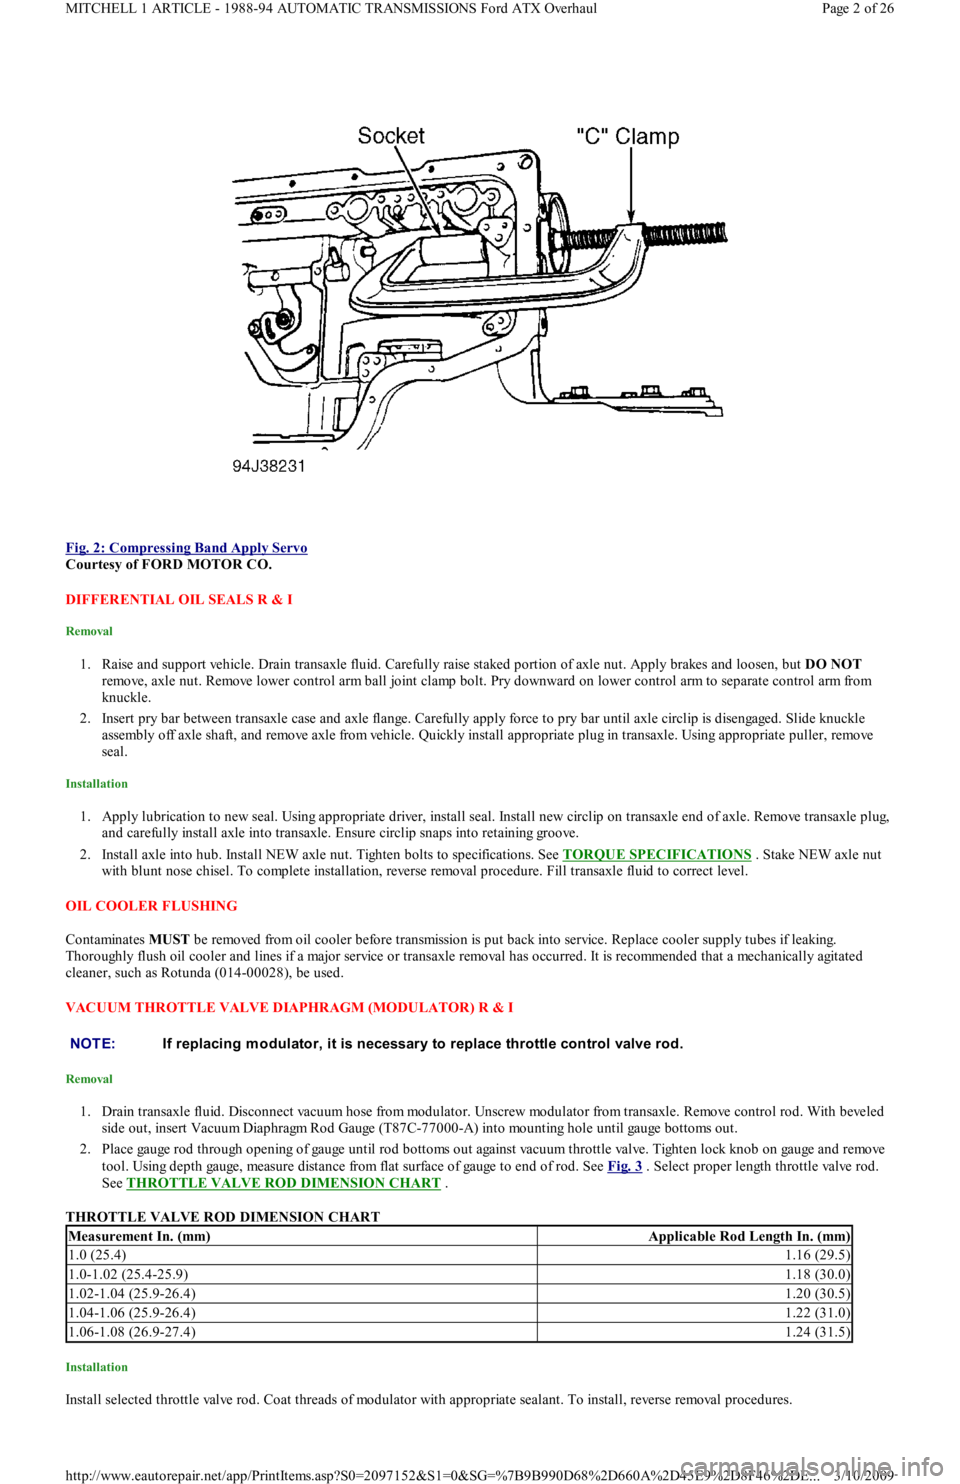
Fig. 2: Compressing Band Apply Servo
Courtesy of FORD MOTOR CO.
DIFFERENTIAL OIL SEALS R & I
Removal
1. Raise and support vehicle. Drain transaxle fluid. Carefully raise staked portion of axle nut. Apply brakes and loosen, but DO NOT
remove, axle nut. Remove lower control arm ball joint clamp bolt. Pry downward on lower control arm to separate control arm from
knuckle.
2. Insert pry bar between transaxle case and axle flange. Carefully apply force to pry bar until axle circlip is disengaged. Slide knuckle
assembly off axle shaft, and remove axle from vehicle. Quickly install appropriate plug in transaxle. Using appropriate puller, remove
seal.
Installation
1. Apply lubrication to new seal. Using appropriate driver, install seal. Install new circlip on transaxle end of axle. Remove transaxle plug,
and carefully install axle into transaxle. Ensure circlip snaps into retaining groove.
2. Install axle into hub. Install NEW axle nut. Tighten bolts to specifications. See TORQUE SPECIFICATIONS
. Stake NEW axle nut
with blunt nose chisel. To complete installation, reverse removal procedure. Fill transaxle fluid to correct level.
OIL COOLER FLUSHING
Contaminates MUST be removed from oil cooler before transmission is put back into service. Replace cooler supply tubes if leaking.
Thoroughly flush oil cooler and lines if a major service or transaxle removal has occurred. It is recommended that a mechanically agitated
cleaner, such as Rotunda (014-00028), be used.
VACUUM THROTTLE VALVE DIAPHRAGM (MODULATOR) R & I
Removal
1. Drain transaxle fluid. Disconnect vacuum hose from modulator. Unscrew modulator from transaxle. Remove control rod. With beveled
side out, insert Vacuum Diaphragm Rod Gauge (T87C-77000-A) into mounting hole until gauge bottoms out.
2. Place gauge rod through opening of gauge until rod bottoms out against vacuum throttle valve. Tighten lock knob on gauge and remove
tool. Using depth gauge, measure distance from flat surface of gauge to end of rod. See Fig. 3
. Select proper length throttle valve rod.
See THROTTLE VALVE ROD DIMENSION CHART
.
THROTTLE VALVE ROD DIMENSION CHART
Installation
Install selected throttle valve rod. Coat threads of modulator with appropriate sealant. To install, reverse removal procedures.
NOTE:If replacing m odulator, it is necessary to replace throttle control valve rod.
Measurement In. (mm)Applicable Rod Length In. (mm)
1.0 (25.4)1.16 (29.5)
1.0-1.02 (25.4-25.9)1.18 (30.0)
1.02-1.04 (25.9-26.4)1.20 (30.5)
1.04-1.06 (25.9-26.4)1.22 (31.0)
1.06-1.08 (26.9-27.4)1.24 (31.5)
Page 2 of 26 MITCHELL 1 ARTICLE - 1988-94 AUTOMATIC TRANSMISSIONS Ford ATX Overhaul
3/10/2009 http://www.eautorepair.net/app/PrintItems.asp?S0=2097152&S1=0&SG=%7B9B990D68%2D660A%2D45E9%2D8F46%2DE
...