FORD MUSTANG 1969 Volume One Chassis
Manufacturer: FORD, Model Year: 1969, Model line: MUSTANG, Model: FORD MUSTANG 1969Pages: 413, PDF Size: 75.81 MB
Page 381 of 413
07-04-12
C-6 Automatic Transmission
07-04-12
•TRANSMISSION
CASE SEAL-7D024
SEAL-7D025
COVER .7D027
D1599-B
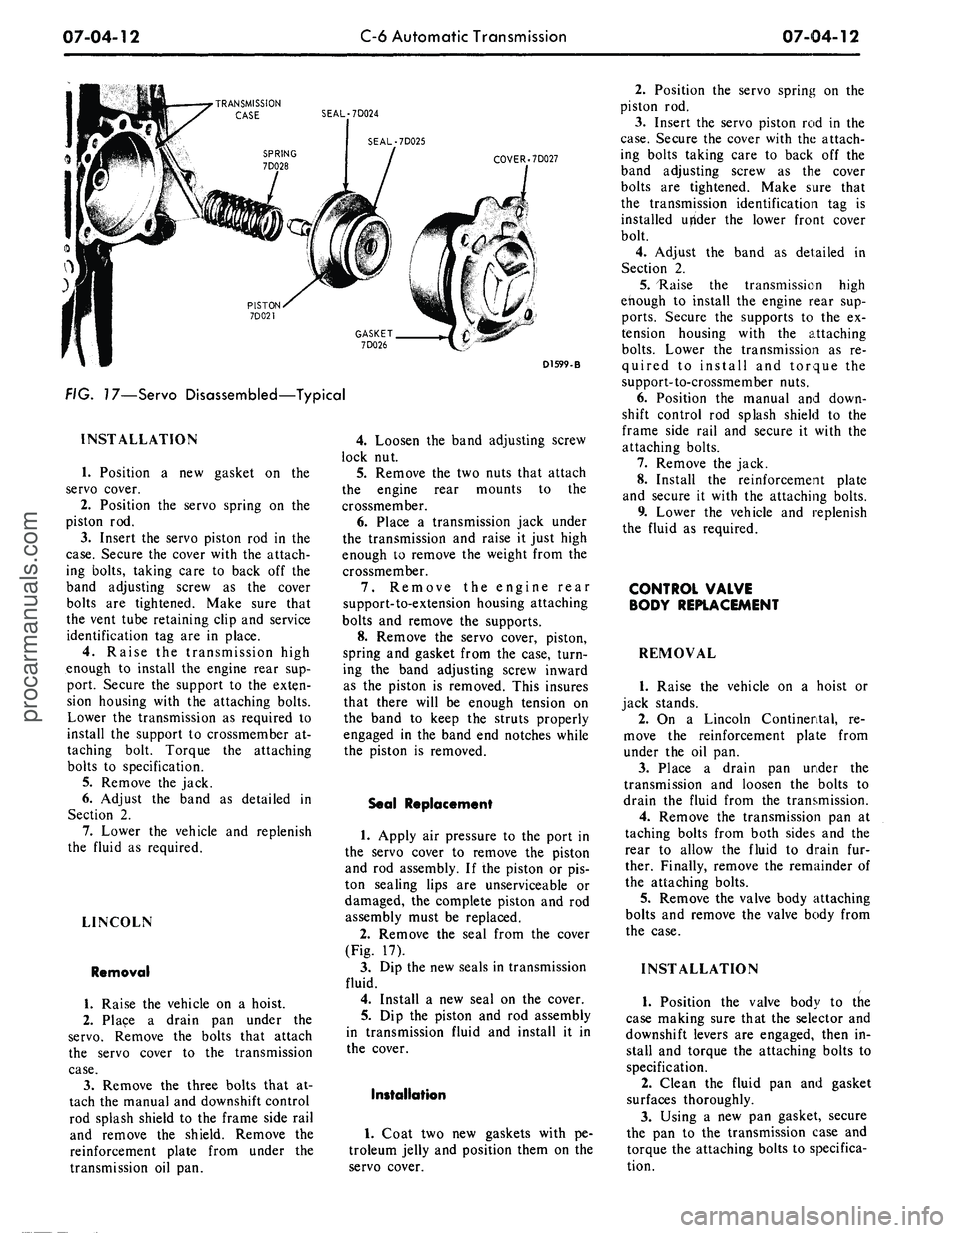
FIG. 17—Servo Disassembled—Typical
INSTALLATION
1.
Position a new gasket on the
servo cover.
2.
Position the servo spring on the
piston rod.
3.
Insert the servo piston rod in the
case.
Secure the cover with the attach-
ing bolts, taking care to back off the
band adjusting screw as the cover
bolts are tightened. Make sure that
the vent tube retaining clip and service
identification tag are in place.
4.
Raise the transmission high
enough to install the engine rear sup-
port. Secure the support to the exten-
sion housing with the attaching bolts.
Lower the transmission as required to
install the support to crossmember at-
taching bolt. Torque the attaching
bolts to specification.
5.
Remove the jack.
6. Adjust the band as detailed in
Section 2.
7.
Lower the vehicle and replenish
the fluid as required.
LINCOLN
Removal
1.
Raise the vehicle on a hoist.
2.
Place a drain pan under the
servo.
Remove the bolts that attach
the servo cover to the transmission
case.
3.
Remove the three bolts that at-
tach the manual and downshift control
rod splash shield to the frame side rail
and remove the shield. Remove the
reinforcement plate from under the
transmission oil pan.
4.
Loosen the band adjusting screw
lock nut.
5.
Remove the two nuts that attach
the engine rear mounts to the
crossmember.
6. Place a transmission jack under
the transmission and raise it just high
enough to remove the weight from the
crossmember.
7.
Remove the engine rear
support-to-extension housing attaching
bolts and remove the supports.
8. Remove the servo cover, piston,
spring and gasket from the case, turn-
ing the band adjusting screw inward
as the piston is removed. This insures
that there will be enough tension on
the band to keep the struts properly
engaged in the band end notches while
the piston is removed.
Seal Replacement
1.
Apply air pressure to the port in
the servo cover to remove the piston
and rod assembly. If the piston or pis-
ton sealing lips are unserviceable or
damaged, the complete piston and rod
assembly must be replaced.
2.
Remove the seal from the cover
(Fig. 17).
3.
Dip the new seals in transmission
fluid.
4.
Install a new seal on the cover.
5.
Dip the piston and rod assembly
in transmission fluid and install it in
the cover.
Installation
1.
Coat two new gaskets with pe-
troleum jelly and position them on the
servo cover.
2.
Position the servo spring on the
piston rod.
3.
Insert the servo piston rod in the
case.
Secure the cover with the attach-
ing bolts taking care to back off the
band adjusting screw as the cover
bolts are tightened. Make sure that
the transmission identification tag is
installed utfider the lower front cover
bolt.
4.
Adjust the band as detailed in
Section 2.
5.
"Raise the transmission high
enough to install the engine rear sup-
ports.
Secure the supports to the ex-
tension housing with the attaching
bolts.
Lower the transmission as re-
quired to install and torque the
support-to-crossmember nuts.
6. Position the manual and down-
shift control rod splash shield to the
frame side rail and secure it with the
attaching bolts.
7.
Remove the jack.
8. Install the reinforcement plate
and secure it with the attaching bolts.
9. Lower the vehicle and replenish
the fluid as required.
CONTROL VALVE
BODY REPLACEMENT
REMOVAL
1.
Raise the vehicle on a hoist or
jack stands.
2.
On a Lincoln Continental, re-
move the reinforcement plate from
under the oil pan.
3.
Place a drain pan under the
transmission and loosen the bolts to
drain the fluid from the transmission.
4.
Remove the transmission pan at
taching bolts from both sides and the
rear to allow the fluid to drain fur-
ther. Finally, remove the remainder of
the attaching bolts.
5.
Remove the valve body attaching
bolts and remove the valve body from
the case.
INSTALLATION
1.
Position the valve body to the
case making sure that the selector and
downshift levers are engaged, then in-
stall and torque the attaching bolts to
specification.
2.
Clean the fluid pan and gasket
surfaces thoroughly.
3.
Using a new pan gasket, secure
the pan to the transmission case and
torque the attaching bolts to specifica-
tion.procarmanuals.com
Page 382 of 413
07-04-13
C-6 Automatic Transmission
07-04-13
On a Lincoln Continental, install
the reinforcement plate and secure it
with the attaching bolts.
4.
Lower the vehicle and fill the
transmission to the correct level with
the specified fluid.
EXTENSION HOUSING
BUSHING AND REAR
SEAL REPLACEMENT
Too/—
1175-AB
Tool—750T-70O-A
D 1927-A
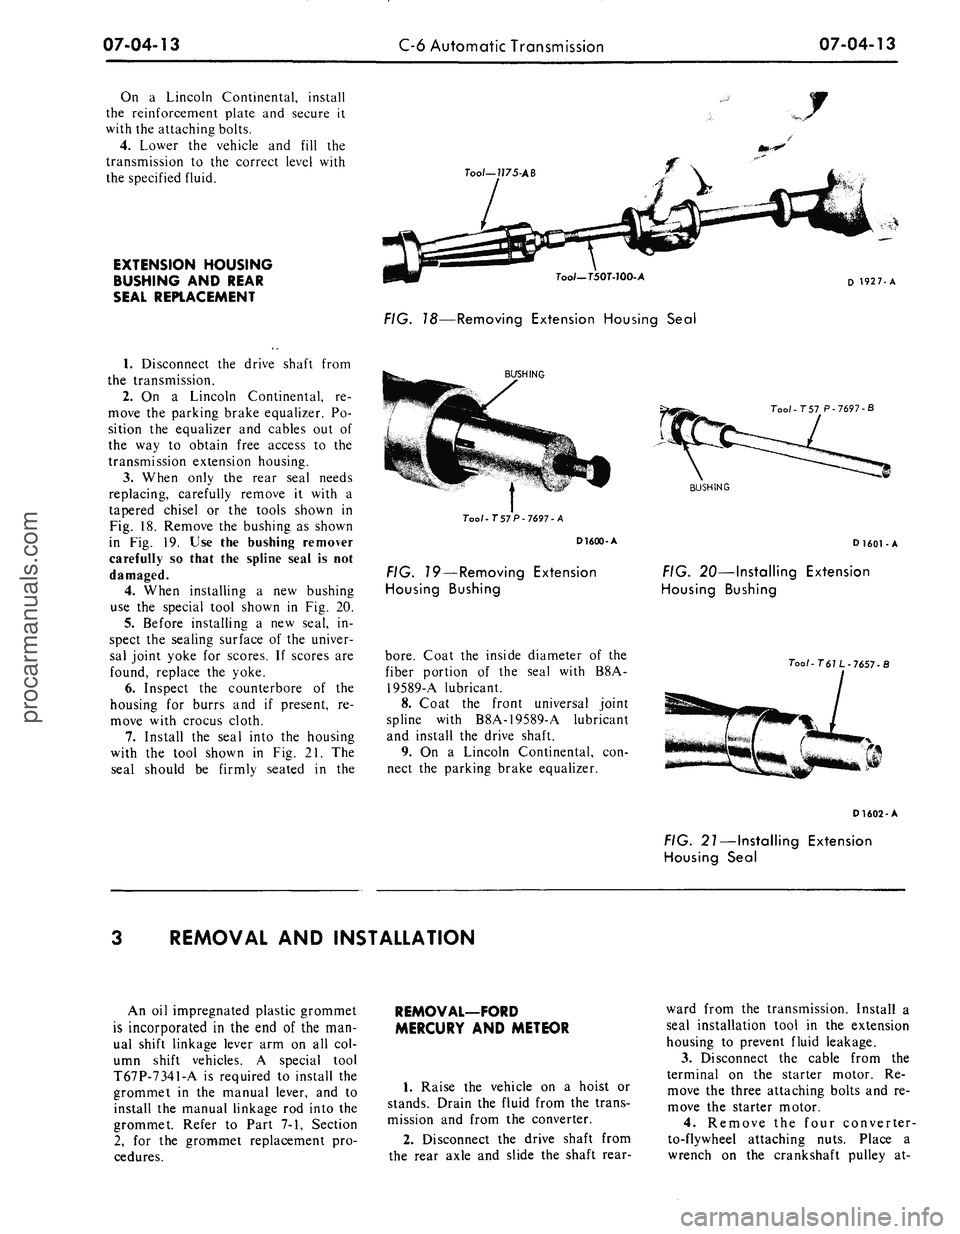
FIG. 18—Removing Extension Housing Seal
1.
Disconnect the drive shaft from
the transmission.
2.
On a Lincoln Continental, re-
move the parking brake equalizer. Po-
sition the equalizer and cables out of
the way to obtain free access to the
transmission extension housing.
3.
When only the rear seal needs
replacing, carefully remove it with a
tapered chisel or the tools shown in
Fig. 18. Remove the bushing as shown
in Fig. 19. Use the bushing remover
carefully so that the spline seal is not
damaged.
4.
When installing a new bushing
use the special tool shown in Fig. 20.
5.
Before installing a new seal, in-
spect the sealing surface of the univer-
sal joint yoke for scores. If scores are
found, replace the yoke.
6. Inspect the counterbore of the
housing for burrs and if present, re-
move with crocus cloth.
7.
Install the seal into the housing
with the tool shown in Fig. 21. The
seal should be firmly seated in the
BUSHING
Too/-757 P-7697-A
D1600-A
FIG. 19—Removing Extension
Housing Bushing
bore.
Coat the inside diameter of the
fiber portion of the seal with B8A-
19589-A lubricant.
8. Coat the front universal joint
spline with B8A-19589-A lubricant
and install the drive shaft.
9. On a Lincoln Continental, con-
nect the parking brake equalizer.
Tool-T 57 P-7697-B
BUSHING
D
1601
-A
FIG. 20—Installing Extension
Housing Bushing
Tool-
T61 L
-
7657-
B
D1602-A
FIG. 21—Installing Extension
Housing Seal
REMOVAL AND INSTALLATION
An oil impregnated plastic grommet
is incorporated in the end of the man-
ual shift linkage lever arm on all col-
umn shift vehicles. A special tool
T67P-7341-A is required to install the
grommet in the manual lever, and to
install the manual linkage rod into the
grommet. Refer to Part 7-1, Section
2,
for the grommet replacement pro-
cedures.
REMOVAL—FORD
MERCURY AND METEOR
1.
Raise the vehicle on a hoist or
stands. Drain the fluid from the trans-
mission and from the converter.
2.
Disconnect the drive shaft from
the rear axle and slide the shaft rear-
ward from the transmission. Install a
seal installation tool in the extension
housing to prevent fluid leakage.
3.
Disconnect the cable from the
terminal on the starter motor. Re-
move the three attaching bolts and re-
move the starter motor.
4.
Remove the four converter-
to-flywheel attaching nuts. Place a
wrench on the crankshaft pulley at-procarmanuals.com
Page 383 of 413
07-04-14
C-6 Automatic Transmission
07-04-14
taching bolt to turn the converter to
gain access to the nuts.
5.
Remove the rear mount to
crossmember attaching bolt.
6. Remove the two crossmember-
to-frame attaching bolts.
7.
Remove the two engine rear
support-to-extension housing attaching
bolts.
8. Disconnect the downshift rod
from the transmission downshift lever.
9. Disconnect the manual linkage
rod from the lever at the transmission.
On a column shift, use tool T67P-
7341-A to remove the rod.
10.
Remove the two bolts securing
the bellcrank bracket to the converter
housing.
11.
Raise the transmission with a
transmission jack to provide clearance
to remove the crossmember.
12.
Remove the rear mount from
the crossmember and remove the
crossmember from the side supports.
13.
Lower the transmission to gain
access to the oil cooler lines.
14.
Disconnect each oil line from
the fittings on the transmission.
15.
Disconnect the vacuum line
from the diaphragm located at the
right rear of the transmission. Remove
the metal line from the retaining clip
on the transmission.
16.
Disconnect the speedometer
cable from the extension housing.
17.
Remove the bolt that secures
the transmission fluid filler tube to the
cylinder block. Lift the filler tube and
the dipstick from the transmission.
18.
Secure the transmission to the
jack with the chain.
19.
Remove the converter housing-
to-cylinder block attaching bolts.
20.
Carefully move the transmission
away from the engine and, at the
same time, lower it to clear the und-
erside of the vehicle.
21.
Remove the converter and
mount the transmission in a holding
fixture.
INSTALLATION—FORD
MERCURY AND METEOR
1.
Torque the two converter drain
plugs to specification.
2.
Install the converter on the sta-
tor support.
3.
Secure the transmission to the
jack with the chain.
4.
Rotate the flywheel to place two
converter mounting stud holes that are
adjacent to the drain plug holes in a
vertical position.
5.
Rotate the converter so that the
studs and drain plugs are in alignment
with those in the flywheel.
6. Move the transmission toward
the cylinder block until they are in
contact. Install and torque the attach-
ing bolts to specification making sure
that the vacuum tube retaining clips
are properly positioned.
7.
Remove the transmission jack
chain from around the transmission.
8. Install a new Oring on the lower
end of the transmission filler tube. In-
sert the tube in the transmission case
and secure the tube to the engine with
the attaching bolt.
9. Connect the speedometer cable
to the extension housing.
10.
Connect the oil cooler lines to
the right side of transmission case.
11.
Connect the vacuum line to the
vacuum diaphragm making sure that
the metal tube is secured in the retain-
ing clip.
12.
Position the cross member on
the side supports. Position the rear
mount on the crossmember and install
the attaching bolt and nut.
13.
Secure the engine rear support
to the extension housing and torque
the bolts to specification.
14.
Lower the transmission and re-
move the jack.
15.
Secure the crossmember to the
side supports with the attaching bolts
and torque them to specification.
16.
Position the bellcrank bracket
to the converter housing and install
the two attaching bolts.
17.
Connect the downshift rod to
the transmission downshift lever.
18.
Connect the selector rod to the
manual lever at the transmission. On
a column shift, use tool T67P-7341-A
and install a new grommet in the
manual lever. Then, secure the manual
selector rod to the lever.
19.
Secure the converter-to-flywheel
attaching nuts and torque them to
specification. Use a wrench on the
crankshaft pulley attaching nut to ro-
tate the flywheel. Do not use a wrench
on the converter attaching nuts to ro-
tate it.
20.
Install the converter housing
dust shield and secure it with the at-
taching bolts.
21.
Secure the starter motor in
place with the attaching bolts. Con-
nect the cable to the terminal on the
starter.
22.
Install the driveshaft.
23.
Adjust the shift linkage as de-
tailed in Section 2.
24.
Lower the vehicle.
25.
Fill the transmission to the cor-
rect level with the specified lubricant.
Start the engine and shift the trans-
mission to all ranges, then recheck the
fluid level.
REMOVAL—FAIRLANE,
MONTEGO, MUSTANG
AND COUGAR
1.
On Mustang and Cougar, dis-
connect the neutral switch wires from
the harness connector and the retain-
ing clip on the dash.
2.
Remove the bolt that secures the
filler tube to the rear of the right
cylinder head.
3.
Raise the vehicle on a hoist or
jack stands.
4.
Remove the converter drain plug
access cover from the lower end of the
converter housing.
5.
Place a drain pan under nhe con-
verter housing and remove the two
converter drain plugs. Install the plugs
after the fluid has drained.
6. Place the drain pan under the
transmission fluid pan. Starting at the
rear of the pan and working toward
the front, loosen the attaching bolts
and allow the fluid to drain. Finally
remove all of the pan attaching bolts
except two at the front, to allow the
fluid to further drain. After the fluid
has drained, install two bolts on the
rear side of the pan to temporarily
hold it in place.
7.
Disconnect the drive shaft from
the rear axle flange and remove it
from the transmission. Install tool
T61L-7657-A in the rear of the exten-
sion housing to prevent the fluid from
leaking.
8. Disconnect the downshift rod
from the transmission downshift lever.
9. Disconnect the shift rod from the
manual lever. On a column shift, use
tool T67P-7341-A to remove the rod.
10.
Disconnect the speedometer
cable from the extension housing.
11.
Disconnect the rubber hose
from the vacuum diaphragm at the
rear of the transmission. Remove the
vacuum tube from the retaining clip at
the transmission.
12.
Disconnect the starter cable
from the terminal on the starter. Re-
move the starter attaching bolts and
remove it from the housing.
13.
Lift the fluid filler tube from
the transmission case.
14.
Remove the four converter-
to-flywheel attaching nuts.
15.
On a Mustang or Cougar, dis-
connect the complete exhaust system
and allow it to hang on the rear axle.
16.
Remove the two nuts that at-
tach the engine rear support to the
crossmember.
17.
Raise the transmission with a
jack just enough to remove the weight
from the crossmember.
18.
Remove the cotter pins from
the crossmember-to-frame side sup-procarmanuals.com
Page 384 of 413
07-04-15
C-6
Automatic Transmission
07-04-15
port attaching nuts and remove the
nuts.
Lift the crossmember from the
frame side supports.
19.
Remove the bolts that attach
the engine rear support to the exten-
sion housing and remove the support.
20.
Lower the transmission, then
disconnect the fluid cooler lines from
the transmission case.
21.
Secure the transmission to the
jack with a chain.
22.
Remove the six bolts that at-
tach the converter housing to the cyl-
inder block.
23.
Move the jack rearward until
the transmission clears the engine,
then tip it forward to provide clear-
ance. Lower the transmission and re-
move it from under the vehicle.
24.
Remove the converter from the
transmission. Mount the transmission
in a holding fixture if repairs are nec-
essary.
INSTALLATION—FAIRLANE,
MONTEGO,
MUSTANG
AND COUGAR
1. Mount the transmission in a
transmission jack and secure it with a
safety chain.
2.
Install the converter on the front
pump.
3.
Rotate the flywheel so that the
drain plug holes are in a vertical posi-
tion. Rotate the converter so that the
drain plugs are in the same relative
position as the drain plug holes in the
flywheel.
4.
Roll the transmission into posi-
tion under the vehicle and raise it to
alignment with the engine. Move it
forward until the converter housing
contacts the cylinder block. Install
and torque the converter-to-cylinder
block attaching bolts.
5.
Remove the jack safety chain
from the transmission.
6. Connect the two fluid cooler
lines to the fittings in the transmission
case.
7.
Secure the engine rear support to
the extension housing with the attach-
ing bolts. Torque the bolts to specifi-
cation.
8. Position the crossmember on the
frame side supports and install and
tighten the attaching nuts to specifica-
tion. Install cotter Dins to retain the
nuts.
9. Remove the transmission jack
from under the vehicle. Install and
torque the engine rear support-
to-crossmember attaching nuts.
10.
Install the exhaust system on
Mustang and Cougar.
11.
Install the converter-to-flywheel
attaching nuts and torque them to
specifications. Tighten the drain plugs
to specification.
12.
Secure the converter drain plug
access cover to the lower end of the
converter housing with the attaching
bolts.
13.
Install a new O-ring on the
lower end of the fluid filler tube. Dip
the O-ring in clean automatic trans-
mission fluid and insert the filler tube
in the transmission case.
14.
Secure the starter to the con-
verter housing. Connect the cable to
the terminal on the starter.
15.
Connect the speedometer cable
to the extension housing.
16.
Connect the shift rod to the
manual lever at the transmission. On
a column shift, use tool T67P-7341-A
and install a new grommet in the
manual lever. Then, secure the manual
selector rod to the lever.
17.
Connect the downshift rod to
the lever on the transmission. Adjust
the rod.
18.
Remove the tool from the ex-
tension housing and install the drive
shaft.
19.
Lower the vehicle.
20.
Working from the engine com-
partment, secure the fluid filler tube
to the rear of the right cylinder head
with the attaching bolt.
21.
On Mustang and Cougar, con-
nect the neutral switch wires to the
harness. Secure the wires to the dash
with the retaining clip.
22.
Fill the transmission with the
specified lubricant as detailed in Part
7-1.
REMOVAL—THUNDERBIRD
1. Working from the engine com-
partment, remove the fluid filler tube
bracket attaching screw that secures it
to the rear of the right cylinder head.
Lift the tube and dipstick from the
transmission.
2.
Remove the starting motor upper
attaching bolt using a long extension.
3.
Remove the two converter hous-
ing upper attaching bolts.
4.
Raise the vehicle on a hoist or
stands.
5.
Remove the dust shield from the
front lower end of the converter hous-
ing.
6. Crank the engine until one of the
converter drain plugs is accessible.
Then, remove the plug.
7.
Crank the engine until the other
plug is at the bottom. Place a drain
pan to catch the fluid, then remove
the pan and allow the fluid to drain.
8. Remove the drive shaft.
9. Remove the frame side rail sup-
port brace attaching bolts and remove
the brace.
10.
After the fluid has been drained
from the converter, install the plug.
11.
Place the drain pan under the
transmission pan and loosen the at-
taching bolts and allow the fluid to
drain. Finally remove all of the pan
attaching bolts except two, to allow
the oil to further drain. After the fluid
has drained, install two bolts on the
opposite side of the pan to temporari-
ly hold it in place.
12.
Remove the converter-
to-flywheel attaching nuts.
13.
Disconnect the downshift link-
age from the transmission downshift
lever.
14.
Using tool T67P-7341-A, re-
move the selector rod from the manu-
al lever.
15.
Remove the two screws that at-
tach the shift rod bellcrank bracket to
the converter housing and remove the
bracket.
16.
Disconnect the vacuum dia-
phragm hose from the upper end of
the vacuum tube.
17.
Disconnect the speedometer
cable from the extension housing and
place it to one side.
18.
Remove the starting motor two
lower attaching bolts and place the
motor to one side.
19.
Disconnect the two oil cooler
lines from the right side of the trans-
mission.
20.
Disconnect the muffler inlet
pipes at the exhaust manifolds and
allow the pipes to hang.
21.
Remove the vibration absorber
from the extension housing.
22.
Remove the two engine rear
support-to-extension housing attaching
bolts.
23.
Place a transmission jack under
the transmission and raise it just
enough to remove the weight from the
support.
24.
Remove the two support attach-
ing bolts and remove the support.
25.
Lower the jack just enough to
remove the weight.
26.
Remove the four remaining
converter housing-to-cylinder block at-
taching bolts and the accelerator link-
age stop from the left side of the
housing.
27.
Carefully lower the transmis-
sion and remove it from under the ve-
hicle.
28.
Remove the converter and
mount the transmission in a holding
fixture.procarmanuals.com
Page 385 of 413
07-04-16
C-6 Automatic Transmission
07-04-16
INSTALLATION—
THUNDERBIRD
1.
Torque the two converter drain
plugs to specification.
2.
Install the converter on the sta-
tor support.
3.
Secure the transmission on a
transmission jack.
4.
Rotate the converter so that the
studs and drain plugs are in alignment
with their holes in the flywheel.
5.
Move the transmission toward
the cylinder block until they contact
each other. Install and torque the at-
taching bolts to specification. Before
tightening the center bolt on the left
side,
make sure that the accelerator
linkage stop bracket is properly posi-
tioned so that the left upper bolt may
be installed later.
6. Connect the fluid cooler lines to
their fittings on the right side of the
transmission.
7.
Raise the transmission and in-
stall the engine rear support and tor-
que the bolts to specification. Make
sure that the hand brake equalizer is
positioned properly.
8. Lower the transmission and re-
move the jack.
9. Install the engine rear support-
to-extension housing attaching bolts.
10.
Install the drive shaft.
11.
Connect the speedometer cable
to the extension housing.
12.
Position the starting motor on
the converter housing and secure it
with the two lower bolts.
13.
Install the torque converter-
to-flywheel attaching nuts and torque
them to specification.
14.
Install the converter housing
dust shield.
15.
Secure the frame side rail sup-
port brace with the attaching bolts
and lock washers. Torque the bolts to
specification.
16.
Connect the downshift rod to
the transmission downshift lever.
17.
Connect the vacuum diaphragm
hose to the upper end of the vacuum
tube.
18.
Using Tool T67P-7341-A, in-
stall a new grommet in the manual
lever. Then, secure the manual selec-
tor rod to the lever.
19.
Position the vibration absorber
to the transmission extension housing
and secure it with the three attaching
bolts.
20.
Connect the muffler inlet pipes
to the exhaust manifolds.
21.
Lower the vehicle and install
the two converter housing upper bolts
and torque them to specification.
22.
Install the starting motor upper
bolt.
23.
Place a new O-ring on the end
of the fluid filler tube and insert it in
the transmission case. Secure the tube
to the rear of the right cylinder head
with the attaching screw and lock
washer.
24.
Fill the transmission to the
proper level with the specified fluids.
25.
Adjust the manual and throttle
linkage as required.
REMOVAL-
CONTINENTAL MARK III
1.
Working from the engine com-
partment, lift the fluid filler tube dio-
stick from the transmission.
2.
Raise the vehicle on a hoist or
stands.
3.
Remove the dust shield from the
front lower end of the converter hous-
ing.
4.
Crank the engine until one of the
converter drain plugs is accessible.
Then, remove the plug.
5.
Crank the engine until the other
plug is at the bottom. Place a drain
pan to catch the fluid, then remove
the pan and allow the fluid to drain.
6. Remove the driveshaft.
7.
Remove the frame side rail sup-
port brace attaching bolts and remove
the brace.
8. After the fluid has been drained
from the converter, install the plug.
9. Place the drain pan under the
transmission pan and loosen the at-
taching bolts and allow the fluid to
drain. Finally remove all of the pan
attaching bolts except two, to allow
the oil to further drain. After the fluid
has drained, install two bolts on the
opposite side of the pan to temporari-
ly hold it in place.
10.
Remove the. converter-
to-flywheel attaching nuts.
11.
Disconnect the downshift link-
age from the transmission downshift
lever.
12.
Using tool T67P-7341-A, re-
move the selector rod from the manu-
al lever.
13.
Remove the two screws that at-
tach the shift rod bellcrank bracket to
the converter housing and remove the
bracket.
14.
Disconnect the vacuum dia-
phragm hose at the transmission.
15.
Disconnect the speedometer
cable from the extension housing and
place it to one side.
16.
Remove the two idler arm
bracket retaining bolts at the frame
side rail and allow the linkage to
hang.
17.
Disconnect the starter cable
from the terminal on the starter. Re-
move the starter attaching bolts and
remove it from the housing.
18.
Remove the clip securing the oil
cooler lines to the support bracket.
19.
Disconnect the two oil cooler
lines from the right side of the trans-
mission.
20.
Disconnect the muffler inlet
pipes at the exhaust manifolds and
allow the pipes to hang.
21.
Remove the vibration absorber
from the extension housing.
22.
Remove the engine rear support
to extension housing attaching bolts.
23.
Place a transmission jack under
the transmission and raise it just
enough to remove the weight from the
support.
24.
Remove the two support attach-
ing bolts and remove the support.
25.
Lower the jack and secure the
transmission to the jack with a safety
chain.
26.
Remove the bolt that secures
the filler tube to the rear of the right
cylinder head and lift the tube from
the transmission case.
27.
Remove the six converter
housing-to-cylinder block attaching
bolts.
28.
Carefully lower the transmis-
sion and remove it from under the ve-
hicle.
29.
Remove the converter and
mount the transmission in a holding
fixture.
INSTALLATION—
CONTINENTAL MARK III
1.
Torque the two converter drain
plugs to specification.
2.
Install the converter on the sta-
tor support.
3.
Secure the transmission on a
transmission jack.
4.
Rotate the converter so that the
studs and drain plugs are in alignment
with their holes in the flywheel.
5.
Move the transmission toward
the cylinder block until they contact
each other. Install and torque the at-
taching bolts to specification
6. Remove the jack safety chain
from the transmission.
7.
Connect the fluid cooler lines to
their fittings on the right side of the
transmission.
8. Install a new O-ring on the lower
end of the fluid filler tube. Dip the
O-ring in clean automatic transmis-
sion fluid and insert the tube in the
transmission case. Install the attach-
ing bolt.procarmanuals.com
Page 386 of 413
07-04-17
C-6 Automatic Transmission
07-04-17
9. Raise the transmission and in-
stall the engine rear support and tor-
que the bolts to specification.
10.
Lower the transmission and re-
move the jack.
11.
Install the engine rear support-
to-extension housing attaching bolts.
12.
Install the drive shaft.
13.
Connect the speedometer cable
to the extension housing.
14.
Connect the muffler inlet pipes
to the exhaust manifolds.
15.
Position the starting motor on
the converter housing and secure it
with the attaching bolts. Connect the
cable to the terminal on the starter.
16.
Position the idler arm bracket
to the frame side rail and install the
attaching bolts.
17.
Install the torque converter-
to-flywheel attaching nuts and torque
them to specification.
18.
Install the converter housing
dust shield.
19.
Secure the frame side rail sup-
port brace with the attaching bolts
and lock washers. Torque the bolts to
specification.
20.
Connect the downshift rod to
the transmission downshift lever.
21.
Using Tool T67P-7341-A, in-
stall a new grommet in the manual
lever. Then, secure the manual selec-
tor rod to the lever.
22.
Connect the vacuum hose to the
vacuum diaphragm.
23.
Install the oil cooler line retain-
ing clip at the transmission support.
24.
Position the vibration absorber
to the transmission extension housing
and secure it with the three attaching
bolts.
25.
Lower the vehicle.
26.
Fill the transmission to the
proper level with the specified fluids.
27.
Adjust the manual and throttle
linkage as required.
REMOVAL-
LINCOLN CONTINENTAL
1.
Raise the hood and remove the
transmission dipstick.
2.
Raise the vehicle on a hoist. Re-
move the bolt that secures the trans-
mission filler tube to the cylinder
head.
3.
Remove the bolts that attach the
reinforcement plate at the rear of the
transmission oil pan and remove the
plate.
4.
Remove the three bolts that at-
tach the manual and downshift control
rod splash shield to the side rail and
remove the shield.
5.
Place a drain pan under the
transmission. Loosen all transmission
pan attaching bolts and allow the fluid
to drain. Remove the bolts from the
rear and both sides of the pan to
allow further drainage; then, finally
remove the pan. After all fluid has
been drained, install the pan using
four attaching bolts.
6. Remove the two bolts that attach
the cover to the lower end of the con-
verter housing.
7.
Remove the two front support
bracket bolts at the converter housing.
8. Remove the two drain plugs
from the converter and allow it to
drain.
9. Remove the four nuts that attach
the converter to the flywheel.
10.
Lift the fluid filler tube from
the transmission case.
11.
Remove the two idler arm
bracket bolts from the frame side rail
and allow the idler arm to hang free.
12.
Disconnect the starter cable
from the starter. Remove the starter
attaching bolts and remove the starter.
13.
Disconnect the oil cooler lines
from the transmission.
14.
Disconnect the vacuum hose
from the diaphragm.
15.
Loosen the parking brake ad-
justing nut at the equalizer and re-
move the retracting spring. Disconnect
the rear brake cables and remove the
equalizer from the bracket.
16.
Disconnect the speedometer
cable from the extension housing.
17.
Disconnect the drive shaft from
the transmission flange and position
the shaft out of the way.
18.
Disconnect the downshift rod
from the transmission downshift lever.
19.
Using tool T67P-7341-A, re-
move the manual selector rod from
the manual lever.
20.
Remove the lower bellcrank at-
taching bolts and remove the bell-
crank.
21.
Pry the upper bellcrank out of
the converter housing and allow it to
hang free.
22.
Remove the cooler lines from
the clip at the cylinder head.
23.
Remove the converter housing-
to-cylinder block lower attaching
bolts.
24.
Remove the two nuts that at-
tach the engine rear mounts to the
crossmember.
25.
Place a transmission jack under
the transmission and raise it just high
enough to remove the weight from the
crossmember.
26.
Remove the engine rear
support-to-extension housing attaching
bolts and remove the supports.
27.
Remove the crossmember-
to-frame attaching nuts and remove
the crossmember.
28.
Secure the transmission to the
jack with the safety chain. Lower the
transmission and remove the upper
converter housing-to-cylinder block at-
taching bolts.
29.
Move the transmission away
from the cylinder block.
30.
Carefully lower the transmis-
sion and remove it from under the ve-
hicle.
31.
Remove the converter and mount
the transmission in a holding fixture.
INSTALLATION-
LINCOLN CONTINENTAL
1.
Torque the two converter drain
plugs to specification.
2.
Install the converter on the sta-
tor support.
3.
Secure the transmission on a
transmission jack.
4.
Rotate the converter so that the
studs and drain plugs are in alignment
with those in the flywheel.
5.
Move the transmission toward the
cylinder block until they contact each
other. Install and torque the attaching
bolts to specification.
6. Secure the converter to the fly-
wheel with the four attaching nuts.
Torque the nuts to specification.
7.
Secure the converter access cover
to the converter housing with the at-
taching bolts.
8. Secure the two front support
brackets to the converter housing with
the attaching bolts.
9. Raise the transmission high en-
ough to position the crossmember. In-
stall the bolts, but do not tighten at
this time.
10.
Secure the engine rear support
to the extension housing and torque
the bolts to specification. At this time,
install and torque the crossmember-
to-frame attaching nuts to specifica-
tion.
11.
Lower the transmission and in-
stall the engine rear support-
to-crossmember attaching nuts and
plates.
Torque the •"its to specifica-
tion. Remove the transmission jack.
12.
Install the upper bellcrank in
the left side of the converter housing.
13.
Position the lower bellcrank to
the transmission and floor pan and se-
cure it with the two attaching bolts.
14.
Connect the downshift rod to
transmission downshift lever.
15.
Using tool T67P-7341-A, install
a new grommet in the manual lever.
Then, secure the manual selector rod
to the lever.procarmanuals.com
Page 387 of 413
07-04-18
C-6 Automatic Transmission
07-04-18
16.
Position the manual and down-
shift control rod splash shield to the
frame side rail and secure it with the
attaching bolts.
17.
Connect the speedometer cable
to the extension housing.
18.
Connect the vacuum hose to the
vacuum diaphragm and secure with a
clamp.
19.
Connect the two oil cooler lines
to the fittings on the right side of the
case.
20.
Install the cooler lines under
the clip at the cylinder head.
21.
Position the reinforcement plate
and torque the attaching bolts.
22.
Install the equalizer and park-
ing brake cables. Install the equalizer
lever retracting spring.
23.
Install the drive shaft.
24.
Install a new seal on the filler
tube and install it in the transmission
case.
Secure the filler tube to the cyl-
inder head.
25.
Install the starting motor and
connect the cable.
26.
Install the idler arm bracket-
to-frame side rail.
27.
Lower the vehicle.
28.
Fill the transmission to the cor-
rect level with the specified fluid.
29.
Adjust the manual and throttle
linkage as required.
MAJOR REPAIR OPERATIONS
DISASSEMBLY OF
TRANSMISSION
1.
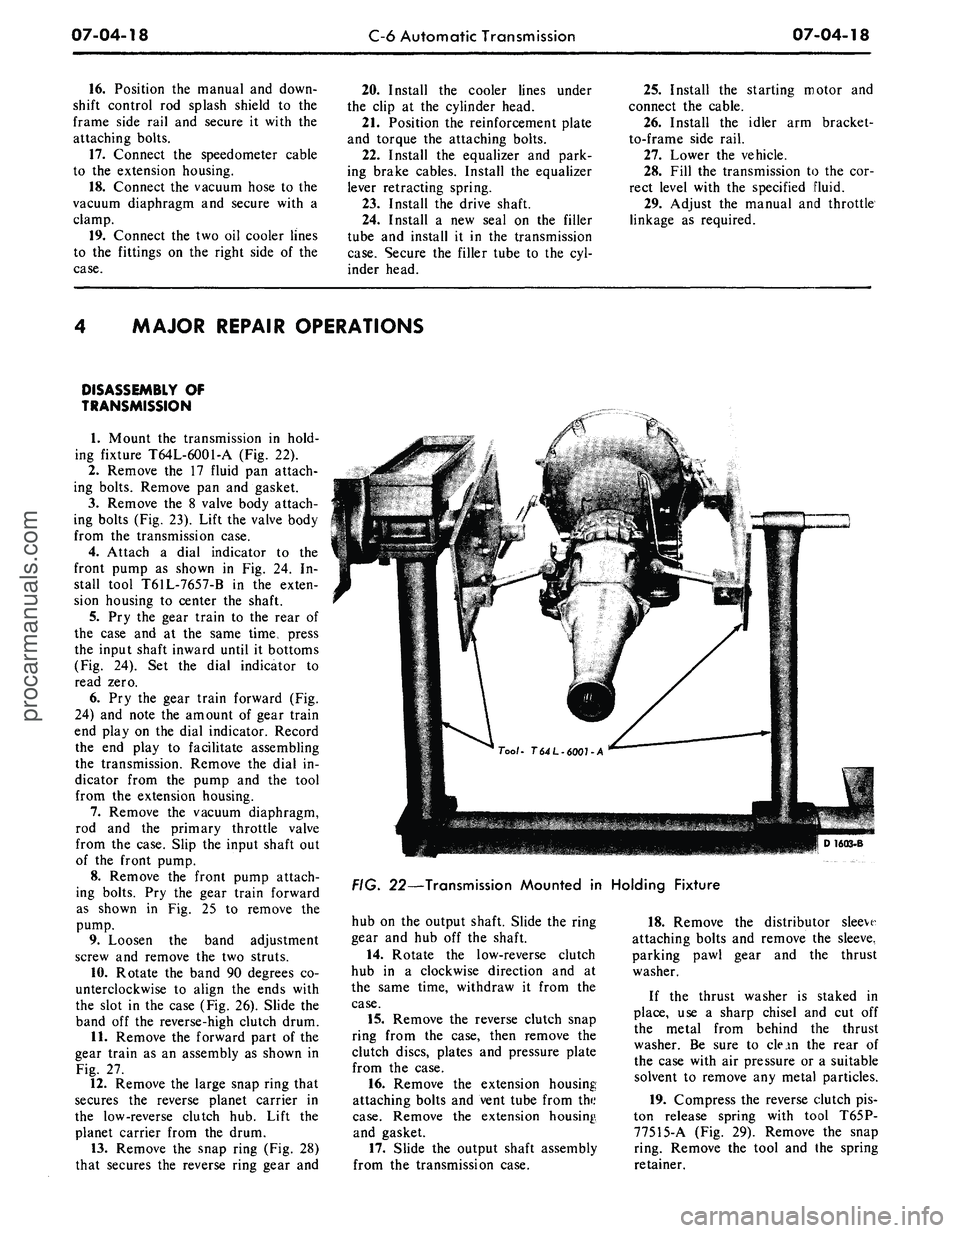
Mount the transmission in hold-
ing fixture T64L-6001-A (Fig. 22).
2.
Remove the 17 fluid pan attach-
ing bolts. Remove pan and gasket.
3.
Remove the 8 valve body attach-
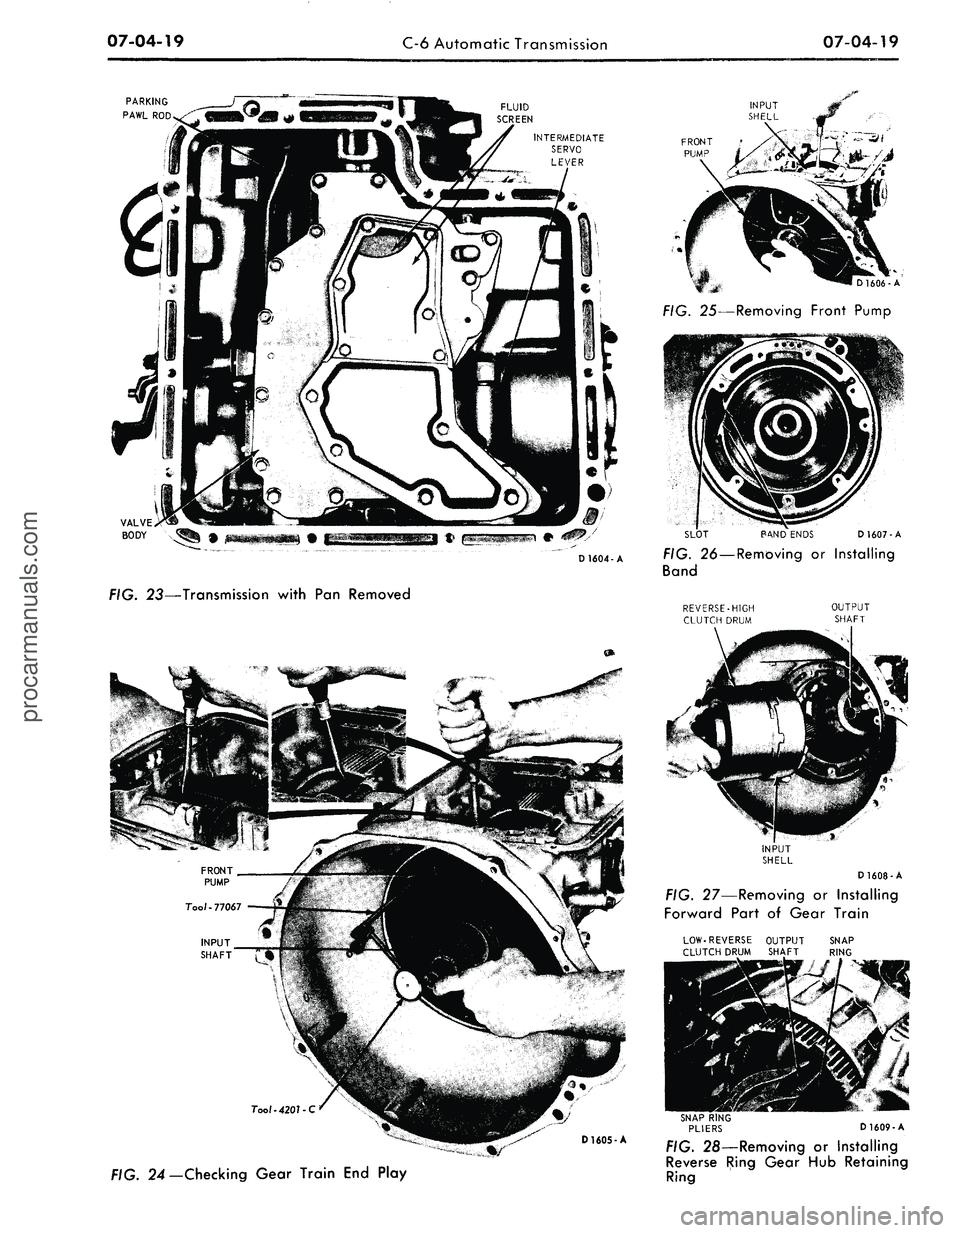
ing bolts (Fig. 23). Lift the valve body
from the transmission case.
4.
Attach a dial indicator to the
front pump as shown in Fig. 24. In-
stall tool T61L-7657-B in the exten-
sion housing to center the shaft.
5.
Pry the gear train to the rear of
the case and at the same time, press
the input shaft inward until it bottoms
(Fig. 24). Set the dial indicator to
read zero.
6. Pry the gear train forward (Fig.
24) and note the amount of gear train
end play on the dial indicator. Record
the end play to facilitate assembling
the transmission. Remove the dial in-
dicator from the pump and the tool
from the extension housing.
7.
Remove the vacuum diaphragm,
rod and the primary throttle valve
from the case. Slip the input shaft out
of the front pump.
8. Remove the front pump attach-
ing bolts. Pry the gear train forward
as shown in Fig. 25 to remove the
pump.
9. Loosen the band adjustment
screw and remove the two struts.
10.
Rotate the band 90 degrees co-
unterclockwise to align the ends with
the slot in the case (Fig. 26). Slide the
band off the reverse-high clutch drum.
11.
Remove the forward part of the
gear train as an assembly as shown in
Fig. 27.
12.
Remove the large snap ring that
secures the reverse planet carrier in
the low-reverse clutch hub. Lift the
planet carrier from the drum.
13.
Remove the snap ring (Fig. 28)
that secures the reverse ring gear and
D16Q3-B
FIG. 22—Transmission Mounted in Holding Fixture
hub on the output shaft. Slide the ring
gear and hub off the shaft.
14.
Rotate the low-reverse clutch
hub in a clockwise direction and at
the same time, withdraw it from the
case.
15.
Remove the reverse clutch snap
ring from the case, then remove the
clutch discs, plates and pressure plate
from the case.
16.
Remove the extension housing
attaching bolts and vent tube from the
case.
Remove the extension housing,
and gasket.
17.
Slide the output shaft assembly
from the transmission case.
18.
Remove the distributor sleeve
attaching bolts and remove the sleeve,
parking pawl gear and the thrust
washer.
If the thrust washer is staked in
place, use a sharp chisel and cut off
the metal from behind the thrust
washer. Be sure to clean the rear of
the case with air pressure or a suitable
solvent to remove any metal particles.
19.
Compress the reverse clutch pis-
ton release spring with tool T65P-
77515-A (Fig. 29). Remove the snap
ring. Remove the tool and the spring
retainer.procarmanuals.com
Page 388 of 413
07-04-19
C-6 Automatic Transmission
07-04-19
PARKING
PAWL
ROD
FLUID
SCREEN
INTERMEDIATE
SERVO
LEVER
FIG. 23—Transmission with Pan Removed
Tool-4201-C
D1605-A
D 1606-A
FIG. 25—Removing Front Pump
SLOT
BAND ENDS
D 1607-A
FIG. 26—Rembving or Installing
Band
REVERSE-HIGH OUTPUT
CLUTCH DRUM SHAFT
D 1608 -A
FIG. 27—Removing or Installing
Forward Part of Gear Train
LOW-REVERSE OUTPUT SNAP
CLUTCH DRUM SHAFT RING
D1609-A
FIG. 24— Checking Gear Train End Play
FIG. 28—Removing or Installing
Reverse Ring Gear Hub Retaining
Ringprocarmanuals.com
Page 389 of 413
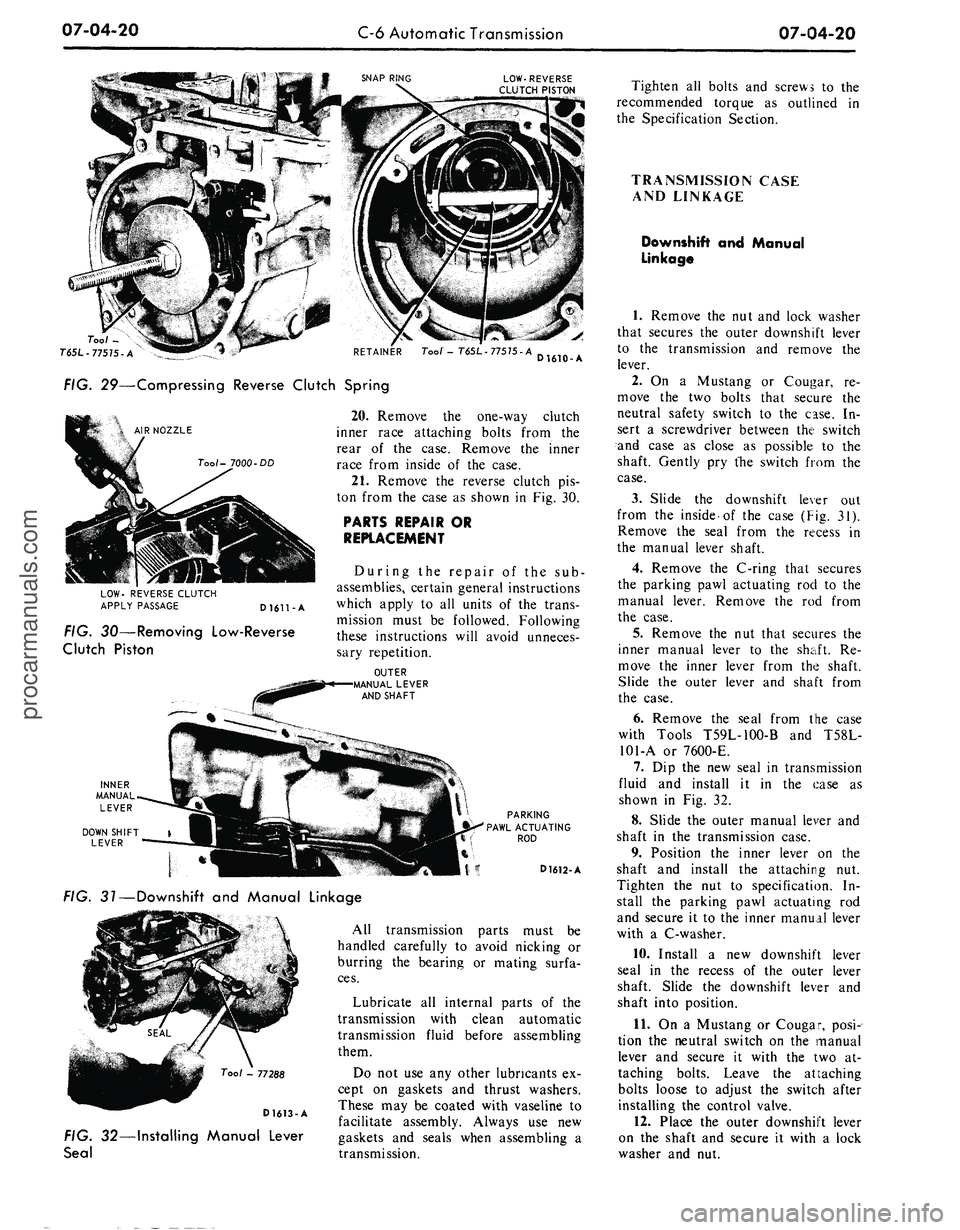
07-04-20
C-6 Automatic Transmission
07-04-20
SNAP RING
LOW-REVERSE
CLUTCH PISTON
Tool -
T6SL-77515-A
RETAINER Toof - T65L- 77575- A
D1610-A
FIG. 29—Compressing Reverse Clutch Spring
AIR NOZZLE
Tool- 7000- DD
LOW- REVERSE CLUTCH
APPLY PASSAGE
D1611-A
FIG. 30—Removing Low-Reverse
Clutch Piston
20.
Remove the one-way clutch
inner race attaching bolts from the
rear of the case. Remove the inner
race from inside of the case.
21.
Remove the reverse clutch pis-
ton from the case as shown in Fig. 30.
PARTS REPAIR OR
REPLACEMENT
During the repair of the sub-
assemblies, certain general instructions
which apply to all units of the trans-
mission must be followed. Following
these instructions will avoid unneces-
sary repetition.
OUTER
MANUAL LEVER
AND SHAFT
PARKING
PAWL ACTUATING
ROD
D1612-A
FIG. 31—Downshift and Manual Linkage
7"oo/ - 77288
D1613-A
FIG. 32—Installing Manual Lever
Seal
All transmission parts must be
handled carefully to avoid nicking or
burring the bearing or mating surfa-
ces.
Lubricate all internal parts of the
transmission with clean automatic
transmission fluid before assembling
them.
Do not use any other lubricants ex-
cept on gaskets and thrust washers.
These may be coated with vaseline to
facilitate assembly. Always use new
gaskets and seals when assembling a
transmission.
Tighten all bolts and screws to the
recommended torque as outlined in
the Specification Section.
TRANSMISSION CASE
AND LINKAGE
Downshift and Manual
Linkage
1.
Remove the nut and lock washer
that secures the outer downshift lever
to the transmission and remove the
lever.
2.
On a Mustang or Cougar, re-
move the two bolts that secure the
neutral safety switch to the case. In-
sert a screwdriver between the switch
and case as close as possible to the
shaft. Gently pry the switch from the
case.
3.
Slide the downshift lever out
from the inside-of the case (Fig. 31).
Remove the seal from the recess in
the manual lever shaft.
4.
Remove the C-ring that secures
the parking pawl actuating rod to the
manual lever. Remove the rod from
the case.
5.
Remove the nut that secures the
inner manual lever to the shaft. Re-
move the inner lever from the shaft.
Slide the outer lever and shaft from
the case.
6. Remove the seal from the case
with Tools T59L-1OO-B and T58L-
101-A or 7600-E.
7.
Dip the new seal in transmission
fluid and install it in the case as
shown in Fig. 32.
8. Slide the outer manual lever and
shaft in the transmission case.
9. Position the inner lever on the
shaft and install the attaching nut.
Tighten the nut to specification. In-
stall the parking pawl actuating rod
and secure it to the inner manual lever
with a C-washer.
10.
Install a new downshift lever
seal in the recess of the outer lever
shaft. Slide the downshift lever and
shaft into position.
11.
On a Mustang or Cougar, posi-
tion the neutral switch on the manual
lever and secure it with the two at-
taching bolts. Leave the attaching
bolts loose to adjust the switch after
installing the control valve.
12.
Place the outer downshift lever
on the shaft and secure it with a lock
washer and nut.procarmanuals.com
Page 390 of 413
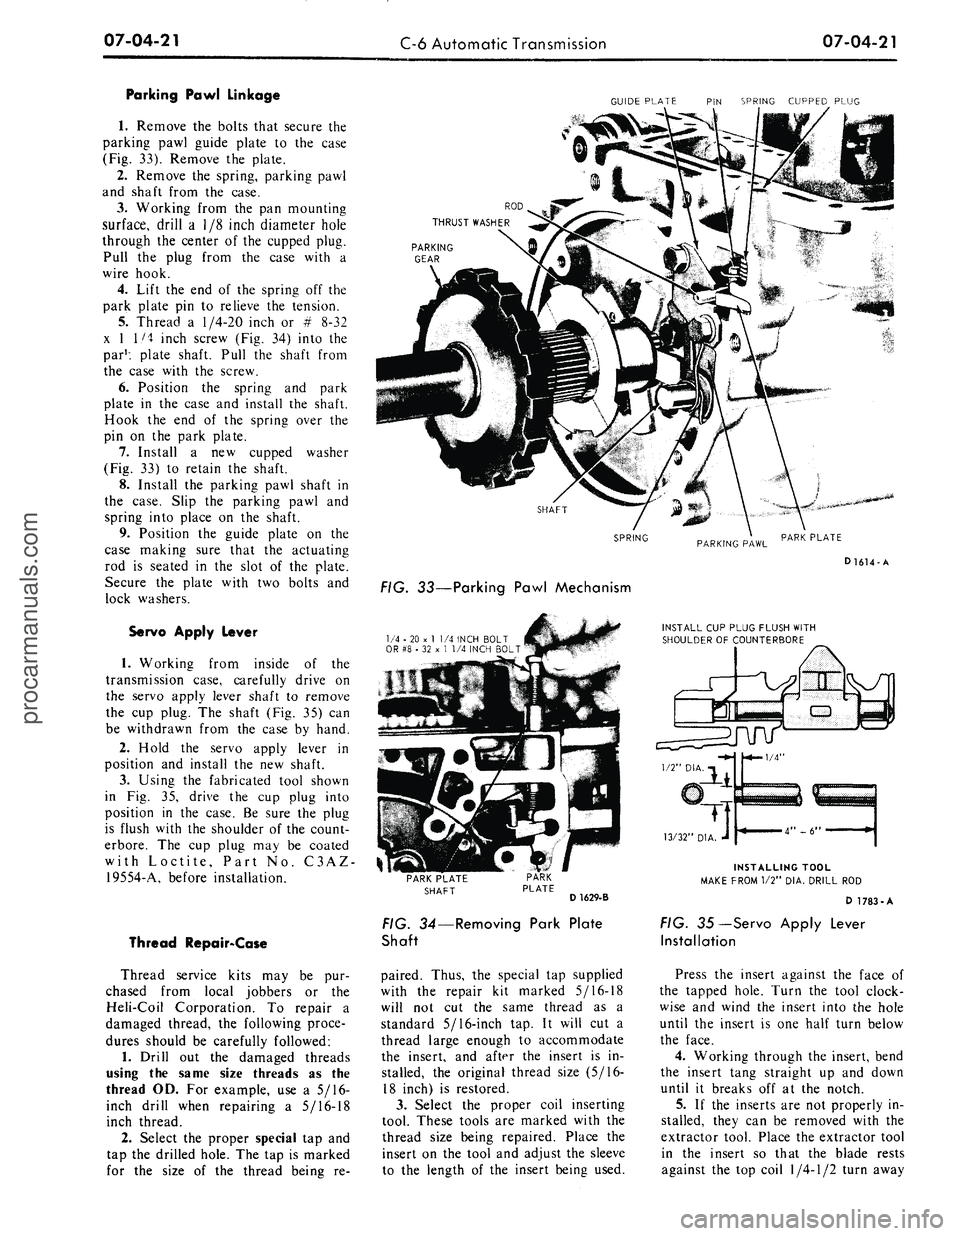
07-04-21
C-6 Automatic Transmission
07-04-21
Parking Pawl Linkage
1.
Remove the bolts that secure the
parking pawl guide plate to the case
(Fig. 33). Remove the plate.
2.
Remove the spring, parking pawl
and shaft from the case.
3.
Working from the pan mounting
surface, drill a 1/8 inch diameter hole
through the center of the cupped plug.
Pull the plug from the case with a
wire hook.
4.
Lift the end of the spring off the
park plate pin to relieve the tension.
5.
Thread a
1/4-20
inch or # 8-32
x 1 1/4 inch screw (Fig. 34) into the
par1: plate shaft. Pull the shaft from
the case with the screw.
6. Position the spring and park
plate in the case and install the shaft.
Hook the end of the spring over the
pin on the park plate.
7.
Install a new cupped washer
(Fig. 33) to retain the shaft.
8. Install the parking pawl shaft in
the case. Slip the parking pawl and
spring into place on the shaft.
9. Position the guide plate on the
case making sure that the actuating
rod is seated in the slot of the plate.
Secure the plate with two bolts and
lock washers.
Servo Apply Lever
1.
Working from inside of the
transmission case, carefully drive on
the servo apply lever shaft to remove
the cup plug. The shaft (Fig. 35) can
be withdrawn from the case by hand.
2.
Hold the servo apply lever in
position and install the new shaft.
3.
Using the fabricated tool shown
in Fig. 35, drive the cup plug into
position in the case. Be sure the plug
is flush with the shoulder of the count-
erbore. The cup plug may be coated
with Loctite, Part No. C3AZ-
19554-A, before installation.
Thread Repair-Case
Thread service kits may be pur-
chased from local jobbers or the
Heli-Coil Corporation. To repair a
damaged thread, the following proce-
dures should be carefully followed:
1.
Drill out the damaged threads
using the same size threads as the
thread OD. For example, use a 5/16-
inch drill when repairing a 5/16-18
inch thread.
2.
Select the proper special tap and
tap the drilled hole. The tap is marked
for the size of the thread being re-
GUIDE PLATE PIN SPRING CUPPED PLUG
PARKING
GEAR
SHAFT
SPRING
PARKING PAWL
PARK PLATE
D1614-A
FIG. 33—Parking Pawl Mechanism
1/4 - 20 x
1
1/4 INCH BOLT
OR #8 • 32 x 1 1/4 INCH BOLT
INSTALL CUP PLUG FLUSH WITH
SHOULDER OF COUNTERBORE
PARK PLATE
SHAFT
D 1629-B
FIG. 34—Removing Park Plate
Shaft
paired. Thus, the special tap supplied
with the repair kit marked 5/16-18
will not cut the same thread as a
standard 5/16-inch tap. It will cut a
thread large enough to accommodate
the insert, and after the insert is in-
stalled, the original thread size (5/16-
18 inch) is restored.
3.
Select the proper coil inserting
tool. These tools are marked with the
thread size being repaired. Place the
insert on the tool and adjust the sleeve
to the length of the insert being used.
INSTALLING TOOL
MAKE FROM 1/2" DIA. DRILL ROD
D 1783-A
FIG. 35—Servo Apply Lever
Installation
Press the insert against the face of
the tapped hole. Turn the tool clock-
wise and wind the insert into the hole
until the insert is one half turn below
the face.
4.
Working through the insert, bend
the insert tang straight up and down
until it breaks off at the notch.
5.
If the inserts are not properly in-
stalled, they can be removed with the
extractor tool. Place the extractor tool
in the insert so that the blade rests
against the top coil
1/4-1/2
turn awayprocarmanuals.com