ISUZU TROOPER 1995 Workshop Manual
Manufacturer: ISUZU, Model Year: 1995, Model line: TROOPER, Model: ISUZU TROOPER 1995Pages: 1928
Page 1471 of 1928
CHASSIS ELECTRICAL 8-281
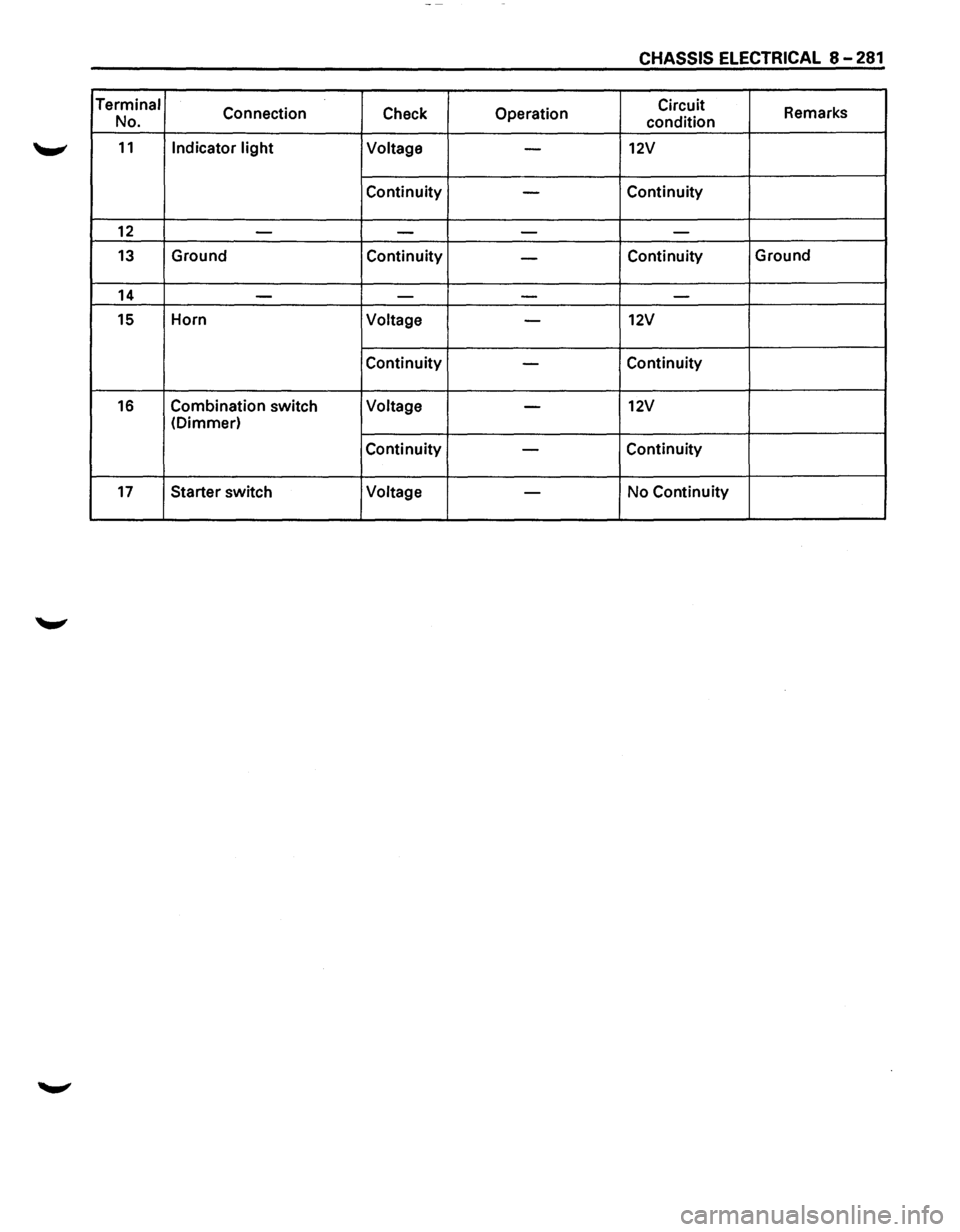
Terminal
Connection Check Operation Circuit
Remarks
No. condition
11 Indicator light Voltage -12V
Continuity -Continuity
12 ----
13 Ground
Continuity -Continuity Ground
14 ---
-
15 Horn
Voltage -12V
Continuity -Continuity
16 Combination switch Voltage -12V
(Dimmer)
Continuity
-Continuity
17 Starter switch Voltage -No
Continuity
Page 1472 of 1928
8-282 CHASSIS ELECTRICAL
ENGINE HOOD SWITCH
~ INSPECTION
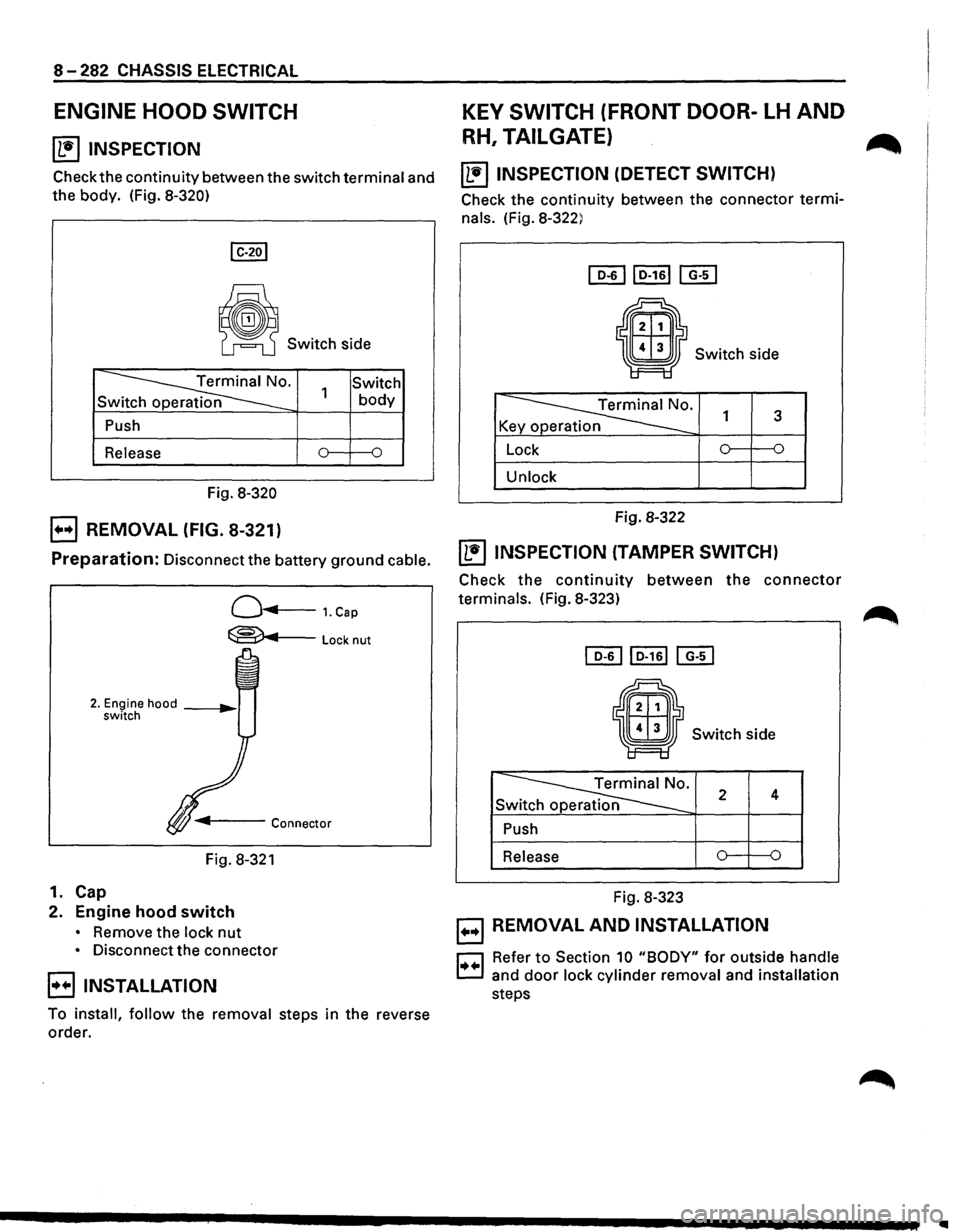
Check the continuity between the switch terminal and
the body. (Fig. 8-320)
~ Switch side
~· Sw
Push
Release
Fig.
8-320
E) REMOVAL (FIG. 8-321)
Switch 1 body
Preparation: Disconnect the battery ground cable.
Q...,..,...___ 1. Cap
~Locknut
Fig. 8-321
1. Cap
2. Engine hood switch
• Remove the lock nut
• Disconnect the connector
B INSTALLATION
To install, follow the removal steps in the reverse
order.
KEY SWITCH (FRONT DOOR-LH AND
RH, TAILGATE) ...
~ INSPECTION (DETECT SWITCH)
Check the continuity between the connector termi
nals. (Fig. 8-322)
Switch side
~· K y p 1 3
Lock 0 {)
Unlock
Fig. 8-322
~ INSPECTION (TAMPER SWITCH)
Check the continuity between the connector
terminals. (Fig. 8-323)
• Switch side
~· Sw 2 4
Push
Release
Fig. 8-323
B REMOVAL AND INSTALLATION
r::J Refer to Section 10 "BODY" for outside handle
c:.:J and door lock cylinder removal and installation
steps
Page 1473 of 1928
DOOR LOCK ACTUATOR (fRT DOOR
LH & RH, RR DOOR -LH & RH, TAIL-
~ GATE)
~ INSPECTION
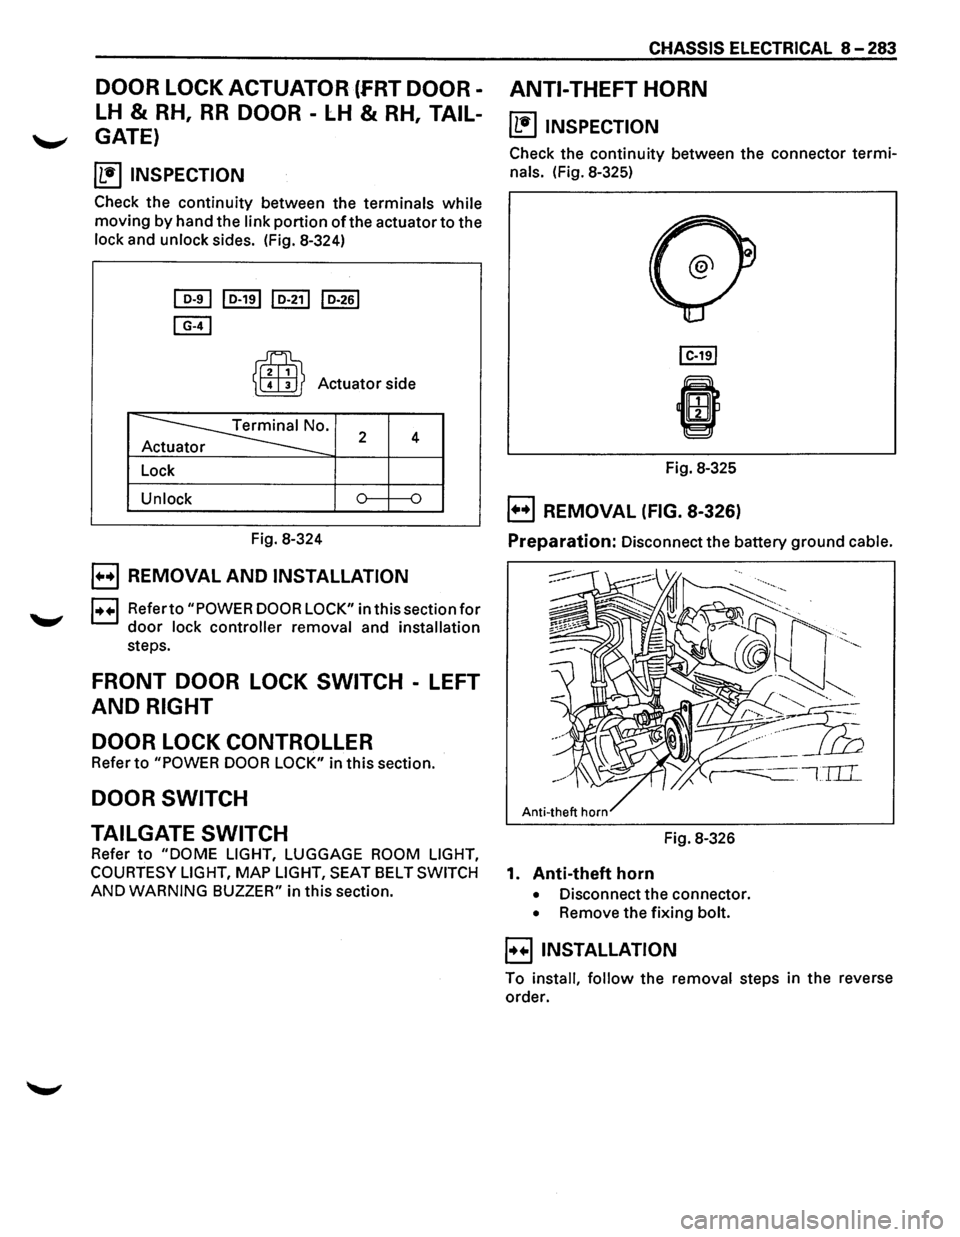
Check the continuity between the terminals while
moving by hand the link portion of the actuator to the
lock and unlock sides. (Fig. 8-324)
[QI] I D-191 I D-211 I D-261
[E)
~
~ Actuator side
~· 2 4 r
Lock
Unlock
Fig. 8-324
B REMOVAL AND INSTALLATION
1++1 Referto "POWER DOOR LOCK" in this section for
door lock controller removal and installation
steps.
FRONT DOOR LOCK SWITCH -LEFT
AND RIGHT
DOOR LOCK CONTROLLER
Refer to "POWER DOOR LOCK" in this section.
DOOR SWITCH
CHASSIS ELECTRICAL 8-283
ANTI-THEFT HORN
~ INSPECTION
Check the continuity between the connector termi
nals. (Fig. 8-325)
Fig. 8-325
B REMOVAL (FIG. 8-326)
Preparation: Disconnect the battery ground cable.
TAILGATE SWITCH Fig. 8-326
Refer
to "DOME LIGHT, LUGGAGE ROOM LIGHT,
COURTESY LIGHT,
MAP LIGHT, SEAT BELT SWITCH 1. Anti-theft horn
AND WARNING BUZZER" in this section. • Disconnect the connector.
• Remove the fixing bolt.
B INSTALLATION
To install, follow the removal steps in the reverse
order.
Page 1474 of 1928
8-284 CHASSIS ELECTRICAL
ANTI-THEFT INDICATOR
~ INSPECTION
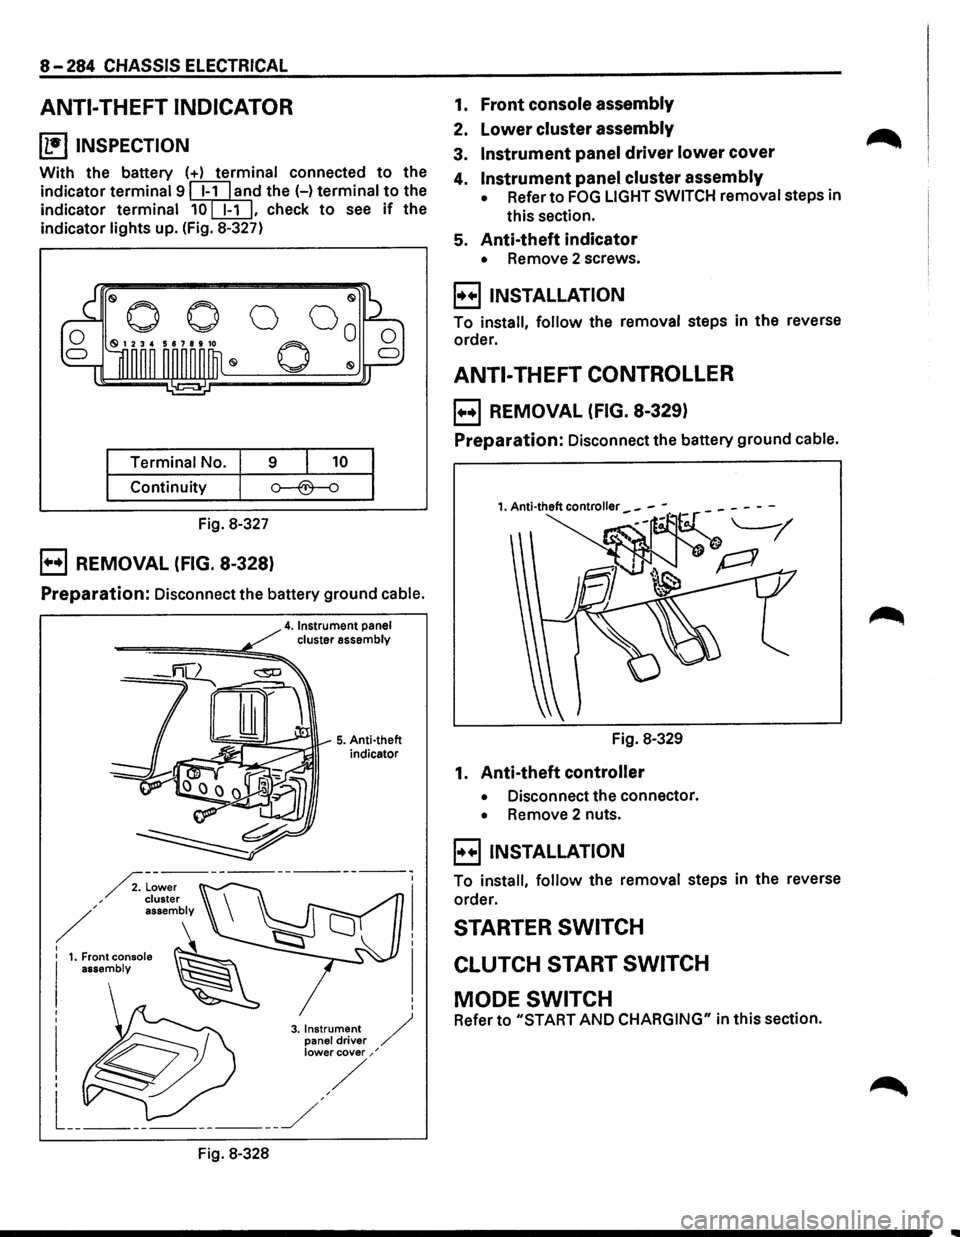
With the battery (+) terminal connected to the
indicator
terminal 9 ~l'ld the H terminal to the
indicator
terminal 10[EIJ, check to see if the
indicator
lights up. (Fig. 8-327)
Terminal No. 9 10
Continuity
Fig. 8-327
B REMOVAL (FIG. 8-328)
Preparation: Disconnect the battery ground cable.
4. Instrument panel cluster assembly
-====-==============~!!;!;::,..
Fig. 8-328
5. Anti-theft
indicator
1. Front console assembly
2. lower cluster assembly
3. Instrument panel driver lower cover
4. Instrument panel cluster assembly
• Refer to FOG LIGHT SWITCH removal steps in
this section.
5. Anti-theft indicator
• Remove 2 screws.
B INSTALLATION
To install, follow the removal steps in the reverse
order.
ANTI-THEFT CONTROLLER
B REMOVAL (FIG. 8-329)
Preparation: Disconnect the battery ground cable.
Fig. 8-329
1. Anti-theft controller
• Disconnect the connector.
• Remove 2 nuts.
B INSTALLATION
To install, follow the removal steps in the reverse
order.
STARTER SWITCH
CLUTCH START SWITCH
MODE SWITCH
Refer to "START AND CHARGING" in this section.
Page 1475 of 1928
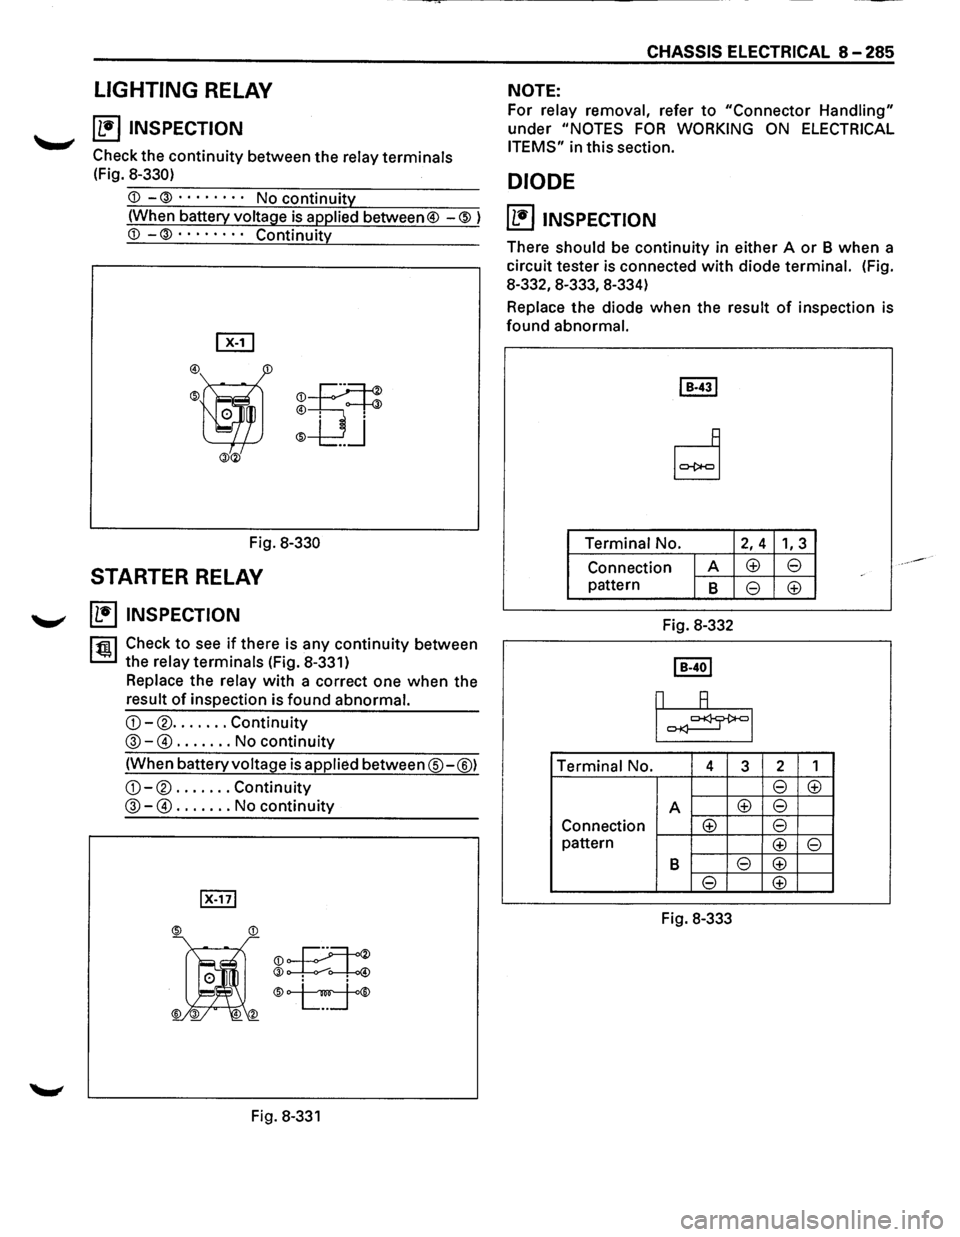
LIGHTING RELAY
~ ~ INSPECTION
Check the continuity between the relay terminals
(Fig.
8-330)
is applied between® -@ )
Fig. 8-330
STARTER RELAY
~ INSPECTION
rfii1 Check to see if there is any continuity between
~the relay terminals (Fig. 8-331)
Replace the relay with a correct one when the
result
of inspection is found abnormal.
G)-® ....... Continuity
@-@) ....... No continuity
(When battery voltage is applied between®-@)
G)-® ....... Continuity
@-@) ....... No continuity
®K
®~® ® •.
Fig. 8-331
CHASSIS ELECTRICAL 8-285
NOTE:
For relay removal, refer to "Connector Handling"
under
"NOTES FOR WORKING ON ELECTRICAL
ITEMS" in this section.
DIODE
(1!] INSPECTION
There should be continuity in either A or B when a
circuit tester
is connected with diode terminal. (Fig.
8-332,8-333, 8-334)
Replace the diode when the result of inspection is
found abnormal.
Terminal No.
2, 4 1, 3
Connection A <±> 8
pattern B 8 <±>
Fig. 8-332
Terminal
No. 4 3 2 1
8 <±>
A <±> 8
Connection <±> 8
pattern <±> 8
B 8 <±>
8 <±>
Fig. 8-333
Page 1476 of 1928
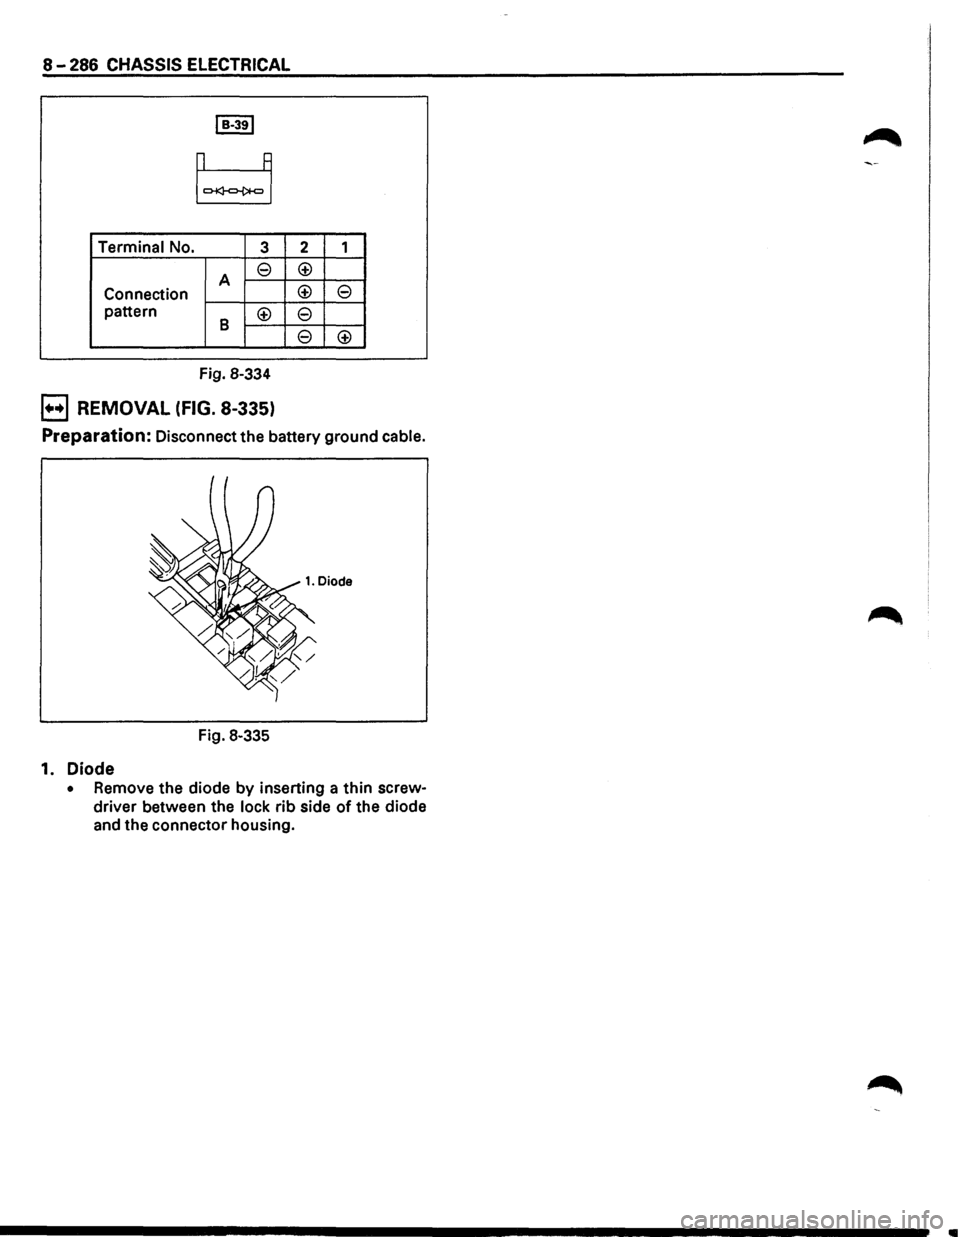
8-286 CHASSIS ELECTRICAL
Terminal No. 3
A e
Connection
pattern
8 <±>
Fig. 8-334
B REMOVAL (FIG. 8-335)
2 1
<±>
<±>
e
e
e
<±>
Preparation: Disconnect the battery ground cable.
Fig. 8-335
1. Diode
• Remove the diode by inserting a thin screw
driver between the
lock rib side of the diode
and the connector housing.
Page 1477 of 1928
CHASSIS ELECTRICAL 8-287
MEMO
--
Page 1478 of 1928
8-288 CHASSIS ELECTRICAL
METER AND WARNING/INDICATOR LIGHT
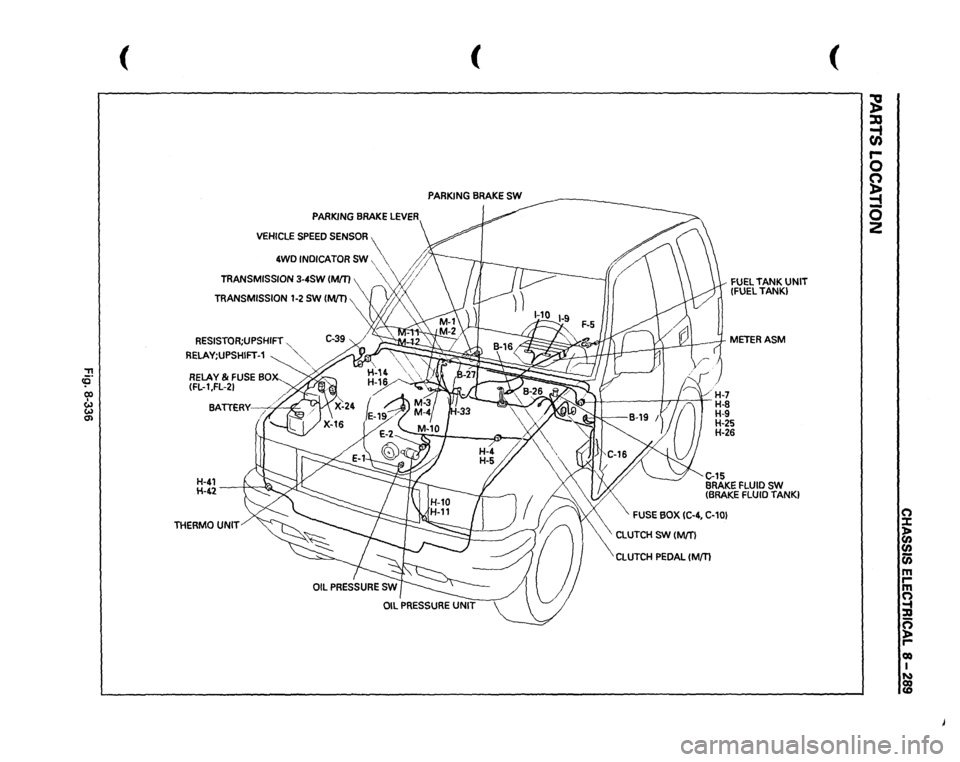
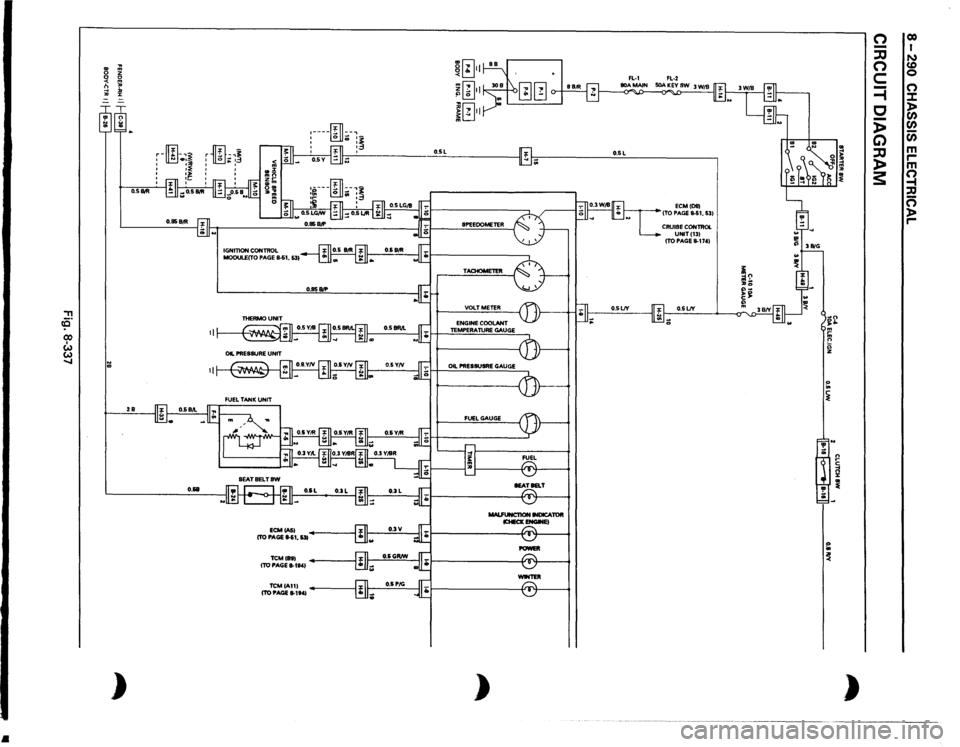
GENERAL DESCRIPTION
The circuit consists of the starter switch, meter assembly, vehicle speed sensor, clutch switch, transmission
switch, lighting switch,
turn signal switch, thermo unit, oil pressure unit, Engine Control Module, fuel tank unit,
4WD
SW, oil pressure switch, parking brake switch, brake fluid switch, seat belt switch and illumination
controller.
The meter ASM contains the speedometer, tachometer, voltmeter, engine coolant temperature gauge, oil
pressure gauge, fuel gauge and warning/indicator lights.
The meter warning/indicator lights and
their bulb sockets are a unit, they are installed from the back of the
speedometer assembly.
Page 1479 of 1928
::!!
(
(
PARKING
BRAKE
SW
PARKING
BRAKE
LEVER
VEHICLE
SPEED
SENSOR
4WD
INDICATOR
SW,
~
' '
/;~>
TRANSMISSION
3-4SW
IMJT)
"vf;/
RESISTOR;UPSHIFT
."
RELAY;UPSHIFT-1
~":'""
RELAY
& FUSE
BOX-_
(FL-1
,FL-21 BA.
TTERY--.;:;4"~
H-41 H-42
-----;1-"'.,.,-~
THERMO
UNIT
FUEL
TANK
UNIT
(FUEL
TANK)
METERASM
~
16)
1 /
1
(
H-7
/'1'-J
? I n
H-8 H-9 H-25
H-26 C..15 BRAKE
FLUID
SW
(BRAKE
FLUID
TANK}
FUSE
BOX
IC-4,
C-10}
\CLUTCH
SW
(M/T)
CLUTCH
PEDAL
(Mm
(
~ ::xs ~ r-0 0 ~ -0 2
(") :X: ~ en (i) m rm (") ~ g roo I ~
Page 1480 of 1928
•
, ce· CX) I w w .....
..
~ m
0
z
0 0 <
m
n
"'
-1
:D
"'
:z:
= ~~ :;; )
O.SIItll 2B
O.&B
ID
-,~
r
-•3
'
.. '
'
' ' IGNITION
CONTROL
MODULECTO
PAGE
S.S1,
531
ECMCASI
(TO PAGE
11-51,
531
TCMihl (TO PAGE
8-1t41
TCMIA111 (TO PAGE
11-1141
~[~} m[i] ~ .:. II
. 0 j[~}l
I'lL,
II"
:----~
.. :~.:,._
:
fill
:~
~~~~ I -··
.!., -
SPEEOOMETER TACHOMETER VOLTMETER ENGINE
COOLANT
TEMPERATURE
GAUGE
OIL PRESSUSRE
GAUGE
FUEL
GAUGE MALFUNCT10N
INDICATOR
lCHECKENGWEI
POWEll -TER
)
O.SL
ECMIDIII
ITO PAGE
11-51,
531
CRUISE
CONTROL UNITI131 ITO PAGE
11-1741
O.SLJY ;;
~ ~ '!' ;;: ~ ~ n ~ ~ )
n -:JJ n c =i c -)> G) :JJ )> 3:
co I N CD 0 (") :.t: > Cl) Cl) Cl) m ,.... m Q , n )> ,....