ISUZU TROOPER 1995 Workshop Manual
Manufacturer: ISUZU, Model Year: 1995, Model line: TROOPER, Model: ISUZU TROOPER 1995Pages: 1928
Page 281 of 1928
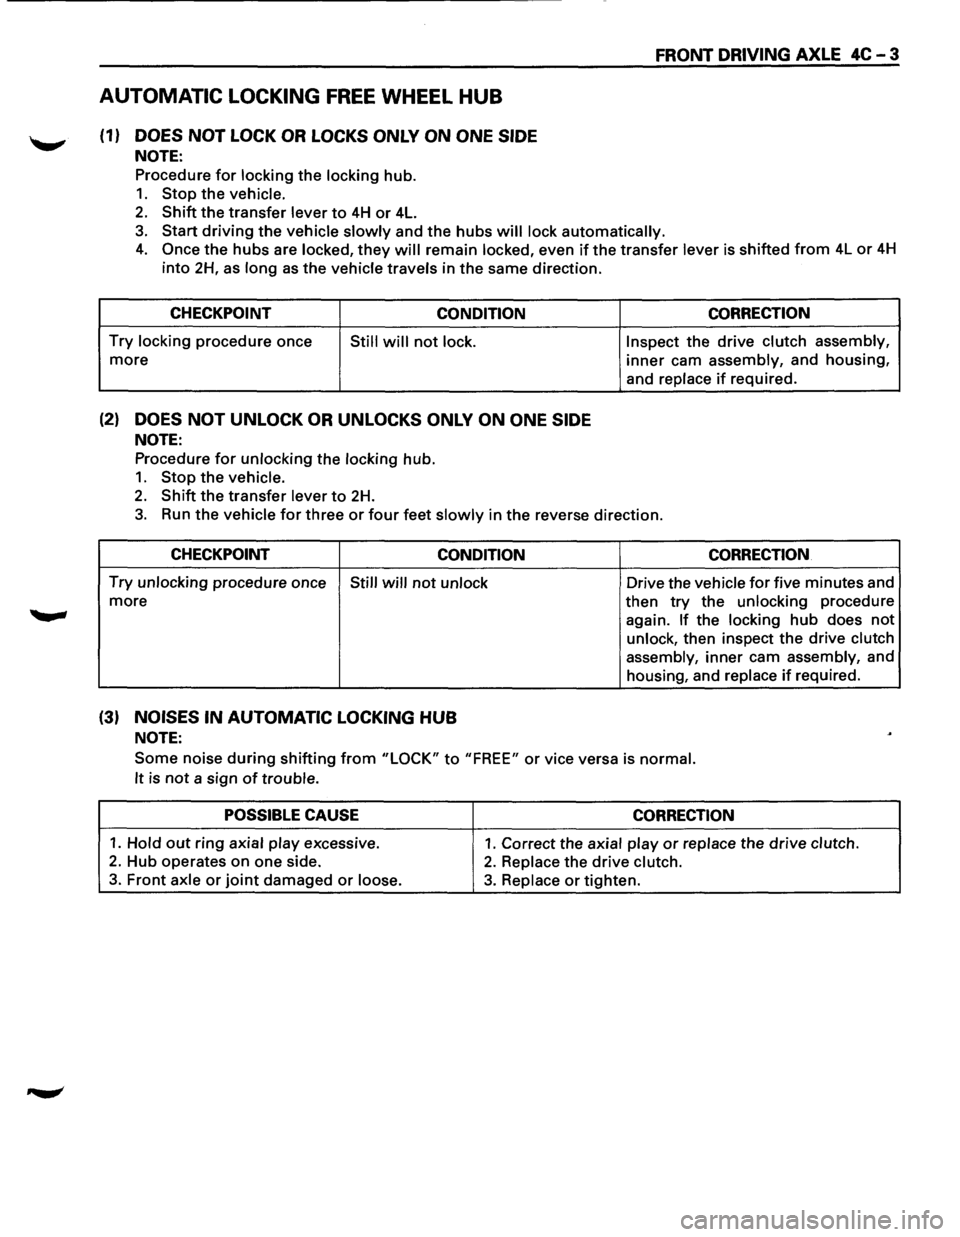
AUTOMATIC LOCKING FREE WHEEL HUB
(1) DOES NOT LOCK OR LOCKS ONLY ON ONE SIDE
NOTE:
Procedure for locking the locking hub.
1. Stop the vehicle.
2. Shift the transfer lever to 4H or 4L.
FRONT DRIVING AXLE 4C-3
3. Start driving the vehicle slowly and the hubs will lock automatically.
4. Once the hubs are locked, they will remain locked, even if the transfer lever is shifted from 4L or 4H
into 2H, as long as the vehicle travels in the same direction.
CHECKPOINT
CONDITION
Try locking procedure once Still will not lock.
more
(2) DOES NOT UNLOCK OR UNLOCKS ONLY ON ONE SIDE
NOTE:
Procedure for unlocking the locking hub.
1. Stop the vehicle.
2. Shift the transfer lever to 2H.
CORRECTION
Inspect the drive clutch assembly,
inner cam assembly, and housing,
and replace
if required.
3. Run the vehicle for three or four feet slowly in the reverse direction.
CHECKPOINT
CONDITION CORRECTION
Try unlocking procedure once Still will not unlock Drive the vehicle for five minutes and
more
(3) NOISES IN AUTOMATIC LOCKING HUB
NOTE:
then try the unlocking procedure
again.
If the locking hub does not
unlock, then inspect the drive clutch
assembly,
inner cam assembly, and
housing, and replace
if required.
Some noise during shifting from "LOCK" to "FREE" or vice versa is normal.
It
is not a sign of trouble.
POSSIBLE CAUSE CORRECTION
1. Hold out ring axial play excessive. 1. Correct the axial play or replace the drive clutch.
2. Hub operates on one side. 2. Replace the drive clutch.
3. Front axle or joint damaged or loose. 3. Replace or tighten.
Page 282 of 1928
4C-4 FRONT DRIVING AXLE
ON-VEHICLE SERVICE
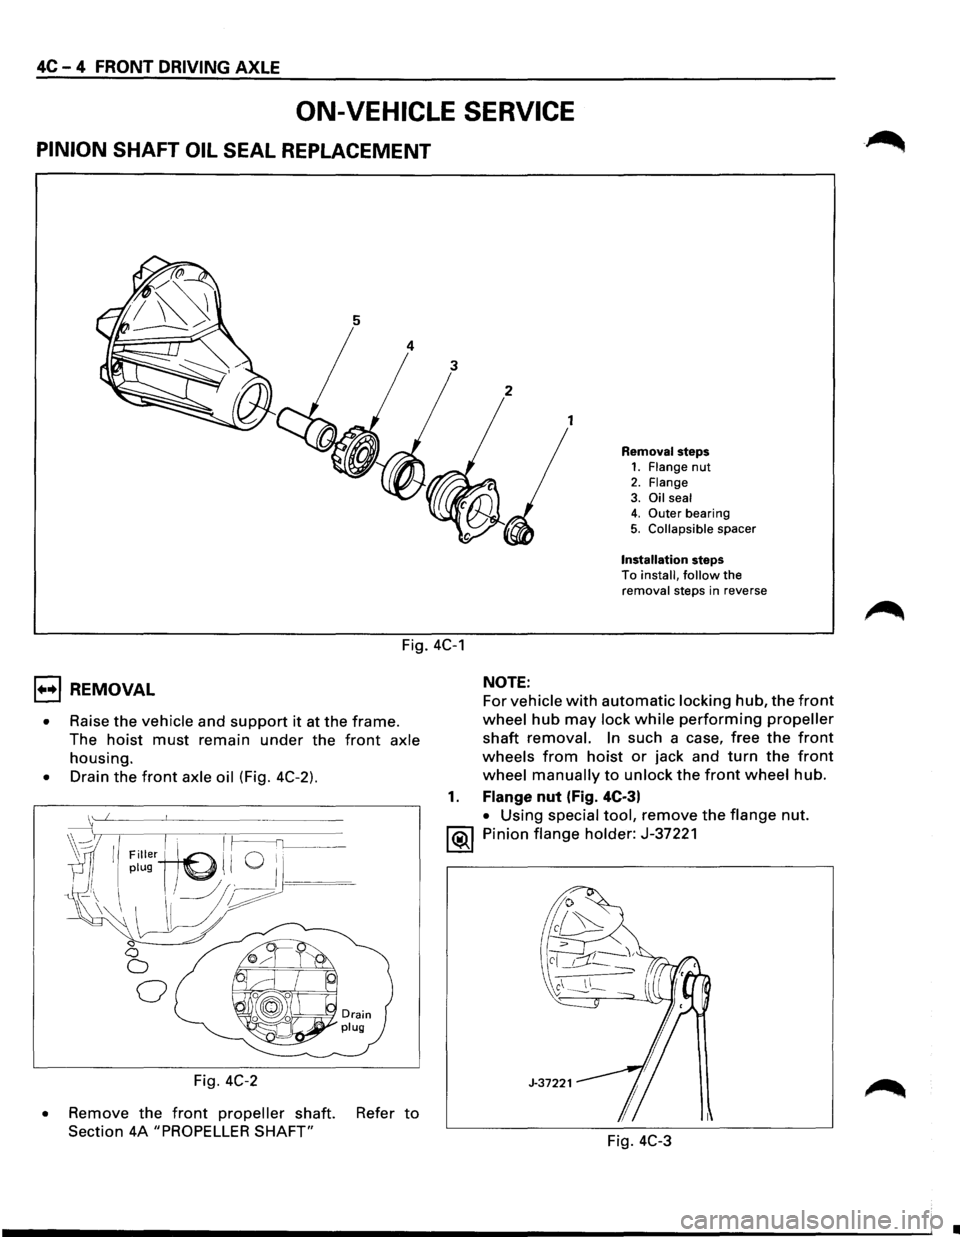
PINION SHAFT OIL SEAL REPLACEMENT
1
Removal steps 1. Flange nut
2. Flange 3. Oil seal 4. Outer bearing
5. Collapsible spacer
Installation steps To install, follow the removal steps in reverse
Fig. 4C-1
1••1 REMOVAL
• Raise the vehicle and support it at the frame.
The
hoist must remain under the front axle
housing.
• Drain the front axle oil (Fig. 4C-2).
~wIll ~I · I ~----fl______~~-' Filler (./ Q i,
//plug ~ I ) . ---
-\\I 11/~/~
~ <:1 0
0
0
Fig. 4C-2
•
Remove the front propeller shaft. Refer to
Section 4A "PROPELLER SHAFT"
NOTE:
For vehicle with automatic locking hub, the front
wheel hub may lock while performing propeller
shaft removal. In such a case, free the front
wheels from hoist or jack and turn the front
wheel manually to unlock the front wheel hub.
1. Flange nut (Fig. 4C-3)
• Using special tool, remove the flange nut.
1®.1 Pinion flange holder: J-37221
Fig.
4C-3
•
Page 283 of 1928
2. Flange
3. Oil seal
4. Outer bearing
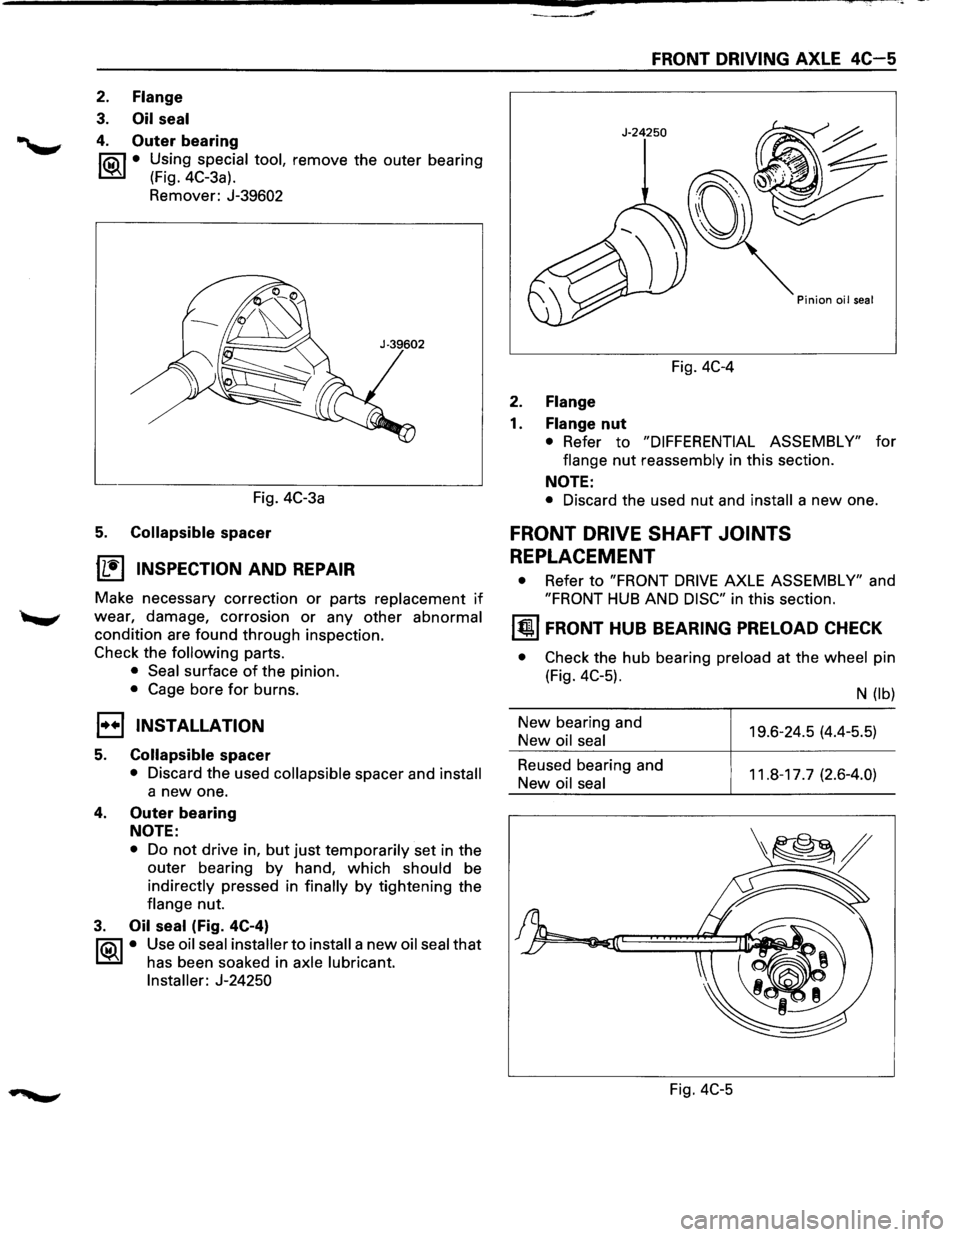
f'Qil • Using special tool, remove the outer bearing
~ (Fig. 4C-3a).
Remover: J-39602
FRONT DRIVING AXLE 4C-5
Fig. 4C-4
2. Flange
1. Flange nut
• Refer to "DIFFERENTIAL ASSEMBLY" for
flange
nut reassembly in this section.
NOTE:
Fig. 4C-3a • Discard the used nut and install a new one.
5. Collapsible spacer
1L:~'I INSPECTION AND REPAIR
Make necessary correction or parts replacement if
wear, damage, corrosion or any other abnormal
condition are found through inspection.
Check the
following parts.
• Seal surface of the pinion.
• Cage bore for burns.
1••1 INSTALLATION
5. Collapsible spacer
• Discard the used collapsible spacer and install
a new one.
4. Outer bearing
NOTE:
• Do not drive in, but just temporarily set in the
outer bearing by hand, which should be
indirectly pressed in
finally by tightening the
flange nut.
3. Oil seal (Fig. 4C-4)
f'Qil • Use oil seal installer to install a new oil seal that
~ has been soaked in axle lubricant.
Installer: J-24250
FRONT DRIVE SHAFT JOINTS
REPLACEMENT
• Refer to "FRONT DRIVE AXLE ASSEMBLY" and
"FRONT HUB AND DISC" in this section.
~ FRONT HUB BEARING PRELOAD CHECK
• Check the hub bearing preload at the wheel pin
(Fig. 4C-5).
New bearing and
New oil seal
Reused bearing and
New
oil seal
Fig.
4C-5
N (lb)
19.6-24.5 (4.4-5.5)
11.8-17.7 (2.6-4.0)
Page 284 of 1928
4C-6 FRONT DRIVING AXLE
UNIT REPAIR
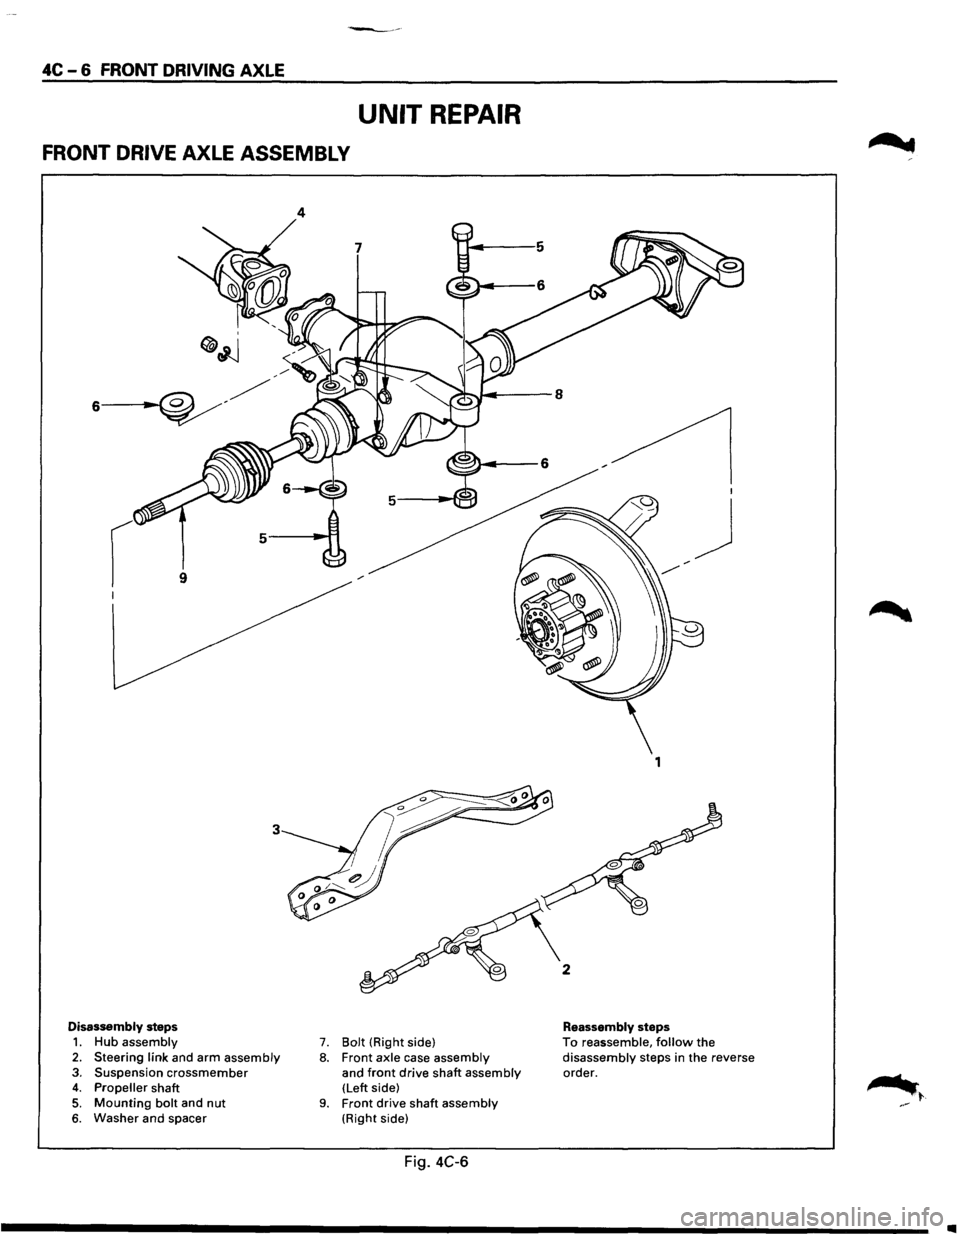
FRONT DRIVE AXLE ASSEMBLY
9
3
Disassembly steps
1. Hub assembly 2. Steering link and arm assembly 3. Suspension crossmember 4. Propeller shaft 5. Mounting bolt and nut 6. Washer and spacer
4
7. Bolt (Right side)
8. Front axle case assembly and front drive shaft assembly (Left side) 9. Front drive shaft assembly (Right side)
Fig. 4C-6
I
j
1
Reassembly steps To reassemble, follow the disassembly steps in the reverse
order.
•
Page 285 of 1928
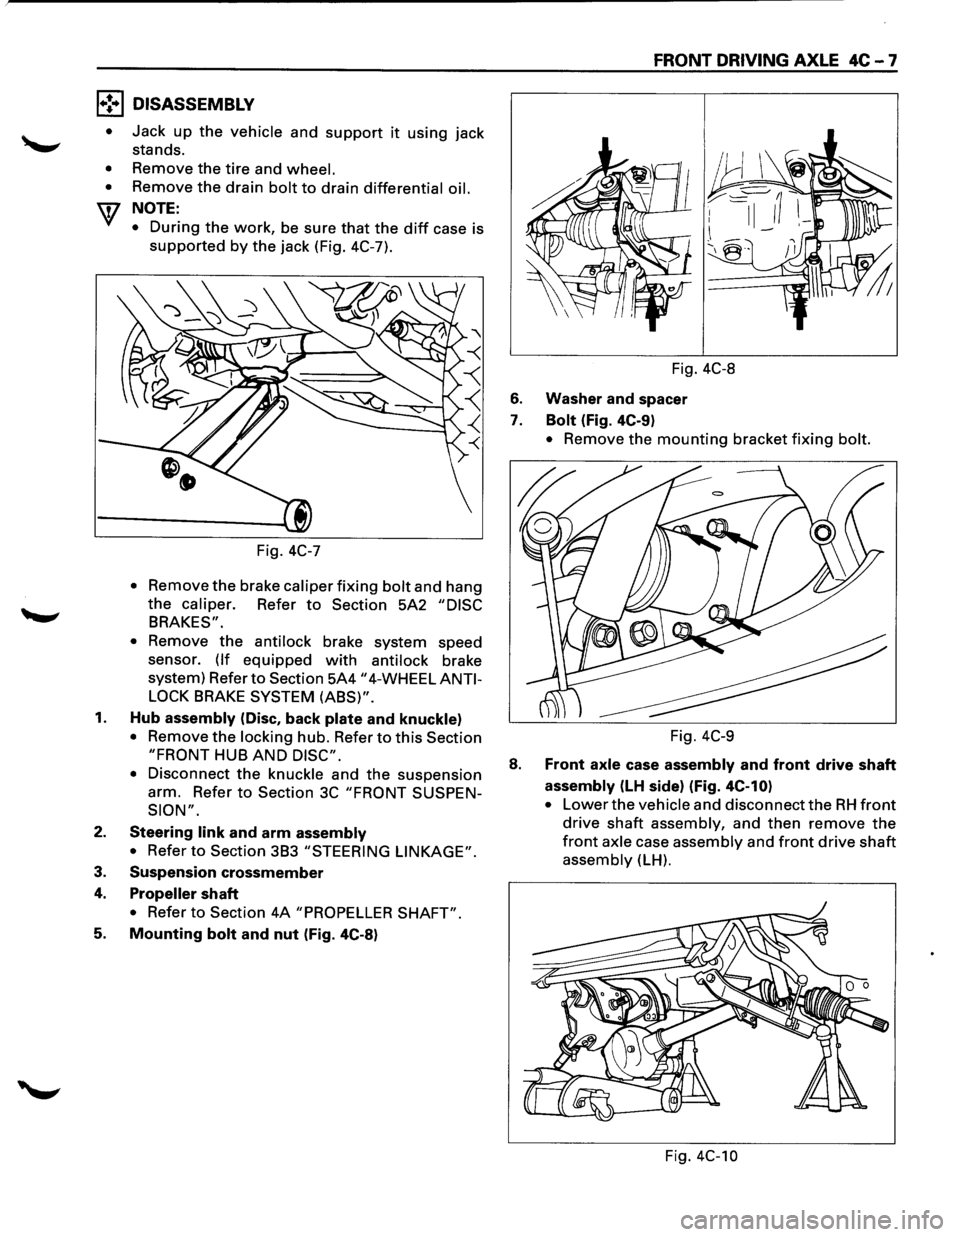
l•!•l DISASSEMBLY
•
•
•
Jack up the vehicle and support it using jack
stands.
Remove the
tire and wheel.
Remove the drain bolt to drain differential oil.
NOTE:
•
During the work, be sure that the diff case is
supported by the jack (Fig. 4C-7).
Fig.
4C-7
• Remov: the brake caliper fixing bolt and hang
the caliper. Refer to Section 5A2 "DISC
BRAKES".
•
Remove the antilock brake system speed
sensor.
(If equipped with antilock brake
system) Refer
to Section 5A4 "4-WHEEL ANTI
LOCK
BRAKE SYSTEM (ABS)".
1. Hub assembly (Disc, back plate and knuckle)
• Remove the locking hub. Refer to this Section
"FRONT HUB AND DISC".
•
Disconnect the knuckle and the suspension
arm. Refer
to Section 3C "FRONT SUSPEN
SION".
2. Steering link and arm assembly
• Refer to Section 3B3 "STEERING LINKAGE".
3. Suspension crossmember
4. Propeller shaft
• Refer to Section 4A "PROPELLER SHAFT".
5. Mounting bolt and nut (Fig. 4C-8)
FRONT DRIVING AXLE 4C-7
Fig. 4C-8
6. Washer and spacer
7. Bolt (Fig. 4C-9)
• Remove the mounting bracket fixing bolt.
Fig. 4C-9
8. Front axle case assembly and front drive shaft
assembly (LH side) (Fig. 4C-10)
• Lower the vehicle and disconnect the RH front
drive shaft assembly, and then remove the
front axle case assembly and front drive shaft
assembly (LH).
Fig. 4C-10
Page 286 of 1928
4C - 8 FRONT DRIVING AXLE
9. Front drive shaft assembly (RH)
l•!•l REASSEMBLY
9. Front drive shaft assembly (RH)
• Lay the assembly on the lower arm.
8. Front axle case assembly and front drive shaft
assembly (LH)
• Place the axle case on the jack, connect to the
front drive shaft assembly (RH) before
installing to the vehicle.
7. Bolt
• Tighten the mounting bracket fixing bolt to
the specified torque.
~~~ Torque N.m (lb.ft) I 116 (85)
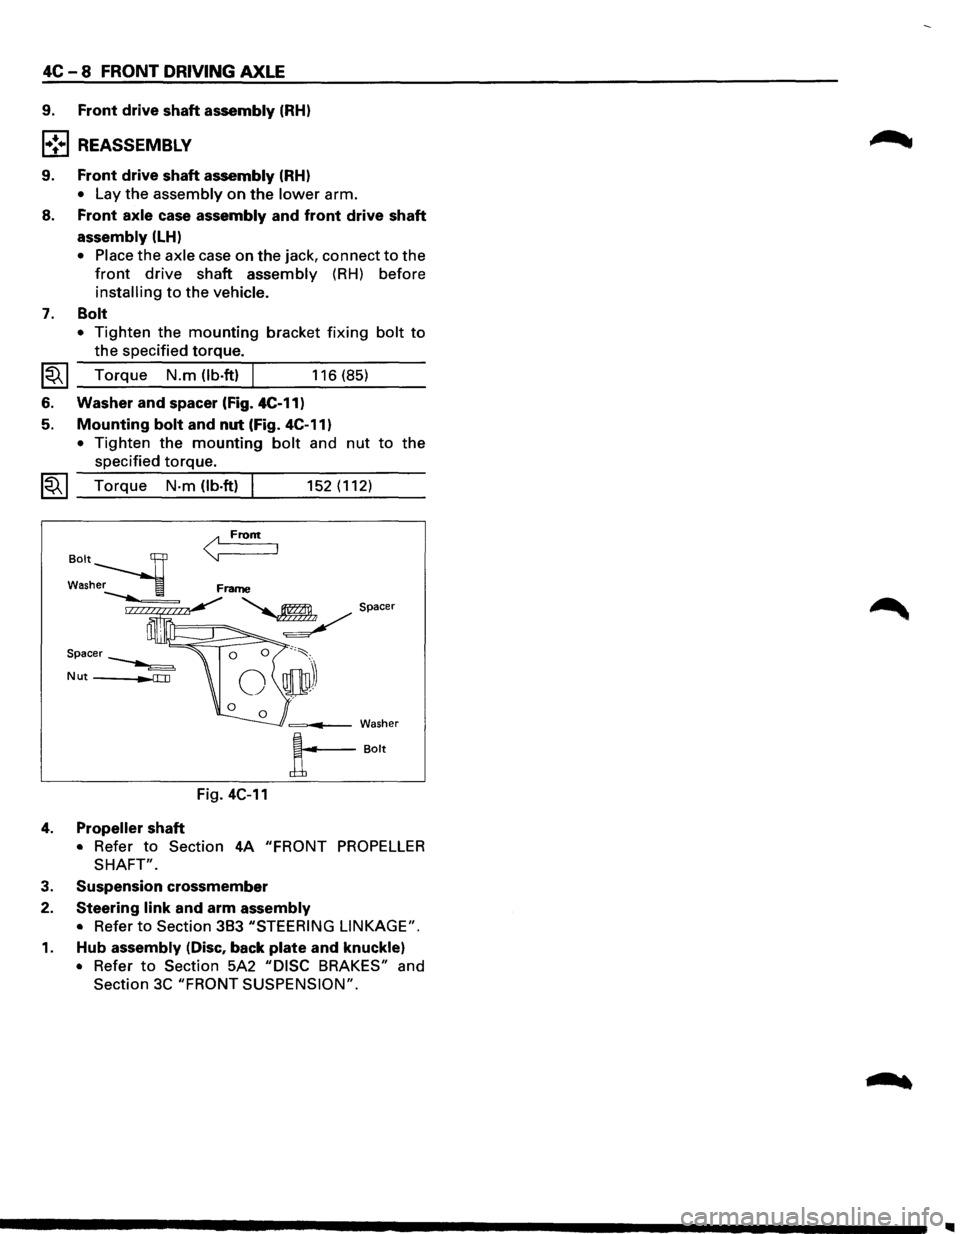
6. Washer and spacer (Fig. 4C-11)
5. Mounting bolt and nut (Fig. 4C-11)
• Tighten the mounting bolt and nut to the
specified torque.
~~~ Torque N·m (lb.ft) I 152 (112)
< From
=---Washer
A--Bolt
Fig. 4C-11
4. Propeller shaft
• Refer to Section 4A "FRONT PROPELLER
SHAFT".
3. Suspension crossmember
2. Steering link and arm assembly
• Refer to Section 383 "STEERING LINKAGE".
1. Hub assembly (Disc, back plate and knuckle)
• Refer to Section 5A2 "DISC BRAKES" and
Section
3C "FRONT SUSPENSION".
Page 287 of 1928
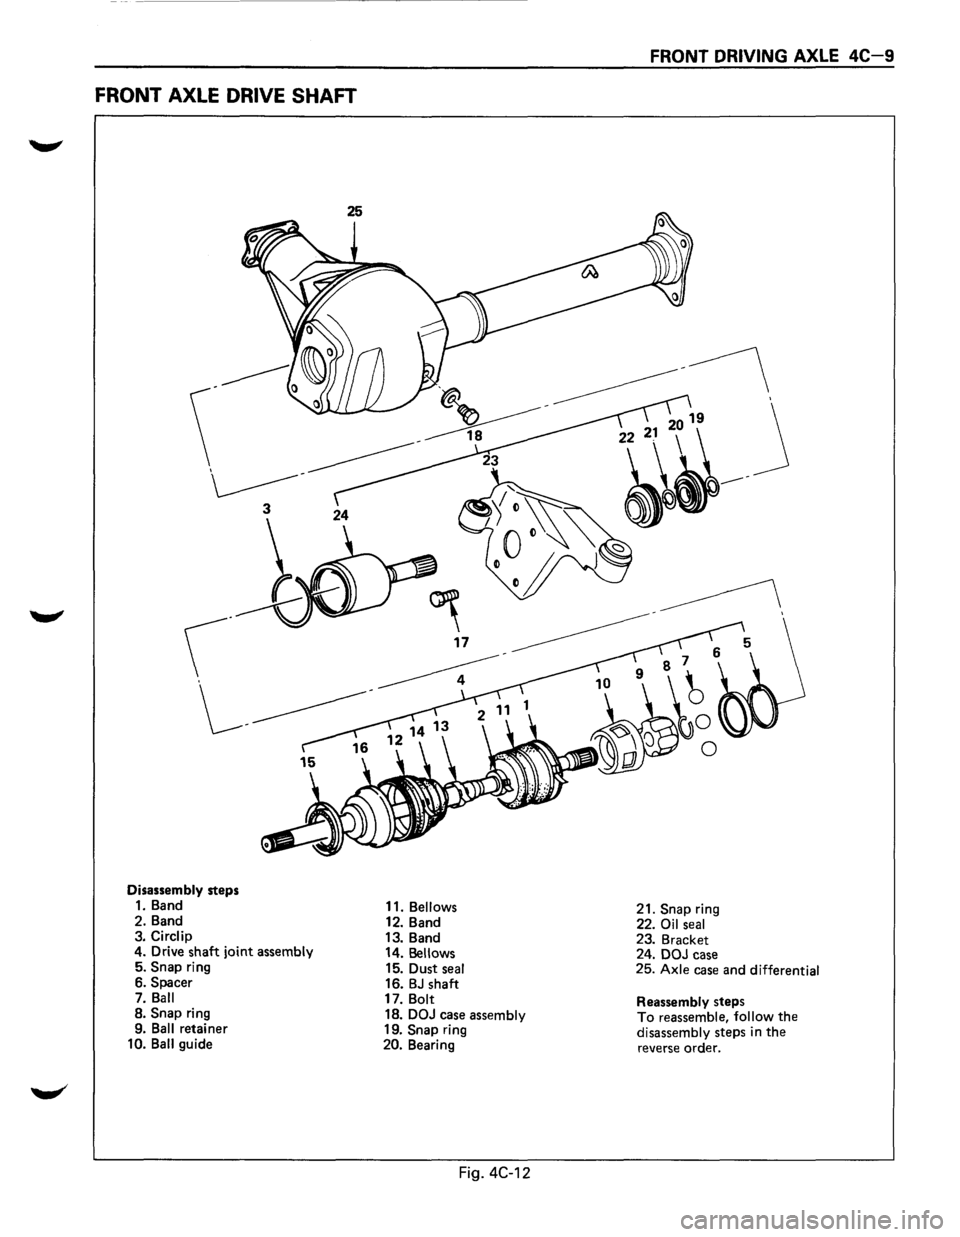
FRONT AXLE DRIVE SHAFT
Disassembly steps 1. Band
2. Band
3.
Circlip 4. Drive shaft joint assembly 5. Snap ring
6. Spacer
7.
Ball 8. Snap ring
9. Ball retainer
10. Ball guide 11.
Bellows 12.
Band
13. Band
14.
Bellows 15. Dust seal 16. BJ shaft
17. Bolt
18. DOJ case assembly 19. Snap ring
20. Bearing
Fig. 4C-12
FRONT DRIVING AXLE 4C-9
21. Snap ring
22. Oil seal 23. Bracket
24. DOJ case
25.
Axle case and differential
Reassembly
steps To reassemble, follow the disassembly steps in the reverse order.
Page 288 of 1928
4C-10 FRONT DRIVING AXLE
l•!•l DISASSEMBLY
W NOTE:
• For the left side, follow the same steps as
right side.
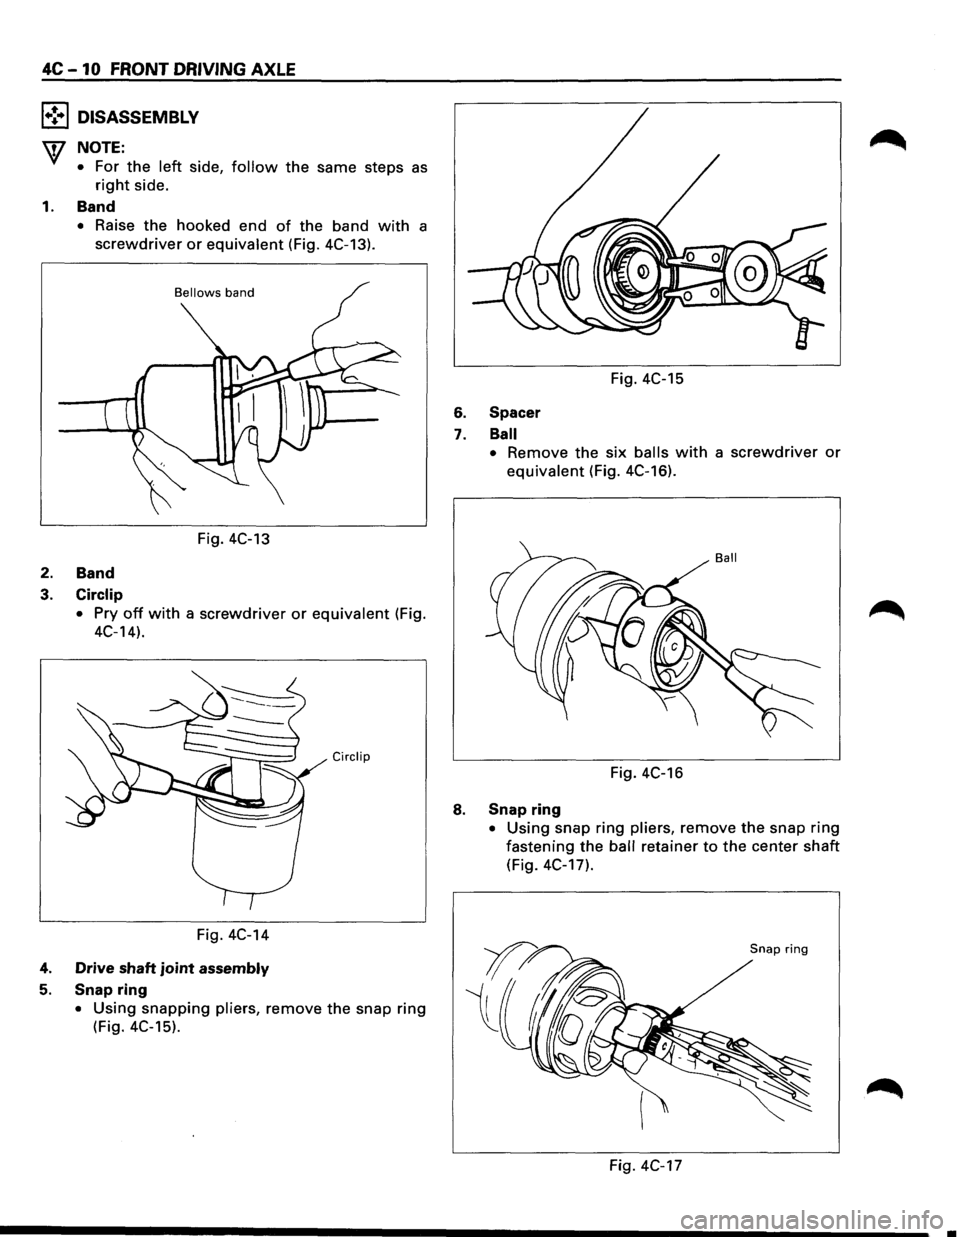
1. Band
• Raise the hooked end of the band with a
screwdriver or equivalent (Fig. 4C-13).
Bellows band
Fig. 4C-13
2. Band
3.
Circlip •
Pry off with a screwdriver or equivalent (Fig.
4C-14).
Circlip
Fig. 4C-14
4. Drive shaft joint assembly
5. Snap ring
• Using snapping pliers, remove the snap ring
(Fig. 4C-15).
Fig. 4C-15
6. Spacer
7. Ball
•
Remove the six balls with a screwdriver or
equivalent (Fig. 4C-16).
Fig. 4C-16
8. Snap ring
• Using snap ring pliers, remove the snap ring
fastening the ball retainer to the center shaft
(Fig. 4C-17).
Snap ring
Fig. 4C-17
Page 289 of 1928
__,.
9. Ball retainer
10. Ball guide
11. Bellows
12. Band
13. 14.
15.
16.
17.
18.
19.
20.
21.
22.
23.
24. 25.
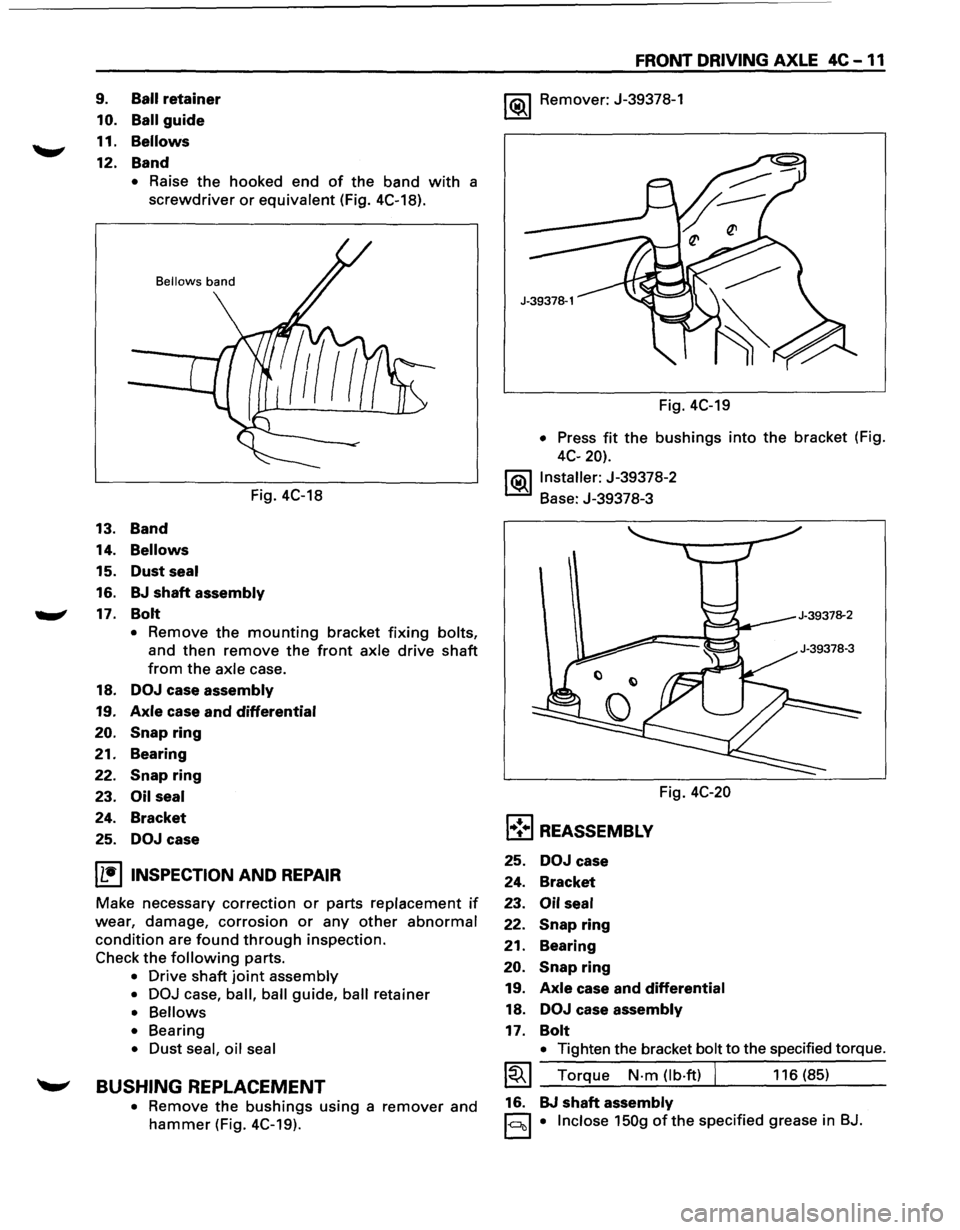
• Raise the hooked end of the band with a
screwdriver or equivalent (Fig. 4C-18).
Bellows band
Fig. 4C-18
Band
Bellows
Dust seal
BJ shaft assembly
Bolt
• Remove the mounting bracket fixing bolts,
and then remove the front axle drive shaft
from the axle case.
DOJ case assembly
Axle case and differential
Snap ring
Bearing
Snap ring
Oil seal
Bracket
DOJ case
I L•IINSPECTION AND REPAIR
Make necessary correction or parts replacement if
wear, damage, corrosion or any other abnormal
condition are found through inspection.
Check
the following parts.
• Drive shaft joint assembly
• DOJ
case, ball, ball guide, ball retainer
• Bellows
• Bearing
• Dust seal, oil seal
~ BUSHING REPLACEMENT
• Remove the bushings using a remover and
hammer (Fig. 4C-19).
FRONT DRIVING AXLE 4C -11
1 (ij),_j Remover: J-39378-1
Fig. 4C-19
• Press fit the bushings into the bracket (Fig.
4C-20).
j(ij),_jlnstaller:
J-39378-2
Base: J-39378-3
Fig.
4C-20
l•!•l REASSEMBLY
25. DOJ case
24. Bracket
23.
Oil seal
22. Snap ring
21.
Bearing
20.
Snap ring
19. Axle case and differential
18. DOJ case assembly
17. Bolt
• Tighten the bracket bolt to the specified torque.
~~~ Torque N-m (lb-ft) I 116 (85)
16. BJ
shaft assembly
1-c:::lcll • Inclose 150g ofthe specified grease in BJ.
Page 290 of 1928
4C-12 FRONT DRIVING AXLE
15. Dust seal
14.
Bellows
c::::1 • Apply a thin coat of grease to the shaft for
D smooth installation.
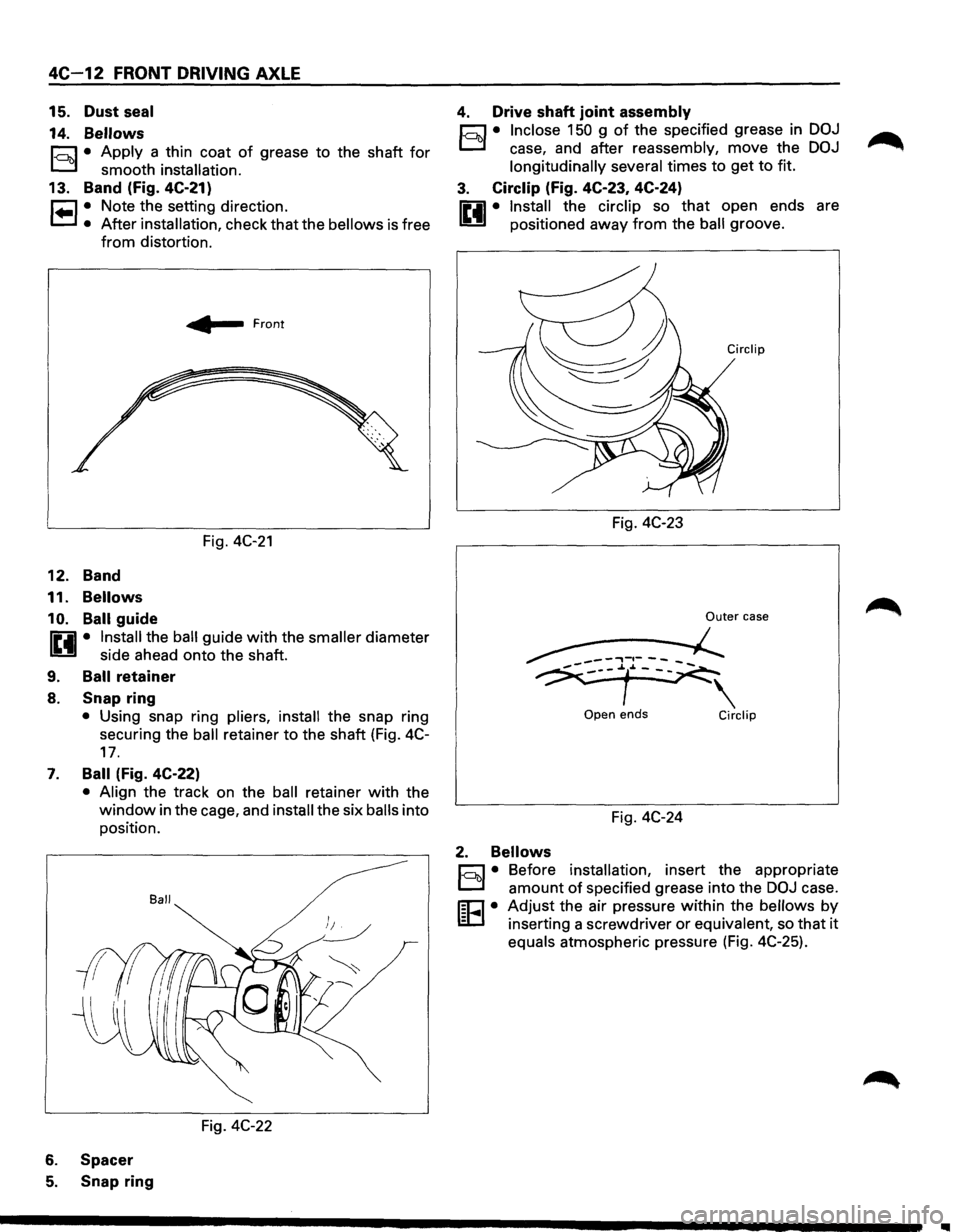
13. Band (fig. 4C-21)
r=l • Note the setting direction.
'-=.1 • After installation, check that the bellows is free
from distortion.
12. Band
11.
Bellows
10. Ball
guide
~ Front
Fig. 4C-21
fiiil • Install the ball guide with the smaller diameter
U side ahead onto the shaft.
9. Ball retainer
8. Snap ring
• Using snap ring pliers, install the snap ring
securing the
ball retainer to the shaft (Fig. 4C-
17.
7. Ball (Fig. 4C-22)
• Align the track on the ball retainer with the
window in the cage, and install the six balls into
position.
Ball
Fig. 4C-22
6. Spacer
5. Snap ring
4. Drive shaft joint assembly
c::::1 • Inclose 150 g of the specified grease in DOJ
D case, and after reassembly, move the DOJ
longitudinally several
times to get to fit.
3. Circlip (Fig. 4C-23, 4C-24)
fiiil • Install the circlip so that open ends are
U positioned away from the ball groove.
Fig.
4C-23
Outer case
~-J.r~
Open ends Circlip
Fig. 4C-24
2. Bellows
c::::1 • Before installation, insert the appropriate
D amount of specified grease into the DOJ case.
m=J • Adjust the air pressure within the bellows by
I§C.I inserting a screwdriver or equivalent, so that it
equals atmospheric pressure (Fig. 4C-25).
1111