ISUZU TROOPER 1995 Workshop Manual
Manufacturer: ISUZU, Model Year: 1995, Model line: TROOPER, Model: ISUZU TROOPER 1995Pages: 1928
Page 271 of 1928
(j) @
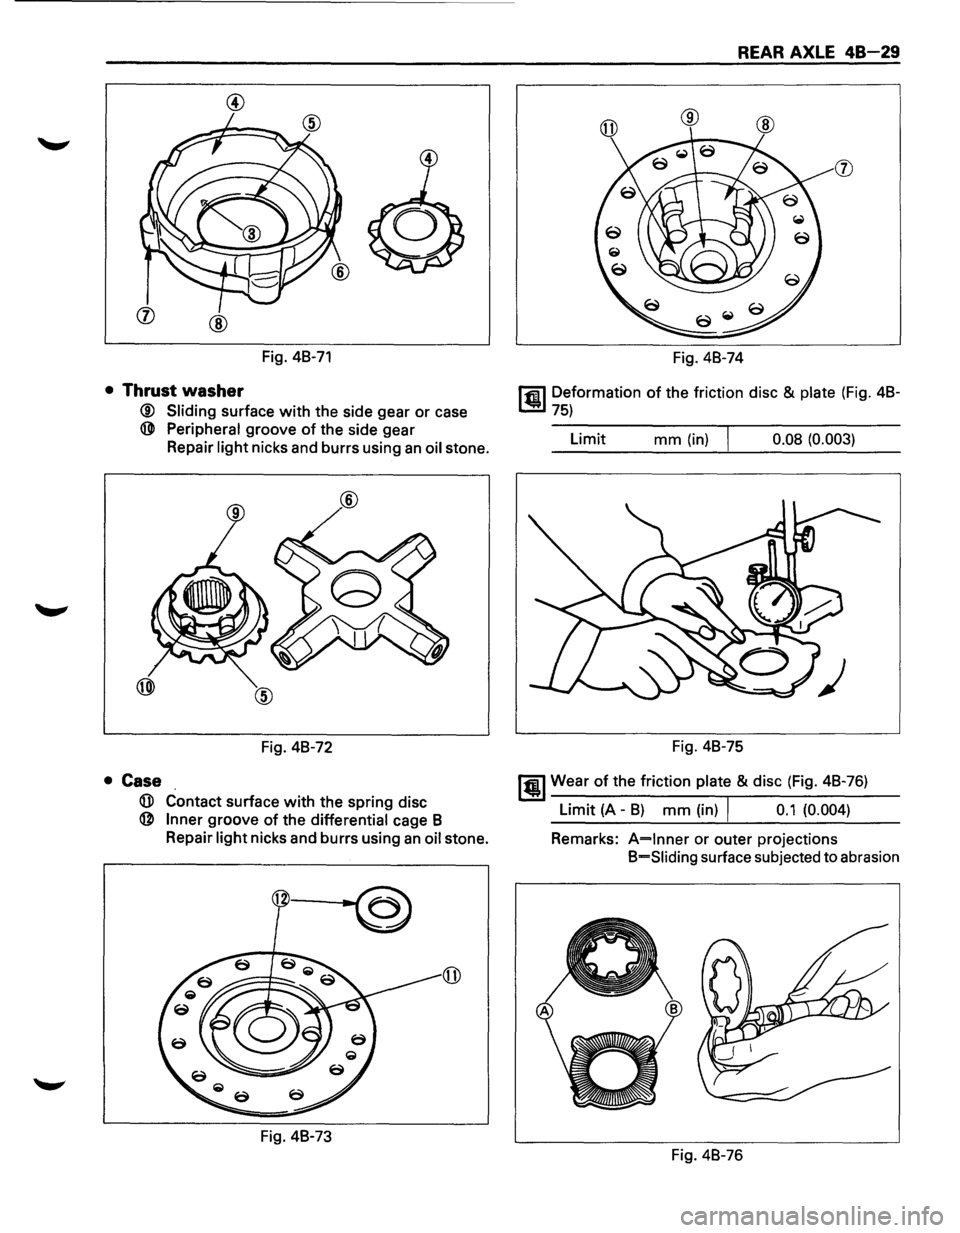
Fig. 48-71
• Thrust washer
® Sliding surface with the side gear or case
@ Peripheral groove of the side gear
Repair
light nicks and burrs using an oil stone.
Fig. 48-72
• Case
G)) Contact surface with the spring disc
@ Inner groove of the differential cage B
Repair
light nicks and burrs using an oil stone.
1~
Fig. 48-73
REAR AXLE 48-29
Fig. 48-74
rfiil Deformation of the friction disc & plate (Fig. 48-
~75)
Limit mm (in) I 0.08 (0.003)
Fig. 48-75
1@1 Wear of the friction plate & disc (Fig. 48-76)
Limit (A -B) mm (in) I 0.1 (0.004)
Remarks:
A=lnner or outer projections
B=Siiding surface subjected to abrasion
Fig. 48-76
Page 272 of 1928
48-30 REAR AXLE
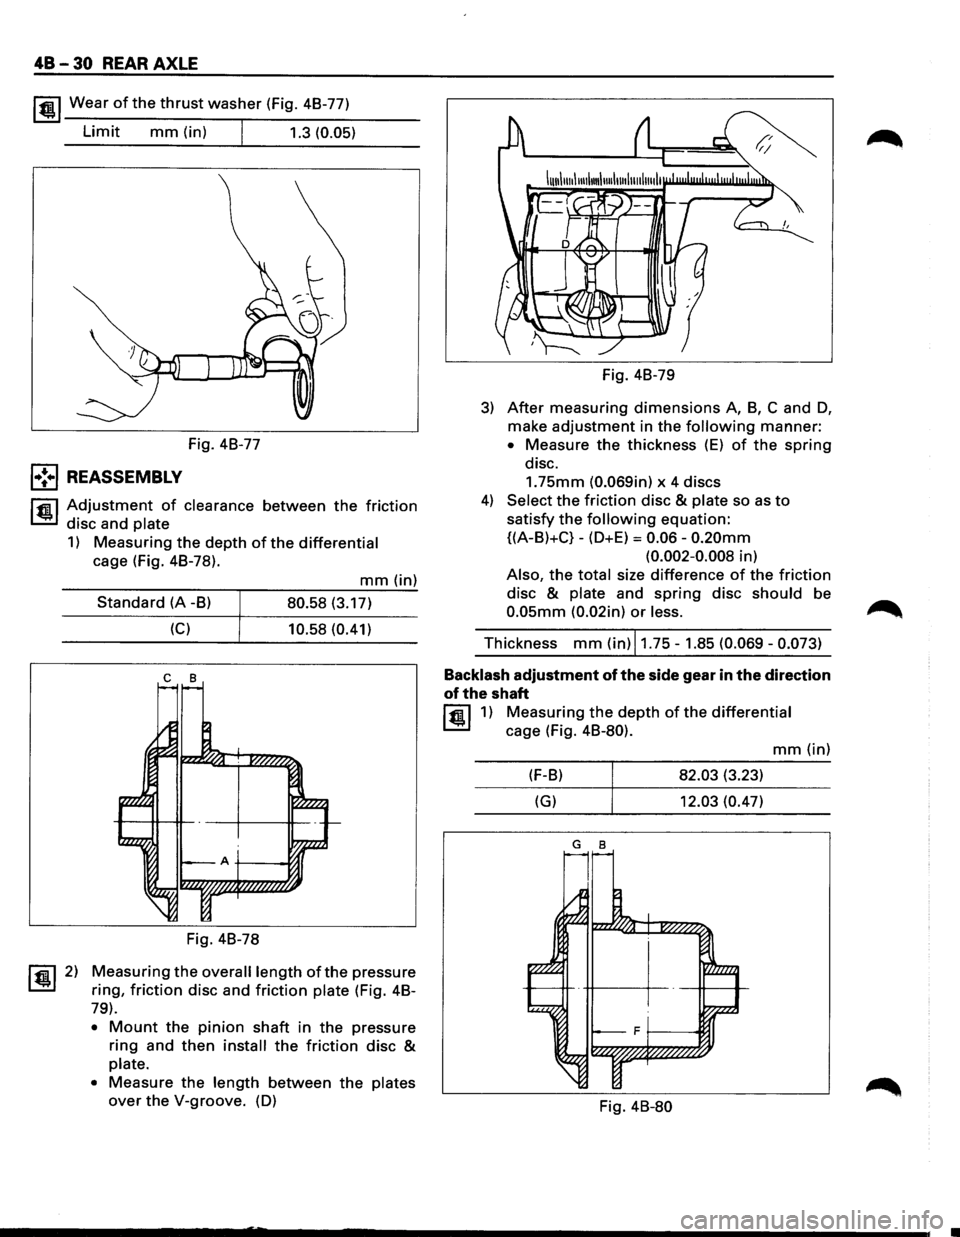
lfil!.l Wear of the thrust washer (Fig. 48-77)
Limit mm (in) I 1.3 (0.05)
Fig. 48-77
l•!•l REASSEMBLY
l"fll Adjustment of clearance between the friction
~ disc and plate
1) Measuring the depth of the differential
cage (Fig. 48-78).
~ 2)
mm(in)
Standard (A -8) 80.58 (3.17)
(C) 10.58 (0.41)
c 8
Fig. 48-78
Measuring the overall length ofthe pressure
ring,
friction disc and friction plate (Fig. 48-
79).
• Mount the pinion shaft in the pressure
ring and then install the friction disc &
plate.
•
Measure the length between the plates
over the V-groove. (D) Fig.
48-79
3) After measuring dimensions A, 8, C and D,
make adjustment in the following manner:
• Measure the thickness (E) of the spring
disc.
1.75mm (0.069in) x 4 discs
4) Select the friction disc & plate so as to
satisfy the following equation:
{(A-8)+C}-(D+E) = 0.06-0.20mm
(0.002-0.008 in)
Also, the total size difference of the friction
disc & plate and spring disc should be
0.05mm (0.02in) or less.
Thickness mm (in) 11.75-1.85 (0.069-0.073)
Backlash
adjustment of the side gear in the direction
of the shaft
lfil!.l1) Measuring the depth of the differential
cage (Fig. 48-80).
mm(in)
(F-8) 82.03 (3.23)
(G) 12.03 (0.47)
G 8
Fig. 48-80
Page 273 of 1928
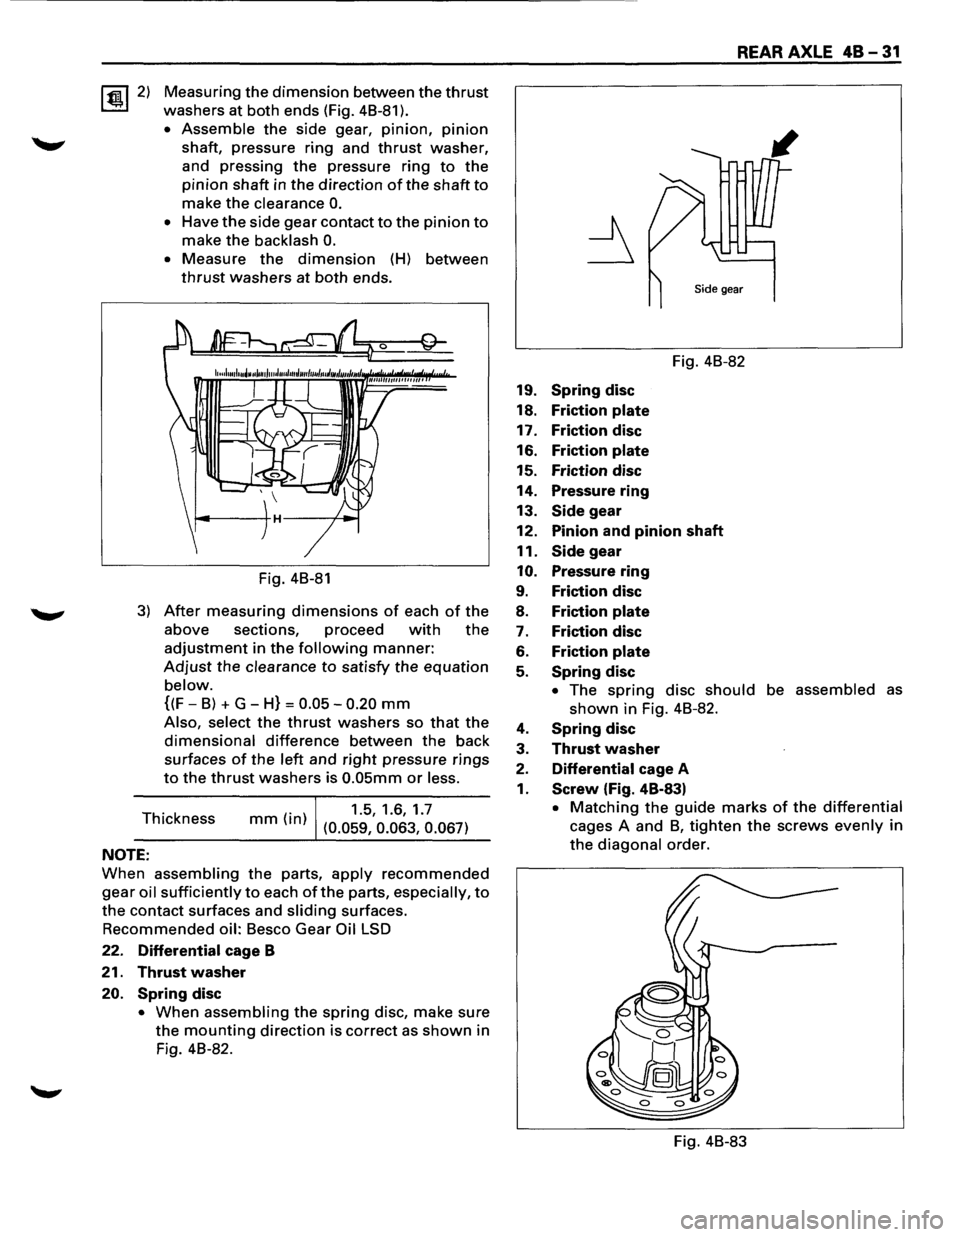
~2) Measuring the dimension between the thrust
washers at both ends (Fig. 48-81 ).
• Assemble the side gear, pinion, pinion
shaft, pressure ring and thrust washer,
and pressing
the pressure ring to the
pinion shaft in the direction of the shaft to
make the clearance 0.
• Have the side gear contact to the pinion to
make the backlash 0.
• Measure the dimension (H) between
thrust washers at both ends.
Fig. 48-81
3) After measuring dimensions of each of the
above sections, proceed with the
adjustment in the following manner:
Adjust the clearance to satisfy the equation
below.
{(F-8) + G-H} = 0.05-0.20 mm
Also, select the thrust washers so that the
dimensional difference between the back
surfaces
of the left and right pressure rings
to the thrust washers is 0.05mm or less.
Thickness (. )
1.5, 1.6, 1.7 mm In (0.059, 0.063, 0.067)
NOTE:
When assembling the parts, apply recommended
gear oil sufficiently to each of the parts, especially, to
the contact surfaces and sliding surfaces.
Recommended oil: 8esco Gear Oil LSD
22. Differential cage B
21. Thrust washer
20. Spring disc
• When assembling the spring disc, make sure
the mounting direction is correct as shown in
Fig. 48-82.
REAR AXLE 48-31
Fig. 48-82
19.
Spring disc
18. Friction plate
17. Friction disc
16. Friction plate
15. Friction disc
14. Pressure ring
13.
Side gear
12. Pinion and pinion shaft
11.
Side gear
10. Pressure ring
9. Friction disc
8. Friction plate
7. Friction disc
6. Friction plate
5. Spring disc
• The spring disc should be assembled as
shown in Fig. 48-82.
4. Spring disc
3. Thrust washer
2. Differential cage A
1. Screw (Fig. 48-83)
• Matching the guide marks of the differential
cages A and 8, tighten the screws evenly in
the diagonal order.
Fig. 48-83
Page 274 of 1928
48 32 REAR AXLE
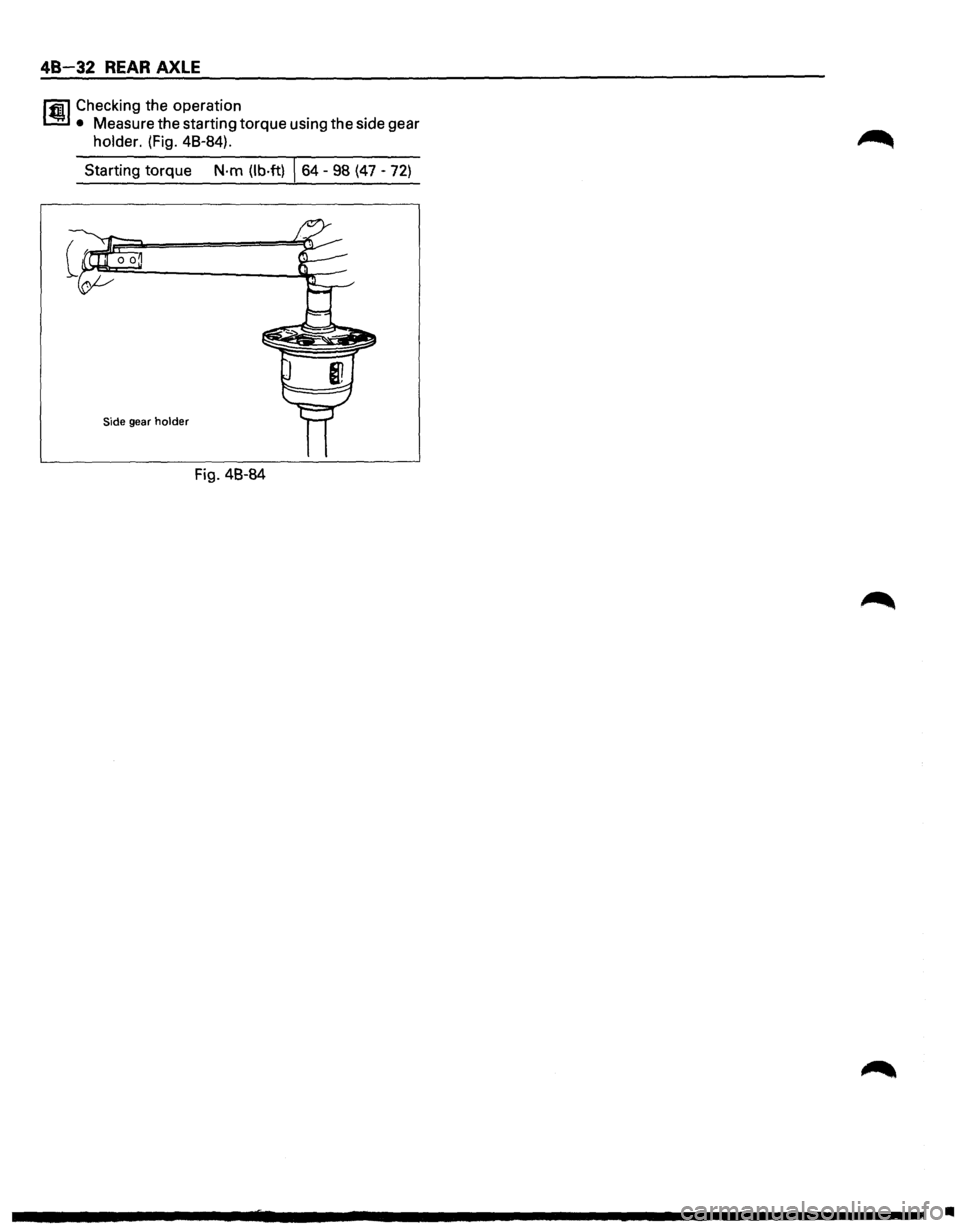
lfl1 Checking the operation
1.!!:.1 • Measure the starting torque using the side gear
holder. (Fig. 48-84).
Starting torque
N·m (lb·ft) \s4 -98 (47 -72)
Side gear holder
Fig. 48-84
•
Page 275 of 1928
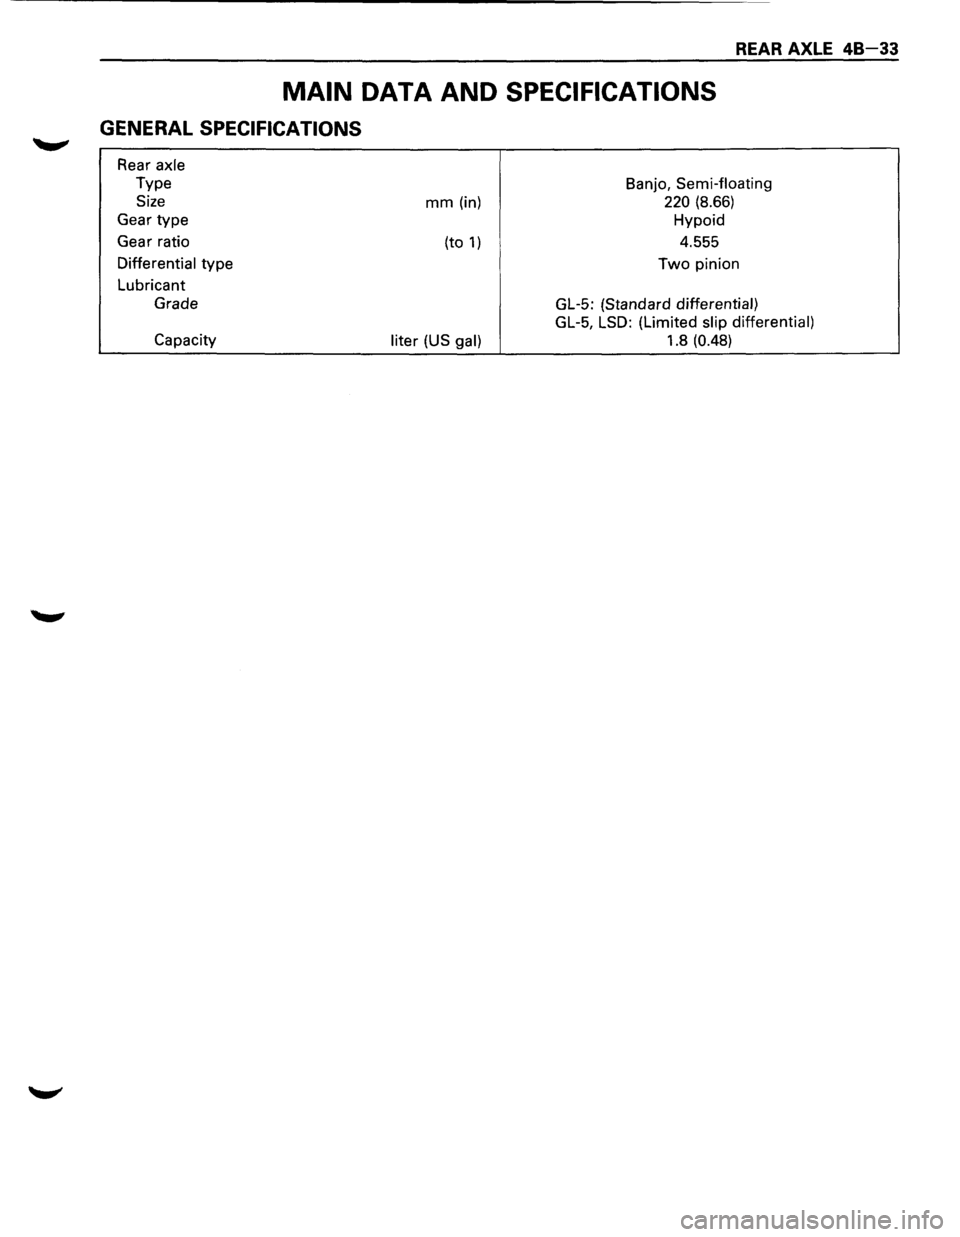
REAR AXLE 48-33
MAIN DATA AND SPECIFICATIONS
GENERAL SPECIFICATIONS
Rear axle
Type
Size
Gear type
Gear ratio
Differential type
Lubricant
Grade
Capacity
mm (in)
(to
1)
liter (US gal)
Banjo, Semi-floating
220 (8.66)
Hypoid
4.555
Two pinion
GL-5: (Standard
differential)
GL-5, LSD:
(Limited slip differential)
1.8 (0.48)
Page 276 of 1928
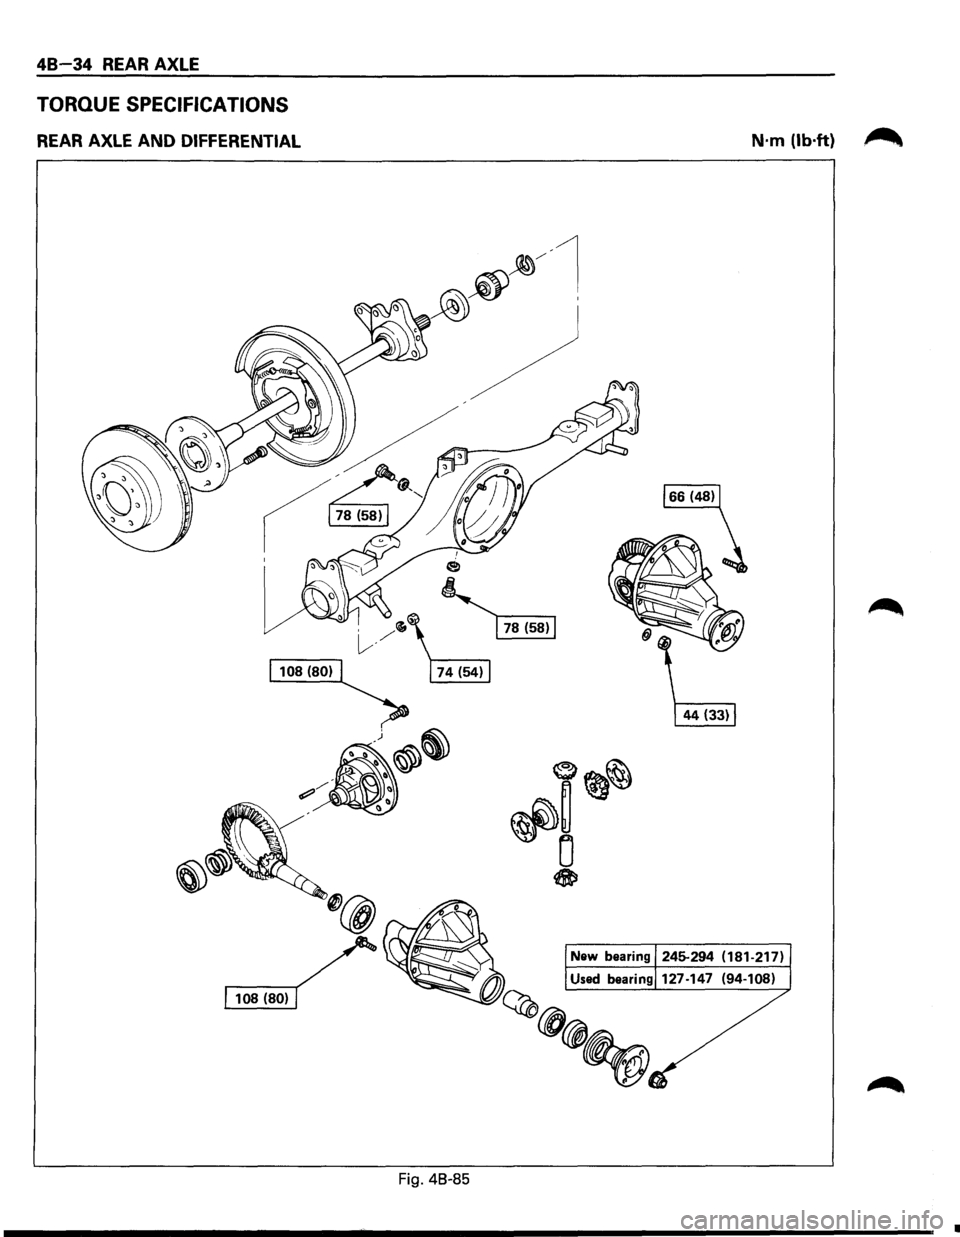
48 34 REAR AXLE
TORQUE SPECIFICATIONS
REAR AXLE AND DIFFERENTIAL
Fig. 48-85
N·m (lb·ft) ~
•
Page 277 of 1928
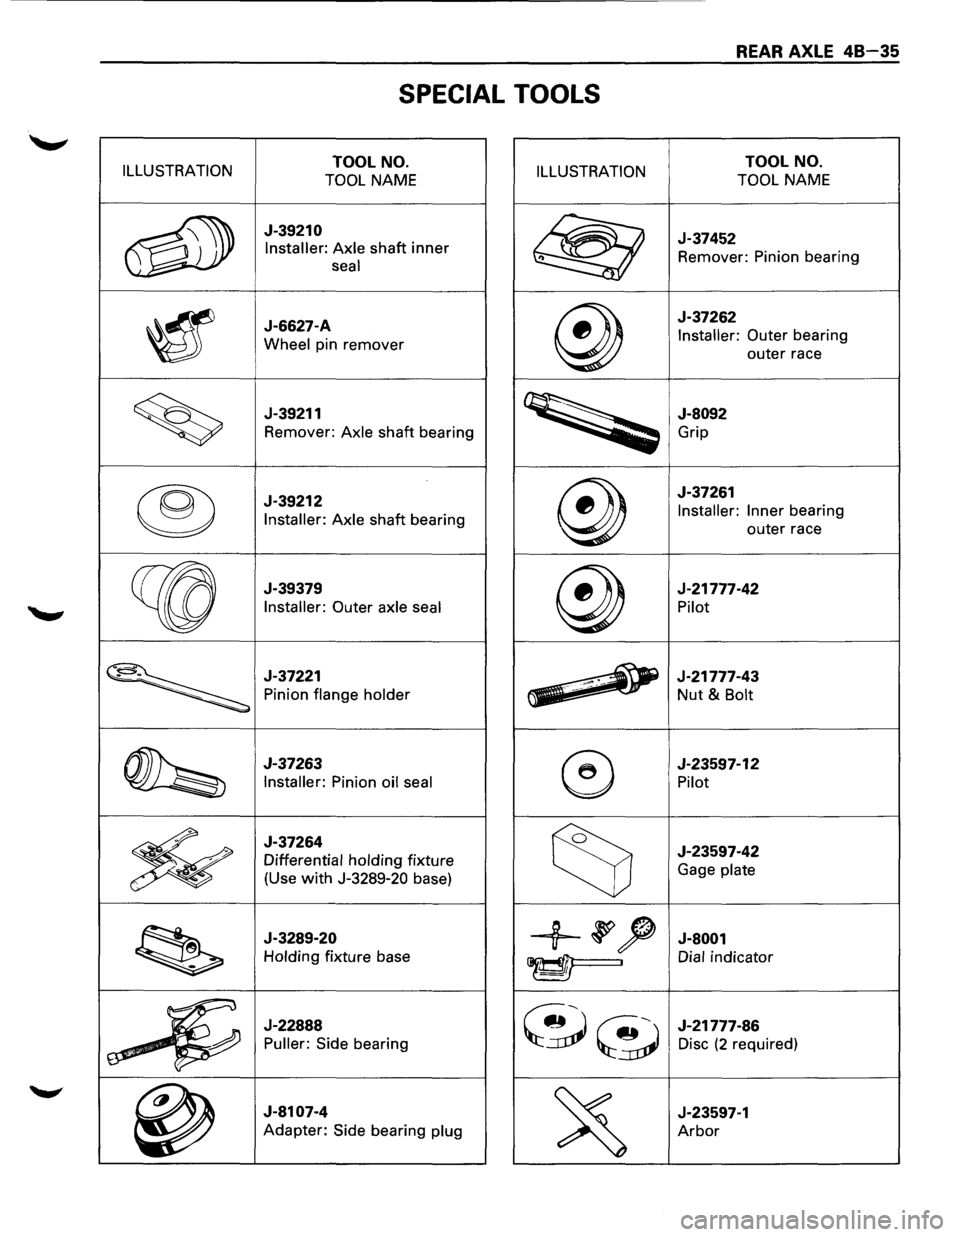
REAR AXLE 48-35
SPECIAL TOOLS
ILLUSTRATION TOOL NO.
TOOL NAME ILLUSTRATION TOOL NO.
TOOL NAME
~
J-39210
Installer: Axle shaft inner
seal @
J-37452
Remover: Pinion bearing
~
J-6627-A
Wheel pin remover @
J-37262
Installer: Outer bearing
outer race
~
J-39211
Remover: Axle shaft bearing
~
J-8092
Grip
®
J-39212
Installer: Axle shaft bearing @
J-37261
Installer: Inner bearing
outer race
~
J-39379
Installer: Outer axle seal @
J-21777-42
Pilot
~
J-37221
Pinion flange holder ~ ~
J-21777-43 -Nut & Bolt
~
J-37263
Installer: Pinion oil seal ®
J-23597-12
Pilot
~
J-37264
Differential holding fixture
(Use
with J-3289-20 base) ~
J-23597-42
Gage plate
~
J-3289-20
Holding fixture base +~~ J-8001
~I Dial indicator
a
~_j~
J-22888
Puller: Side bearing ~~
J-21777-86
Disc (2 required)
~
J-8107-4
Adapter: Side bearing plug
~
J-23597-1
Arbor
Page 278 of 1928
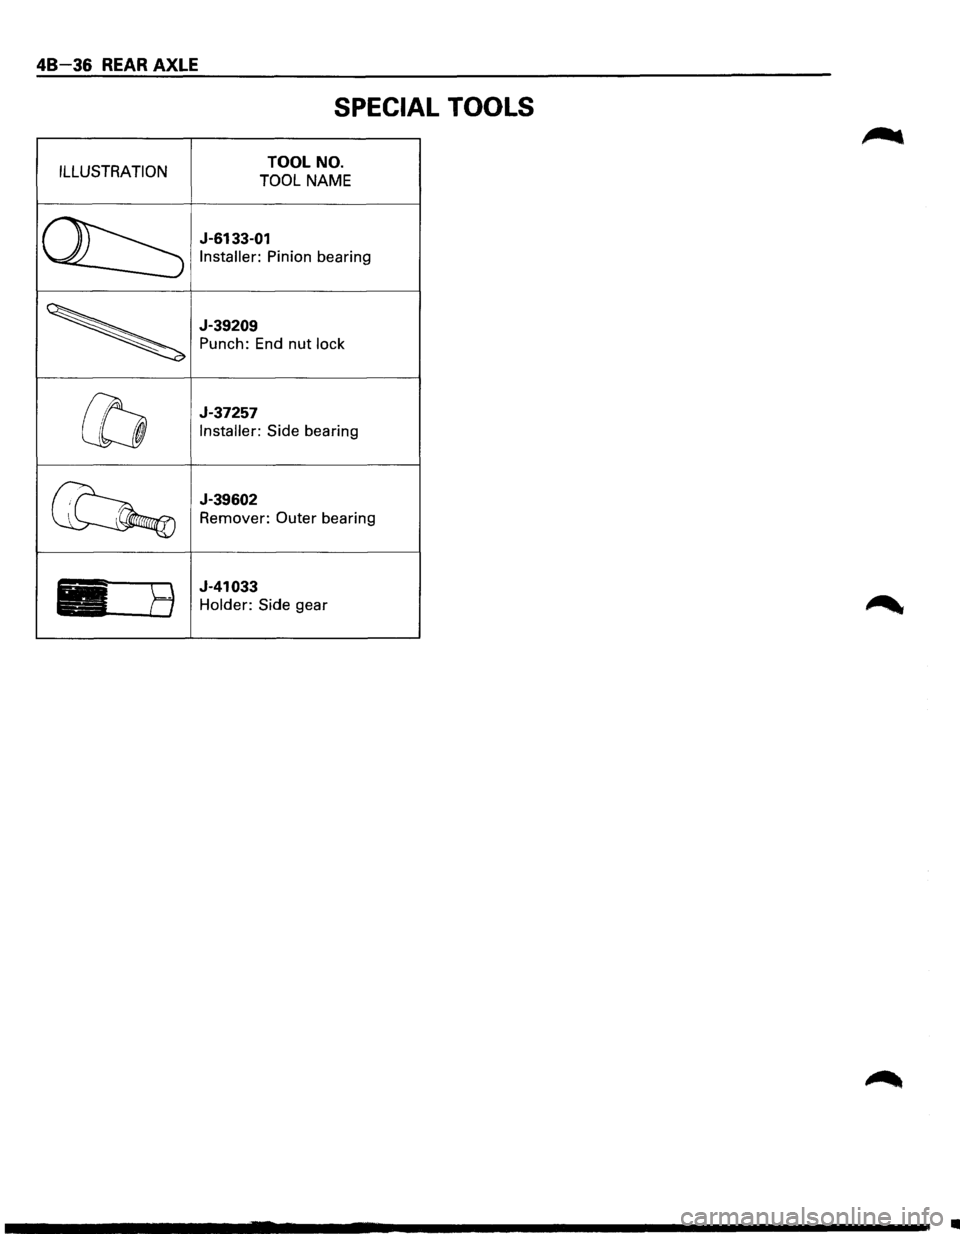
48-36 REAR AXLE
SPECIAL TOOLS
ILLUSTRATION TOOL NO.
TOOL NAME
J-6133-01
Installer: Pinion bearing
J-39209
Punch:
End nut lock
J-37257
Installer: Side bearing
J-39602
Remover: Outer bearing
J-41033
Holder: Side
gear
•
Page 279 of 1928
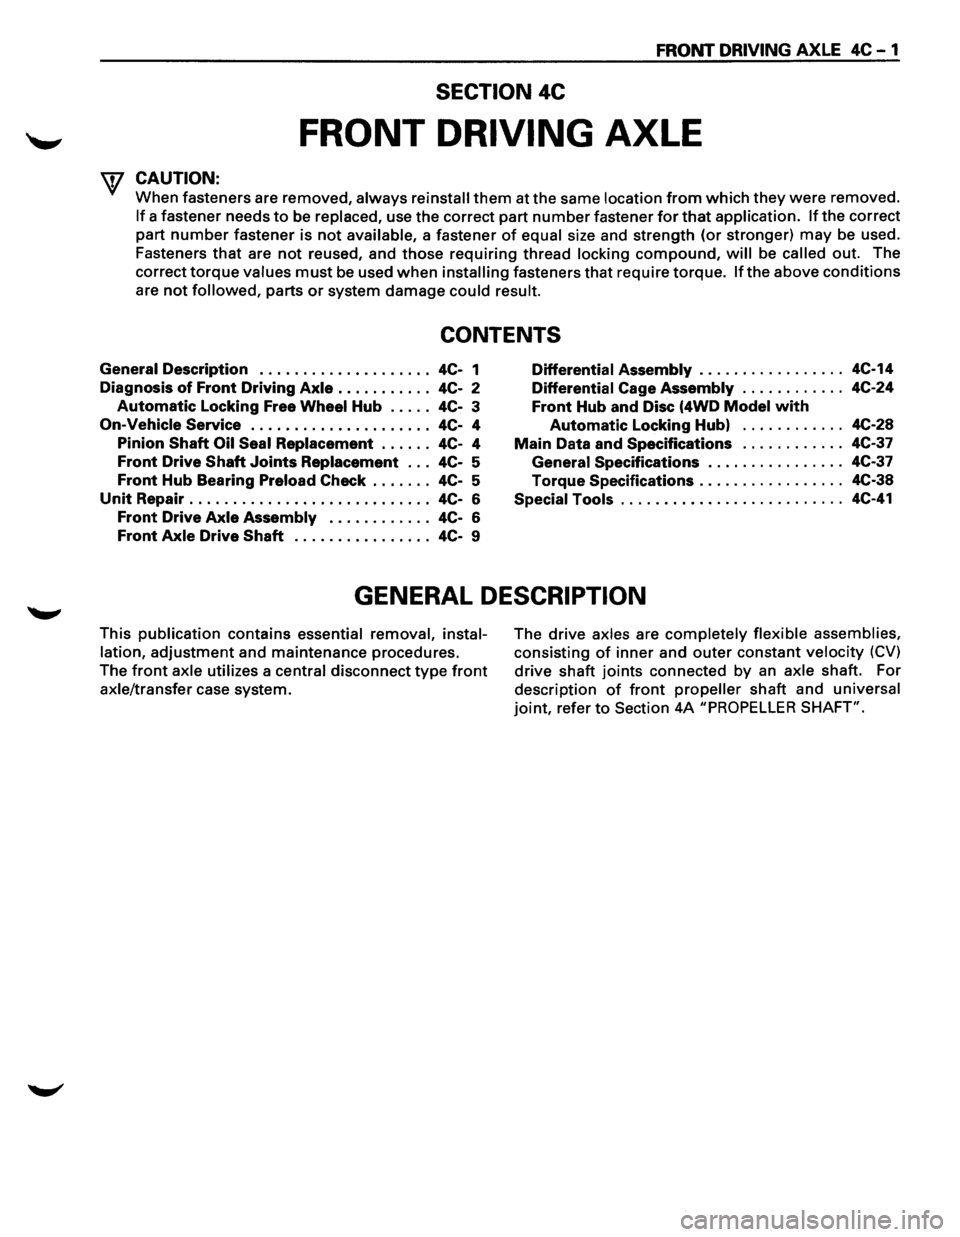
FRONT DRIVING AXLE 4C-1
SECTION 4C
FRONT DRIVING AXLE
'f CAUTION:
When fasteners are removed, always reinstall them at the same location from which they were removed.
If a fastener needs to be replaced, use the correct part number fastener for that application. If the correct
part
number fastener is not available, a fastener of equal size and strength (or stronger) may be used.
Fasteners
that are not reused, and those requiring thread locking compound, will be called out. The
correct
torque values must be used when installing fasteners that require torque. If the above conditions
are not followed, parts or system damage could result.
CONTENTS
General Description . . . . . . . . . . . . . . . . . . . . 4C-1
Diagnosis
of Front Driving Axle . . . . . . . . . . . 4C-2
Automatic Locking Free Wheel Hub . . . . . 4C-3
On-Vehicle Service ..................... 4C- 4
Pinion
Shaft Oil Seal Replacement . . . . . . 4C-4
Front Drive Shaft Joints Replacement . . . 4C-5
Front Hub Bearing Preload Check . . . . . . . 4C-5
Unit Repair . . . . . . . . . . . . . . . . . . . . . . . . . . . . 4C-6
Front Drive Axle Assembly . . . . . . . . . . . . 4C-6
Front Axle Drive Shaft . . . . . . . . . . . . . . . . 4C-9
Differential Assembly ................. 4C-14
Differential Cage Assembly . . . . . . . . . . . . 4C-24
Front Hub and Disc (4WD Model with
Automatic Locking Hub) . . . . . . . . . . . . 4C-28
Main Data and Specifications . . . . . . . . . . . . 4C-37
General Specifications . .
. . . . . . . . . . . . . . 4C-37
Torque Specifications ................. 4C-38
Special Tools .......................... 4C-41
GENERAL DESCRIPTION
This publication contains essential removal, instal
lation,
adjustment and maintenance procedures.
The
front axle utilizes a central disconnect type front
axle/transfer case system. The
drive axles are completely flexible assemblies,
consisting
of inner and outer constant velocity (CV)
drive shaft joints connected by an axle shaft. For
description
of front propeller shaft and universal
joint, refer to Section 4A "PROPELLER SHAFT".
Page 280 of 1928
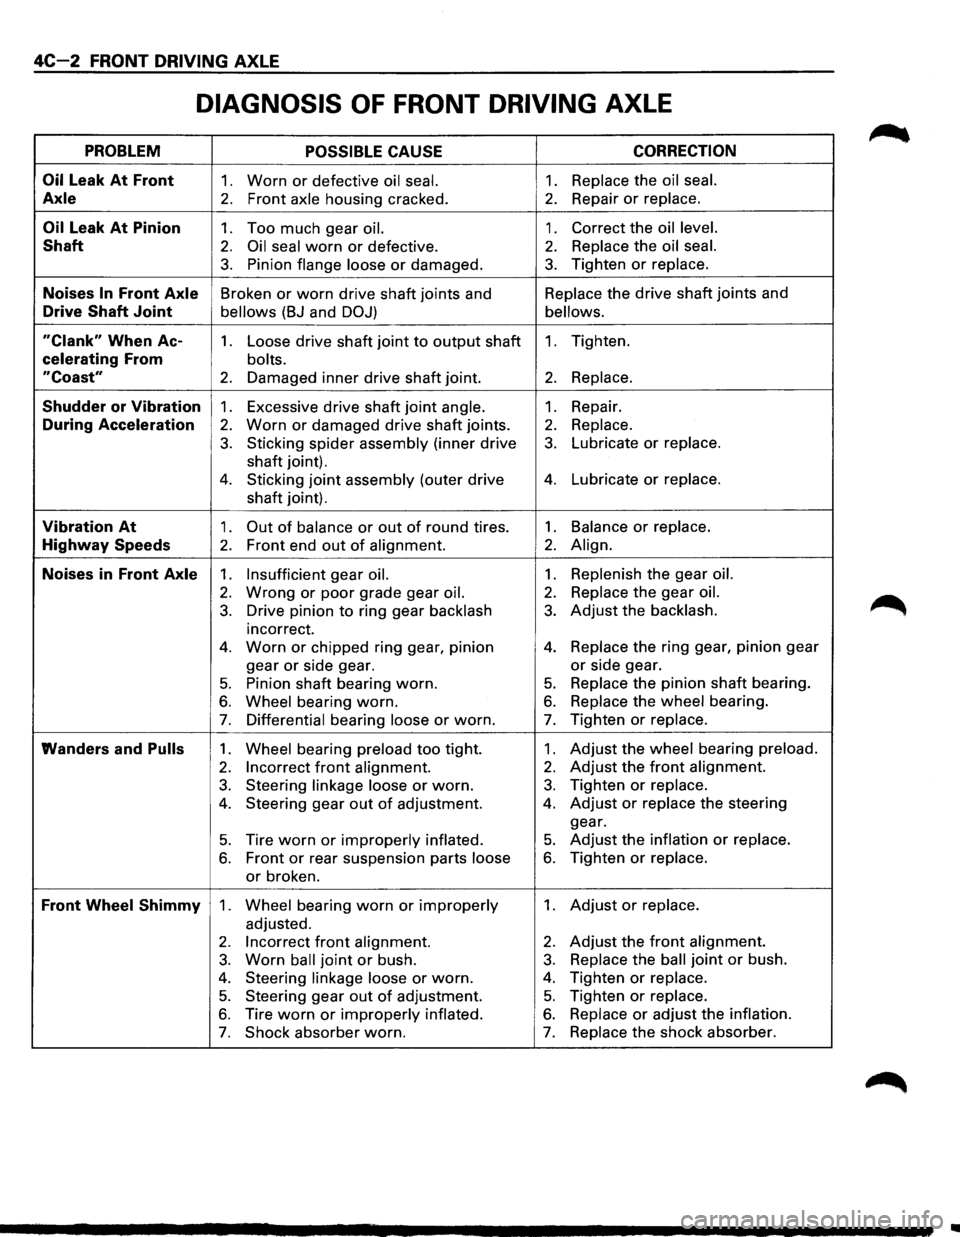
4C-2 FRONT DRIVING AXLE
DIAGNOSIS OF FRONT DRIVING AXLE
PROBLEM POSSIBLE CAUSE CORRECTION
Oil
Leak At Front 1. Worn or defective oil seal. 1. Replace the oil seal.
Axle 2. Front axle housing cracked. 2. Repair or replace.
Oil Leak At Pinion 1. Too much gear oil. 1. Correct the oil level.
Shaft 2. Oil seal worn or defective. 2. Replace the oil seal.
3. Pinion flange loose or damaged. 3. Tighten or replace.
Noises In Front Axle Broken or worn drive shaft joints and Replace
the drive shaft joints and
Drive Shaft Joint bellows (BJ and DOJ) bellows.
"Clank" When Ac-1. Loose drive shaft joint to output shaft 1. Tighten.
celerating From bolts.
"Coast" 2. Damaged inner drive shaft joint. 2. Replace.
Shudder or Vibration 1. Excessive drive shaft joint angle. 1. Repair.
During Acceleration 2. Worn or damaged drive shaft joints. 2. Replace.
3. Sticking spider assembly (inner drive 3. Lubricate or replace.
shaft joint).
4. Sticking joint assembly (outer drive 4. Lubricate or replace.
shaft joint).
Vibration At 1. Out of balance or out of round tires. 1. Balance or replace.
Highway Speeds 2. Front end out of alignment. 2. Align.
Noises in Front Axle 1. Insufficient gear oil. 1. Replenish the gear oil.
2. Wrong or poor grade gear oil. 2. Replace the gear oil.
3. Drive pinion to ring gear backlash 3. Adjust the backlash.
incorrect.
4. Worn or chipped ring gear, pinion 4. Replace the ring gear, pinion gear
gear
or side gear. or side gear.
5. Pinion shaft bearing worn. 5. Replace the pinion shaft bearing.
6. Wheel bearing worn. 6. Replace the wheel bearing.
7. Differential bearing loose or worn. 7. Tighten or replace.
Wanders and Pulls 1. Wheel bearing preload too tight. 1. Adjust the wheel bearing preload.
2. Incorrect front alignment. 2. Adjust the front alignment.
3. Steering linkage loose or worn. 3. Tighten or replace.
4. Steering gear out of adjustment. 4. Adjust or replace the steering
gear.
5. Tire worn or improperly inflated. 5. Adjust the inflation or replace.
6. Front or rear suspension parts loose 6. Tighten or replace.
or broken.
Front Wheel Shimmy 1. Wheel bearing worn or improperly 1. Adjust or replace.
adjusted.
2. Incorrect front alignment. 2. Adjust the front alignment.
3. Worn ball joint or bush. 3. Replace the ball joint or bush.
4. Steering linkage loose or worn. 4. Tighten or replace.
5. Steering gear out of adjustment. 5. Tighten or replace.
6. Tire worn or improperly inflated. 6. Replace or adjust the inflation.
7. Shock absorber worn. 7. Replace the shock absorber.
..