lock ISUZU TROOPER 1995 Workshop Manual
[x] Cancel search | Manufacturer: ISUZU, Model Year: 1995, Model line: TROOPER, Model: ISUZU TROOPER 1995Pages: 1928
Page 1047 of 1928
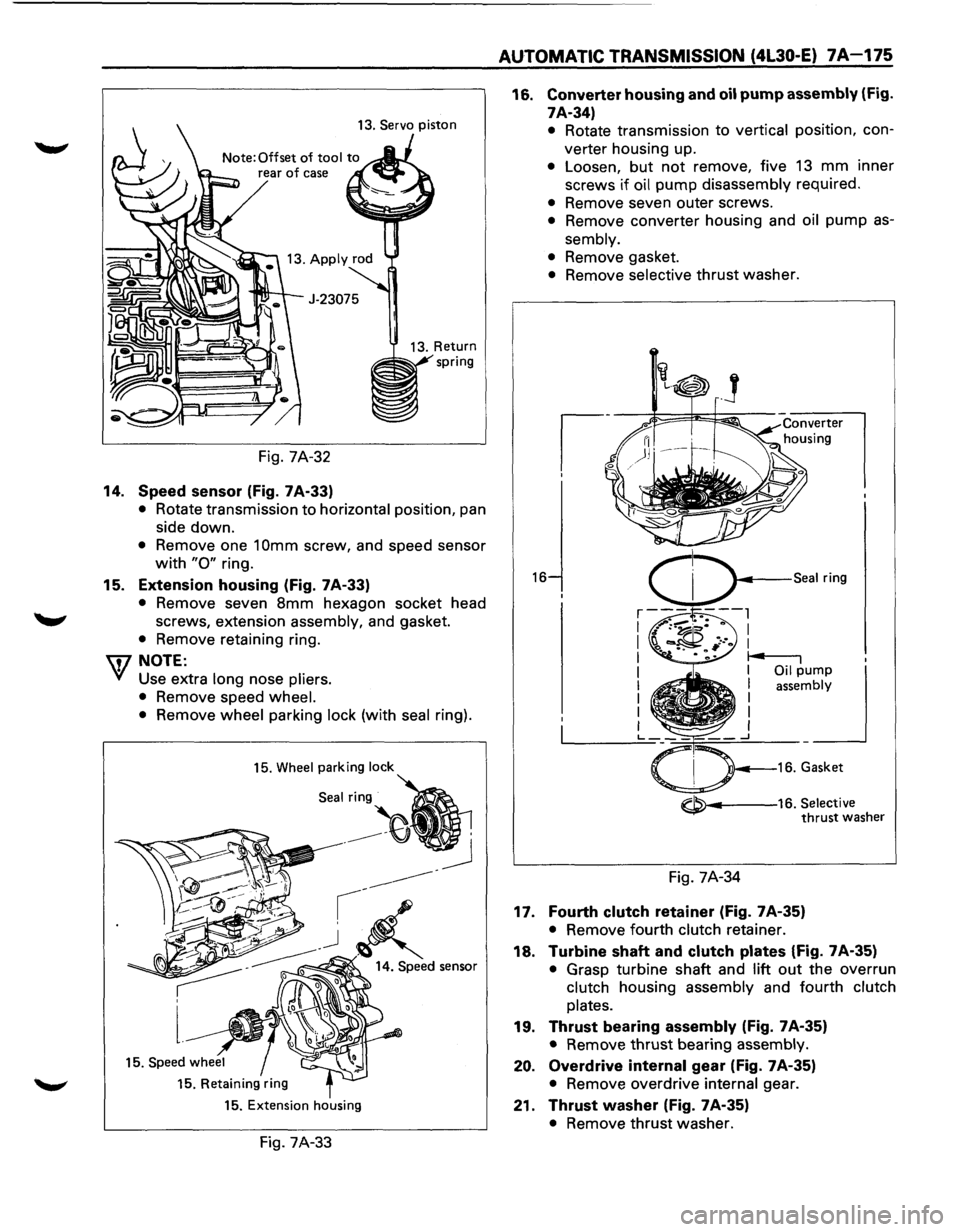
13. Servo piston
Fig. 7A-32
14. Speed sensor (Fig. 7A-33)
• Rotate transmission to horizontal position, pan
side down.
• Remove one 1 Omm screw, and speed sensor
with "0" ring.
15. Extension housing (Fig. 7 A-33)
• Remove seven 8mm hexagon socket head
screws, extension assembly, and gasket.
• Remove retaining ring.
\fl NOTE:
V Use extra long nose pliers.
• Remove speed wheel.
• Remove wheel parking lock (with seal ring).
15. Wheel parking lock
Seal:~
15. Retaining ring
15. Extension housing
Fig. 7A-33
AUTOMATIC TRANSMISSION (4L30-E) 7A-175
16. Converter housing and oil pump assembly (Fig.
7A-34)
16
• Rotate transmission to vertical position, con
verter housing up.
• Loosen, but not remove, five 13 mm inner
screws
if oil pump disassembly required.
• Remove seven outer screws.
• Remove converter housing and oil pump as
sembly.
• Remove gasket.
• Remove selective thrust washer.
~---16. Selective thrust washer
Fig. 7A-34
17. Fourth clutch retainer (Fig. 7A-35)
• Remove fourth clutch retainer.
18. Turbine shaft and clutch plates (Fig. 7A-35)
• Grasp turbine shaft and lift out the overrun
clutch housing assembly and fourth
clutch
plates.
19. Thrust bearing assembly (Fig. 7A-35)
• Remove thrust bearing assembly.
20. Overdrive internal gear (Fig. 7A-35)
• Remove overdrive internal gear.
21. Thrust washer (Fig. 7A-35)
• Remove thrust washer.
Page 1049 of 1928
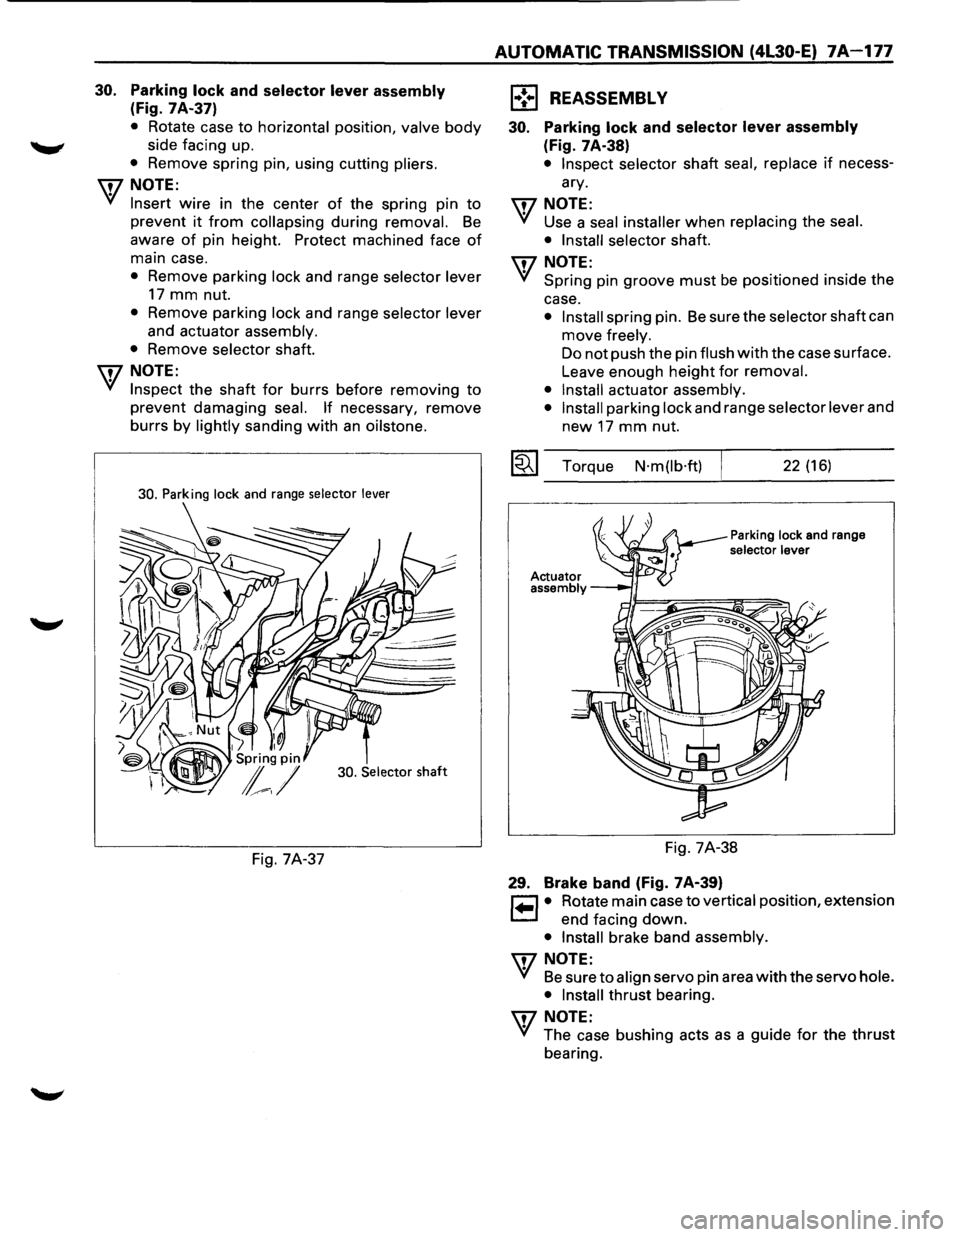
30. Parking lock and selector lever assembly
(Fig. 7A-37)
• Rotate case to horizontal position, valve body
side facing up.
• Remove spring pin, using cutting pliers.
\fl NOTE:
~ Insert wire in the center of the spring pin to
prevent it from collapsing during removal. Be
aware of pin height. Protect machined face of
main case.
• Remove parking lock and range selector lever
17 mm nut.
• Remove parking lock and range selector lever
and actuator assembly.
•
Remove selector shaft.
\fl NOTE:
~ Inspect the shaft for burrs before removing to
prevent damaging seal. If necessary, remove
burrs
by lightly sanding with an oilstone.
30. Parking lock and range selector lever
30. Selector
shaft
Fig. 7A-37
AUTOMATIC TRANSMISSION (4L30-E) 7A-177
1 .. ! .. 1 REASSEMBLY
30. Parking lock and selector lever assembly
(Fig. 7A-38)
• Inspect selector shaft seal, replace if necess
ary.
\fl NOTE:
~ Use a seal installer when replacing the seal.
• Install selector
shaft.
\fl NOTE:
~ Spring pin groove must be positioned inside the
case.
• Install spring pin. Be sure the selector shaft can
move
freely.
Do not push the pin flush with the case surface.
Leave enough
height for removal.
• Install
actuator assembly.
• Install
parking lock and range selector lever and
new 17 mm nut.
~~~ Torque N·m(lb·ft) 22 (16)
Parking lock and range selector lever
Fig. 7A-38
29. Brake band (Fig. 7A-39)
~ • Rotate main case to vertical position, extension
~ end facing down.
• Install brake band assembly.
\fl NOTE:
~ Be sure to align servo pin area with the servo hole.
• Install
thrust bearing.
\fl NOTE:
~ The case bushing acts as a guide for the thrust
bearing.
Page 1056 of 1928
7A-184 AUTOMATIC TRANSMISSION (4L30-E)
~· Ensure free rotation of pump using rotation
tool.
16
Pump rotation tool: J-23082-01
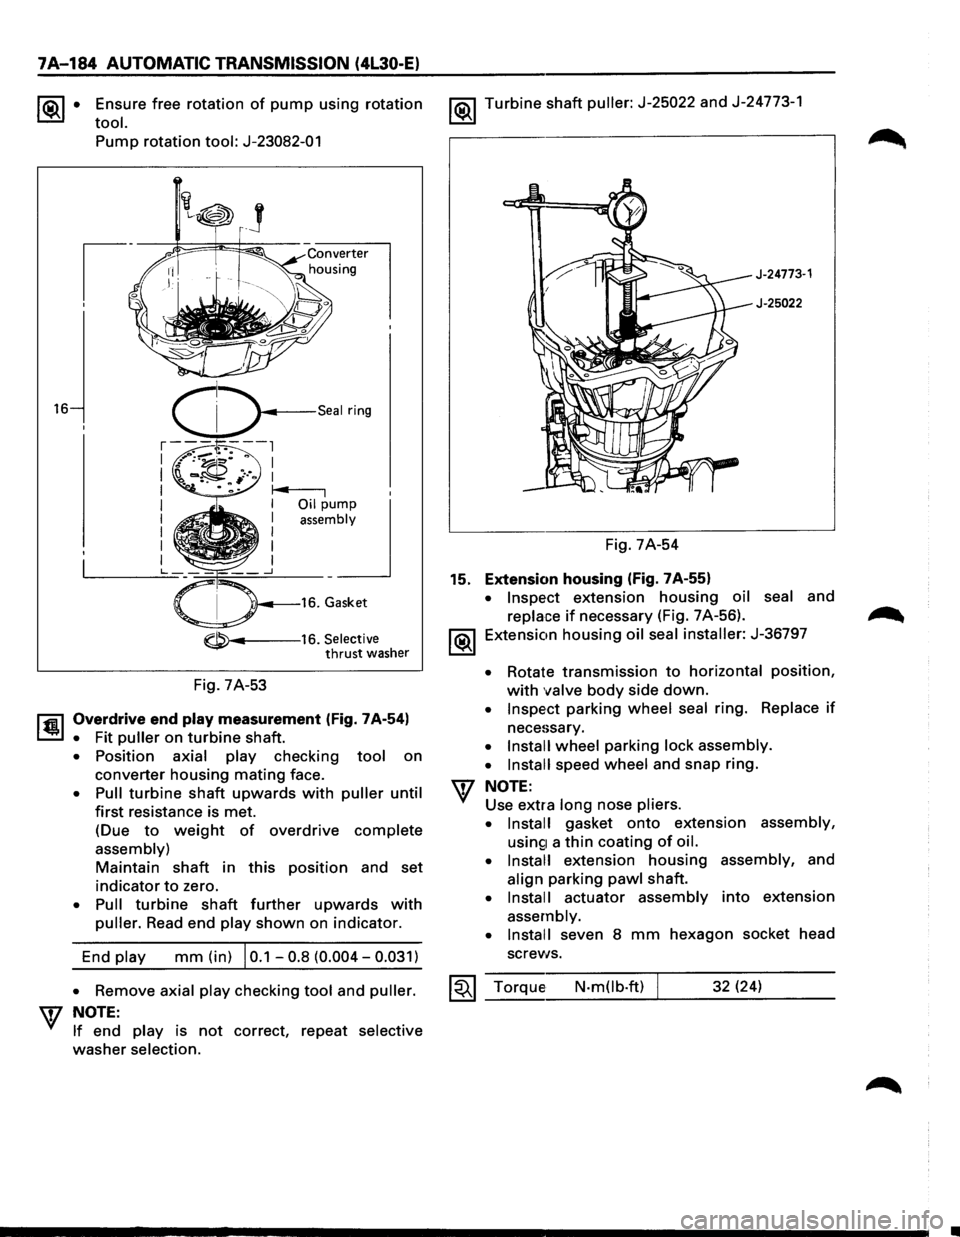
-----16. Selective thrust washer
Fig. 7A-53
l'fil Overdrive end play measurement (Fig. 7A-54)
~ • Fit puller on turbine shaft.
• Position axial play checking tool on
converter housing mating face.
• Pull turbine shaft upwards with puller until
first resistance is met.
(Due
to weight of overdrive complete
assembly)
Maintain shaft in this position and set
indicator to zero.
• Pull turbine shaft further upwards with
puller. Read end play shown on indicator.
End
play mm (in) I 0.1 -0.8 (0.004-0.031)
1®.1 Turbine shaft puller: J-25022 and J-24773-1
J-24773·1
J-25022
Fig. 7A-54
15. Extension housing (Fig. 7A-55)
• Inspect extension housing oil seal and
replace if necessary (Fig. 7 A-56).
1®.1 Extension housing oil seal installer: J-36797
• Rotate transmission to horizontal position,
with valve body side down.
• Inspect parking wheel seal ring. Replace if
necessary.
• Install wheel parking lock assembly.
• Install
speed wheel and snap ring.
NOTE:
Use extra long nose pliers.
• Install
gasket onto extension assembly,
usin£1 a thin coating of oil.
• Install
extension housing assembly, and
align parking pawl shaft.
• Install actuator assembly into extension
assembly.
• Install
seven 8 mm hexagon socket head
screws.
• Remove axial play checking tool and puller. ~~~ Torque N-m(lb.ft) 32 (24) W NOTE: _ __:_ ___ __:___:__J_ _ __.::..:::....=_:..:.__ __
If end play is not correct, repeat selective
washer selection.
Page 1057 of 1928
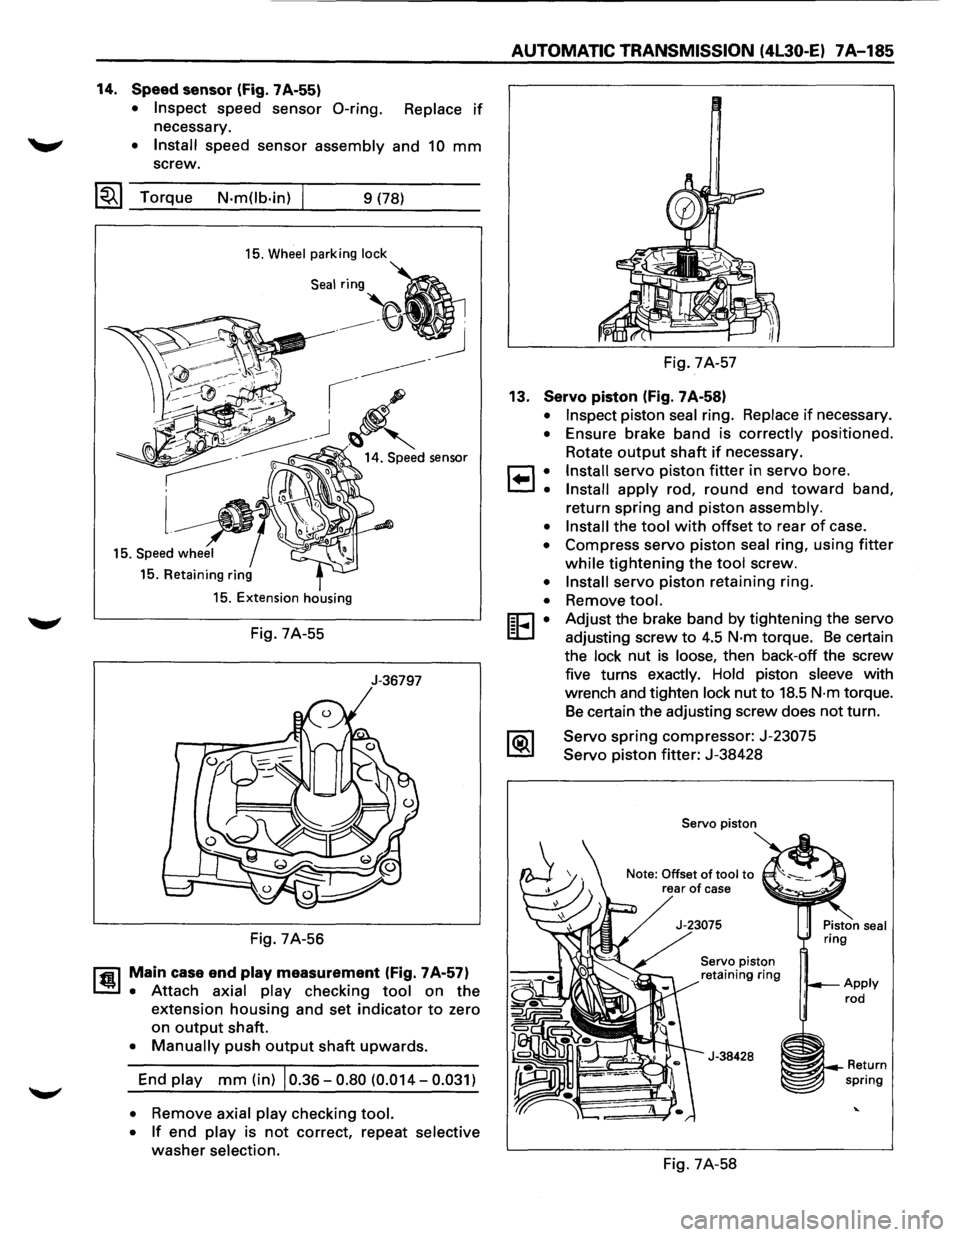
14. Speed sensor (Fig. 7A-55)
• Inspect speed sensor 0-ring. Replace if
necessary.
~ • Install speed sensor assembly and 10 mm
screw.
~~~ Torque N-m(lb-in) 9 (78)
15. Wheel parking lock
15. Retaining ring
15. Extension housing
Fig. 7A-55
J-36797
Fig. 7A-56
rfil Main case end play measurement (Fig. 7A-57)
~ • Attach axial play checking tool on the
extension housing and set indicator to zero
on
output shaft.
• Manually push output shaft upwards.
End play mm (in) 10.36-0.80 (0.014-0.031)
• Remove axial play checking tool.
• If end play is not correct, repeat selective
washer selection.
AUTOMATIC TRANSMISSION (4l30-E) 7A-185
Fig. 7A-57
13. Servo piston (Fig. 7A-58)
•
•
8:
•
•
•
•
[E•
Inspect piston seal ring. Replace if necessary .
Ensure brake band is correctly
positioned .
Rotate
output shaft if necessary.
Install servo piston fitter in servo bore.
Install apply rod, round end toward band,
return
spring and piston assembly.
Install the tool with offset to rear of case .
Compress servo
piston seal ring, using fitter
while tightening the tool screw.
Install servo piston retaining ring .
Remove
tool.
Adjust the brake band by tightening the servo
adjusting screw
to 4.5 N-m torque. Be certain
the lock nut
is loose, then back-off the screw
five turns exactly. Hold piston sleeve with
wrench and tighten lock nut to
18.5 N-m torque.
Be certain the adjusting screw does not turn.
Servo
spring compressor: J-23075
Servo piston fitter: J-38428
Servo piston
Note: Offset
of tool to rear of case
Servo piston
retaining ring
J-38428
Fig. 7A-58
~~--Return spring
Page 1070 of 1928
7A-198 AUTOMATIC TRANSMISSION (4L30-E)
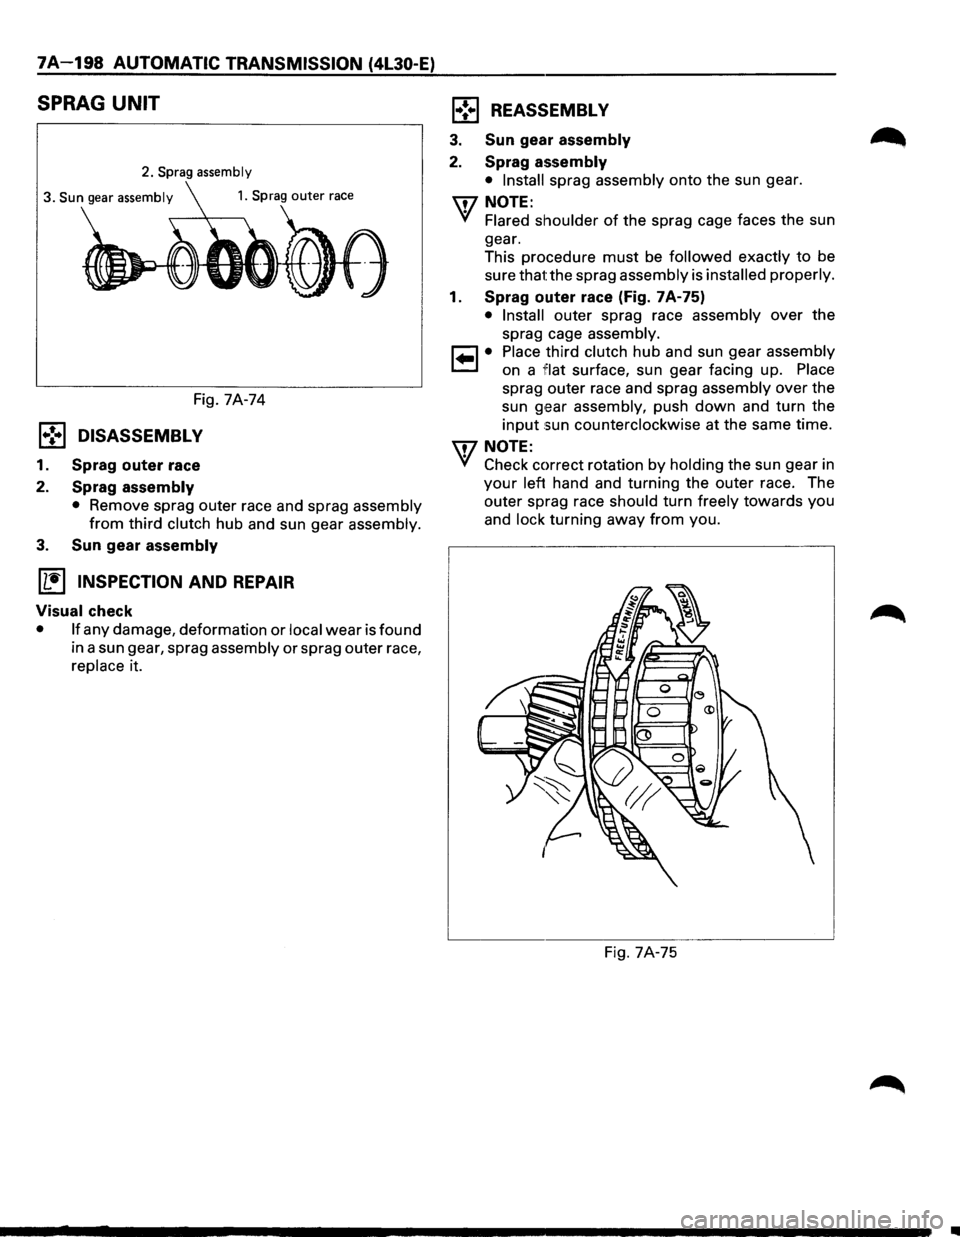
SPRAG UNIT
2. Sprag assembly
3. Sun gear assembly
Fig. 7A-74
1.,!•1 DISASSEMBLY
1. Sprag outer race
2.
Sprag assembly
• Remove sprag outer race and sprag assembly
from third clutch hub and sun gear assembly.
3. Sun gear assembly
(1!] INSPECTION AND REPAIR
Visual check
• If any damage, deformation or local wear is found
in a sun gear, sprag assembly or sprag outer race,
replace it.
1•! .. 1 REASSEMBLY
3. Sun gear assembly
2. Sprag assembly
• Install sprag assembly onto the sun gear.
\fl NOTE:
VI Flared shoulder of the sprag cage faces the sun
gear.
This procedure
must be followed exactly to be
sure that the sprag assembly is
installed properly.
1. Sprag outer race (Fig. 7A-75)
• Install outer sprag race assembly over the
sprag cage assembly.
1•1• Place third clutch hub and sun gear assembly
on a
1Fiat surface, sun gear facing up. Place
sprag outer race and sprag assembly over the
sun
g,ear assembly, push down and turn the
input sun counterclockwise at the same time.
\fl NOTE:
VI Check correct rotation by holding the sun gear in
your left hand and turning the outer race. The
outer sprag race should turn freely
towards you
and
lock turning away from you.
Fig. 7A-75
•
Page 1074 of 1928
7A-202 AUTOMATIC TRANSMISSION (4l30-E)
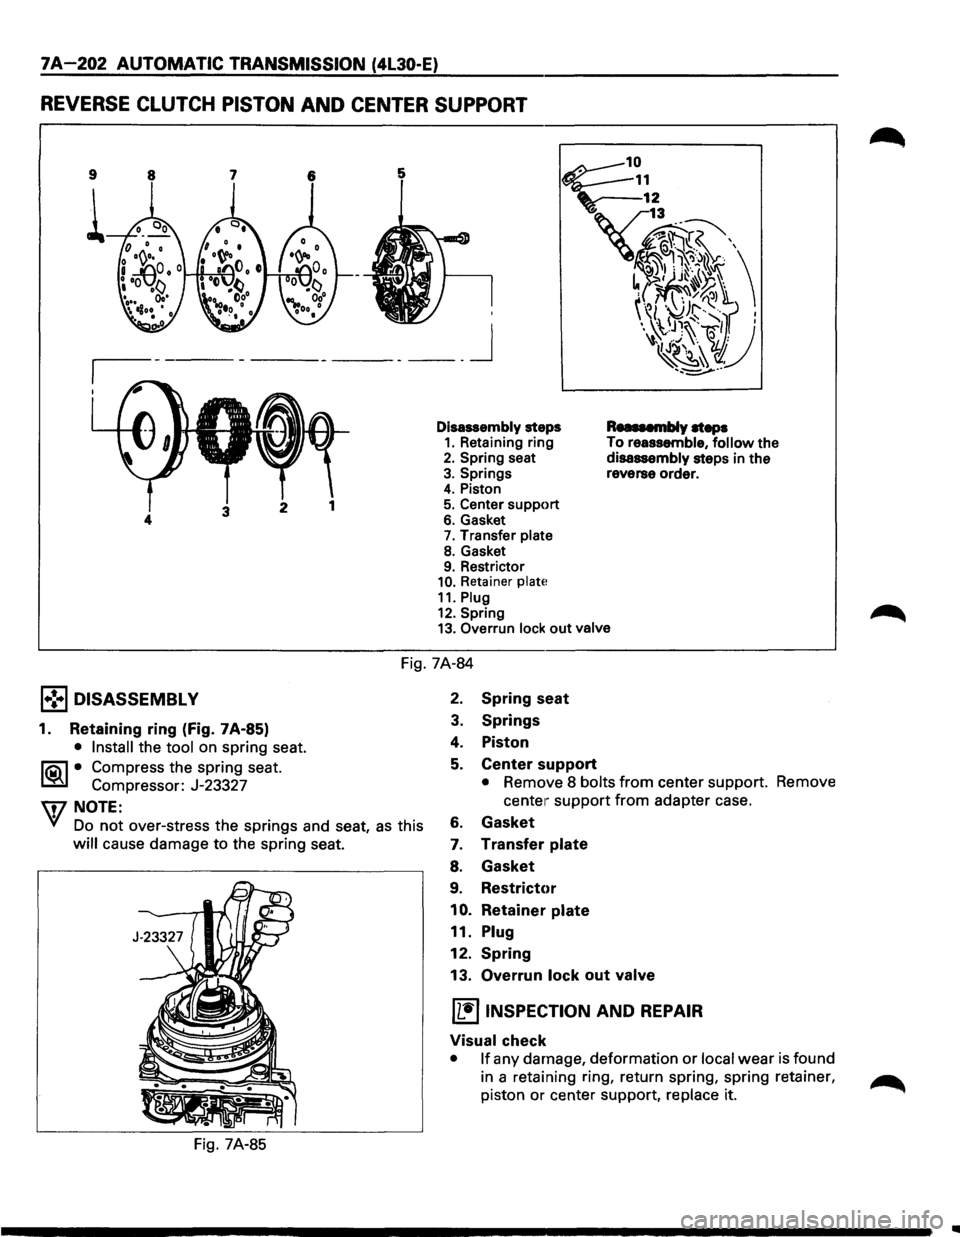
REVERSE CLUTCH PISTON AND CENTER SUPPORT
9
i
____ j
Disassembly steps 1. Retaining ring 2. Spring seat
3. Springs 4. Piston
5. Center support 6. Gasket 7. Transfer plate
8. Gasket 9. Restrictor 10. Retainer plate
11. Plug 12. Spring
RusMmbly steps To reassemble, follow the
disassembly steps in the
reverse order.
13. Overrun lock out valve
Fig. 7A-84
1•! .. 1 DISASSEMBLY
1. Retaining ring (fig. 7A-85)
• Install the tool on spring seat.
liC\1 • Compress the spring seat.
~ Compressor: J-23327
W NOTE:
¥1 Do not over-stress the springs and seat, as this
will cause damage to the spring seat.
Fig.
7A-85
2. Spring seat
3. Springs
4. Piston
5. Center support
• Remove 8 bolts from center support.
center· support from adapter case.
6. Gasket
7. Transfer plate
8. Gasket
9. Restrict<,r
10. Retainer plate
11. Plug
12. Spring
13. Overrun lock out valve
IL•IINSPECTION AND REPAIR
Visual check Remove
•
If any damage, deformation or local wear is found
in a retaining ring, return spring, spring retainer,
~
piston or center support, replace it.
..
Page 1075 of 1928
1 .. !•1 REASSEMBL V
13. Overrun lock out valve
........,
12. Spring
• Install overrun lock out valve and spring.
\fJ NOTE:
VI Ensure correct assembly of valve. The spring
should be located over the long small diameter
end.
11. Plug
10.
Pin
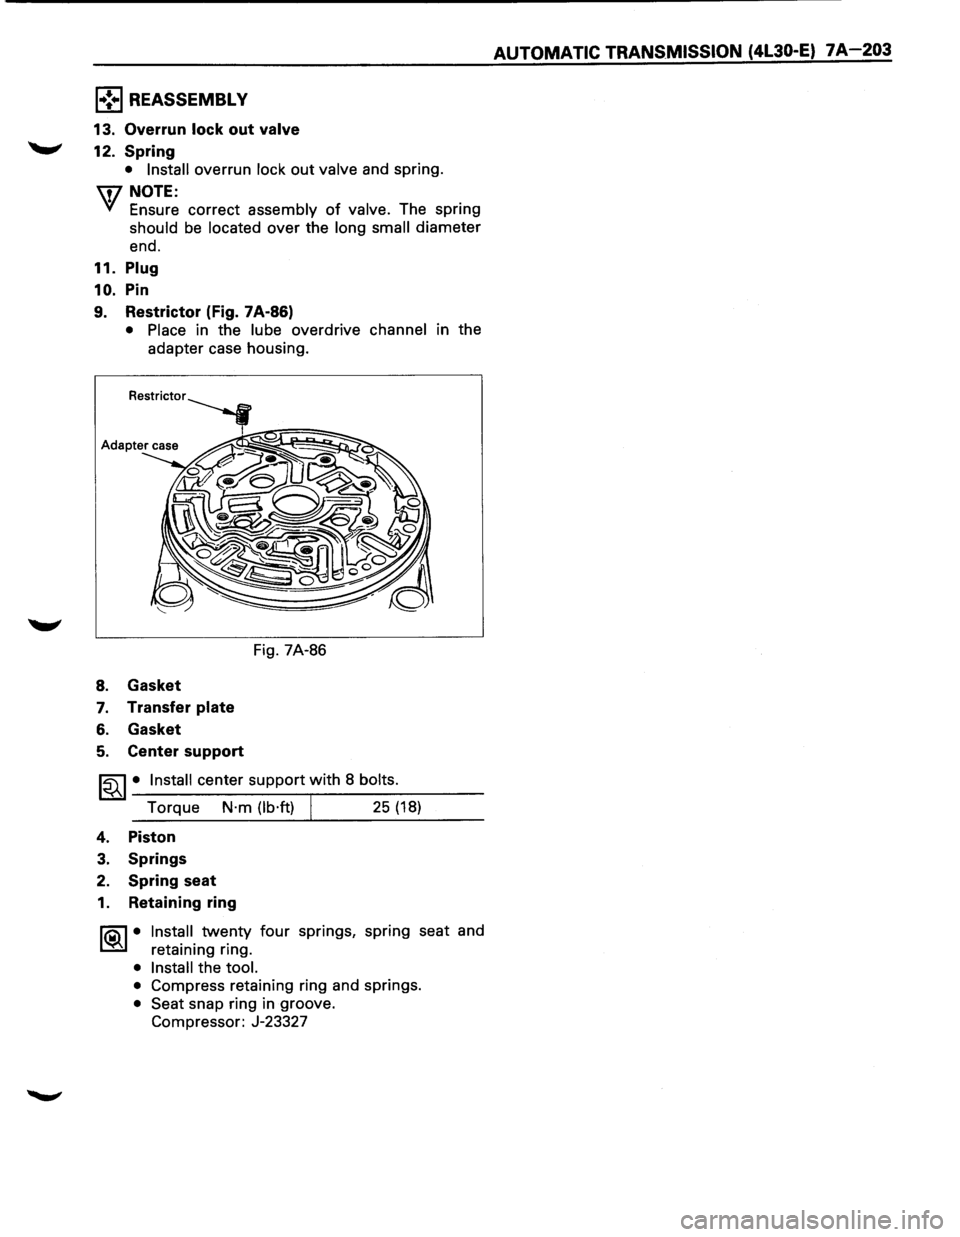
9. Restrictor (Fig. 7A·86)
• Place in the lube overdrive channel in the
adapter case housing.
8. Gasket
7. Transfer plate
6. Gasket
5. Center support
Fig. 7A-86
~~~· Install center support with 8 bolts.
Torque N·m (lb·ft) I 25 (18)
4. Piston
3. Springs
2. Spring seat
1. Retaining ring
1®.1• Install twenty four springs, spring seat and
retaining ring.
• Install the tool.
•
Compress retaining ring and springs.
• Seat snap ring in groove.
Compressor: J-23327
AUTOMATIC TRANS.MISSION (4L30-E) 7A-203
Page 1078 of 1928
7A-206 AUTOMATIC TRANSMISSION (4L30-E)
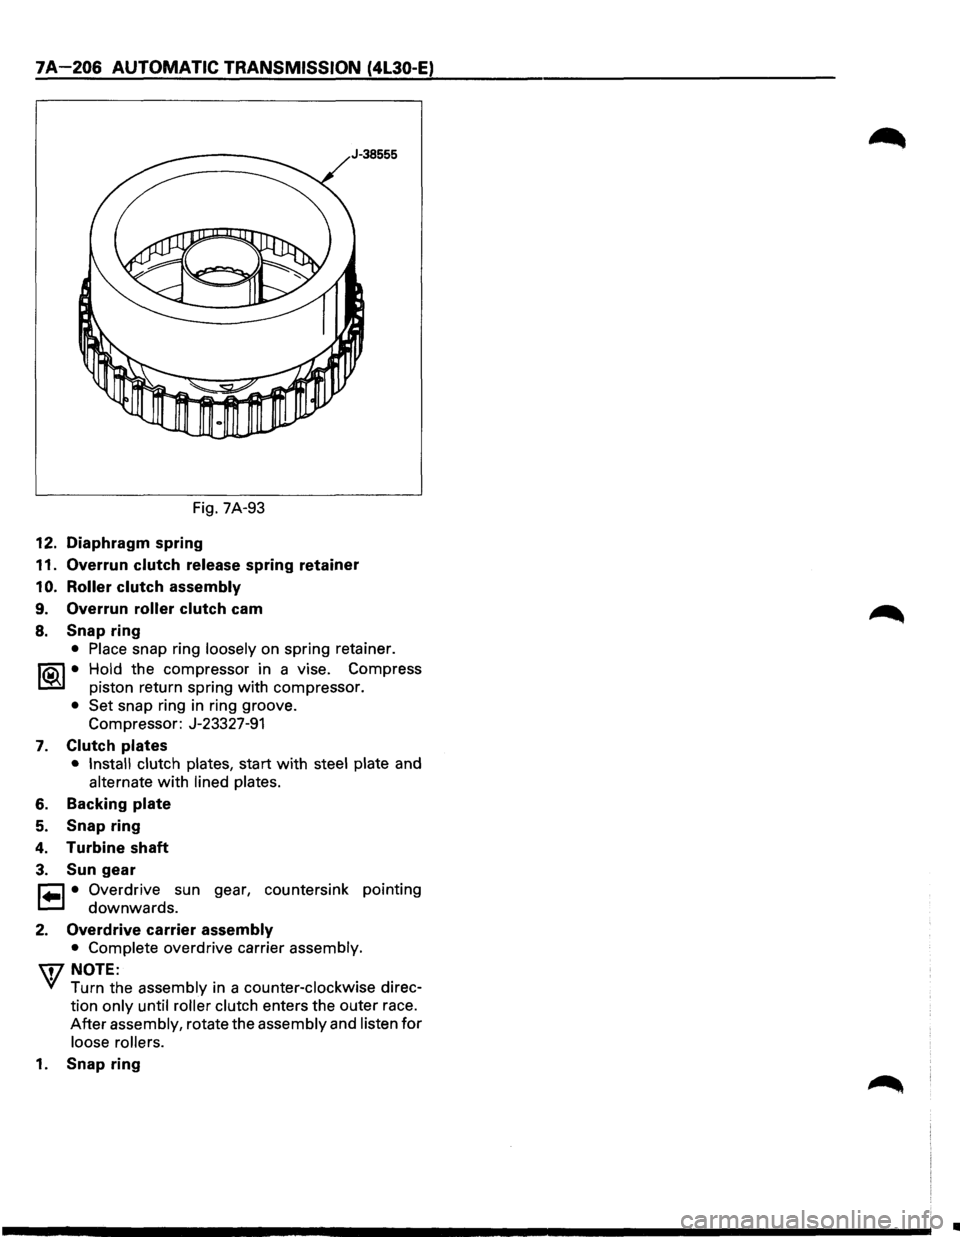
Fig. 7A-93
12. Diaphragm spring
11. Overrun clutch release spring retainer
1 0. Roller clutch assembly
9. Overrun roller clutch cam
8. Snap ring
• Place snap ring loosely on spring retainer.
I®J • Hold the compressor in a vise. Compress
piston return spring
with compressor.
• Set snap ring in ring groove.
Compressor: J-23327-91
7. Clutch plates
• Install clutch plates, start with steel plate and
alternate with lined plates.
6. Backing plate
5. Snap ring
4. Turbine shaft
3. Sun gear
r=l • Overdrive sun gear, countersink pointing
t=.l downwards.
2. Overdrive carrier assembly
• Complete overdrive carrier assembly.
\i7 NOTE:
VI Turn the assembly in a counter-clockwise direc
tion
only until roller clutch enters the outer race.
After assembly, rotate the assembly and listen for
loose rollers.
1. Snap ring
•
Page 1079 of 1928
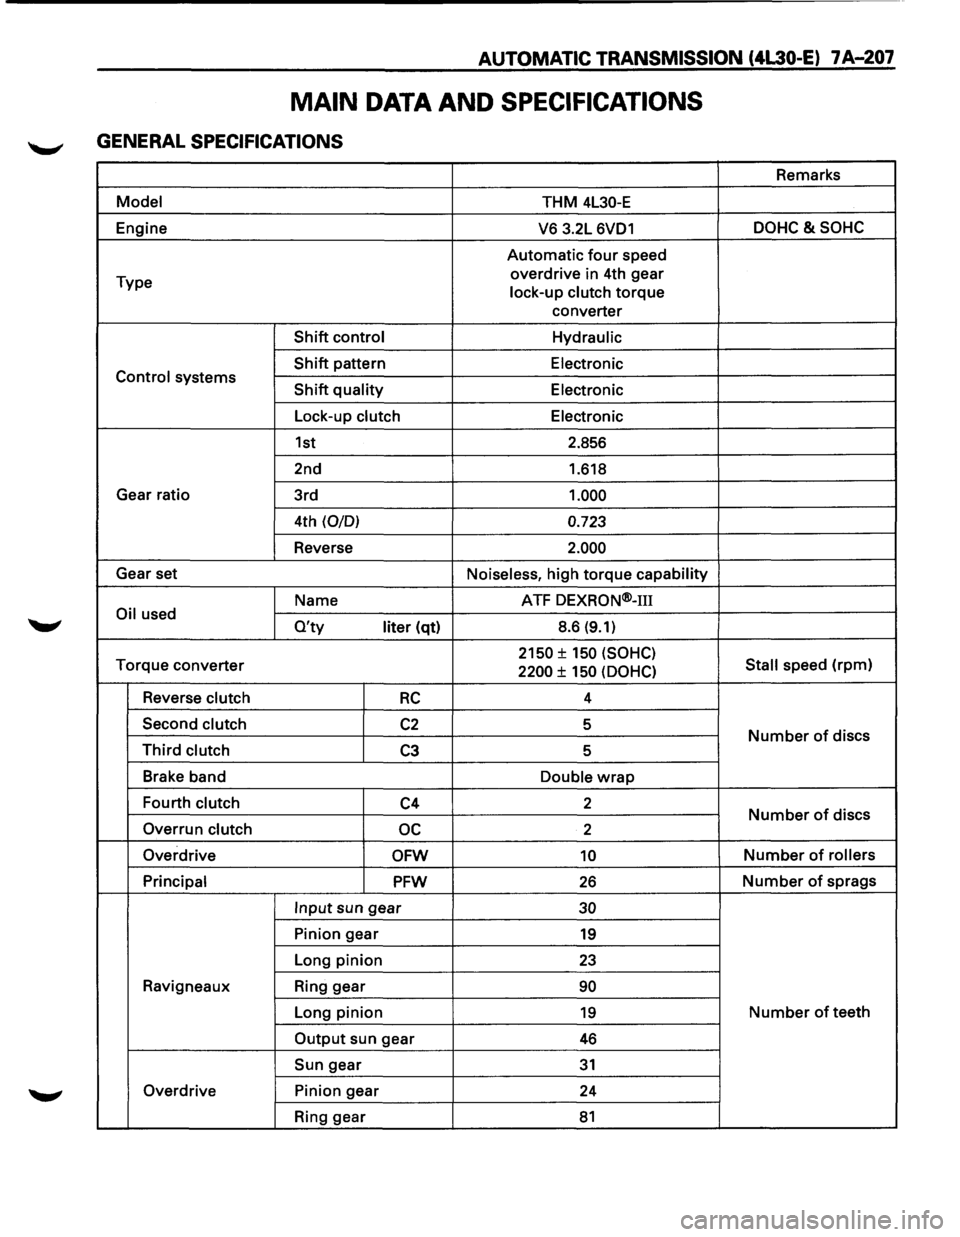
AUTOMATIC TRANSMISSION (4L30-E) 7 A-207
MAIN DATA AND SPECIFICATIONS
GENERAL SPECIFICATIONS
Remarks
Model THM 4L30-E
Engine
V6 3.2L 6VD1 DOHC&SOHC
Automatic four speed
Type overdrive
in 4th gear
lock-up clutch
torque
converter
Shift control Hydraulic
Shift pattern
Electronic Control systems Shift quality Electronic
Lock-up clutch Electronic
1st 2.856
2nd 1.618
Gear ratio
3rd
1.000
4th (0/0) 0.723
Reverse 2.000
Gear set
Noiseless, high torque capability
Name ATF
DEXRON®-m
Oil used O'ty liter (qt) 8.6 (9.1)
Torque
converter 2150 ± 150 (SOHC)
Stall speed (rpm) 2200 ± 150 (OOHC)
Reverse clutch RC 4
Second clutch
C2 5 Number of discs Third clutch C3 5
Brake band
Double
wrap
Fourth clutch C4 2 Number of discs
Overrun clutch oc 2
Overdrive
OFW 10 Number of rollers
Principal
PFW 26 Number of sprags
Input sun gear 30
Pinion gear 19
Long pinion 23
Ravigneaux Ring gear 90
Long pinion 19 Number of teeth
Output sun gear 46
Sun gear 31
Overdrive Pinion gear
24
Ring gear
81
Page 1086 of 1928
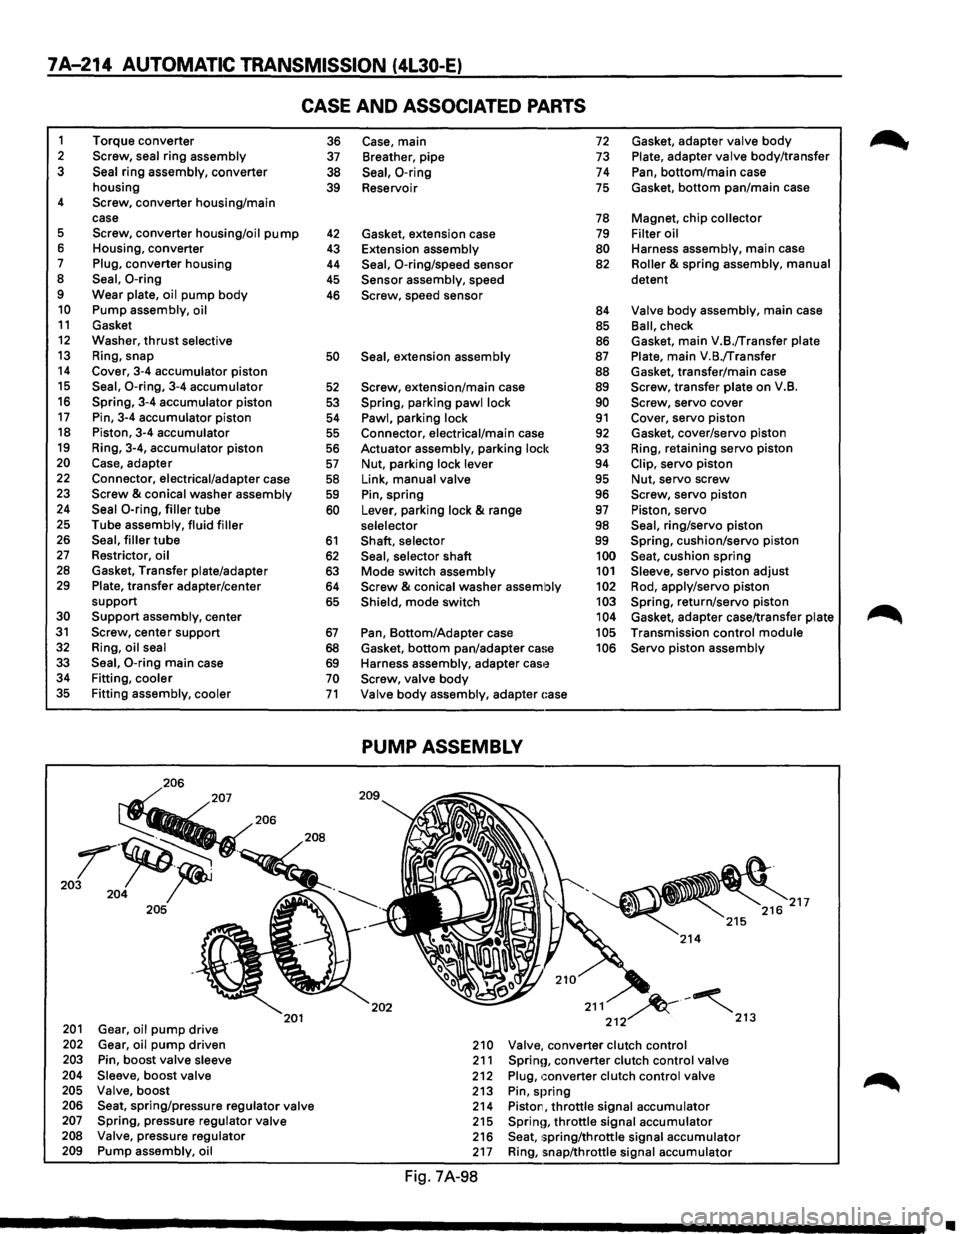
7A-214 AUTOMATIC TRANSMISSION (4L30-E)
CASE AND ASSOCIATED PARTS
1 Torque converter 2 Screw, seal ring assembly 3 Seal ring assembly, converter
housing
4 Screw, converter housing/main
case
5 Screw, converter housing/oil pump 6 Housing, converter 7 Plug, converter housing 8 Seal, 0-ring 9 Wear plate, oil pump body 10 Pump assembly, oil 11 Gasket 12 Washer, thrust selective 13 Ring, snap 14 Cover, 3-4 accumulator piston 15 Seal, 0-ring, 3-4 accumulator 16 Spring, 3-4 accumulator piston 17 Pin, 3-4 accumulator piston 18 Piston, 3-4 accumulator 19 Ring, 3-4, accumulator piston 20 Case, adapter 22 Connector, electrical/adapter case 23 Screw & conical washer assembly 24 Seal 0-ring, filler tube 25 Tube assembly, fluid filler 26 Seal, filler tube 27 Restrictor, oil 28 Gasket, Transfer plate/adapter 29 Plate, transfer adapter/center
support
30 Support assembly, center 31 Screw, center support 32 Ring, oil seal
33 Seal, 0-ring main case 34 Fitting, cooler 35 Fitting assembly, cooler
206
201 Gear, oil pump drive 202 Gear, oil pump driven 203 Pin, boost valve sleeve 204 Sleeve, boost valve 205 Valve, boost
201
206 Seat, spring/pressure regulator valve 207 Spring, pressure regulator valve 208 Valve, pressure regulator 209 Pump assembly, oil
36 37
38
39
42 43
44
45
46
50
52
53
54
55
56
57
58 59
60
61
62 63 64
65
67
68 69 70 71
Case, main 72 Gasket, adapter valve body
Breather, pipe 73 Plate, adapter valve body/transfer
Seal, 0-ring 74 Pan, bottom/main case
Reservoir
75 Gasket, bottom pan/main case
78 Magnet, chip collector
Gasket, extension case
79 Filter oil
Extension assembly
80 Harness assembly, main case
Seal, 0-ring/speed sensor 82 Roller & spring assembly, manual
Sensor assembly, speed detent Screw, speed
sensor 84 Valve body assembly, main case
85 Ball, check
86 Gasket, main V.B./Transfer plate
Seal, extension assembly 87 Plate, main V.B./Transfer
88 Gasket, transfer/main case
Screw, extension/main case 89 Screw, transfer plate on V.B.
Spring, parking pawl lock 90 Screw, servo cover
Pawl, parking lock 91 Cover, servo piston Connector, electrical/main case 92 Gasket, cover/servo piston
Actuator assembly, parking lock
93 Ring, retaining servo piston
Nut, parking lock lever 94 Clip, servo piston
Link, manual valve 95 Nut, servo screw
Pin, spring 96 Screw, servo piston
Lever, parking lock
& range 97 Piston, servo
selelector 98 Seal, ring/servo piston
Shaft, selector 99 Spring, cushion/servo piston
Seal, selector shaft 100 Seat, cushion spring
Mode switch assembly 101 Sleeve, servo piston adjust
Screw & conical washer assembly 102 Rod, apply/servo piston
Shield, mode switch 103 Spring, return/servo piston 104 Gasket, adapter case/transfer plate
Pan, Bottom/Adapter case 105 Transmission control module
Gasket,
bottom pan/adapter ca!~e 106 Servo piston assembly
Harness assembly, adapter
cas'~ Screw, valve body
Valve body assembly, adapter ~:ase
PUMP ASSEMBLY
202 211 ~-~ 212 . 213
210 Valve, converter clutch control 211 Sprinn, converter clutch control valve 212 Plug, converter clutch control valve 213 Pin, spring 214 Piston, throttle signal accumulator 215 Sprinn, throttle signal accumulator 216 Seat, 1;pring/throttle signal accumulator 217 Ring, snap/throttle signal accumulator
Fig. 7A-98
~
•