lock ISUZU TROOPER 1995 Workshop Manual
[x] Cancel search | Manufacturer: ISUZU, Model Year: 1995, Model line: TROOPER, Model: ISUZU TROOPER 1995Pages: 1928
Page 1186 of 1928
70-28 TRANSFER CASE
16. Front output gear assembly
15. Bearing snap ring
• Use a pair of snap ring pliers to install the snap
ring to the transfer case.
U7NOTE:
VI The snap ring must be fully inserted into the
transfer case snap ring groove.
14. Input shaft (A/T)
13.
Ball bearing (A/T)
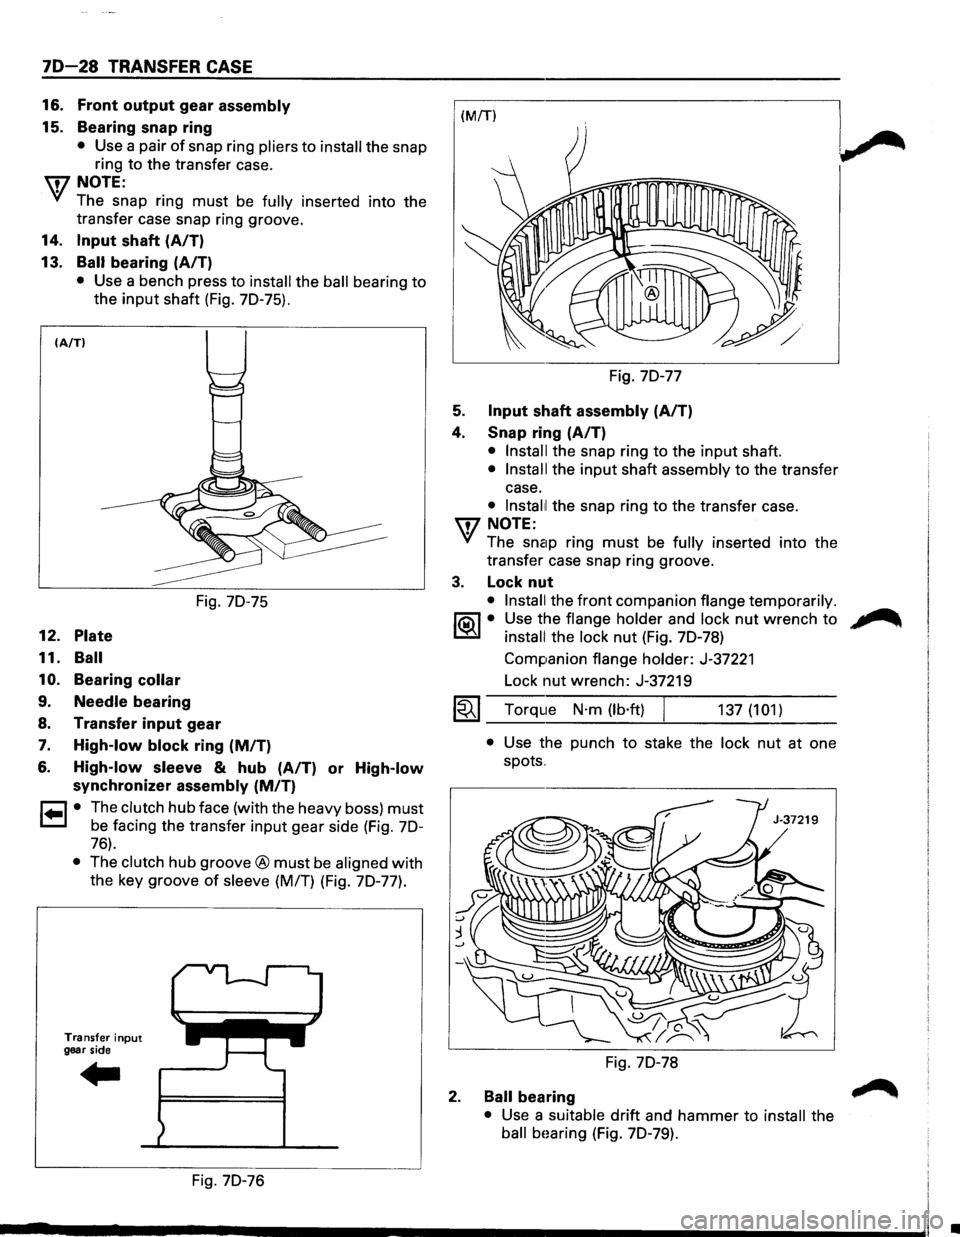
• Use a bench press to install the ball bearing to
the
input shaft (Fig. 70-75).
(A/TI
12. Plate
11. Ball
10.
Bearing collar
9. Needle bearing
Fig. 70-75
8. Transfer input gear
7. High-low block ring (MIT)
6. High-low sleeve & hub (A/T) or High-low
synchronizer assembly (MIT)
r=l • The clutch hub face (with the heavy boss) must
1=.1 be facing the transfer input gear side (Fig. 70-
76).
• The clutch hub groove® must be aligned with
the key groove
of sleeve (M/T) (Fig. 70-77).
Transfer input
gear side
Fig. 70-76 Fig.
70-77
5. Input shaft assembly (AIT)
4. Snap ring (A/T)
• Install the snap ring to the input shaft.
• Install the input shaft assembly to the transfer
case.
• lnstal1l the snap ring to the transfer case.
U7 NOTE:
VI The snap ring must be fully inserted into the
transfer case snap ring groove.
3. Lock nut
• Install the front companion flange temporarily.
1®..1• Use the flange holder and lock nut wrench to
install the lock nut (Fig. 70-78)
Companion
flange holder: J-37221
Lock nut wrench: J-37219
1~1 Torque N·m (lb·ft) 137 (101)
2.
• Use the punch to stake the lock nut at one
spots
..
Fig. 70-78
Ball bearing
• Use a suitable drift and hammer to install the
ball bHaring (Fig. 70-79).
•
Page 1191 of 1928
CHASSIS ELECTRICAL 8-1
·SECTION 8
CHASSIS ELECTRICAL
'\f CAUTION: .
When fasteners are removed, always reinstall them at the same location from which they were removed.
If a fastener needs to be replaced, use the correct part number fastener for that application. If the correct
part number fastener is not
available, a fastener of equal size and strength (or stronger) may be used.
Fasteners that are not reused, and those requiring thread
locking compound, will be called out. The correct
torque
values must be used when installing fasteners that require it. If the above conditions are not
followed, parts or system damage could result.
CONTENTS
General Information .................................... 8-2
Notes for Working on Electrical
Items .................................................... 8-2
Symbols and Abbreviations ................. 8-8
Symbols ............................................ 8-8
Abbreviations ................................... 8-9
Parts for Electrical Circuit ..................... 8-10
Wiring ............................................... 8-10
Fuse .................................................. 8-11
Fusible Link ....................................... 8-12
Circuit Breaker ................................... 8-12
Relay ................................................. 8-12
Relay Specifications and
Configurations ................................ 8-13
Diode ................................................. 8-14
Connector ......................................... 8-15
Reading the Circuit Diagram ................ 8-17
Main Data and Specifications .................... 8-19
Bulb Specifications ................................ 8-19
Fuse,
Fusible Link and
Circuit Breaker Location ..................... 8-21
Fuse
Block Circuit .................................. 8-22
Reference Table of Fuse, Fusible
Link and Circuit Breaker ..................... 8-23
Relay Location ....................................... 8-27
Diode Location .......................................
8-28
Grounding Point .................................... 8-29
Reference Table ................................ 8-29
Location ............................................ 8-31
Cable Harness Routing .......................... 8-34
System Repair .............................................. 8-38
Start and Charging ................................ 8-38
Engine Control Module
(ECM) ................................................... 8-47
Headlight and Fog Light ........................ 8-58
Front Side Marker Light, Parking Light,
Taillight, License Plate Light and
Illumination Light .............................. 8-76
Stoplight and Rear Defogger .............. 8-92
Turn Signal Light, Hazard
Warning
Light, Cornering Light,
Backup
Light and Horn ..................... 8-106
Dome Light, Luggage room Light,
Courtesy Light, Map Light,
Seat Belt Switch and
Warning Buzzer ................................. 8-128
Power Door Lock ................................. 8-142
Power
Window .................................... 8-156
Cruise
Control ...................................... 8-172
Anti-Lock Brake
System (ABS) ........... 8-178
Rear
Wheel Anti-Lock Brake
System (RWAL) ................................. 8-185
Transmission
Control Module
(TCM) ................................................. 8-192
A/T Shift Lock ...................................... 8-200
Windshield
Wiper/Washer and
Rear
Wiper/Washer .......................... 8-205
Headlight wiper /washer ..................... 8-232
Audio, Auto Antenna,
Cigarette
Lighter and digital clock ... 8-246
Power Door Mirror ............................... 8-254
Anti-theft System ................................ 8-270
Meter and Warning/Indicator Light ... 8-288
A/T Shift Indicator ............................... 8-336
Heater and
Air Conditioning ............... 8-340
Sun
Roof ............................................... 8-346
Power Seat ........................................... 8-360
Seat
Heater .......................................... 8-37 4
Supplemental Restraint
System (SRS) -AIR BAG ................... 8-382
Page 1192 of 1928
-·*; ~---
8-2 CHASSIS ELECTRICAL
GENERAL INFORMATION
The chassis electrical system is of 12-volt specifications with a negative ground polarity.
Wire sizes are appropriate
to respective circuits, and classified by color. (The classification of harnesses by
color is shown on the circuit diagram for ease of harness identification.)
The
wire size is determined by load capacity and the length of wire required.
The
vehicle harnesses are: body harness, chassis harness, engine room harness, instrument harness,
transmission harness, engine
ECGI harness, dome light harness, door harness, rear body harness, tailgate
harness,
SRS harness and battery cables.
The harnesses are protected either
by tape or corrugated tube, depending on harness location.
The circuit
for each system consists of the power source, wire, fuse, relay, switch, load parts and ground, all of
which are shown on the circuit diagram.
In this manual, each electrical device is classified by system. For major parts shown on the circuit based on
the circuit diagram
for each system, a summary, diagnosis oftroubles, inspection and removal and installation
procedures are detailed.
NOTES FOR WORKING ON ELECTRICAL ITEMS
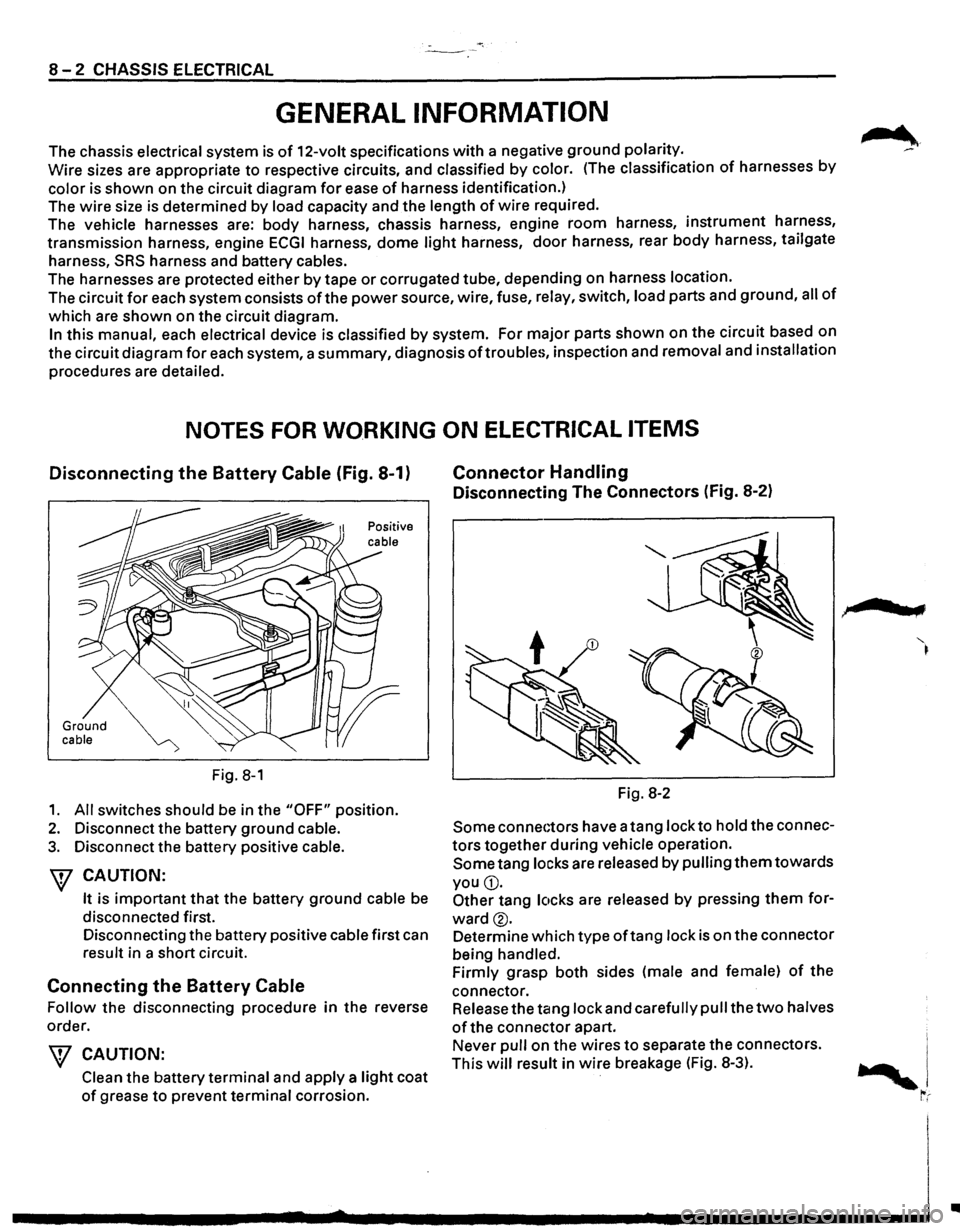
Disconnecting the Battery Cable (Fig. 8-1)
Ground cable
Fig. 8-1
1. All switches should be in the "OFF" position.
2. Disconnect the battery ground cable.
3. Disconnect the battery positive cable.
W CAUTION:
It is important that the battery ground cable be
disconnected first.
Disconnecting the battery positive cable first can
result in a short circuit.
Connecting the Battery Cable
Follow the disconnecting procedure in the reverse
order.
\V CAUTION:
Clean the battery terminal and apply a light coat
of grease to prevent terminal corrosion.
Connector Handling
Disconnecting The Connectors (Fig. 8-2)
Fig. 8-2
Some connectors have a tang lock to hold the connec
tors together during vehicle operation.
Some tang locks are released by pulling them towards
you
G).
Other tang locks are released by pressing them for
ward®.
Determine which type oftang lock is on the connector
being handled.
Firmly grasp both sides (male and female)
of the
connector. Release the tang lock and carefully pull the
two halves
of the connector apart.
Never pull on the wires
to separate the connectors.
This
will result in wire breakage (Fig. 8-3).
.,
..
Page 1193 of 1928
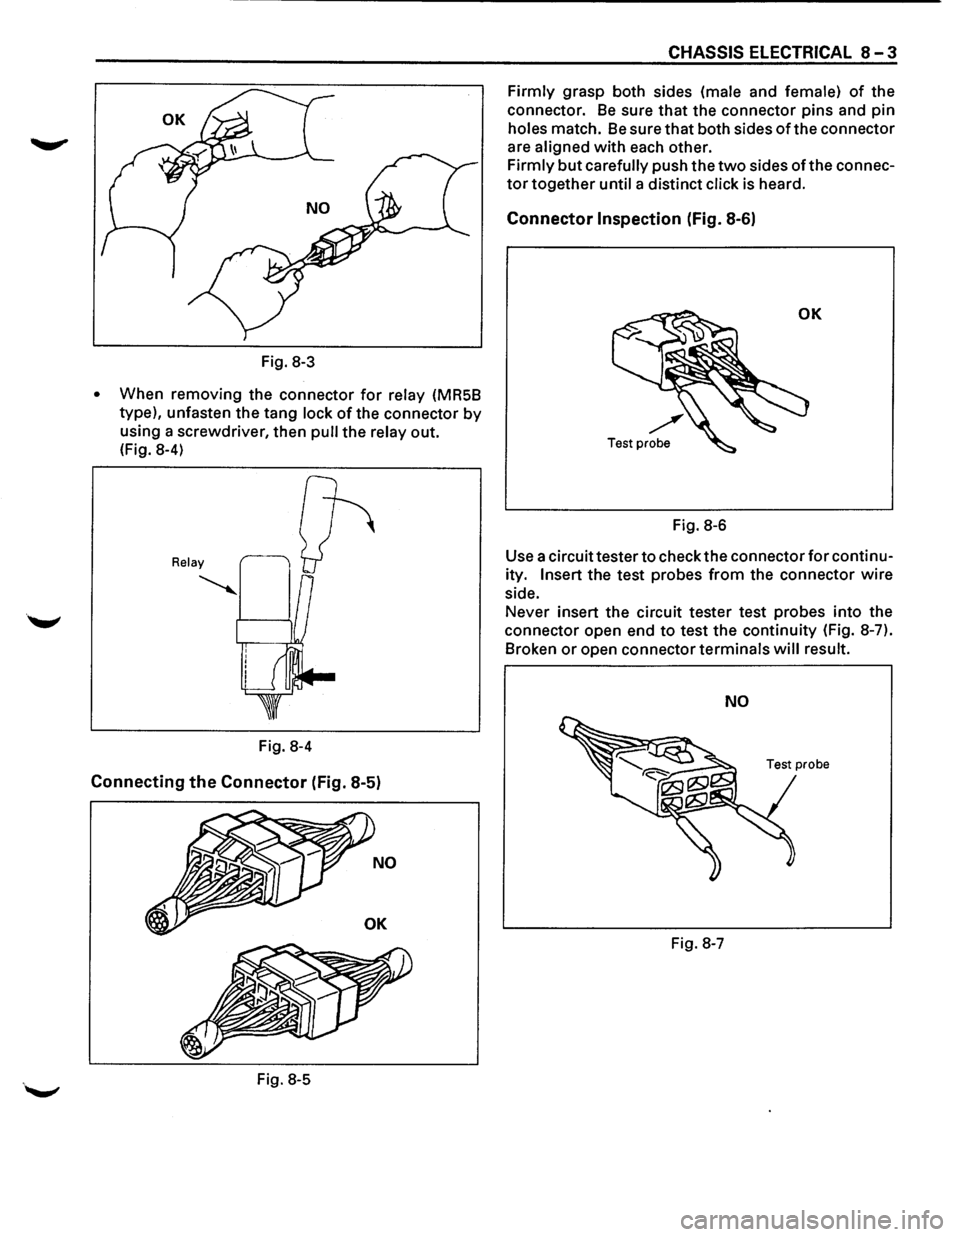
Fig. 8-3
• When removing the connector for relay (MR5B
type), unfasten the tang
lock of the connector by
using a screwdriver, then pull the relay out.
(Fig. 8-4)
Relay
~
Fig. 8-4
Connecting the Connector (Fig. 8-5)
Fig. 8-5
CHASSIS ELECTRICAL 8-3
Firmly grasp both sides (male and female) of the
connector.
Be sure that the connector pins and pin
holes match. Be sure that both sides of the connector
are
aligned with each other.
Firmly but carefully push the two sides of the connec
tor together until a distinct click is heard.
Connector Inspection (Fig. 8-6)
OK
Test probe
Fig. 8-6
Use a circuit tester to check the connector for continu
ity.
Insert the test probes from the connector wire
side. Never insert the circuit tester test probes into the
connector open end
to test the continuity (Fig. 8-7).
Broken
or open connector terminals will result.
NO
Fig. 8-7
Page 1194 of 1928
8-4 CHASSIS ELECTRICAL
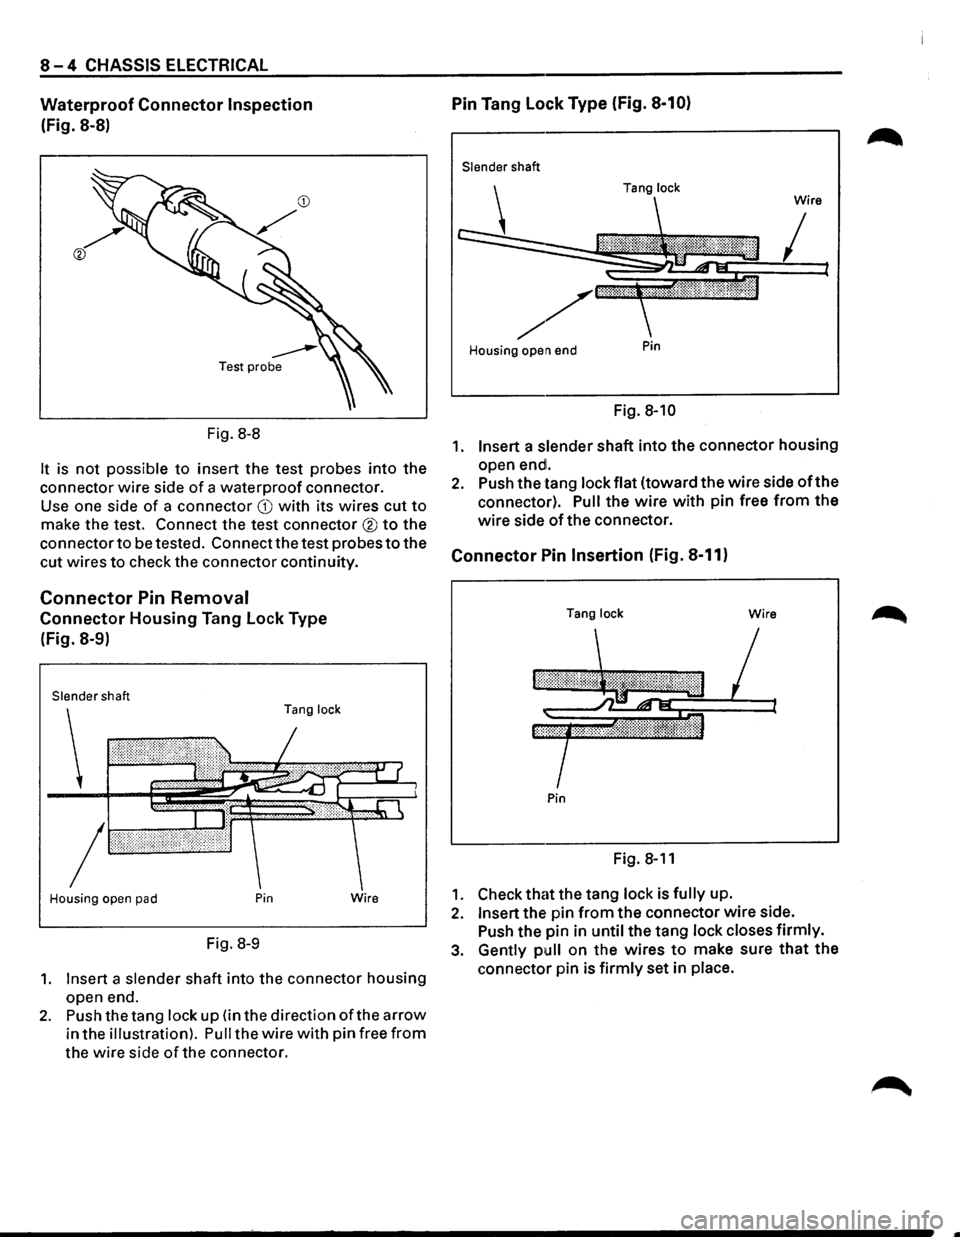
Waterproof Connector Inspection
(Fig. 8-8)
Fig.
8-8
It is not possible to insert the test probes into the
connector wire side
of a waterproof connector.
Use one side
of a connector CD with its wires cut to
make the test. Connect the test connector ® to the
connector
to be tested. Connect the test probes to the
cut wires
to check the connector continuity.
Connector Pin Removal
Connector Housing Tang Lock Type
(Fig. 8-9)
Slender shaft
Tang lock
Housing open pad Pin
Fig. 8-9
Wire
1. Insert a slender shaft into the connector housing
open end.
2. Push the tang lock up (in the direction ofthe arrow
in the illustration). Pull the wire with pin free from
the wire side of the connector.
Pin Tang Lock Type (Fig. 8-10)
Slender shaft
Housing open end
Pin
Fig. 8-10
1. Insert a slender shaft into the connector housing
open
endl.
2. Push the tang lock flat (toward the wire side oft he
connector).
Pull the wire with pin free from the
wire side of the connector.
Connector Pin Insertion (Fig. 8-11)
Tang lock Wire
Pin
Fig. 8-11
1. Check that the tang lock is fully up.
2. Insert the pin from the connector wire side.
Push the pin in
until the tang lock closes firmly.
3. Gently pull on the wires to make sure that the
connector pin is firmly set in place.
Page 1199 of 1928
CHASSIS ELECTRICAL 8-9
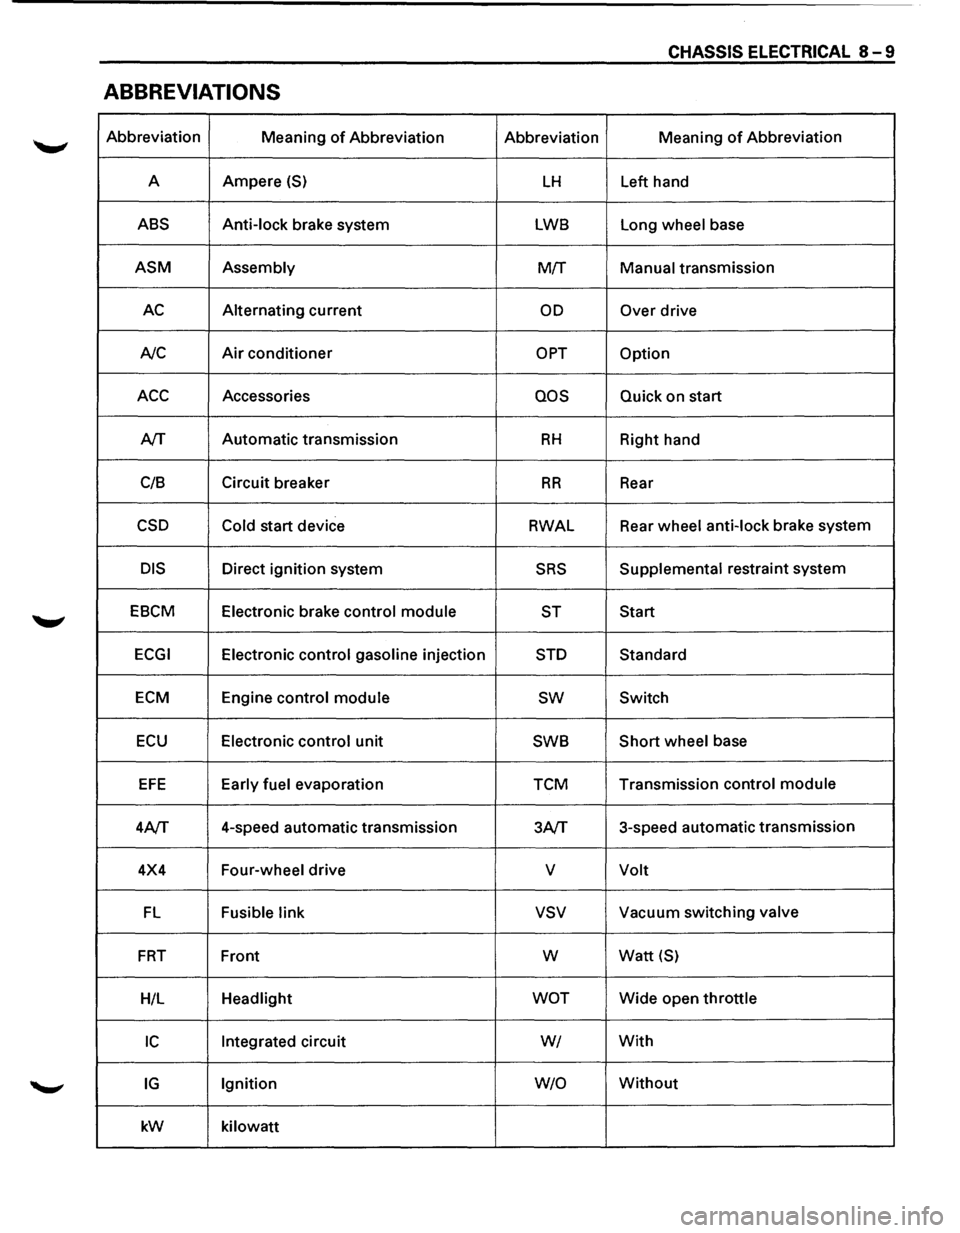
ABBREVIATIONS
Abbreviation
Meaning of Abbreviation Abbreviation Meaning of Abbreviation
A Ampere
(S) LH Left
hand
ABS Anti-lock brake system LWB Long wheel base
ASM Assembly M!f Manual transmission
AC Alternating current OD Over drive
A/C
Air conditioner OPT Option
ACC Accessories QOS Quick on start
A/T Automatic
transmission
RH Right hand
C/8 Circuit
breaker
RR Rear
CSD Cold start device RWAL Rear
wheel anti-lock brake system
DIS Direct ignition system SRS Supplemental restraint system
EBCM Electronic brake control module
ST Start
ECGI Electronic control gasoline injection STD Standard
ECM Engine control module sw Switch
ECU Electronic control unit SWB Short wheel
base
EFE Early fuel evaporation TCM Transmission
control module
4A/T 4-speed
automatic transmission
3A/T 3-speed
automatic transmission
4X4 Four-wheel drive
v Volt
FL Fusible link vsv Vacuum switching valve
FRT Front w Watt {S)
H/L Headlight WOT Wide open throttle
IC Integrated circuit WI With
IG Ignition W/0 Without
kW
kilowatt
Page 1205 of 1928
CONNECTOR
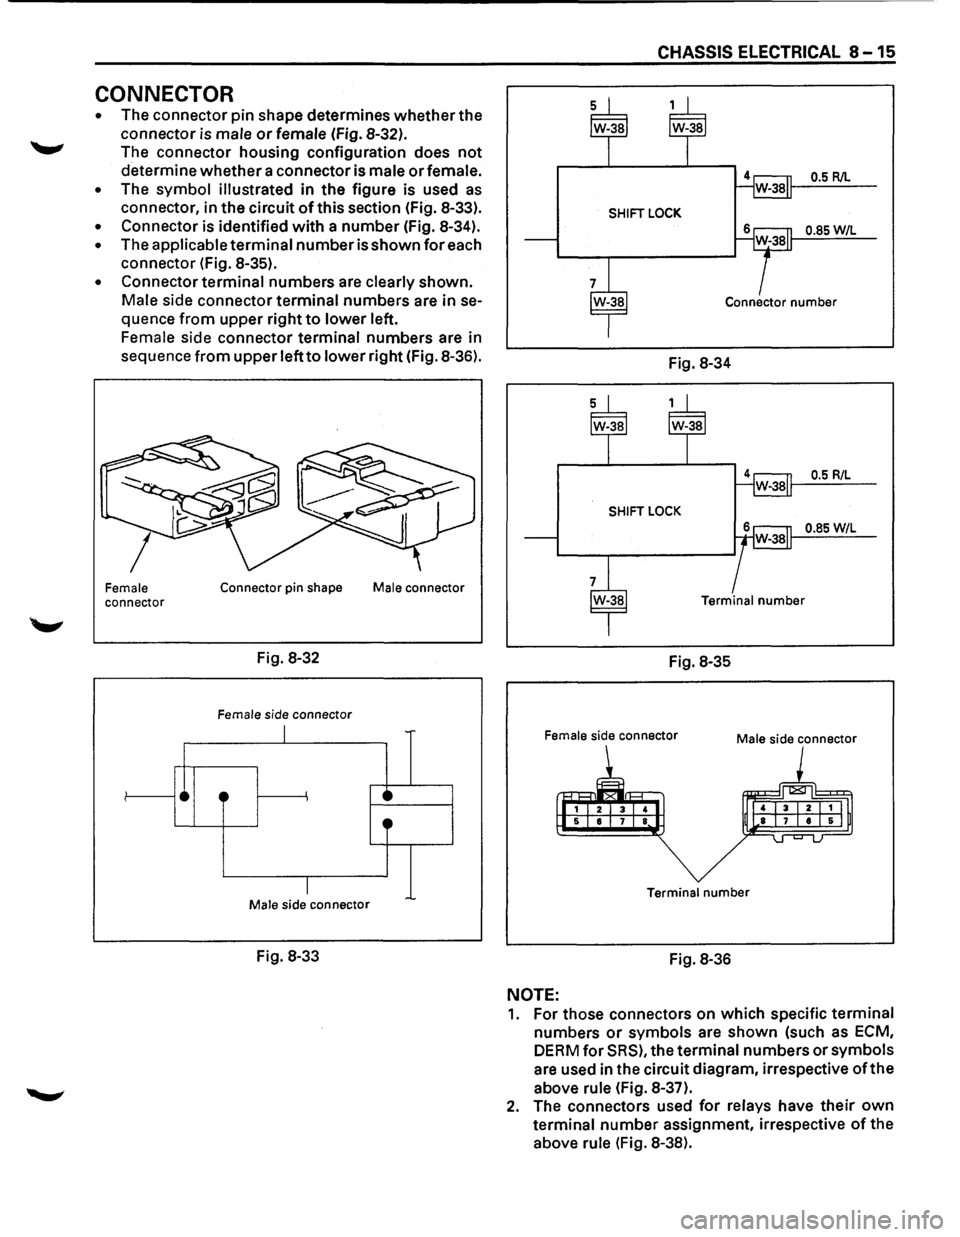
• The connector pin shape determines whether the
connector is
male or female (Fig. 8-32).
The connector housing configuration does
not
determine whether a connector is male or female.
• The symbol illustrated in the figure is used as
connector, in the circuit of this section (Fig. 8-33).
• Connector is identified with a number (Fig. 8-34).
• The applicable terminal number is shown for each
connector (Fig. 8-35).
• Connector terminal numbers are clearly shown.
Male side connector terminal numbers are in se
quence
from upper right to lower left.
Female side connector terminal numbers are in
sequence
from upper left to lower right (Fig. 8-36).
Female connector
•
Connector pin shape
Fig. 8-32
Female side connector
I
·~
I Male s1de connector
Fig. 8-33
Male connector
·~ 0
CHASSIS ELECTRICAL 8-15
0.5 R/L
SHIFT LOCK
0.85W/L
Connector number
Fig. 8-34
0.5 R/L
SHIFT LOCK
0.85 W/L
Terminal number
Fig. 8-35
Female side connector Male side connector
Terminal number
Fig. 8-36
NOTE:
1. For those connectors on which specific terminal
numbers
or symbols are shown (such as ECM,
DERM for SRS), the terminal numbers or symbols
are used in the circuit diagram, irrespective
of the
above rule (Fig. 8-37).
2. The connectors used for relays have their own
terminal number assignment, irrespective of the
above
rule (Fig. 8-38).
Page 1206 of 1928
8 -16 CHASSIS ELECTRICAL
Fig. 8-37
Fig. 8-38
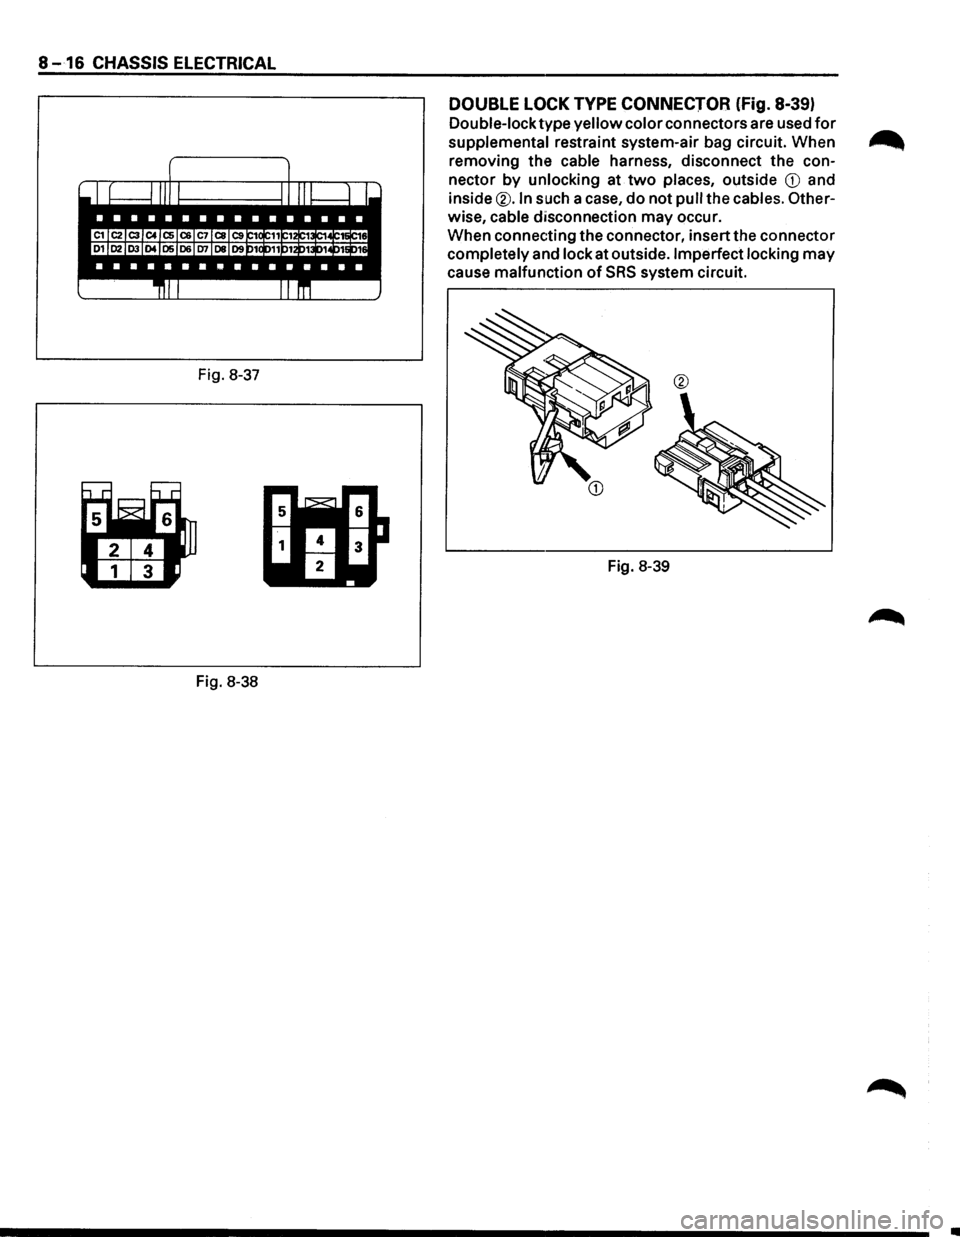
DOUBLE LOCK TYPE CONNECTOR (fig. 8-39)
Double-lock type yellow color connectors are used for
supplemental restraint system-air bag circuit. When ...
removing the cable harness, disconnect the con-
nector
by unlocking at two places, outside CD and
inside
®.In such a case, do not pull the cables. Other-
wise, cable disconnection may occur.
When connecting the connector, insert the connector
completely and lock at outside. Imperfect locking may
cause malfunction of SRS system circuit.
Fig. 8-39
•
Page 1211 of 1928
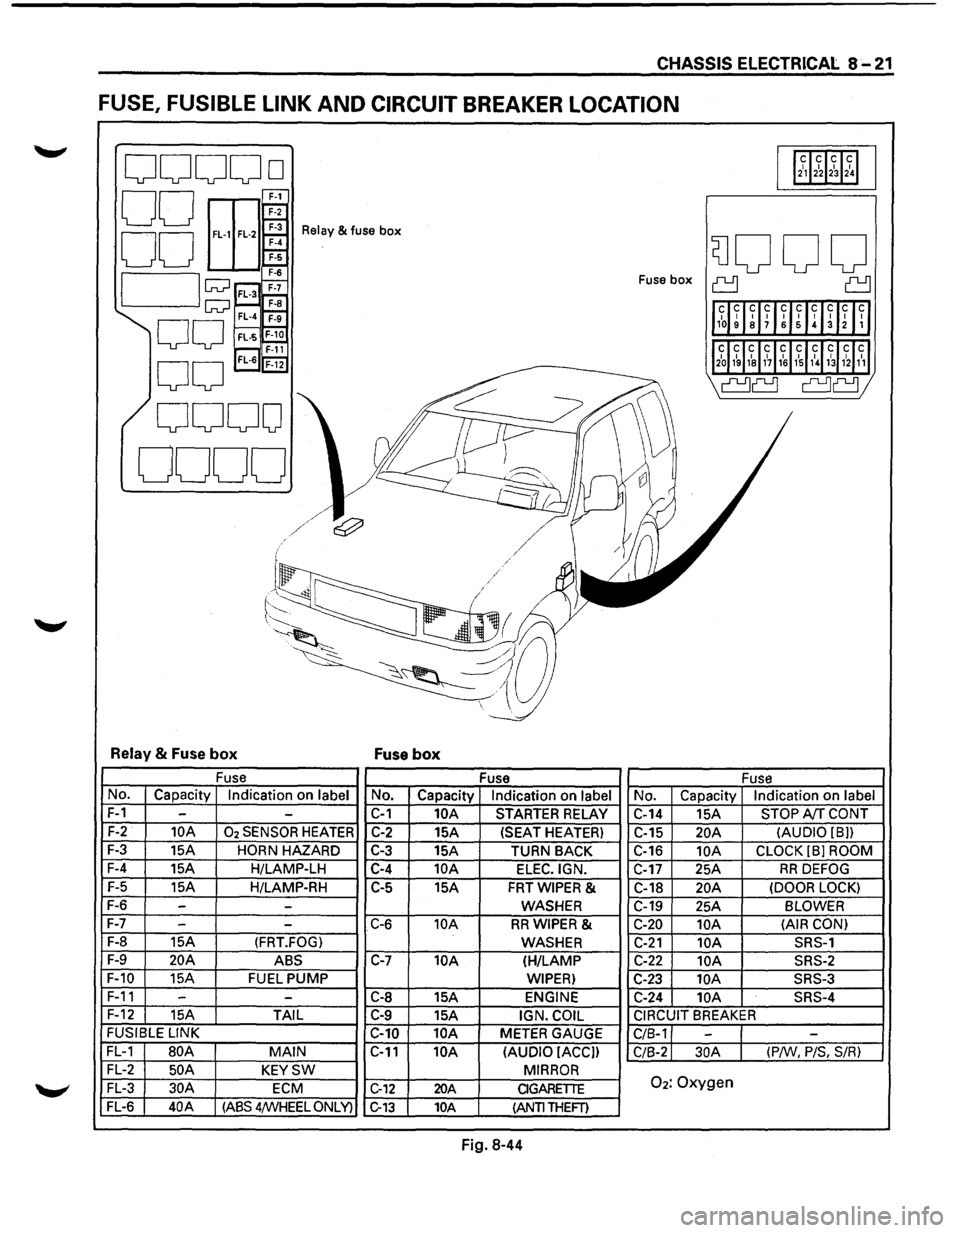
CHASSIS ELECTRICAL 8-21
FUSE, FUSIBLE LINK AND CIRCUIT BREAKER LOCATION
ooooo 112~12~1~1~1
00 E
EEr 00 ~
Relay & fuse box
SJOOO 7-6
I lw ;;::;~ Fuse box ~ ~
1l1~~ ~lff~UIH~Inll
w~ F-a FL-4 ~
00 FL·S~ r---, F-11 'l2~J1~ 1~1&11~11~1,\l~31hl1~1
0
0
FL-6 'F-i2
I' ~
\a~ a~;
0000
0000
I ~
l/
~
j
~/~/ e:;?' v II I / / .I / /
('-/ .
~~
-~-~;,a~ ~~ --.:_
~~~~ -
Relay & Fuse box Fuse box
Fuse
Fuse Fuse
No. Capacity Indication on label No. Capacity Indication on label No. Capacity Indication on label
F-1 --C-1 10A STARTER RELAY
C-14 15A STOP A!f CONT
F-2 10A 02 SENSOR HEATER C-2 15A (SEAT HEATER)
C-15 20A (AUDIO [8))
F-3
15A HORN HAZARD C-3 15A
TURN BACK C-16 10A CLOCK (8] ROOM
F-4
15A H/LAMP-LH C-4 10A ELEC.IGN. C-17 25A RR DEFOG
F-5
15A H/LAMP-RH C-5
15A FRTWIPER & C-18 20A (DOOR LOCK)
F-6 --WASHER C-19
25A BLOWER
F-7
- -C-6 10A RRWIPER & C-20 10A (AIR
CON)
F-8
15A (FRT.FOG) WASHER C-21 10A SRS-1
F-9 20A ABS C-7 10A (H/LAMP C-22 10A SRS-2
F-10
15A FUEL PUMP WIPER) C-23 lOA SRS-3
F-11 -
-C-8 15A ENGINE C-24 10A SRS-4
F-12
15A TAIL C-9 15A IGN. COIL CIRCUIT BREAKER
FUSIBLE
LINK
C-10 10A METER GAUGE
C/8-1 --FL-1 80A MAIN C-11 10A
(AUDIO IACC])
C/8-2 30A (P/W, P/S, S/R)
FL-2 50 A KEYSW MIRROR
FL-3 30A ECM C-12 20A CIGARETTE 02: Oxygen
FL-6 40A (ASS 4/WHEEL ONLY) C-13 10A (ANTI THEFT)
Fig. 8-44
Page 1212 of 1928
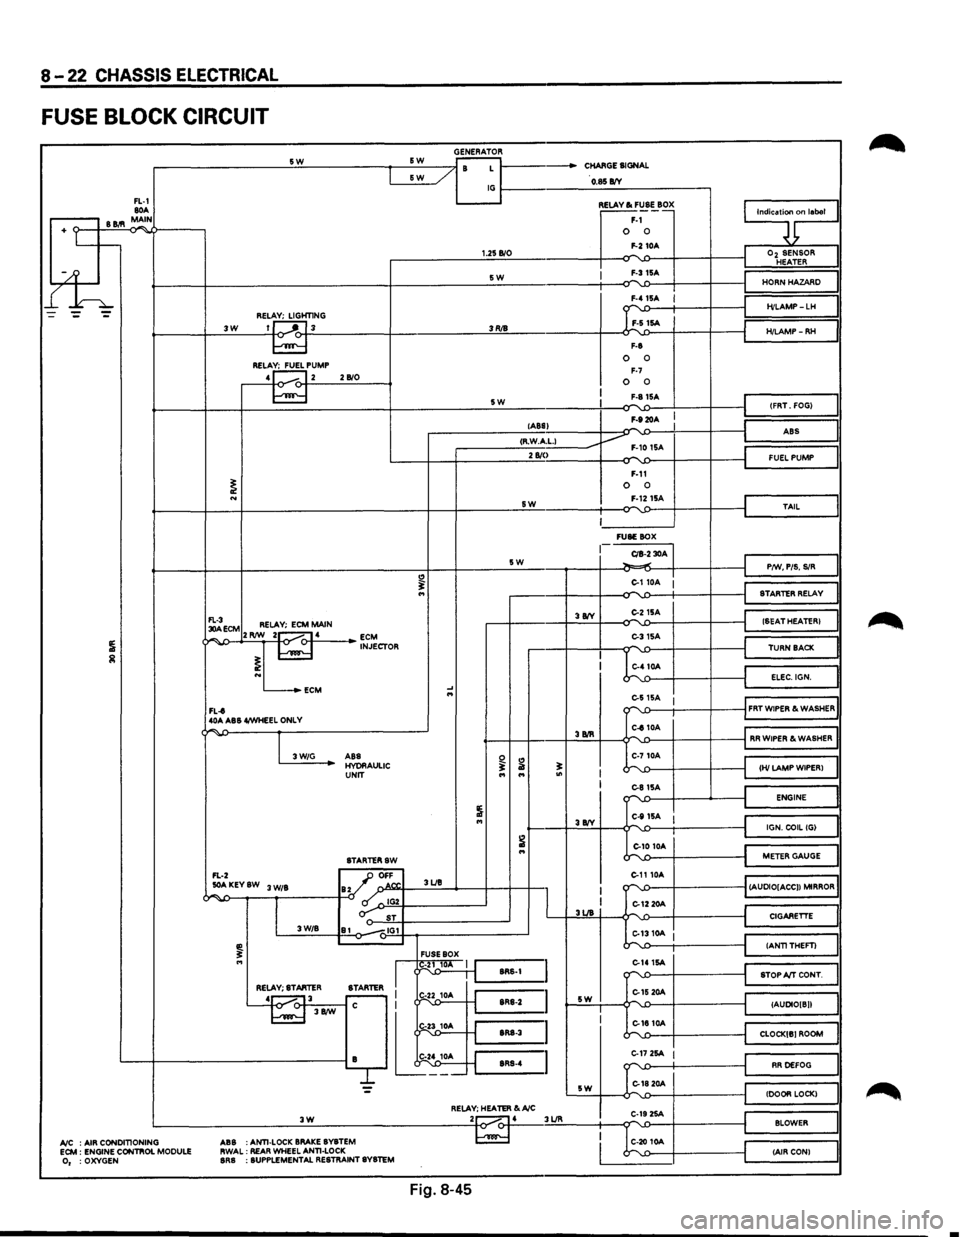
8-22 CHASSIS ELECTRICAL
FUSE BLOCK CIRCUIT
GENERATOR -------------------~s~w~------------~~s~w~--~~~~ r- / B L 1------CHARGE SIGNAL &W _/
FL-1 80A .-----, B 11.'1 MAIN
+ Lt--
l£h
~----/ IG~----------~O~.$~B/V~-----------,
3W REL~HT1NG 1J ---'"~L 3
RELA~PUMP 4 1...---. 12 2 B/0
1.25 B/0
SW
3RJ8
5W
~~~·~ F-1 0 0 F-2 10A
I F-315A
F-8
0 0 F-7 0 0 F-81SA
F-920A
9;nlaool
I
Oz SENSOR HEATER
HORN HAZARD
H/LAMP-LH
H/LAMP-RH
(FRT. FOG)
lABS) -I ABS
I ,--------__:<;;:R·.:.:W.::..Acc·L;;:-1 ____ ----Jv F-10 1SA 2 810
I
~ECM RELAY; ECM MAIN ¢~,...,..J>--+2'-'RIW~_::2~1-o.....-<:>-f-·4.:._ __ _. ~J~CTOR
L...-_.ECM
FL-t 40A ABS 4/WHEEL ONLY
"
.... ...
SW
5W
3 8IY
F-11 0 0 F-1215A
~------' FUSE BOX
CIB-2 30A ~.,.;
C-110A :
C-215A
C-31SA
C-410A
I
J
FUEL PUMP
TAIL
P/W, PIS. SIR
STARTER RELAY
(SEAT HEATER)
TURN BACK
ELEC.IGN.
e-s
15A 1 ""'-.0---t-----+----il FRT WIPER & WASHER
"""' -
I 3W/G
C-810A '---f-+----+.:3.:BIR::::..+---¢""''-£>---i-----f-----jl RR WIPER & WASHER
ABS HYORAULIC UNIT
STARTERSW
FL-2 _JJ OFF
~ ...
..:..AKEYSW 3 W/B ay ' o.N". 3UB
~~--~--~,~------~-0 ~~IG~2Y-----------~ o-: ST 3W/B 81 -.,IG1
FUSE BOX
I
I g1~ 1 J'-:::s:R:s-:1 =I RELAY; STARTER
STARTER I r-
L~---'~-j.t
I I 3UB
sw
C-710A
~';::--~--~-'---~~~HI~LA~M~P~W~IP~E~R~l~~ C-81SA ""'-'>--1---...__---i ENGINE
C-111SA I J~======~l IGN. COIL (G)
C-10 10A
C-1110A
k'-1:>----t----t
~==~I
METER GAUGE
""''-£>---f----------1 (AUDIO[ACC)) MIRROR
C-12 20A
::...1310A I
C-141SA -r"\'-1)----f----t
C-15 20A L,-.
CIGARETTE
(ANTITHEFT)
STOP A/T CONT.
(AUDIO[ B))
C-1810A """"-'-.0---f----------t_j CLOCK[B) ROOM
L---+------------------------iB lt~;_ ~=~~~:~:~::~~~: C-17 2SA I
G1820A
RR DEFOG
= sw (DOOR LOCK) RELAY; HEATER &A/C .:._ __________________ .:.:3~W'-'---------------------~2to~.....-4 3UR C-19 2SA ...... BLOWER
A/C : AIR CONDITIONING ECM : ENGINE CONTIIOL MODULE 0, :OXYGEN ABS
:ANTI-LOCK
BRAKE BYBTEM
RWAL: REAR WHEEL ANTI-LOCK BRB : SUPPLEMENTAL RESTRAINT SYSTEM
C-20 10A (AIR CON)
Fig. 8-45
•