bulb ISUZU TROOPER 1995 Repair Manual
[x] Cancel search | Manufacturer: ISUZU, Model Year: 1995, Model line: TROOPER, Model: ISUZU TROOPER 1995Pages: 1928
Page 1498 of 1928
8-308 CHASSJS ELECTRICAL
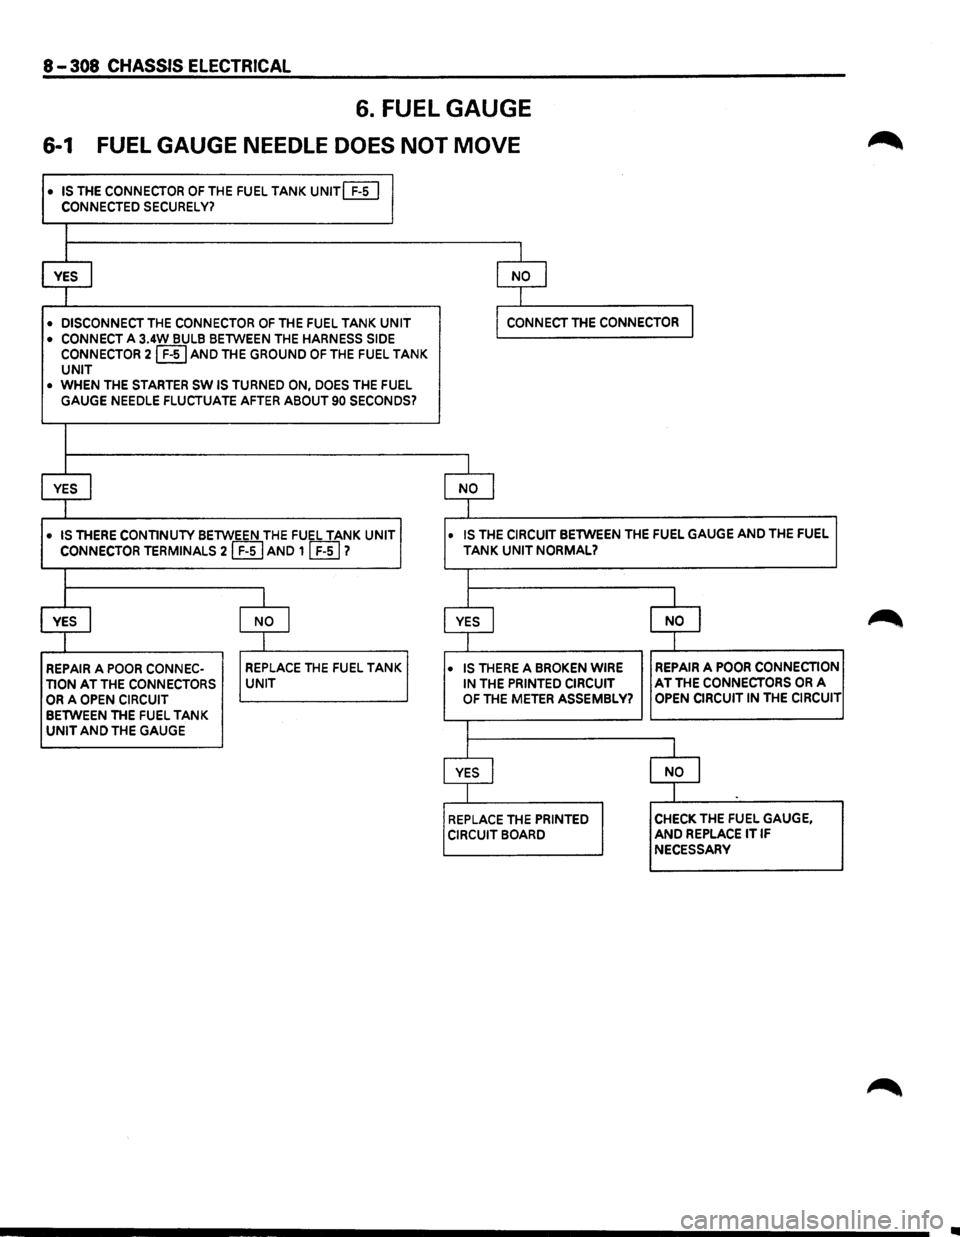
6. FUEL GAUGE
6-1 FUEL GAUGE NEEDLE DOES NOT MOVE
• IS THE CONNECTOR OF THE FUEL TANK UNIT(£[]
CONNECTED SECURELY?
I
YES I I NO I
I
• DISCONNECT THE CONNECTOR OF THE FUEL TANK UNIT I CONNECT THE CONNECTOR I
• CONNECT A 3.4W BULB BETWEEN THE HARNESS SIDE CONNECTOR 2 ~AND THE GROUND OF THE FUEL TANK UNIT
• WHEN THE STARTER SW IS TURNED ON, DOES THE FUEL GAUGE NEEDLE FLUCTUATE AFTER ABOUT 90 SECONDS?
I
YES I NO I
I
• IS THERE CONTINUTV BETWEEN THE FUEL TANK UNIT • IS THE CIRCUIT BETWEEN THE FUEL GAUGE AND THE FUEL
CONNECTOR TERMINALS 2 ~AND 1 [£I) ? TANK UNIT NORMAL?
I
I I
l
YES I NO I YES I NO l
I I I
REPAIR A POOR CONNEC-REPLACE THE FUEL TANK • IS THERE A BROKEN WIRE REPAIR A POOR CONNECTION
TION AT THE CONNECTORS UNIT IN THE PRINTED CIRCUIT AT THE CONNECTORS OR A
OR A OPEN CIRCUIT OF THE METER ASSEMBL Y7 OPEN CIRCUIT IN THE CIRCUIT
BETWEEN THE FUEL TANK
UNIT AND THE GAUGE I
I I
YES I NO I
I l
REPLACE THE PRINTED CHECK THE FUEL GAUGE,
CIRCUIT BOARD AND REPLACE IT IF NECESSARY
..
Page 1501 of 1928
CHASSIS ELECTRICAL 8-311
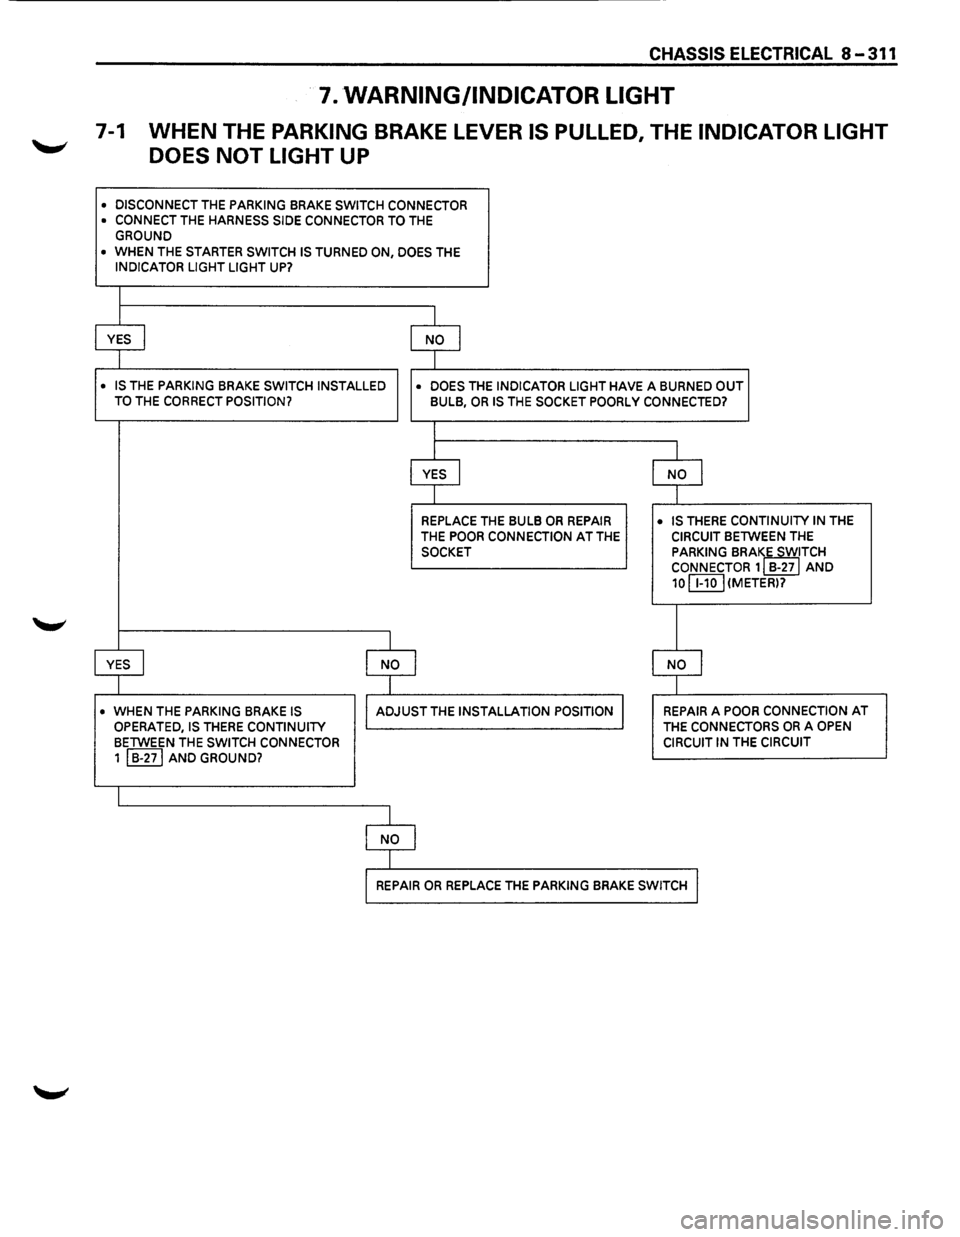
7. WARNING/INDICATOR LIGHT
7-1 WHEN THE PARKING BRAKE LEVER IS PULLED, THE INDICATOR LIGHT
DOES
NOT LIGHT UP
• DISCONNECT THE PARKING BRAKE SWITCH CONNECTOR • CONNECT THE HARNESS SIDE CONNECTOR TO THE GROUND
• WHEN THE STARTER SWITCH IS TURNED ON, DOES THE INDICATOR LIGHT LIGHT UP?
I
YES I NO I
I
• IS THE PARKING BRAKE SWITCH INSTALLED
• DOES THE INDICATOR LIGHT HAVE A BURNED OUT TO THE CORRECT POSITION? BULB, OR IS THE SOCKET POORLY CONNECTED?
I
I
YES I NO j
I
REPLACE THE BULB OR REPAIR • IS THERE CONTINUITY IN THE
THE POOR CONNECTION AT THE CIRCUIT BETWEEN THE
SOCKET PARKING BRAIE SWITCH CONNECTOR 1 B-27 AND
10 C8.QJ (METER)?
I
YES I I NO I NO I
I
• WHEN THE PARKING BRAKE IS I ADJUST THE INSTALLATION POSITION I REPAIR A POOR CONNECTION AT
OPERATED, IS THERE CONTINUITY THE CONNECTORS OR A OPEN
BETWEEN THE SWITCH CONNECTOR CIRCUIT IN THE CIRCUIT
1 I B-271 AND GROUND?
I
I NO I
I
I REPAIR OR REPLACE THE PARKING BRAKE SWITCH I
Page 1504 of 1928
8-314 CHASSIS ELECTRICAL
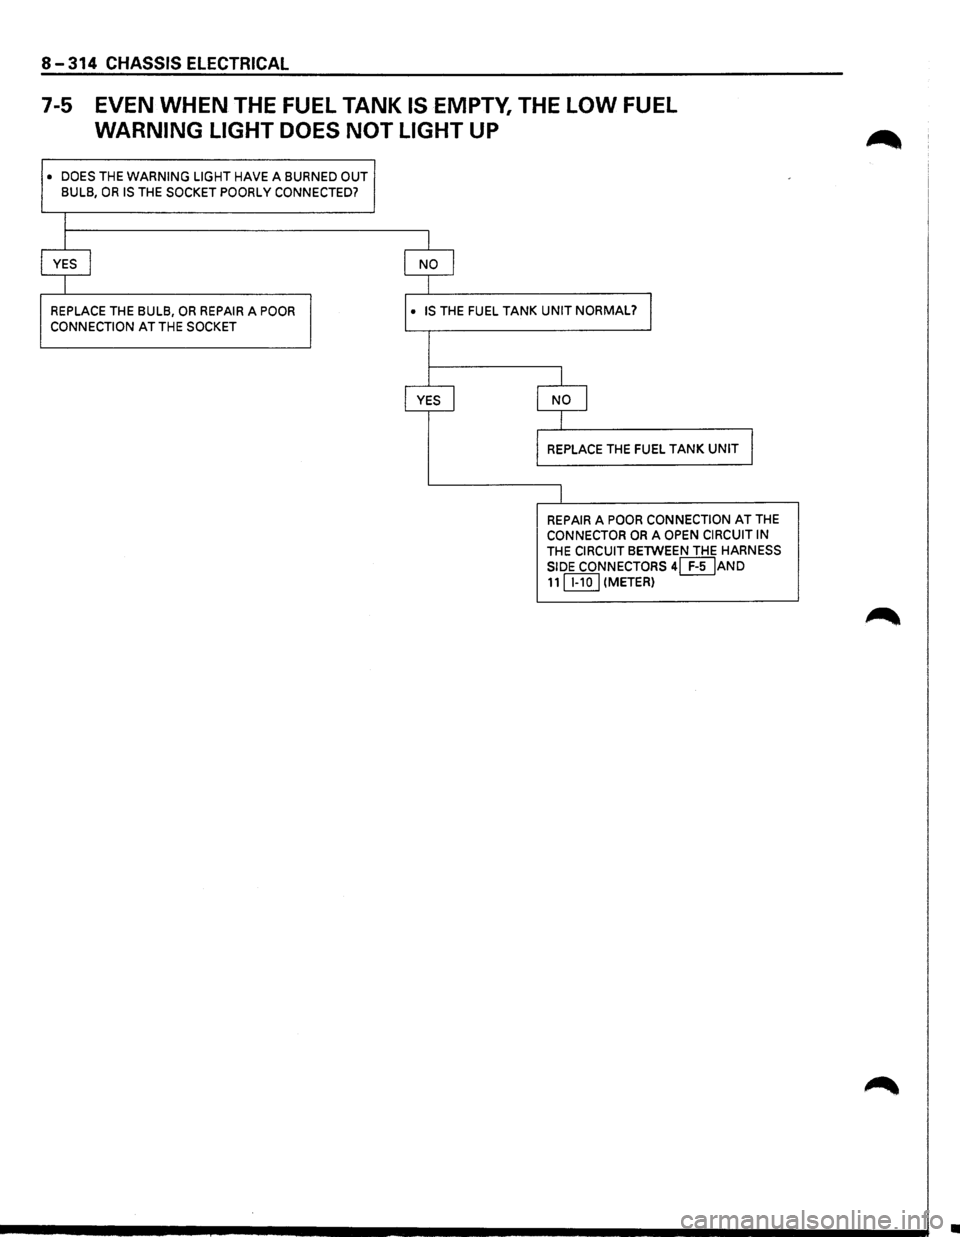
7-5 EVEN WHEN THE FUEL TANK IS EMPTY, THE LOW FUEL
WARNING LIGHT DOES NOT LIGHT UP
• DOES THE WARNING LIGHT HAVE A BURNED OUT
BULB, OR IS THE SOCKET POORLY CONNECTED?
I
I
YES I
I
REPLACE THE BULB, OR REPAIR A POOR
CONNECTION
AT THE SOCKET
I NO I
I· IS THE FUEL TANK UNIT NORMAL? I
I YES I
J
NO I
I
REPLACE THE FUEL TANK UNIT I
I
REPAIR A POOR CONNECTION AT THE CONNECTOR OR A OPEN CIRCUIT IN
THE CIRCUIT BETWEEN THE HARNESS
SIDE CONNECTORS
4[}IJAND 11 IT.IQJ (METER)
•
Page 1514 of 1928
8-324 CHASSIS ELECTRICAL
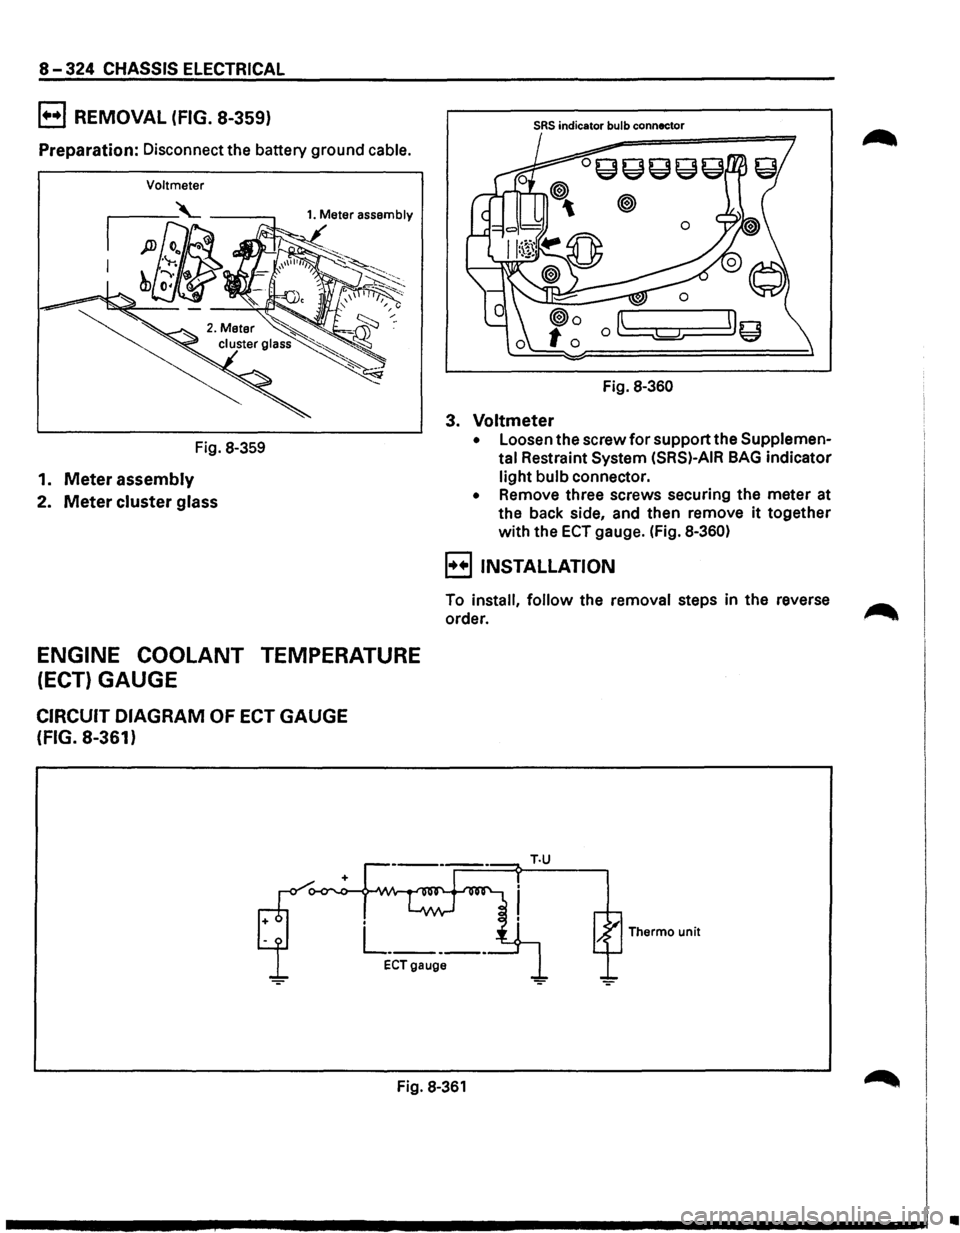
B REMOVAL (FIG. 8-359)
Preparation: Disconnect the battery ground cable.
Voltmeter
Fig. 8-359
1. Meter assembly
2. Meter cluster glass
ENGINE COOLANT TEMPERATURE
(ECT) GAUGE
CIRCUIT DIAGRAM OF ECT GAUGE
(FIG. 8-361)
SRS indicator bulb connector
Fig. 8-360
3. Voltmeter
• Loosen the screw for support the Supplemen
tal
Restraint System (SRS)-AIR BAG indicator
light bulb connector.
• Remove three screws securing the meter at
the back side, and then remove
it together
with the
ECT gauge. (Fig. 8-360)
B INSTALLATION
To install, follow the removal steps in the reverse ....-...
order. ,........
Thermo unit
ECTgauge
Fig. 8-361
•
Page 1518 of 1928
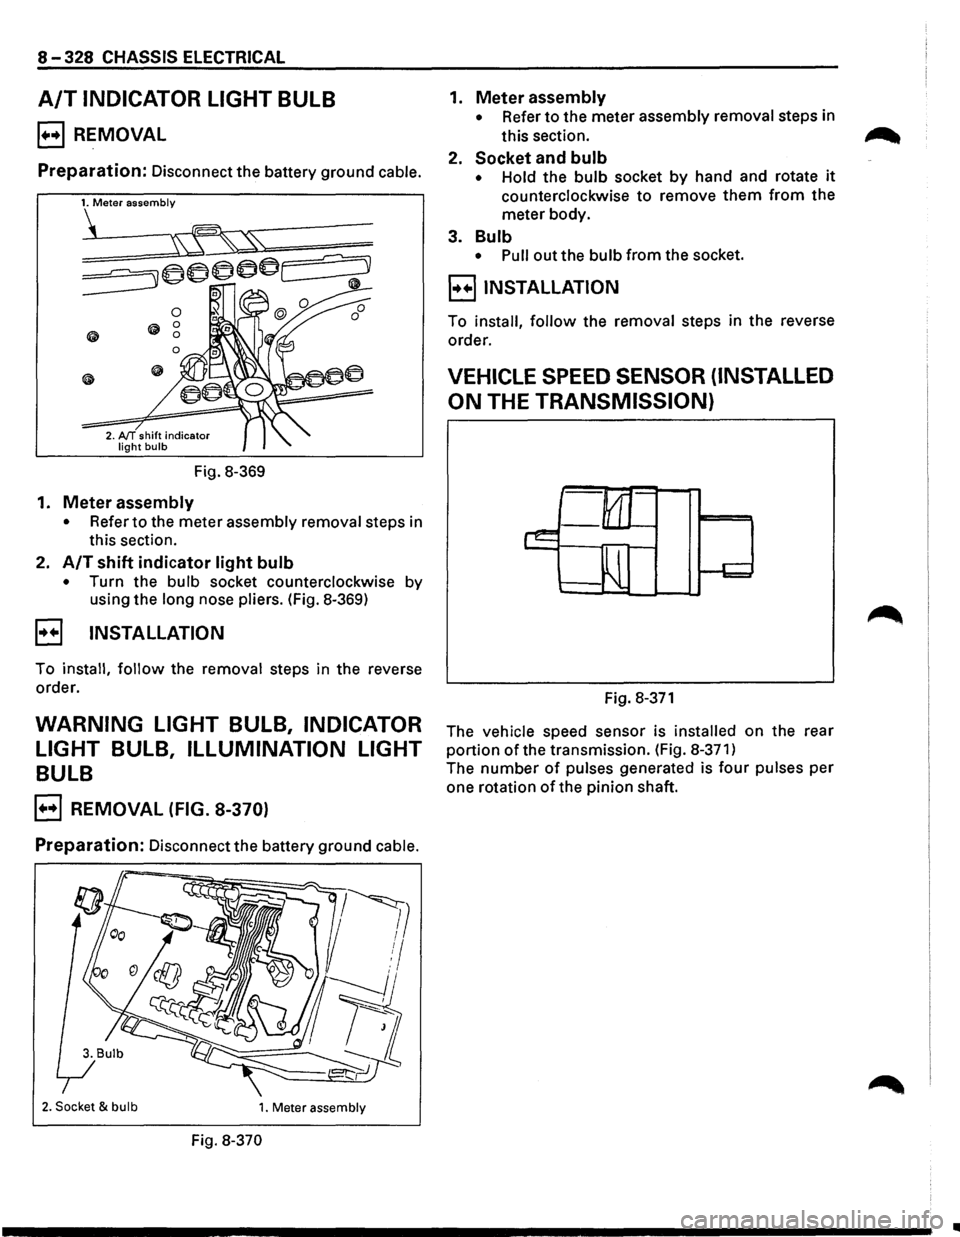
8-328 CHASSIS ELECTRICAL
A/T INDICATOR LIGHT BULB
B REMOVAL
Preparation: Disconnect the battery ground cable.
Fig.
8-369
1. Meter assembly
• Refer to the meter assembly removal steps in
this section.
2.
A/T shift indicator light bulb
• Turn the bulb socket counterclockwise by
using the
long nose pliers. (Fig. 8-369)
B INSTALLATION
To install, follow the removal steps in the reverse
order.
WARNING LIGHT BULB, INDICATOR
LIGHT
BULB, ILLUMINATION LIGHT
BULB
B REMOVAL (FIG. 8-370)
Preparation: Disconnect the battery ground cable.
2. Socket & bulb 1. Meter assembly
Fig. 8-370
1. Meter assembly
• Refer to the meter assembly removal steps in
this section.
2.
Socket and bulb
• Hold the bulb socket by hand and rotate it
counterclockwise to remove them from the
meter body.
3.
Bulb
• Pull out the bulb from the socket.
B INSTALLATION
To install, follow the removal steps in the reverse
order.
VEHICLE SPEED SENSOR (INSTALLED
ON
THE TRANSMISSION)
Fig. 8-371
The vehicle speed sensor is installed on the rear
portion of the transmission. (Fig. 8-371)
The number of pulses generated is four pulses per
one rotation
of the pinion shaft.
..
Page 1523 of 1928
1. Fuel tank
• Refer to fuel tank removal steps in Section 6C
"ENGINE FUEL."
2. Fuel tank unit
• Disconnect the connectors.
• Remove the five screws.
B INSTALLATION
To install, follow the removal steps in the reverse
order.
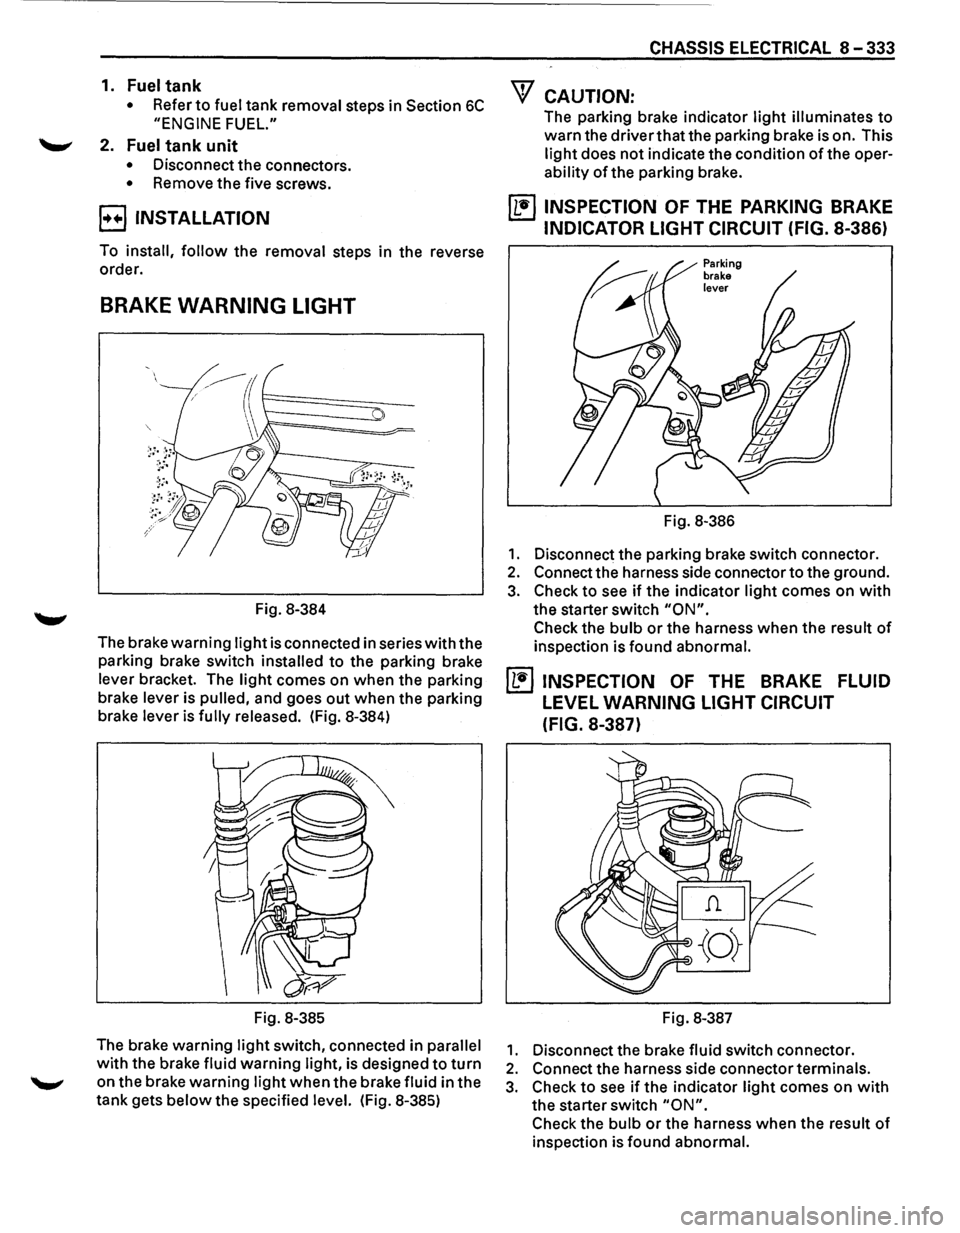
BRAKE WARNING LIGHT
Fig. 8-384
The brake
warning light is connected in series with the
parking brake switch
installed to the parking brake
lever bracket. The
light comes on when the parking
brake lever is
pulled, and goes out when the parking
brake lever is
fully released. (Fig. 8-384)
Fig. 8-385
The brake warning
light switch, connected in parallel
with the brake fluid warning light, is designed to turn
on the brake warning light when the brake fluid in the
tank gets
below the specified level. (Fig. 8-385)
CHASSIS ELECTRICAL 8-333
"f CAUTION:
The parking brake indicator light illuminates to
warn the driver that the parking brake is on. This
light does not indicate the condition of the oper
ability of the parking brake.
~ INSPECTION OF THE PARKING BRAKE
INDICATOR LIGHT CIRCUIT (FIG. 8-386)
Fig. 8-386
1. Disconnect the parking brake switch connector.
2. Connect the harness side connector to the ground.
3. Check to see if the indicator light comes on with
the starter switch "ON".
Check the bulb or the harness when the result of
inspection is found abnormal.
~ INSPECTION OF THE BRAKE FLUID
LEVEL WARNING LIGHT CIRCUIT
(FIG.
8-387)
Fig. 8-387
1. Disconnect the brake fluid switch connector.
2. Connect the harness side connector terminals.
3. Check to see if the indicator light comes on with
the starter switch "ON".
Check the bulb or the harness when the result of
inspection is found abnormal.
Page 1594 of 1928
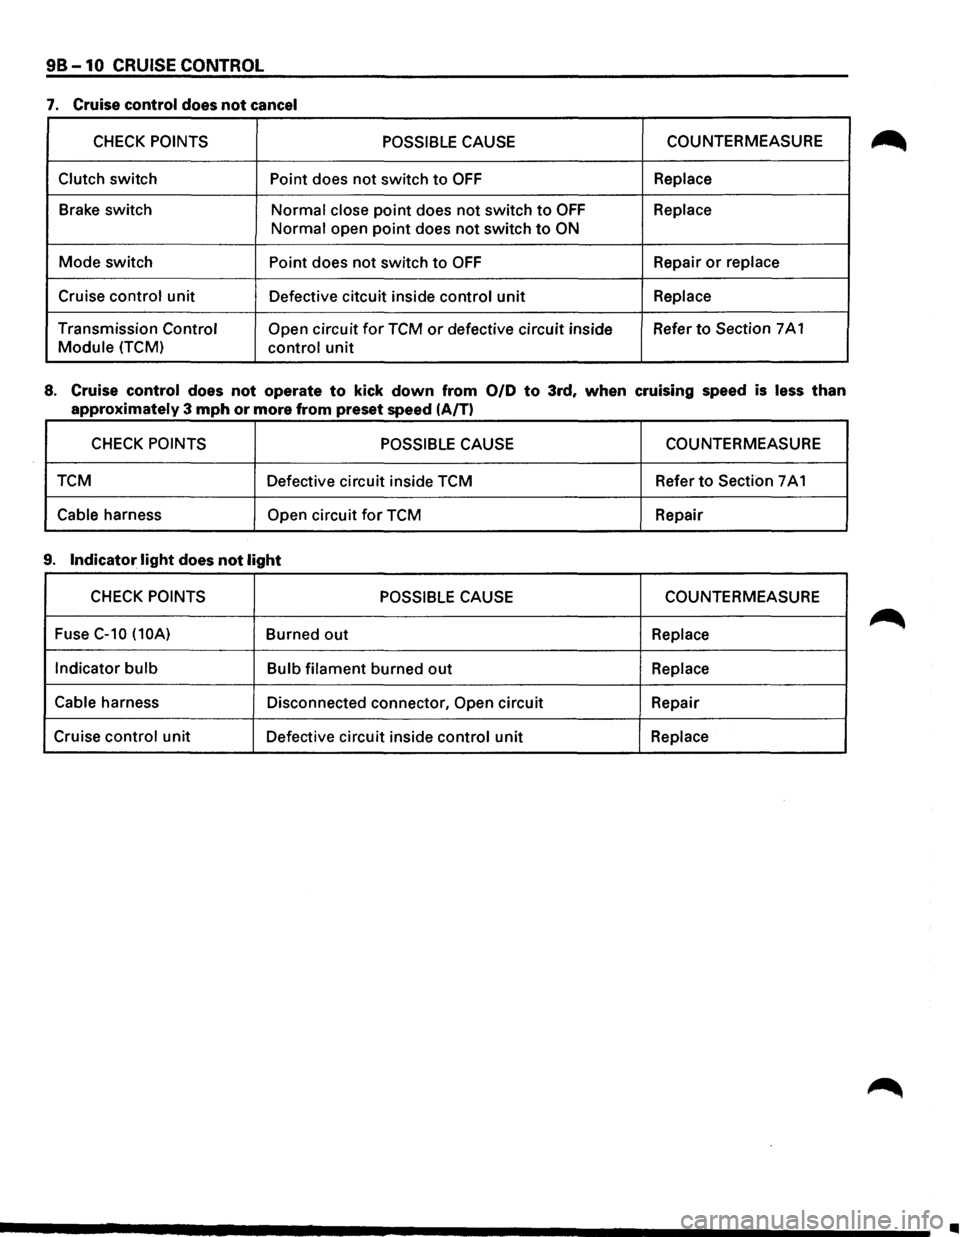
98-10 CRUISE CONTROL
7. Cruise control does not cancel
CHECK POINTS POSSIBLE CAUSE COUNTERMEASURE
Clutch switch Point does not switch to OFF Replace
Brake switch
Normal close point does not switch to OFF Replace
Normal open point does not switch to ON
Mode switch Point does not switch to OFF Repair or replace
Cruise control unit
Defective citcuit inside control unit Replace
Transmission Control Open circuit for TCM or defective circuit inside Refer to Section
7 A 1
Module (TCM) control unit
8. Cruise control does not operate to kick down from 0/D to 3rd, when cruising speed is less than
approximately 3 mph or more from preset speed (A/T)
CHECK POINTS POSSIBLE CAUSE COUNTERMEASURE
TCM Defective circuit inside TCM Refer
to Section 7 A 1
Cable harness Open circuit for TCM
Repair
9. Indicator light does not light
CHECK POINTS POSSIBLE CAUSE COUNTERMEASURE
Fuse
C-10 (10A) Burned out Replace
Indicator
bulb Bulb filament burned out Replace
Cable
harness Disconnected connector, Open circuit Repair
Cruise
control unit Defective circuit inside control unit Replace
..
Page 1614 of 1928
9B-30 CRUISE CONTROL
1. Front console assembly
• Remove four screws.
• Remove the transmission shift lever knob.
• Remove the transfer shift lever knob.
• Disconnect the seat heater switch connectors
(If so equipped).
• Disconnect the "POWER & WINTER" switch
connectors (A/T only).
2. Lower cluster assembly
• Remove three screws.
• Disconnect the cigar lighter connectors.
• Remove the cigar lighter illumination bulb
socket.
• Disconnect the ashtray illumination bulb
connector.
3. Instrument panel driver lower cover
• Remove the engine hood opener.
• Remove three screws and clip.
•
Disconnect four fasteners.
4. Steering cowl
• Remove seven screws.
5. Starter switch
• Disconnect the connector.
• Remove the screw.
8 INSTALLATION
To install, follow the removal steps in the reverse
order noting the following point.
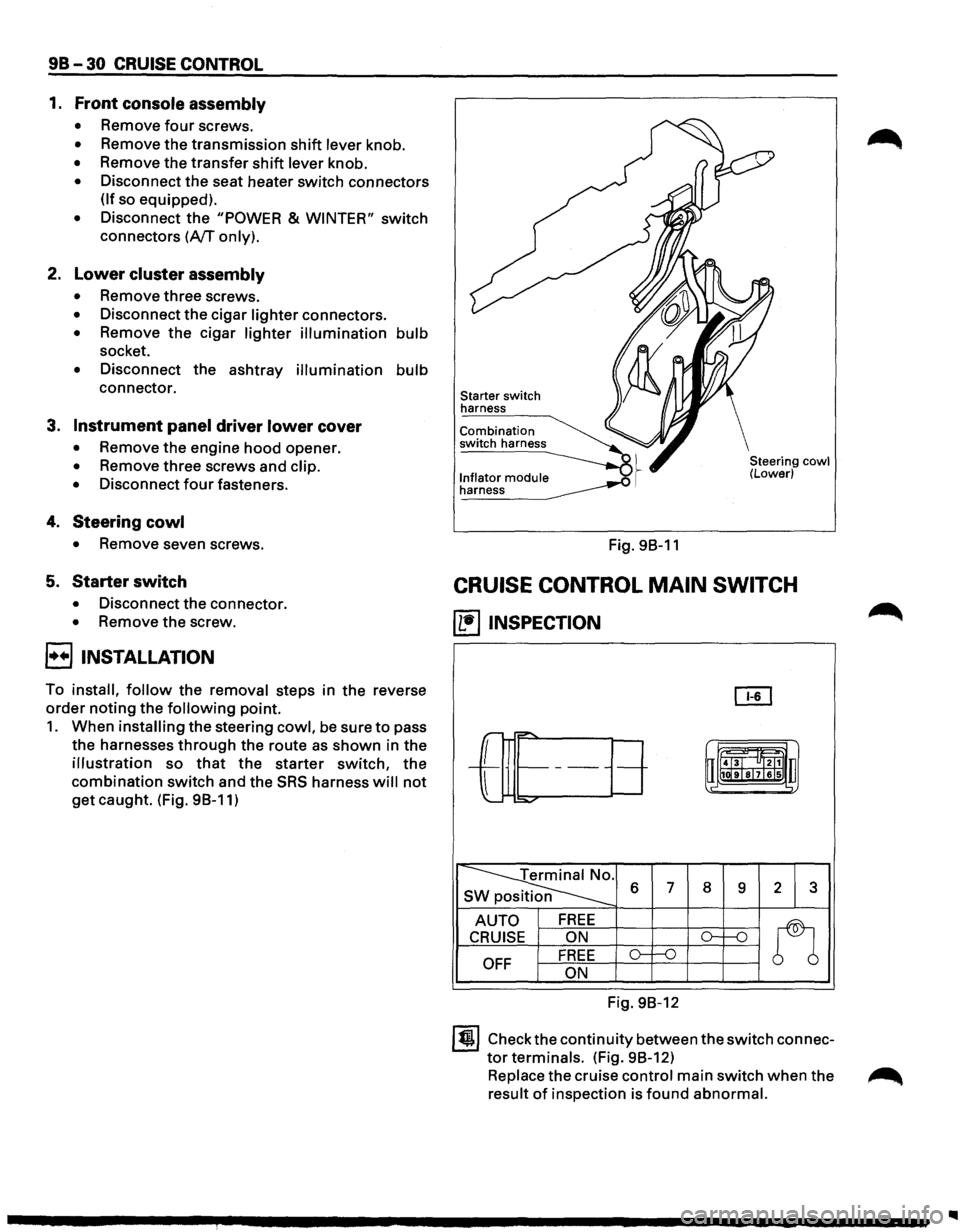
1. When installing the steering cowl, be sure to pass
the harnesses
through the route as shown in the
illustration so that the starter switch, the
combination switch and the SRS harness will not
get caught. (Fig. 98-11)
Starter switch
harness
Combination
switch harness
l._n!~~~o!_ module __..o .~ ~
Fig. 98-11
Steering cowl (Lower)
CRUISE CONTROL MAIN SWITCH
(1!1 INSPECTION
OI1
r-="'
-L
r= t-------uii4J~l "ltl1 u
l
1111ilr9Tsl7lels .,
:::o.,..o-
~ s 6 7 8 9 2 3
AUTO FREE
n
CRUISE ON ()-1---n
OFF FREE o-f--0
ON
Fig. 98-12
ltjl Check the continuity between the switch connec
tor terminals. (Fig. 98-12)
Replace the cruise control main switch when the ~
result of inspection is found abnormal.
Page 1630 of 1928
9J-6 Supplemental Restraint System <
COMPONENT DESCRIPTION
DERM
CAUTION: DO NOT OPEN THE DERM CASE FOR
ANY REASON. TOUCHING THE CONNECTOR PINS
OR SOLDERED COMPONENTS MAY CAUSE
ELECTROSTATIC DISCHARGE DAMAGE. REPAIR
OF A MALFUNCTIONING DERM IS BY
REPLACEMENT ONLY.
The DERM is designed to perform the following functions
in the SRS:
1. Energy Reserve- The DERM maintains two 36-Volt
Loop Reserve(36VLR) energy supplies to provide
deployment energy when the vehicle voltage is low
or lost in a frontal crash.
2. Malfunction Detection-The DERM performs
diagnostic monitoring of SRS electrical components.
3. Malfunction Recording- The DERM provides SRS
diagnostic trouble code information through a scan
tool.
4. Driver Notification- The DERM warns the vehicle
driver of SRS malfunctions by controlling the "AIR
BAG"
warning lamp.
5. Frontal Crash Recording- The DERM records the
SRS status during a frontal crash.
The DERM is connected to the
SRS wiring harness by
a
24-way connector. This harness connector uses a
shorting
clip across certain terminals in the contact area.
This shorting
clip connects the "AIR BAG" warning lamp
to ground when the DERM harness connector is
disconnected. This will cause the "AIR BAG" warning
lamp to come "ON" steady whenever the ignition switch
is at the RUN,BULB
TEST or START positions with the
DERM disconnected.
"AIR BAG"WARNING LAMP
Ignition voltage is applied to the "AIR BAG" warning lamp
when the ignition switch is at the RUN,BULB TEST or
START positions. The DERM controls the lamp by
providing ground with a
lamp driver. The "AIR BAG"
warning lamp is used in the SRS to do the following:
1. Verify lamp and DERM operation by flashing SEVEN
times when the ignition switch is first turned"ON".
2. Warn the vehicle driver of SRS electrical system
malfunctions which could potentially affect the
operation of the
SRS. These malfunctions could
result
in non-deployment in case of a frontal crash
or deployment for conditions less severe than
intended.
The "AIR BAG" warning lamp is the key to driver
notification of SRS malfunctions. For proper lamp
operation, refer to the "SRS Diagnostic System Check"
in this section.
DUAL POLE ARMING SENSOR ~
The dual pole arming sensor is a protective switch
located in the high side(power side) of the deployment
loops.
The dual pole arming sensor is calibrated to close
at low level velocity changes(lower than the
discriminating sensors).
This ensures that the
inflator modules are connected
directly to the "36 VLR" outputs of the DERM or "Ignition
1" voltage
when any discriminating sensor closes.
The dual pole arming sensor consists of: a sensing
element, two sets of normally open switch contacts,
diagnostic resistors and diodes. The sensing
element
closes
both sets of switch contacts when the velocity of
the
vehicle changes at a rate indicating a potential need
for
deployment.
Two of the diagnostic resistors are connected in parallel
with the switch contacts. This allows a small amount of
current to
flow through each of the deployment loops
during normal, non-deployment operation. This current
flow results in voltage drops across each component in
the
deployment loops. The DERM monitor these voltage
drops to detect circuit or component malfunctions. There
are two
additional diagnostic resistors within the dual
pole
arming sensor which allow the DERM to monitor the
voltage supplied to the high side ofthe deployment loops.
These monitored voltages are used by the diagnostic
logic of the DERM to make a more precise determination
of the
actual deployment loop malfunction. ~
The diodes within the dual pole arming sensor provide
isolation between the "36VLR" outputs of the DERM and
the
vehicle electrical system "Ignition 1" voltage. The
presence of the diodes prevents a direct continuity
measurement through the
dual pole arming sensor
resistors to
terminals"3","4" or "5".
DISCRIMINATING SENSORS
The discriminating sensors are protective switches wired
in parallel on the low side(ground side) of the deployment
loops.
These sensors are calibrated to close with velocity
changes which are severe enough to warrant
deployment.
The discriminating sensors consist of a sensing element
and normally open switch contacts when the vehicle
velocity changes are severe enough to warrant
deployment.
A diagnostic resistor is connected in parallel with the
switch contacts within the
LH forward discriminating
sensor and
RH forward discriminating sensor. These
parallel resistors supply the ground path for the current
passing through the
deployment loops during normal,
non-deployment operation. This current flow results in
voltage drops across each component within the
deployment loops. The DERM monitors these voltage
drops to detect circuit or component malfunctions.
II
Page 1632 of 1928
9J-8 Supplemental Restraint System
DEFINITIONS
AIR BAG -An inflatable cloth cushion designed to
deploy in certain frontal crashes. It supplements the
protection offered by the seat belts by distributing the
impact load more evenly over the vehicle occupant's
head and torso.
ASYNCHRONOUS -Performed in a non-periodic
fashion,i.e.no defined time or interval.
B+-Battery voltage, the voltage available at the battery
at the time of the indicated measurement. With the key
"ON" and the engine not running, the system voltage will
likely be between 12 and 12.5 volts. At idle the voltage
may be 14 to 16 volts. The voltage could be as low as 1
0
volts during engine cranking.
BULB
CHECK-The DERM will cause the "AIR BAG"
warning lamp to flash seven times and then go "OFF"
whenever the ignition switch transitions to the RUN
position from any other ignition switch position and no
malfunctions are detected.
"CONTINUOUS MONITORING"-Tests performed by
the DERM on the
SRS every 1 00 milliseconds while
"Ignition
1" voltage is in the normal operating voltage
range at the DERM.
DATA LINK CONNECTOR(DLC)-Formerly "ALDL'', a
connector which allows communication with an
off-board computer, such as a scan
tool.
DATUM LINE-A base line parallel to the plane of the
underbody or frame from which all vertical
measurements originate.
DEPLOY-To inflate the air bag.
DEPLOYMENT
LOOPS - The circuits which supply
current to the inflator modules to deploy the air bag.
DERM -Diagnostic
energy reserve module which
provides reserve energy to the deployment loops and
performs diagnostic monitoring of
all SRS components.
DIAGNOSTIC TROUBLE CODE(DTC) -Formerly
"Code,"a numerical designator used by the DERM to
indicate specific
SRS malfunctions.
DRIVER CURRENT SOURCE-An output of the DERM
which injects current into the driver inflator module circuit
during the "Initiator Assembly Resistance
Test."
DRIVER INFLATOR
MODULE-An assembly located in
the steering wheel hub consisting of an inflatable air bag,
an inflator and an initiator.
DUAL
POLE ARMING SENSOR-A sensor on the high
side(power side) of the deployment loops that is
calibrated to supply voltage to the inflator modules when
the vehicle velocity changes are severe enough to
warrant arming of the air bags in preparation for
deployment.
EEPROM -Electrically Erasable Programmable Read ~
Only Memory. Memory which retains its contents when
power
is removed from the DERM.
FORWARD LH DISCRIMINATING SENSOR-A sensor
on the low side(ground side) of the deployment loops
which is calibrated to ground the inflator modules when
the vehicle velocity changes are severe enough to
warrant deployment of the air bags.
FORWARD RH DISCRIMINATING SENSOR-A sensor
on the low side(ground side) of the deployment loops
which
is calibrated to ground the inflator modules when
the vehicle velocity changes are severe enough
to
warrant deployment of the air bag.
FORWARD LH SENSOR Eng-Room HARNESS-An
assembly of two correct carrying wires which connects
the Forward
LH discriminating sensor to SRS harness.
FORWARD RH SENSOR Eng-Room HARNESS
JUMPER-An assembly of two current carrying wires
which connects the Forward
RH discriminating sensor to
the
SRS harness.
HIGHER PRIORITY FAULT-Each diagnostic trouble
code
is assigned a priority based on the detectability with
other DTCs present. The priority corresponds to the
detectability of the malfunction ONLY, and does NOT
relate to the criticality of the malfunction with respect to ~
deployment or non-deployment under any given
condition.
IGNITION CYCLE -The voltage at the PERM "Ignition
1"
inputs, with ignition switch "ON," is within the normal
operating voltage range for at least ten seconds before
turning ignition switch
"OFF."
IGNITION1
-A battery voltage(B+)circuit which is only
powered with the ignition switch in the RUN,BULB
TEST,or START positions.
INITIATOR-The electrical component inside the inflator
module which, when sufficient current flows, sets off the
chemical reaction that inflates the air bag.
"INITIATOR ASSEMBLY RESISTANCE TEST"-Tests
performed once each ignition cycle when no
malfunctions are detected during "Turn-ON" or
"Continuous Monitoring." This test checks for the correct
DERM configuration for the vehicle, shorts to
"Ignition 1"
in the deployment loops, high resistance or opens in the
"Driver
Side High," "Driver Side Low," "Passenger Side
High"
and "Passenger Side Low" circuits and measures
the resistance of the inflator assembly consisting of: 1)
Initiators, 2) SRS coil assembly(driver side only), 3)
Connectors and associated wiring.
NORMAL OPERATING VOLTAGE RANGE-The ~
voltage measured between the DERM "Ignition 1" ·
terminals and "Ground" terminals is between 7.25 and 16
volts.
•