wiring ISUZU TROOPER 1995 Repair Manual
[x] Cancel search | Manufacturer: ISUZU, Model Year: 1995, Model line: TROOPER, Model: ISUZU TROOPER 1995Pages: 1928
Page 758 of 1928
6E2~62 DRIVEABILITY AND EMISSIONS
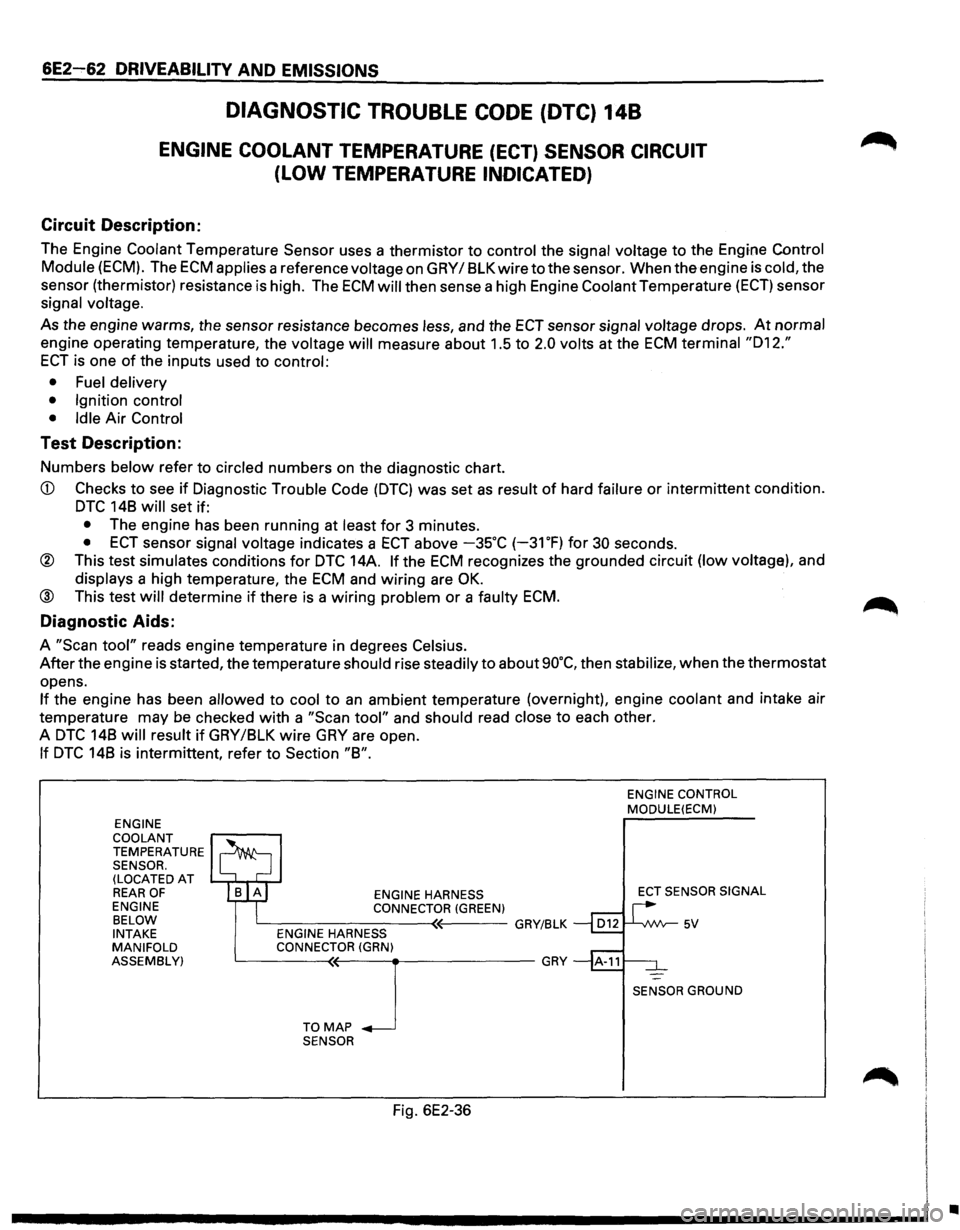
DIAGNOSTIC TROUBLE CODE (DTC) 148
ENGINE COOLANT TEMPERATURE (ECT) SENSOR CIRCUIT
(LOW TEMPERATURE INDICATED)
Circuit Description:
The Engine Coolant Temperature Sensor uses a thermistor to control the signal voltage to the Engine Control
Module (ECM). The ECM applies a reference voltage on GRY I 8LK wire to the sensor. When the engine is cold, the
sensor (thermistor) resistance
is high. The ECM will then sense a high Engine Coolant Temperature (ECT) sensor
signal
voltage.
As the engine warms, the sensor resistance becomes less, and the ECT sensor signal voltage drops. At normal
engine operating temperature, the voltage will measure about 1.5 to 2.0 volts at the ECM terminal "012."
ECT is one of the inputs used to control:
• Fuel delivery
• Ignition control
• Idle
Air Control
Test Description:
Numbers below refer to circled numbers on the diagnostic chart.
CD Checks to see if Diagnostic Trouble Code (DTC) was set as result of hard failure or intermittent condition.
DTC 148 will set if:
• The engine has been running at least for 3 minutes.
• ECT sensor signal voltage indicates a ECT above -35°C (-31 OF) for 30 seconds.
® This test simulates conditions for DTC 14A. If the ECM recognizes the grounded circuit (low voltage), and
displays a high temperature, the ECM and wiring are OK.
@ This test will determine if there is a wiring problem or a faulty ECM.
Diagnostic Aids:
A "Scan tool" reads engine temperature in degrees Celsius.
After the engine is started, the temperature should rise steadily to about 90°C, then stabilize, when the thermostat
opens.
If the engine has been allowed to cool to an ambient temperature (overnight), engine coolant and intake air
temperature may be checked
with a "Scan tool" and should read close to each other.
A
DTC 148 will result if GRY/8LK wire GRY are open.
If DTC 148 is intermittent, refer to Section "8".
ENGINE
COOLANT
TEMPERATURE SENSOR.
(LOCATED AT REAR OF ENGINE
BELOW
INTAKE
MANIFOLD
ASSEMBLY) ENGINE
HARNESS
CONNECTOR (GREEN) c__---------<~'----GRY/BLK ENGINE HARNESS
CONNECTOR (GRN)
~---T-0--<'M<(--A-P_J ___________ GRY
SENSOR
Fig. 6E2-36
ENGINE CONTROL MODULE(ECM)
ECT
SENSOR SIGNAL
SENSOR GROUND
•
Page 762 of 1928
6E2-66 DRIVEABILITV AND EMISSIONS
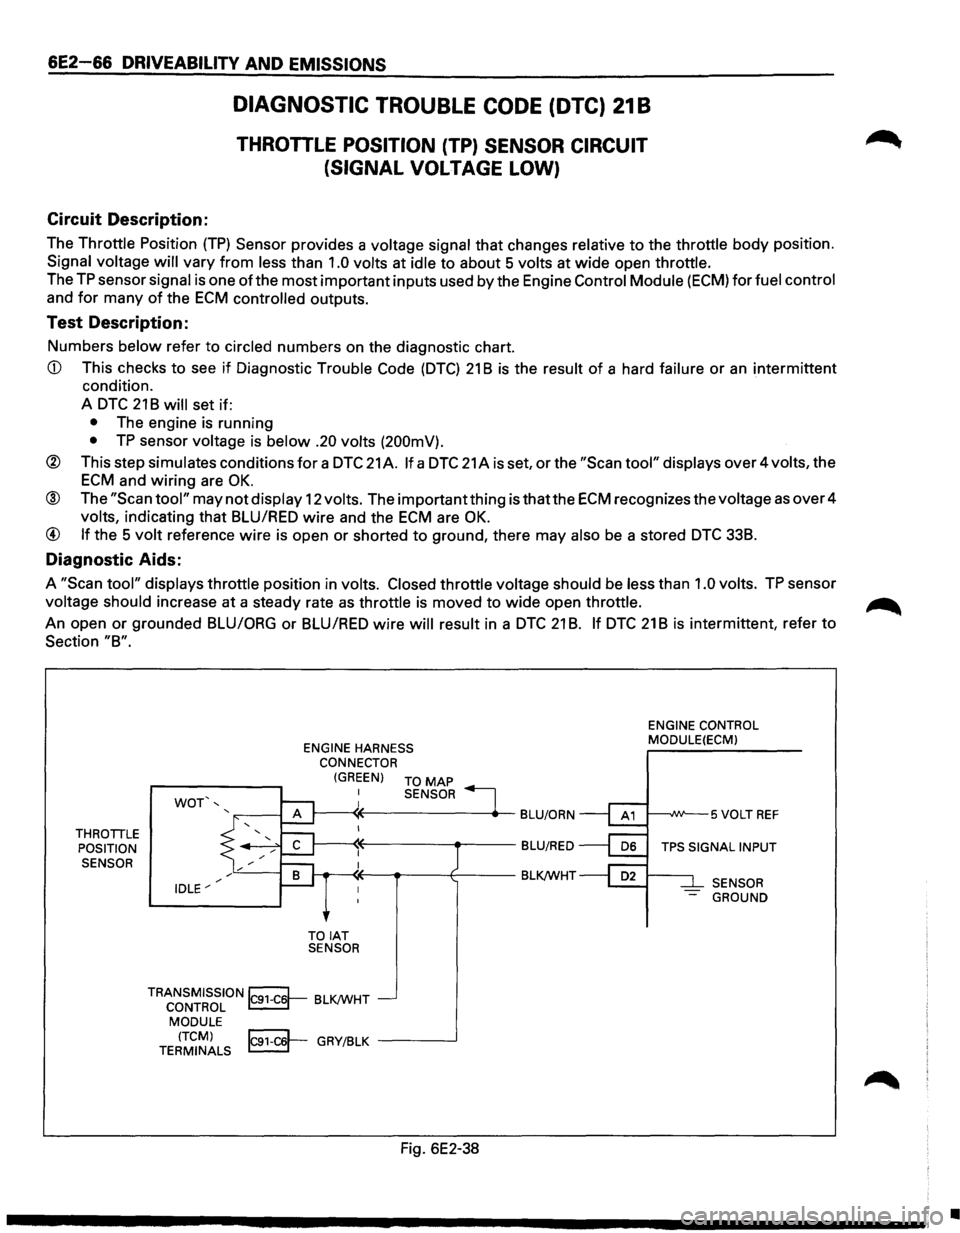
DIAGNOSTIC TROUBLE CODE (DTC) 21 8
THROTILE POSITION (TP) SENSOR CIRCUIT
(SIGNAL VOLTAGE LOW)
Circuit Description:
The Throttle Position (TP) Sensor provides a voltage signal that changes relative to the throttle body position.
Signal voltage will vary from less than 1.0 volts at idle to about 5 volts at wide open throttle.
The
TP sensor signal is one of the most important inputs used by the Engine Control Module (ECM) for fuel control
and
for many of the ECM controlled outputs.
Test Description:
Numbers below refer to circled numbers on the diagnostic chart.
CD This checks to see if Diagnostic Trouble Code (DTC) 21 B is the result of a hard failure or an intermittent
condition.
A
DTC 21 B will set if:
• The engine is running
• TP sensor voltage is below .20 volts (200mV).
® This step simulates conditions for a DTC 21 A. If a DTC 21 A is set, or the "Scan tool" displays over 4 volts, the
ECM and wiring are OK.
® The "Scan tool" may not display 12 volts. The important thing is thatthe ECM recognizes the voltage as over 4
volts, indicating that BLU/RED wire and the ECM are OK.
@ If the 5 volt reference wire is open or shorted to ground, there may also be a stored DTC 338.
Diagnostic Aids:
A "Scan tool" displays throttle position in volts. Closed throttle voltage should be less than 1.0 volts. TP sensor
voltage should increase at
a steady rate as throttle is moved to wide open throttle. ~
An open or grounded BLU/ORG or BLUIRED wire will result in a DTC 21 B. If DTC 21 B is intermittent, refer to
Section "8".
THROTTLE POSITION
SENSOR ENGINE
HARNESS
CONNECTOR
WOT',
IDLE"'
(GREEN) TO MAP
TOIAT SENSOR SENSOR
TRANSMISSION~ BLK/WHT CONTROL ~ MODULE
(TCM) IC91-C6'-GRY/BLK -----..J TERMINALS ~ -
Fig. 6E2-38
ENGINE
CONTROL
MODULE(ECMl
1---..JW--5 VOLT REF
TPS SIGNAL INPUT
SENSOR
- GROUND
•
Page 764 of 1928
6E2-68 DRIVEABILITV AND EMISSIONS
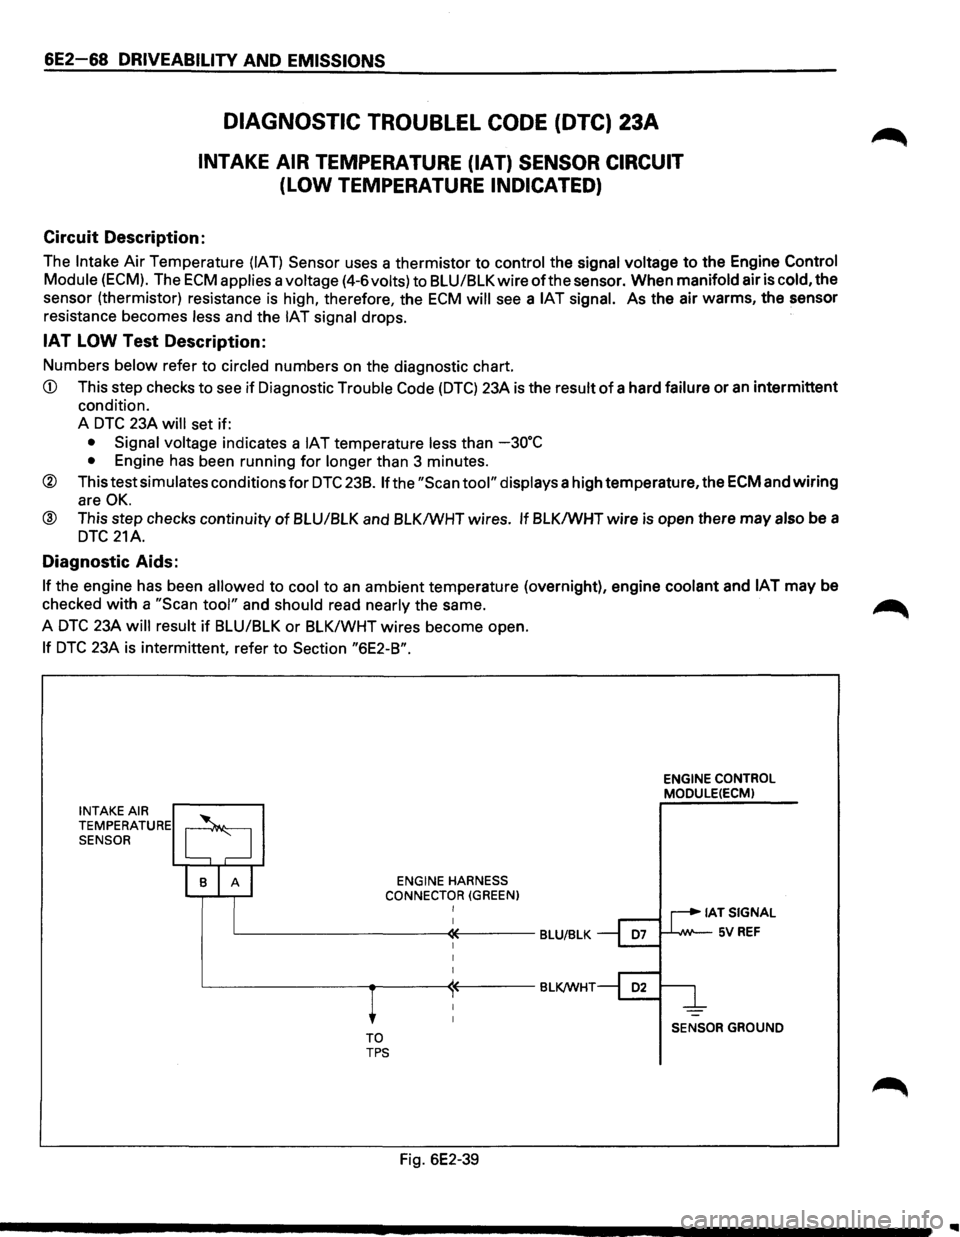
DIAGNOSTIC TROUBLEL CODE (DTC) 23A
INTAKE AIR TEMPERATURE {IAT) SENSOR CIRCUIT
(LOW TEMPERATURE INDICATED)
Circuit Description:
The Intake Air Temperature (IAT) Sensor uses a thermistor to control the signal voltage to the Engine Control
Module
(ECM). The ECM applies a voltage (4-6volts) to BLU/BLK wire of the sensor. When manifold air is cold, the
sensor (thermistor) resistance is high, therefore, the
ECM will see a IAT signal. As the air warms, the sensor
resistance becomes
less and the IAT signal drops.
IAT LOW Test Description:
Numbers below refer to circled numbers on the diagnostic chart.
CD This step checks to see if Diagnostic Trouble Code (DTC) 23A is the result of a hard failure or an intermittent
condition.
A
DTC 23A will set if:
• Signal voltage indicates a IAT temperature less than -30"C
• Engine has been running for longer than 3 minutes.
® This test simulates conditions for DTC 238. If the "Scan tool" displays a high temperature, the ECM and wiring
are OK.
@ This step checks continuity of BLU/BLK and BLK/WHT wires. If BLK/WHT wire is open there may also be a
DTC 21A.
Diagnostic Aids:
If the engine has been allowed to cool to an ambient temperature (overnight), engine coolant and IAT may be
checked
with a "Scan tool" and should read nearly the same. ~
A DTC 23A will result if BLU/BLK or BLK/WHT wires become open.
If DTC 23A is intermittent, refer to Section "6E2-B".
INTAKE AIR TEMPERATURE SENSOR
ENGINE HARNESS
CONNECTOR
(GREEN) I
L-----------«----BLU/BLK
TO TPS
Fig. 6E2-39
ENGINE CONTROL
MODULE(ECM)
IATSIGNAL
1--'--IW'--5V REF
SENSOR GROUND
Page 769 of 1928
DRIVEABILITY AND EMISSIONS 6E2-73
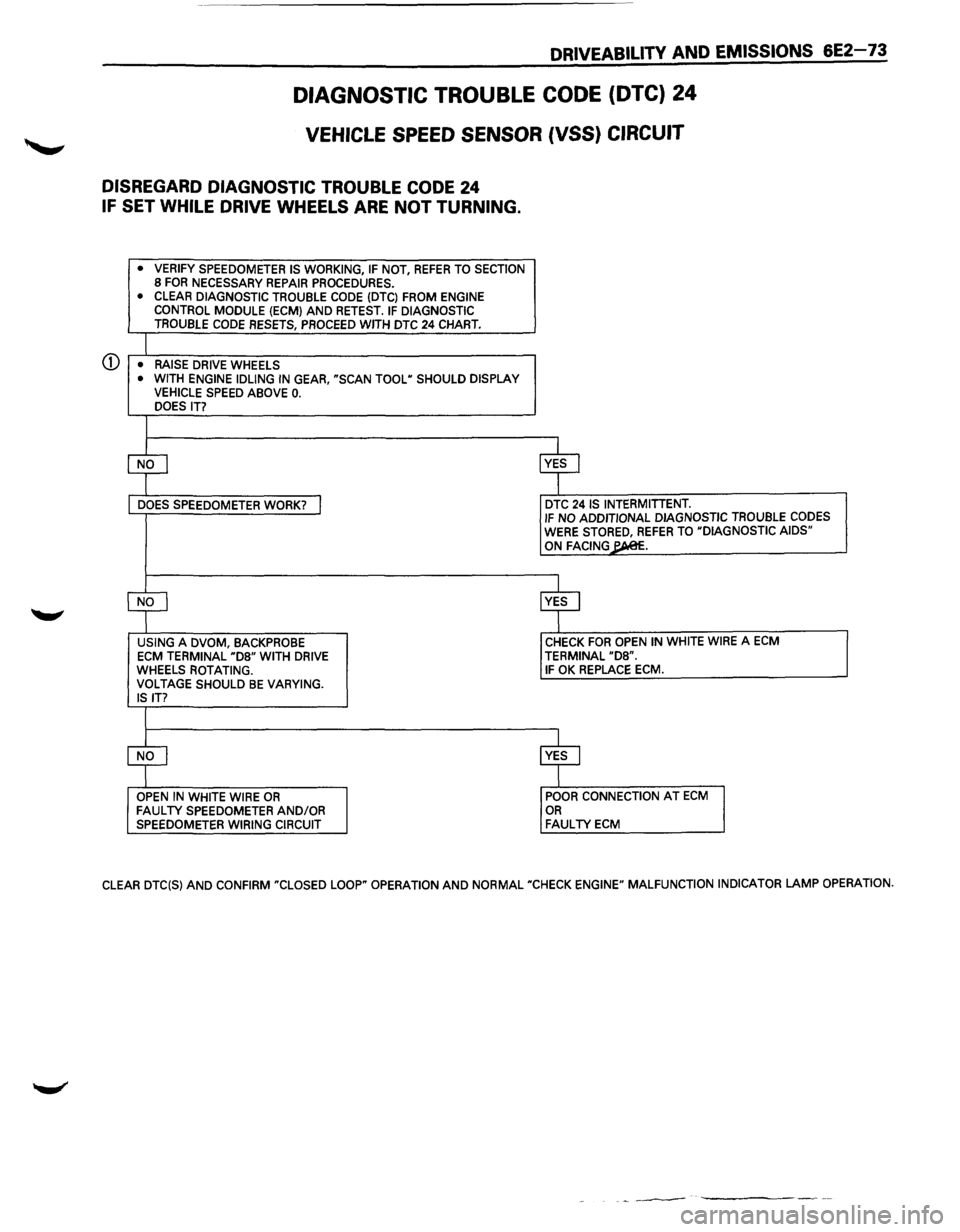
DIAGNOSTIC TROUBLE CODE (DTC) 24
VEHICLE SPEED SENSOR (VSS) CIRCUIT
DISREGARD DIAGNOSTIC TROUBLE CODE 24
IF SET WHILE DRIVE WHEELS ARE NOT TURNING.
• VERIFY SPEEDOMETER IS WORKING, IF NOT, REFER TO SECTION 8 FOR NECESSARY REPAIR PROCEDURES. • CLEAR DIAGNOSTIC TROUBLE CODE (DTC) FROM ENGINE CONTROL MODULE (ECM) AND RETEST. IF DIAGNOSTIC TROUBLE CODE RESETS, PROCEED WITH DTC 24 CHART.
CD • RAISE DRIVE WHEELS • WITH ENGINE IDLING IN GEAR, "SCAN TOOL" SHOULD DISPLAY VEHICLE SPEED ABOVE 0. DOES IT?
$ ~
DOES SPEEDOMETER WORK? I DTC 24 IS INTERMITIENT. IF NO ADDITIONAL DIAGNOSTIC TROUBLE CODES WERE STORED, REFER TO "DIAGNOSTIC AIDS" ON FACING~.
CfJ ~ USING A DVOM, BACKPROBE CHECK FOR OPEN IN WHITE WIRE A ECM
ECM TERMINAL "D8" WITH DRIVE TERMINAL "D8". WHEELS ROTATING. IF OK REPLACE ECM. VOLTAGE SHOULD BE VARYING. IS IT?
$ ~ OPEN IN WHITE WIRE OR POOR CONNECTION AT ECM FAULTY SPEEDOMETER AND/OR OR SPEEDOMETER WIRING CIRCUIT FAULTY ECM
CLEAR DTC(S) AND CONFIRM "CLOSED LOOP" OPERATION AND NORMAL "CHECK ENGINE" MALFUNCTION INDICATOR LAMP OPERATION.
-~---
Page 774 of 1928
6E2-78 DRIVEABILITV AND EMISSIONS
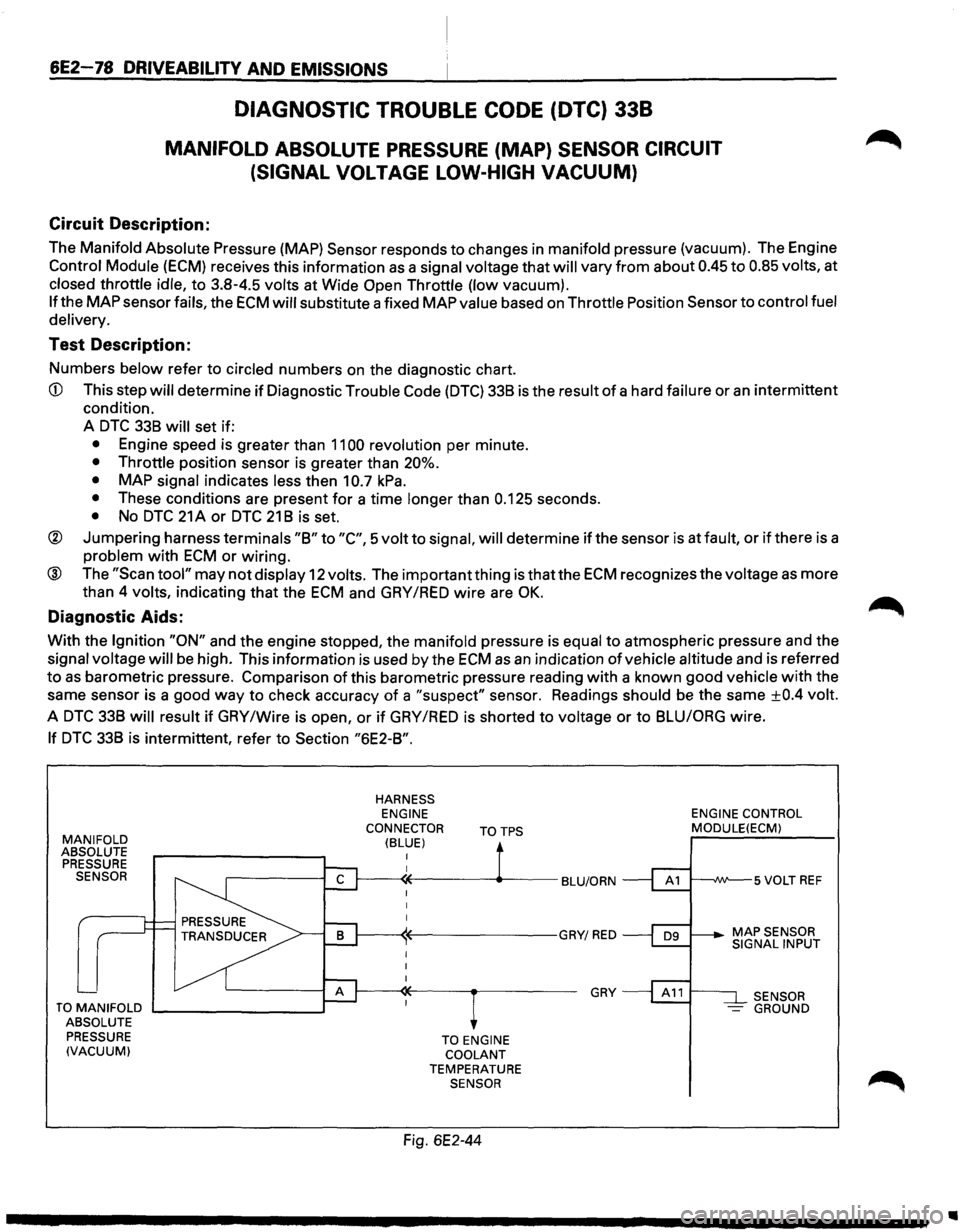
DIAGNOSTIC TROUBLE CODE (DTC) 338
MANIFOLD ABSOLUTE PRESSURE (MAP) SENSOR CIRCUIT
(SIGNAL
VOLTAGE LOW-HIGH VACUUM)
Circuit Description:
The Manifold Absolute Pressure (MAP) Sensor responds to changes in manifold pressure (vacuum). The Engine
Control Module (ECM) receives this information as a signal voltage that will vary from about 0.45 to 0.85 volts, at
closed throttle idle, to 3.8-4.5 volts at Wide Open Throttle (low vacuum).
If the MAP sensor fails, the ECM will substitute a fixed MAP value based on Throttle Position Sensor to control fuel
delivery.
Test Description:
Numbers below refer to circled numbers on the diagnostic chart.
CD This step will determine if Diagnostic Trouble Code (DTC) 338 is the result of a hard failure or an intermittent
condition.
A
DTC 338 will set if:
• Engine speed is greater than 1100 revolution per minute.
• Throttle position sensor is greater than 20%.
•
MAP signal indicates less then 10.7 kPa.
• These conditions are present for a time longer than 0.125 seconds.
• No DTC 21 A or DTC 21 8 is set.
® Jumpering harness terminals "8" to "C", 5 volt to signal, will determine if the sensor is at fault, or if there is a
problem with ECM or wiring.
® The "Scan tool" may not display 12 volts. The important thing is that the ECM recognizes the voltage as more
than 4
volts, indicating that the ECM and GAY /RED wire are OK.
Diagnostic Aids:
With the Ignition "ON" and the engine stopped, the manifold pressure is equal to atmospheric pressure and the
signal voltage will be high. This information is used by the ECM as an indication of vehicle altitude and is referred
to as barometric pressure. Comparison of this barometric pressure reading with a known good vehicle with the
same sensor is a good
way to check accuracy of a "suspect" sensor. Readings should be the same ±0.4 volt.
A DTC 338 will result if GAY /Wire is open, or if GAY /RED is shorted to voltage or to 8LUIORG wire.
If DTC 338 is intermittent, refer to Section "6E2-8".
MANIFOLD ABSOLUTE
PRESSURE SENSOR
TO MANIFOLD .._ _______ --.~
ABSOLUTE
PRESSURE
(VACUUM)
HARNESS ENGINE
CONNECTOR
(BLUE) TOTPS
TO ENGINE COOLANT TEMPERATURE SENSOR
Fig. 6E2-44
GRY
ENGINE CONTROL MODULE(ECM)
SENSOR -GROUND
..
Page 778 of 1928
6E2-82 DRIVEABILITY AND EMISSIONS
Circuit Description:
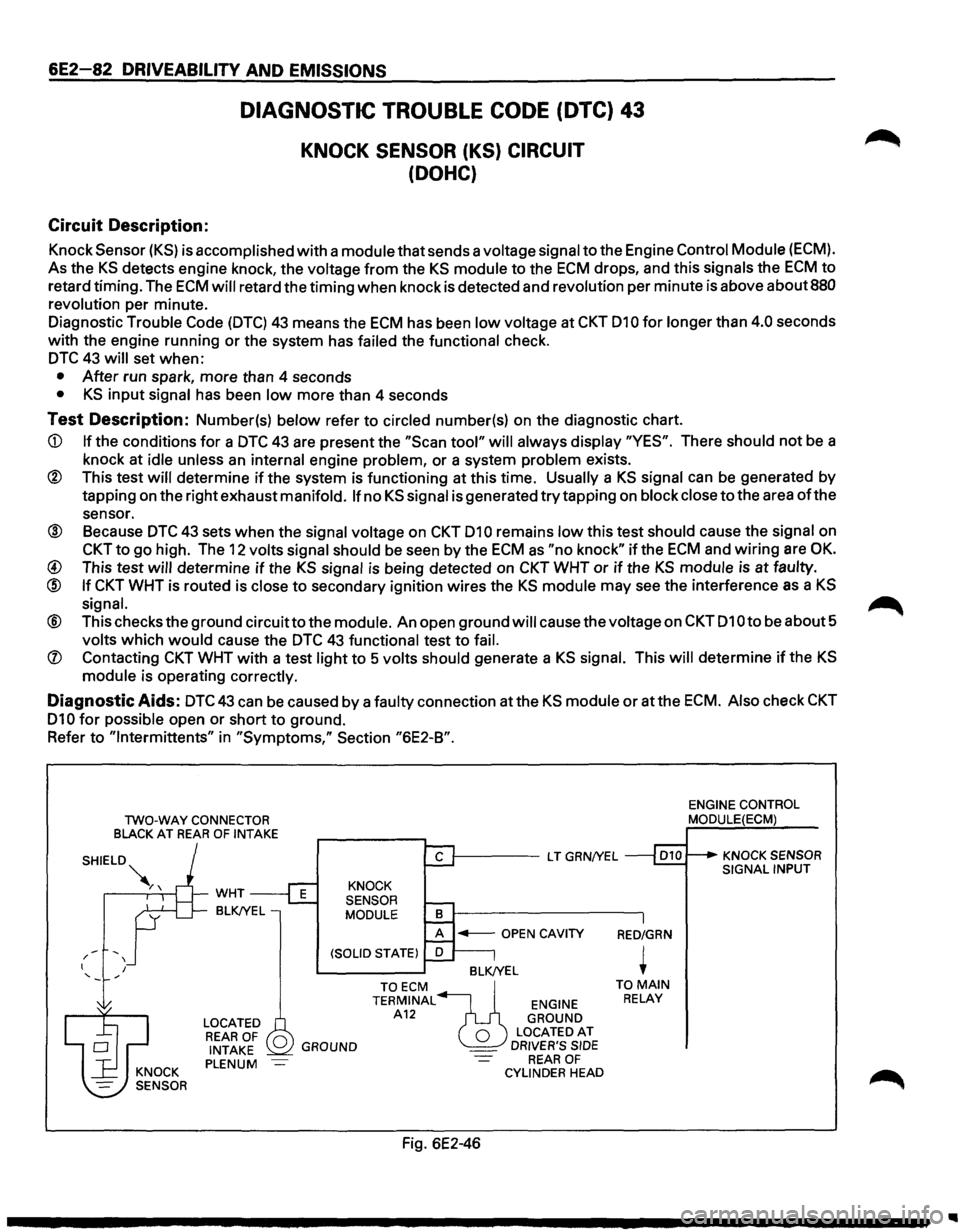
DIAGNOSTIC TROUBLE CODE (DTC) 43
KNOCK SENSOR (KS) CIRCUIT
(DOHC)
Knock Sensor (KS) is accomplished with a module that sends a voltage signal to the Engine Control Module (ECM).
As the KS detects engine knock, the voltage from the KS module to the ECM drops, and this signals the ECM to
retard timing. The ECM will retard the timing when knock is detected and revolution per minute is above about 880
revolution
per minute.
Diagnostic
Trouble Code (DTC) 43 means the ECM has been low voltage at CKT 010 for longer than 4.0 seconds
with the engine running or the system has
failed the functional check.
DTC 43 will set when:
• After run spark, more than 4 seconds
• KS input signal has been low more than 4 seconds
Test Description: Number(s) below refer to circled number(s) on the diagnostic chart.
CD If the conditions for a DTC 43 are present the "Scan tool" will always display "YES". There should not be a
knock at
idle unless an internal engine problem, or a system problem exists.
® This test will determine if the system is functioning at this time. Usually a KS signal can be generated by
tapping on the right exhaust
manifold. If no KS signal is generated try tapping on block close to the area of the
sensor.
® Because DTC 43 sets when the signal voltage on CKT 010 remains low this test should cause the signal on
CKT to go high. The 12 volts signal should be seen by the ECM as "no knock" if the ECM and wiring are OK.
@ This test will determine if the KS signal is being detected on CKT WHT or if the KS module is at faulty.
@ If CKT WHT is routed is close to secondary ignition wires the KS module may see the interference as a KS
signal. ~
® This checks the ground circuitto the module. An open ground will cause the voltage on CKT 010 to be about 5
volts which would cause the DTC 43 functional test to fail.
(J) Contacting CKT WHT with a test light to 5 volts should generate a KS signal. This will determine if the KS
module is operating correctly.
Diagnostic Aids: DTC43 can be caused by a faulty connection atthe KS module or atthe ECM. Also check CKT
010 for possible open or short to ground.
Refer
to "lntermittents" in "Symptoms," Section "6E2-B".
TWO-WAY CONNECTOR
BLACK AT REAR OF INTAKE
-' / I I
WHT
BLK!YEL
LOCATED REAR OF 0 INTAKE PLENUM
1-----L T GRN/YEL
KNOCK
SENSOR
MODULE
BLK/YEL
GROUND
TOECM ~ TERMINAL ENGINE A12 GROUND
0 LOCATEDAT _ DRIVER'S SIDE REAR OF CYLINDER HEAD
Fig. 6E2-46
RED/GRN
+ TO MAIN RELAY
ENGINE CONTROL MODULE(ECM)
KNOCK SENSOR SIGNAL INPUT
Page 785 of 1928
DRIVEABILITY AND EMISSIONS 6E2-89
SECTION B
SYMPTOMS
CONTENTS
Important Preliminary Checks . . . . . . . . . 6E2-89
Before Starting . . . . . . . . . . . . . . . . . . . . . . 6E2-89
Symptom . . . . . . . . . . . . . . . . . . . . . . . . . . . 6E2-89
Visual/Physical Check . . . . . . . . . . . . . . . . 6E2-89
lntermittents . . . . . . . . . . . . . . . . . . . . . . . . 6E2-90
Hard Start . . . . . . . . . . . . . . . . . . . . . . . . . . 6E2-90
Surges and/or Chuggles .............. 6E2-91
Lack of Power, Sluggish, or Spongy . . . . 6E2-92
Detonation/Spark Knock .............. 6E2-92
Hesitation, Sag, Stumble . . . . . . . . . . . . . 6E2-93
Cuts Out, Misses . . . . . . . . . . . . . . . . . . . . . 6E2-93
Rough, Unstable, or Incorrect Idle,
Stalling ............................. 6E2-94
Poor Fuel Economy . . . . . . . . . . . . . . . . . . . 6E2-95
Excessive Exhaust Emissions or Odors .. 6E2-96
Backfire . . . . . . . . . . . . . . . . . . . . . . . . . . . . 6E2-96
Dieseling, Run-on .................... 6E2-97
Restricted Exhaust System
Check (CHART B-1) ................... 6E2-98
IMPORTANT PRELIMINARY CHECKS
BEFORE STARTING
Before using this section you should have performed
the on-board diagnostic system check and determined
that:
1. The engine control module and "Check Engine"
malfunction indicator lamp are operating
correctly.
2. There are no diagnostic trouble codes stored, or
there is a diagnostic trouble code but no "Check
Engine" malfunction indicator lamp.
SYMPTOM
Verify the customer complaint, and locate the correct
symptom in the
table of contents. Check the items
indicated under
that symptom.
VISUAL/PHYSICAL CHECK
Several of the symptom procedures call for a Careful
Visual/Physical
Check. The importance of this step
cannot
be stressed too strongly -it can lead to
correcting a
problem witho'ut further checks and can
save
valuable time. This check should include: •
Engine control
module grounds for being clean,
tight and in their proper location.
•
Vacuum hoses for splits, kinks, and proper
connections,
as shown on "Vehicle Emission
Control Information" label. Check thoroughly for
any type of leak or restriction.
• Air leaks atthrottle body mounting area and intake
manifold
sealing surfaces.
• Ignition wires for cracking, hardness, proper
routing and carbon tracking.
• Wiring for proper connections, pinches and cuts.
• Fuel lines for being pinched or misrouted.
Page 786 of 1928
6E2-90 DRIVEABILITY AND EMISSIONS
INTERMITTENTS
Definition: Problem may or may not turn "ON" the
"Check Engine" malfunction indicator lamp or store
Diagnostic
Trouble Code (DTC).
DO NOT use the DTC charts in "Engine Components/
Wiring Diagrams/Diagnostic
Charts," Section "6E2-A"
for intermittent problem. The fault must be present to
locate the problem. If a fault is intermittent, use of DTC
charts may result in replacement of good parts.
•
• Most intermittent problems are caused by faulty
electrical
connections or wiring. Perform careful
visual/physical
check as described at start of
"Symptoms," Section "6E2-B." Check for:
Poor mating
of the connector halves. or
terminal not fully seated in the connector body
(backed out).
Improperly formed or damaged terminal. All
connector
terminals in the problem circuit
should be carefully reformed or replaced to
insure proper contact tension.
Poor
terminal to wire connection. This
requires removing the
terminal from the
connector body to check. Refer to
SECTION 8
"Wiring Harness Service,"
If a visual/physical check does not find the cause
of the problem, the car can be driven with a
voltmeter connected to a suspected circuit. A
"Scan tool" can also be used to help detect
intermittent conditions. An abnormal
voltage, or
"Scan" tool reading, when the problem occurs,
indicates the
problem may be in that circuit. If the wiring
and connectors check
OK, and a DTC was
stored
for a circuit having a sensor, except for
DTC(s) 44 and 45, substitute a known good sensor
and recheck.
• Loss of DTC memory. To check, disconnect
throttle position (TP) sensor and idle engine until
"Check
Engine" malfunction indicator lamp comes
"ON". DTC 21 should be stored, and kept in
memory when ignition is turned "OFF". If not, the
Engine
Control Module (ECM) is faulty.
•
An intermittent "Check Engine" malfunction
indicator
lamp with no stored DTC may be caused
by:
Ignition coil shorted to ground and arcing at
spark
plug wires or plugs.
"Check
Engine" malfunction indicator lamp
wire to ECM shorted to ground.
Diagnostic
"test" terminal wire to ECM,
shorted to ground.
ECM grounds, refer to ECM wiring diagrams.
• Check for an electrical system interference caused
by a defective
relay, ECM driven solenoid, or
switch. They can cause a sharp electrical surge.
Normally, the problem will occur when the faulty
component is operated.
• Check for improper installation of electrical
options such as lights, 2 way radios, etc.
• Ignition control wires should be routed away from
spark plug wires, electronic ignition (EI) wires, El
housing, coil and generator. Ground wire from
ECM to El should have a good connection.
• If problem has not been found, refer to "ECM
Connector Symptom" charts at the end of
"Symptoms," Section "6E2-B."
HARD START
Definition: Engine cranks OK, but does not start for a
long time. Does eventually run, or may
start
but immediately dies.
PRELIMINARY CHECKS
• Perform the careful visual/physical checks as
described at start of "Symptoms," Section "6E2-
B".
•
Make sure the driver is using the correct starting
procedure.
SENSORS
• CHECK: Engine coolant temperature sensor using
a
"Scan tool", compare engine coolant
temperature with ambient temperature
on
cold engine. -
If engine coolant temperature
readings
is 5 degrees greater than or less than
ambient air temperature on a
cold
engine, check resistance in engine
coolant temperature sensor circuit
or
sensor itself. Compare engine coolant
temperature sensor resistance value
to the "Diagnostic Aids" chart on
DTC
14 chart.
• CHECK: Manifold absolute pressure sensor.
Check for flooding and/or correct sensor
for vehicle.
• CHECK: TP sensor for binding or a high TP sensor
voltage with the throttle closed (should
read between 0.54 volt and 1.25 volts.)
Page 788 of 1928
6E2-92 DRIVEABILITY AND EMISSIONS
LACK OF POWER, SLUGGISH OR SPONGY
Definition: Engine delivers less than expected power.
Little or no increase in speed when
accelerator
pedal is pushed down part
way.
PRELIMINARY CHECKS
• Perform the careful visual/physical checks as
described at start of "Symptoms," Section "6E2-
B."
•
Compare customer's car to similar unit. Make sure
the
vehicle has an actual problem.
• Remove air filter and check air filter for dirt, or for
being plugged. Replace as necessary.
FUEL SYSTEM
• CHECK: Rescricted fuel filter.
• CHECK: Fuel pressure, use CHART A-7.
• CHECK: Contaminated fuel.
• CHECK: Fuel injectors are correct for the vehicle.
IGNITION SYSTEM
• CHECK: Ignition timing, using "Scan tool".
• CHECK: Knock sensor system for excessive spark
retard activity. Refer to CHART
C-5. Use
"Scan tool".
• CHECK: Secondary voltage using an oscilloscope
or a spark tester J 26792 (ST-125), or
equivalent, to check for a weak coil.
ADDITIONAL CHECKS
• CHECK: Engine control module grounds for being
clean,
tight and in their proper locations.
See engine control module wiring
diagrams.
• CHECK: Exhaust gas recirculation operation for
being open or partly open all the time.
- Refer to CHART
C-7.
• CHECK: Generator output voltage. Repair if less
than 9
or more than 16 volts.
• CHECK: Exhaust system for possible restriction.
Refer
to CHART B-1.
-Inspect exhaust system for damaged
or collapsed pipes.
-
Inspect muffler for heat damage or
possible internal failure.
• CHECK: Torque converter clutch for proper
operation. Refer
to AUTOMATIC
TRANSMISSION
(SECTION 7A).
ENGINE MECHANICAL
• CHECK: Engine valve timing and compression.
• CHECK: Engine for correct or worn camshaft.
Refer
to ENGINE MECHANICAL
DIAGNOSIS
(SECTION 6A).
DETONATION/SPARK KNOCK
Definition: A mild to severe ping, usually worse under
acceleration. The engine makes sharp
metallic knocks that change with throttle
opening.
Sounds like popcorn popping.
PRELIMINARY CHECKS
• Perform the careful visual/physical checks as
Low engine coolant.
Restricted air
flow to radiator, or restricted
water flow through radiator.
Correct engine
coolant solution should be a 50/
50 mix of anti-freeze engine coolant (or
equivalent) and water.
described at start
of "Symptoms," Section "6E2-FUEL SYSTEM
B."
•
Park/Neutral position switch. Be sure "Scan tool"
indicates drive with gear selector in drive or
overdrive. Use
CHART C-1A.
• If "Scan tool" readings are normal (see facing page
of on-board diagnostic system check) and there
are no engine mechanical faults,
fill fuel tank with a
gasoline
that has a minimum octane reading of 87
and revaluate vehicle performance.
• CHECK: Exhaust gas recirculation system for not
opening. Use CHART C-7.
COOLING SYSTEM
• Check for obvious overheating problems:
• NOTICE: To determine if the condition is caused by
a rich
or lean system, the car should be
driven at the speed
of the complaint.
Monitoring
LT. Fuel Trim will help
identify problem.
Lean-
LT. Fuel Trim above 142. Refer to
"Diagnostic Aids" on facing page of
diagnostic trouble code 44.
Rich-LT. Fuel Trim below 118. Refer to
"Diagnostic Aids" on facing page of
diagnostic trouble code 45.
• CHECK: Fuel pressure, use CHART A-7.
..
Page 789 of 1928
IGNITION SYSTEM
• CHECK: Spark plugs for proper heat cause. Refer
to Owner's Manual.
• CHECK: Ignition timing, using a "Scan tool".
ENGINE MECHANICAL
• CHECK: For excessive oil in the combustion
chamber. -
Valve oil seals for leaking.
• CHECK: Combustion chambers for excessive
carbon
build up. Remove carbon with top
engine cleaner and follow instructions on
can.
DRIVEABILITY AND EMISSIONS 6E2-93
• CHECK: Combustion chamber pressure by
performing a compression test.
See
ENGINE MECHANICAL DIAGNOSIS
(SECTION 6A).
• CHECK: For incorrect basic engine parts such as
cam, heads, pistons, etc.
HESITATION, SAG, STUMBLE
Definition: Momentary lack of response as the
accelerator is pushed down. Can occur at
all car speeds. Usually most severe when
first trying
to make the car move, as from a
stop sign. May cause engine to
stall if
severe enough.
PRELIMINARY CHECKS
• Perform the careful visual/physical checks as
described at start of "Symptoms," Section "6E2-
B."
SENSORS
• CHECK: Throttle position sensor for binding or
sticking. Voltage should increase at a
steady
rate as throttle is moved toward
Wide Open Throttle.
• CHECK: Manifold absolute pressure sensor-use
CHART C-10.
FUEL SYSTEM
• CHECK: Fuel pressure, use CHART A-7.
• CHECK: Fuel injectors are correct for vehicle.
• CHECK: Contaminated fuel.
• CHECK: Evaporative emission canister purge
system
for proper operation. Refer to
"Evaporative Emission Control System,"
Section "6E2-C3."
IGNITION SYSTEM
• CHECK: Spark plugs for being fouled, or for faulty
secondary wiring.
• CHECK: Ignition timing, using a "Scan tool".
• CHECK: Ignition system ground.
ADDITIONAL CHECKS
• CHECK: Exhaust gas recirculation operation, use
CHART
C-7.
• CHECK: Engine thermostat functioning correctly
and proper heat range.
• CHECK: Generator output voltage. Repair if less
than 9 or more than 16 volts.
CUTS OUT, MISSES
Definition: Steady pulsation or jerking that follows
engine speed, usually more pronounced
as engine load increases, not normally felt
above 1500 revolution per minute or 48
kph
(30 mile per hour). The exhaust has a
steady spitting sound at
idle or low speed.
PRELIMINARY CHECKS
• Perform the careful visual/physical checks as
described at start of "Symptoms," Section "6E2-
B."
IGNITION SYSTEM
• Check for cylinder miss by:
1. Start engine, allow engine to stabilize then
disconnect
idle air control motor. Remove
one spark
plug wire at a time, using insulated
pliers.
CAUTION: Do not perform this test for
more than 2 minutes,
as this test may
cause damage to the three
way
catalytic converter.
2. If there is a revolution per minute drop on all
cylinders (equal
to within 50 revolution per
minute), go
to "Rough, Unstable, or Incorrect
Idle, Stalling"
symptom. Reconnect idle air
control valve.