JAGUAR X308 1998 2.G Workshop Manual
X308 1998 2.G
JAGUAR
JAGUAR
https://www.carmanualsonline.info/img/21/7640/w960_7640-0.png
JAGUAR X308 1998 2.G Workshop Manual
Trending: oil level, draining the coolant system, CRANKSHAFT SENSOR LOCATION, Coolant recovery, B pillar, brake fluid, Starter relay
Page 241 of 2490
24
.
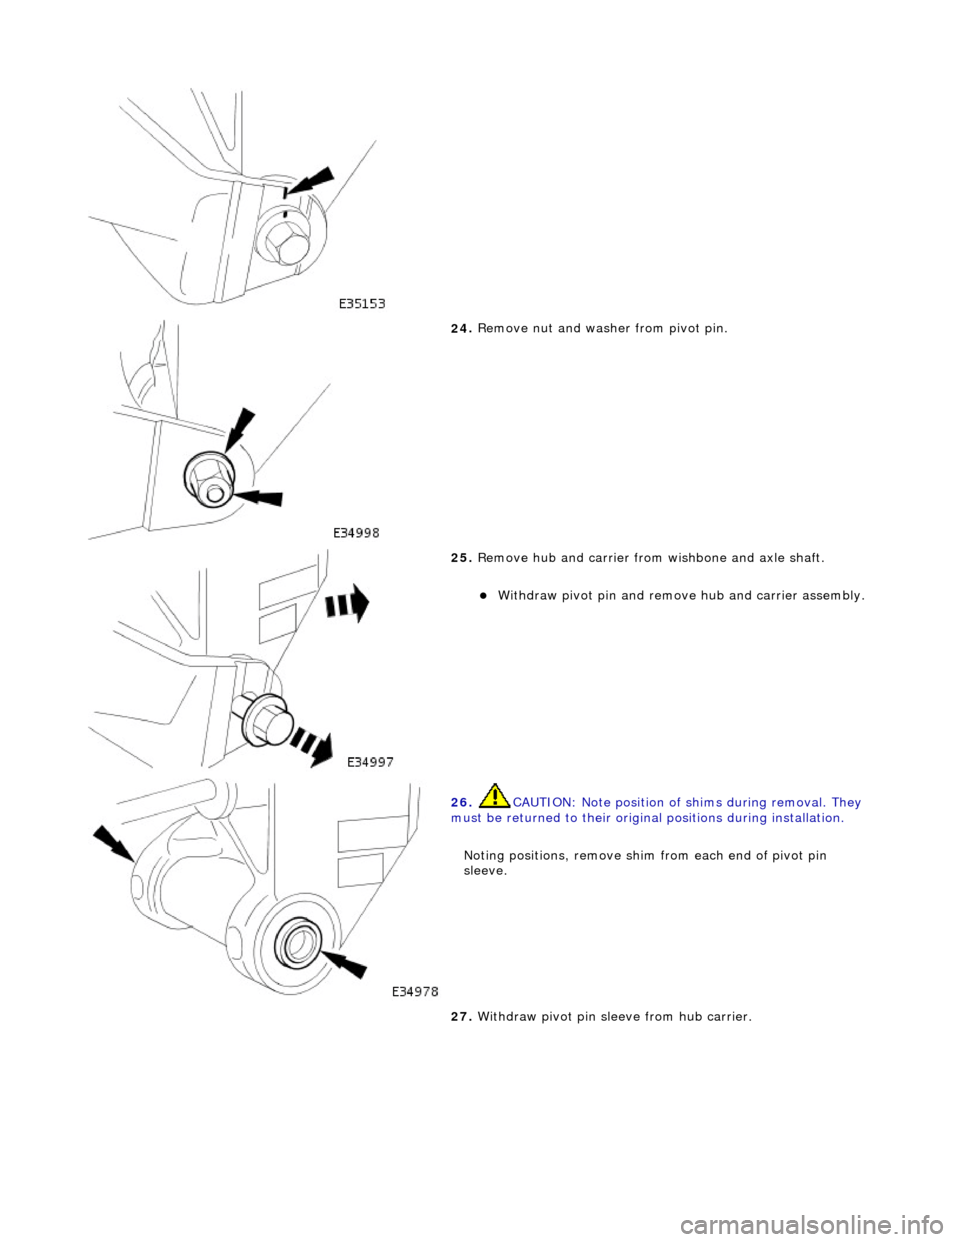
Remove nut and washer from pivot pin.
25
.
Remove hub and carrier from wishbone and axle shaft.
With
draw pivot pin and remove
hub and carrier assembly.
26
.
CAUTION: Note position of shims during removal. They
must be returned to their original positions during installation.
Noting positions, remove shim from each end of pivot pin
sleeve.
27
.
Withdraw pivot pin sleeve from hub carrier.
Page 242 of 2490
28. Using a h
ydraulic press,
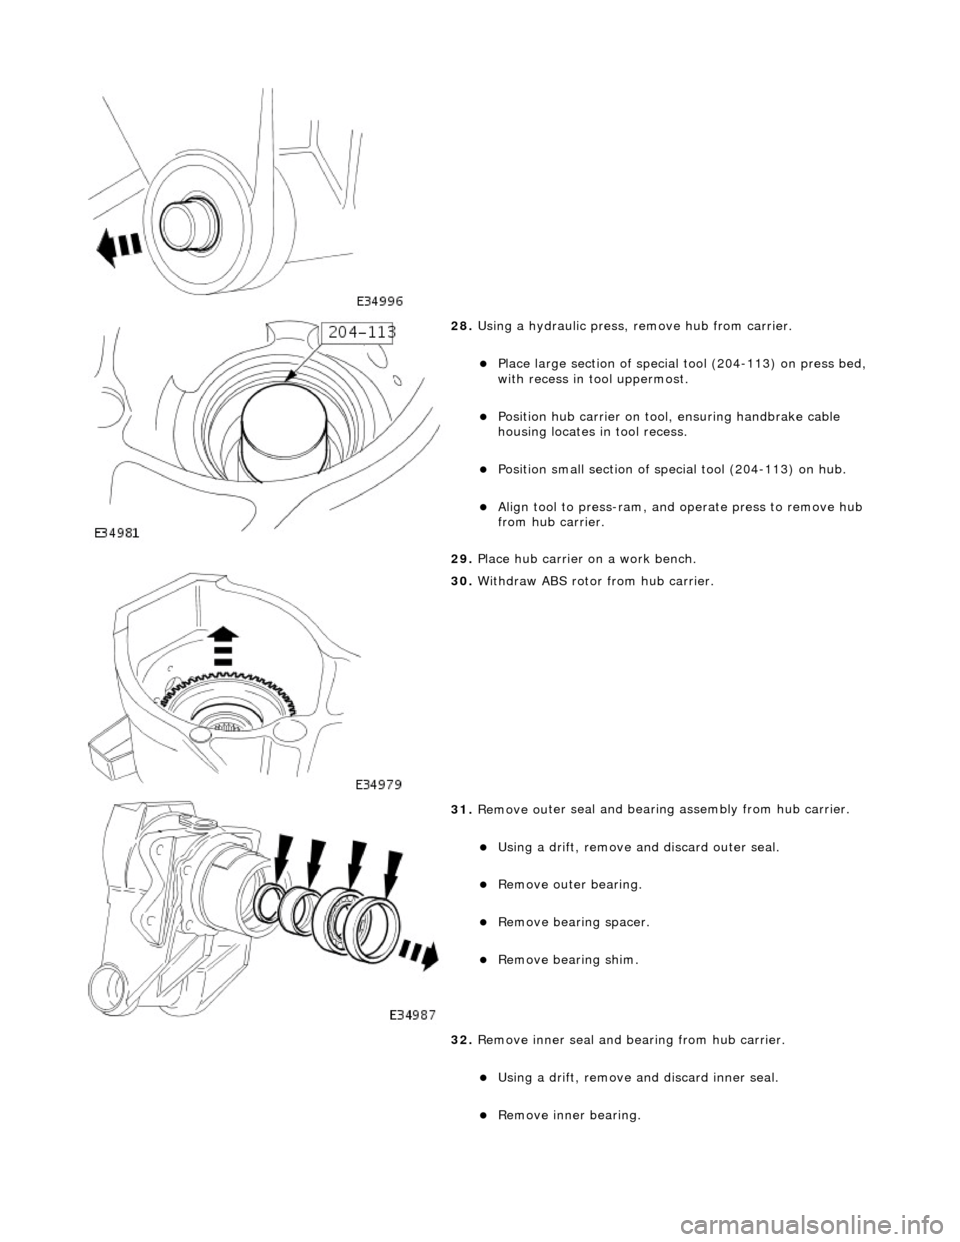
remove hub from carrier.
Pla
ce large section of special tool (204-113) on press bed,
with recess in t ool uppermost.
Positi
on hub carrier on tool
, ensuring handbrake cable
housing locates in tool recess.
P o
sition small section of spec
ial tool (204-113) on hub.
Align tool to press-r
am, and
operate press to remove hub
from hub carrier.
29. Place hub carrier on a work bench.
30 . W
ithdraw ABS rotor from hub carrier.
31 . Remove ou
ter seal and bearin
g assembly from hub carrier.
Using a drift, re
move an
d discard outer seal.
Remove ou ter bearin
g.
Re
mo
ve bearin
g spacer.
Remove bearin g shim.
32
.
Remove inner seal and bearing from hub carrier.
Using a drift, re
move and discard inner seal.
Re
move inner bearing.
Page 243 of 2490
I
nstallation
33
.
Using approved cleaning agents:
Wash an
d thoroughly dry inner and outer bearings.
Thorough
ly clean hub carrier payi
ng particular attention to
bearing cups.
Thoroughl
y clean hub.
1. Grease bearings.
Pack inner and outer bea
ring races with Shell Retinax 'A'
grease:
Appl
y a film of shell Retinax
'A' grease to bearing cups
2. Install outer bearing in hu
b carrier and fully seat new seal
using special tool 205-234.
3. Apply a th
in film of Shell Retinax 'A' grease to hub shaft and
install hub in carrier /bearing assembly.
4. Install inner bearing assembly and seal.
1. Install bearing spacer.
Page 244 of 2490
2.
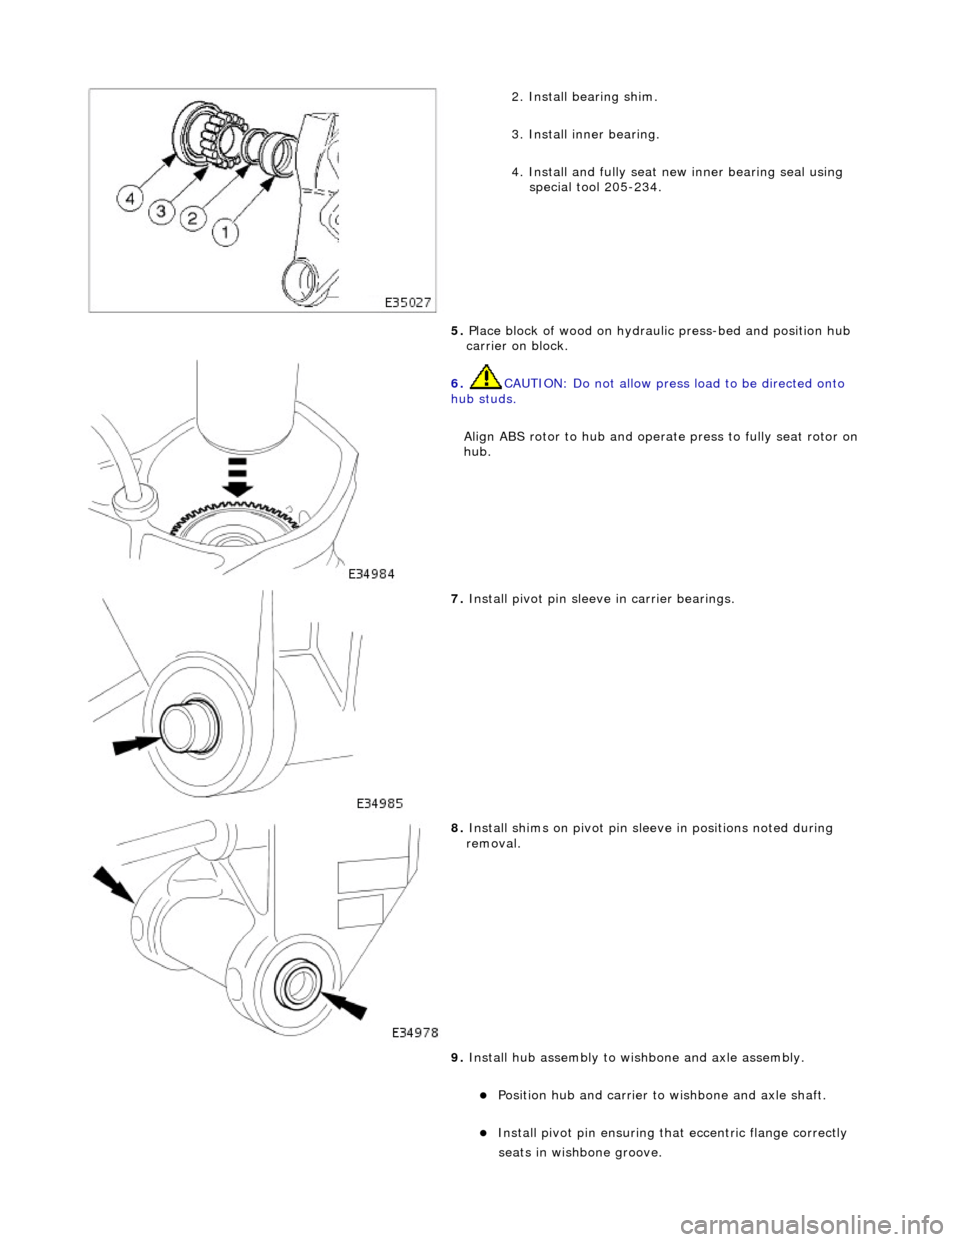
Install bearing shim.
3. Install inner bearing.
4. Install and fully seat new inner bearing seal using special tool 205-234.
5. Place block of wood on hydrau lic press-bed and position hub
carrier on block.
6. CAUTIO
N: Do not allow press
load to be directed onto
hub studs.
Align ABS rotor to hub and operat e press to fully seat rotor on
hub.
7. Install piv o
t pin sleeve in carrier bearings.
8. Inst al
l shims on pivot pin slee
ve in positions noted during
removal.
9. Install hub assembly to wi shbone and axle assembly.
Position hub and carr
ier to wishbone and axle shaft.
Install pivo
t pin ensuring that
eccentric flange correctly
seats i
n wishbone groove.
Page 245 of 2490
10
.
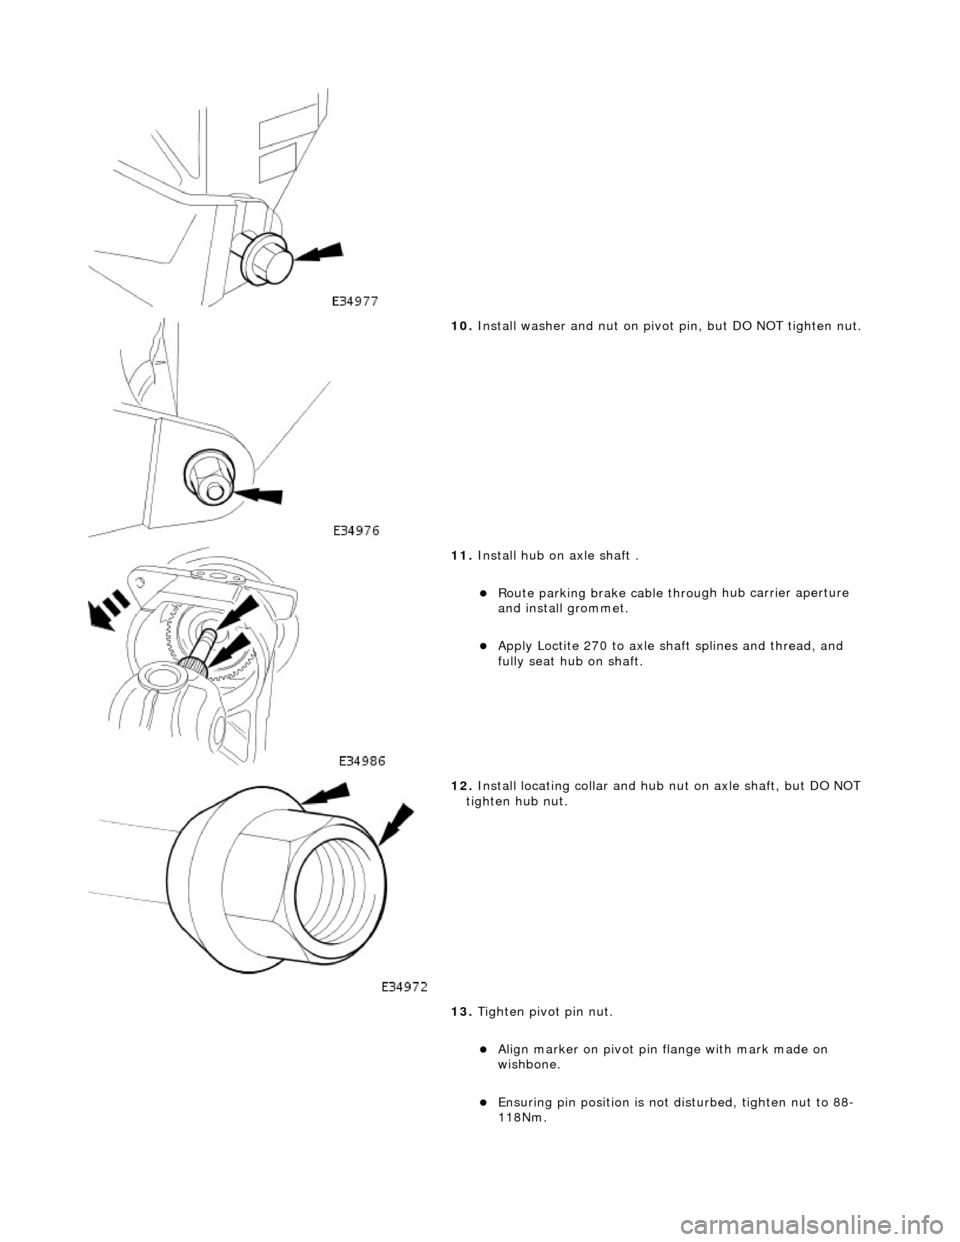
Install washer and nut on pivot pin, but DO NOT tighten nut.
11
.
Install hub on axle shaft .
Route parking brake cable throu
gh hub carrier aperture
and install grommet.
Appl
y Loctite 270 to axle shaft splines and thread, and
fully seat hub on shaft.
12
.
Install locating collar and hub nut on axle shaft, but DO NOT
tighten hub nut.
13. Tighten pivot pin nut.
Al
ign marker on pivot pin flange with mark made on
wishbone.
Ensuri
ng pin position is not
disturbed, tighten nut to 88-
118Nm.
Page 246 of 2490
14. Inst
all wheel speed sensor on hub carrier.
Posit
i
on sensor on hub carrier
and install and tighten bolt
to 7-10Nm.
Conne ct
wheel speed sensor harness to sensor.
15 . Using new ti
e strap, secure wh
eel speed sensor harness to
hub carrier.
16. Install handbrake shoes. Re fer to operation 70.40.05.
17. Install brake disc. Refer to operation 70.10.13.
18 . Posit
ion special tool (204-195)
on hub studs and install nuts.
19. Tighten hub nut to 304-336Nm.
Page 247 of 2490
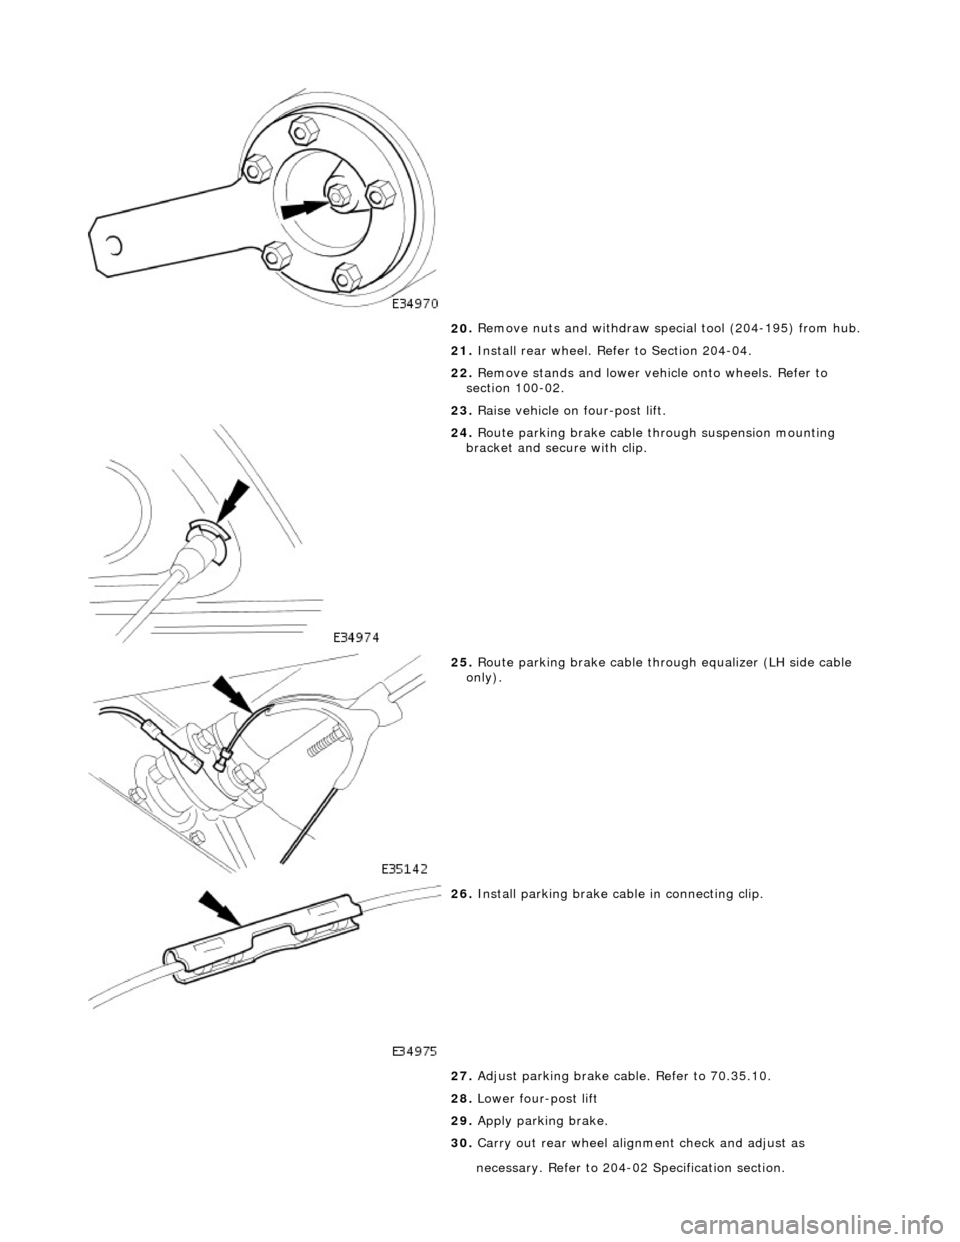
20
.
Remove nuts and withdraw special tool (204-195) from hub.
21. Install rear wheel. Refer to Section 204-04.
22. Remove stands and lower vehi cle onto wheels. Refer to
section 100-02.
23. Raise vehicle on four-post lift.
24
.
Route parking brake cable through suspension mounting
bracket and secure with clip.
25
.
Route parking brake cable through equalizer (LH side cable
only).
26
.
Install parking brake cabl e in connecting clip.
27. Adjust parking brake cable. Refer to 70.35.10.
28. Lower four-post lift
29. Apply parking brake.
30. Carry out rear wheel alignm ent check and adjust as
necessary. Refer
t
o 204-02 Specification section.
Page 248 of 2490
Rear Su
spension - Wh
eel Knuckle Bushing
Remo
val and Installation
Remov
a
l
S
p
ecial Tool(s)
Hub Holdin
g Tool
2
04-195 (JD227)
Hub Pu
ller
204-011 (JD 1D)
D rive
r Handle
100-013 (18G-134)
Bearing Cu p Replacer Adaptor
2
04-120 (JD 550-6)
1. CAUTION: Replacement of nuts and bolts: Various
thread-locking devices are used on nuts and bolts throughout the
vehicle. These devices restrict the number of times a nut or bolt
can be used. See section 100-00 for information.
Release parking brake.
2. Ra
ise the vehicle on a four-post lift.
3. Fully slacken bu
t do not remove parking brake cable adjuster
nut.
4. Release appropriate side parkin g brake cable from connecting
Page 249 of 2490
cli
p.
5. With
draw parking brake cable th
rough equalizer (LH side cable
only).
6. Lower four-post lift.
7. Raise rear of vehicle to workin g height and support on stands.
Refer to section 100-02.
8. Remove rear wheel. Refer to section 204-04.
9. Posit
ion special tool (204-1
95) on hub studs and install
securing nuts.
10
.
Slacken but do not remove hub to axle shaft securing nut.
11. Remove securing nuts from stud s and withdraw special tool
(204-195) from hub.
12. Remove rear brake disc. Refer to 70.10.13.
13. Remove parking brake shoe s. Refer to 70.40.05.
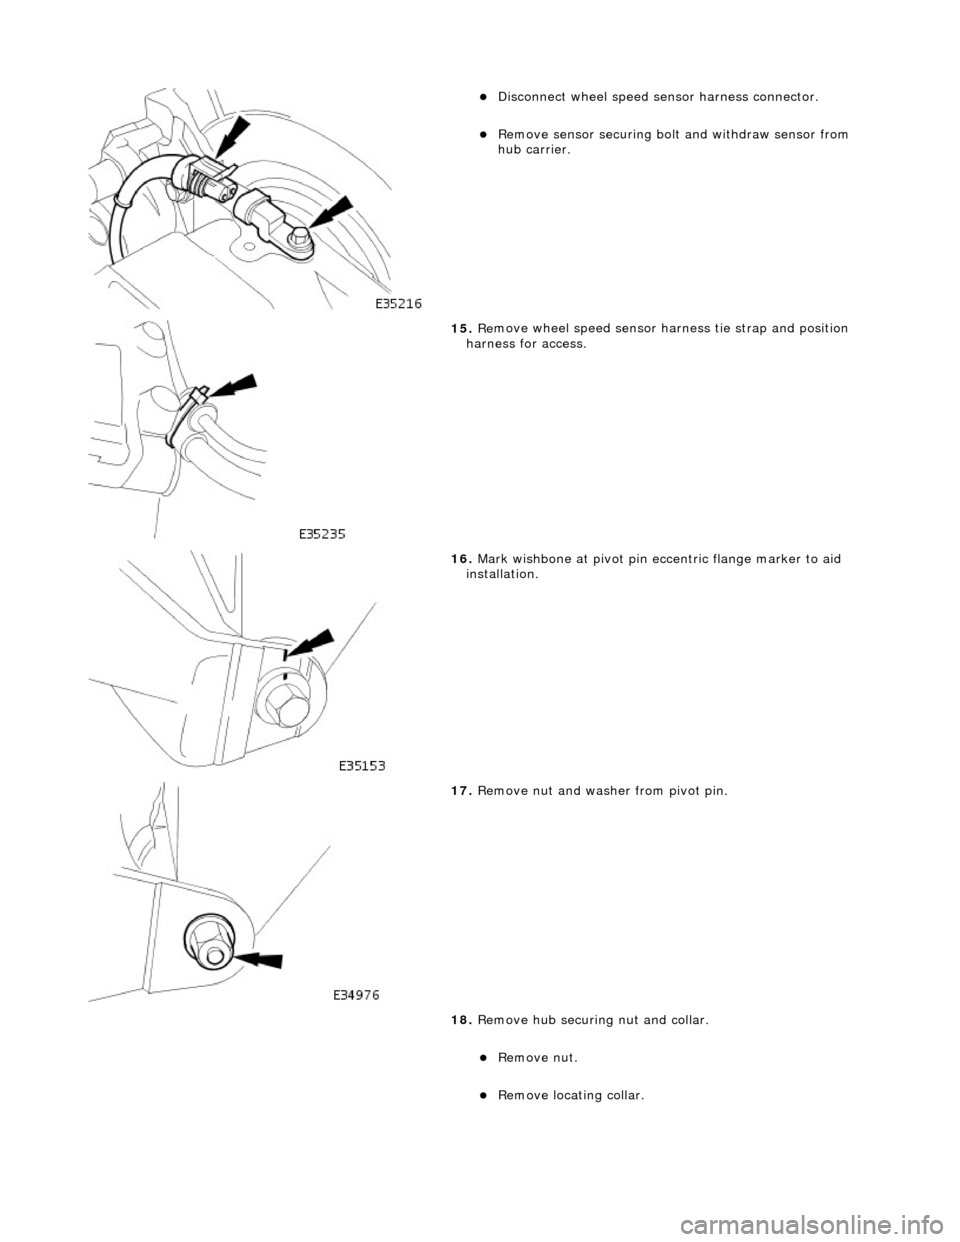
14. Remove wheel speed sensor.
Page 250 of 2490
Disconne
ct wheel speed sensor harness connector.
Re
move sensor securing bolt
and withdraw sensor from
hub carrier.
15 . Re
move wheel speed sensor harness tie strap and position
harness for access.
16 . Mark wi
shbone at pivot pin eccentric flange marker to aid
installation.
17 . Remove n
ut and washer from pivot pin.
18. Remove hub securing nut and collar.
Remo
ve nut.
Remove l
ocating collar.
Trending: door control module, manual transmission, set clock, subframe, catalytic converters, roof rack, tire size
