Seat JAGUAR X308 1998 2.G Manual PDF
[x] Cancel search | Manufacturer: JAGUAR, Model Year: 1998, Model line: X308, Model: JAGUAR X308 1998 2.GPages: 2490, PDF Size: 69.81 MB
Page 445 of 2490

Anti-Lock Control - Hydraulic Contro
l Unit (HCU)
Re
moval and Installation
Remov
al
• C
AUTIONS:
Replacement of nuts and bolts: Various thread-locking de vices are used on nuts and bolts throughout the vehicle.
These devices restrict the number of times a nut or bolt can be used. See section 100-00 for information.
Remove brake fluid spilla ge immediately from paint work, with clean water.
S
pecial Tool(s)
Brake Pedal
Hold Tool
JDS 9013
1. Disc
onnect battery ground cable (IMPORTANT, see operation
86.15.19 for further information).
2. Position vehicle on a four-post lift.
3. Open engine compartment and fit paint work protection covers
to fenders.
4. NOTE
: The following three pictorial procedures must be
carried-out to minimize brake fl uid loss when disconnecting the
brake tubes.
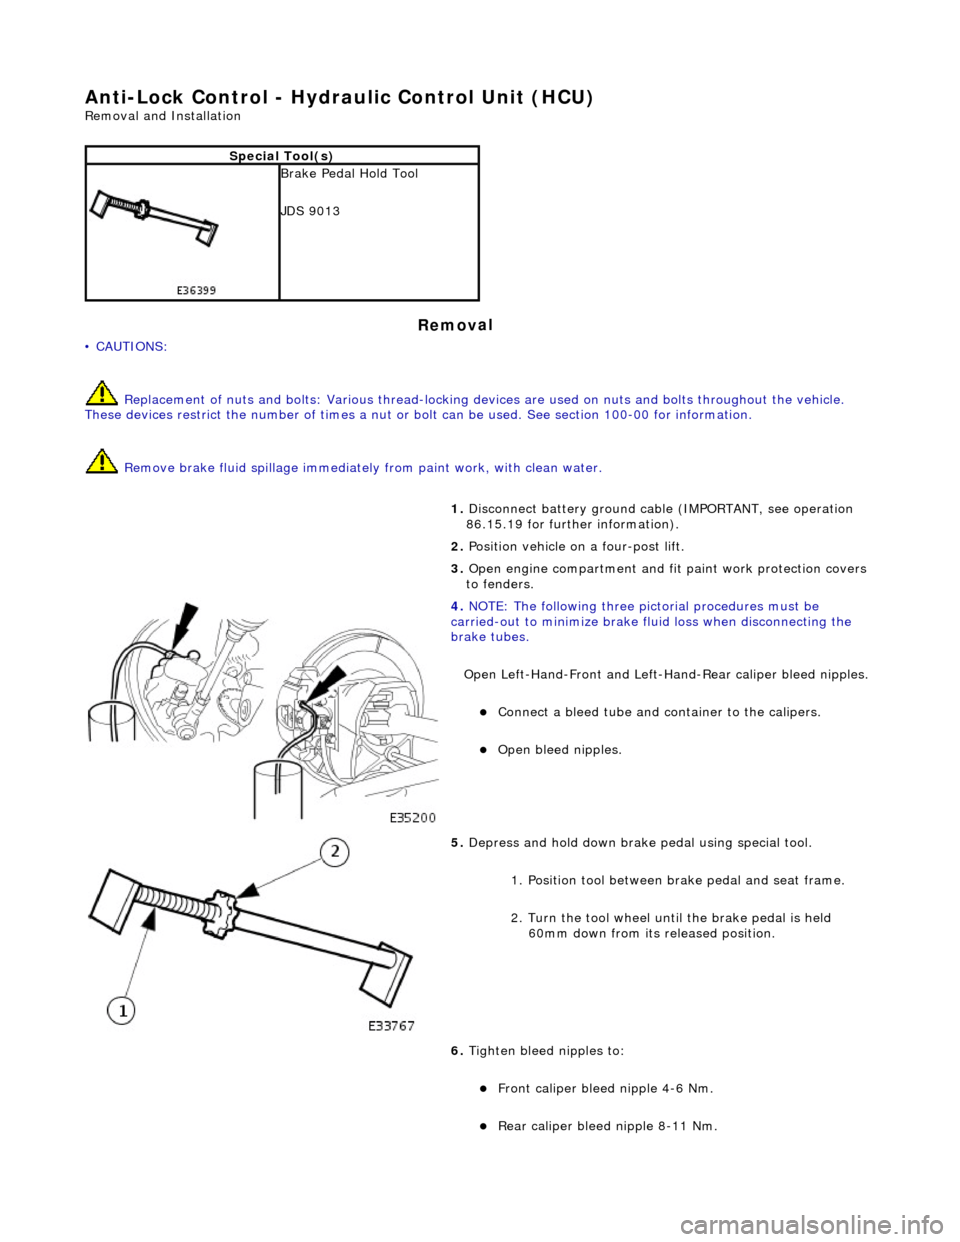
Open Left-Hand-Front and Left-H and-Rear caliper bleed nipples.
Connect
a bleed tube and co
ntainer to the calipers.
O
pen bleed nipples.
5. Depress and hold down brake pedal u
sing special tool.
1. Position tool between brake pedal and seat frame.
2. Turn the tool wheel unti l the brake pedal is held
60mm down from its released position.
6. Tighten bleed nipples to:
Front caliper blee d nipple 4-6
Nm.
Rear
caliper bleed nipple 8-11 Nm.
Page 495 of 2490

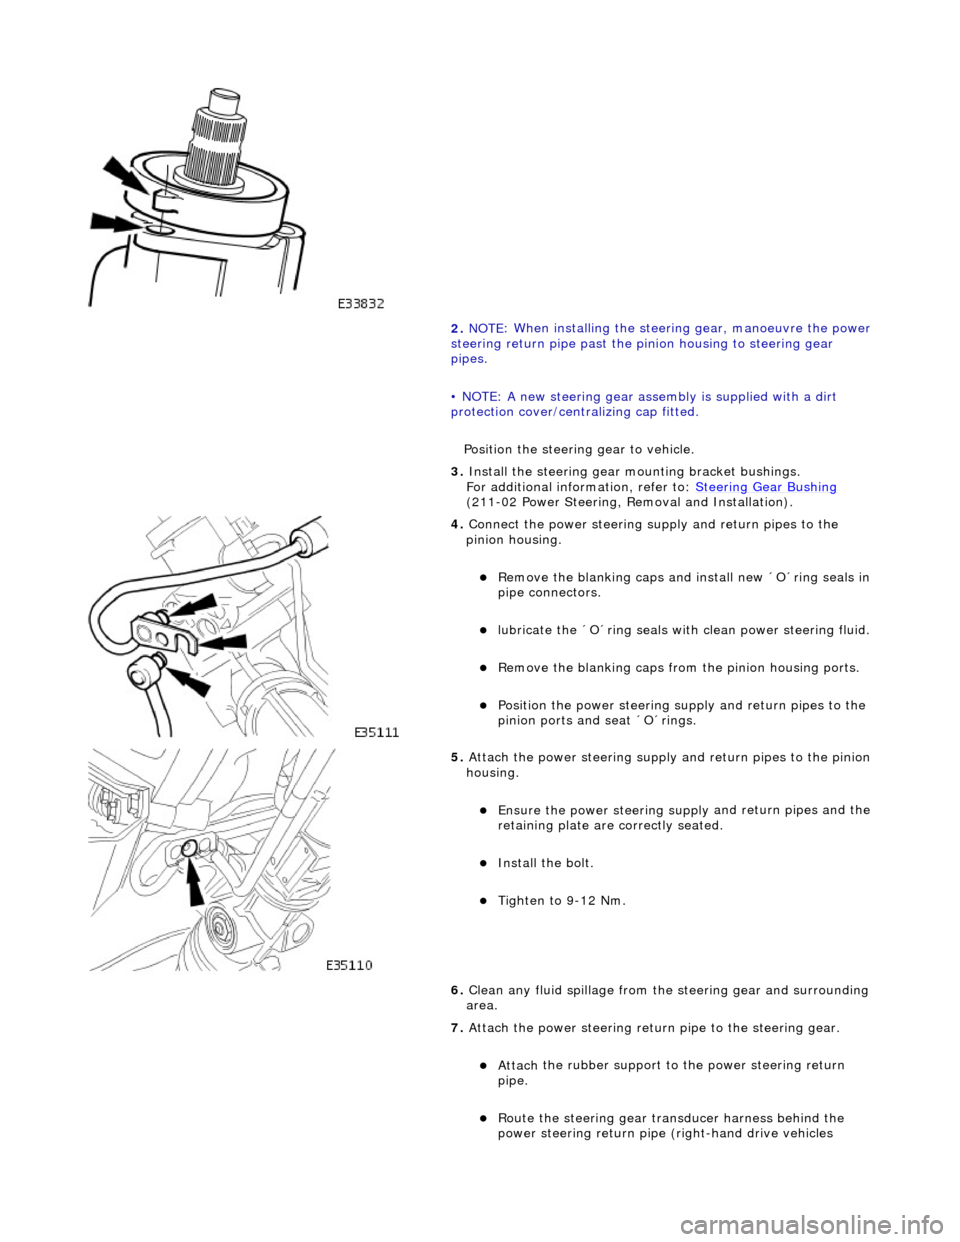
2. NOTE
: When installing the steering gear, manoeuvre the power
steering return pipe past the pinion housin g to steering gear
pipes.
• NOTE: A new steering gear assembly is supplied with a dirt
protection cover/cent ralizing cap fitted.
Position the steering gear to vehicle.
3. Install the steering gear mo unting bracket bushings.
For additional information, refer to: Steering Gear Bushing
(
211-02 Power Steering, Removal and Installation).
4. Conne
ct the power steering su
pply and return pipes to the
pinion housing.
R
emove the blanking caps an
d install new ´O´ring seals in
pipe connectors.
lubri
cate the ´O´ring seals wi
th clean power steering fluid.
R
emove the blanking caps from
the pinion housing ports.
Position the power
steering su
pply and return pipes to the
pinion ports and seat ´O´rings.
5. Attach
the power steering supply
and return pipes to the pinion
housing.
Ensure the power steering su pply
and return pipes and the
retaining plate are correctly seated.
Install th
e bolt.
Tigh
ten to 9-12 Nm.
6. Clean any fluid spillage from the steering gear and surrounding
area.
7. Attach the power steering return pipe to the steering gear.
Attach
the rubber support to
the power steering return
pipe.
Rout
e the steering gear transducer harness behind the
power steering return pipe (right-hand drive vehicles
Page 512 of 2490

In
stallation
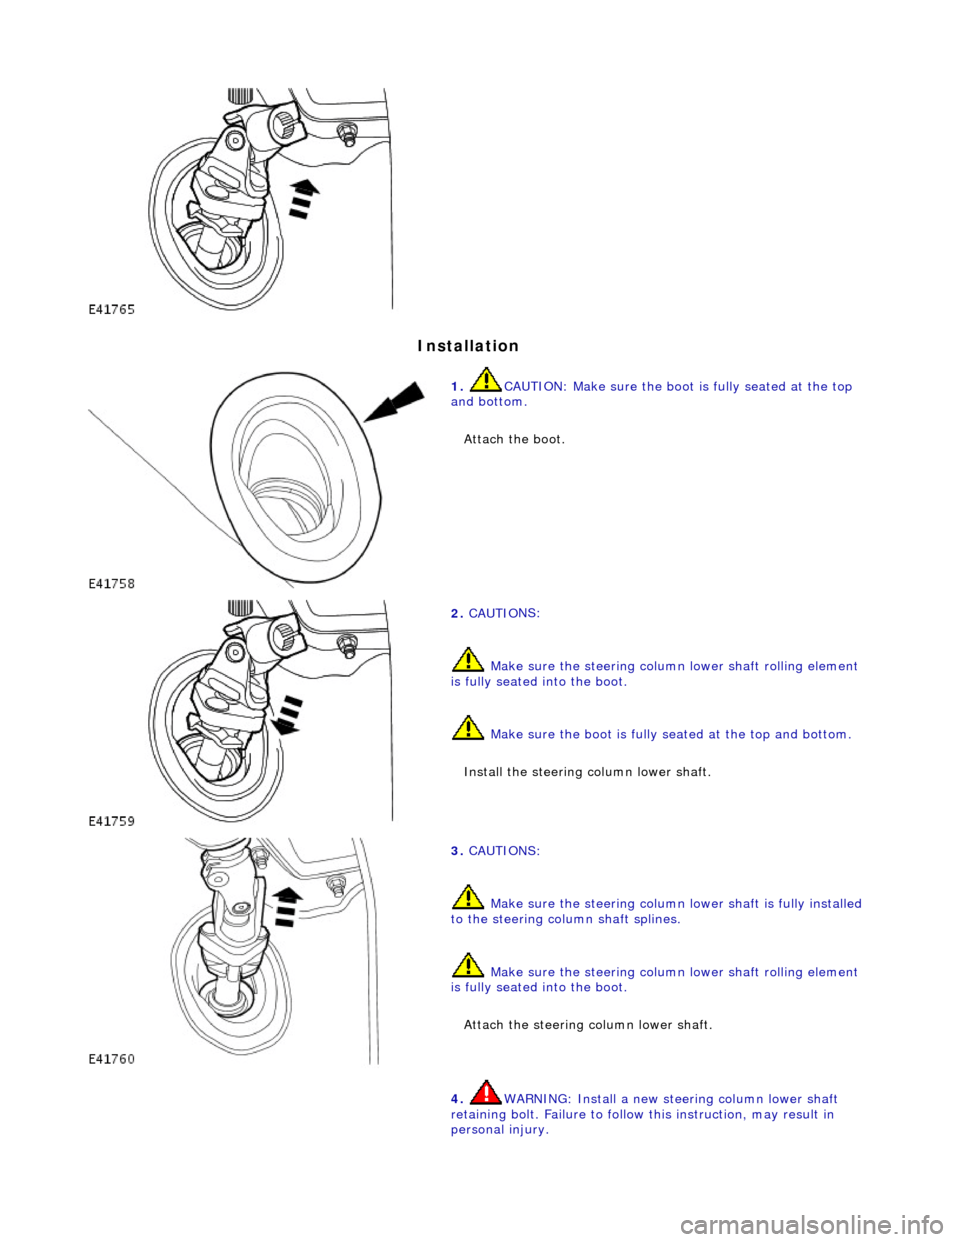
1.
CAUTIO
N: Make sure the boot
is fully seated at the top
and bottom.
Attach the boot.
2. CAUTI O
NS:
Make sure the steering column lower shaft rolling element
is fully seated into the boot.
Make sure the boot is fully seated at the top and bottom.
Install the steering column lower shaft.
3. CAUTI O
NS:
Make sure the steering column lower shaft is fully installed
to the steering column shaft splines.
Make sure the steering column lower shaft rolling element
is fully seated into the boot.
Attach the steering column lower shaft.
4. WARNING: In stall a new stee ring column lower shaft
r
etaining bolt. Failure to follow this instruction, may result in
personal injury.
Page 559 of 2490

I
nstallation
11
.
Remove the crankshaft front seal.
1. Install and tighten the removal tool 303-541 to the crankshaft front seal.
2. Tighten the centre bolt of the tool to extract the seal.
R
emove the tool an
d seal assembly.
Separate the seal
from the tool.
12. Very carefully clean the thread s of the crankshaft, using a
plug tap M16x2, to remove all old cured sealant.
Kee
p the tap horizontal. Do not enlarge the crankshaft
thread - remove sealant only.
13. Clean all relevant parts and faces.
1. Loc
ate the new oil seal into the timing cover.
1. Remove the transit ring from the oil seal.
2. Position the seal to the timing cover.
2. Inst
all the new oil seal to the timing cover.
1. Install oil seal replacer tool 303-542 to the oil seal.
2. Use the nut and bolt provided with the tool, to fully seat the seal to the timing cover. Only tighten the nut
sufficiently to locate the seal and no more, or the
timing cover could become distorted.
All
ow the tool to stay in posi
tion against the seal for at
least five seconds.
R
emove the special tool from the seal.
Page 563 of 2490

I
nstallation
12
.
Remove the crankshaft front seal.
1. Install and tighten the removal tool 303-541 to the crankshaft front seal.
2. Tighten the centre bolt of the tool to extract the seal.
R
emove the tool an
d seal assembly.
Separate the seal
from the tool.
13. Very carefully clean the thread s of the crankshaft, using a
plug tap M16x2, to remove all old cured sealant.
Kee
p the tap horizontal. Do not enlarge the crankshaft
thread - remove sealant only.
14. Clean all relevant parts and faces.
1. Loc
ate the new oil seal into the timing cover.
1. Remove the transit ring from the oil seal.
2. Position the seal to the timing cover.
2. Inst
all the new oil seal to the timing cover.
1. Install oil seal replacer tool 303-542 to the oil seal.
2. Use the nut and bolt provided with the tool, to fully seat the seal to the timing cover. Only tighten the nut
sufficiently to locate the seal and no more, or the
timing cover could become distorted.
All
ow the tool to stay in posi
tion against the seal for at
least five seconds.
R
emove the special tool from the seal.
Page 595 of 2490

I
nstallation
11
.
Remove the crankshaft front seal.
1. Install and tighten the removal tool 303-541 to the crankshaft front seal.
2. Tighten the centre bolt of the tool to extract the seal.
R
emove the tool an
d seal assembly.
Separate the seal
from the tool.
12. Very carefully clean the thread s of the crankshaft, using a
plug tap M16x2, to remove all old cured sealant.
Kee
p the tap horizontal. Do not enlarge the crankshaft
thread - remove sealant only.
13. Clean all relevant parts and faces.
1. Loc
ate the new oil seal into the timing cover.
1. Remove the transit ring from the oil seal.
2. Position the seal to the timing cover.
2. Inst
all the new oil seal to the timing cover.
1. Install oil seal replacer tool 303-542 to the oil seal.
2. Use the nut and bolt provided with the tool, to fully seat the seal to the timing cover. Only tighten the nut
sufficiently to locate the seal and no more, or the
timing cover could become distorted.
All
ow the tool to stay in posi
tion against the seal for at
least five seconds.
R
emove the special tool from the seal.
Page 602 of 2490

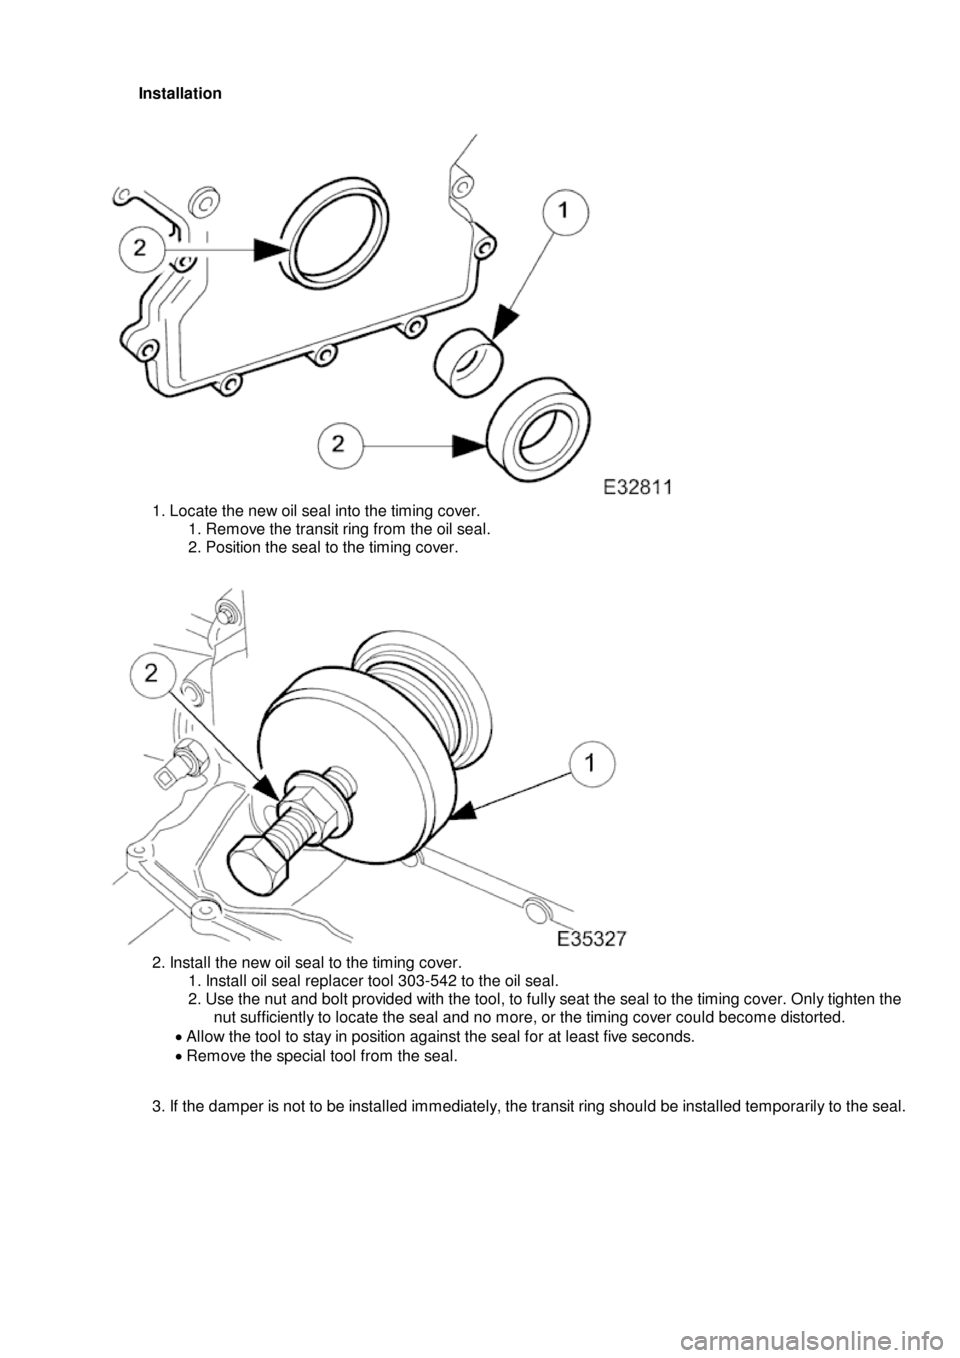
1.
Locate the new oil seal into the timing cover.
1. Remove the transit ring from the oil seal.
2. Position the seal to the timing cover.
2.
Install the new oil seal to the timing cover.
1. Install oil seal replacer tool 303-542 to the oil seal.
2. Use the nut and bolt provided with the tool, to fully seat the seal to the timing cover. Only tighten the nut sufficiently to locate the seal and no more, or the timing cover could become distorted.
Allow the tool to stay in position against the seal for at least five seconds.
Remove the special tool from the seal.
3. If the damper is not to be installed immediately, the transit ring should be installed temporarily to the seal.
Installation
Page 622 of 2490

2. In
stall the camshaft caps to their respective locations (inlet 0 to 4
and exhaust 5 to 9 from the front) and in the correct orientation
(arrow to front of engine).
3. Install and tighten the cap securing bolts. Tighten evenly, in stages, to 10 Nm.
19. Install the camshaft locking tool 303 - 530, align the camshafts as
necessary.
20 . Install the chain guide
.
The
c
hain guide must be installed so that the slotted hole is towards
the top, and the rais ed shoulder to the cylinder block.
1. Install the chain guide to the block and locate it onto the upper retaining pin.
2. Install the retaining bolt and tighten it to 12 Nm.
21. P
ush the secondary chain tensioner piston into the body to provide
clearance for installing the chain.
1. Insert a thin rigid wire through the hole in the end of the tensioner
piston to displace the ball from the non-return valve seat.
2. With the wire in position, press the piston fully into the tensioner body.
Rem
ove the wire.
22 . Ins
tall the secondary chain tensioner to the engine.
1. Fully seat the tensioner to the cylinder head.
2. Install the two bolts which secure the tensioner and tighten to 12 Nm.
23 . N
OTE: Assemble the VVT unit, the exhaust camshaft sprocket and the
secondary chain, in preparation for installing to the engine.
Install the VVT unit to the engine.
1. Install the above assembly to the camshafts with the chain correctly positioned over the tensioner; VVT unit to the inlet and
the sprocket to the exhaust.
2. Install, but do not tighten, each bolt which secures the VVT unit and the exhaust sprocket to the camshafts.
24. Install the chain tensioning tool 303 - 532 to the exhaust camshaft
sprocket.
Page 623 of 2490

Re
position the sprocket (and the VVT unit) for the most advantageous
position for use of the tool.
R
emove the tool.
25
.
Install the primary timing chain.
R
eposition the VVT unit forwards on the cam journal (do not rotate it)
to allow the chain to cl ear the head casting. Disconnect the primary
chain from the Ty-strap.
1. Install the primary chain to position over the crankshaft sprocket and the VVT unit sprocket. There mu st be no slack on the drive
side of the primary chain and the VVT unit must not be rotated on
the camshaft.
26
.
Install the primary chain tensioner blade.
1. Position the tensioner blade to the cylinder block.
2. Install the retaining / pivot bolt and tighten it to 14 Nm.
27
.
Push the primary chain tensioner piston into the body to provide clearance
for installing.
1. Insert a thin rigid wire through the hole in the end of the tensioner
piston to displace the ball from the non-return valve seat.
2. With the wire in position, press the piston fully into the tensioner body.
Re
move the wire.
28
.
Assemble the tensioner.
1. Install the two mounting bolts to the tensioner.
2. Locate the tensioner back-plate to the two bolts.
29. Install the tensioner to the cylinder block.
1. Position and align the tensioner to the cylinder block and to the mating slot on the rear face of the tensioner blade.
2. Install and tighten the two bolts to 12 Nm.
Page 637 of 2490

To th
e upper face of each bearing surface (two places) in the cylinder
head.
To th
e upper face of each bearing surface (two places) in each bearing
cap.
On
the cam lobes ONLY, not on the base circle area.
17
.
Install the camshafts.
1. Install the camshafts to position in the cylinder head, with the timing flats uppermost.
2. Install the camshaft caps to their respective locations (inlet 0 to 4 and exhaust 5 to 9 from the front) and in the correct orientation
(arrow to front of engine).
3. Install and tighten the cap securing bolts. Tighten evenly, in stages, to 10 Nm.
18. Install the camshaft locking tool 303 - 530, align the camshafts as
necessary.
19
.
Install the chain guide.
• NOTE: The chain guide must be installed so that the slotted hole is
towards the top, and the raised shoulder to the cylinder block. 1. Install the chain guide to the block and locate it onto the upper retaining pin.
2. Install the retaining bolt and tighten it to 12 Nm.
20
.
Push the secondary chain tensioner piston into the body to provide
clearance for installing the chain.
1. Insert a thin rigid wire through the hole in the end of the tensioner
piston to displace the ball from the non-return valve seat.
2. With the wire in position, press the piston fully into the tensioner body.
Re
move the wire.
21
.
Install the secondary chain tensioner to the engine.
1. Fully seat the tensioner to the cylinder head.
2. Install the two bolts which secure the tensioner and tighten to 12 Nm.
22. Install the VVT unit to the engine.
A
ssemble the VVT unit, the exhaust camshaft sprocket and the