body JAGUAR X308 1998 2.G Manual PDF
[x] Cancel search | Manufacturer: JAGUAR, Model Year: 1998, Model line: X308, Model: JAGUAR X308 1998 2.GPages: 2490, PDF Size: 69.81 MB
Page 666 of 2490

Installation
12. Remove the bolt which secures the sprocket to the exhaust
camshaft.
Move the sprocket forward from the camshaft boss.
Remove the sprocket and leav e the chain resting on the
cylinder head.
13. Clean and inspect all relevant components.
1. Push the tensioner piston into the body to provide clearance
for installing. Tensioner fitted to cylinder head.
1. Insert a thin rigid wire th rough the hole in the end of
the tensioner piston to displace the ball from the non-
return valve seat.
2. With the wire in position, press the piston fully into the tensioner body.
Remove the wire.
2. Install the sprocket to the secondary chain.
1. With the sprocket installe d to the chain, temporarily
position (do not install the securing bolt) the sprocket
onto the camshaft.
2. Adjust the position of the sprocket within the chain to
allow the chain tensioning tool 303-532 to be
approximately vertical, as shown.
3. Install the cams haft sprocket.
Apply force to the tool (303-532) in an anti-clockwise
direction to tension the chain on its drive side.
Whilst applying the opposing force to the sprocket and
chain, tighten the sprocket securing bolt to 115-125 Nm.
Remove the chain tensioning tool.
Page 670 of 2490

Installation
removing the bolt which secures the sprocket. 1. Place a flat piece of stee l strip along the timing cover
horizontal jointing face, adjacent to the exhaust
camshaft sprocket.
2. Secure the steel strip in place with adhesive tape.
11. A ball-ended hexagon drive bit is required to remove the
sprocket securing bolt. A suitable tool is available from Snap On as (FABLM10E) Long Series 10mm AF.
12. Remove the bolt which secures the sprocket to the exhaust
camshaft.
Move the sprocket forward from the camshaft boss.
Remove the sprocket and leav e the chain resting on the
cylinder head.
13. Clean and inspect all relevant components.
1. Push the tensioner piston into the body to provide clearance
for installing. Tensioner fitted to cylinder head.
1. Insert a thin rigid wire th rough the hole in the end of
the tensioner piston to displace the ball from the non-
return valve seat.
2. With the wire in position, press the piston fully into the tensioner body.
Remove the wire.
2. Install the sprocket to the secondary chain.
1. With the sprocket installe d to the chain, temporarily
position the sprocket onto the camshaft.
2. Adjust the position of the sprocket within the chain to
allow the chain tensioning tool 303-532 to be
approximately vertical, as shown.
Page 674 of 2490

Installation
12. Remove the bolt which secures the sprocket to the exhaust
camshaft.
Move the sprocket forward from the camshaft boss.
13. Remove the secondary chain tensioner. The tensioner piston
cannot be pushed into the body with the assembly in position.
1. Remove the two bolts which secure the tensioner.
Lift the tensioner, sprocket (release it fully from the
camshaft) and ch ain assembly.
2. Remove the tensioner rearward from between the chain.
14. Remove the sprocket and leav e the chain resting on the
cylinder head.
15. Clean and inspect all relevant components.
1. Install the sprocket to the secondary chain.
1. With the sprocket installe d to the chain, temporarily
position (do not install the securing bolt) the sprocket
onto the camshaft.
2. Adjust the position of the sprocket within the chain to
allow the chain tensioning tool 303-532 to be
approximately vertical, as shown.
Remove the chain tensioni ng tool; during future
operations, do not move the sprocket within the chain.
2. Push the tensioner piston into the body to provide clearance
for installing.
1. Insert a thin rigid wire th rough the hole in the end of
the tensioner piston to displace the ball from the non-
return valve seat.
Page 675 of 2490

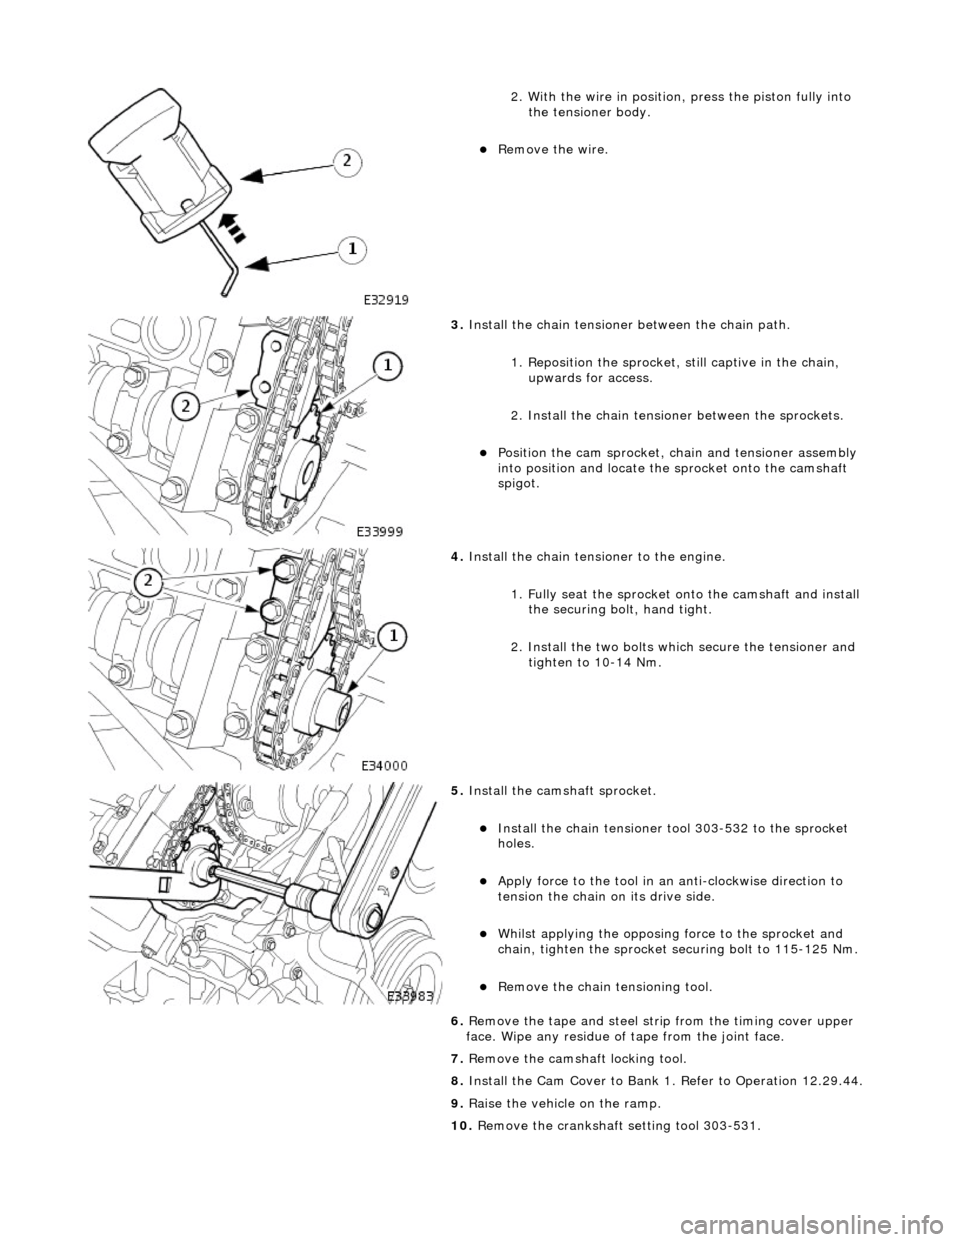
2. With the wire in position, press the piston fully into the tensioner body.
Remove the wire.
3. Install the chain tensioner between the chain path.
1. Reposition the sprocket, still captive in the chain, upwards for access.
2. Install the chain tensioner between the sprockets.
Position the cam sprocket, chain and tensioner assembly
into position and locate the sprocket onto the camshaft
spigot.
4. Install the chain tensioner to the engine.
1. Fully seat the sprocket onto the camshaft and install the securing bolt, hand tight.
2. Install the two bolts which secure the tensioner and tighten to 10-14 Nm.
5. Install the cams haft sprocket.
Install the chain tensioner tool 303-532 to the sprocket
holes.
Apply force to the tool in an anti-clockwise direction to
tension the chain on its drive side.
Whilst applying the opposing force to the sprocket and
chain, tighten the sprocket securing bolt to 115-125 Nm.
Remove the chain tensioning tool.
6. Remove the tape and steel stri p from the timing cover upper
face. Wipe any residue of tape from the joint face.
7. Remove the camshaft locking tool.
8. Install the Cam Cover to Bank 1. Refer to Operation 12.29.44.
9. Raise the vehicle on the ramp.
10. Remove the crankshaft setting tool 303-531.
Page 679 of 2490

Installation
removing the bolt which secures the sprocket. 1. Place a flat piece of stee l strip along the timing cover
horizontal jointing face, adjacent to the exhaust
camshaft sprocket.
2. Secure the steel strip in place with adhesive tape.
11. A ball-ended hexagon drive bit is required to remove the
sprocket securing bolt. A suitable tool is available from Snap On as (FABLM10E) Long Series 10mm AF.
12. Remove the bolt which secures the sprocket to the exhaust
camshaft.
Move the sprocket forward from the camshaft boss.
13. Remove the secondary chain tensioner. The tensioner piston
cannot be pushed into the body with the assembly in position.
1. Remove the two bolts which secure the tensioner.
Lift the tensioner, sprocket (release it fully from the
camshaft) and ch ain assembly.
2. Remove the tensioner rearward from between the chain.
14. Remove the sprocket and leav e the chain resting on the
cylinder head.
15. Clean and inspect all relevant components.
1. Install the sprocket to the secondary chain.
1. With the sprocket installe d to the chain, temporarily
position (do not install the securing bolt) the sprocket
onto the camshaft.
2. Adjust the position of the sprocket within the chain to
Page 680 of 2490

allow the chain tensioning tool 303-532 to be approximately vertical, as shown.
Remove the chain tensioni ng tool; during future
operations, do not move the sprocket within the chain.
2. Push the tensioner piston into the body to provide clearance
for installing.
1. Insert a thin rigid wire th rough the hole in the end of
the tensioner piston to displace the ball from the non-
return valve seat.
2. With the wire in position, press the piston fully into the tensioner body.
Remove the wire.
3. Install the chain tensioner between the chain path.
1. Reposition the sprocket, still captive in the chain, upwards for access.
2. Install the chain tensioner between the sprockets.
Position the cam sprocket, chain and tensioner assembly
into position and locate the sprocket onto the camshaft
spigot.
4. Install the chain tensioner to the engine.
1. Fully seat the sprocket onto the camshaft and install the securing bolt, hand tight.
2. Install the two bolts which secure the tensioner and tighten to 10-14 Nm.
5. Install the cams haft sprocket.
Install the chain tensioner tool 303-532 to the sprocket
holes.
Apply force to the tool in an anti-clockwise direction to
tension the chain on its drive side.
Page 705 of 2490

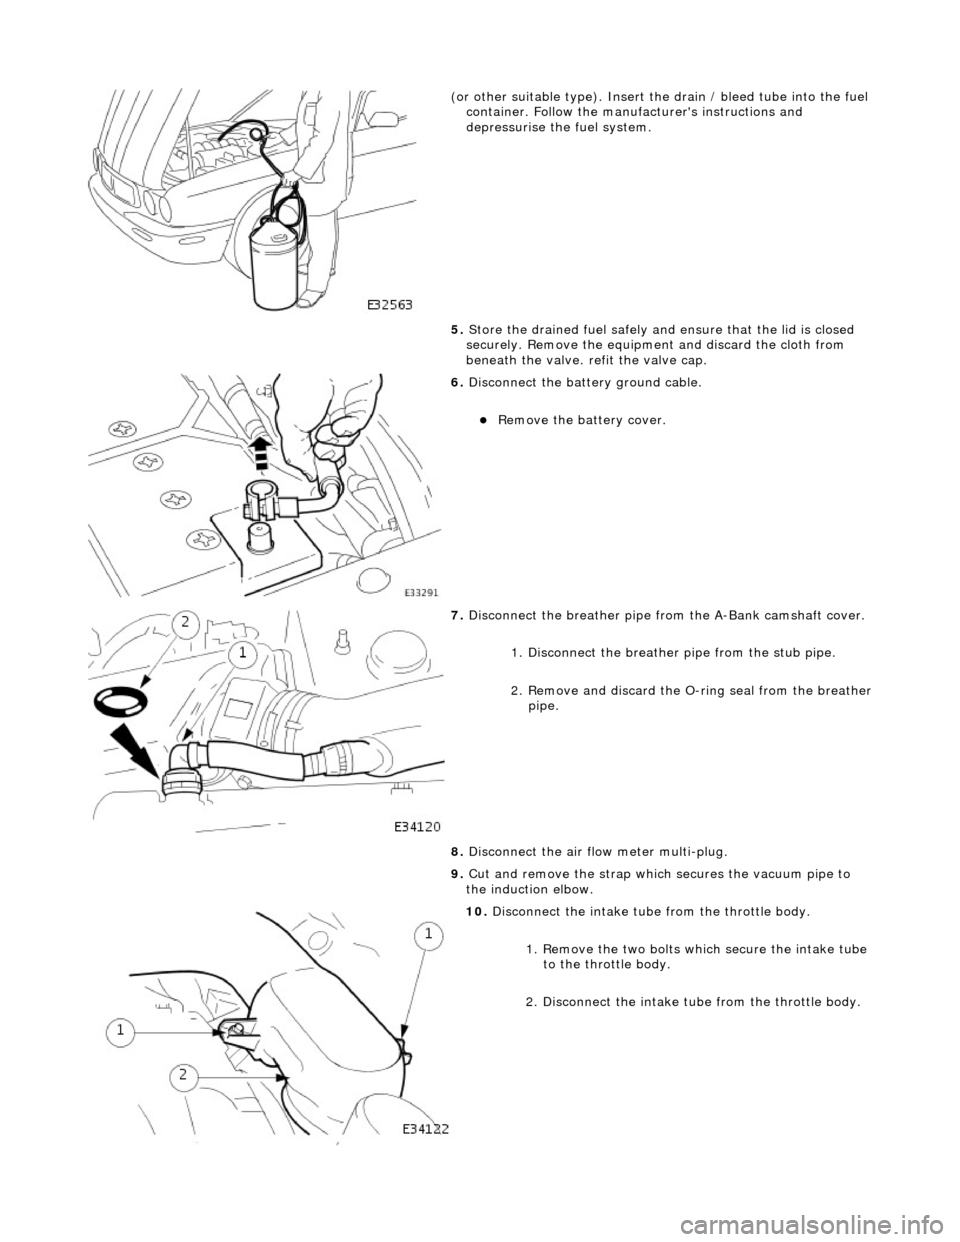
(or other sui
table type). Insert the drain / bleed tube
into the fuel
container. Follow the manufa cturer's instructions and
depressurise the fuel system.
5. Store the drained fuel safely and ensure that the lid is closed
securely. Remove the equipmen t and discard the cloth from
beneath the valve. refit the valve cap.
6. Di
sconnect the batt
ery ground cable.
R
emove the battery cover.
7. Disconnect the breather pipe fro m the
A-Bank camshaft cover.
1. Disconnect the breather pipe from the stub pipe.
2. Remove and discard the O-ring seal from the breather
pipe.
8. Disconnect the air fl ow meter multi-plug.
9. Cut and remove the strap which secures the vacuum pipe to
the induction elbow.
10
.
Disconnect the intake tube from the throttle body.
1. Remove the two bolts which secure the intake tube to the throttle body.
2. Disconnect the intake tube from the throttle body.
Page 706 of 2490

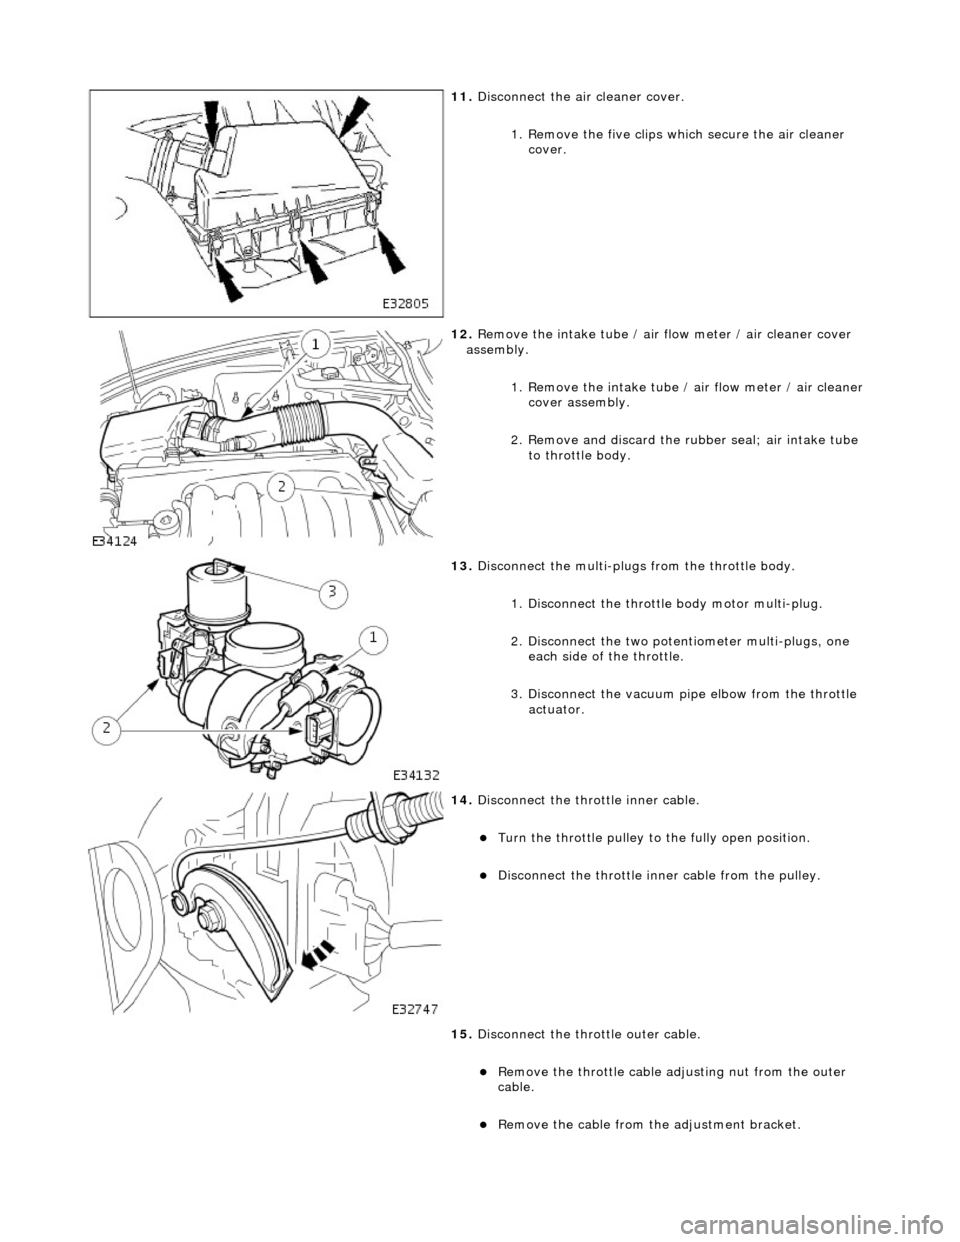
11. Disconnect the air cleaner cover.
1. Remove the five clips wh ich secure the air cleaner
cover.
12. Remove the intake tube / air flow meter / air cleaner cover
assembly.
1. Remove the intake tube / air flow meter / air cleaner
cover assembly.
2. Remove and discard the ru bber seal; air intake tube
to throttle body.
13. Disconnect the multi-plug s from the throttle body.
1. Disconnect the throttle body motor multi-plug.
2. Disconnect the two potentiometer multi-plugs, one each side of the throttle.
3. Disconnect the vacuum pi pe elbow from the throttle
actuator.
14. Disconnect the throttle inner cable.
Turn the throttle pulley to the fully open position.
Disconnect the throttle in ner cable from the pulley.
15. Disconnect the throttle outer cable.
Remove the throttle cable adjusting nut from the outer
cable.
Remove the cable from the adjustment bracket.
Page 707 of 2490

16. Disconnect the coolant hoses from the throttle body.
Release the clip which secures the coolant return hose and
disconnect the hose. Fit a blanking plug to the hose to
prevent water leakage.
Release the clip which secures the coolant feed hose and
disconnect the hose. Fit a blanking plug to the hose to
prevent water leakage.
17. Disconnect the multi-plug, located on the bracket under the
left side of th e throttle body.
18. Remove the throttle bo dy securing bolts.
19. Remove the throttle body.
1. Remove the throttle body from the induction elbow.
2. Remove and discard the throttle body gasket.
Page 714 of 2490

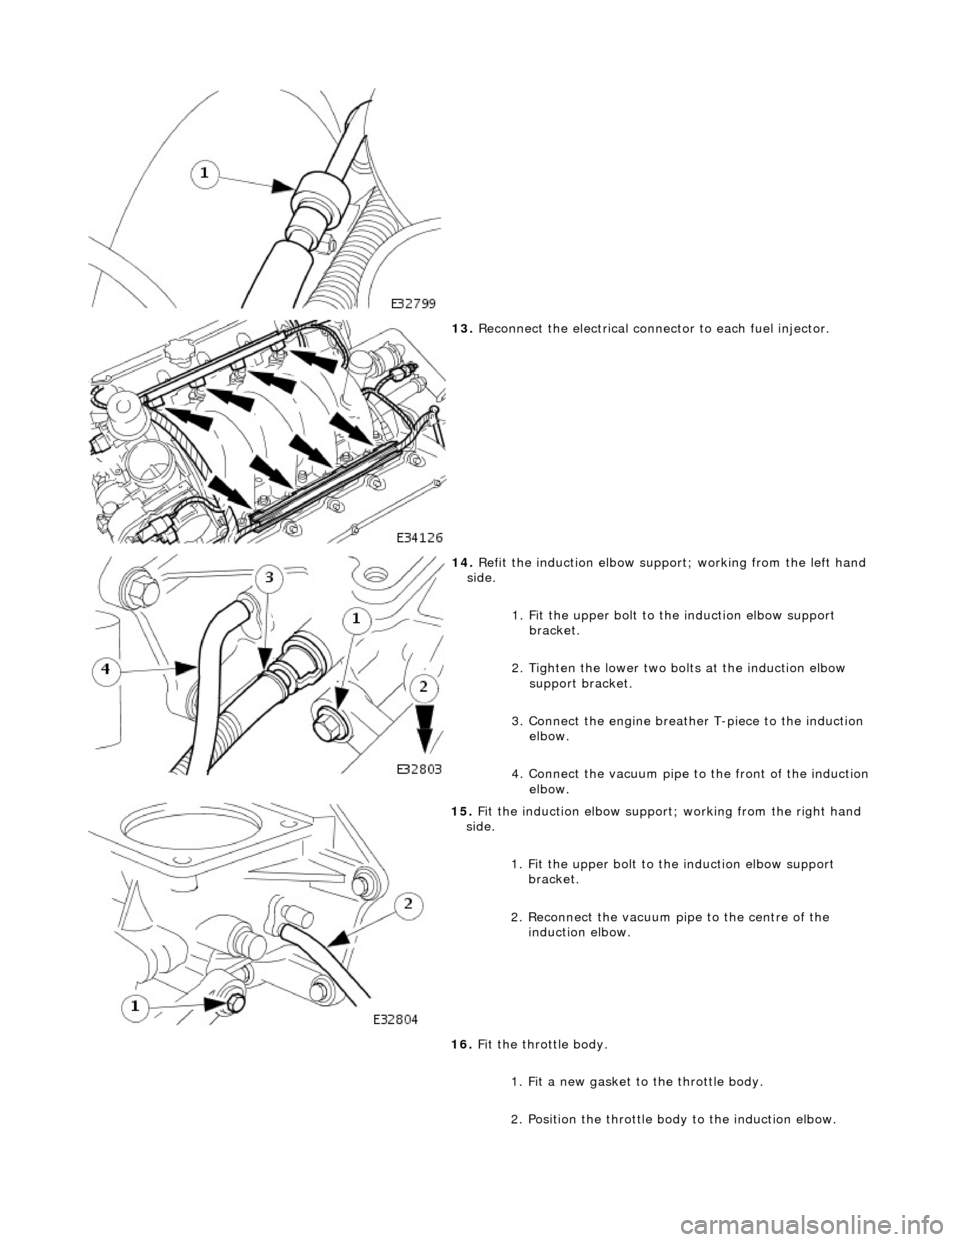
13. Reconnect the electrical connector to each fuel injector.
14. Refit the induction elbow support ; working from the left hand
side.
1. Fit the upper bolt to the induction elbow support
bracket.
2. Tighten the lower two bolts at the induction elbow support bracket.
3. Connect the engine breather T-piece to the induction elbow.
4. Connect the vacuum pipe to the front of the induction
elbow.
15. Fit the induction elbow support; working from the right hand
side.
1. Fit the upper bolt to the induction elbow support
bracket.
2. Reconnect the vacuum pi pe to the centre of the
induction elbow.
16. Fit the throttle body.
1. Fit a new gasket to the throttle body.
2. Position the throttle body to the induction elbow.