LAND ROVER FRELANDER 2 2006 Repair Manual
FRELANDER 2 2006
LAND ROVER
LAND ROVER
https://www.carmanualsonline.info/img/64/57251/w960_57251-0.png
LAND ROVER FRELANDER 2 2006 Repair Manual
Trending: air filter, brake pads, handbrake, winter tyres, isofix, clock, brake fluid
Page 841 of 3229
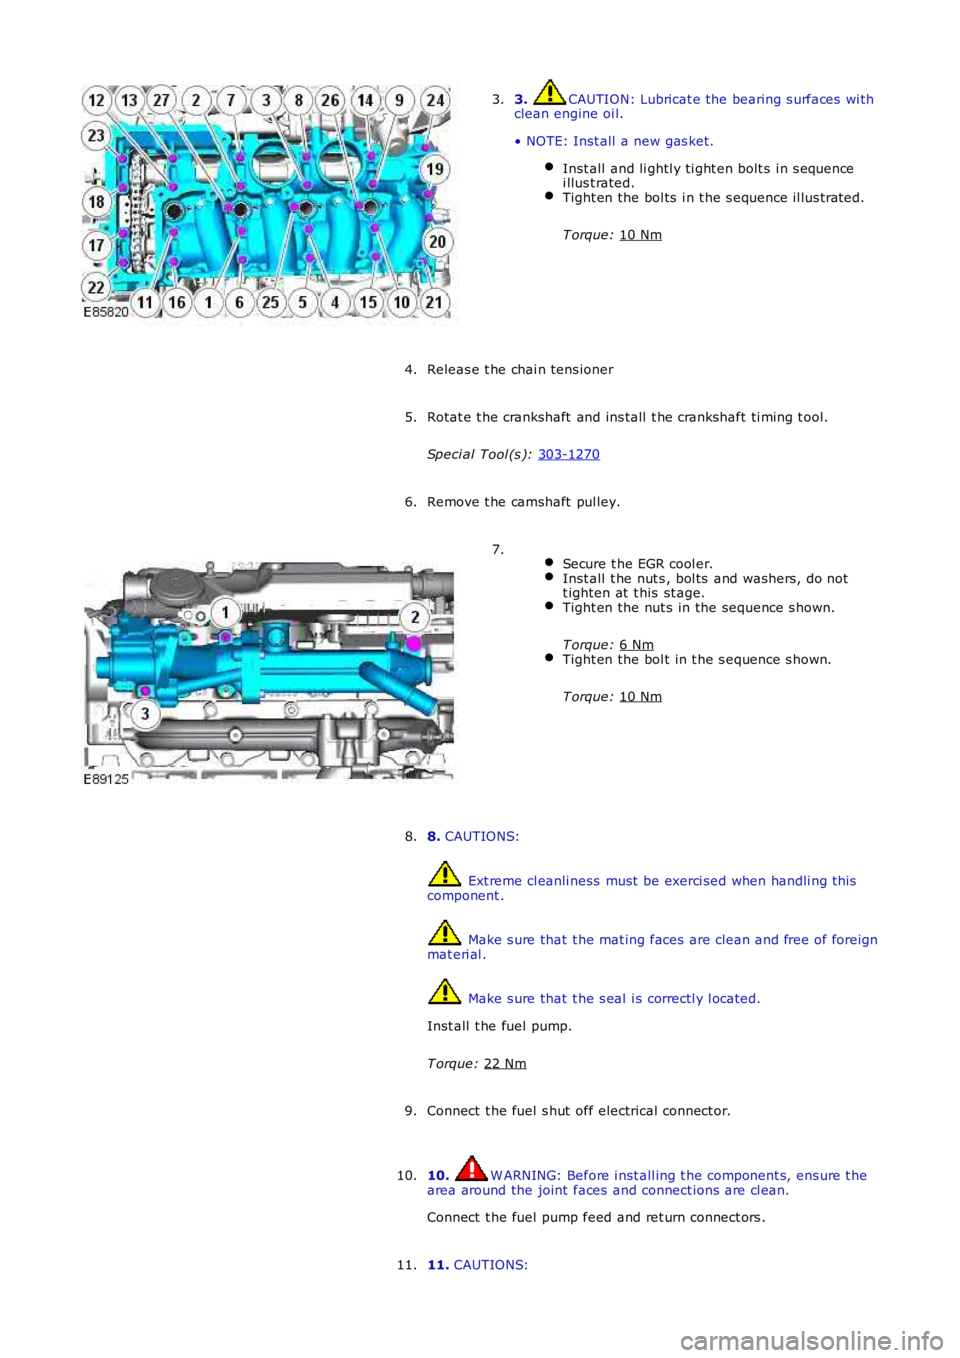
3. CAUTION: Lubricat e the bearing s urfaces wi th
clean engine oi l.
• NOTE: Inst all a new gas ket. Inst all and li ghtl y ti ght en bolt s i n s equence
i llus t rated. Tight en the bol ts i n t he s equence il lus trated.
T orque: 10 Nm 3.
Releas e t he chai n tens ioner
4.
Rotat e t he crankshaft and ins tall t he crankshaft ti ming t ool.
Speci al Tool (s ): 303-1270 5.
Remove t he camshaft pul ley.
6.
Secure t he EGR cool er. Inst all t he nut s , bol ts and washers, do not
t ighten at t his st age. Tight en the nut s in the sequence s hown.
T orque: 6 Nm Tight en the bol t in t he s equence s hown.
T orque: 10 Nm 7.
8. CAUTIONS: Ext reme cl eanli ness must be exerci sed when handli ng t hi s
component . Make s ure that t he mat ing faces are clean and free of foreign
mat eri al . Make s ure that t he s eal i s correctl y l ocated.
Inst all t he fuel pump.
T orque: 22 Nm 8.
Connect t he fuel s hut off electrical connect or.
9.
10. W ARNING: Before i nst all ing t he component s, ens ure t he
area around the joint faces and connect ions are cl ean.
Connect t he fuel pump feed and ret urn connect ors .
10.
11. CAUTIONS:
11.
Page 842 of 3229
Make s ure that t he mat ing faces are clean and free of foreign
mat eri al . Make s ure that t he s eal i s correctl y l ocated.
Inst all t he vacuum pump.
T orque: 9 Nm Secure t he oil fill er tube.
T orque: 9 Nm 12.
13. CAUTION: Make s ure t hat the mati ng faces are cl ean and
free of foreign mat eri al.
Connect t he vacuum lines t o t he vacuum pump.
13.
Secure t he fuel li nes .
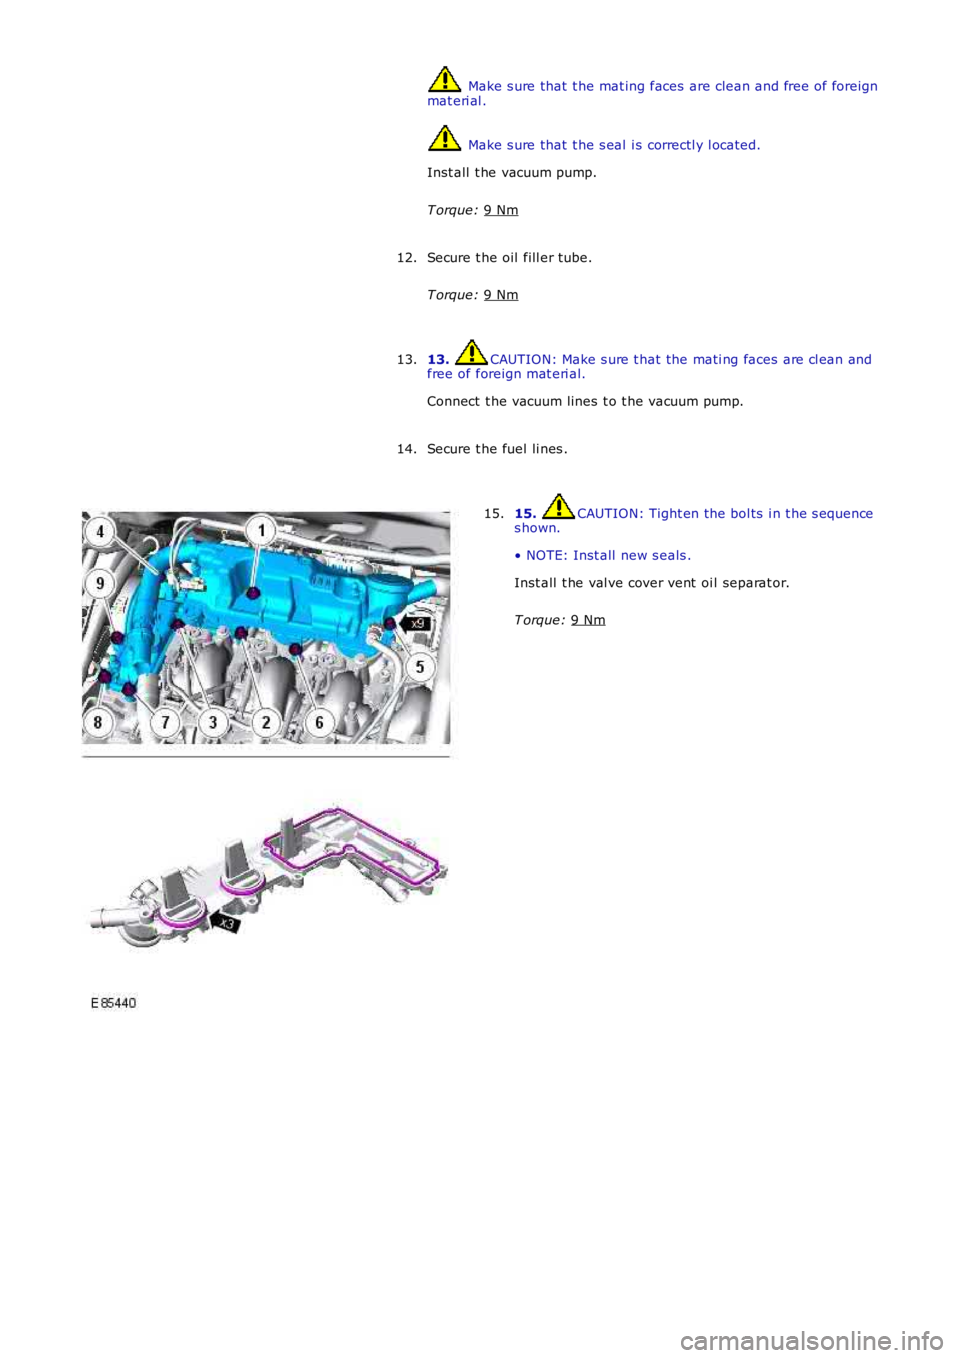
14. 15. CAUTION: Tight en the bol ts i n t he s equence
s hown.
• NOTE: Inst all new s eals .
Inst all t he val ve cover vent oi l separat or.
T orque: 9 Nm 15.
Page 843 of 3229
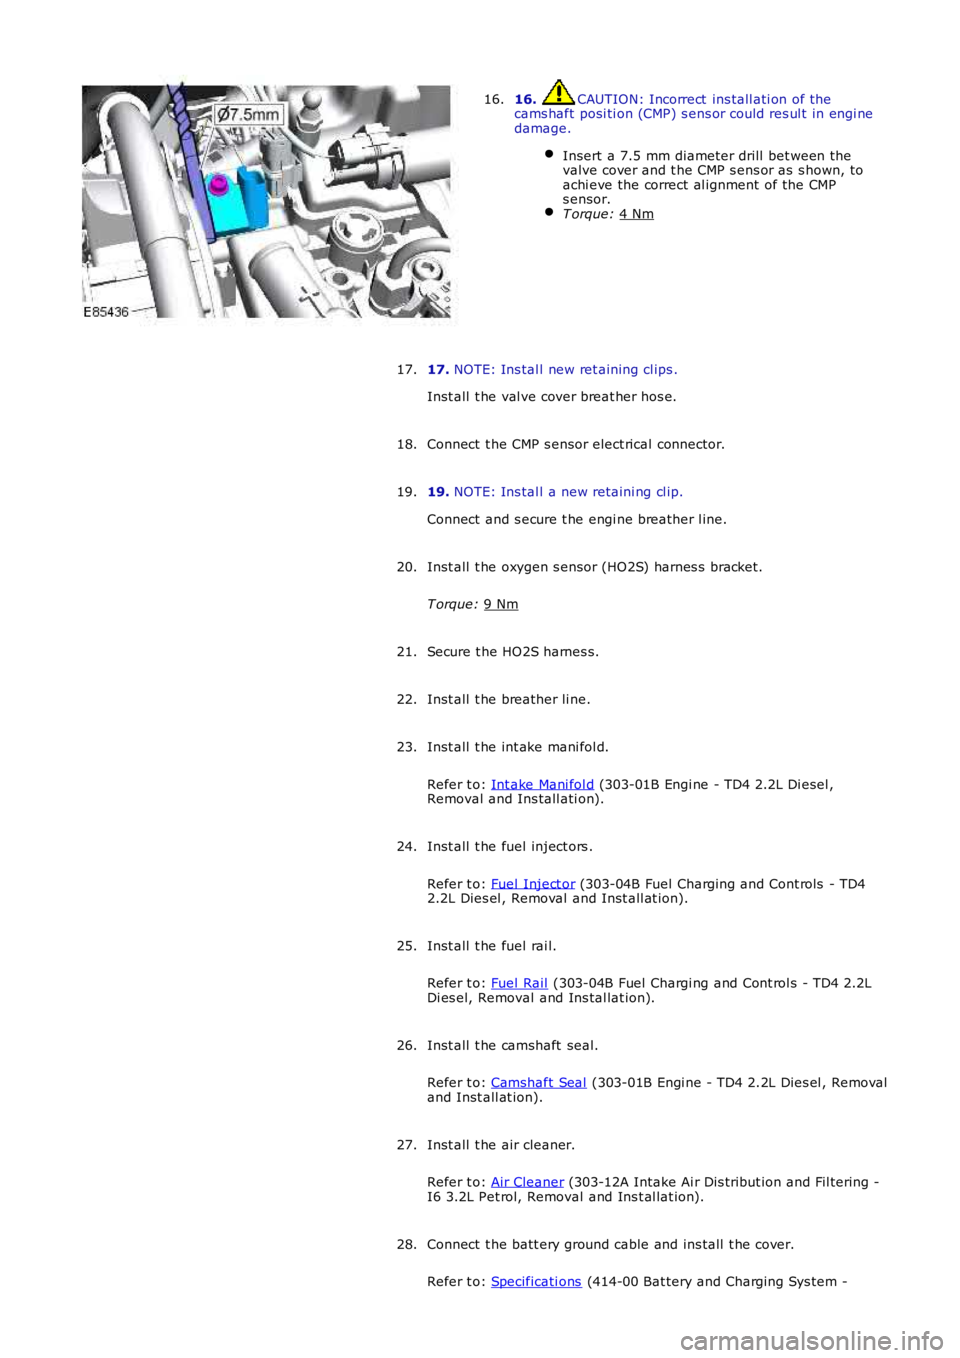
16. CAUTION: Incorrect ins tall ati on of the
cams haft posi ti on (CMP) s ens or could res ul t in engi ne
damage.
Insert a 7.5 mm diameter drill bet ween the
valve cover and t he CMP s ens or as s hown, to
achi eve the correct al ignment of the CMP
s ensor. T orque:
4 Nm 16.
17. NOTE: Ins tal l new ret aining cl ips .
Inst all t he val ve cover breat her hos e.
17.
Connect t he CMP s ensor elect rical connector.
18.
19. NOTE: Ins tal l a new retaini ng cl ip.
Connect and s ecure t he engi ne breather l ine.
19.
Inst all t he oxygen s ensor (HO2S) harnes s bracket.
T orque: 9 Nm 20.
Secure t he HO2S harnes s.
21.
Inst all t he breather li ne.
22.
Inst all t he int ake mani fol d.
Refer t o: Int ake Mani fol d (303-01B Engi ne - TD4 2.2L Di esel ,
Removal and Ins tall ati on).
23.
Inst all t he fuel inject ors .
Refer t o: Fuel Inject or (303-04B Fuel Charging and Cont rols - TD4
2.2L Dies el , Removal and Inst all at ion).
24.
Inst all t he fuel rai l.
Refer t o: Fuel Rail (303-04B Fuel Chargi ng and Cont rol s - TD4 2.2L
Di es el, Removal and Ins tal lat ion).
25.
Inst all t he camshaft seal.
Refer t o: Camshaft Seal (303-01B Engi ne - TD4 2.2L Dies el , Removal
and Inst all at ion).
26.
Inst all t he air cleaner.
Refer t o: Air Cleaner (303-12A Intake Ai r Dis tribut ion and Fil tering -
I6 3.2L Pet rol, Removal and Ins t al lat ion).
27.
Connect t he batt ery ground cable and ins tall t he cover.
Refer t o: Specificati ons (414-00 Bat tery and Charging Sys tem -
28.
Page 844 of 3229
Publi s hed: 11-May-2011
Engine - TD4 2.2L Diesel - Camshafts
Removal and Inst all ati on
Removal
Remove t he cover and dis connect the bat tery ground cabl e.
Refer t o: Specificati ons (414-00 Bat tery and Charging Sys tem -
General Informat ion, Specificati ons).
1.
2. W ARNING: Make sure t o s upport the vehicle wit h axle
s tands .
Rais e and s upport t he vehi cl e.
2.
Remove t he val ve cover.
Refer t o: Val ve Cover (303-01B Engine - TD4 2.2L Dies el, Removal
and Inst all at ion).
3. 4.
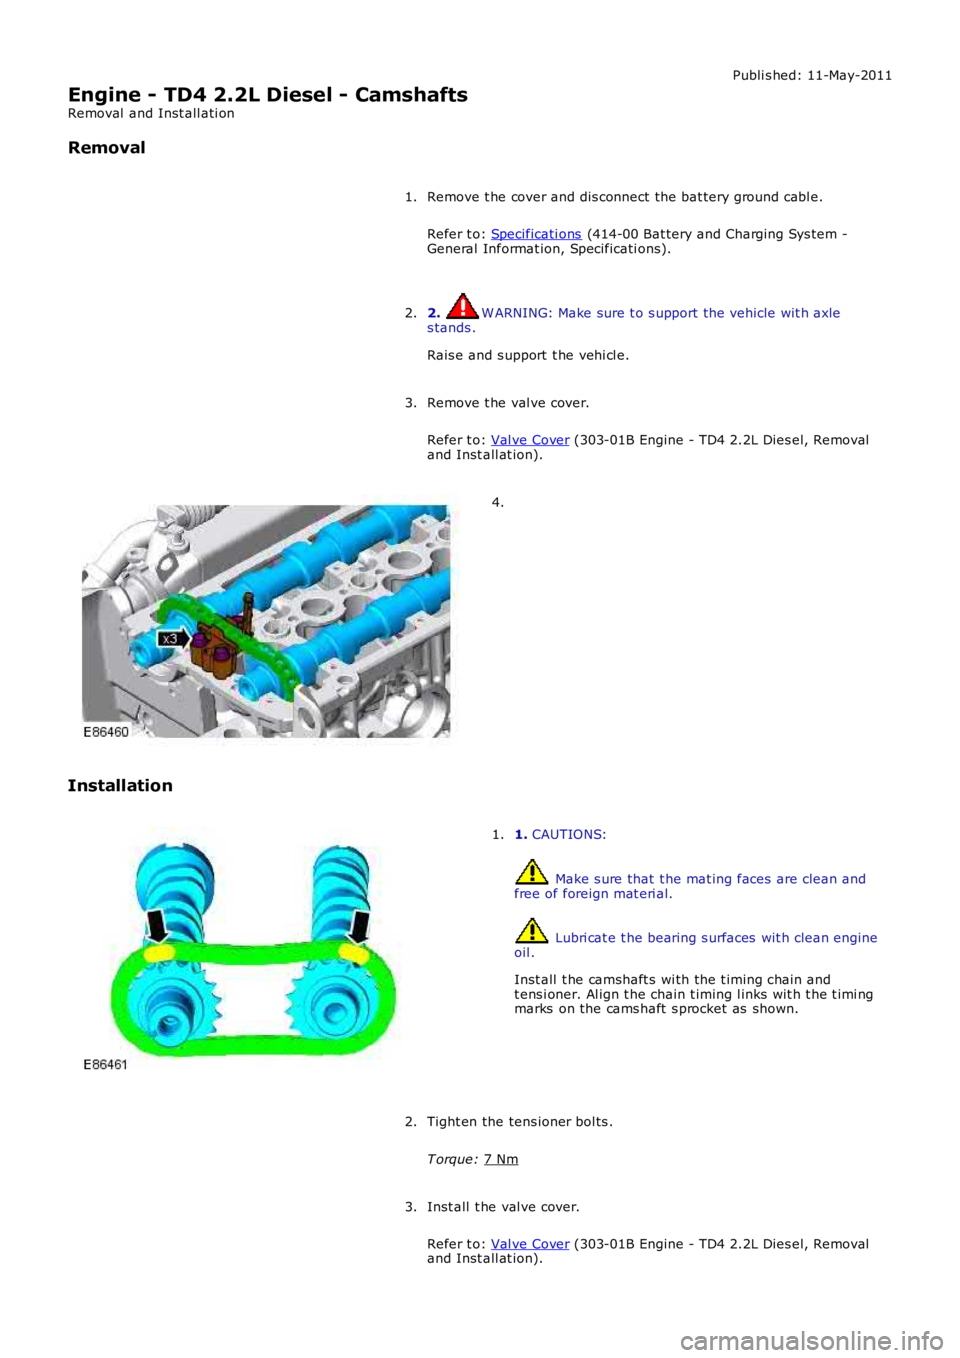
Installation 1.
CAUTIONS: Make s ure that t he mat ing faces are clean and
free of foreign mat eri al. Lubri cat e t he bearing s urfaces wit h clean engine
oil .
Inst all t he camshaft s wi th the t iming chain and
t ens i oner. Al ign t he chain t iming l inks wit h t he t imi ng
marks on the cams haft s procket as shown.
1.
Tight en the tens ioner bol ts .
T orque: 7 Nm 2.
Inst all t he val ve cover.
Refer t o: Val ve Cover (303-01B Engine - TD4 2.2L Dies el, Removal
and Inst all at ion).
3.
Page 845 of 3229
Connect t he batt ery ground cable and ins tall t he cover.
Refer t o: Specificati ons (414-00 Bat tery and Charging Sys tem -General Informat ion, Specificati ons).
4.
Page 846 of 3229
Publi s hed: 11-May-2011
Engine - TD4 2.2L Diesel - Camshaft Seal
Removal and Inst all ati on
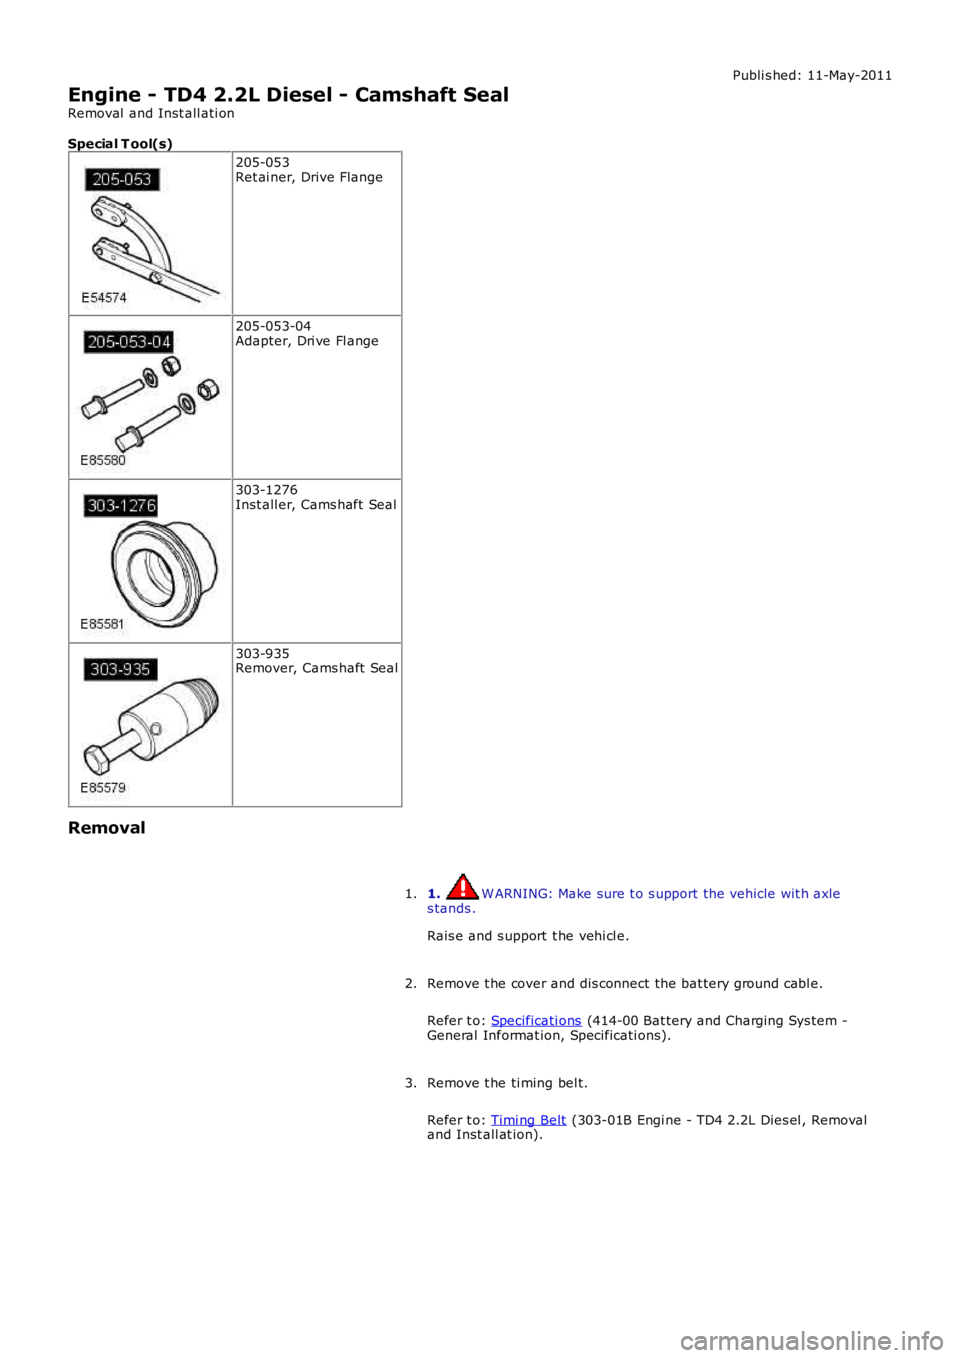
Special T ool(s)
205-053Ret ai ner, Drive Flange
205-053-04Adapter, Dri ve Fl ange
303-1276Inst all er, Cams haft Seal
303-935Remover, Cams haft Seal
Removal
1. W ARNING: Make sure t o s upport the vehicle wit h axles tands .
Rais e and s upport t he vehi cl e.
1.
Remove t he cover and dis connect the bat tery ground cabl e.
Refer t o: Specificati ons (414-00 Bat tery and Charging Sys tem -General Informat ion, Specificati ons).
2.
Remove t he ti ming bel t.
Refer t o: Timi ng Belt (303-01B Engi ne - TD4 2.2L Dies el , Removaland Inst all at ion).
3.
Page 847 of 3229
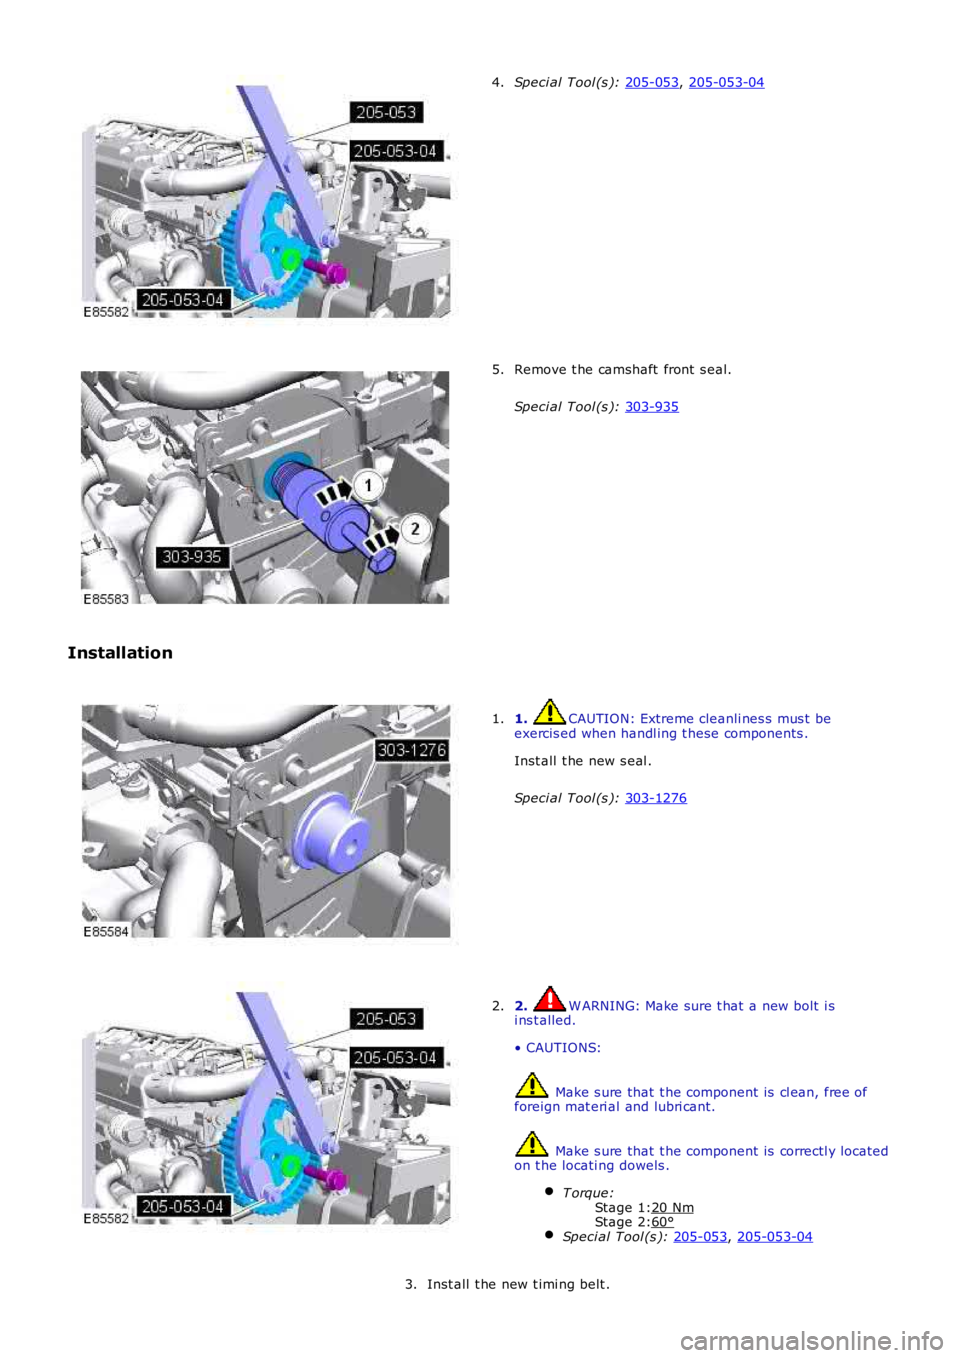
Stage 1:
Stage 2: Speci al Tool (s ):
205-053 ,
205-053-04 4.
Remove t he camshaft front s eal.
Speci al Tool (s ): 303-935 5.
Installation 1. CAUTION: Extreme cleanli nes s mus t be
exercis ed when handl ing t hese components .
Inst all t he new s eal .
Speci al Tool (s ): 303-1276 1.
2. W ARNING: Make sure t hat a new bolt i s
i ns t alled.
• CAUTIONS: Make s ure that t he component is cl ean, free of
foreign mat eri al and lubri cant. Make s ure that t he component is correctl y located
on t he locati ng dowels .
T orque: 20 Nm 60°
Speci al Tool (s ):
205-053 ,
205-053-04 2.
Inst all t he new t imi ng belt .
3.
Page 848 of 3229
Refer t o: Timi ng Belt (303-01B Engi ne - TD4 2.2L Dies el , Removaland Inst all at ion).
Connect t he batt ery ground cable and ins tall t he cover.
Refer t o: Specificati ons (414-00 Bat tery and Charging Sys tem -General Informat ion, Specificati ons).
4.
Page 849 of 3229
Publi s hed: 11-May-2011
Engine - TD4 2.2L Diesel - Timing Belt
Removal and Inst all ati on
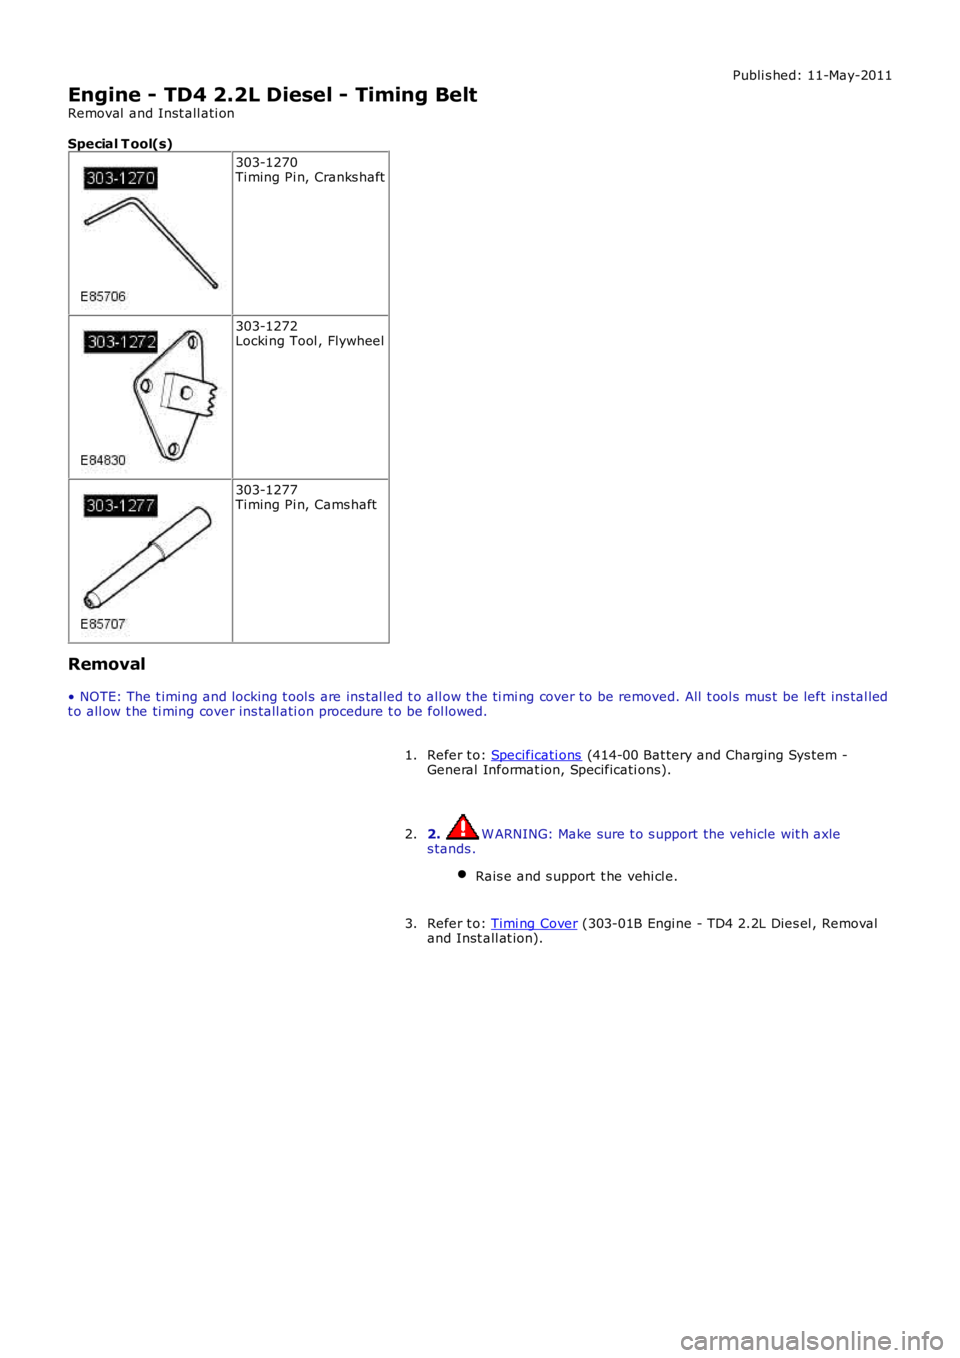
Special T ool(s) 303-1270
Ti ming Pi n, Cranks haft 303-1272
Locki ng Tool , Flywheel 303-1277
Ti ming Pi n, Cams haft
Removal
• NOTE: The t imi ng and locking t ool s are ins tal led t o all ow t he ti mi ng cover to be r emoved. All t ool s mus t be left ins tal led
t o all ow t he ti ming cover ins tall ati on procedure t o be fol lowed.
Refer t o: Specificati ons (414-00 Bat tery and Charging Sys tem -
General Informat ion, Specificati ons).
1.
2. W ARNING: Make sure t o s upport the vehicle wit h axle
s tands .
Rais e and s upport t he vehi cl e. 2.
Refer t o: Timi ng Cover (303-01B Engi ne - TD4 2.2L Dies el , Removal
and Inst all at ion).
3.
Page 850 of 3229
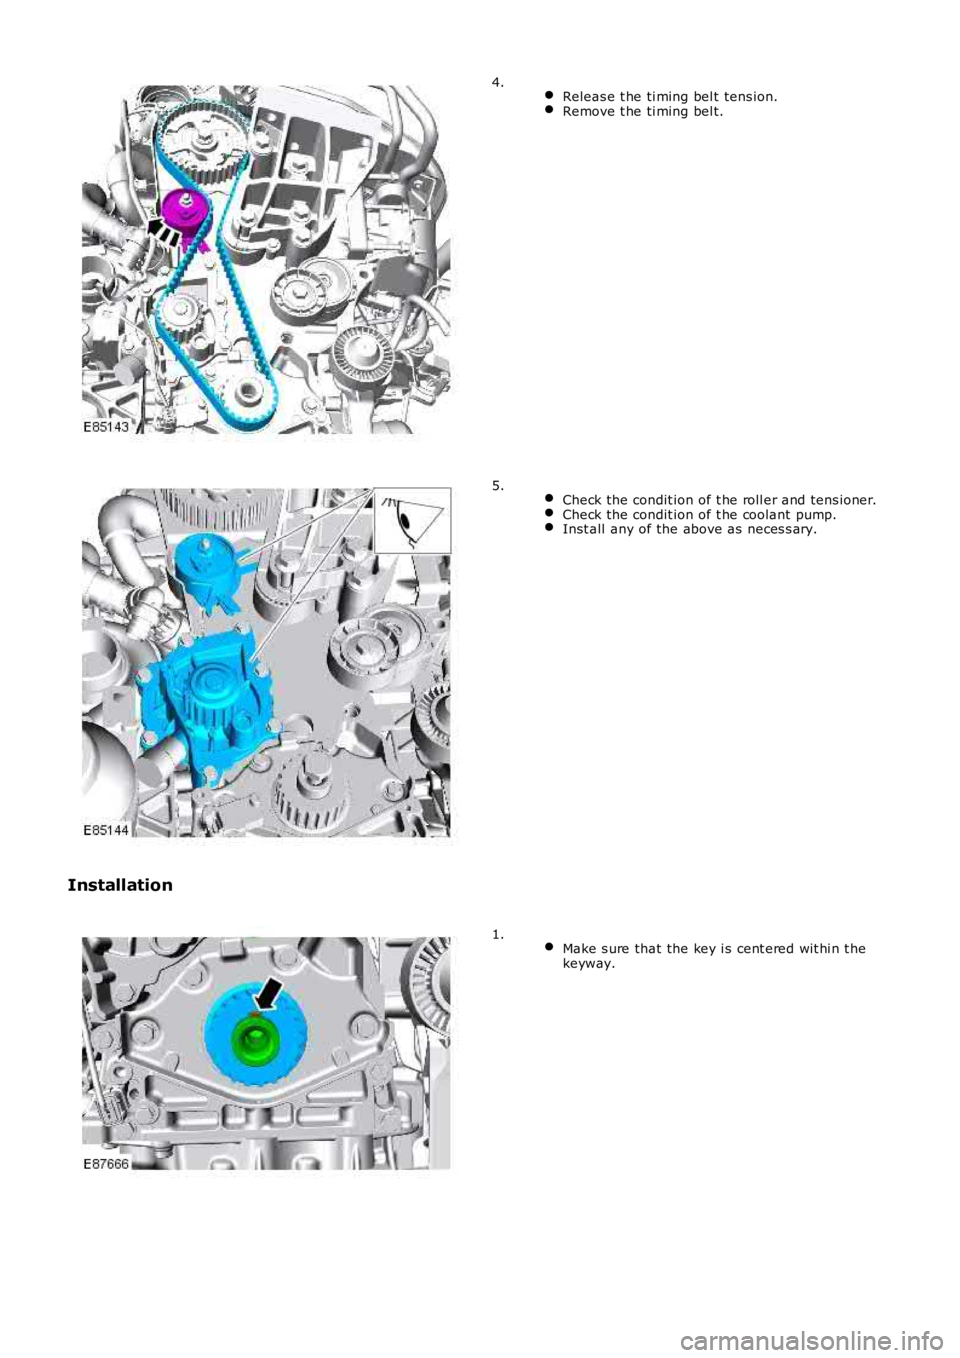
Releas e t he ti ming bel t tens ion. Remove t he ti ming bel t.4.
Check the condit ion of t he roll er and tens ioner. Check the condit ion of t he coolant pump.
Inst all any of the above as neces s ary.5.
Installation
Make s ure that the key i s cent ered wit hi n t he
keyway. 1.
Trending: climate settings, fan, traction control, check engine light, emergency towing, check transmission fluid, key

