LAND ROVER FRELANDER 2 2006 Repair Manual
FRELANDER 2 2006
LAND ROVER
LAND ROVER
https://www.carmanualsonline.info/img/64/57251/w960_57251-0.png
LAND ROVER FRELANDER 2 2006 Repair Manual
Trending: cooling, wiper blades, relay, change wheel, fuse diagram, tire pressure, low oil pressure
Page 881 of 3229
Publi s hed: 11-May-2011
Engine - TD4 2.2L Diesel - Oil Pan Extension
Removal and Inst all ati on
Removal
1. W ARNING: Make sure t o s upport the vehicle wit h axles tands .
Rais e and s upport t he vehi cl e.
1.
Remove t he engi ne cover.
Refer t o: Engi ne Cover - TD4 2.2L Dies el (501-05 Interior Tri m andOrnament ati on, Removal and Ins tal lat ion).
2.
Remove t he oil pan.
Refer t o: Oil Pan (303-01B Engi ne - TD4 2.2L Dies el , Removal andInst all at ion).
3.
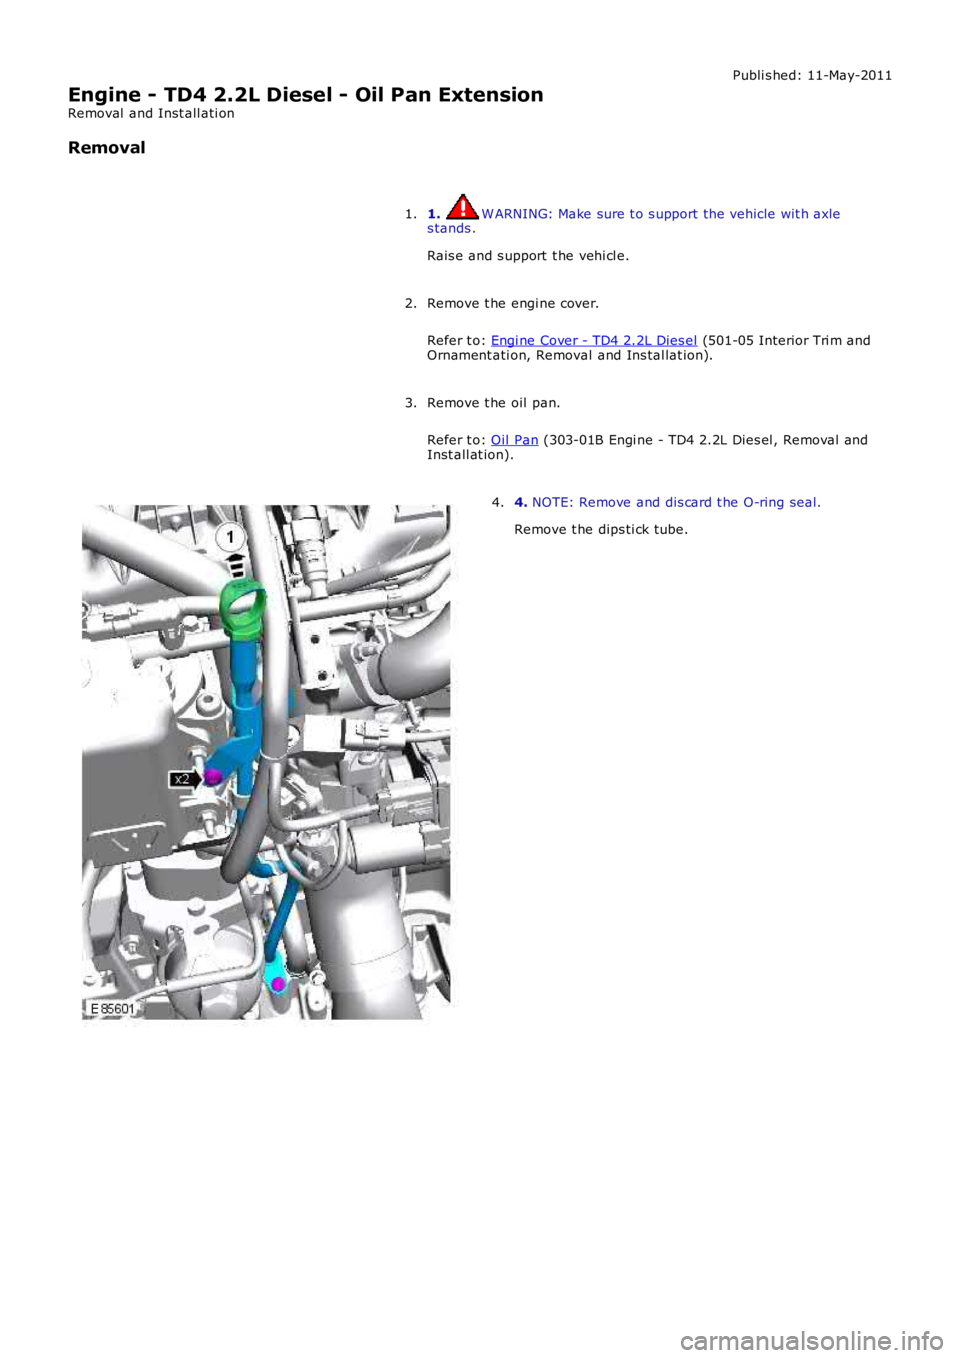
4. NOTE: Remove and dis card t he O-ring seal.
Remove t he dips ti ck tube.
4.
Page 882 of 3229
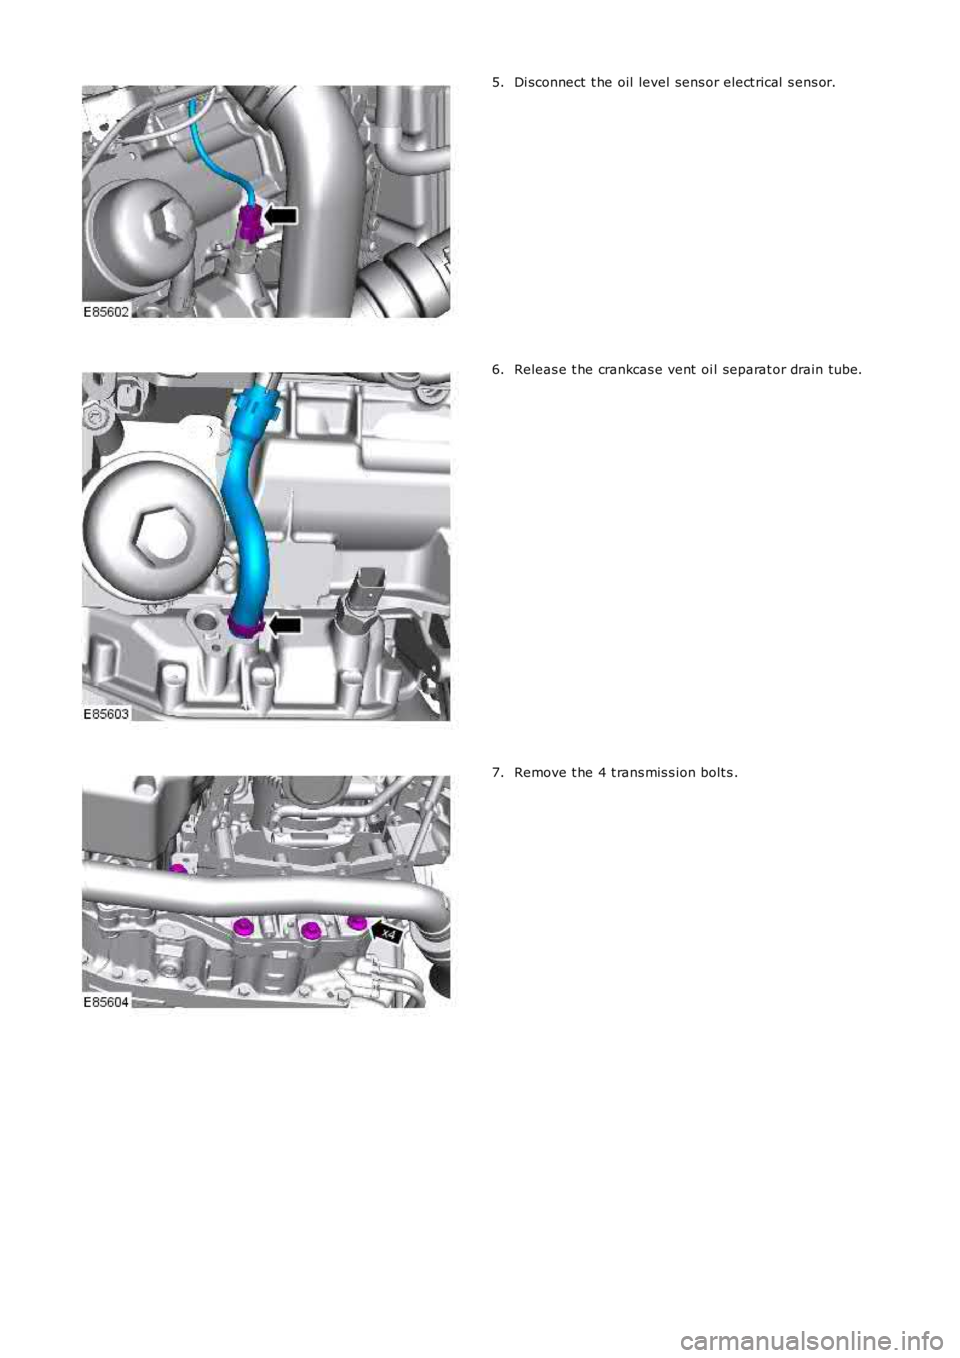
Di sconnect t he oil level sens or elect rical s ens or.5.
Releas e t he crankcas e vent oi l separat or drain tube.6.
Remove t he 4 t rans mis s ion bolt s .7.
Page 883 of 3229
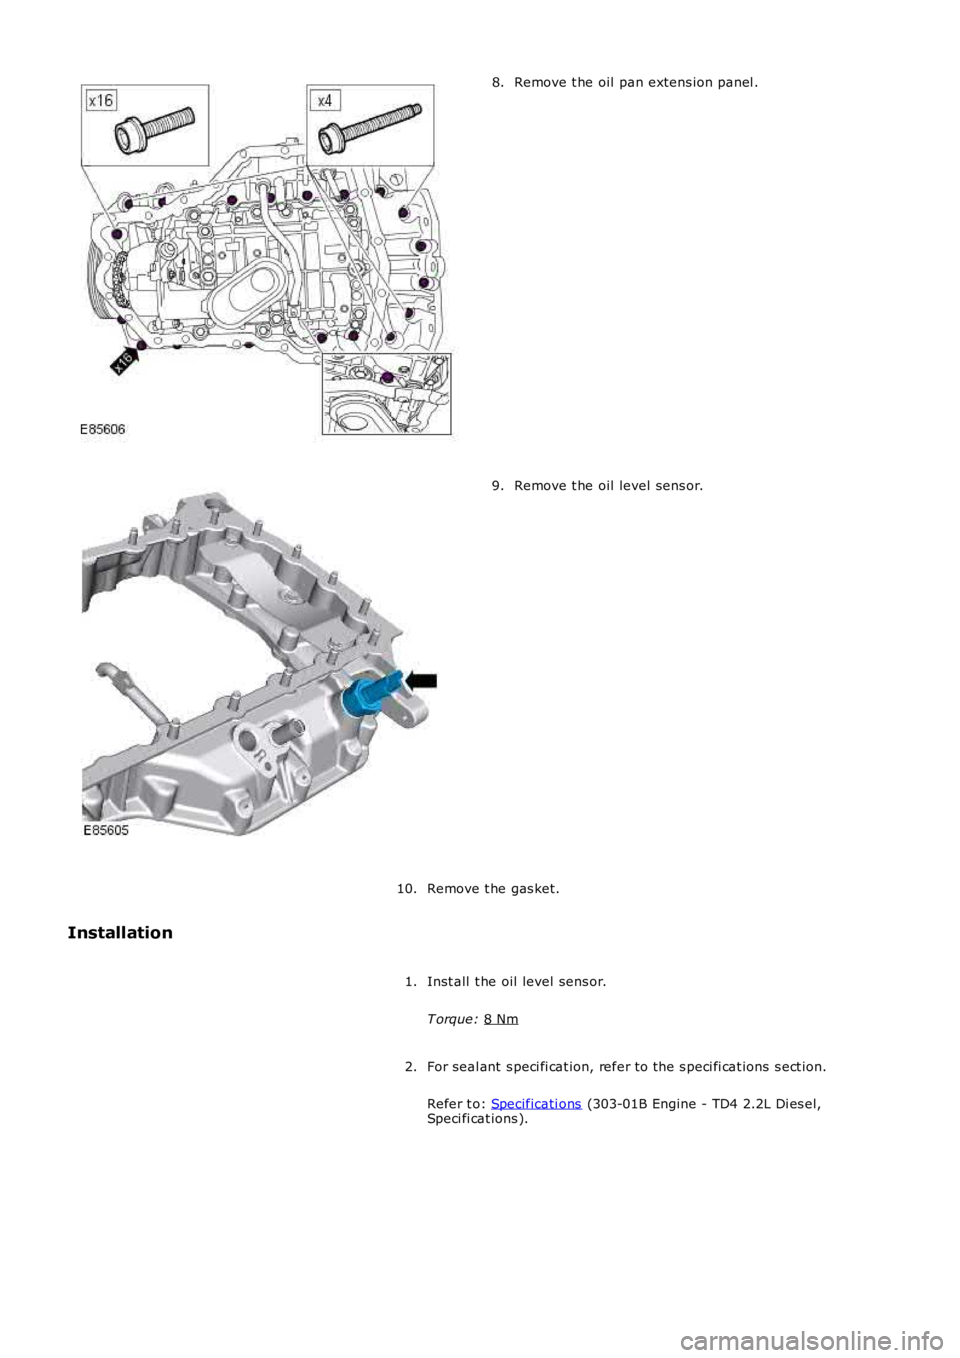
Remove t he oil pan extens ion panel .
8. Remove t he oil level sens or.
9.
Remove t he gas ket.
10.
Installation
Inst all t he oil level sens or.
T orque: 8 Nm 1.
For seal ant s peci fi cat ion, refer to t he s peci fi cat ions s ect ion.
Refer t o: Specificati ons (303-01B Engine - TD4 2.2L Di es el,
Speci fi cat ions ).
2.
Page 884 of 3229
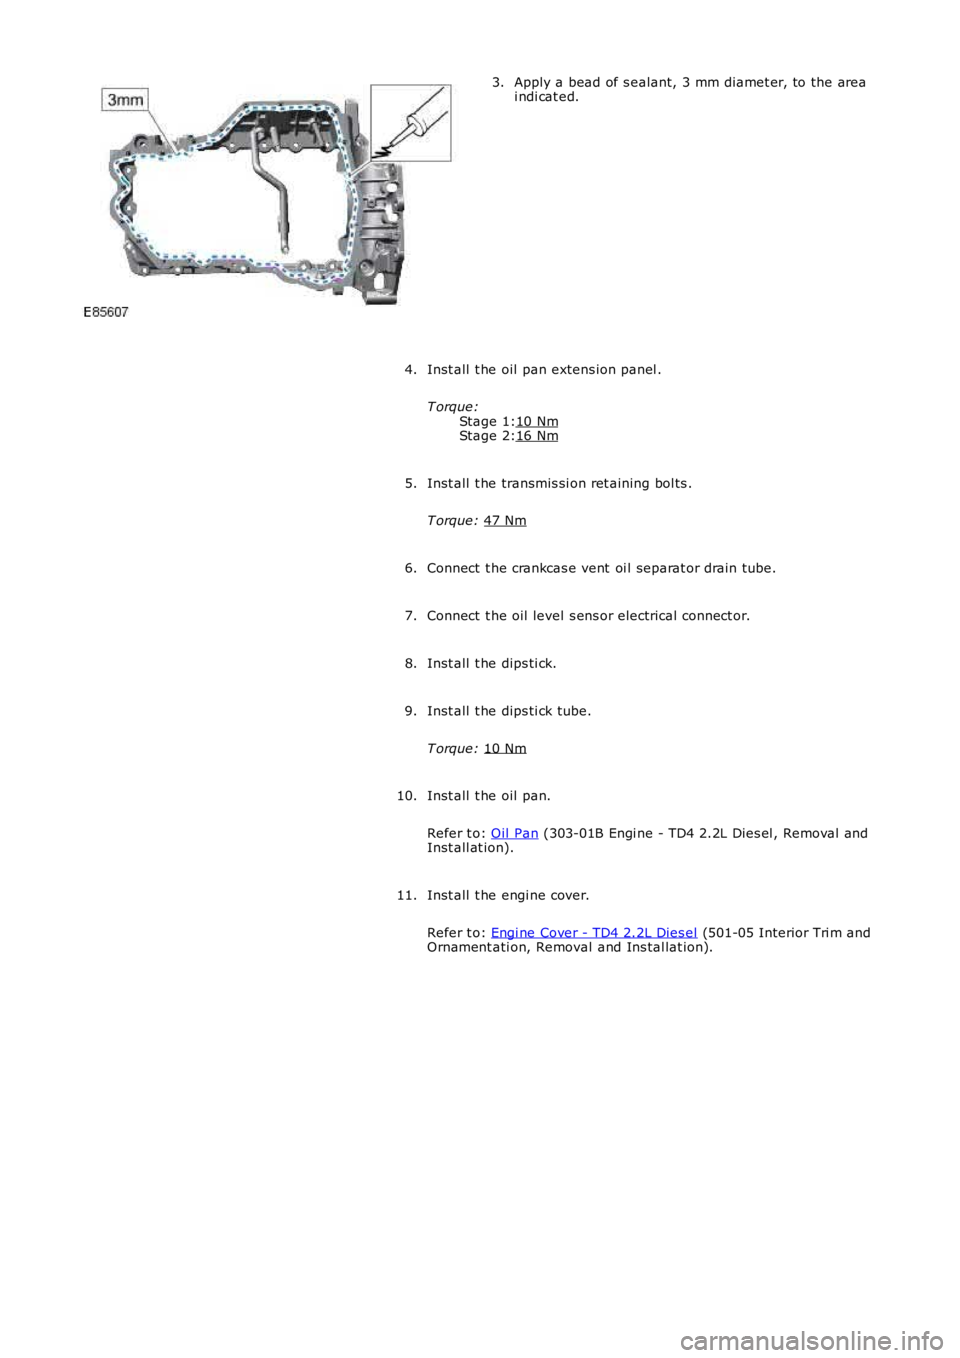
Stage 1:
Stage 2: Apply a bead of s ealant, 3 mm diamet er, to the area
i ndi cat ed.
3.
Inst all t he oil pan extens ion panel .
T orque: 10 Nm 16 Nm4.
Inst all t he transmis si on ret aining bol ts .
T orque: 47 Nm 5.
Connect t he crankcas e vent oi l separat or drain tube.
6.
Connect t he oil level s ens or electrical connect or.
7.
Inst all t he dips ti ck.
8.
Inst all t he dips ti ck tube.
T orque: 10 Nm 9.
Inst all t he oil pan.
Refer t o: Oil Pan (303-01B Engi ne - TD4 2.2L Dies el , Removal and
Inst all at ion).
10.
Inst all t he engi ne cover.
Refer t o: Engi ne Cover - TD4 2.2L Dies el (501-05 Interior Tri m and
Ornament ati on, Removal and Ins tal lat ion).
11.
Page 885 of 3229
Publi s hed: 11-May-2011
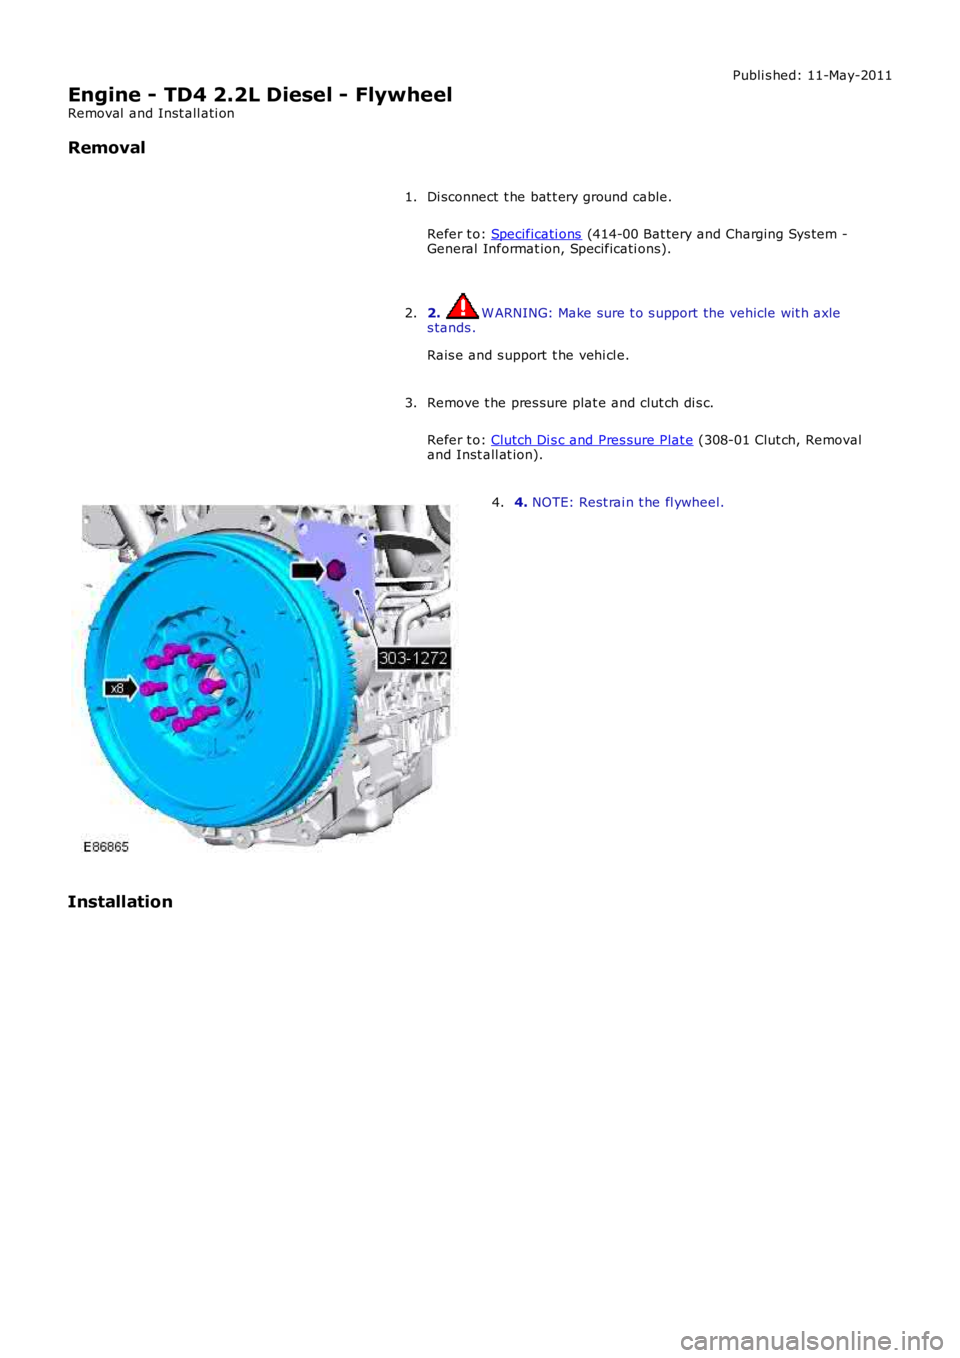
Engine - TD4 2.2L Diesel - Flywheel
Removal and Inst all ati on
Removal
Di sconnect t he bat t ery ground cable.
Refer t o: Specificati ons (414-00 Bat tery and Charging Sys tem -General Informat ion, Specificati ons).
1.
2. W ARNING: Make sure t o s upport the vehicle wit h axles tands .
Rais e and s upport t he vehi cl e.
2.
Remove t he pres sure plat e and clut ch di s c.
Refer t o: Clutch Di s c and Pres sure Plat e (308-01 Clut ch, Removaland Inst all at ion).
3.
4. NOTE: Rest rai n t he fl ywheel.4.
Installation
Page 886 of 3229
Stage 1:
Stage 2: 1.
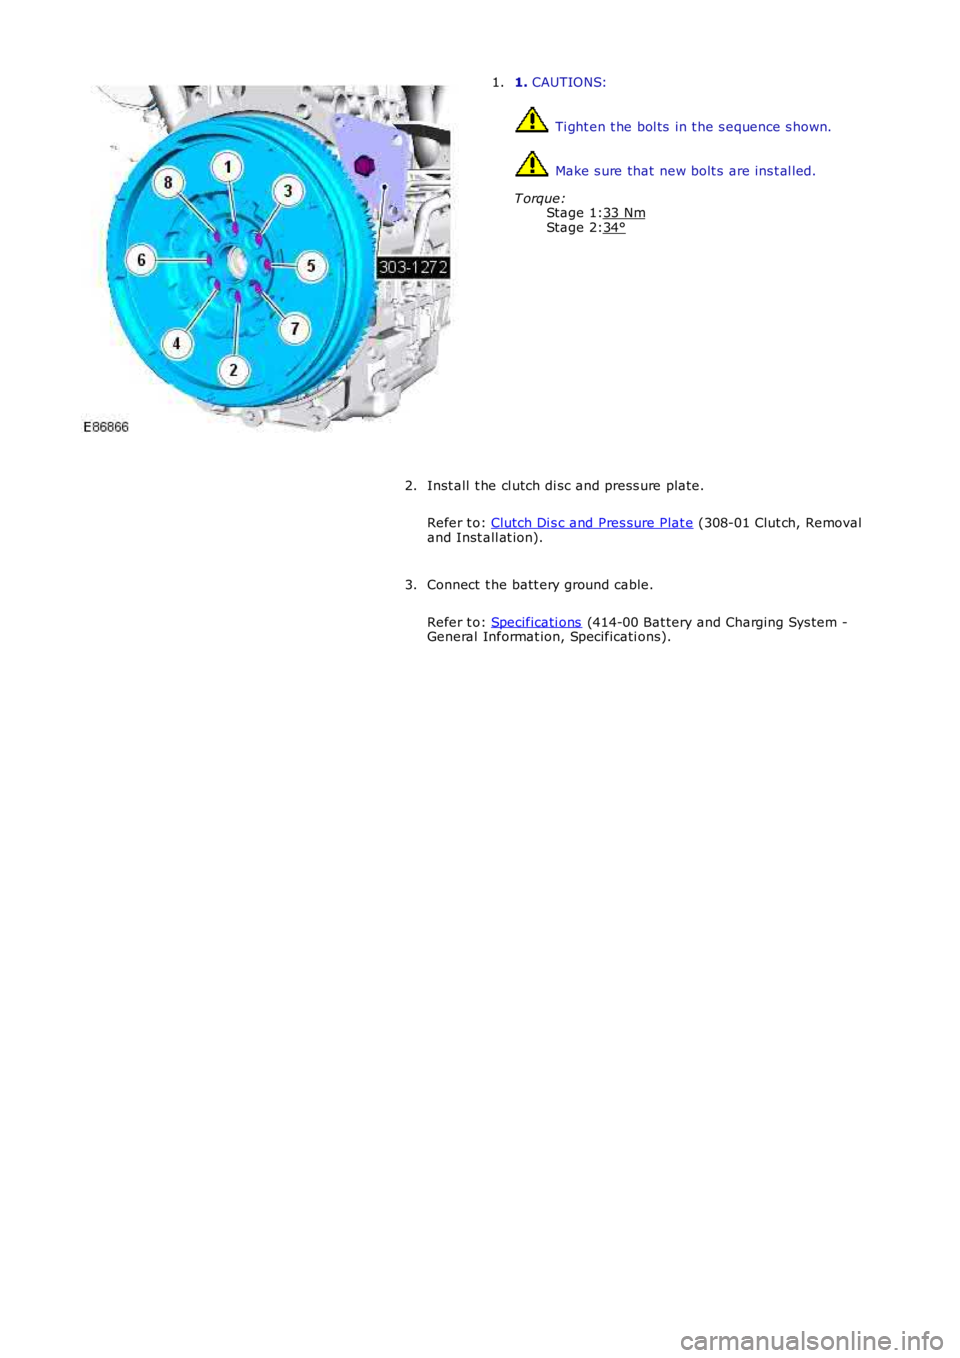
CAUTIONS: Ti ght en t he bol ts in t he s equence s hown.
Make s ure that new bolt s are ins t al led.
T orque: 33 Nm 34°1.
Inst all t he cl utch di sc and press ure plate.
Refer t o: Clutch Di s c and Pres sure Plat e (308-01 Clut ch, Removal
and Inst all at ion).
2.
Connect t he batt ery ground cable.
Refer t o: Specificati ons (414-00 Bat tery and Charging Sys tem -
General Informat ion, Specificati ons).
3.
Page 887 of 3229
Stage 1:
Stage 2: Publi s hed: 11-May-2011
Engine - TD4 2.2L Diesel - Flexplate
Removal and Inst all ati on
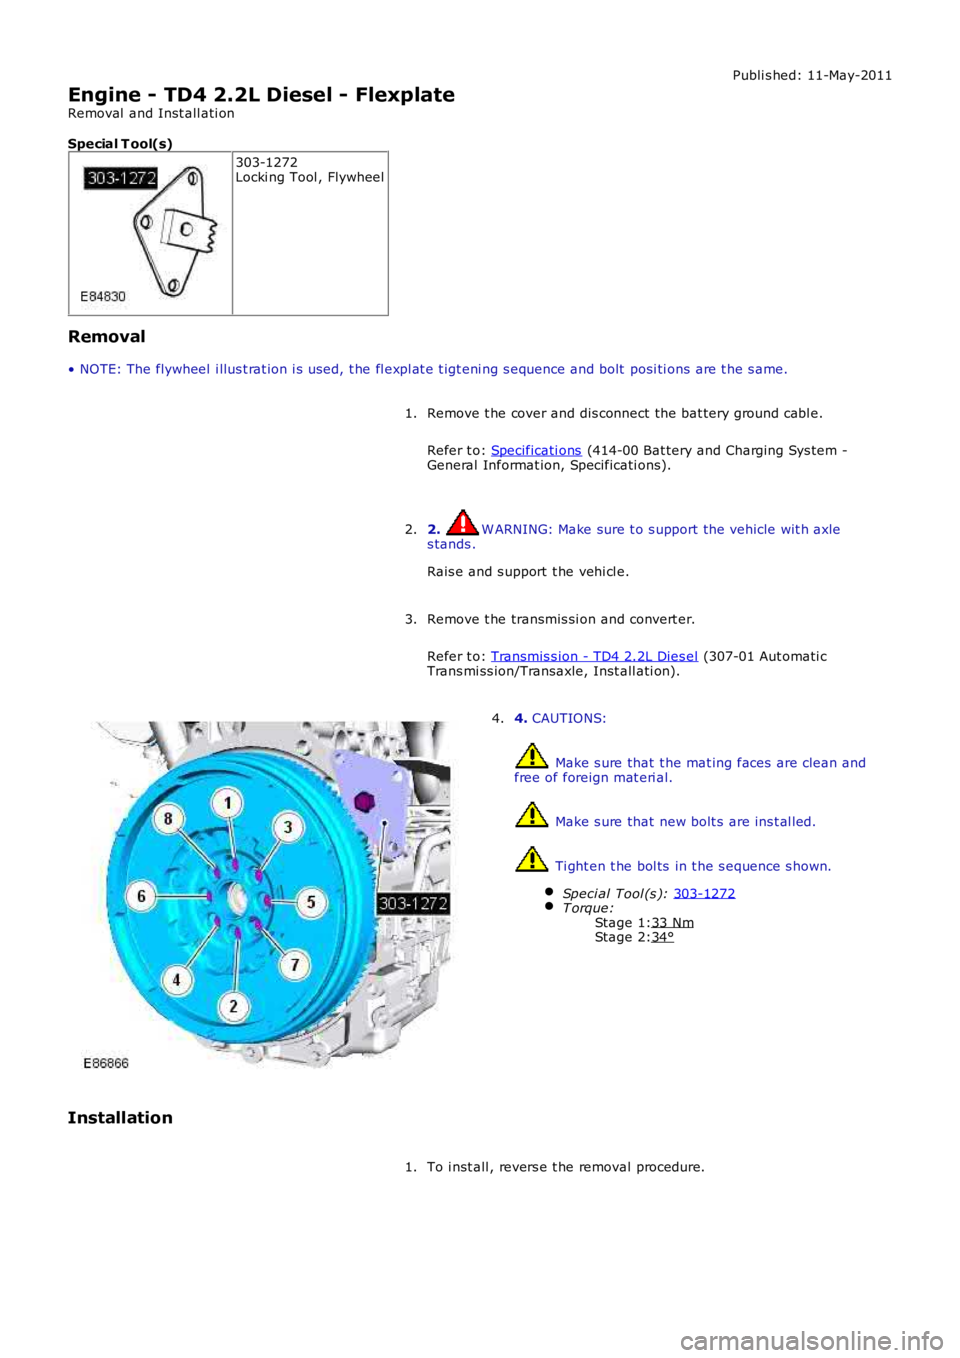
Special T ool(s) 303-1272
Locki ng Tool , Flywheel
Removal
• NOTE: The flywheel i llus t rat ion i s used, t he fl expl at e t igt eni ng s equence and bolt posi ti ons are t he s ame.
Remove t he cover and dis connect the bat tery ground cabl e.
Refer t o: Specificati ons (414-00 Bat tery and Charging Sys tem -
General Informat ion, Specificati ons).
1.
2. W ARNING: Make sure t o s upport the vehicle wit h axle
s tands .
Rais e and s upport t he vehi cl e.
2.
Remove t he transmis si on and convert er.
Refer t o: Transmis s ion - TD4 2.2L Dies el (307-01 Aut omati c
Trans mi ss ion/Transaxle, Inst all ati on).
3. 4.
CAUTIONS: Make s ure that t he mat ing faces are clean and
free of foreign mat eri al. Make s ure that new bolt s are ins t al led.
Ti ght en t he bol ts in t he s equence s hown.
Speci al Tool (s ): 303-1272 T orque:
33 Nm 34°4.
Installation To i nst all , revers e t he removal procedure.
1.
Page 888 of 3229
Publi s hed: 11-May-2011
Engine - TD4 2.2L Diesel - Balance Shaft Assembly
Removal and Inst all ati on
Special T ool(s)
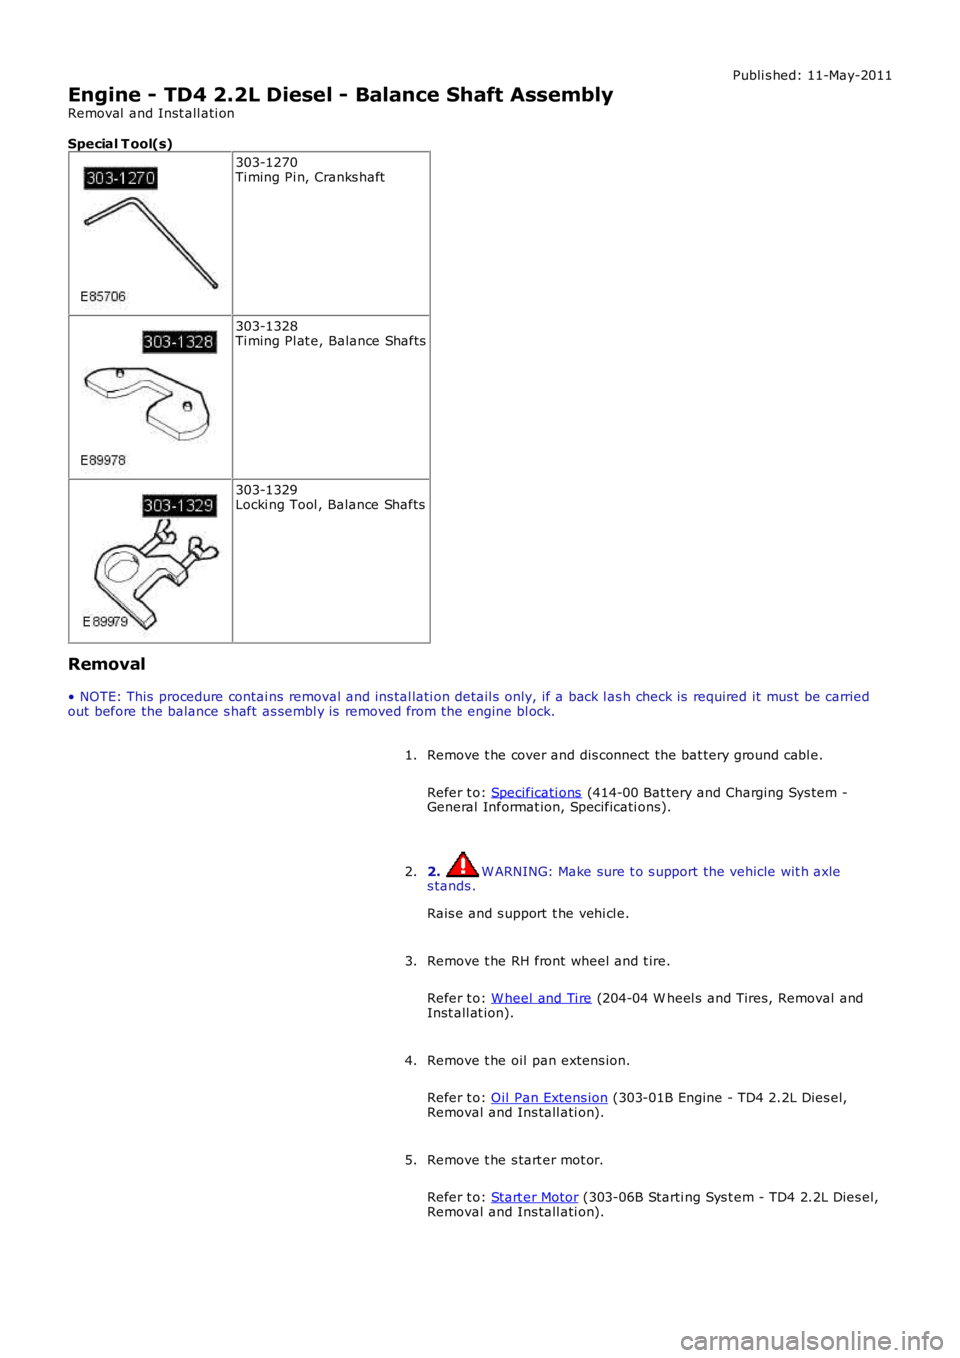
303-1270Ti ming Pi n, Cranks haft
303-1328Ti ming Pl at e, Balance Shafts
303-1329Locki ng Tool , Balance Shafts
Removal
• NOTE: This procedure contai ns removal and ins tal lati on detail s only, if a back l ash check is required it mus t be carriedout before the balance s haft as sembl y is removed from the engine bl ock.
Remove t he cover and dis connect the bat tery ground cabl e.
Refer t o: Specificati ons (414-00 Bat tery and Charging Sys tem -General Informat ion, Specificati ons).
1.
2. W ARNING: Make sure t o s upport the vehicle wit h axles tands .
Rais e and s upport t he vehi cl e.
2.
Remove t he RH front wheel and t ire.
Refer t o: W heel and Ti re (204-04 W heel s and Tires, Removal andInst all at ion).
3.
Remove t he oil pan extens ion.
Refer t o: Oil Pan Extens ion (303-01B Engine - TD4 2.2L Dies el,Removal and Ins tall ati on).
4.
Remove t he s tart er mot or.
Refer t o: Start er Motor (303-06B Starti ng Sys t em - TD4 2.2L Dies el,Removal and Ins tall ati on).
5.
Page 889 of 3229
6.
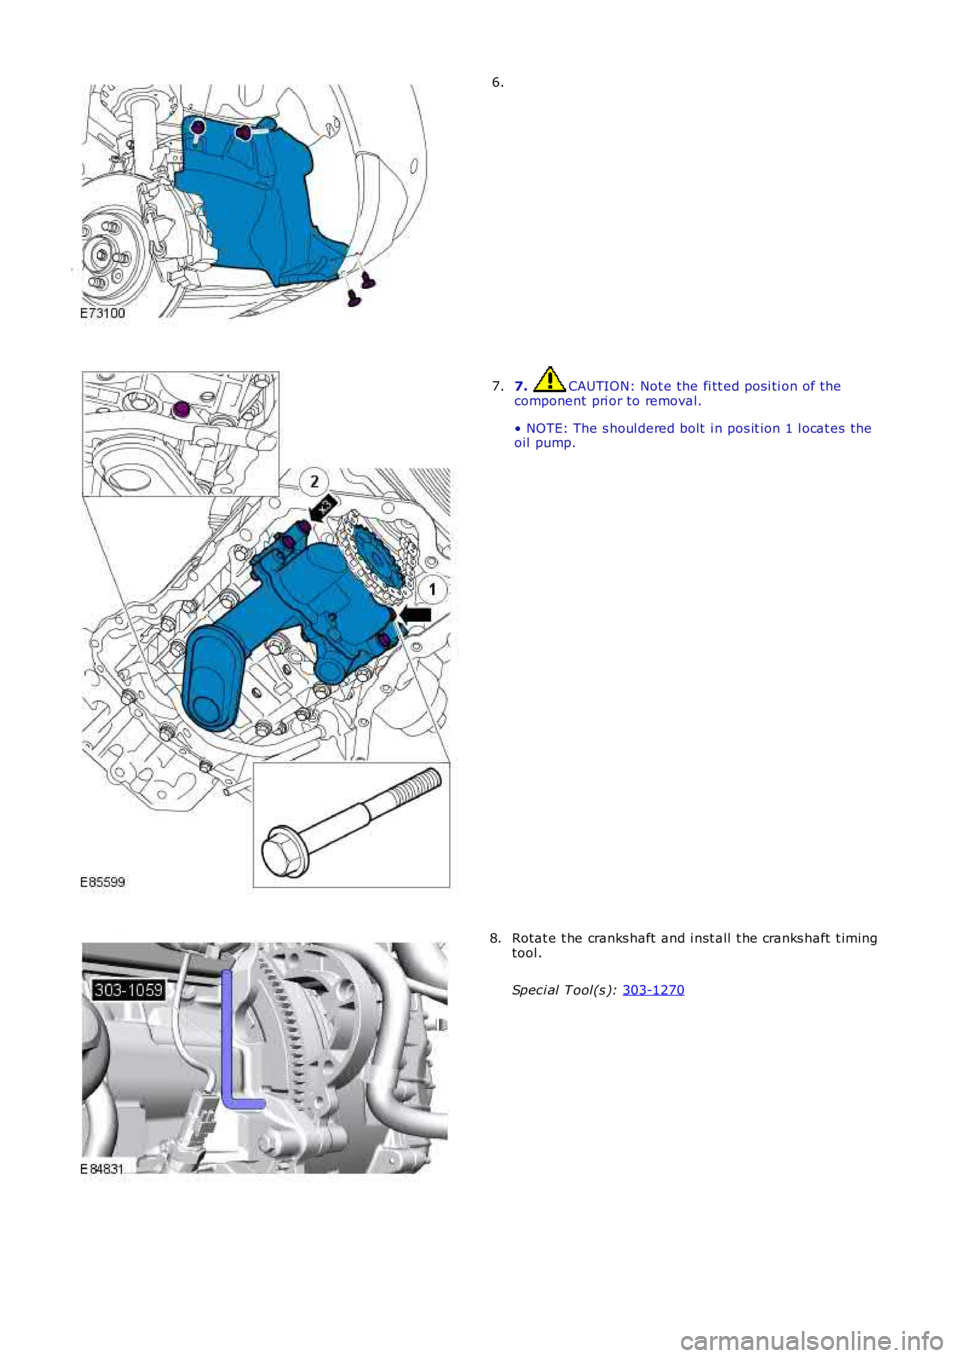
7. CAUTION: Not e the fi tt ed posi ti on of the
component pri or to removal.
• NOTE: The s houl dered bolt i n pos it ion 1 l ocat es the
oil pump.
7. Rotat e t he cranks haft and i nst all t he cranks haft t iming
tool .
Spec i al T ool(s ): 303-1270 8.
Page 890 of 3229
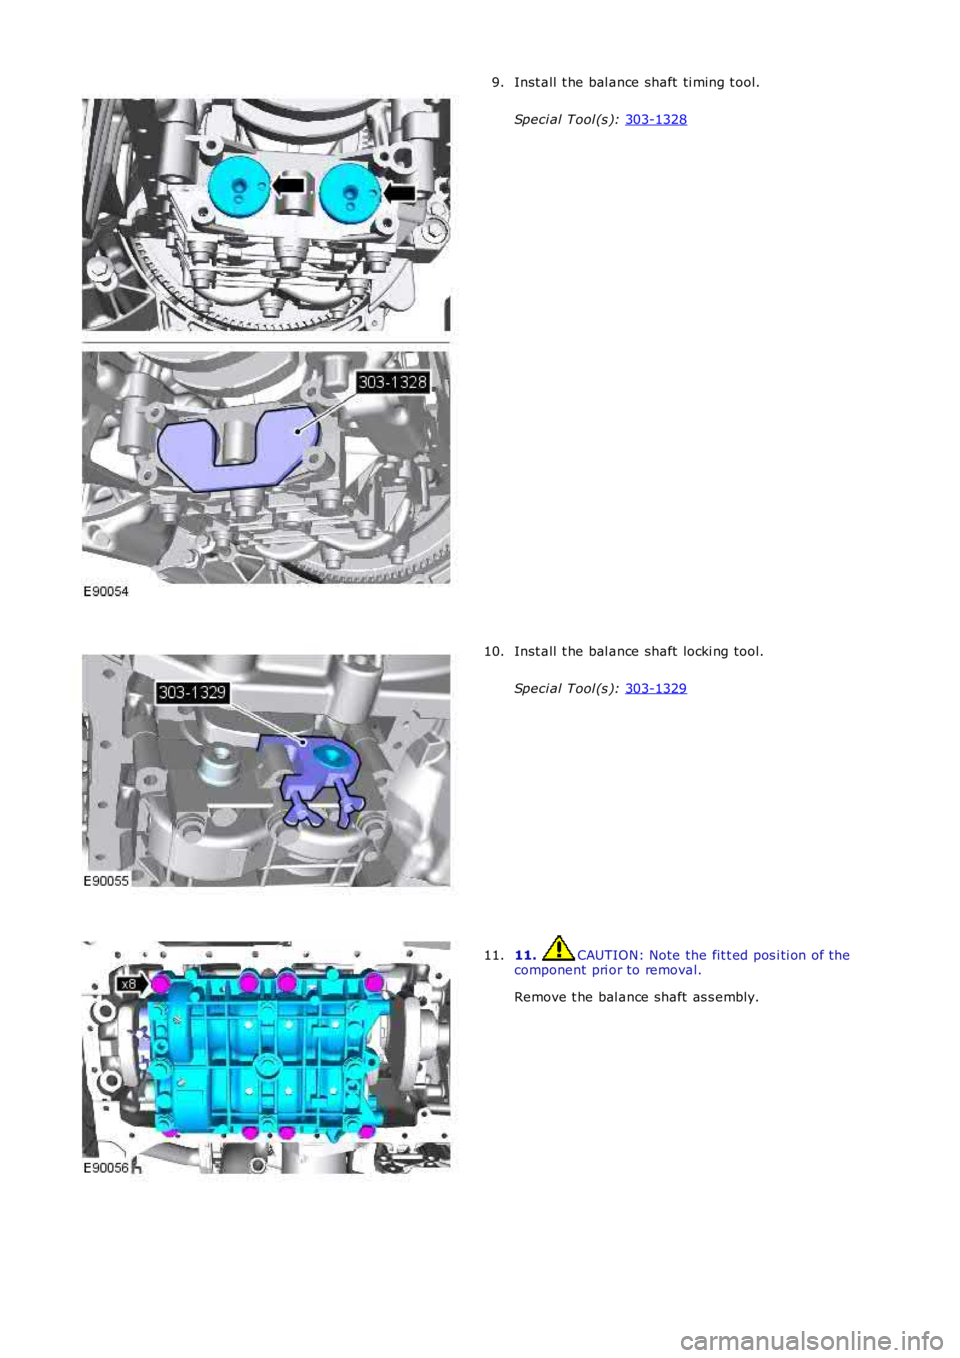
Inst all t he bal ance shaft ti ming t ool.
Speci al Tool (s ): 303-1328 9.
Inst all t he bal ance shaft locki ng tool.
Speci al Tool (s ): 303-1329 10.
11. CAUTION: Note the fit t ed pos i ti on of the
component pri or to removal.
Remove t he bal ance shaft as s embly.
11.
Trending: fuel pump, recommended oil, fuse box, ECO mode, ESP inoperative, oil capacity, suspension
