LEXUS LS430 2003 Factory Repair Manual
Manufacturer: LEXUS, Model Year: 2003,
Model line: LS430,
Model: LEXUS LS430 2003
Pages: 4500, PDF Size: 87.45 MB
LEXUS LS430 2003 Factory Repair Manual
LS430 2003
LEXUS
LEXUS
https://www.carmanualsonline.info/img/36/57050/w960_57050-0.png
LEXUS LS430 2003 Factory Repair Manual
Trending: vacuum switching valve, ESP, Air Conditioning Compressor, fuel filter, service interval, air bleeding, immobilizer
Page 1581 of 4500
Page 1582 of 4500
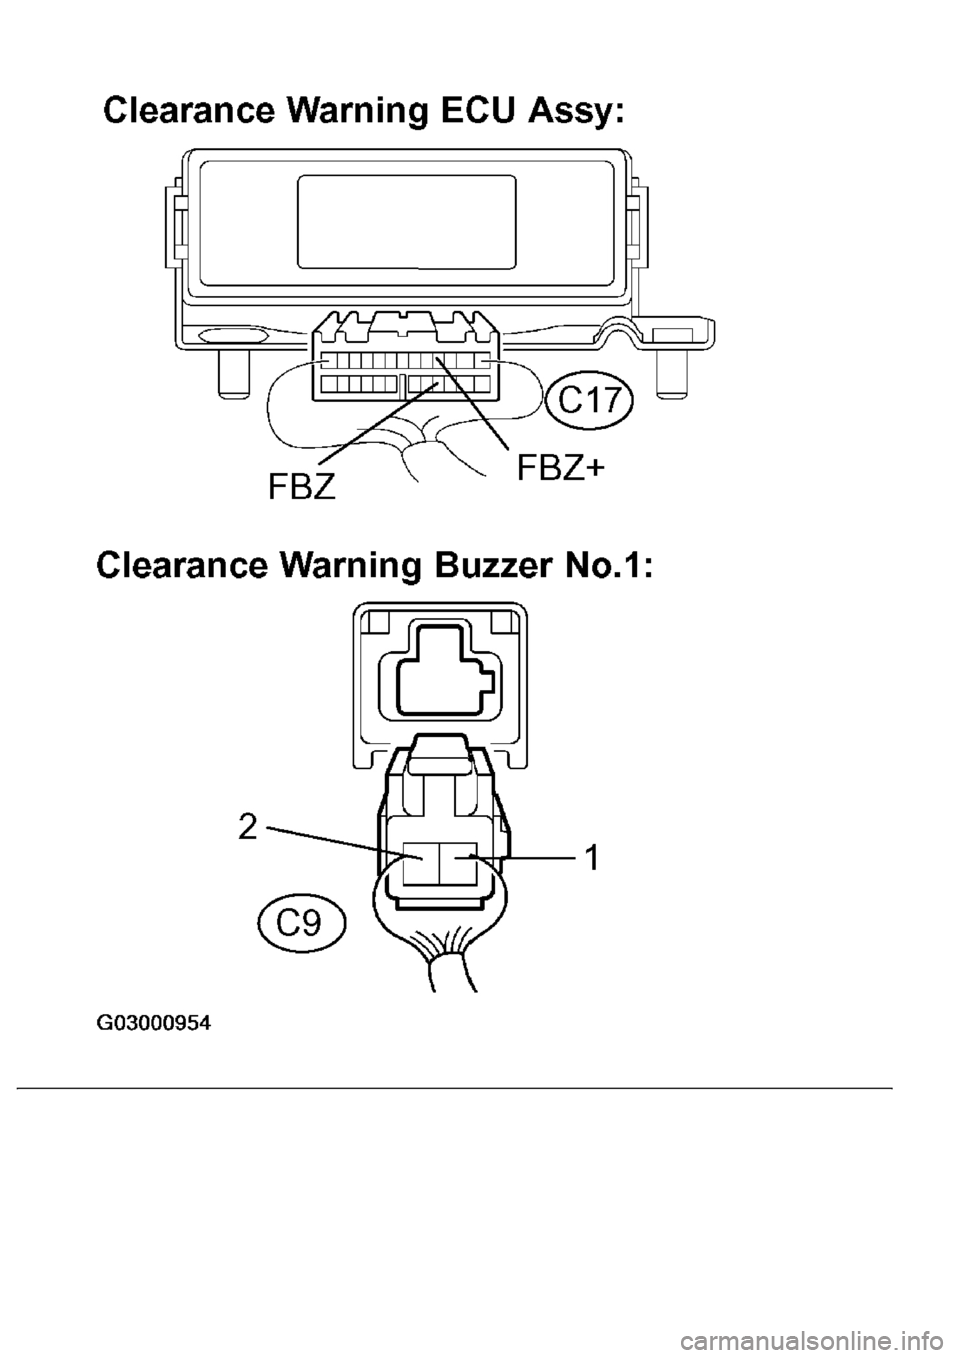
Fig. 69: Identifying Clearance Warning ECU Assy Terminals
Courtesy of TOYOTA MOTOR SALES, U.S.A., INC.
NG: REPAIR OR REPLACE HARNESS OR CONNECTOR
OK: Go To Next Step.
3.REPLACE CLEARANCE WARNING BUZZER NO.1
a. Replace clearance warning buzzer No.1 with a new one.
b. Check clearance warning buzzer No.1.
Perform ACTIVE TEST following the same procedure as for step 1.
OK: Malfunction disappears (Clearance warning buzzer No.1 sounds).
OK: NORMAL
NG: PROCEED TO NEXT CIRCUIT INSPECTION SHOWN IN PROBLEM SYMPTOMS
TABLE
CIRCUIT DESCRIPTION
The clearance warning ECU assy receives the ultrasonic sensor signal to sound the clearance warning buzzer.
WIRING DIAGRAM
Page 1583 of 4500
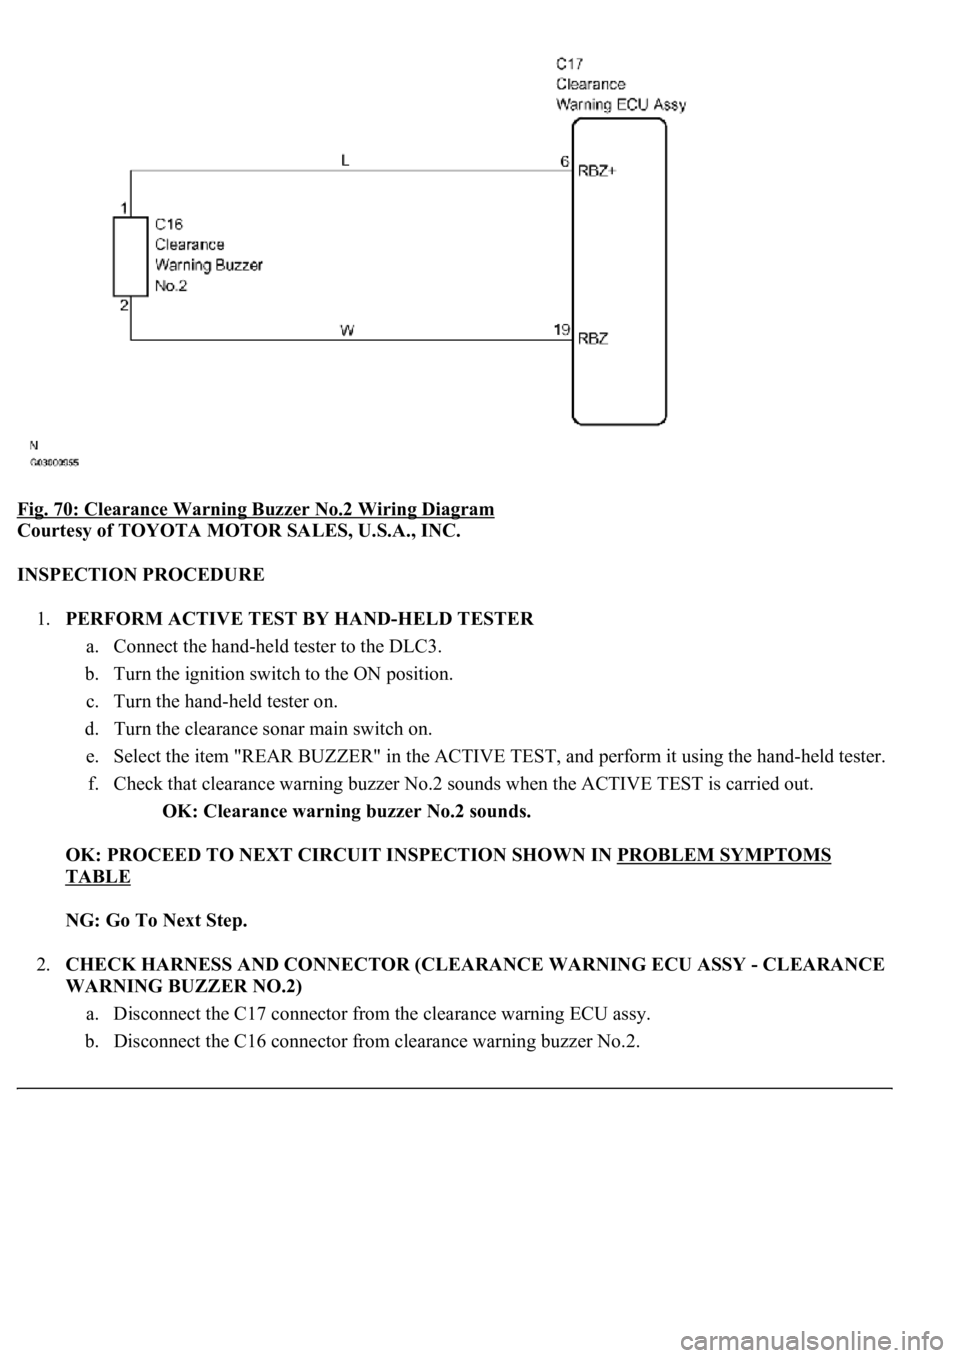
Fig. 70: Clearance Warning Buzzer No.2 Wiring Diagram
Courtesy of TOYOTA MOTOR SALES, U.S.A., INC.
INSPECTION PROCEDURE
1.PERFORM ACTIVE TEST BY HAND-HELD TESTER
a. Connect the hand-held tester to the DLC3.
b. Turn the ignition switch to the ON position.
c. Turn the hand-held tester on.
d. Turn the clearance sonar main switch on.
e. Select the item "REAR BUZZER" in the ACTIVE TEST, and perform it using the hand-held tester.
f. Check that clearance warning buzzer No.2 sounds when the ACTIVE TEST is carried out.
OK: Clearance warning buzzer No.2 sounds.
OK: PROCEED TO NEXT CIRCUIT INSPECTION SHOWN IN PROBLEM SYMPTOMS
TABLE
NG: Go To Next Step.
2.CHECK HARNESS AND CONNECTOR (CLEARANCE WARNING ECU ASSY - CLEARANCE
WARNING BUZZER NO.2)
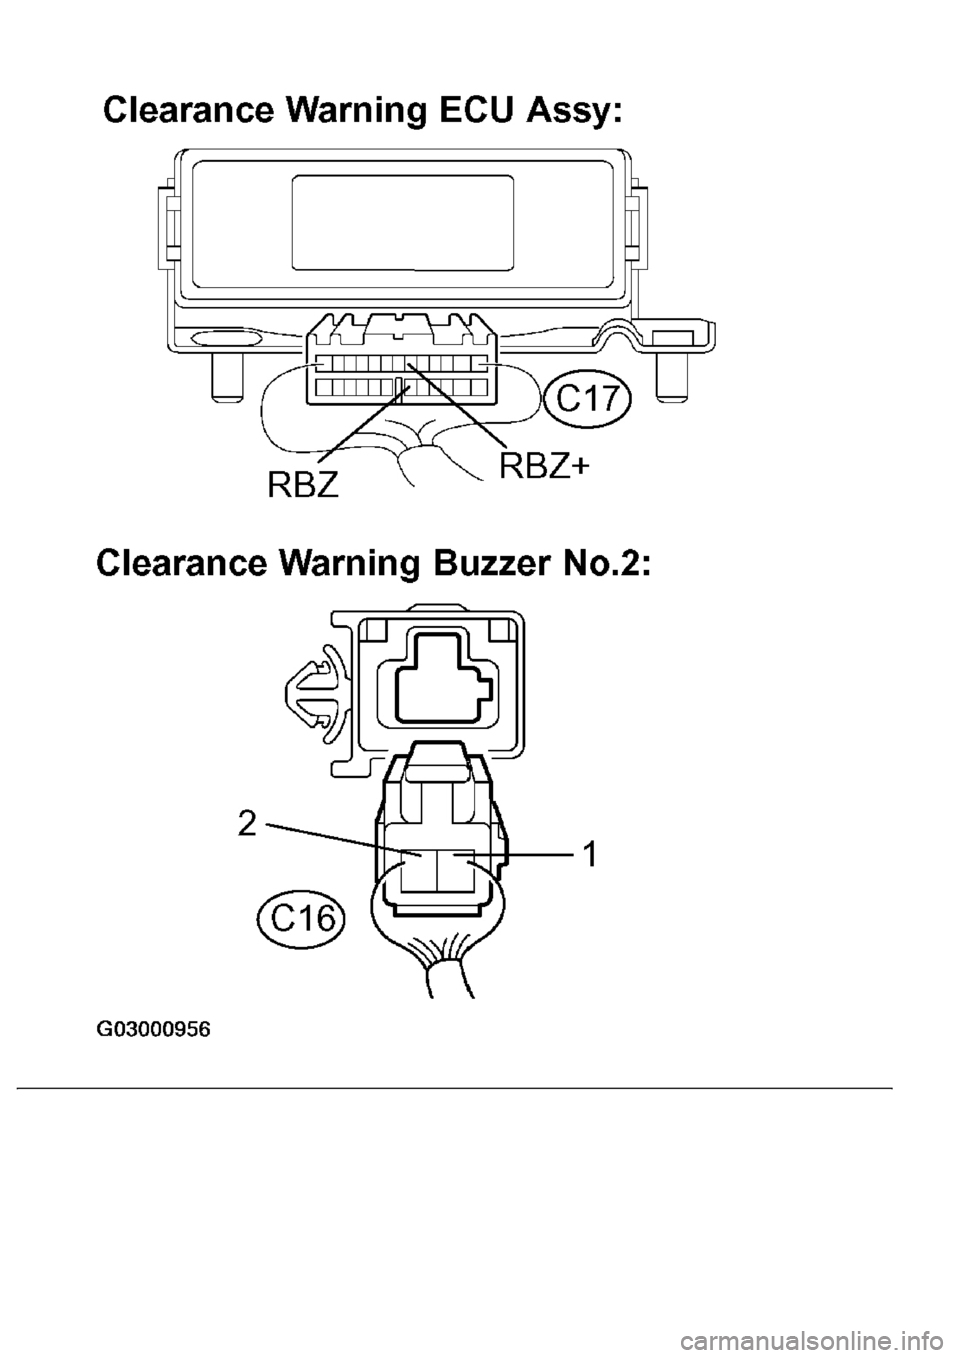
a. Disconnect the C17 connector from the clearance warning ECU assy.
b. Disconnect the C16 connector from clearance warning buzzer No.2.
Page 1584 of 4500
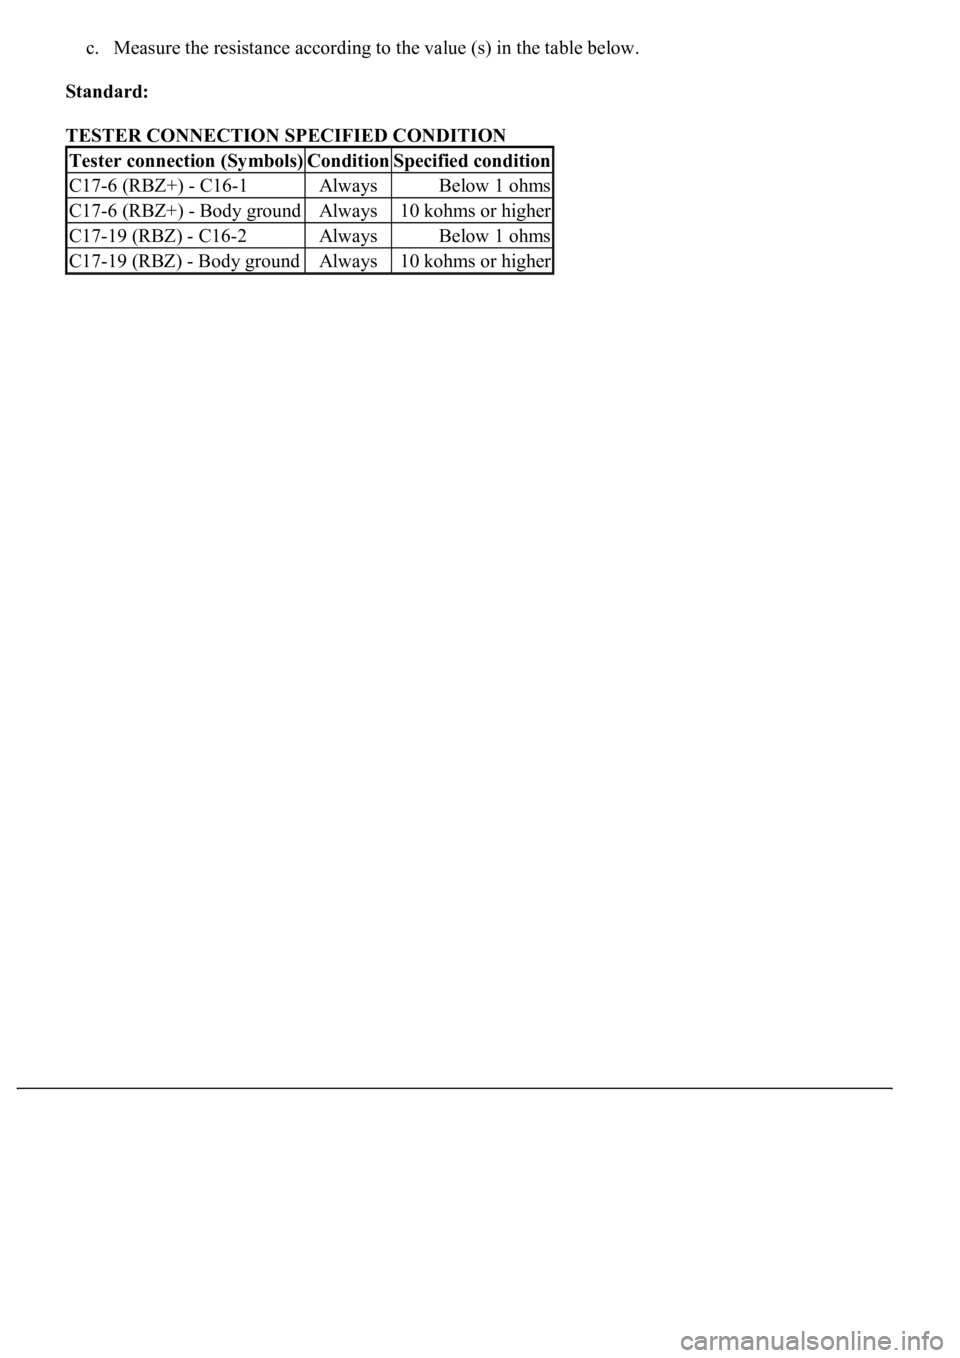
c. Measure the resistance according to the value (s) in the table below.
Standard:
TESTER CONNECTION SPECIFIED CONDITION
Tester connection (Symbols)ConditionSpecified condition
C17-6 (RBZ+) - C16-1AlwaysBelow 1 ohms
C17-6 (RBZ+) - Body groundAlways10 kohms or higher
C17-19 (RBZ) - C16-2AlwaysBelow 1 ohms
C17-19 (RBZ) - Body groundAlways10 kohms or higher
Page 1585 of 4500
Page 1586 of 4500
Fig. 71: Identifying Clearance Warning ECU Assy Terminals
Courtesy of TOYOTA MOTOR SALES, U.S.A., INC.
NG: REPAIR OR REPLACE HARNESS OR CONNECTOR
OK: Go To Next Step.
3.REPLACE CLEARANCE WARNING BUZZER NO.2
a. Replace clearance warning buzzer No.2 with a new one.
b. Check clearance warning buzzer No.2.
Perform ACTIVE TEST following the same procedure as for step 1.
OK: Malfunction disappears (Clearance warning buzzer No.2 sounds).
OK: NORMAL
NG: PROCEED TO NEXT CIRCUIT INSPECTION SHOWN IN PROBLEM SYMPTOMS
TABLE
Page 1587 of 4500
FRONT POWER SEAT CONTROL SYSTEM INDEX
System NameSee Procedure
Front Power Seat Control SystemINITIALIZATION
Page 1588 of 4500
Fig. 1: Locating Climate Control Seat System Components (1 Of 2)
Courtesy of TOYOTA MOTOR SALES, U.S.A., INC.
Page 1589 of 4500
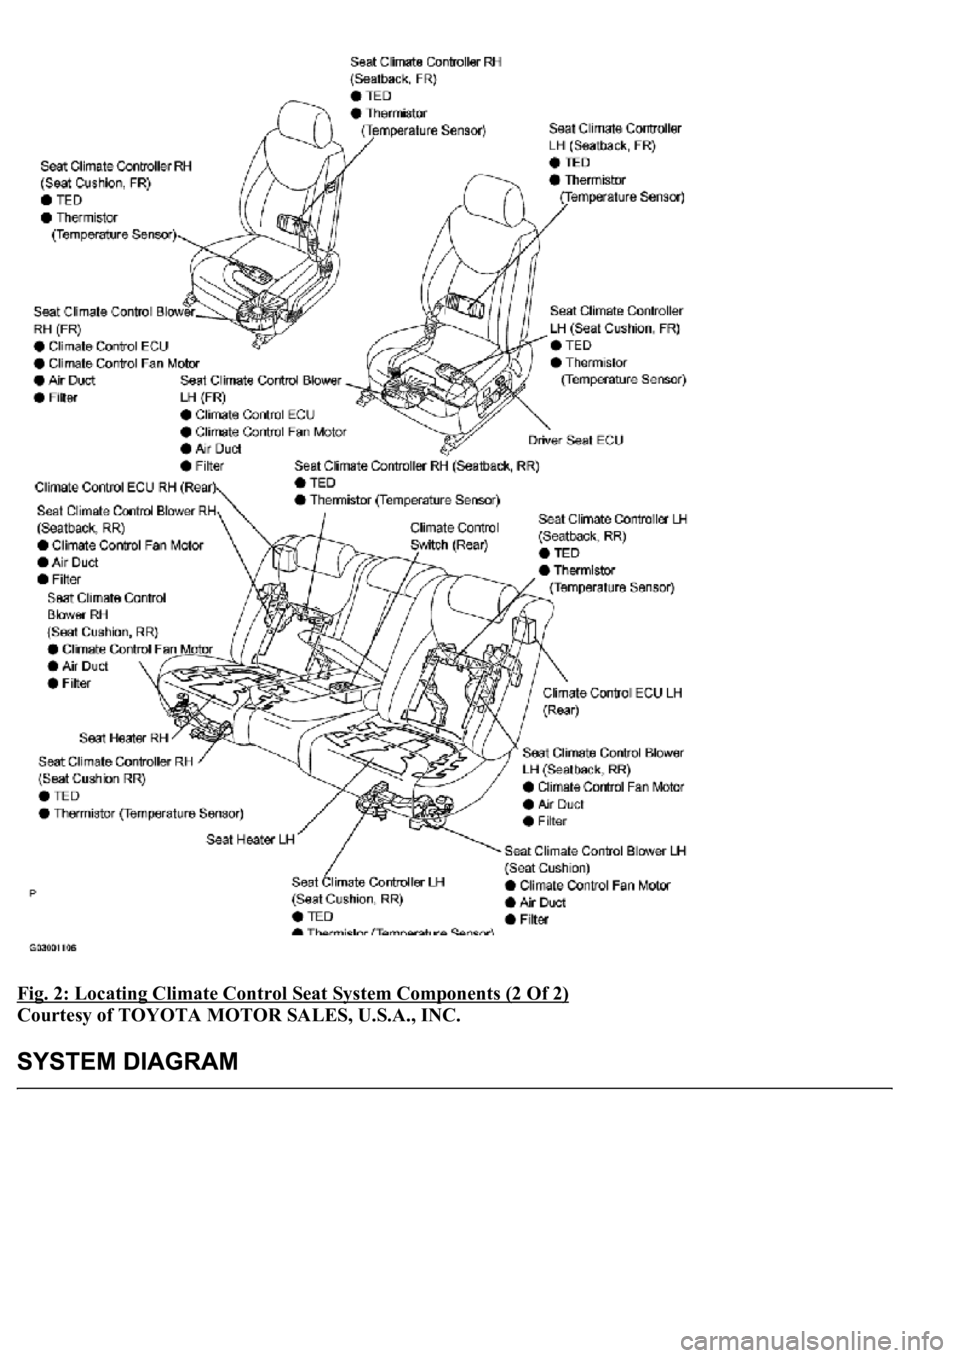
Fig. 2: Locating Climate Control Seat System Components (2 Of 2)
Courtesy of TOYOTA MOTOR SALES, U.S.A., INC.
Page 1590 of 4500
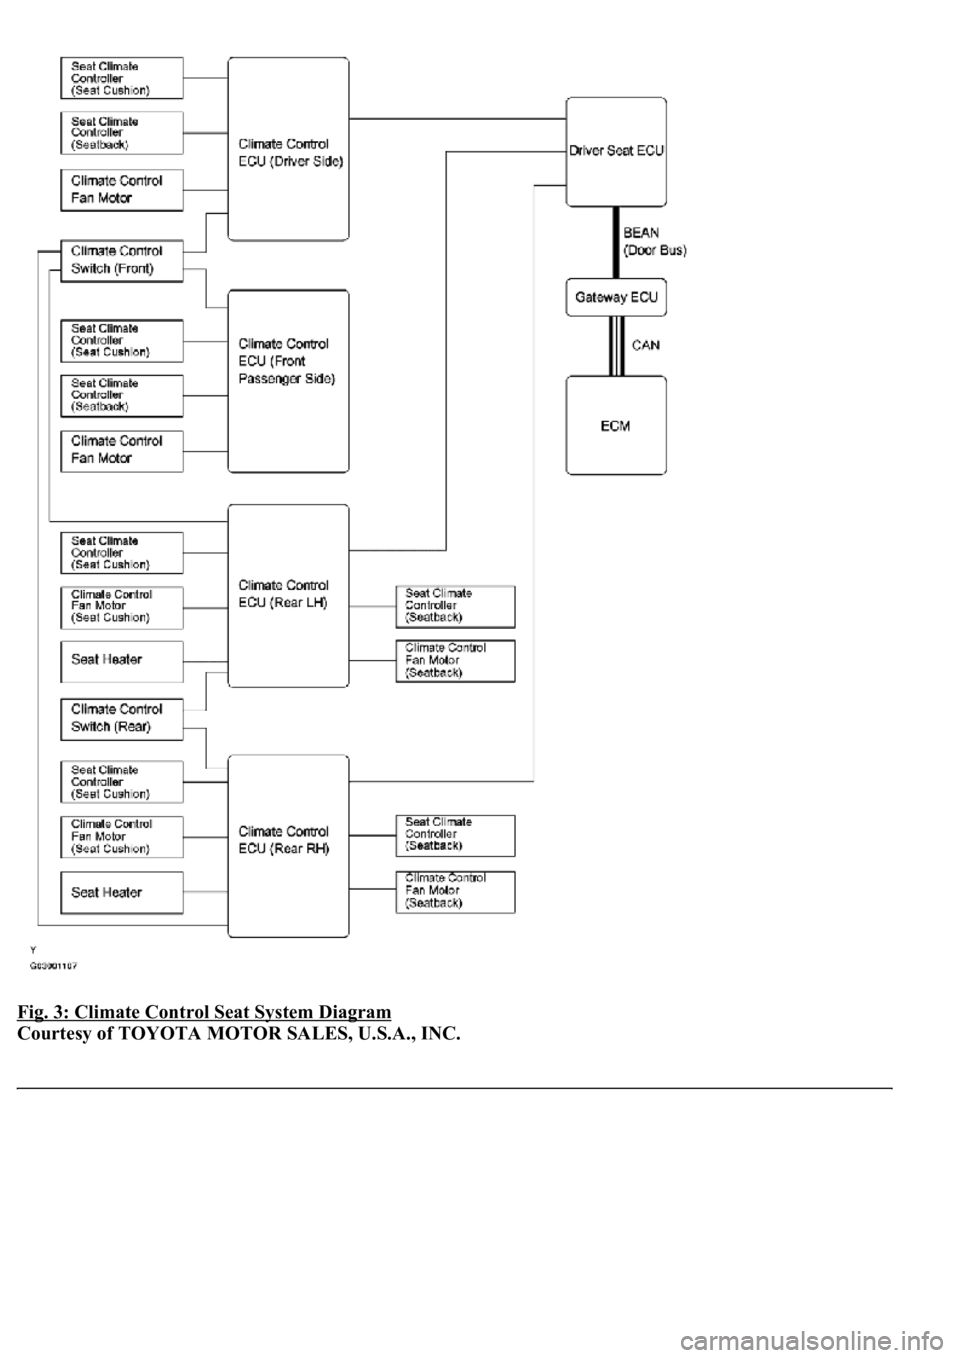
Fig. 3: Climate Control Seat System Diagram
Courtesy of TOYOTA MOTOR SALES, U.S.A., INC.
Trending: fuses, cooling, parking brake, Control actuator, air bleeding, wheel, light
