LEXUS LS430 2003 Factory Repair Manual
Manufacturer: LEXUS, Model Year: 2003, Model line: LS430, Model: LEXUS LS430 2003Pages: 4500, PDF Size: 87.45 MB
Page 221 of 4500

Fig. 16: Connecting Hand-Held Tester To DLC3
Courtesy of TOYOTA MOTOR SALES, U.S.A., INC.
HINT:
Refer to the intelligent tester II operator's manual for further details.
1.ACTUATOR CHECK
a. Turn the ignition switch to the ON position while pressing the A/C control AUTO switch and R/F
(Recirculation / Fresh) switch simultaneously.
b. Press the R/F (Recirculation / Fresh) switch.
c. As each damper, motor and relay automatically operate the actuator check at 1 second intervals
from STEP No. 1 to No. 10 continuousl
y, check the temperature and air flow visually and by hand.
Page 222 of 4500
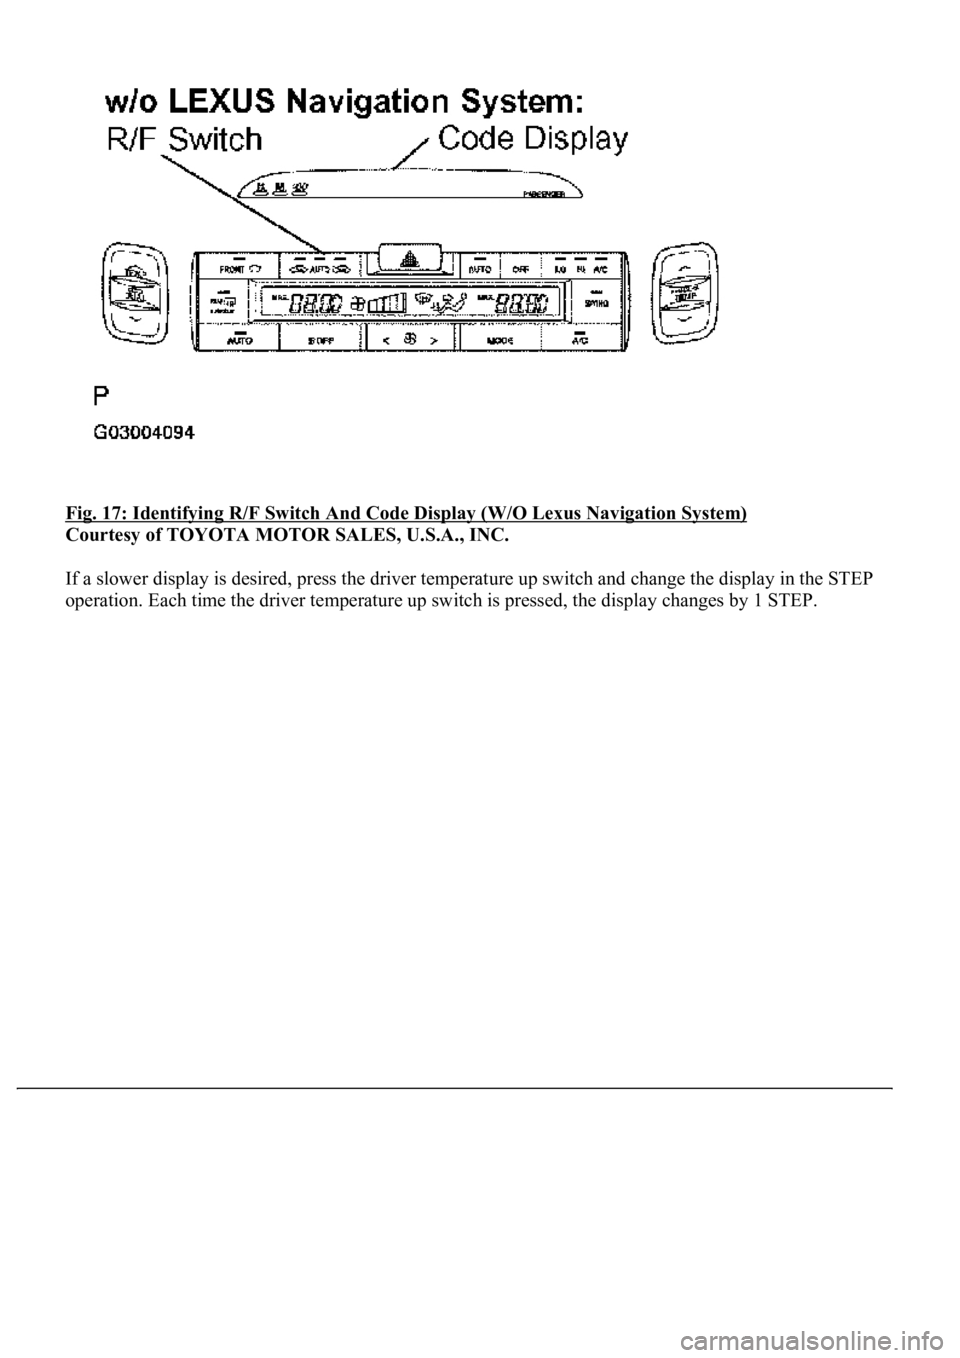
Fig. 17: Identifying R/F Switch And Code Display (W/O Lexus Navigation System)
Courtesy of TOYOTA MOTOR SALES, U.S.A., INC.
If a slower display is desired, press the driver temperature up switch and change the display in the STEP
operation. Each time the driver temperature up switch is pressed, the display changes by 1 STEP.
Page 223 of 4500
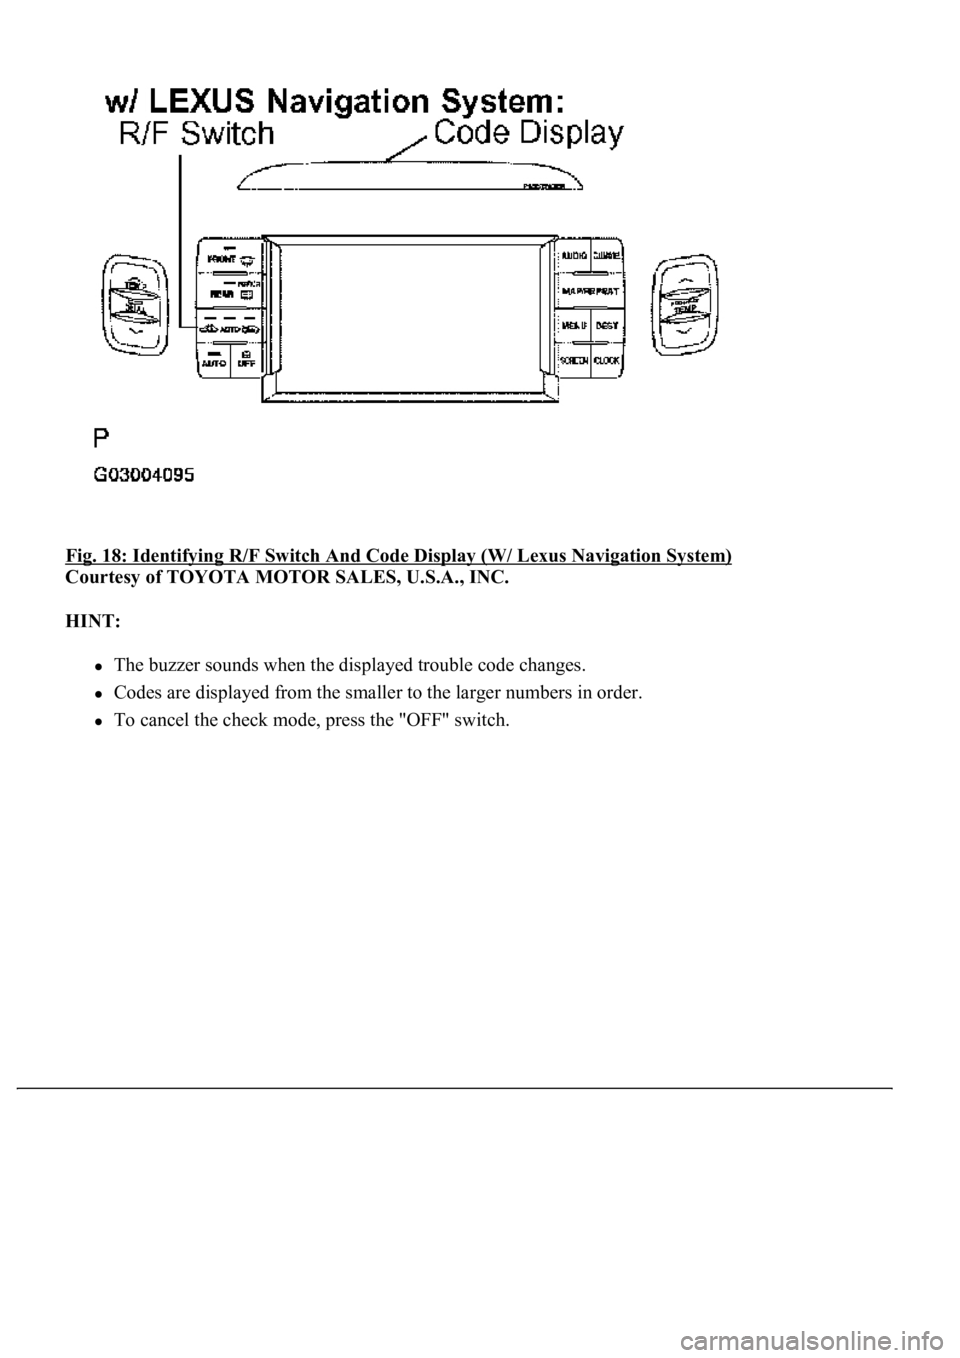
Fig. 18: Identifying R/F Switch And Code Display (W/ Lexus Navigation System)
Courtesy of TOYOTA MOTOR SALES, U.S.A., INC.
HINT:
<0037004b0048000300450058005d005d0048005500030056005200580051004700560003005a004b0048005100030057004b004800030047004c00560053004f0044005c00480047000300570055005200580045004f004800030046005200470048000300
46004b00440051004a00480056001100030003[
Codes are displayed from the smaller to the larger numbers in order.
To cancel the check mode, press the "OFF" switch.
Page 224 of 4500
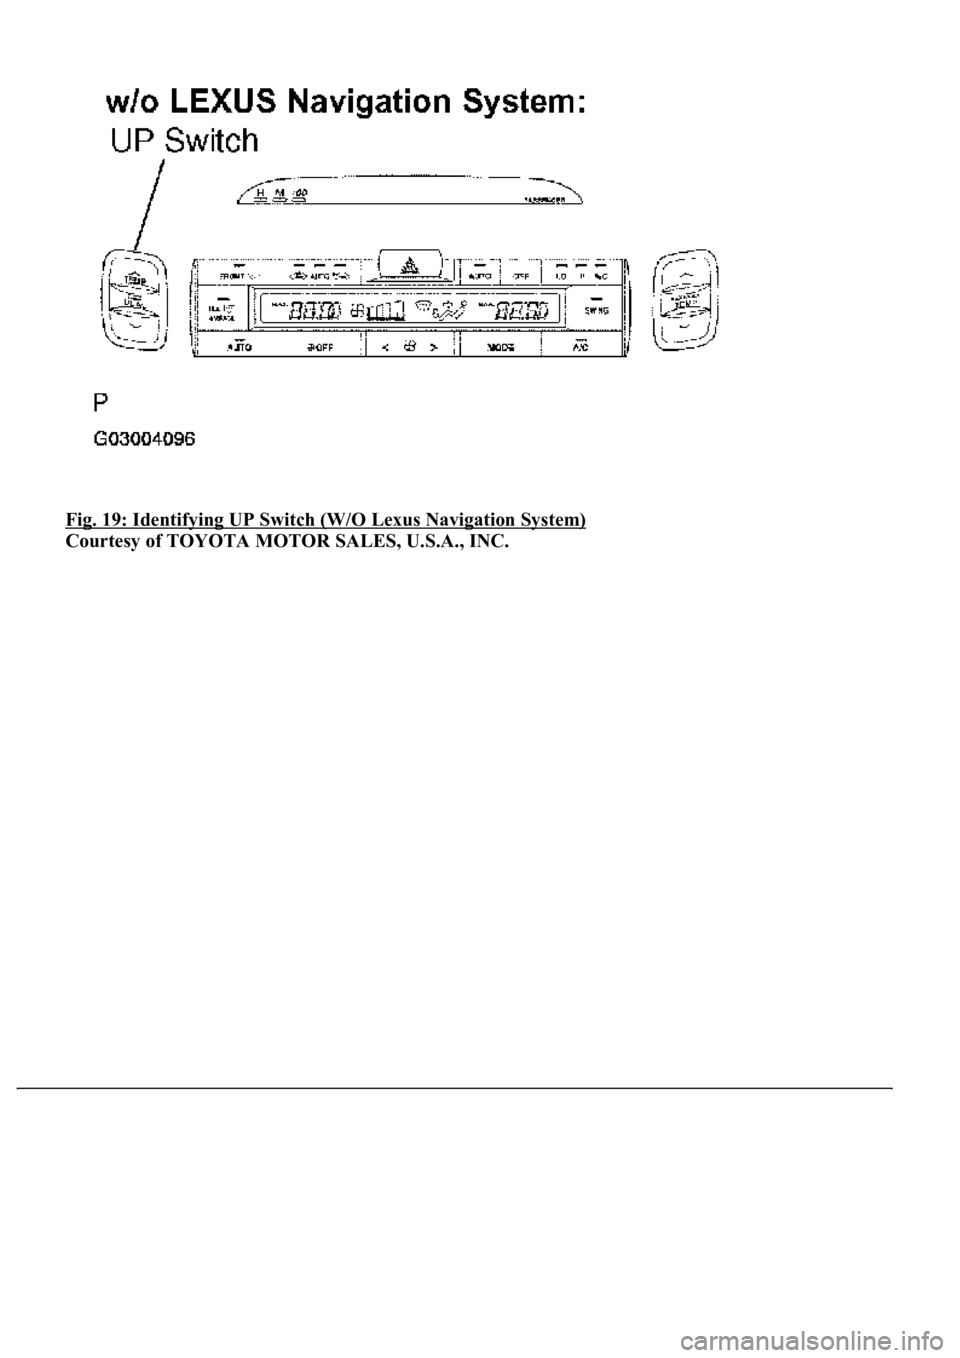
Fig. 19: Identifying UP Switch (W/O Lexus Navigation System)
Courtesy of TOYOTA MOTOR SALES, U.S.A., INC.
Page 225 of 4500
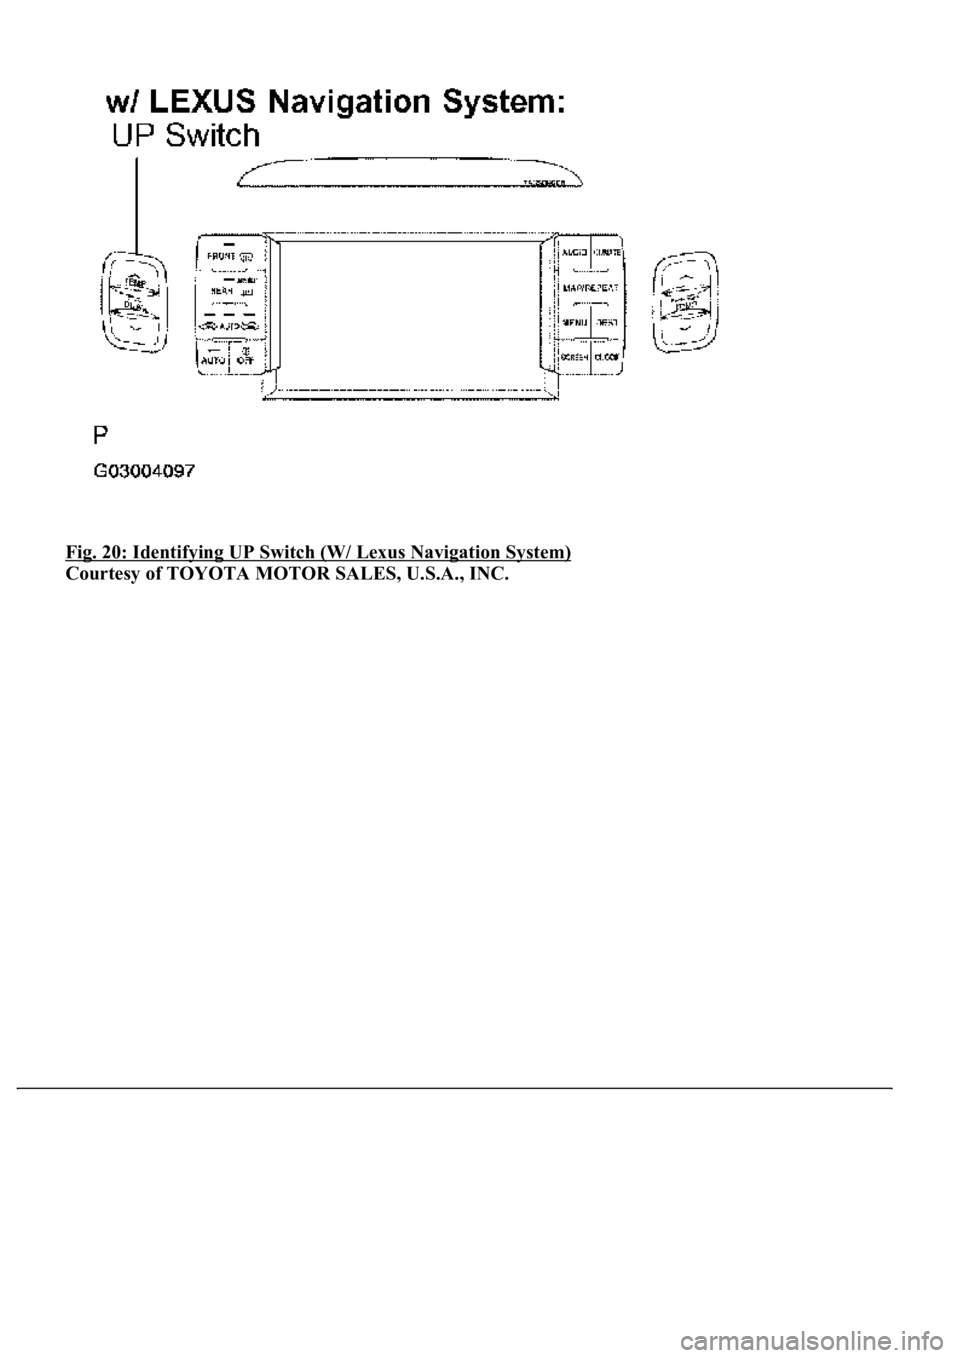
Fig. 20: Identifying UP Switch (W/ Lexus Navigation System)
Courtesy of TOYOTA MOTOR SALES, U.S.A., INC.
Page 226 of 4500
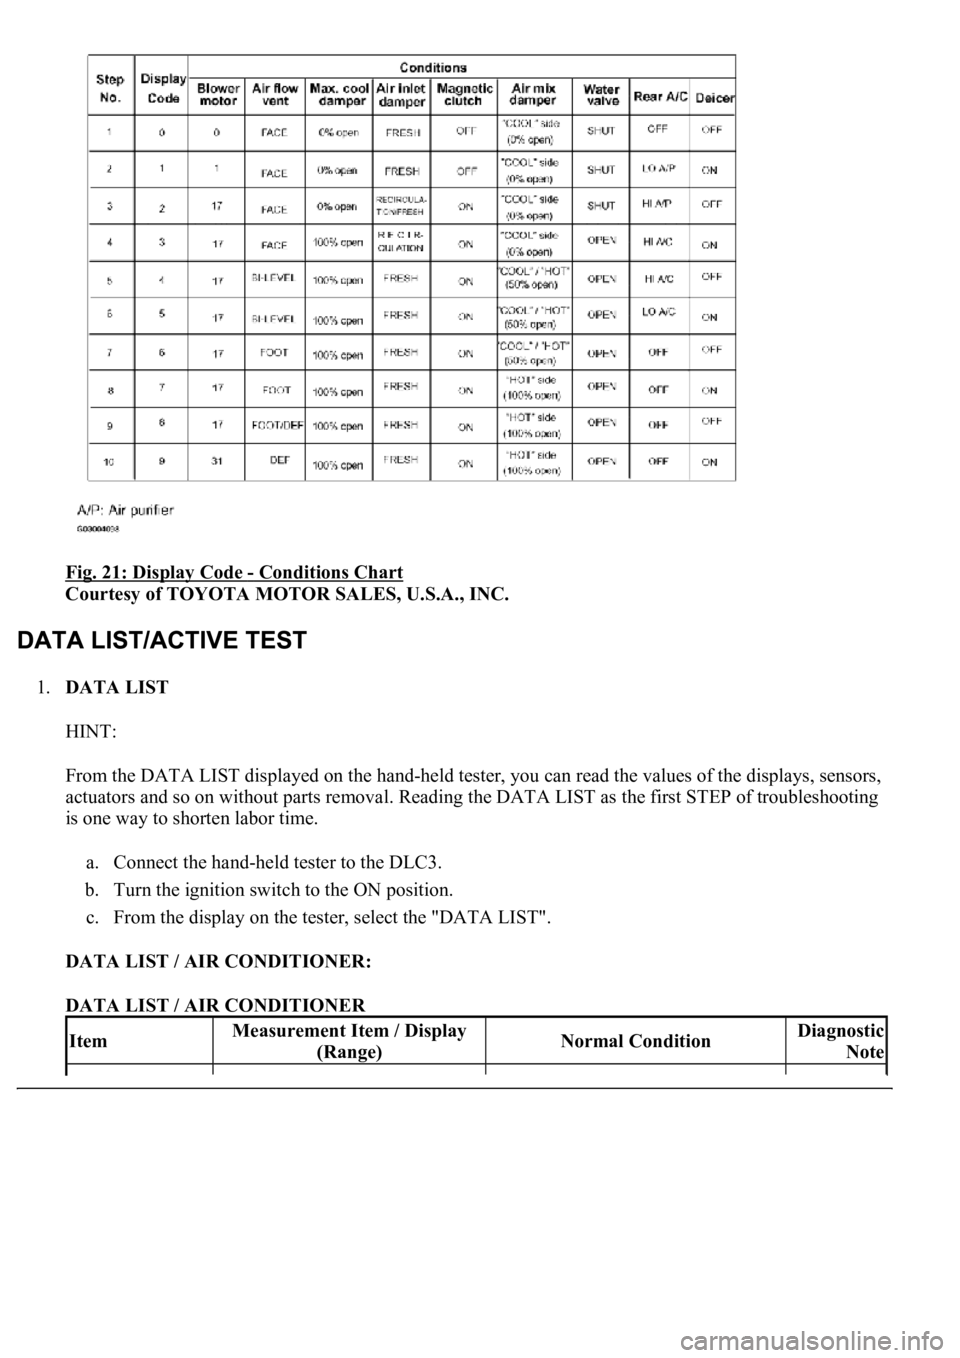
Fig. 21: Display Code - Conditions Chart
Courtesy of TOYOTA MOTOR SALES, U.S.A., INC.
1.DATA LIST
HINT:
From the DATA LIST displayed on the hand-held tester, you can read the values of the displays, sensors,
actuators and so on without parts removal. Reading the DATA LIST as the first STEP of troubleshooting
is one way to shorten labor time.
a. Connect the hand-held tester to the DLC3.
b. Turn the ignition switch to the ON position.
c. From the display on the tester, select the "DATA LIST".
DATA LIST / AIR CONDITIONER:
DATA LIST / AIR CONDITIONER
ItemMeasurement Item / Display
(Range)Normal ConditionDiagnostic
Note
Page 227 of 4500

ROOM TEMP
Room temperature sensor / min.: -
6.5°C (20.3°F) max.: 57.25°C
(126.95°F)
Actual room temperature is displayed-
AMBI TEMP
SENSAmbient temperature sensor /
min.: -23.3°C (-9.94°F) max.:
65.95°C (150.71°F)Actual ambient temperature is
displayed-
EVAP TEMP
Evaporator temperature sensor /
min.: -29.7°C (-21.46°F) max.:
59.55°C (139.19°F)Actual evaporator temperature is
displayed-
SOLAR SENS-DSolar sensor (Driver side) / min.:
0 max.: 255Increases as brightness increases-
SOLAR SENS-PSolar sensor (Passenger side) /
min.: 0 max.: 255decreases as brightness increases-
COOLANT
TEMPEngine coolant temperature /
min.: 1.3°C (34.34°F) max.:
90.55°C (194.99°F)Actual engine coolant temperature is
displayed while the engine is warmed
up
-
DUCT TEMP-D
Duct sensor (Driver side) / min.: -
12.7°C (9.14°F) max.: 76.55°C
(169.79°F)Actual duct temperature is displayed
(Driver side)-
DUST TEMP-P
Duct sensor (Passenger side) /
min.: -12.7°C (9.14°F) max.:
76.55°C (169.79°F)Actual duct temperature is displayed
(Passenger side)-
SET TEMP-DSet temperature (Driver side) /
min.: 0 max.: 255Actual set temperature is displayed
(Driver side)-
SET TEMP-PSet temperature (Passenger
side) /min.: 0 max.: 255Actual set temperature is displayed
(Passenger side)-
ESTIMATE
TEMP-DEstimated temperature (Driver
side) / min.: -358.4°C (-613.12°F)
max.: 358.4°C (677.12°F)Actual estimated temperature is
displayed (Driver side)-
ESTIMATE
TEMP-PEstimated temperature (Passenger
side) / min.: -358.4°C (-613.12°F)
max.: 358.4°C (677.12°F)Actual estimated temperature is
displayed (Passenger side)-
A/I DAMP POSAir inlet damper position / min.: -
14% max.: 113.5%RECIRCULATION: Approx. 0%
FRESH: Approx. 100%-
A/B DAMP POS-
DCool air bypass damper position
(Driver side) / min.: -14% max.:
113.5%OPEN: Approx. 0 % SHUT: Approx.
100%-
A/B DAMP POS-
PCool air bypass damper position
(Passenger side) / min.: -14%
max.: 113.5%OPEN: Approx. 0 % SHUT: Approx.
100%-
ItemMeasurement Item / Display
(Range)Normal ConditionDiagnostic
Note
A/I DAMP
TARGAir inlet damper target / min.: -
14% max.: 113.5%RECIRCULATION: Approx. 0%
FRESH: Approx. 100% HALF-
RECIRCULATION: 43 to 99.5 %
-
Page 228 of 4500

AIR MIX STEP-
DAir mix servomotor target STEP
(Driver side) / min.: 257 STEP
max.: 1571 STEPMAX COOL: Approx. 257 STEP
MAX HOT: Approx. 1,571 STEP-
AIR MIX STEP-
PAir mix servomotor target STEP
(Passenger side) / min.: 257 STEP
max.: 1571 STEPMAX COOL: Approx. 257 STEP
MAX HOT: Approx. 1,571 STEP-
AIR OUT STEP-
DAir outlet servomotor target STEP
(Driver side) / min.: 274 STEP
max.: 2060 STEPFACE: Approx. 274 STEP DEF:
Approx. 2,060 STEP-
AIR OUT STEP-
PAir outlet servomotor target STEP
(Passenger side) / min.: 274 STEP
max.: 2060 STEPFACE: Approx. 274 STEP DEF:
Approx. 2,060 STEP-
HAND FREE
TELHand free telephone / OFF, ON--
BLOWER
LEVELBlower motor speed level / min.:
0 level max.: 31 levelIncreases in the range between 0 and
31 as the speed increase-
AMBI TEMP
Adjusted ambient temperature /
min.: -30.8°C (-23.44°F) max.:
50.8°C (123.44°F)
--
LOW VOLT
COUNT+B abnormal low voltage / min.: 0
times max.: 255 times--
EMISS GAS
SENSEmission gas / min.: 0 V max.:
255 VIncreases as the gas amount increases-
SET TEMP
SHIFTShift set temperature / +2C, +1C,
NORMAL, -1C, -2CCustomized value will be displayed-
AIR INLET
MODEAir inlet mode / AUTO,
MANUALCustomized value will be displayed-
COMPRESSOR
MODECompressor mode / AUTO,
MANUALCustomized value will be displayed-
COMPRS/DEF
OPERCompressor/ DEF operation
mode /LINK, NORMALCustomized value will be displayed-
MOTOR
INITIALIZEMotor initialize after IG SW being
turned OFFCustomized value will be displayed-
EVAP CTRLEvaporator control /AUTO,
MANUALCustomized value will be displayed-
GAS SENS
SHIFT
Emission Gas Sensor Shift / MU
MORE, MORE, LI MORE,
NORMAL, LI LESS, LESS, MU
LESS
Customized value will be displayed-
AUTO MODESwing resister auto mode /
AUTO, MANUALCustomized value will be displayed-
BUTTON PRS
BUZButton press buzzer / ON, OFFCustomized value will be displayed-
FILTER SENSFilter sensor / LESS, NORMAL,
MORECustomized value will be displayed-
Page 229 of 4500

DATA LIST / ENGINE AND ECT / ALL:
DATA LIST / ENGINE AND ECT / ALL
2.ACTIVE TEST
HINT:
Performing the ACTIVE TEST
using the hand-held tester allows the relays, VSV, actuators and so on to
operate without parts removal. Performing the ACTIVE TEST
as the first STEP of troubleshooting is
one way to shorten labor time.
It is possible to display the DATA LIST on the hand-held tester during the ACTIVE TEST.
a. Connect the hand-held tester to the DLC3.
b. Turn the ignition switch to the ON position.
c. From the display on tester, perform the "ACTIVE TEST
".
ACTIVE TEST / AIR CONDITIONER:
ACTIVE TEST / AIR CONDITIONER
FOOT AIR
LEAKFoot air leak / ON, OFFCustomized value will be displayed-
DESTINATION
Destination / DOMEST, USA,
EUROPE, AUSTRAL,
MIDEAST, NO INFO
Changes with destinations-
REAR SOLAR
SENSRear solar sensor / min.: 0 max.:
255Changes depending on brightness-
NOX GAS SENSEmission gas Nox sensor / min.: 0
max.: 255Increases as the gas amount increases-
ItemMeasurement Item / Display
(Range)Normal ConditionDiagnostic
Note
REG PRESS
SENSRegulator pressure sensor / min.:
0 max.: 255Actual regulator pressure is displayed-
FILTER FLOW
VOLFilter flow volume / min.: 0 max.:
65535Actual filter flow volume is displayed-
REG CTRL
CURRNTRegulator control current / min.: 0
A max.: 255 A--
HUMIDITY
SENSHumidity sensor / min.: 0% max.:
100%Actual room humidity is displayed-
#CODESNumber of Trouble Codes / min.:
0 max.: 255Number of DTCs will be displayed-
ItemMeasurement Item/Display (Range)Normal ConditionDiagnostic Note
A/C SIGA/C signal/ ON or OFFA/C ON: ON-
Page 230 of 4500
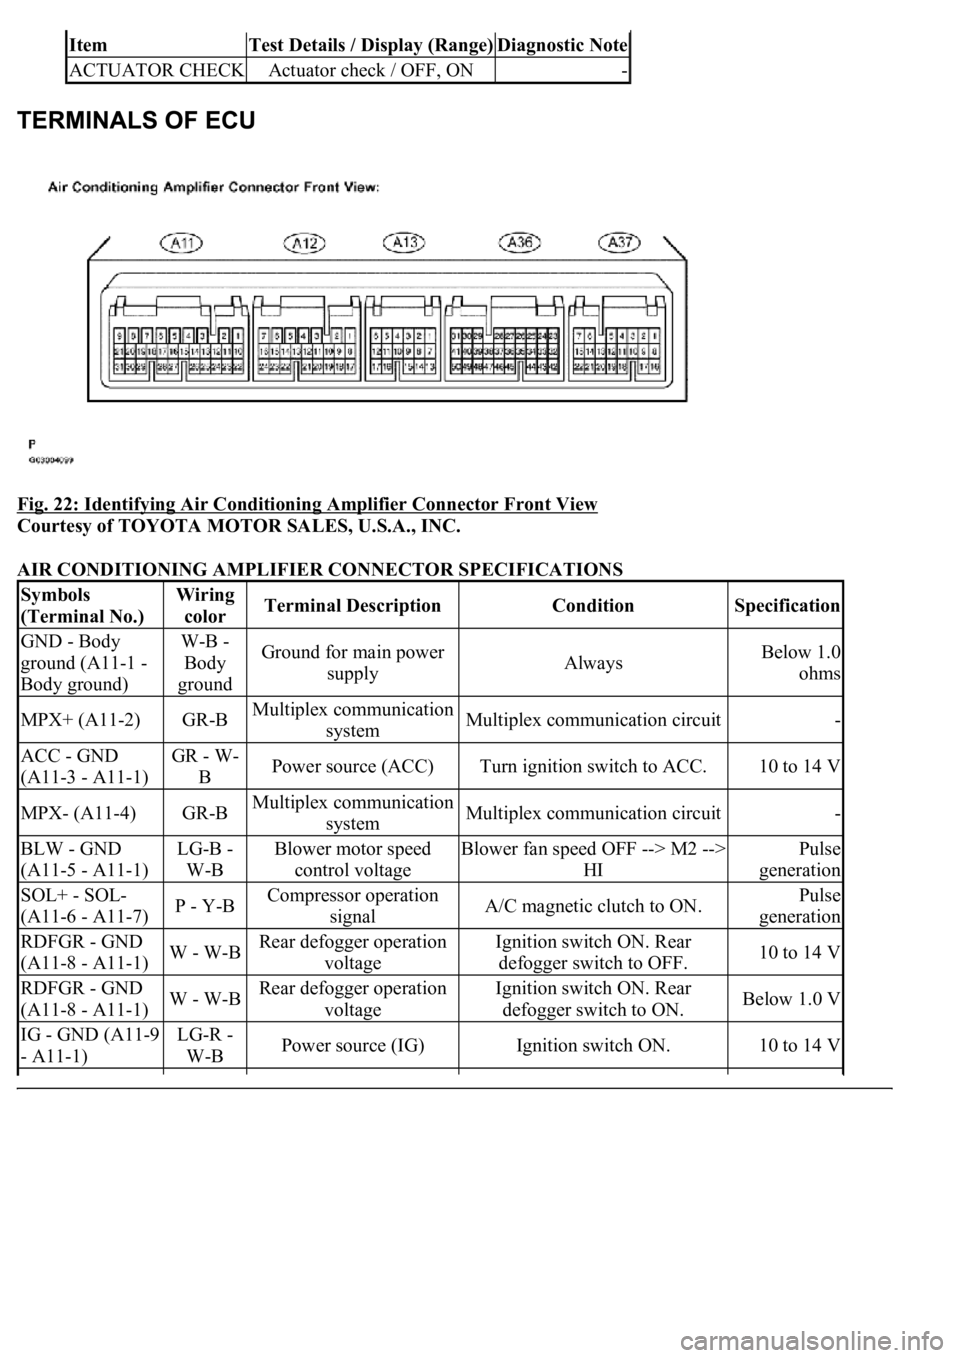
Fig. 22: Identifying Air Conditioning Amplifier Connector Front View
Courtesy of TOYOTA MOTOR SALES, U.S.A., INC.
AIR CONDITIONING AMPLIFIER CONNECTOR SPECIFICATIONS
ItemTest Details / Display (Range)Diagnostic Note
ACTUATOR CHECKActuator check / OFF, ON-
Symbols
(Terminal No.)Wiring
colorTerminal DescriptionConditionSpecification
GND - Body
ground (A11-1 -
Body ground)W-B -
Body
groundGround for main power
supplyAlwaysBelow 1.0
ohms
MPX+ (A11-2)GR-BMultiplex communication
systemMultiplex communication circuit-
ACC - GND
(A11-3 - A11-1)GR - W-
BPower source (ACC)Turn ignition switch to ACC.10 to 14 V
MPX- (A11-4)GR-BMultiplex communication
systemMultiplex communication circuit-
BLW - GND
(A11-5 - A11-1)LG-B -
W-BBlower motor speed
control voltageBlower fan speed OFF --> M2 -->
HIPulse
generation
SOL+ - SOL-
(A11-6 - A11-7)P - Y-BCompressor operation
signalA/C magnetic clutch to ON.Pulse
generation
RDFGR - GND
(A11-8 - A11-1)W - W-BRear defogger operation
voltageIgnition switch ON. Rear
defogger switch to OFF.10 to 14 V
RDFGR - GND
(A11-8 - A11-1)W - W-BRear defogger operation
voltageIgnition switch ON. Rear
defogger switch to ON.Below 1.0 V
IG - GND (A11-9
- A11-1)LG-R -
W-BPower source (IG)Ignition switch ON.10 to 14 V