LEXUS LS430 2003 Factory Repair Manual
Manufacturer: LEXUS, Model Year: 2003,
Model line: LS430,
Model: LEXUS LS430 2003
Pages: 4500, PDF Size: 87.45 MB
LEXUS LS430 2003 Factory Repair Manual
LS430 2003
LEXUS
LEXUS
https://www.carmanualsonline.info/img/36/57050/w960_57050-0.png
LEXUS LS430 2003 Factory Repair Manual
Trending: transmission fluid, battery, torque, manual transmission, fuel filter, Spark plug firing order, B2419 bean
Page 4311 of 4500
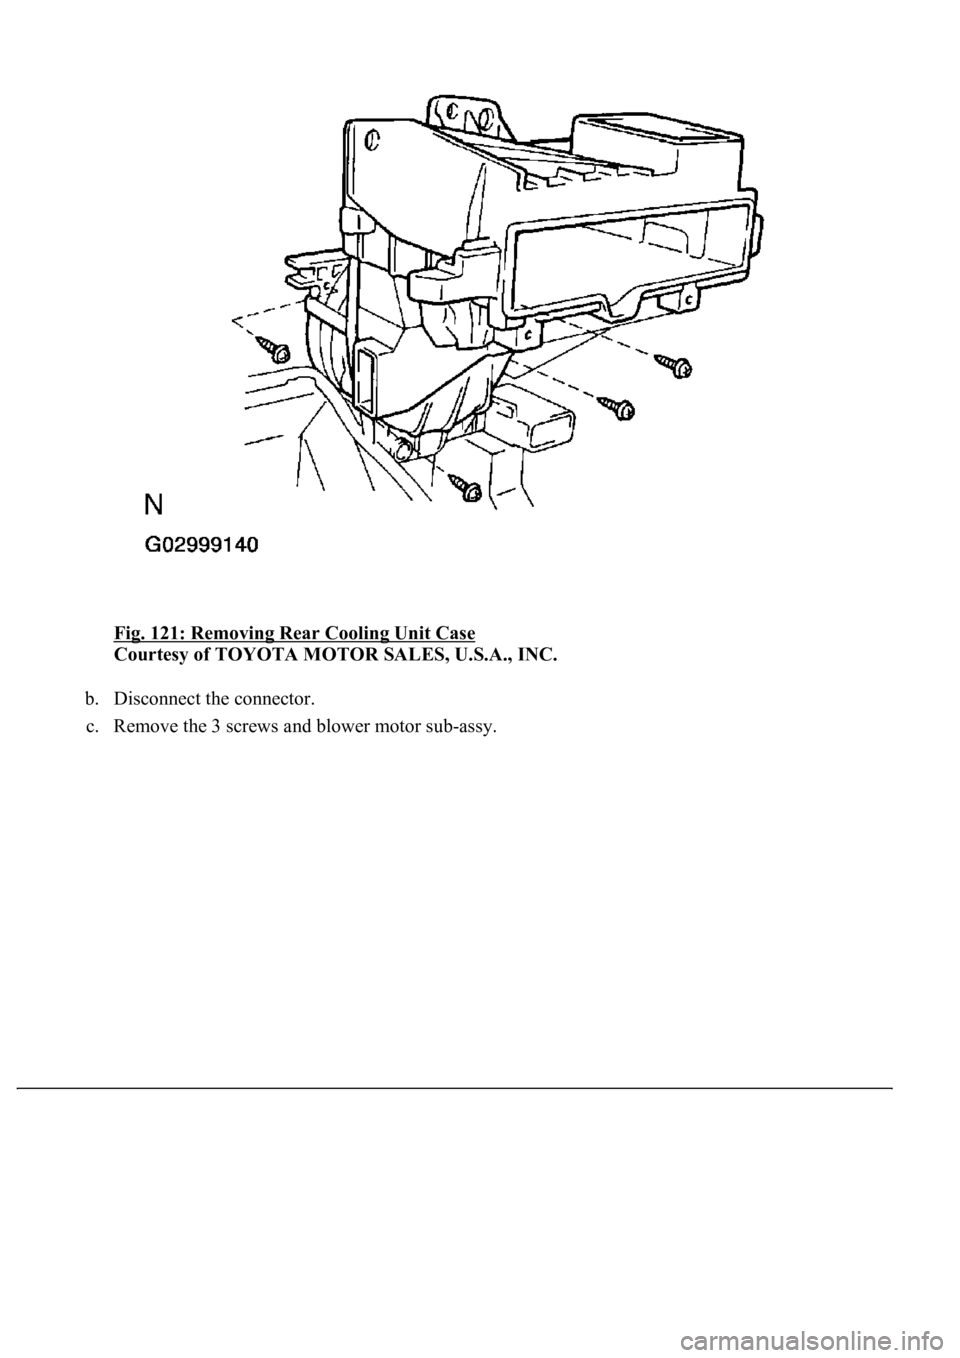
Fig. 121: Removing Rear Cooling Unit Case
Courtesy of TOYOTA MOTOR SALES, U.S.A., INC.
b. Disconnect the connector.
c. Remove the 3 screws and blower motor sub-assy.
Page 4312 of 4500
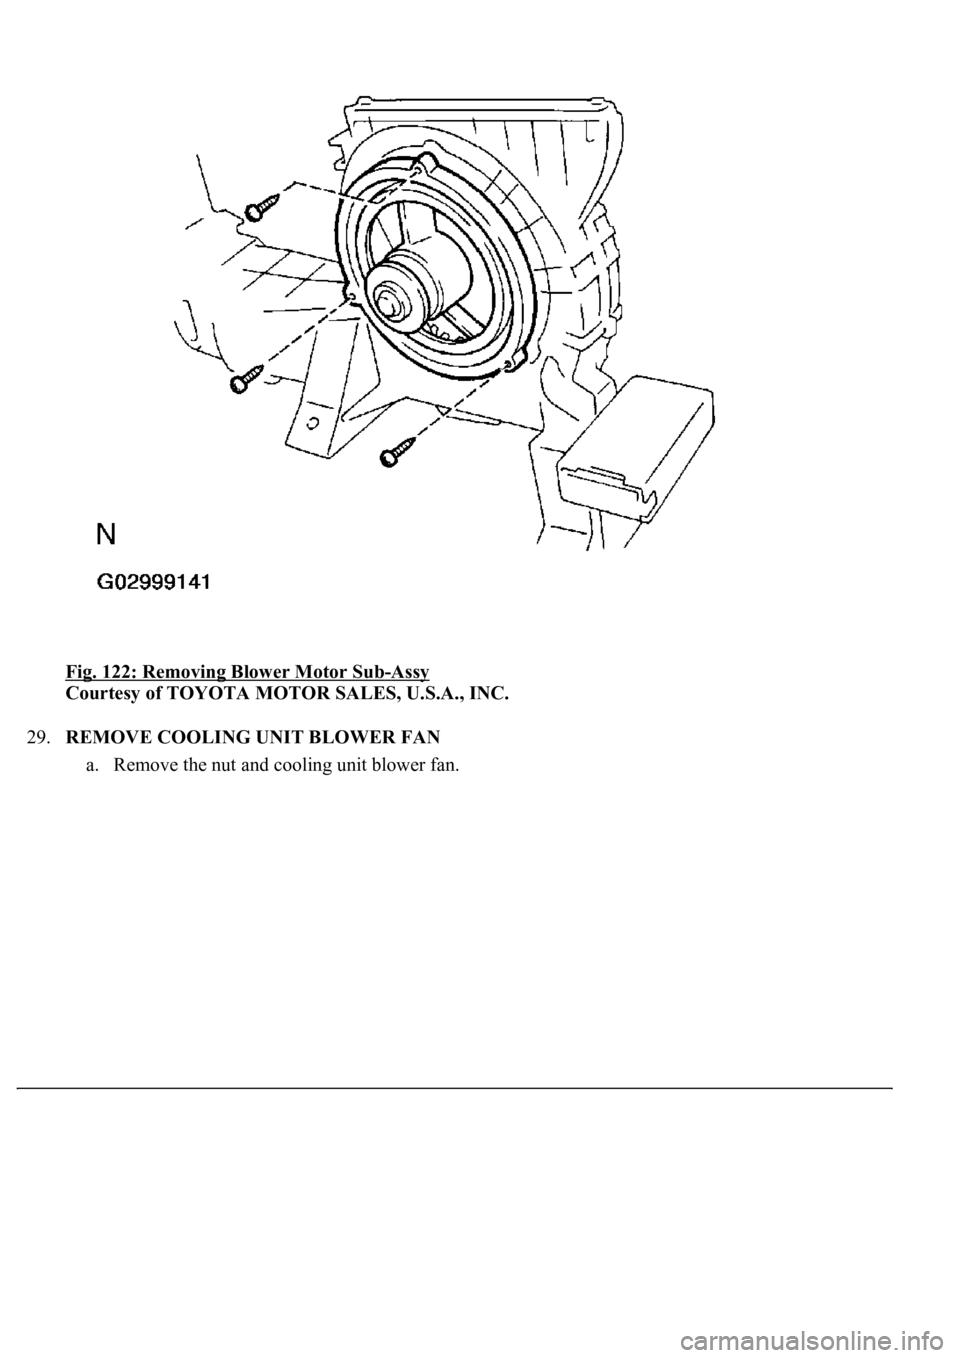
Fig. 122: Removing Blower Motor Sub-Assy
Courtesy of TOYOTA MOTOR SALES, U.S.A., INC.
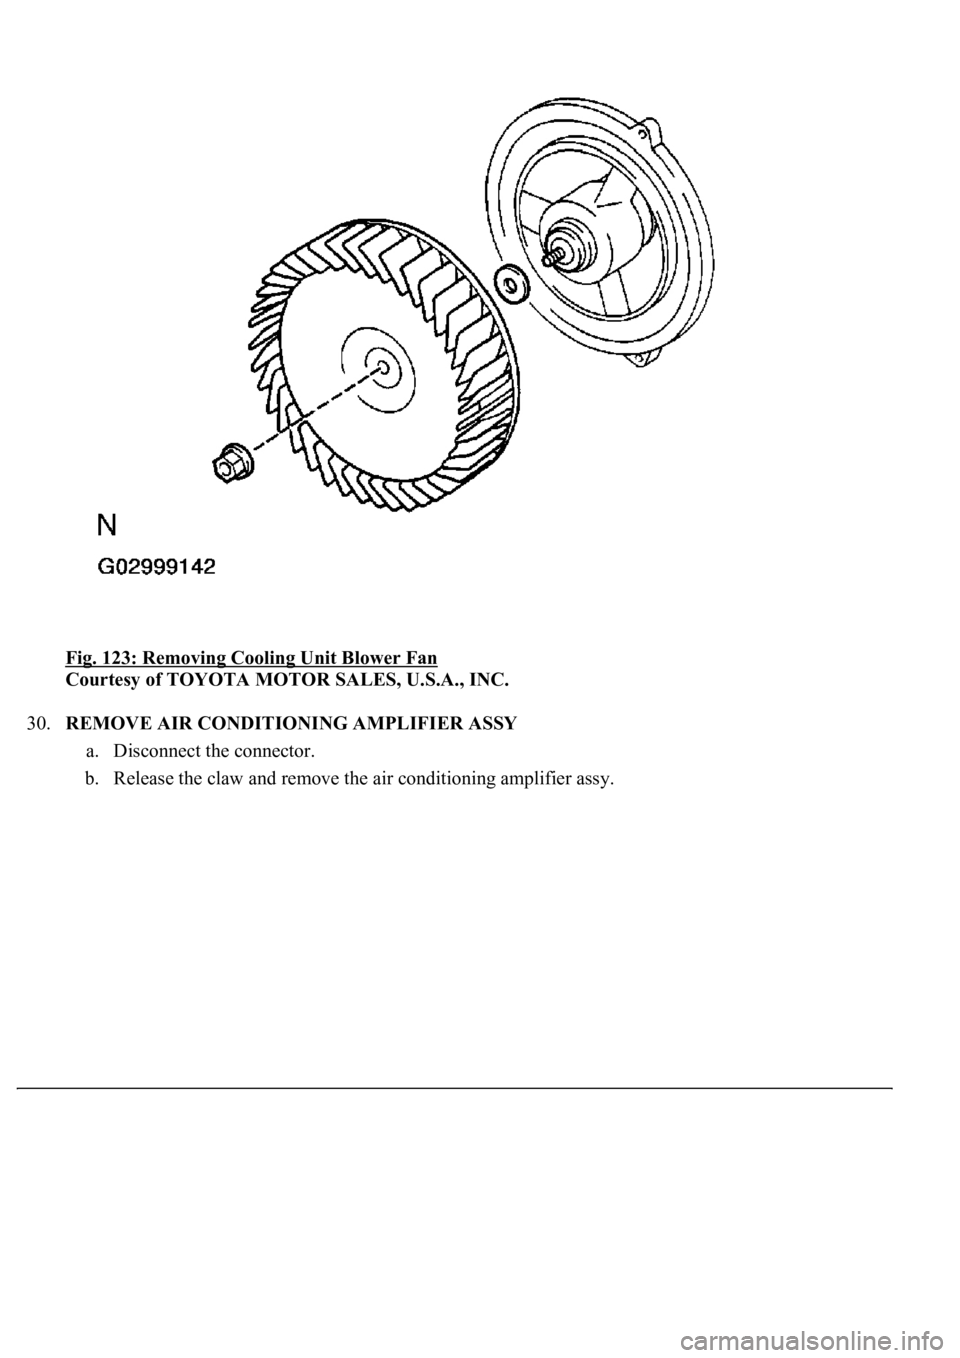
29.REMOVE COOLING UNIT BLOWER FAN
a. Remove the nut and coolin
g unit blower fan.
Page 4313 of 4500
Fig. 123: Removing Cooling Unit Blower Fan
Courtesy of TOYOTA MOTOR SALES, U.S.A., INC.
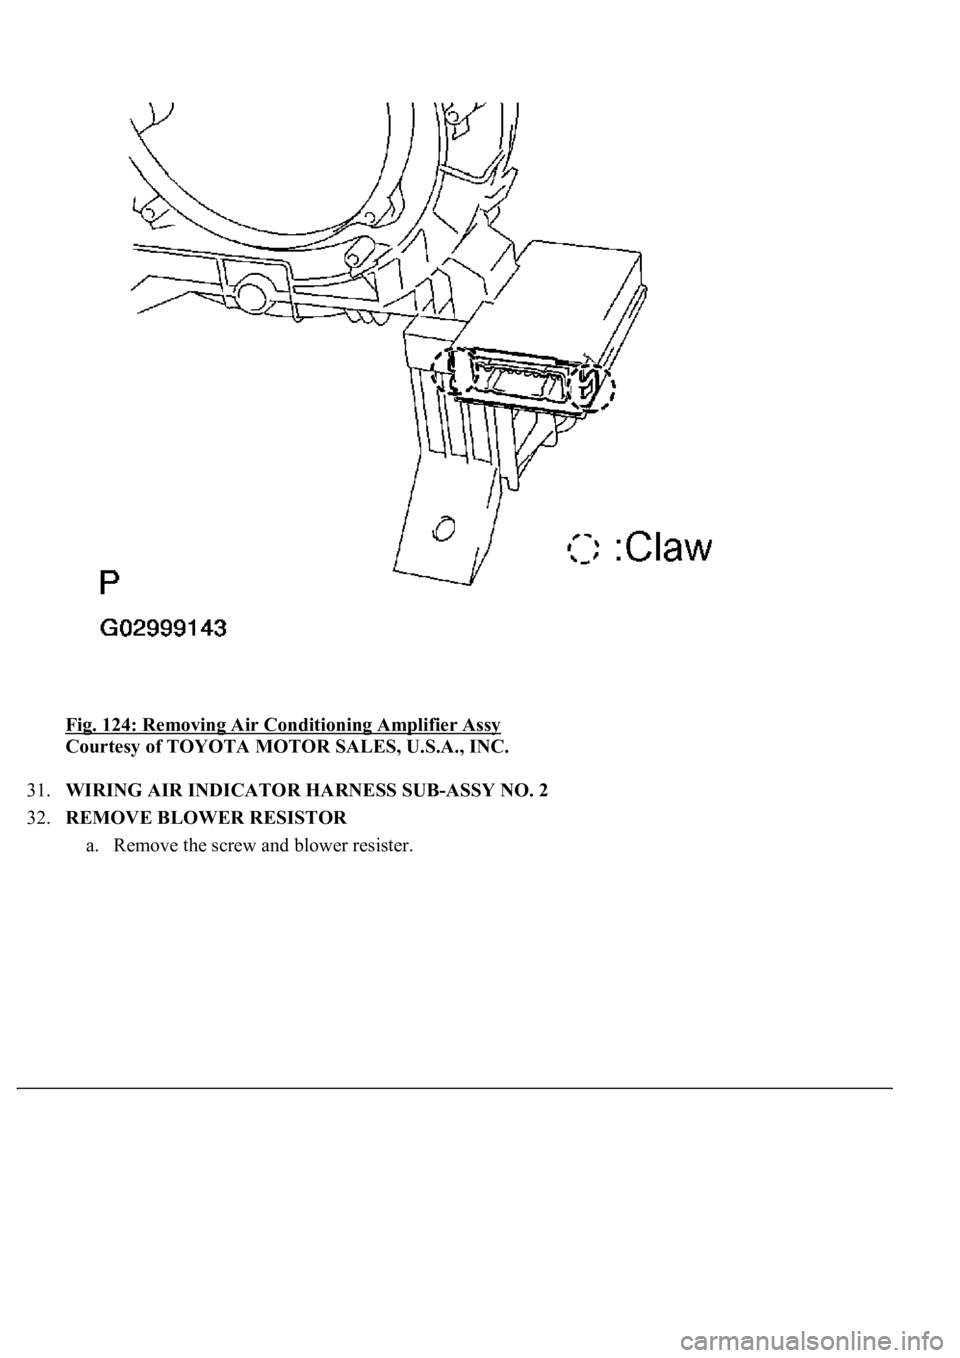
30.REMOVE AIR CONDITIONING AMPLIFIER ASSY
a. Disconnect the connector.
b. Release the claw and remove the air conditioning amplifier assy.
Page 4314 of 4500
Fig. 124: Removing Air Conditioning Amplifier Assy
Courtesy of TOYOTA MOTOR SALES, U.S.A., INC.
31.WIRING AIR INDICATOR HARNESS SUB-ASSY NO. 2
32.REMOVE BLOWER RESISTOR
a. Remove the screw and blower resister.
Page 4315 of 4500
Fig. 125: Removing Blower Resistor
Courtesy of TOYOTA MOTOR SALES, U.S.A., INC.
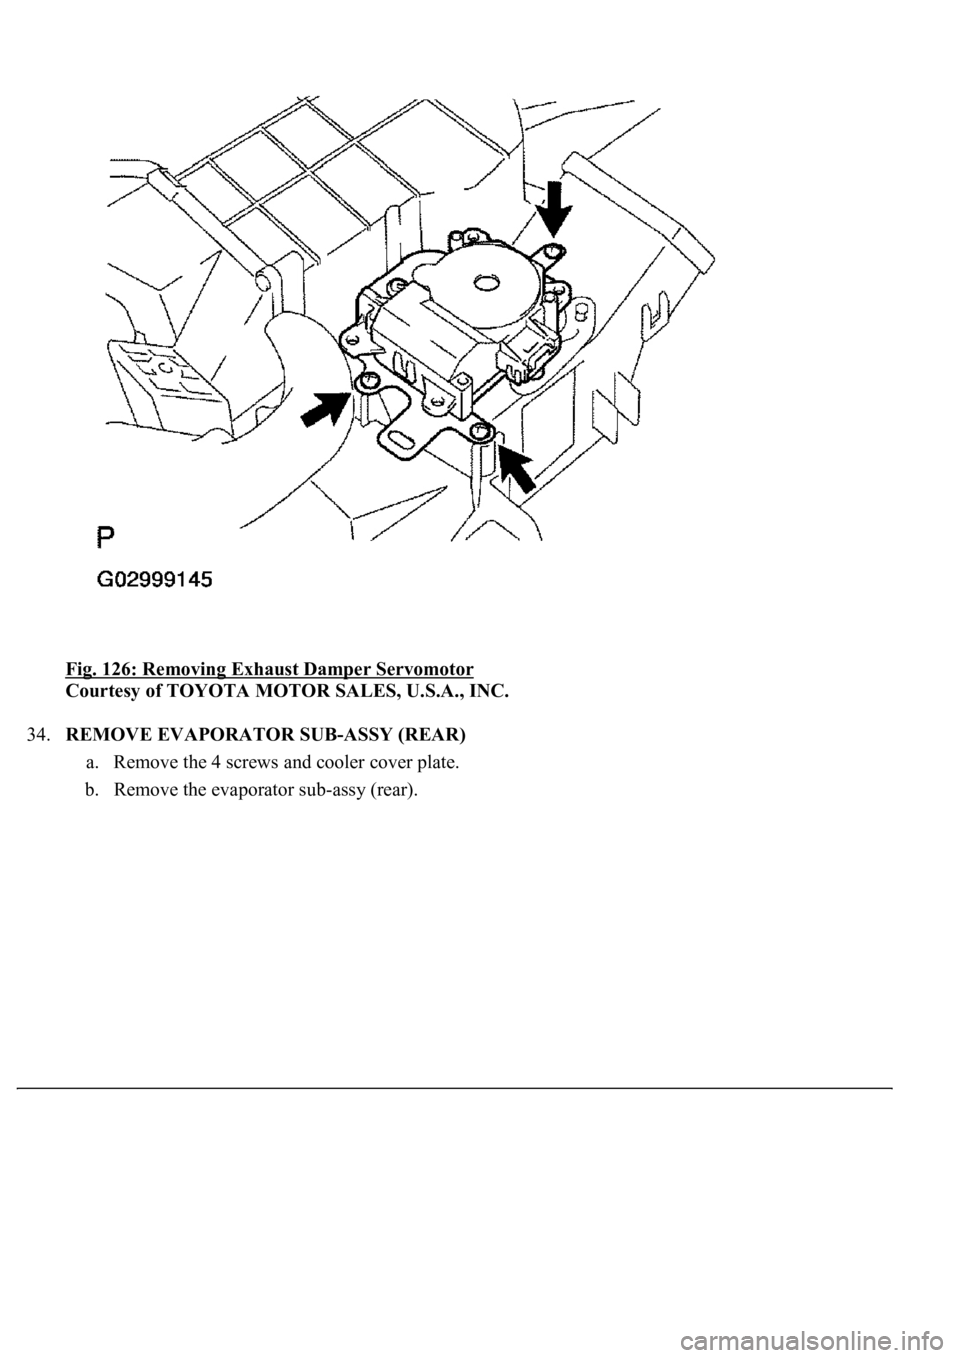
33.REMOVE EXHAUST DAMPER SERVOMOTOR
a. Remove the 3 screws and exhaust damper servomotor.
Page 4316 of 4500
Fig. 126: Removing Exhaust Damper Servomotor
Courtesy of TOYOTA MOTOR SALES, U.S.A., INC.
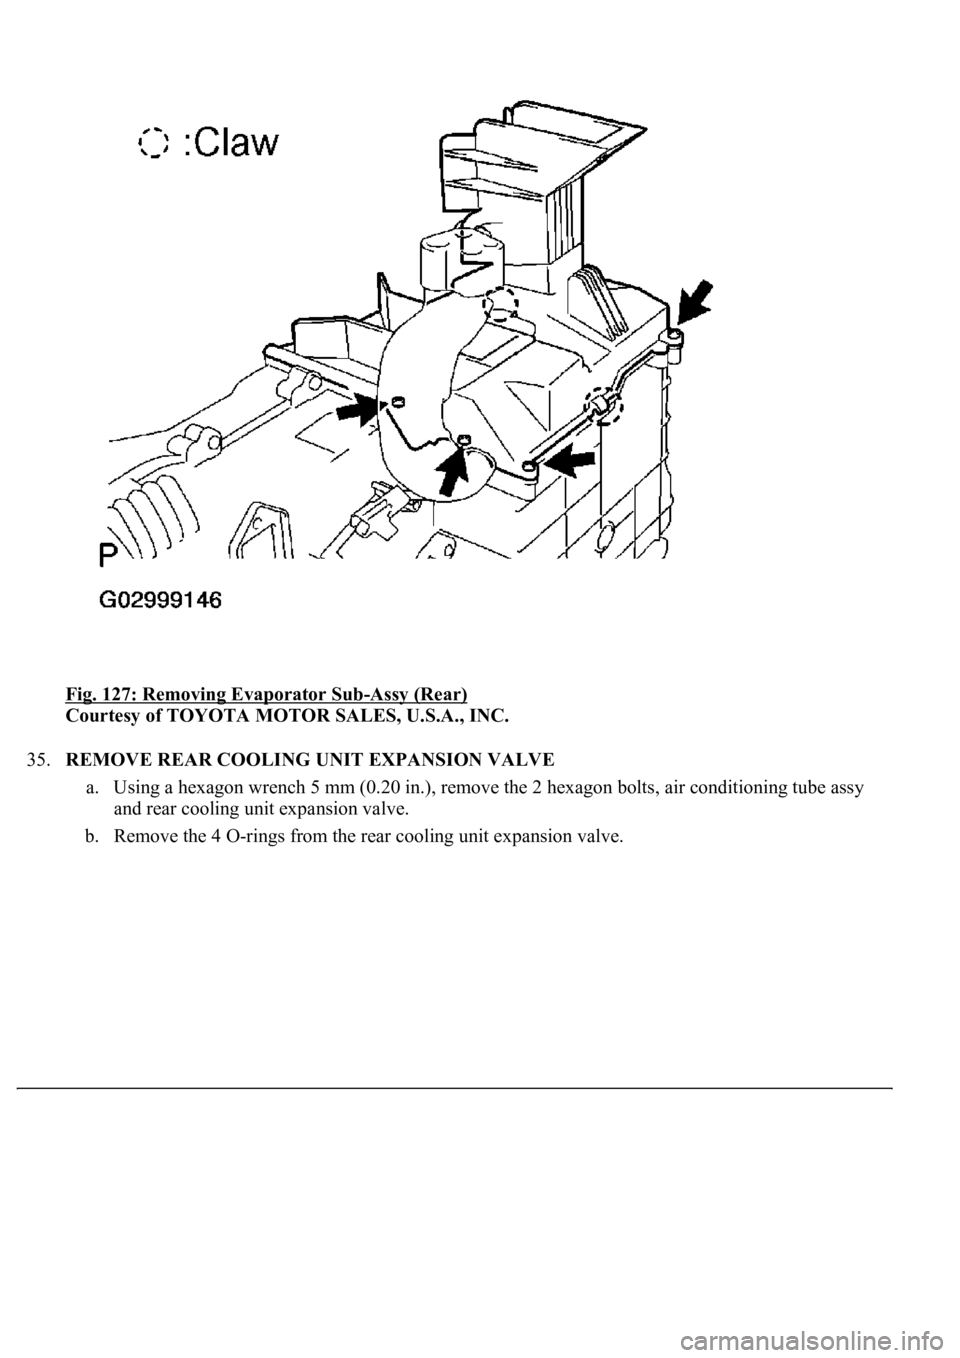
34.REMOVE EVAPORATOR SUB-ASSY (REAR)
a. Remove the 4 screws and cooler cover plate.
b. Remove the evaporator sub-assy (rear).
Page 4317 of 4500
Fig. 127: Removing Evaporator Sub-Assy (Rear)
Courtesy of TOYOTA MOTOR SALES, U.S.A., INC.
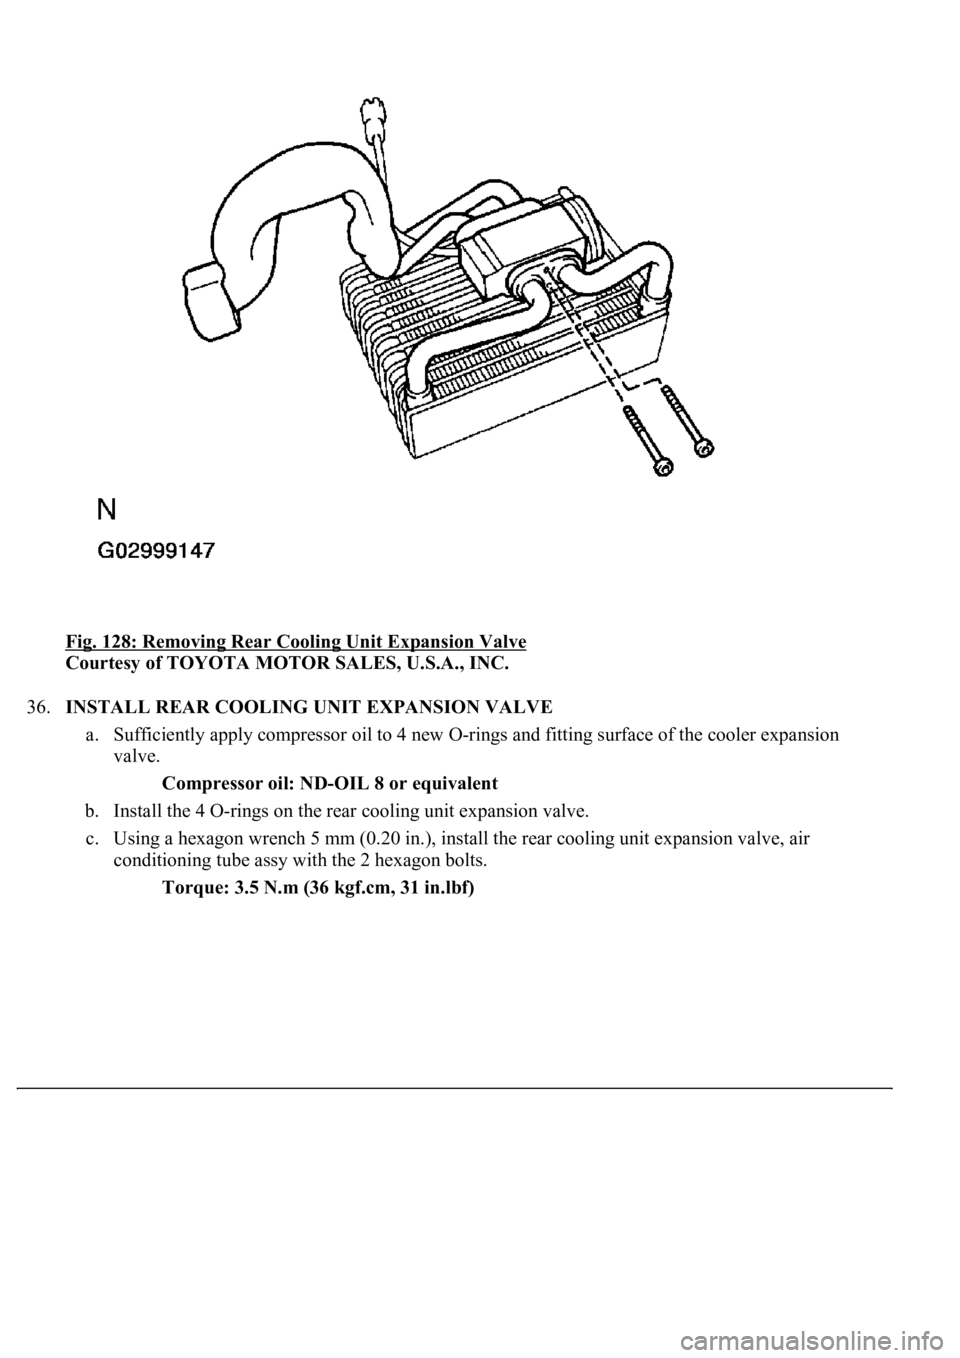
35.REMOVE REAR COOLING UNIT EXPANSION VALVE
a. Using a hexagon wrench 5 mm (0.20 in.), remove the 2 hexagon bolts, air conditioning tube assy
and rear cooling unit expansion valve.
b. Remove the 4 O-rings from the rear cooling unit expansion valve.
Page 4318 of 4500
Fig. 128: Removing Rear Cooling Unit Expansion Valve
Courtesy of TOYOTA MOTOR SALES, U.S.A., INC.
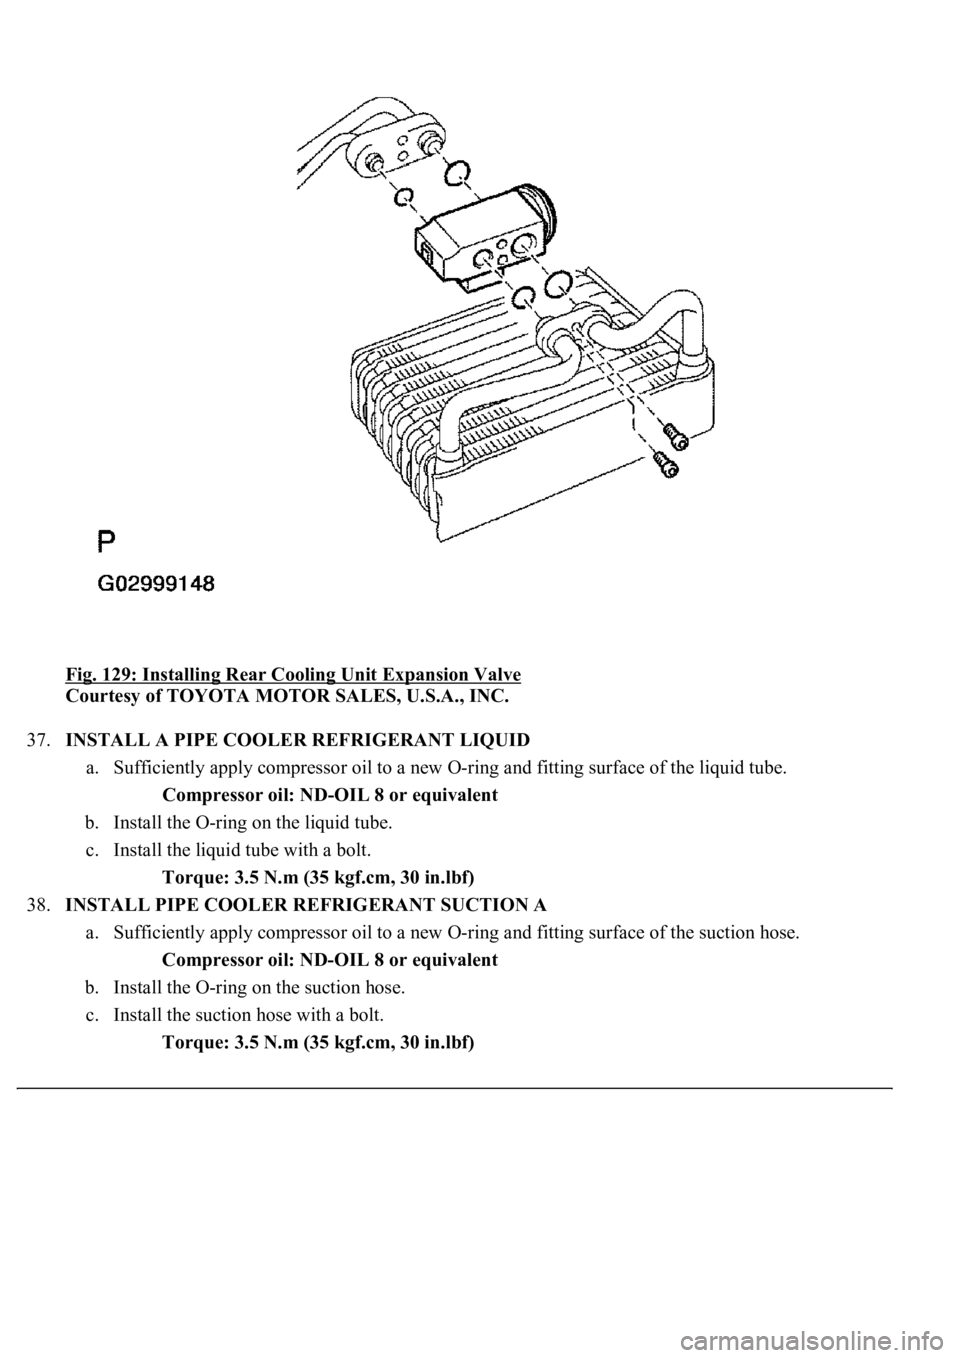
36.INSTALL REAR COOLING UNIT EXPANSION VALVE
a. Sufficiently apply compressor oil to 4 new O-rings and fitting surface of the cooler expansion
valve.
Compressor oil: ND-OIL 8 or equivalent
b. Install the 4 O-rings on the rear cooling unit expansion valve.
c. Using a hexagon wrench 5 mm (0.20 in.), install the rear cooling unit expansion valve, air
conditioning tube assy with the 2 hexagon bolts.
Torque: 3.5 N.m (36 kgf.cm, 31 in.lbf)
Page 4319 of 4500
<0029004c004a0011000300140015001c001d0003002c0051005600570044004f004f004c0051004a000300350048004400550003002600520052004f004c0051004a000300380051004c005700030028005b0053004400510056004c005200510003003900
44004f00590048[
Courtesy of TOYOTA MOTOR SALES, U.S.A., INC.
37.INSTALL A PIPE COOLER REFRIGERANT LIQUID
a. Sufficiently apply compressor oil to a new O-ring and fitting surface of the liquid tube.
Compressor oil: ND-OIL 8 or equivalent
b. Install the O-ring on the liquid tube.
c. Install the liquid tube with a bolt.
Torque: 3.5 N.m (35 kgf.cm, 30 in.lbf)
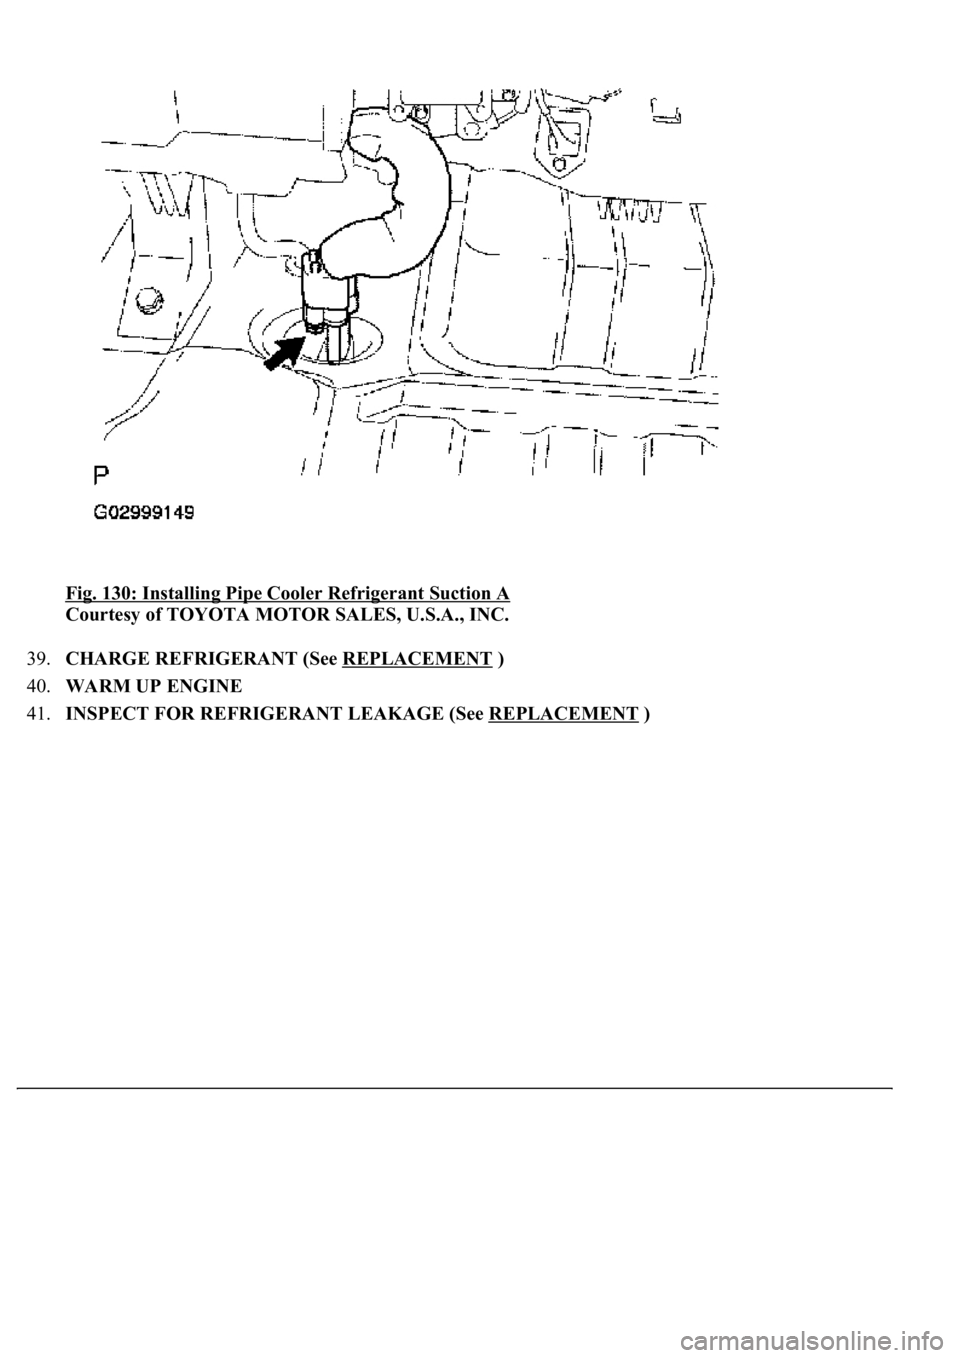
38.INSTALL PIPE COOLER REFRIGERANT SUCTION A
a. Sufficiently apply compressor oil to a new O-ring and fitting surface of the suction hose.
Compressor oil: ND-OIL 8 or equivalent
b. Install the O-ring on the suction hose.
c. Install the suction hose with a bolt.
Torque: 3.5 N.m (35 kgf.cm, 30 in.lbf)
Page 4320 of 4500
<0029004c004a00110003001400160013001d0003002c0051005600570044004f004f004c0051004a00030033004c005300480003002600520052004f0048005500030035004800490055004c004a0048005500440051005700030036005800460057004c00
52005100030024[
Courtesy of TOYOTA MOTOR SALES, U.S.A., INC.
39.CHARGE REFRIGERANT (See REPLACEMENT
)
40.WARM UP ENGINE
41.INSPECT FOR REFRIGERANT LEAKAGE (See REPLACEMENT
)
Trending: service, Compressor control valve, high beam, ground clearance, width, oil capacity, headrest
