MAZDA 6 2002 Workshop Manual Suplement
Manufacturer: MAZDA, Model Year: 2002, Model line: 6, Model: MAZDA 6 2002Pages: 909, PDF Size: 17.16 MB
Page 841 of 909

T–30
AUDIO AND NAVIGATION SYSTEM
NOISE FILTER REMOVAL/INSTALLATIONA6E812466869201Brake Light Noise Filter
1. Remove the noise filter according to the NOISE FILTER REMOVAL/INSTALLATION procedure for the 4SD.
2. Install in the reverse order of removal.
Rear Window Defroster Noise Filter
1. Disconnect the negative battery cable.
2. Remove the liftgate lower trim.
3. Remove in the order indicated in the table.
4. Install in the reverse order of removal.
End Of SieCONDENSER REMOVAL/INSTALLATIONA6E8124668692021. Disconnect the negative battery cable.
2. Remove the liftgate lower trim.
3. Remove in the order indicated in the table.
4. Install in the reverse order of removal.
End Of Sie
AUDIO AND NAVIGATION SYSTEM
1Bolt
2Screw
3 Connector
4 Noise filter
2
3
4
8.9—12.7 N·m
{90—130 kgf·cm,
79—11 2 in·lbf}
1
A6E81241109
1Bolt
2 Connector
3 Condenser
1
3
2
1
2
3
3
2
1
N·m {kgf·cm, in·lbf} 8.9—12.7
{90—130, 79—112}
8.9—12.7
{90—130, 79—112} 8.9—12.7
{90—130, 79—112}
A6E81241122
Page 842 of 909

AUDIO AND NAVIGATION SYSTEM
T–31
T
ANTENNA FEEDER LOCATIONA6E812466941201
.
End Of SieREAR ANTENNA FEEDER INSPECTIONA6E8124669422011. Verify that there is no continuity between antenna
feeder terminals A and B using an ohmmeter.
2. Inspect for continuity between the antenna feeder
terminals using an ohmmeter.
•If not as specified, replace the rear harness.
End Of Sie
1
A6E81241138
1 Rear antenna feeder
C
D
A B
A6E81241142
: Continuity
Step
1
2Terminal
BCD A
A6E81241147
Page 843 of 909

T–32
AIR BAG SYSTEM
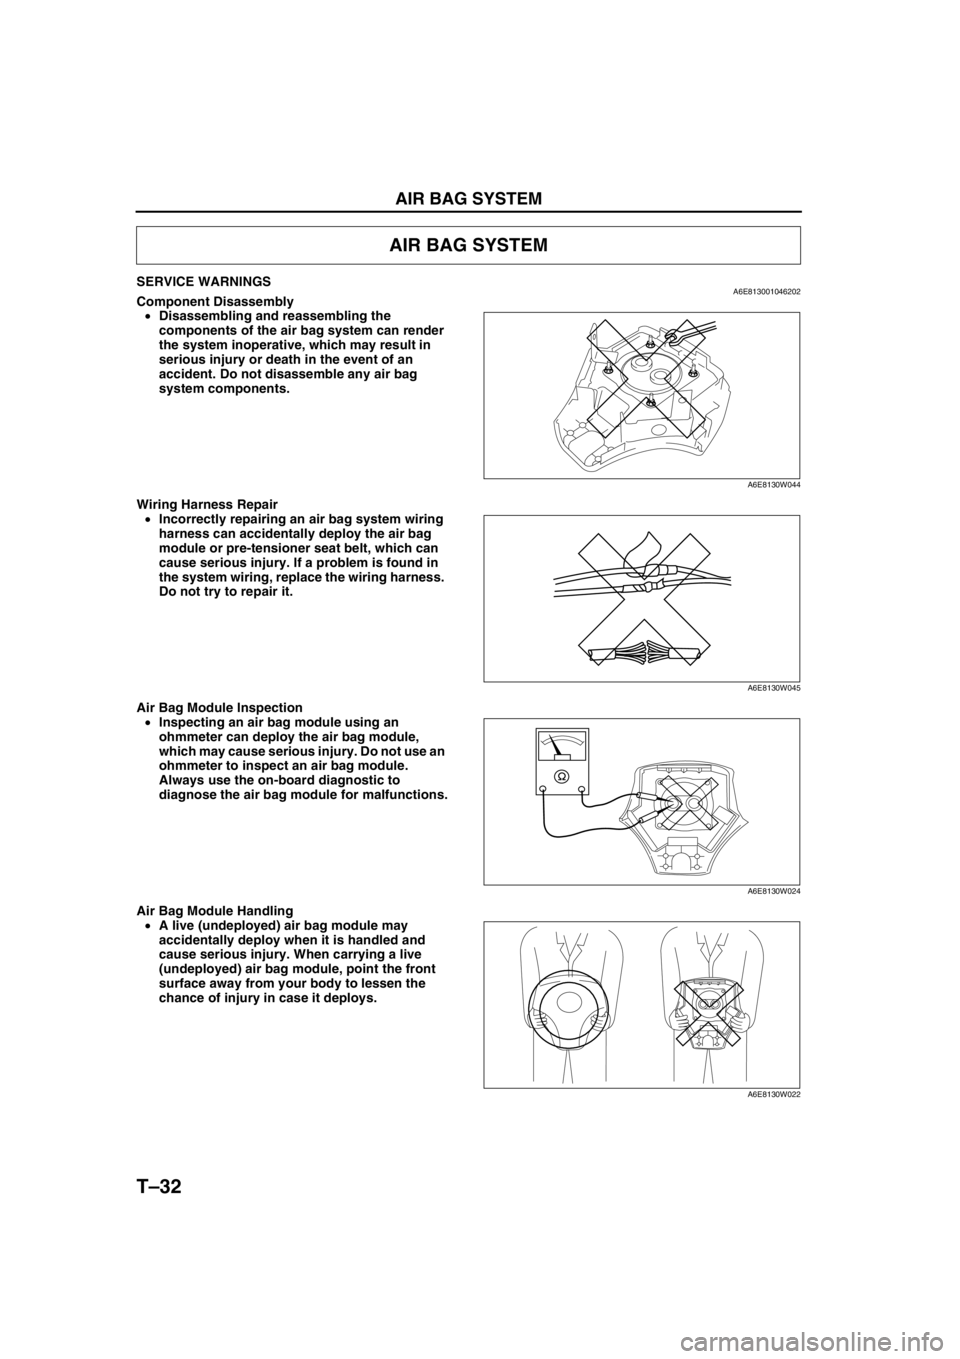
SERVICE WARNINGSA6E813001046202Component Disassembly
•Disassembling and reassembling the
components of the air bag system can render
the system inoperative, which may result in
serious injury or death in the event of an
accident. Do not disassemble any air bag
system components.
Wiring Harness Repair
•Incorrectly repairing an air bag system wiring
harness can accidentally deploy the air bag
module or pre-tensioner seat belt, which can
cause serious injury. If a problem is found in
the system wiring, replace the wiring harness.
Do not try to repair it.
Air Bag Module Inspection
•Inspecting an air bag module using an
ohmmeter can deploy the air bag module,
which may cause serious injury. Do not use an
ohmmeter to inspect an air bag module.
Always use the on-board diagnostic to
diagnose the air bag module for malfunctions.
Air Bag Module Handling
•A live (undeployed) air bag module may
accidentally deploy when it is handled and
cause serious injury. When carrying a live
(undeployed) air bag module, point the front
surface away from your body to lessen the
chance of injury in case it deploys.
AIR BAG SYSTEM
A6E8130W044
A6E8130W045
A6E8130W024
A6E8130W022
Page 844 of 909

AIR BAG SYSTEM
T–33
T
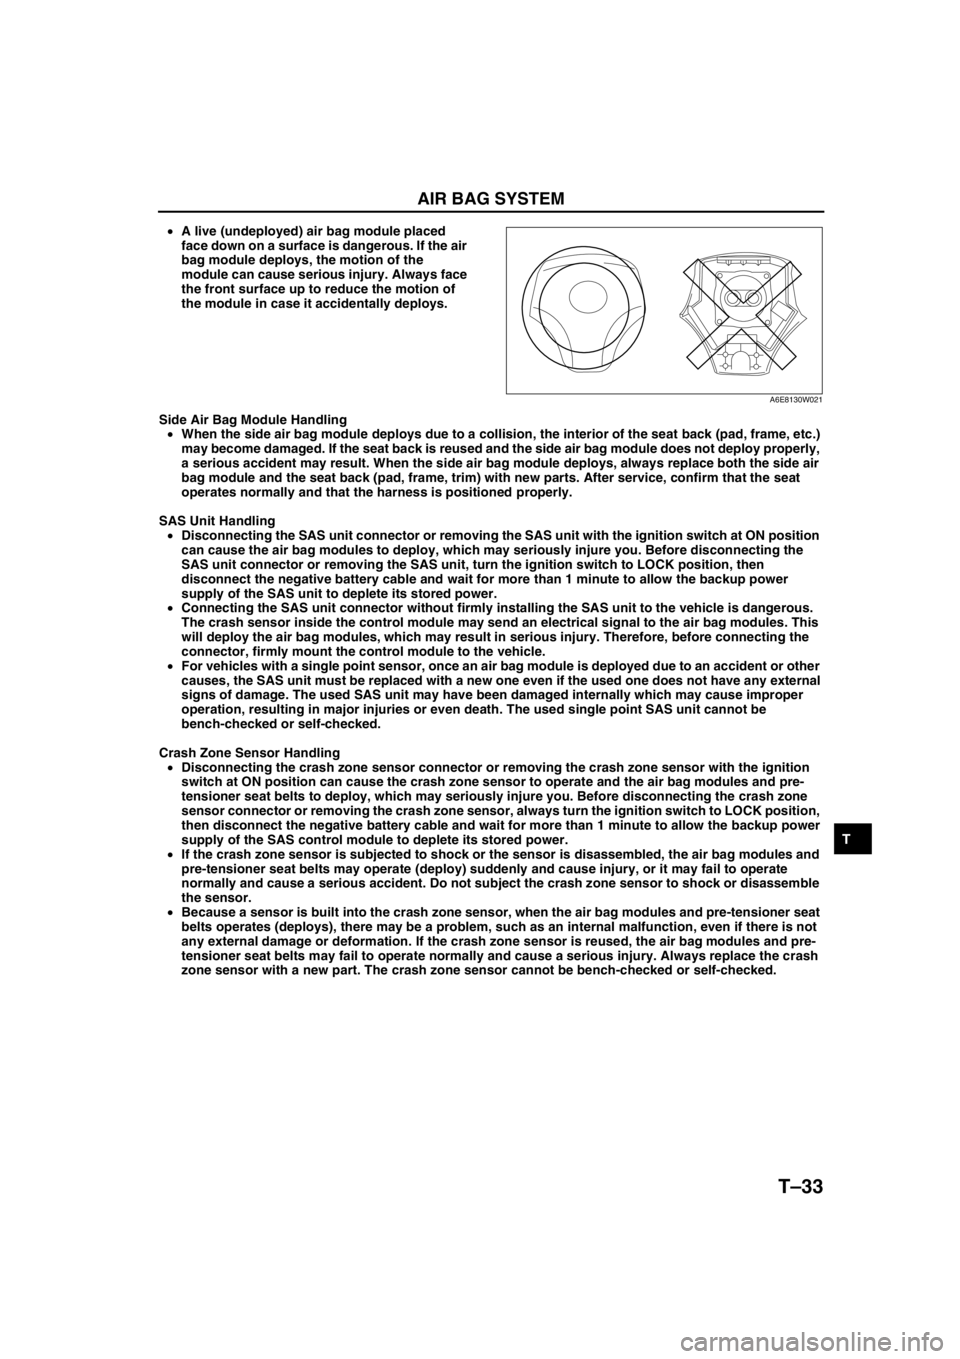
•A live (undeployed) air bag module placed
face down on a surface is dangerous. If the air
bag module deploys, the motion of the
module can cause serious injury. Always face
the front surface up to reduce the motion of
the module in case it accidentally deploys.
Side Air Bag Module Handling
•When the side air bag module deploys due to a collision, the interior of the seat back (pad, frame, etc.)
may become damaged. If the seat back is reused and the side air bag module does not deploy properly,
a serious accident may result. When the side air bag module deploys, always replace both the side air
bag module and the seat back (pad, frame, trim) with new parts. After service, confirm that the seat
operates normally and that the harness is positioned properly.
SAS Unit Handling
•Disconnecting the SAS unit connector or removing the SAS unit with the ignition switch at ON position
can cause the air bag modules to deploy, which may seriously injure you. Before disconnecting the
SAS unit connector or removing the SAS unit, turn the ignition switch to LOCK position, then
disconnect the negative battery cable and wait for more than 1 minute to allow the backup power
supply of the SAS unit to deplete its stored power.
•Connecting the SAS unit connector without firmly installing the SAS unit to the vehicle is dangerous.
The crash sensor inside the control module may send an electrical signal to the air bag modules. This
will deploy the air bag modules, which may result in serious injury. Therefore, before connecting the
connector, firmly mount the control module to the vehicle.
•For vehicles with a single point sensor, once an air bag module is deployed due to an accident or other
causes, the SAS unit must be replaced with a new one even if the used one does not have any external
signs of damage. The used SAS unit may have been damaged internally which may cause improper
operation, resulting in major injuries or even death. The used single point SAS unit cannot be
bench-checked or self-checked.
Crash Zone Sensor Handling
•Disconnecting the crash zone sensor connector or removing the crash zone sensor with the ignition
switch at ON position can cause the crash zone sensor to operate and the air bag modules and pre-
tensioner seat belts to deploy, which may seriously injure you. Before disconnecting the crash zone
sensor connector or removing the crash zone sensor, always turn the ignition switch to LOCK position,
then disconnect the negative battery cable and wait for more than 1 minute to allow the backup power
supply of the SAS control module to deplete its stored power.
•If the crash zone sensor is subjected to shock or the sensor is disassembled, the air bag modules and
pre-tensioner seat belts may operate (deploy) suddenly and cause injury, or it may fail to operate
normally and cause a serious accident. Do not subject the crash zone sensor to shock or disassemble
the sensor.
•Because a sensor is built into the crash zone sensor, when the air bag modules and pre-tensioner seat
belts operates (deploys), there may be a problem, such as an internal malfunction, even if there is not
any external damage or deformation. If the crash zone sensor is reused, the air bag modules and pre-
tensioner seat belts may fail to operate normally and cause a serious injury. Always replace the crash
zone sensor with a new part. The crash zone sensor cannot be bench-checked or self-checked.
A6E8130W021
Page 845 of 909

T–34
AIR BAG SYSTEM
Side Air Bag Sensor Handling
•Disconnecting the side air bag sensor connector or removing the side air bag sensor with the ignition
switch at ON position can cause the side air bag sensor to operate and the side air bag module to
deploy, which may seriously injure you. Before disconnecting the side air bag sensor connector or
removing the side air bag sensor, always turn the ignition switch to LOCK position, then disconnect the
negative battery cable and wait for more than 1 minute to allow the backup power supply of the SAS
control module to deplete its stored power.
•If the side air bag sensor is subjected to shock or the sensor is disassembled, the side air bag module
may operate (deploy) suddenly and cause injury, or it may fail to operate normally and cause a serious
accident. Do not subject the side air bag sensor to shock or disassemble the sensor.
•Because a sensor is built into the side air bag sensor, when the side air bag module operates (deploys),
there may be a problem, such as an internal malfunction, even if there is not any external damage or
deformation. If the side air bag sensor is reused, the side air bag module may fail to operate normally
and cause a serious injury. Always replace the side air bag sensor with a new part. The side air bag
sensor cannot be bench-checked or self-checked.
Pre-tensioner Seat Belt Inspection
•Inspecting a pre-tensioner seat belt using an
ohmmeter can deploy the pre-tensioner seat
belt, which can cause serious injury. Do not
use an ohmmeter to inspect the pre-tensioner
seat belt. Always use the on-board diagnostic
to diagnose the pre-tensioner seat belt for
malfunctions.
Component Handling
•Oil, grease, water, etc on components may cause the air bag modules and pre-tensioner seat belts to
fall to deploy in an accident, which may cause serious injury. Do not allow oil, grease, water, etc., on
components.
•Inserting a screwdriver, etc., into the
connector of an air bag module or a pre-
tensioner seat belt may damage the connector
and cause the air bag module or the pre-
tensioner seat belt to deploy improperly,
which may cause serious injury. Do not insert
any foreign objects into the connector.
Component Reuse
•Even if an air bag module or a pre-tensioner seat belt does not deploy in a collision and does not have
any external signs of damage, it may have been damaged internally, which may cause improper
operation. Improper operation may cause serious injury. Always self-check the undamaged air bag
module or pre-tensioner seat belt to determine whether it can be reused.
End Of Sie
A6E8130W025
A6E8130W023
Page 846 of 909

AIR BAG SYSTEM
T–35
T
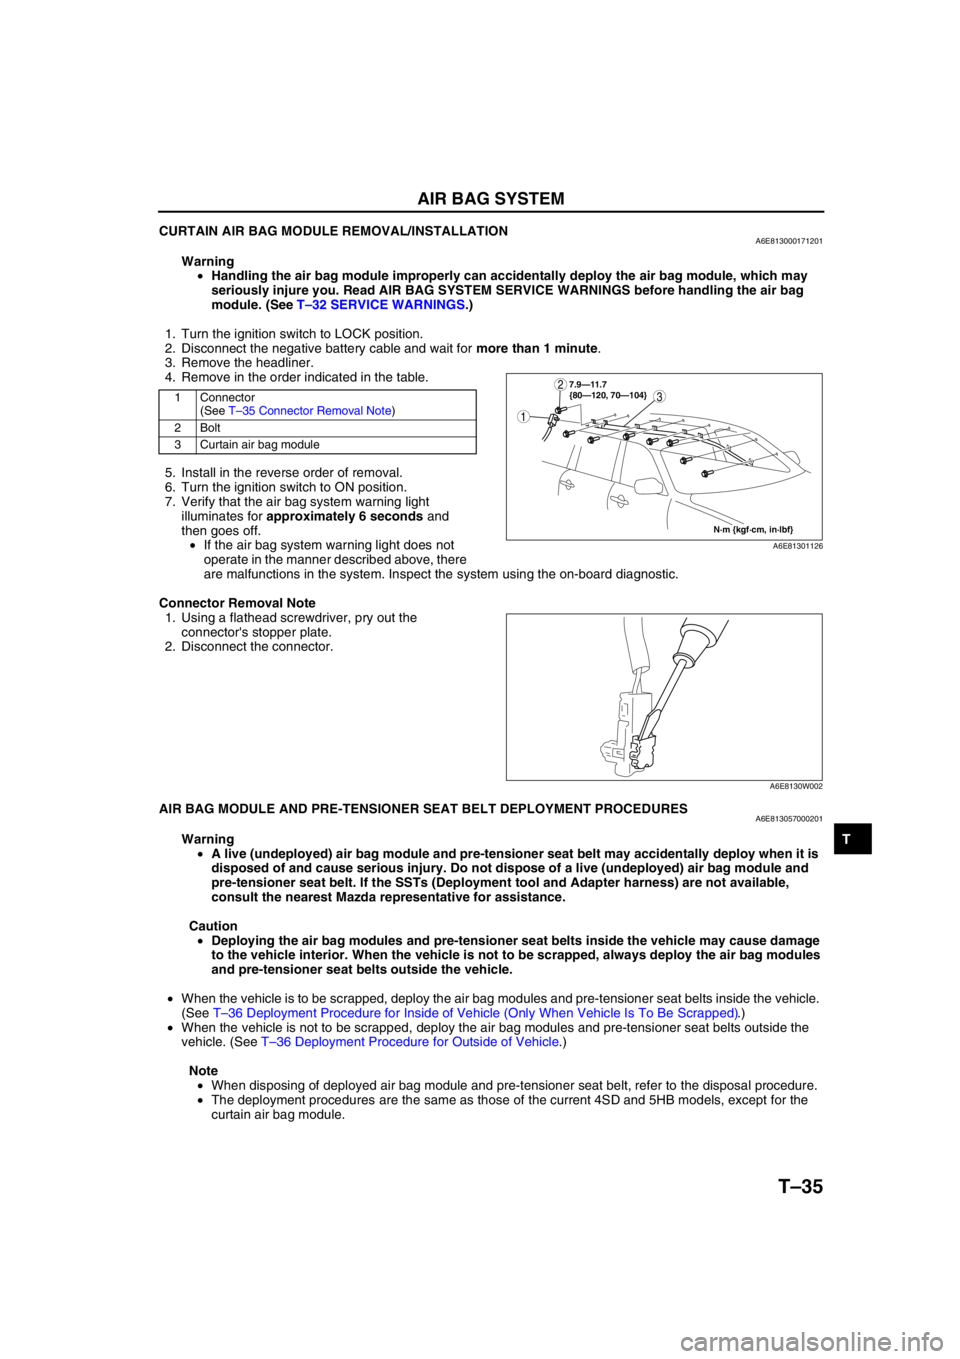
CURTAIN AIR BAG MODULE REMOVAL/INSTALLATIONA6E813000171201
Warning
•Handling the air bag module improperly can accidentally deploy the air bag module, which may
seriously injure you. Read AIR BAG SYSTEM SERVICE WARNINGS before handling the air bag
module. (See T–32 SERVICE WARNINGS.)
1. Turn the ignition switch to LOCK position.
2. Disconnect the negative battery cable and wait for more than 1 minute.
3. Remove the headliner.
4. Remove in the order indicated in the table.
5. Install in the reverse order of removal.
6. Turn the ignition switch to ON position.
7. Verify that the air bag system warning light
illuminates for approximately 6 seconds and
then goes off.
•If the air bag system warning light does not
operate in the manner described above, there
are malfunctions in the system. Inspect the system using the on-board diagnostic.
Connector Removal Note
1. Using a flathead screwdriver, pry out the
connector's stopper plate.
2. Disconnect the connector.
End Of SieAIR BAG MODULE AND PRE-TENSIONER SEAT BELT DEPLOYMENT PROCEDURESA6E813057000201
Warning
•A live (undeployed) air bag module and pre-tensioner seat belt may accidentally deploy when it is
disposed of and cause serious injury. Do not dispose of a live (undeployed) air bag module and
pre-tensioner seat belt. If the SSTs (Deployment tool and Adapter harness) are not available,
consult the nearest Mazda representative for assistance.
Caution
•Deploying the air bag modules and pre-tensioner seat belts inside the vehicle may cause damage
to the vehicle interior. When the vehicle is not to be scrapped, always deploy the air bag modules
and pre-tensioner seat belts outside the vehicle.
•When the vehicle is to be scrapped, deploy the air bag modules and pre-tensioner seat belts inside the vehicle.
(See T–36 Deployment Procedure for Inside of Vehicle (Only When Vehicle Is To Be Scrapped).)
•When the vehicle is not to be scrapped, deploy the air bag modules and pre-tensioner seat belts outside the
vehicle. (See T–36 Deployment Procedure for Outside of Vehicle.)
Note
•When disposing of deployed air bag module and pre-tensioner seat belt, refer to the disposal procedure.
•The deployment procedures are the same as those of the current 4SD and 5HB models, except for the
curtain air bag module.
1 Connector
(See T–35 Connector Removal Note)
2Bolt
3 Curtain air bag module3
1
2
N·m {kgf·cm, in·lbf} 7.9—11.7
{80—120, 70—104}
A6E81301126
A6E8130W002
Page 847 of 909

T–36
AIR BAG SYSTEM
Deployment Procedure for Inside of Vehicle (Only When Vehicle Is To Be Scrapped)
1. Inspect the SST (Deployment tool).
2. Move the vehicle to an open space, away from strong winds, and close all the doors and windows.
3. Turn the ignition switch to LOCK position.
4. Disconnect the negative battery cable and wait for more than 1 minute.
5. Follow the appropriate procedure for deploying the driver-side air bag module, passenger-side air bag module,
side air bag module, curtain air bag module, or pre-tensioner seat belt.
Curtain air bag module (WGN)
1. Remove the headliner.
2. Disconnect the curtain air bag module connector.
3. Connect the SST (Adapter harness) to the curtain
air bag module.
4. Connect the SST (Deployment tool) to the SST
(Adapter harness).
5. Connect the red clip of the SST (Deployment tool)
to the positive battery terminal and the black clip
to the negative battery terminal.
6. Verify that the red light on the SST (Deployment
tool) is illuminated.
7. Make sure all persons are standing at least 6 m
{20 ft} from the vehicle.
8. Press the activation switch on the SST
(Deployment tool) to deploy the curtain air bag
module.
Deployment Procedure for Outside of Vehicle
1. Inspect the SST (Deployment tool).
2. Turn the ignition switch to LOCK position.
3. Disconnect the negative battery cable and wait for more than 1 minute.
4. Follow the appropriate procedure for deploying the driver-side air bag module, passenger-side air bag module,
side air bag module, curtain air bag module, or pre-tensioner seat belt.
49 L066 002
CURTAIN
AIR BAG MODULE
CONNECTOR
A6E81301112
49 L066 002
49 H066 002
A6E8130W151
49 H066 002
ACTIVATION
SWITCH
A6E8130W028
Page 848 of 909

AIR BAG SYSTEM
T–37
T
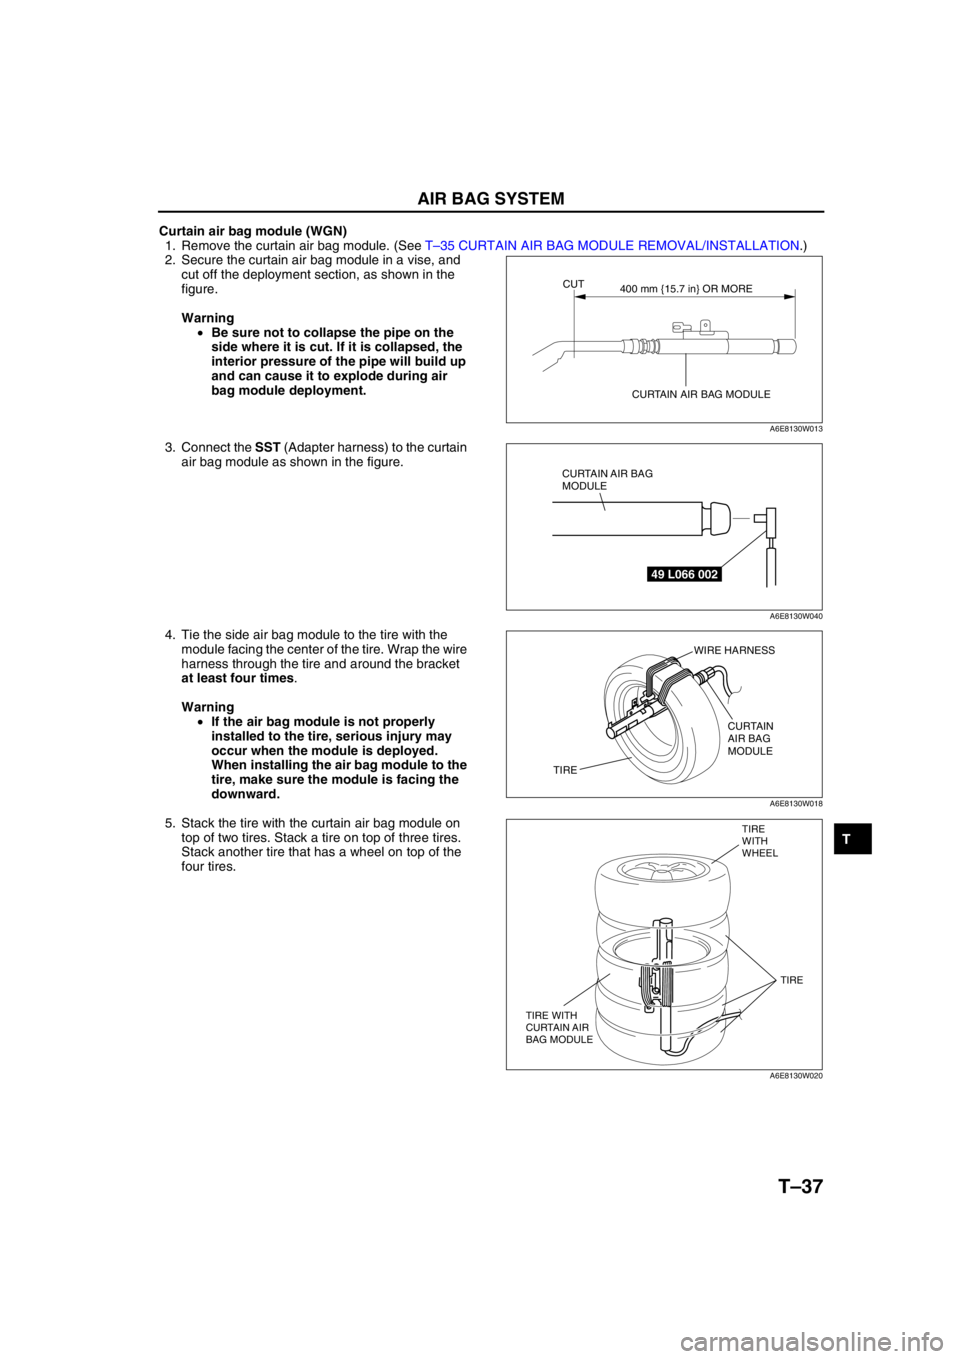
Curtain air bag module (WGN)
1. Remove the curtain air bag module. (See T–35 CURTAIN AIR BAG MODULE REMOVAL/INSTALLATION.)
2. Secure the curtain air bag module in a vise, and
cut off the deployment section, as shown in the
figure.
Warning
•Be sure not to collapse the pipe on the
side where it is cut. If it is collapsed, the
interior pressure of the pipe will build up
and can cause it to explode during air
bag module deployment.
3. Connect the SST (Adapter harness) to the curtain
air bag module as shown in the figure.
4. Tie the side air bag module to the tire with the
module facing the center of the tire. Wrap the wire
harness through the tire and around the bracket
at least four times.
Warning
•If the air bag module is not properly
installed to the tire, serious injury may
occur when the module is deployed.
When installing the air bag module to the
tire, make sure the module is facing the
downward.
5. Stack the tire with the curtain air bag module on
top of two tires. Stack a tire on top of three tires.
Stack another tire that has a wheel on top of the
four tires.
CUT
CURTAIN AIR BAG MODULE400 mm {15.7 in} OR MORE
A6E8130W013
49 L066 002
CURTAIN AIR BAG
MODULE
A6E8130W040
WIRE HARNESS
CURTAIN
AIR BAG
MODULE
TIRE
A6E8130W018
TIRE
WITH
WHEEL
TIRE WITH
CURTAIN AIR
BAG MODULETIRE
A6E8130W020
Page 849 of 909

T–38
AIR BAG SYSTEM
6. Tie all tires together with wire.
7. Connect the SST (Deployment tool) to the SST
(Adapter harness).
8. Connect the red clip of the SST (Deployment tool)
to the positive battery terminal and the black clip
to the negative battery terminal.
9. Verify that the red light on the SST (Deployment
tool) is illuminated.
10. Make sure all persons are standing at least 6 m
{20 ft} from the vehicle.
11. Press the activation switch on the SST
(Deployment tool) to deploy the curtain air bag
module.
End Of Sie
A6E8130W034
49 H066 002
49 L066 002
A6E8130W155
49 H066 002
ACTIVATION
SWITCH
A6E8130W028
Page 850 of 909
![MAZDA 6 2002 Workshop Manual Suplement ON-BOARD DIAGNOSTIC [MULTIPLEX COMMUNICATION SYSTEM]
T–39
T
MULTIPLEX COMMUNICATION SYSTEMA6E816255430201Outline
•If the controller area network (CAN) system is malfunctioning, read the DTCs of t MAZDA 6 2002 Workshop Manual Suplement ON-BOARD DIAGNOSTIC [MULTIPLEX COMMUNICATION SYSTEM]
T–39
T
MULTIPLEX COMMUNICATION SYSTEMA6E816255430201Outline
•If the controller area network (CAN) system is malfunctioning, read the DTCs of t](/img/28/57057/w960_57057-849.png)
ON-BOARD DIAGNOSTIC [MULTIPLEX COMMUNICATION SYSTEM]
T–39
T
MULTIPLEX COMMUNICATION SYSTEMA6E816255430201Outline
•If the controller area network (CAN) system is malfunctioning, read the DTCs of the following modules, using
the SST (WDS or equivalent) to determine the malfunctioning system.
—PCM
—TCM
—ABS (ABS/TCS) HU/CM (with ABS (ABS/TCS))
—DSC HU/CM (with DSC)
—4WD control module
—Instrument cluster
ON-BOARD DIAGNOSTIC [MULTIPLEX COMMUNICATION SYSTEM]