MAZDA 626 1987 Workshop Manual
Manufacturer: MAZDA, Model Year: 1987,
Model line: 626,
Model: MAZDA 626 1987
Pages: 1865, PDF Size: 94.35 MB
MAZDA 626 1987 Workshop Manual
626 1987
MAZDA
MAZDA
https://www.carmanualsonline.info/img/28/57059/w960_57059-0.png
MAZDA 626 1987 Workshop Manual
Trending: service interval, alternator belt, width, trunk release, brake pads, high beam, check oil
Page 1611 of 1865

1 4 REAR HATCH GLASS
2. Carefully clean and remove any grease from a 5
cm (1.97 in) wide area around the circumference
of the glass and the remaining bond on the body.
3. Bond a dam along the circumference of the glass
8 mm (0.31 in) from the edge.
Caution
Securely bond the dam and let it dry.
63U14X-064
4. Apply primer with a brush to the circumference of
the glass and the body and
it
them to naturally dry
for 20 to 30 minutes.
Caution
Be sure not to allow dirt, water, oil, etc. to
come in contact with the coated surfaces and
do not touch it with your hand.
63U14X-065
5. When the primer has dried, apply an 11 mm (0.43
in) thick bead of repair seal (B001 77 739) 11 mm
(0.43 in) from the periphery of the window glass
using a sealant gun.
Caution
Cut the nozzle of the repair seal cartridge as
illustrated in the figure.
If necessary, smooth the repair seal to correct
any irregularities.
63U14X-067
6. Tighten the rear hatch glass mounting nuts.
Tightening torque:
2.9 N-m (30 cm-kg, 26 in-lb)
86U14X-142
14—60
Page 1612 of 1865
REAR HATCH GLASS 1 4
8. Keep the door glass open until the repair seal
hardens to some degree to prevent pressure from
being exerted on the rear hatch glass.
If the door is closed quickly etc.
Hardening time of repair seal
Tem-
perature Surface hardening time Time required until car
can be put in service
5°C
(41
°F) Approx. 1.5 hrs 12 hrs
20°C (68°F) Approx. 1 hr 4 hrs
35°C (95°F) Approx. 10 min 2 hrs
86U14X-144
Replenished section
r with sealing agent
^ \ ^Glass
Spacer
10. Check for water leaks. If a leak is found, wipe the
water off well and add repair seal (B001 77 739).
86U14X-146
After checking for water leakage, install the mold.
Install the wiper arm, door trim, and defogger con-
nector.
86U14X-147
14—61
Page 1613 of 1865
1 4 QUARTER WINDOW GLASS
QUARTER WINDOW GLASS
STRUCTURAL VIEW
76G14X-024
1. Bolt
2. Rear side seatback
3. Screw (Hatchback)
Note
4. Package side shelf
(Hatchback)
5. Rear header trim screw
6. Rear pillar trim
7. Nuts
8. Quarter window molding
9. Quarter window glass
10. Dam
Use window tool set (49 0305 870A) to remove and install the glass.
14-62
Page 1614 of 1865
QUARTER WINDOW GLASS 14
Coupe/MX-6
86U14X-149
1. Seat belt bolts
2. Screw
3. Screw
4. Side trim
5. Screw
6. Rear pillar trim
7. Nut
8. Screw
9. Drip molding
10. Quarter window molding
11. Quarter window glass
12. Dam
14-63
Page 1615 of 1865

14 QUARTER WINDOW GLASS
76G14X-025
86U14X-151
86U14X-152
7mm
0.27in)
t
a H
t
U
n #
Quarter window
glass
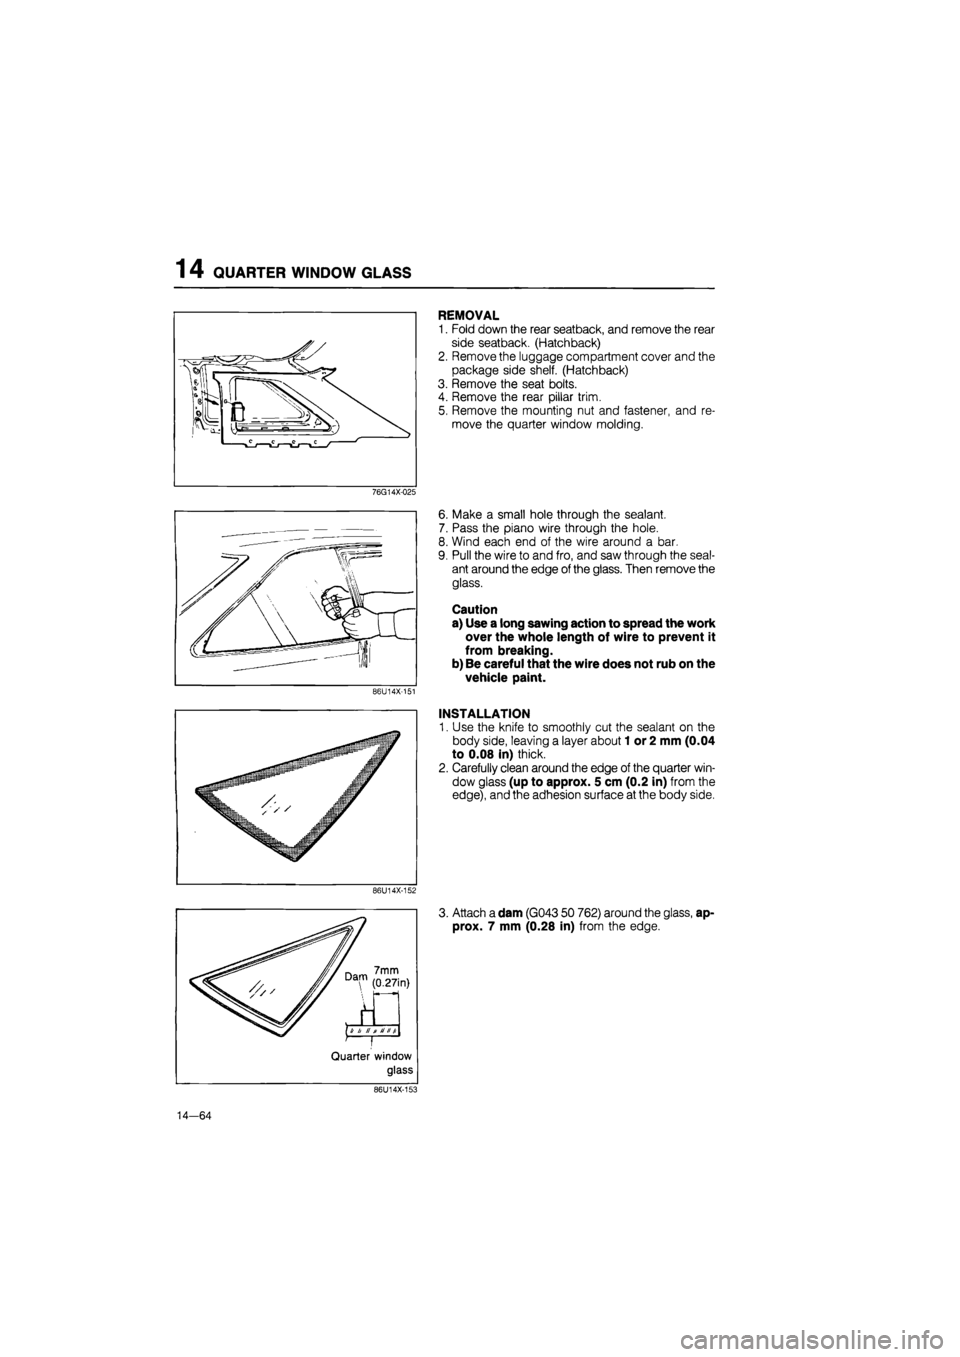
REMOVAL
1. Fold down the rear seatback, and remove the rear
side seatback. (Hatchback)
2. Remove the luggage compartment cover and the
package side shelf. (Hatchback)
3. Remove the seat bolts.
4. Remove the rear pillar trim.
5. Remove the mounting nut and fastener, and re-
move the quarter window molding.
6. Make a small hole through the sealant.
7. Pass the piano wire through the hole.
8. Wind each end of the wire around a bar.
9. Pull the wire to and fro, and saw through the seal-
ant around the edge
of
the glass. Then remove the
glass.
Caution
a) Use a long sawing action to spread the work
over the whole length of wire to prevent it
from breaking.
b) Be careful that the wire does not rub on the
vehicle paint.
INSTALLATION
1. Use the knife to smoothly cut the sealant on the
body side, leaving a layer about
1
or 2 mm (0.04
to 0.08 in) thick.
2. Carefully clean around the edge of the quarter win-
dow glass (up to approx. 5 cm (0.2 in) from the
edge), and the adhesion surface at the body side.
3. Attach a dam (G043 50 762) around the glass, ap-
prox. 7 mm (0.28 in) from the edge.
86U14X-153
14-64
Page 1616 of 1865
QUARTER WINDOW GLASS 1 4
4. Apply a thin coat of primer to the bonding area of
the body and glass, and allow 30 minutes for it
to dry.
Caution
Keep the area free of dirt. Do not touch the
surface. If primer gets on the hands, remove
it immediately.
86U14X-154
Repair
seal
lOver 10mm
\> " fl(Q.4iri)
J -Quarter
window glass
5. After the primer dries, apply a bead of repair seal
to a height of 10 mm (0.4 in) min. around the
edge of the glass.
86U14X-155
6. Attach the glass to the body.
86U14X-157
14-65
Page 1617 of 1865
14 QUARTER WINDOW GLASS
14—66
Check for water leaks. If a leak is found, wipe the
water off well and add repair seal (B001 77 739).
Install in the reverse order of removal.
Page 1618 of 1865
HEADLINER 14
HEADLINER
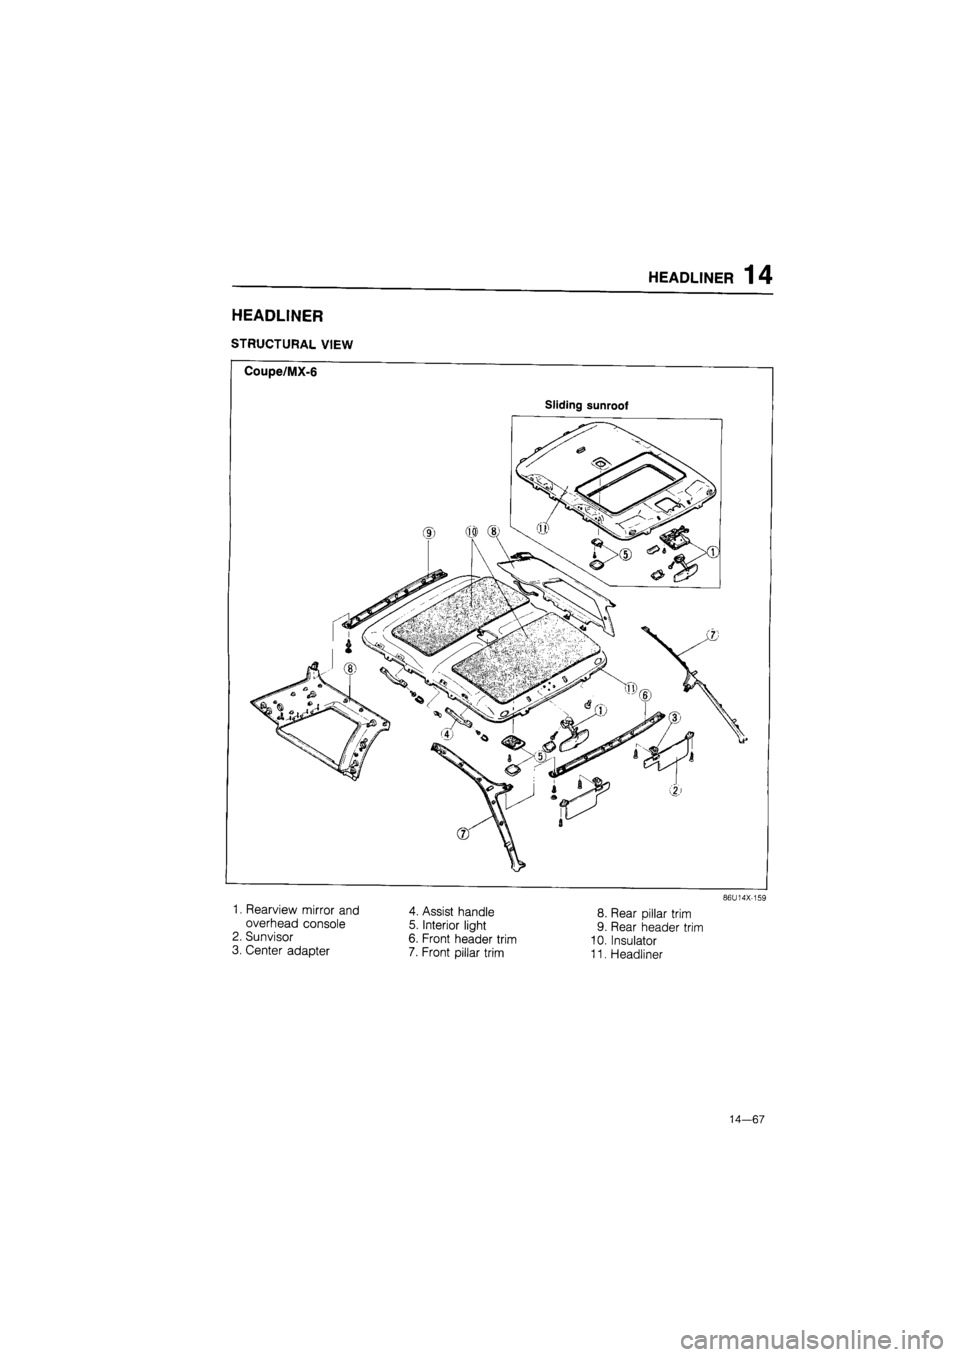
STRUCTURAL VIEW
Coupe/MX-6
Sliding sunroof
1. Rearview mirror and
overhead console
2. Sunvisor
3. Center adapter
4. Assist handle
5. Interior light
6. Front header trim
7. Front pillar trim
8. Rear pillar trim
9. Rear header trim
10. Insulator
11. Headliner
86U14X-159
14—67
Page 1619 of 1865
14 HEADLINER
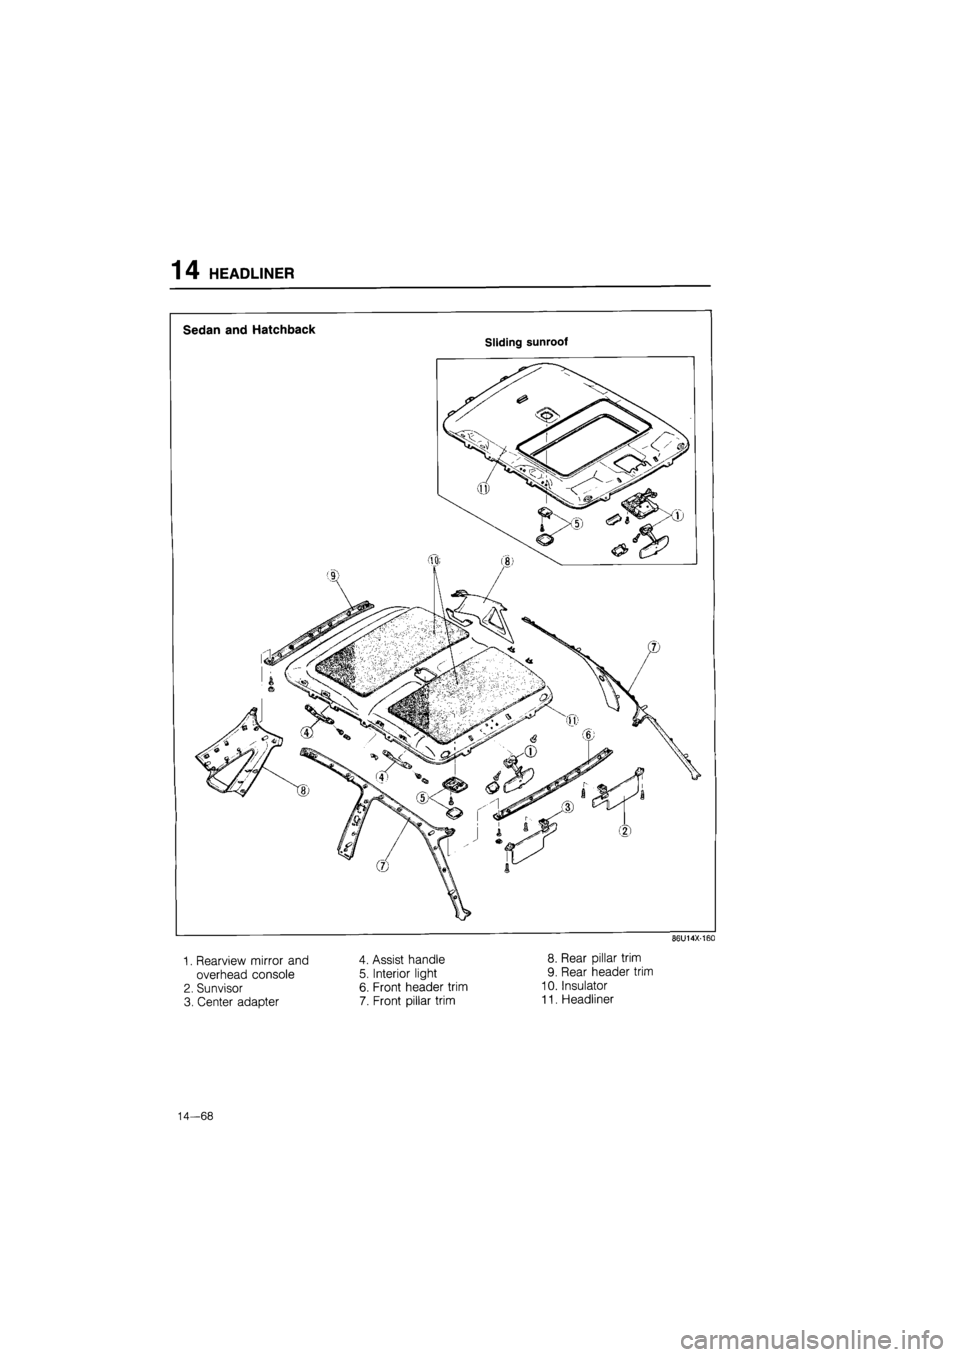
Sedan and Hatchback
Sliding sunroof
86U14X-160
1. Rearview mirror and
overhead console
2. Sunvisor
3. Center adapter
4. Assist handle
5. Interior light
6. Front header trim
7. Front pillar trim
8. Rear pillar trim
9. Rear header trim
10. Insulator
11. Headliner
14—68
Page 1620 of 1865
HEADLINER 14
REMOVAL
1. Remove the overhead console cover.
2. Remove the rearview mirror.
3. Remove the overhead console mounting screws.
4. Disconnect the connectors and remove the over-
head console.
86U14X-161
69G14X-241
5. Remove the sunvisors.
6. Remove the center adapters.
7. Remove the interior light lens with a protected small
screwdriver.
86U14X-162
8. Remove the interior light mounting screws and dis-
connect the connector.
9. Remove the interior light.
86U14X-163
14—69
Trending: Rear brakes, seat adjustment, dimensions, buttons, checking oil, wheel size, radiator cap


