MAZDA 626 1987 Workshop Manual
Manufacturer: MAZDA, Model Year: 1987, Model line: 626, Model: MAZDA 626 1987Pages: 1865, PDF Size: 94.35 MB
Page 971 of 1865

DISASSEMBLY 7B
Outlet pipe
83U07B-168
83U07B-169
83U07B-170
3. Remove the governor outlet pipe, governor inlet
pipe, and O-rings.
4. Remove the 2-3 accumulator piston assembly and
O-rings.
5. Remove the bearing housing.
(1) Remove the bolt indicated in the figure.
(2) Remove the roll pin with a pin punch.
(3) Remove the bearing housing by tapping light-
ly with a plastic hammer.
6. Remove the idle gear assembly and output gear
assembly by tapping out from the torque convert-
er side.
83U07B-171
7B-105
Page 972 of 1865
7B DISASSEMBLY
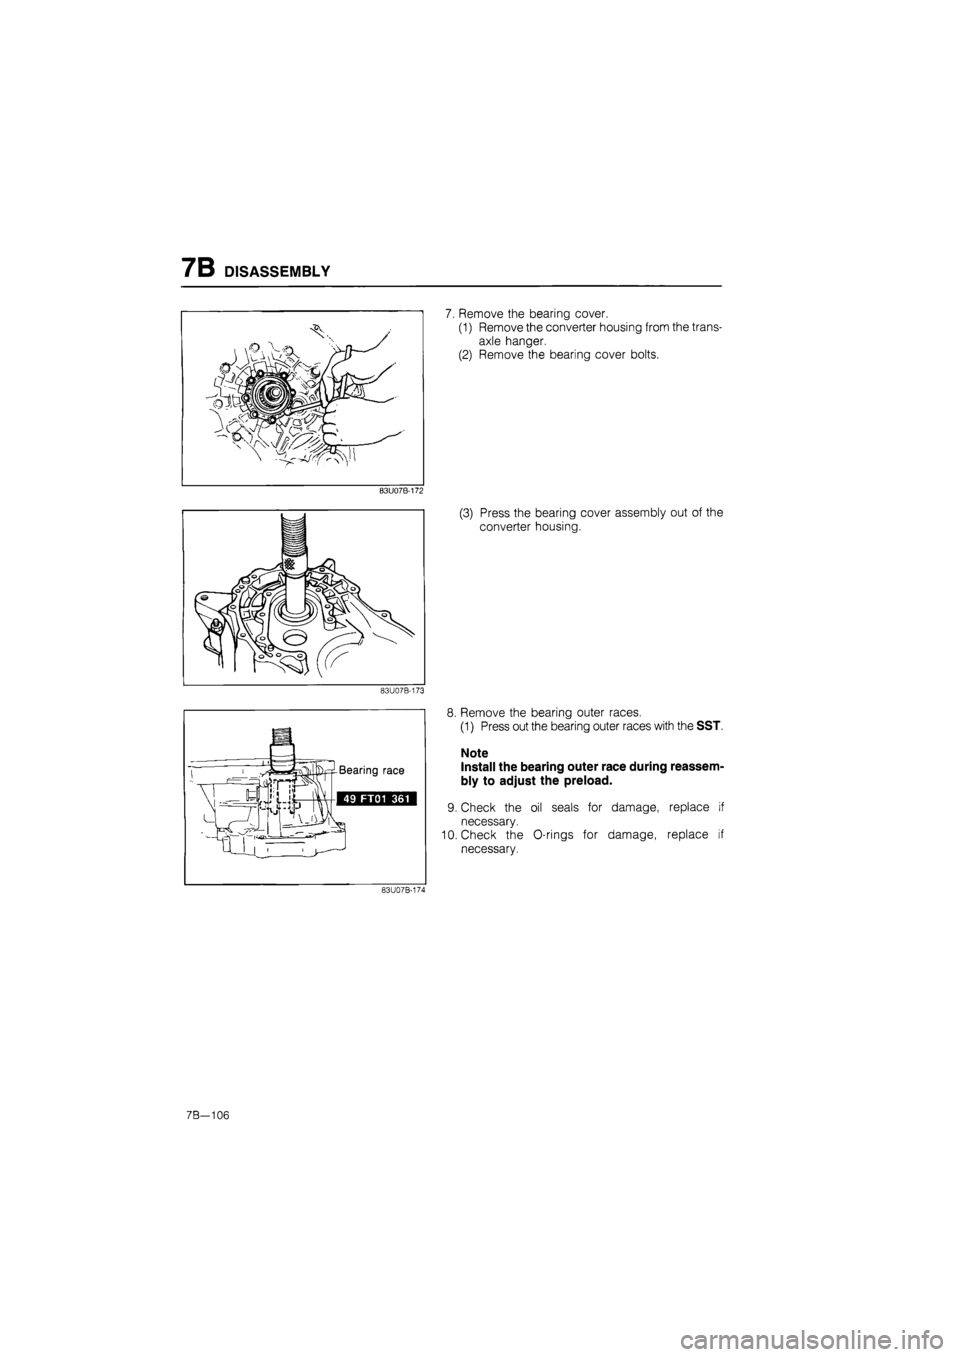
7. Remove the bearing cover.
(1) Remove the converter housing from the trans-
axle hanger.
(2) Remove the bearing cover bolts.
83U07B-173
8. Remove the bearing outer races.
(1) Press out the bearing outer races with the SST.
Note
Install the bearing outer race during reassem-
bly to adjust the preload.
9. Check the oil seals for damage, replace if
necessary.
10. Check the O-rings for damage, replace if
necessary.
83U07B-174
7B—106
Page 973 of 1865
INSPECTION AND REPAIR 7B
INSPECTION AND REPAIR
PRECAUTION
(1) Several of the parts resemble each other; organize them so that they do not get mixed up.
(2) Clean each part with cleaning oil, clean out the oil holes and oil passages with compressed air,
and check that there are no obstructions.
(3) When using cleaning oil and compressed air, wear protective eyewear.
(4) If a clutch plate or brake band is replaced with a new one, soak it in ATF for 2 hours or more
before installing.
(5) Before assembly, apply ATF to all seal rings, rotating parts, and sliding parts.
(6) All seals, gaskets and roll pins must be replaced with new ones during assembly.
(7) Use petroleum jelly, not grease where required.
(8) When it is necessary to replace a bushing, replace the assembly which includes that bushing.
76G07B-217
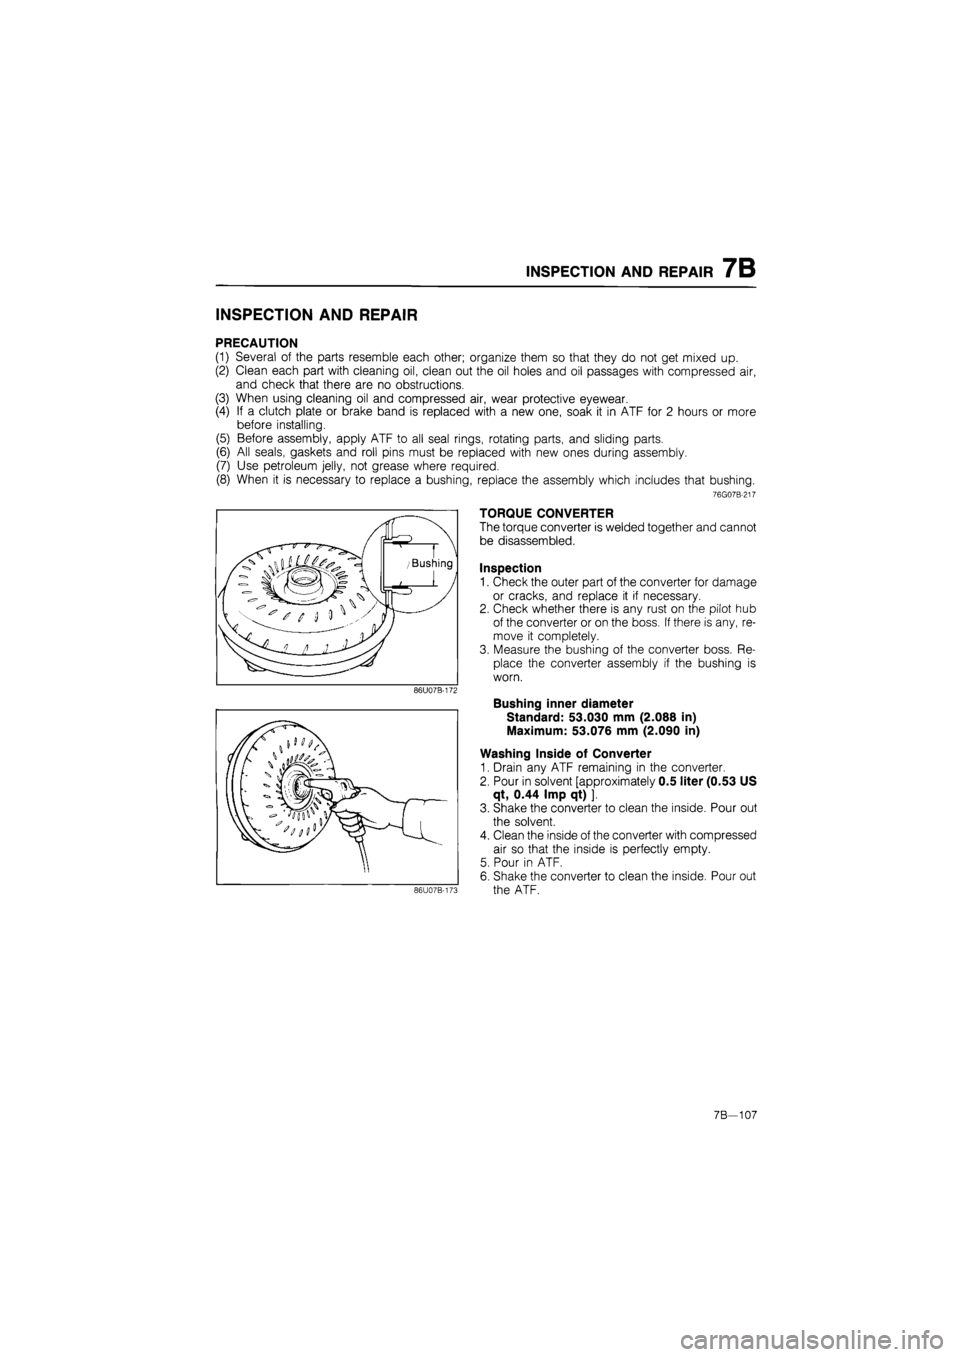
TORQUE CONVERTER
The torque converter is welded together and cannot
be disassembled.
Inspection
1. Check the outer part of the converter for damage
or cracks, and replace it if necessary.
2. Check whether there is any rust on the pilot hub
of the converter or on the boss. If there is any, re-
move it completely.
3. Measure the bushing of the converter boss. Re-
place the converter assembly if the bushing is
worn.
Bushing inner diameter
Standard: 53.030 mm (2.088 in)
Maximum: 53.076 mm (2.090 in)
Washing Inside of Converter
1. Drain any ATF remaining in the converter.
2. Pour in solvent [approximately 0.5 liter (0.53 US
qt, 0.44 Imp qt) ].
3. Shake the converter to clean the inside. Pour out
the solvent.
4. Clean the inside of the converter with compressed
air so that the inside is perfectly empty.
5. Pour in ATF.
6. Shake the converter to clean the inside. Pour out
the ATF.
7B—107
Page 974 of 1865
7B INSPECTION AND REPAIR
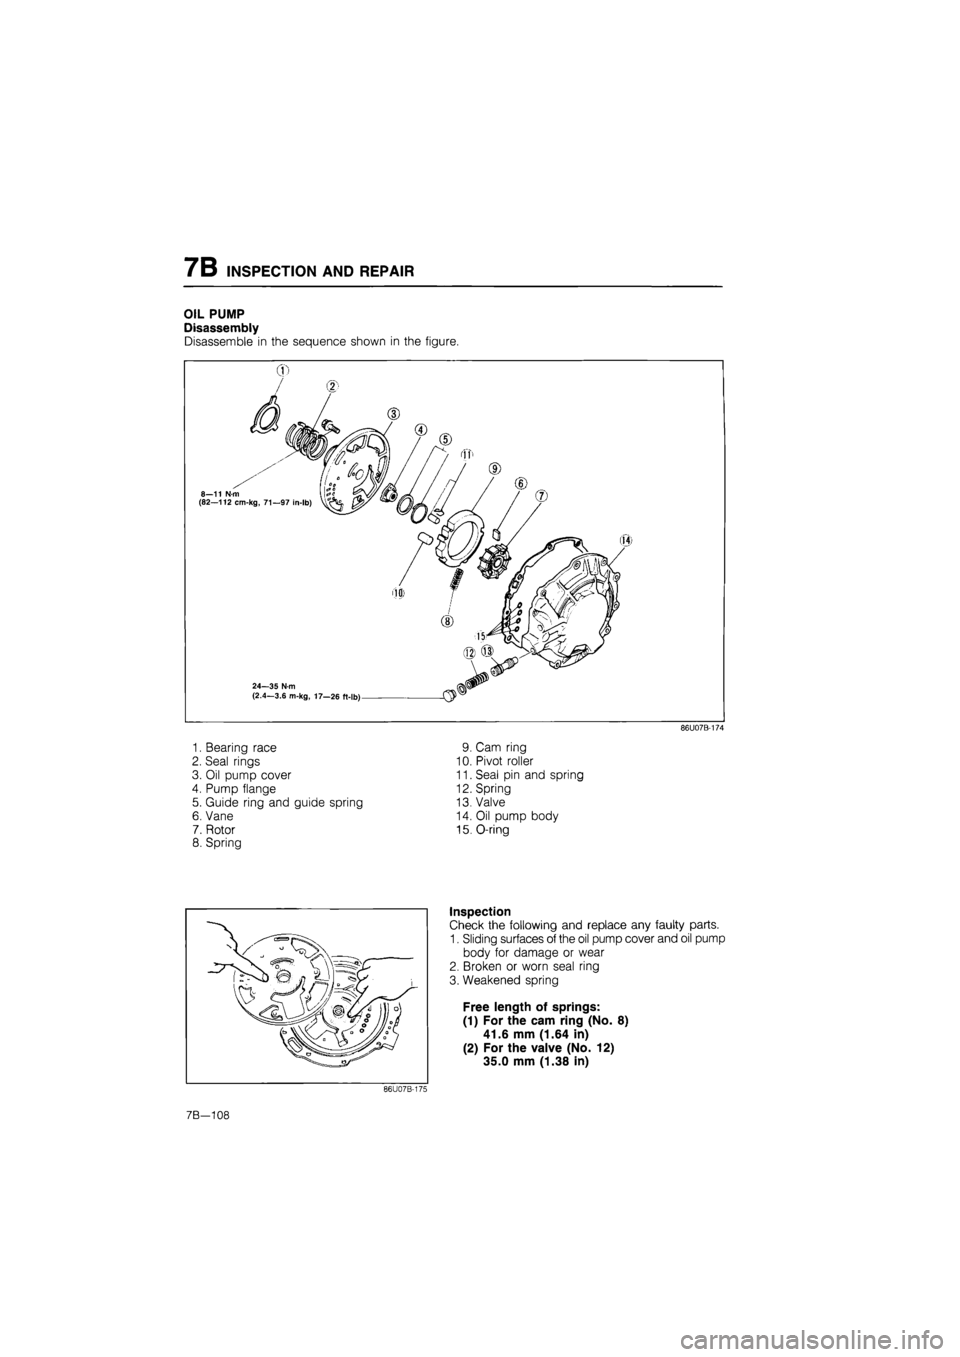
OIL PUMP
Disassembly
Disassemble in the sequence shown in the figure.
8—11 Nm (82—112 cm-kg, 71—97 in-lb)
24—35 N-m (2.4-3.6 m-kg, 17-26 ft-lb)
1. Bearing race
2. Seal rings
3. Oil pump cover
4. Pump flange
5. Guide ring and guide spring
6. Vane
7. Rotor
8. Spring
86U07B-174
9. Cam ring
10. Pivot roller
11. Seal pin and spring
12. Spring
13. Valve
14. Oil pump body
15. O-ring
Inspection
Check the following and replace any faulty parts.
1. Sliding surfaces of the oil pump cover and oil pump
body for damage or wear
2. Broken or worn seal ring
3. Weakened spring
Free length of springs:
(1) For the cam ring (No. 8)
41.6 mm (1.64 in)
(2) For the valve (No. 12)
35.0 mm (1.38 in)
86U07B-175
7B—108
Page 975 of 1865
INSPECTION AND REPAIR 7B
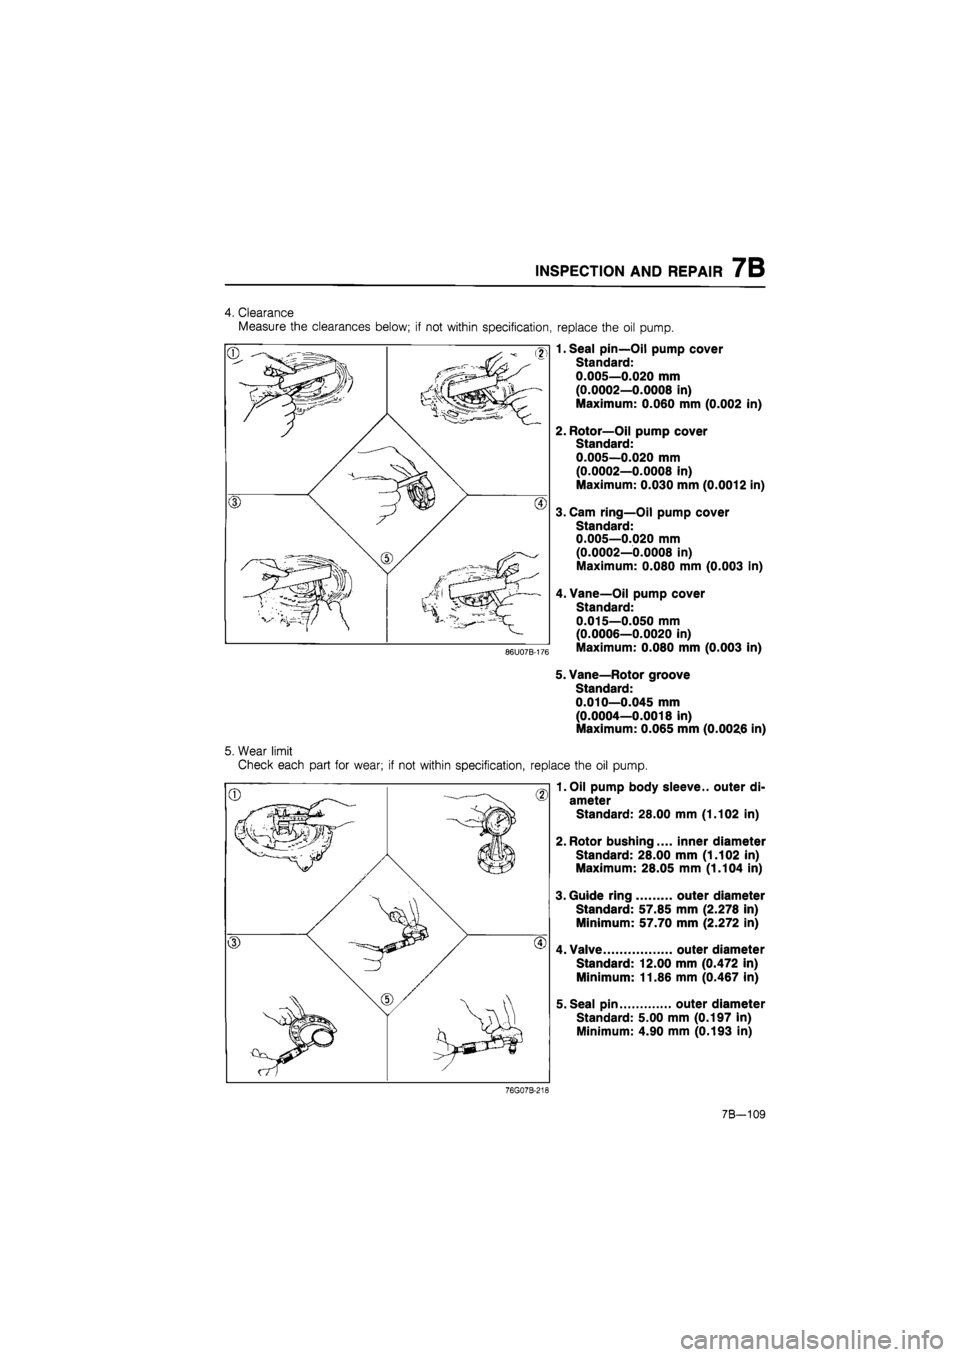
replace the oil pump.
1. Seal pin—Oil pump cover
Standard:
0.005—0.020 mm
(0.0002—0.0008 in)
Maximum: 0.060 mm (0.002 in)
2. Rotor—Oil pump cover
Standard:
0.005—0.020 mm
(0.0002—0.0008 in)
Maximum: 0.030 mm (0.0012 in)
3. Cam ring—Oil pump cover
Standard:
0.005—0.020 mm
(0.0002—0.0008 in)
Maximum: 0.080 mm (0.003 in)
4. Vane—Oil pump cover
Standard:
0.015—0.050 mm
(0.0006—0.0020 in)
Maximum: 0.080 mm (0.003 in)
5. Vane—Rotor groove
Standard:
0.010—0.045 mm
(0.0004—0.0018 in)
Maximum: 0.065 mm (0.0026 in)
5. Wear limit
Check each part for wear; if not within specification, replace the oil pump.
1. Oil pump body sleeve., outer di-
ameter
Standard: 28.00 mm (1.102 in)
2. Rotor bushing.... inner diameter
Standard: 28.00 mm (1.102 in)
Maximum: 28.05 mm (1.104 in)
3. Guide ring outer diameter
Standard: 57.85 mm (2.278 in)
Minimum: 57.70 mm (2.272 in)
4. Valve outer diameter
Standard: 12.00 mm (0.472 in)
Minimum: 11.86 mm (0.467 in)
5. Seal pin outer diameter
Standard: 5.00 mm (0.197 in)
Minimum: 4.90 mm (0.193 in)
4. Clearance
Measure the clearances below; if not within specification,
7B-109
Page 976 of 1865
7B INSPECTION AND REPAIR
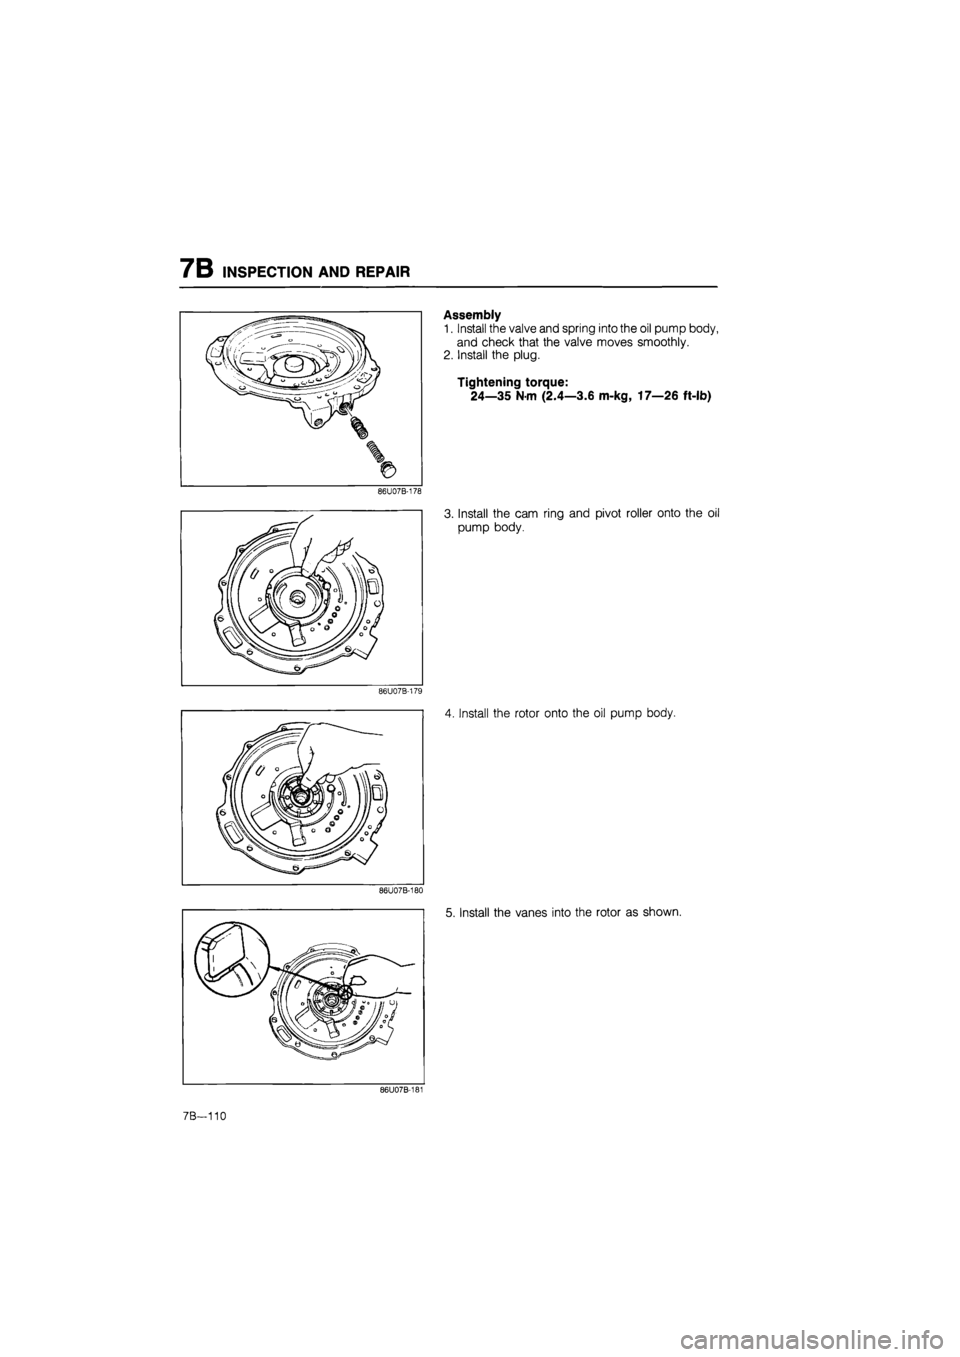
Assembly
1. Install the valve and spring into the oil pump body,
and check that the valve moves smoothly.
2. Install the plug.
Tightening torque:
24—35 Nm (2.4—3.6 m-kg, 17—26 ft-lb)
86U07B-178
86U07B-179
/iiiMd ill
I
o (II m IP
f©
vA /J o " /1 °
Q® //joj / // ° r o t
3. Install the cam ring and pivot roller onto the oil
pump body.
4. Install the rotor onto the oil pump body.
86U07B-180
5. Install the vanes into the rotor as shown.
86U07B-181
7B—110
Page 977 of 1865

INSPECTION AND REPAIR 7B
Guid spring
86U07B-182
86U07B-183
86U07B-184
6. Install the guide spring and guide ring while ex-
panding the vanes toward the cam ring.
7. Install the pump flange onto the rotor.
8. Install the spring between the cam ring and oil
pump body.
9. Install the seal pins and springs with the pins fac-
ing toward the oil pump body.
Note
Install the seal pins round end first.
10. Install the O-rings.
86U07B-185
7R
1 11
Page 978 of 1865
7B INSPECTION AND REPAIR
86U07B-186
86U07B-187
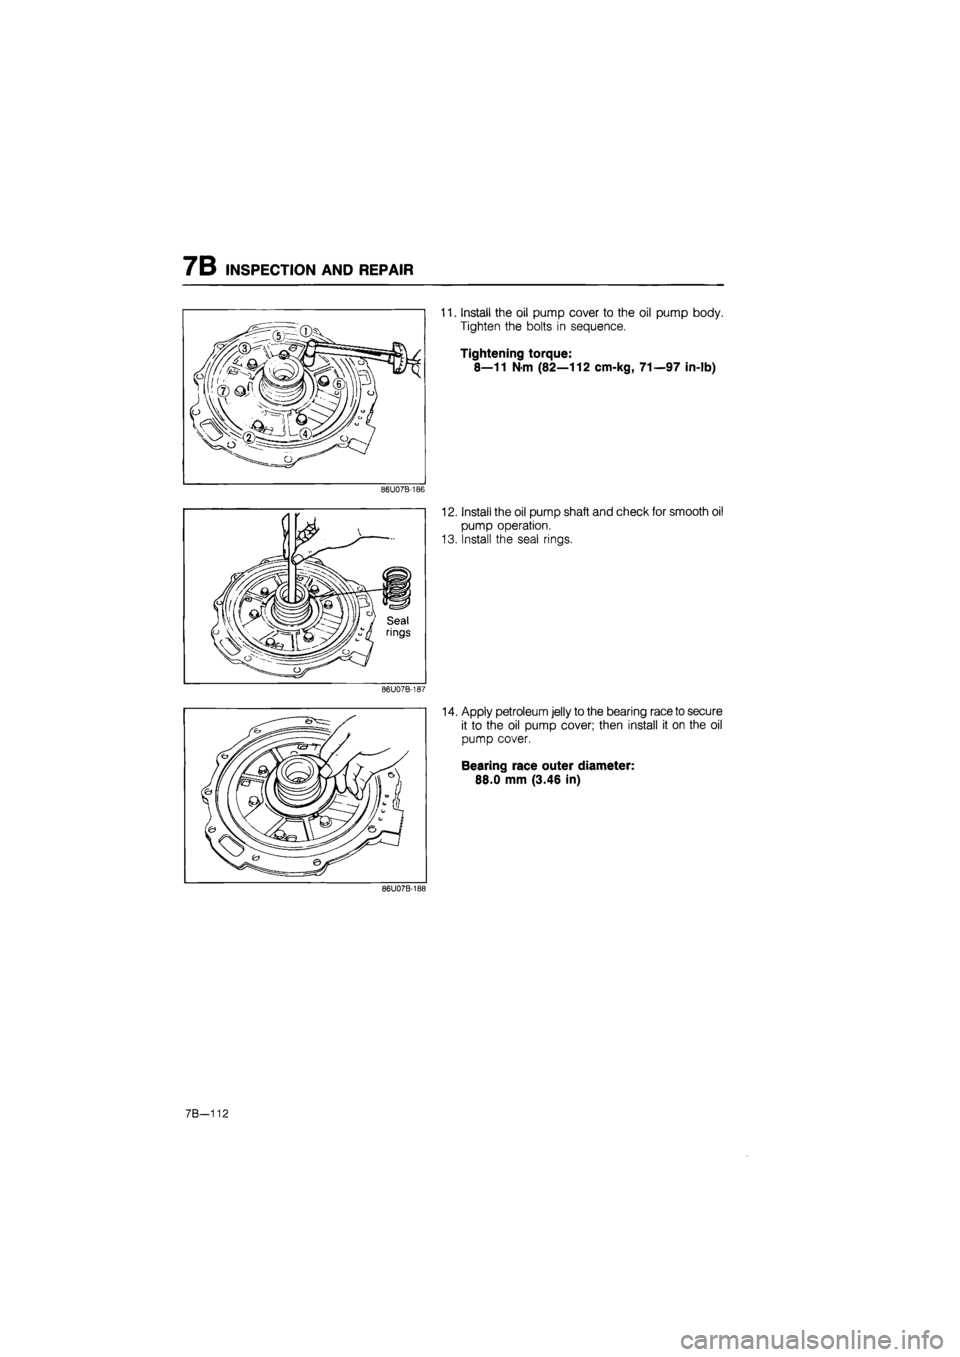
11. Install the oil pump cover to the oil pump body.
Tighten the bolts in sequence.
Tightening torque:
8—11 Nm (82—112 cm-kg, 71—97 in-lb)
12. Install the oil pump shaft and check for smooth oil
pump operation.
13. Install the seal rings.
14. Apply petroleum jelly to the bearing race
to
secure
it to the oil pump cover; then install it on the oil
pump cover.
Bearing race outer diameter:
88.0 mm (3.46 in)
86U07B-188
7B—112
Page 979 of 1865
INSPECTION AND REPAIR 7B
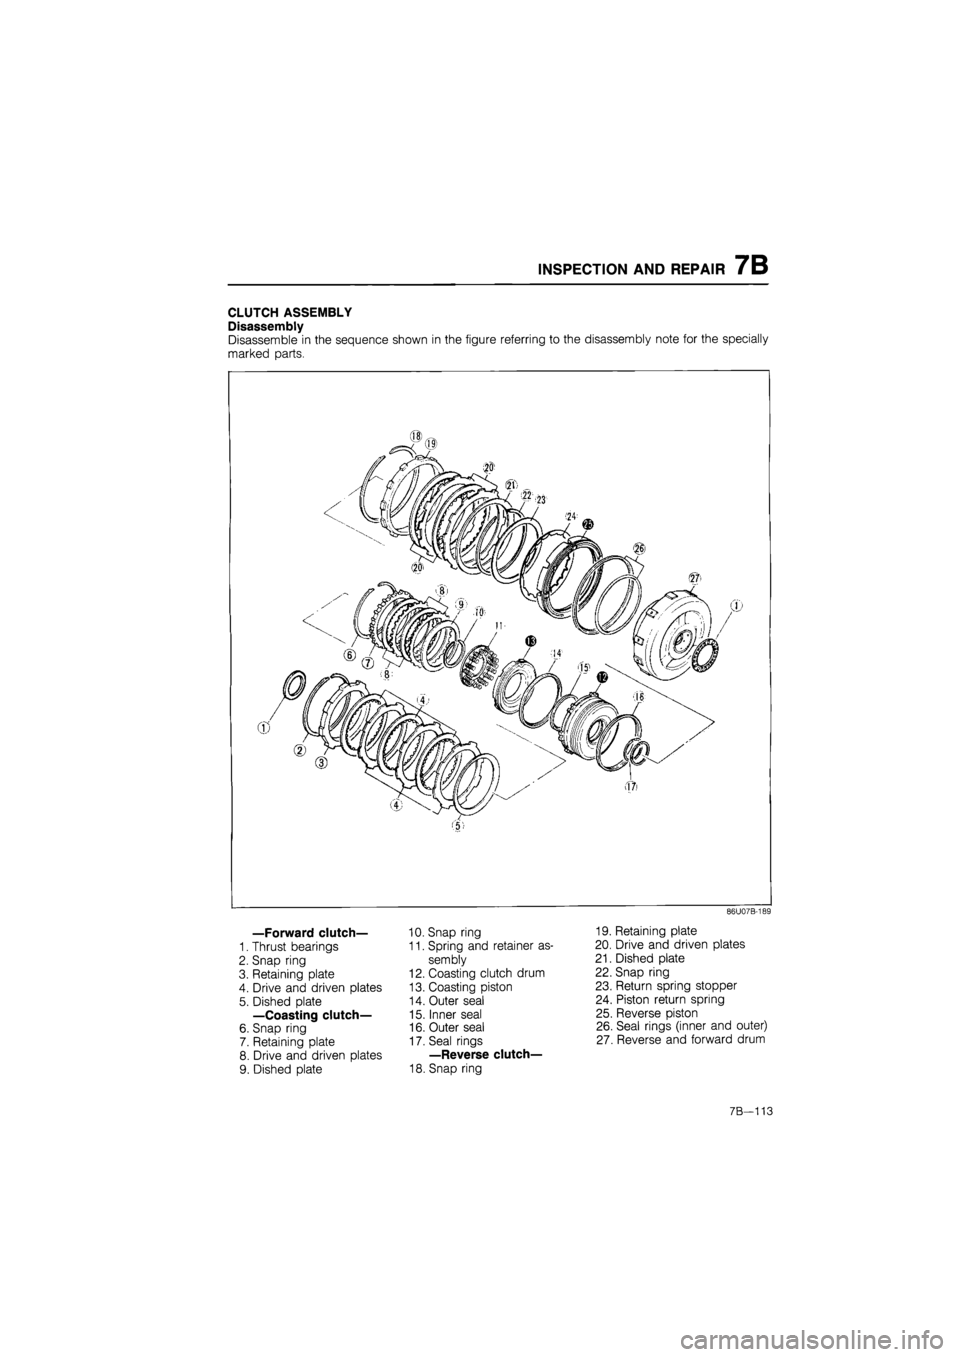
CLUTCH ASSEMBLY
Disassembly
Disassemble in the sequence shown in the figure referring to the disassembly note for the specially
marked parts.
—Forward clutch—
1. Thrust bearings
2. Snap ring
3. Retaining plate
4. Drive and driven plates
5. Dished plate
—Coasting clutch—
6. Snap ring
7. Retaining plate
8. Drive and driven plates
9. Dished plate
10. Snap ring
11. Spring and retainer as-
sembly
12. Coasting clutch drum
13. Coasting piston
14. Outer seal
15. Inner seal
16. Outer seal
17. Seal rings
—Reverse clutch—
18. Snap ring
86U07B-189
19. Retaining plate
20. Drive and driven plates
21. Dished plate
22. Snap ring
23. Return spring stopper
24. Piston return spring
25. Reverse piston
26. Seal rings (inner and outer)
27. Reverse and forward drum
7B—113
Page 980 of 1865
7B INSPECTION AND REPAIR
86U07B-190
86U07B-191
76G07B-130
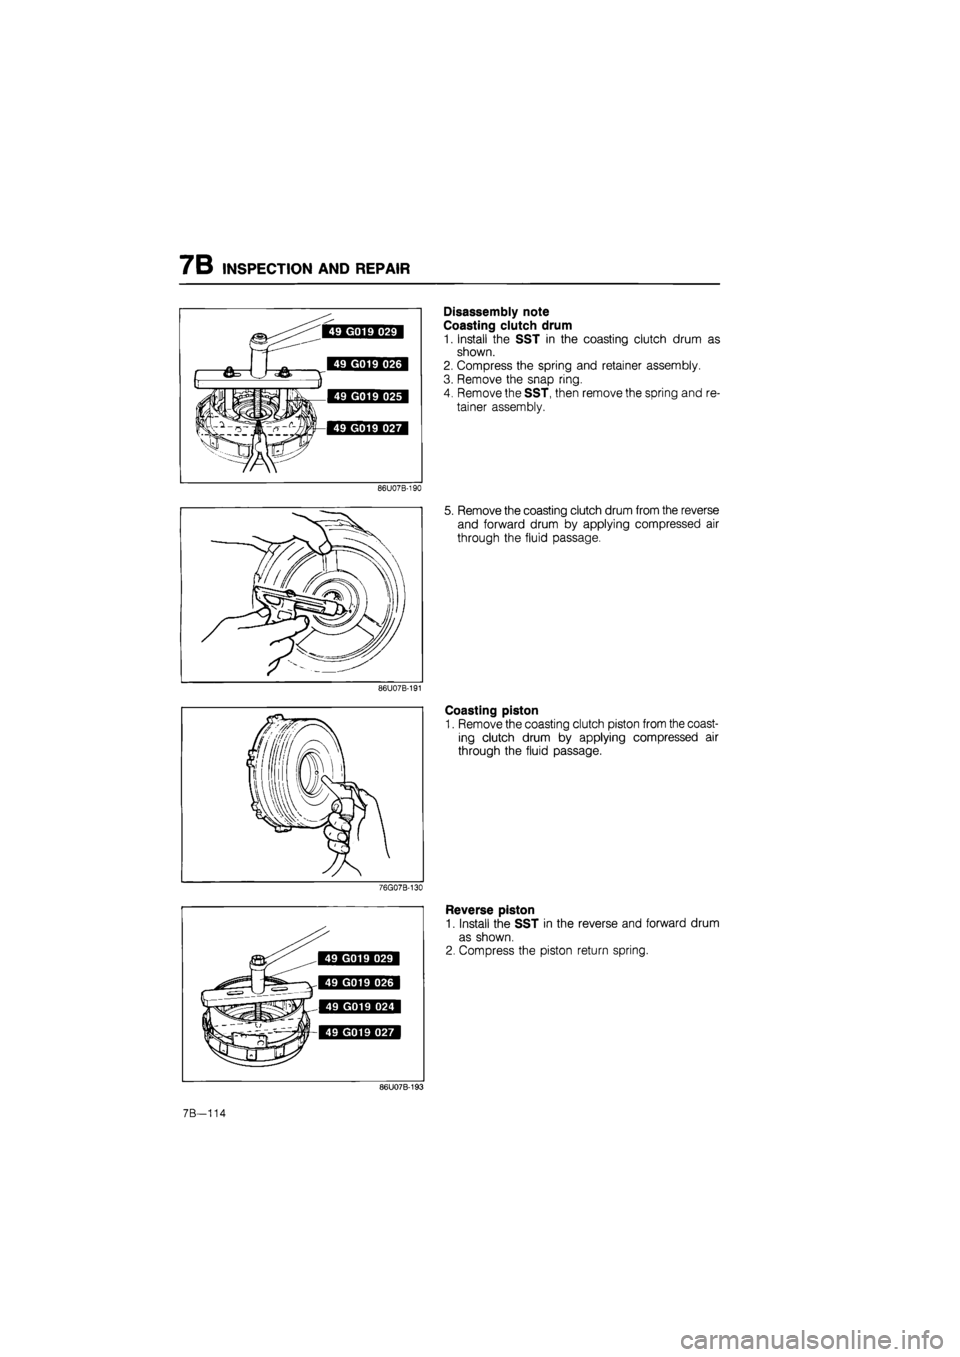
Disassembly note
Coasting clutch drum
1. Install the SST in the coasting clutch drum as
shown.
2. Compress the spring and retainer assembly.
3. Remove the snap ring.
4. Remove the SST, then remove the spring and re-
tainer assembly.
5. Remove the coasting clutch drum from the reverse
and forward drum by applying compressed air
through the fluid passage.
Coasting piston
1. Remove the coasting clutch piston from the coast-
ing clutch drum by applying compressed air
through the fluid passage.
Reverse piston
1. Install the SST in the reverse and forward drum
as shown.
2. Compress the piston return spring.
86U07B-193
7B—114