MITSUBISHI LANCER 2005 Workshop Manual
Manufacturer: MITSUBISHI, Model Year: 2005, Model line: LANCER, Model: MITSUBISHI LANCER 2005Pages: 788, PDF Size: 45.98 MB
Page 161 of 788
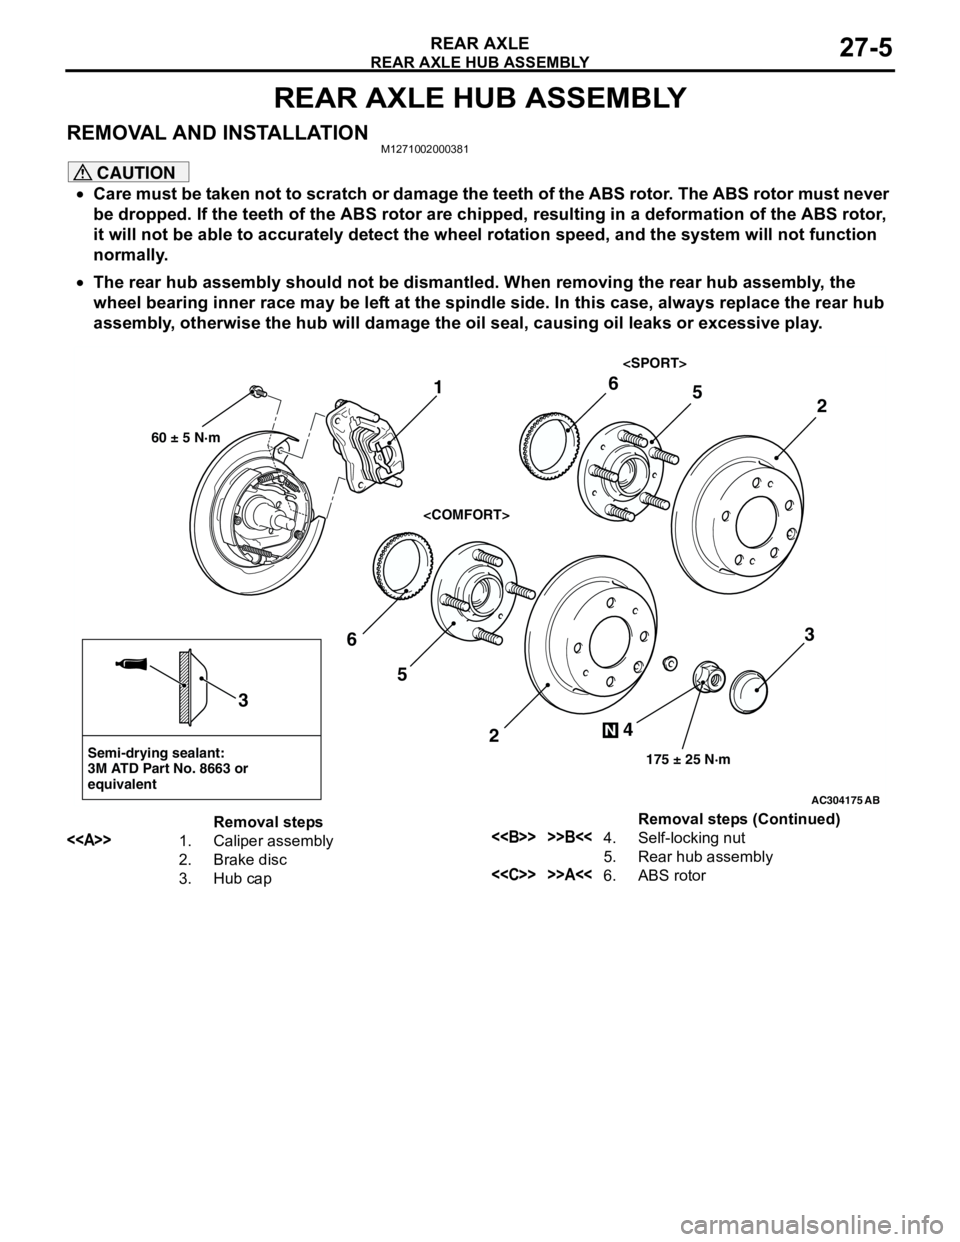
REAR AXLE HUB ASSEMBLY
REAR AXLE27-5
REAR AXLE HUB ASSEMBLY
REMOVAL AND INSTALLATIONM1271002000381
CAUTION
•Care must be taken not to scratch or damage the teeth of the ABS rotor. The ABS rotor must never
be dropped. If the teeth of the ABS rotor are chipped, resulting in a deformation of the ABS rotor,
it will not be able to accurately detect the wheel rotation speed, and the system will not function
normally.
•The rear hub assembly should not be dismantled. When removing the rear hub assembly, the
wheel bearing inner race may be left at the spindle side. In this case, always replace the rear hub
assembly, otherwise the hub will damage the oil seal, causing oil leaks or excessive play.
AC304175
Semi-drying sealant:
3M ATD Part No. 8663 or
equivalent
2
3
5 6
4
N
175 ± 25 N·m
3
AB
1
60 ± 5 N·m
2
56
Removal steps
<>1. Caliper assembly
2. Brake disc
3. Hub cap<> >>B<<4. Self-locking nut
5. Rear hub assembly
<
Page 162 of 788
Page 163 of 788
31-1
GROUP 31
WHEEL AND TYRE
CONTENTS
GENERAL INFORMATION . . . . . . . .31-2
SERVICE SPECIFICATIONS . . . . . . .31-2
TROUBLESHOOTING . . . . . . . . . . . .31-3
DIAGNOSIS . . . . . . . . . . . . . . . . . . . . . . . . 31-3
WHEEL BALANCE ACCURACY . . . . . . . . 31-4
ON-VEHICLE SERVICE . . . . . . . . . . .31-7
TYRE INFLATION PRESSURE CHECK . . . 31-7
TYRE WEAR CHECK . . . . . . . . . . . . . . . . . 31-7
WHEEL RUNOUT CHECK . . . . . . . . . . . . . 31-7
WHEEL AND TYRE . . . . . . . . . . . . . .31-7
INSTALLATION SERVICE POINT . . . . . . . 31-7
Page 164 of 788
GENERAL INFORMATION
WHEEL AND TYRE31-2
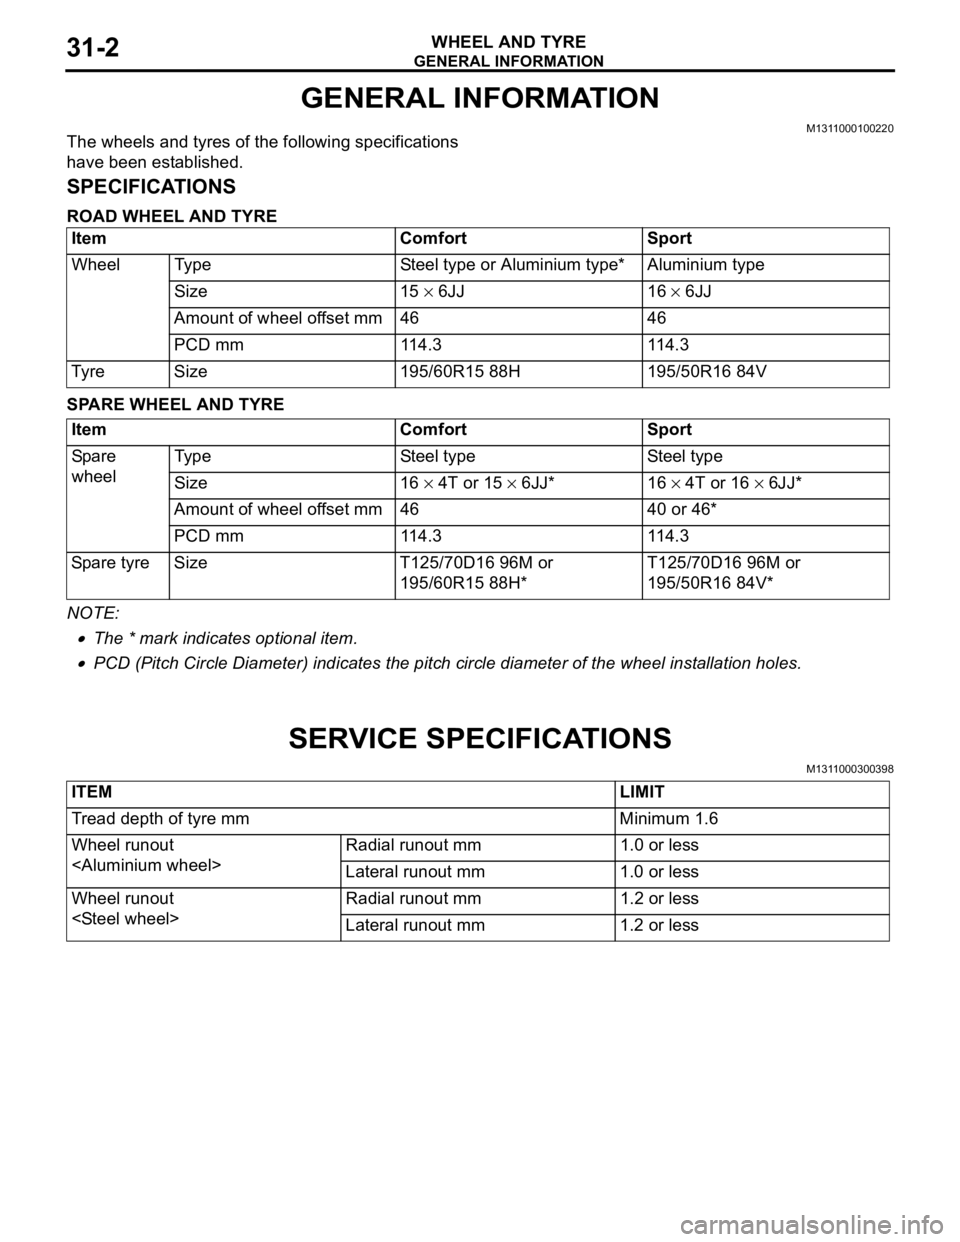
GENERAL INFORMATION
M1311000100220The wheels and tyres of the following specifications
have been established.
SPECIFICATIONS
ROAD WHEEL AND TYRE
SPARE WHEEL AND TYRE
NOTE: .
•The * mark indicates optional item.
•PCD (Pitch Circle Diameter) indicates the pitch circle diameter of the wheel installation holes.
SERVICE SPECIFICATIONS
M1311000300398
Item Comfort Sport
Wheel Type Steel type or Aluminium type* Aluminium type
Size 15 × 6JJ 16 × 6JJ
Amount of wheel offset mm 46 46
PCD mm 114.3 114.3
Tyre Size 195/60R15 88H 195/50R16 84V
Item Comfort Sport
Spare
wheelType Steel type Steel type
Size 16 × 4T or 15 × 6JJ* 16 × 4T or 16 × 6JJ*
Amount of wheel offset mm 46 40 or 46*
PCD mm 114.3 114.3
Spare tyre Size T125/70D16 96M or
195/60R15 88H*T125/70D16 96M or
195/50R16 84V*
ITEM LIMIT
Tread depth of tyre mm Minimum 1.6
Wheel runout
Lateral runout mm 1.0 or less
Wheel runout
Lateral runout mm 1.2 or less
Page 165 of 788
TROUBLESHOOTING
WHEEL AND TYRE31-3
TROUBLESHOOTING
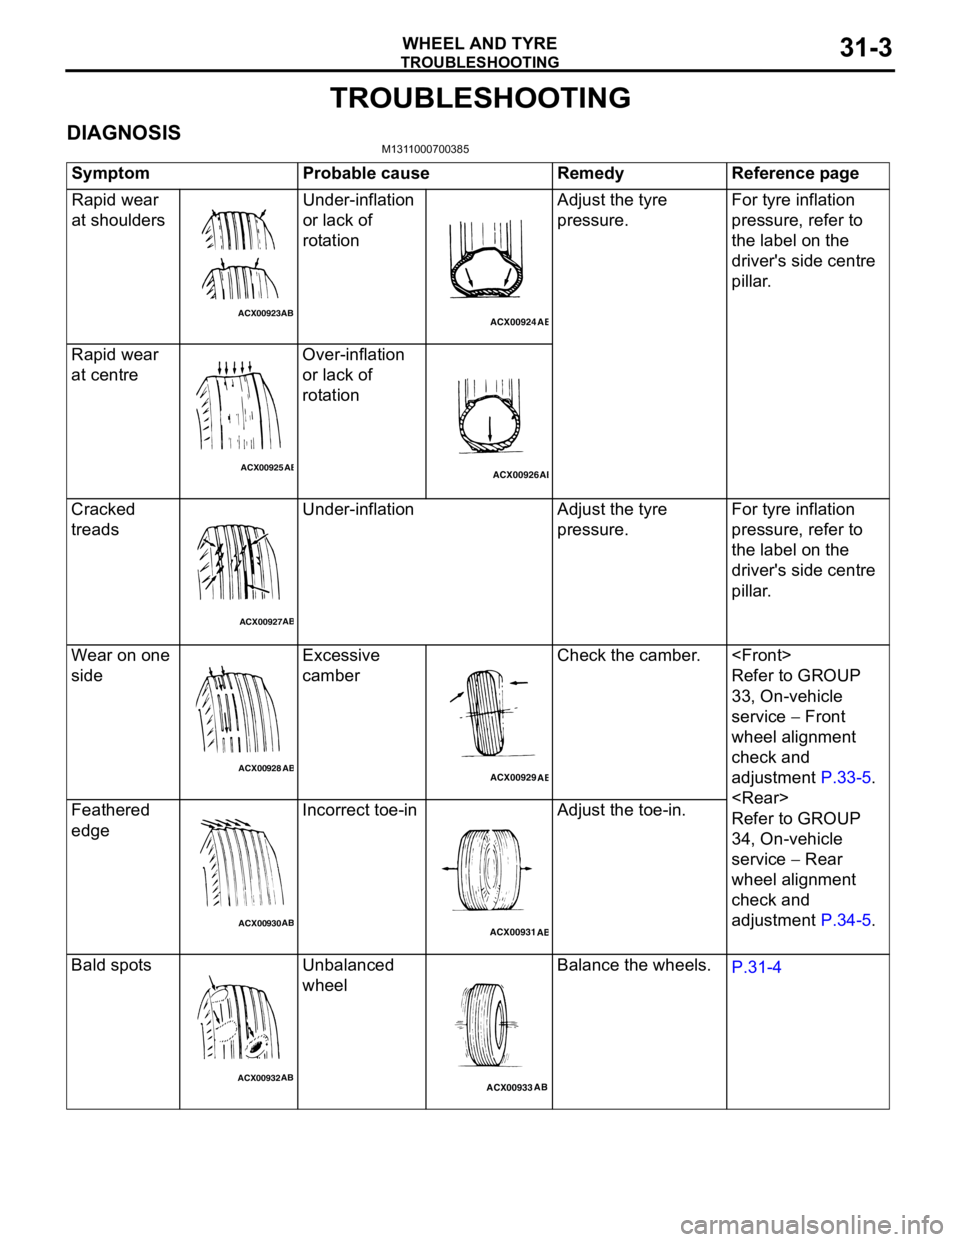
DIAGNOSISM1311000700385
Symptom Probable cause Remedy Reference page
Rapid wear
at shouldersUnder-inflation
or lack of
rotationAdjust the tyre
pressure.For tyre inflation
pressure, refer to
the label on the
driver's side centre
pillar.
Rapid wear
at centreOver-inflation
or lack of
rotation
Cracked
treadsUnder-inflation Adjust the tyre
pressure.For tyre inflation
pressure, refer to
the label on the
driver's side centre
pillar.
Wear on one
sideExcessive
camberCheck the camber.
Refer to GROUP
33, On-vehicle
service − Front
wheel alignment
check and
adjustment P.33-5.
Refer to GROUP
34, On-vehicle
service − Rear
wheel alignment
check and
adjustment P.34-5. Feathered
edgeIncorrect toe-in Adjust the toe-in.
Bald spots Unbalanced
wheelBalance the wheels.
P.31-4
ACX00923ABACX00924
AB
ACX00925ABACX00926AB
ACX00927AB
ACX00928
ABACX00929
AB
ACX00930ABACX00931
AB
ACX00932ABACX00933AB
Page 166 of 788
TROUBLESHOOTING
WHEEL AND TYRE31-4
WHEEL BALANCE ACCURACYM1311001700247
PURPOSE
This section contains tips and procedures for
achieving accurate wheel balance. Steering wheel
vibration and/or body shake can result if any of these
procedures are not carefully observed.
1. Wheels and tyres must be properly mounted on a
balancer in order to achieve correct balance.
Centring the wheel on the shaft of the balancer is
essential for proper mounting.
2. Off-the-car wheel balancers must be calibrated
periodically to ensure good balancing results. An
inaccurately calibrated balancer could cause
unnecessary replacement of tyres, shocks,
suspension components, or steering components.
Check your balancer's calibration approximately
every 100 balances. Your wheel balancer's
instruction manual should include calibration
procedures. If the calibration procedures specifically
for your balancer are missing, use the generic steps
in this section for zero calibration, static balance, and
dynamic balance checks. The wheel balancer
calibration checks are also described in the
flowchart. (Refer to P.31-6).
PROCEDURE
1. Confirm that the balancer's cone and the wheel
mounting cone are undamaged and free of dirt
and rust.
2. On this vehicle, the wheel's centre hole on the
hub side has a chamfered edge. Use a
back-mounting cone on your wheel balancer to
centre the wheel on the balancer shaft.
3. Install a wheel mounting cone. The appropriate
size cone for this vehicle is 67.0 mm.
4. Before balancing the wheel, remove any wheel
weights from both sides. Also check both sides for
any damage.
5. When installing wheel weights, hammer them at a
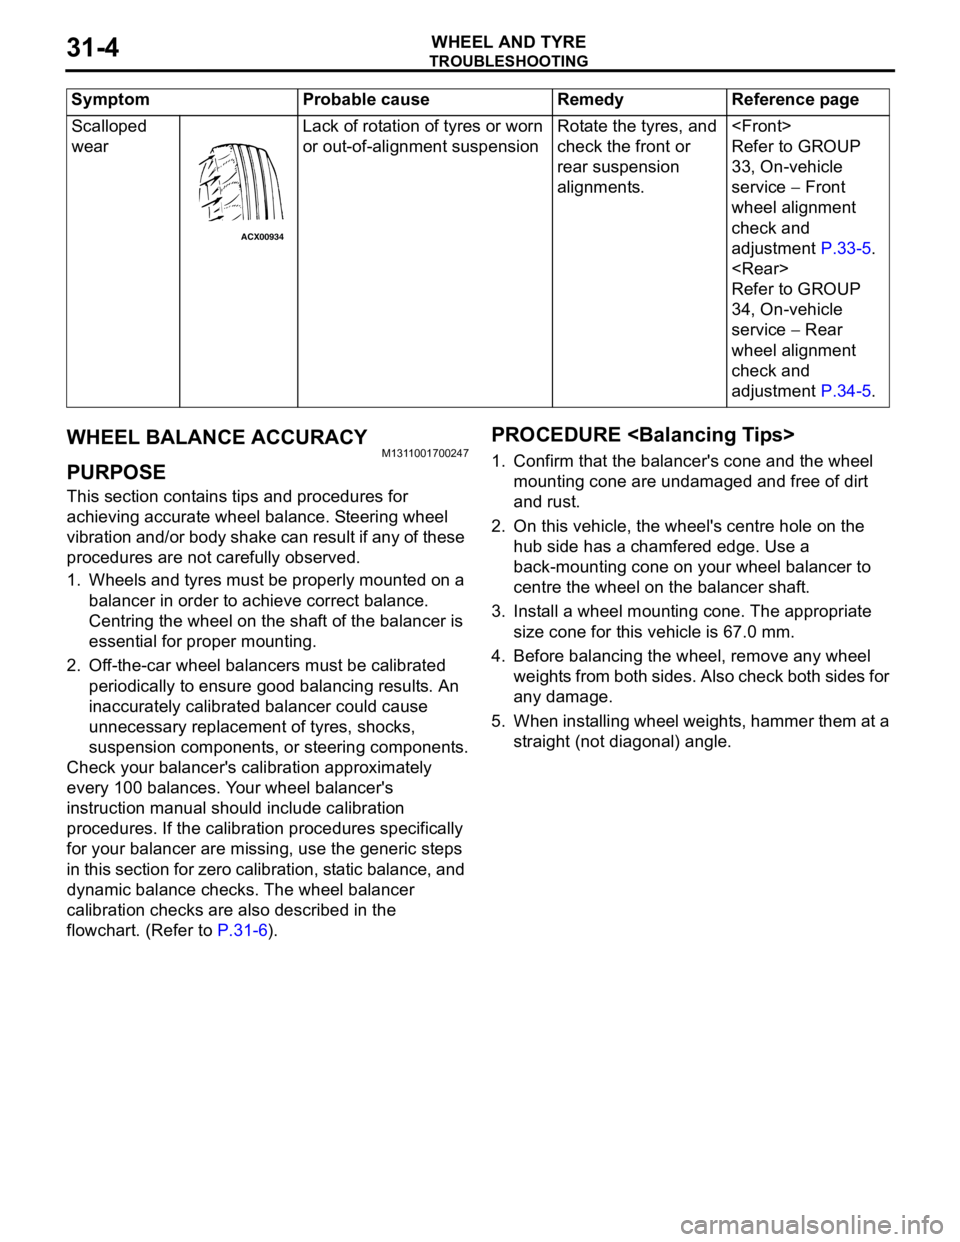
straight (not diagonal) angle. Scalloped
wearLack of rotation of tyres or worn
or out-of-alignment suspensionRotate the tyres, and
check the front or
rear suspension
alignments.
Refer to GROUP
33, On-vehicle
service − Front
wheel alignment
check and
adjustment P.33-5.
Refer to GROUP
34, On-vehicle
service − Rear
wheel alignment
check and
adjustment P.34-5. Symptom Probable cause Remedy Reference page
ACX00934
Page 167 of 788
TROUBLESHOOTING
WHEEL AND TYRE31-5
1. After balancing the wheel, loosen the wing nut
and turn the wheel 180° against the balancer's
hub. Then re-tighten the wing nut and check the
balance again. Repeat wheel balance if
necessary.
2. Turn the wheel again 180° against the balancer's
hub. If the wheel becomes out-of-balance each
time it is turned against the balancer's hub, the
wheel balancer may require calibration.
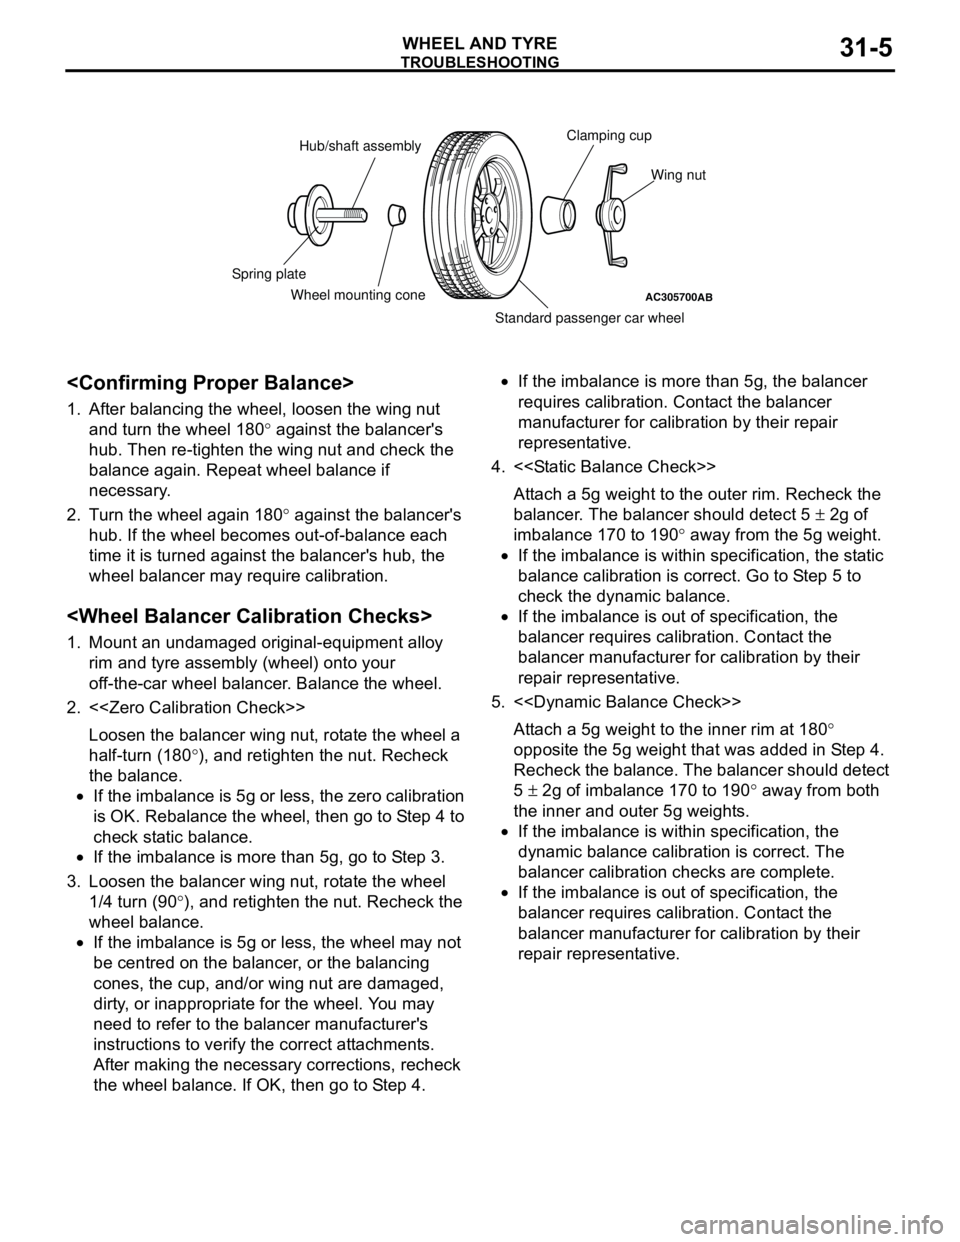
1. Mount an undamaged original-equipment alloy
rim and tyre assembly (wheel) onto your
off-the-car wheel balancer. Balance the wheel.
2. <
Loosen the balancer wing nut, rotate the wheel a
half-turn (180°), and retighten the nut. Recheck
the balance.
•If the imbalance is 5g or less, the zero calibration
is OK. Rebalance the wheel, then go to Step 4 to
check static balance.
•If the imbalance is more than 5g, go to Step 3.
3. Loosen the balancer wing nut, rotate the wheel
1/4 turn (90°), and retighten the nut. Recheck the
wheel balance.
•If the imbalance is 5g or less, the wheel may not
be centred on the balancer, or the balancing
cones, the cup, and/or wing nut are damaged,
dirty, or inappropriate for the wheel. You may
need to refer to the balancer manufacturer's
instructions to verify the correct attachments.
After making the necessary corrections, recheck
the wheel balance. If OK, then go to Step 4.•If the imbalance is more than 5g, the balancer
requires calibration. Contact the balancer
manufacturer for calibration by their repair
representative.
4. <
Attach a 5g weight to the outer rim. Recheck the
balancer. The balancer should detect 5 ± 2g of
imbalance 170 to 190° away from the 5g weight.
•If the imbalance is within specification, the static
balance calibration is correct. Go to Step 5 to
check the dynamic balance.
•If the imbalance is out of specification, the
balancer requires calibration. Contact the
balancer manufacturer for calibration by their
repair representative.
5. <
Attach a 5g weight to the inner rim at 180°
opposite the 5g weight that was added in Step 4.
Recheck the balance. The balancer should detect
5 ± 2g of imbalance 170 to 190° away from both
the inner and outer 5g weights.
•If the imbalance is within specification, the
dynamic balance calibration is correct. The
balancer calibration checks are complete.
•If the imbalance is out of specification, the
balancer requires calibration. Contact the
balancer manufacturer for calibration by their
repair representative.
AC305700AB
Hub/shaft assemblyClamping cup
Wing nut
Standard passenger car wheel Wheel mounting cone Spring plate
Page 168 of 788
TROUBLESHOOTING
WHEEL AND TYRE31-6
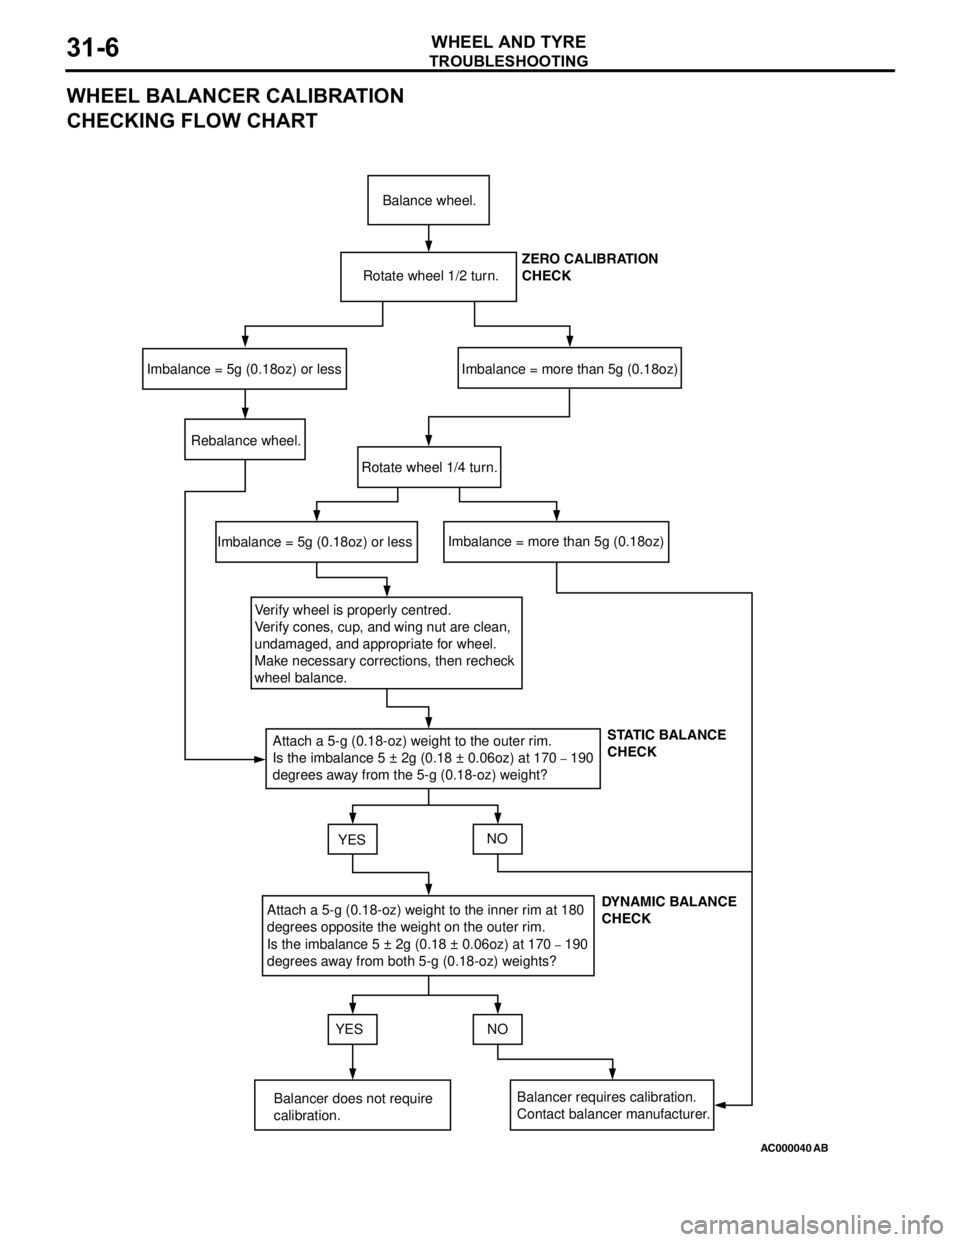
WHEEL BALANCER CALIBRATION
CHECKING FLOW CHART
AC000040
Balance wheel.
Rotate wheel 1/2 turn.
Imbalance = 5g (0.18oz) or lessImbalance = more than 5g (0.18oz)
Rebalance wheel.
Rotate wheel 1/4 turn.
Imbalance = 5g (0.18oz) or lessImbalance = more than 5g (0.18oz)
Verify wheel is properly centred.
Verify cones, cup, and wing nut are clean,
undamaged, and appropriate for wheel.
Make necessary corrections, then recheck
wheel balance.
Attach a 5-g (0.18-oz) weight to the outer rim.
Is the imbalance 5 ± 2g (0.18 ± 0.06oz) at 170
– 190
degrees away from the 5-g (0.18-oz) weight?
YESNO
Attach a 5-g (0.18-oz) weight to the inner rim at 180
degrees opposite the weight on the outer rim.
Is the imbalance 5 ± 2g (0.18 ± 0.06oz) at 170
– 190
degrees away from both 5-g (0.18-oz) weights?
YES NO
Balancer does not require
calibration.Balancer requires calibration.
Contact balancer manufacturer.ZERO CALIBRATION
CHECK
STATIC BALANCE
CHECK
DYNAMIC BALANCE
CHECK
AB
Page 169 of 788
ON-VEHICLE SERVICE
WHEEL AND TYRE31-7
ON-VEHICLE SERVICE
TYRE INFLATION PRESSURE CHECKM1311000900312
NOTE: For information on tyre inflation pressure,
refer to the label attached to the centre pillar on the
driver's side.
TYRE WEAR CHECKM1311001000334
Measure the tread depth of the tyres.
Minimum limit: 1.6 mm
If the remaining tread depth is less than the minimum
limit, replace the tyre.
NOTE: When the tread depth of the tyres is reduced
to 1.6 mm or less, wear indicators will appear.
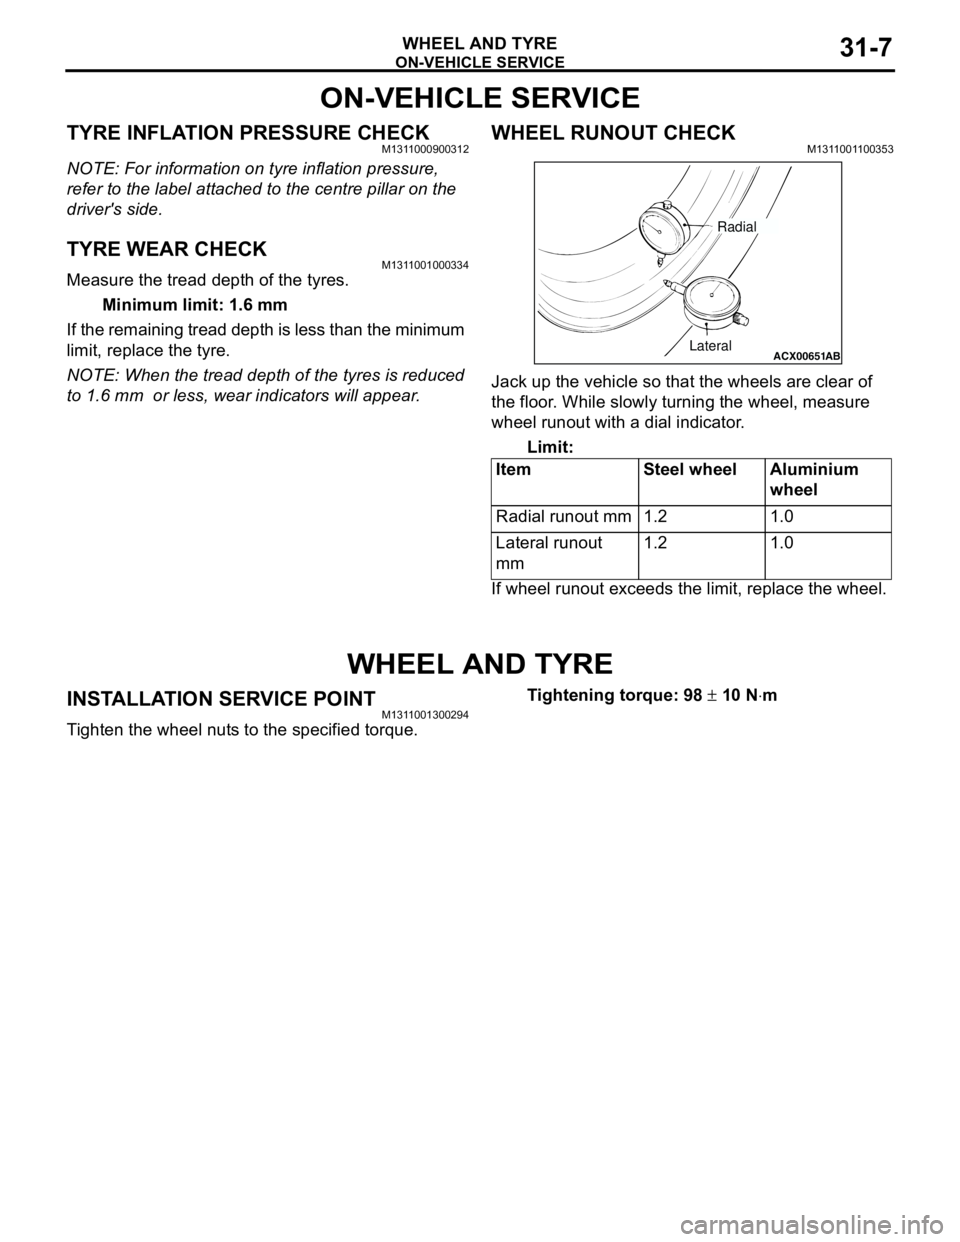
WHEEL RUNOUT CHECKM1311001100353
Jack up the vehicle so that the wheels are clear of
the floor. While slowly turning the wheel, measure
wheel runout with a dial indicator.
Limit:
If wheel runout exceeds the limit, replace the wheel.
WHEEL AND TYRE
INSTALLATION SERVICE POINTM1311001300294
Tighten the wheel nuts to the specified torque.Tightening torque: 98 ± 10 N⋅m Item Steel wheel Aluminium
wheel
Radial runout mm 1.2 1.0
Lateral runout
mm1.2 1.0
ACX00651
ABLateralRadial
Page 170 of 788

NOTES